- Preface
- Introduction to Cisco EnergyWise Orchestrator
- Preparing for the Orchestrator Server Installation
- Installing Orchestrator Server Components
- Configuring Orchestrator for EnergyWise Devices
- Orchestrator Client Distribution
- Licensing Devices
- Gathering Data for and Creating Initial Power Management Policies
- Important Notice
Cisco EnergyWise Orchestrator Installation Guide
Bias-Free Language
The documentation set for this product strives to use bias-free language. For the purposes of this documentation set, bias-free is defined as language that does not imply discrimination based on age, disability, gender, racial identity, ethnic identity, sexual orientation, socioeconomic status, and intersectionality. Exceptions may be present in the documentation due to language that is hardcoded in the user interfaces of the product software, language used based on RFP documentation, or language that is used by a referenced third-party product. Learn more about how Cisco is using Inclusive Language.
- Updated:
- April 9, 2014
Chapter: Orchestrator Client Distribution
- Installing the Orchestrator Client Agent from the Setup Program
- Installing or Uninstalling Orchestrator Client Agent By Using the Command Line
- Distributing the Orchestrator Client Agent by Disk Image
- Deploying the Orchestrator Client Agent using Group Policy
- Distributing the Orchestrator Client Agent through a Microsoft ConfigMgr Package
Orchestrator Client Distribution
•![]() Installing the Orchestrator Client Agent from the Setup Program
Installing the Orchestrator Client Agent from the Setup Program
•![]() Installing or Uninstalling Orchestrator Client Agent By Using the Command Line
Installing or Uninstalling Orchestrator Client Agent By Using the Command Line
•![]() Distributing the Orchestrator Client Agent by Disk Image
Distributing the Orchestrator Client Agent by Disk Image
•![]() Deploying the Orchestrator Client Agent using Group Policy
Deploying the Orchestrator Client Agent using Group Policy
•![]() Distributing the Orchestrator Client Agent through a Microsoft ConfigMgr Package
Distributing the Orchestrator Client Agent through a Microsoft ConfigMgr Package
Installing the Orchestrator Client Agent from the Setup Program
To use the setup program, you need to know the address of the power management server computer.
Step 1 ![]() On the client computer, log in as a local administrator and copy the Orchestrator client distribution files to the client computer.
On the client computer, log in as a local administrator and copy the Orchestrator client distribution files to the client computer.
Step 2 ![]() Run the setup file, and follow the installation wizard instructions.
Run the setup file, and follow the installation wizard instructions.
a. ![]() On the Installation Configuration page, enter the URL of the Orchestrator server.
On the Installation Configuration page, enter the URL of the Orchestrator server.
b. ![]() On the same page, leave the Add Cisco as a trusted publisher check box checked.
On the same page, leave the Add Cisco as a trusted publisher check box checked.
Installing or Uninstalling Orchestrator Client Agent By Using the Command Line
This topic provides the command line parameters for installing or uninstalling the client agent silently.
Installation Process
This procedure is to run the silent installation directly on the client computer. You can use this same command with your standard software distribution process to push the client agent to multiple computers and other agent-based devices.
Step 1 ![]() Copy the files for the Orchestrator client agent distribution to a location on the client computer.
Copy the files for the Orchestrator client agent distribution to a location on the client computer.
Step 2 ![]() To run the silent installation, open a command window, change to the directory that contains the setup file, and then enter this command:
To run the silent installation, open a command window, change to the directory that contains the setup file, and then enter this command:
setup
OrchestratorAgentSetup.exe /s /v"/qn INSTALLDIR=\"C:\Program Files\Cisco\EnergyWiseOrchestratorClient\" INSTALLCERTIFICATE=yes PMP_URL=http://OrchestratorServerName/PMPService/PMPService.svc/PMP"
Step 3 ![]() If you want to create an installation log file, add the /log parameter with the /qn parameter and specify the location. For example:
If you want to create an installation log file, add the /log parameter with the /qn parameter and specify the location. For example:
OrchestratorAgentSetup.exe /s /v"/qn [other parameters] /log setup_log.txt"

Tip ![]() A reliable location for setup_log.txt is the same directory as the setup file. However, you can use a different path and file name. Either way, the directory that you specify must exist on the client computer.
A reliable location for setup_log.txt is the same directory as the setup file. However, you can use a different path and file name. Either way, the directory that you specify must exist on the client computer.
Confirming Client Installation
If you installed the client agent by sending a distribution package from your desktop management system to a large number of PCs, verifying its success is usually a two-phase process:
•![]() After the package runs, you can check the reports in the desktop management system to confirm that it ran successfully.
After the package runs, you can check the reports in the desktop management system to confirm that it ran successfully.
•![]() After a week or two, use the Orchestrator Administrator console to see the number of PCs that are checking in with the server and the number of licenses that are used.
After a week or two, use the Orchestrator Administrator console to see the number of PCs that are checking in with the server and the number of licenses that are used.
Troubleshooting
If it looks as if a computer is not checking in properly, check that the client agent is running on that computer:
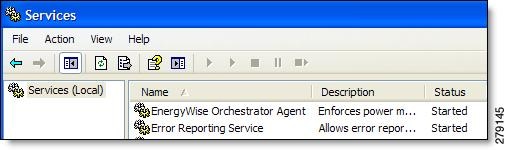
1. ![]() Open the Windows Services console: Click Start menu / Run, and type services.msc.
Open the Windows Services console: Click Start menu / Run, and type services.msc.
2. ![]() Confirm that the status of the EnergyWise Orchestrator Agent shows Started.
Confirm that the status of the EnergyWise Orchestrator Agent shows Started.
Parameters and Descriptions
Common parameters for a standard silent installation include:
•![]() /s —silences the setup.exe file.
/s —silences the setup.exe file.
•![]() /v "[attributes]"—passes everything inside the quotations to the .msi application.
/v "[attributes]"—passes everything inside the quotations to the .msi application.
•![]() /qn—used inside the quotations of the /v parameter to silence the .msi application.
/qn—used inside the quotations of the /v parameter to silence the .msi application.
You can specify additional attributes to the .msi runtime.
•![]() INSTALLDIR=\"[path]"—specifies the parent directory in which you want to install the client application files on the client computer.
INSTALLDIR=\"[path]"—specifies the parent directory in which you want to install the client application files on the client computer.
•![]() INSTALLCERTIFICATE=yes—sets Cisco as a trusted publisher.
INSTALLCERTIFICATE=yes—sets Cisco as a trusted publisher.
•![]() PMP_URL=[url]—specifies the web address to the PMP service on the Orchestrator server.
PMP_URL=[url]—specifies the web address to the PMP service on the Orchestrator server.
Uninstalling Orchestrator Client
You can uninstall the client agent from the Add/Remove Programs component of the Windows control panel on the client computer, or you can use this command from the client distribution directory:
msiexec /q /x "EnergyWise Orchestrator Agent.msi"
If you did not copy the distribution files to the client, you can run a silent uninstall by using the Orchestrator product code instead the .msi file name.
For example:
mxiexec /q /x {8188xxxx-xxxx-xxxxxxxx-xxxxxxxxxxxx}
In this example the x characters represent the product code.
To find the product code, open the Windows registry editor (regedit.exe), and navigate to HKEY_LOCAL_MACHINE / SOFTWARE / Microsoft / Windows / CurrentVersion / Uninstall / {8188...}, where 8188 is the beginning of the EnergyWise product code. Copy the code that represents EnergyWise Orchestrator.
Distributing the Orchestrator Client Agent by Disk Image
Step 1 ![]() On the computer that you want to use as the image, install the client agent from the setup program (OrchestratorAgentSetup.exe).
On the computer that you want to use as the image, install the client agent from the setup program (OrchestratorAgentSetup.exe).
Step 2 ![]() Verify that the client connects to the server.
Verify that the client connects to the server.
Step 3 ![]() In the Windows Services console, stop the EnergyWise Orchestrator Agent service:
In the Windows Services console, stop the EnergyWise Orchestrator Agent service:
a. ![]() Right-click My Computer, and choose Manage.
Right-click My Computer, and choose Manage.
b. ![]() In the Computer Management console, expand Services and Applications.
In the Computer Management console, expand Services and Applications.
c. ![]() Under Services, right-click EnergyWise Orchestrator Agent, and choose Stop.
Under Services, right-click EnergyWise Orchestrator Agent, and choose Stop.
Step 4 ![]() In the Program Files\Cisco Systems\EnergyWise Orchestrator Agent\Data\ folder, delete these files:
In the Program Files\Cisco Systems\EnergyWise Orchestrator Agent\Data\ folder, delete these files:
•![]() eventstore: contains power state and event history
eventstore: contains power state and event history
•![]() policy: contains power management instructions
policy: contains power management instructions
When you transfer the image to new computers, you want them to begin with a clean history and no policy, so that they receive instructions only from the server.
Step 5 ![]() In the same folder, open the server.config file in a text editor such as Notepad, and remove the text that assigns an id to the client:
In the same folder, open the server.config file in a text editor such as Notepad, and remove the text that assigns an id to the client:
"clientID": "xxxxxxxx-xxxx-xxxx-xxxx-xxxxxxxxxxxx"
This enables a new unique id to be assigned to each computer when the agent is installed.
Step 6 ![]() In the text that remains, confirm that the path to your Orchestrator power management service is correct. It looks something like this:
In the text that remains, confirm that the path to your Orchestrator power management service is correct. It looks something like this:
{"serverURL":"http:\/server_name.local\/PMPService\/PMPService.svc\/PMP"}
Step 7 ![]() Delete all files from the following folder (but do not delete the folder):
Delete all files from the following folder (but do not delete the folder):
•![]() Program Files\CiscoSystems\EnergyWise Orchestrator Agent\Logs
Program Files\CiscoSystems\EnergyWise Orchestrator Agent\Logs
After you prepare the prototype computer, you can copy its image to the other client computers.
To prevent collisions among Orchestrator clients when they connect to the server, each computer that receives the disk image must have
•![]() a unique DNS name
a unique DNS name
•![]() a unique MAC address
a unique MAC address
For information about completing the image installation, refer to the software documentation.
Deploying the Orchestrator Client Agent using Group Policy
This process involves two separate procedures: create the transform file from the client installer package (.msi) and then add the transform and package to a Group Policy object.
To create the transform file, you need a transform editor. This uses Orca, although you can use any transform editor.
Orca is a database table editor for creating and editing Windows Installer packages and merge modules. It is available in the Windows Installer SDK, which you can download from the Microsoft Download Center.
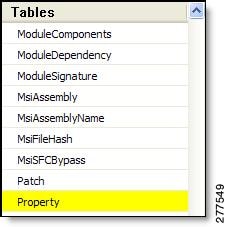
Step 1 ![]() Start Orca, and in the client agent folder of your Orchestrator distribution, open EnergyWise Orchestrator Agent.msi.
Start Orca, and in the client agent folder of your Orchestrator distribution, open EnergyWise Orchestrator Agent.msi.
Step 2 ![]() From the Transform menu, choose New Transform.
From the Transform menu, choose New Transform.
Step 3 ![]() In the Tables column, select Property.
In the Tables column, select Property.
Step 4 ![]() Confirm these properties and values:
Confirm these properties and values:
a. ![]() PMP_URL: the address of the power management web server that hosts the PMP service.
PMP_URL: the address of the power management web server that hosts the PMP service.
b. ![]() SERVER_NAME: the name of the power management server.
SERVER_NAME: the name of the power management server.
c. ![]() SERVER_PORT: the port number to use for the network (HTTP port 80 by default).
SERVER_PORT: the port number to use for the network (HTTP port 80 by default).
Step 5 ![]() From the Transform menu, choose Generate Transform.
From the Transform menu, choose Generate Transform.
Step 6 ![]() Enter a name for the transform file (.mst), save it, and exit Orca.
Enter a name for the transform file (.mst), save it, and exit Orca.
Creating the Group Policy Object for Orchestrator Client Installation
After you create a transform file from the Orchestrator Client installer package, you can add it and the package to a Group Policy object to install the client software.
Before you perform this procedure, create the transform file that you will use in this procedure.

Note ![]() This procedure is from the Group Policy Object Editor Help and is modified to include the information specific to Orchestrator.
This procedure is from the Group Policy Object Editor Help and is modified to include the information specific to Orchestrator.
Step 1 ![]() Open the Group Policy Object Editor by choosing Start menu > Run and entering gpedit.msc.
Open the Group Policy Object Editor by choosing Start menu > Run and entering gpedit.msc.
Step 2 ![]() Select Computer Configuration > Software Settings > Software Installation.
Select Computer Configuration > Software Settings > Software Installation.
Step 3 ![]() Right-click in the details pane, and click New> Package.
Right-click in the details pane, and click New> Package.
Step 4 ![]() In the Open dialog box, from the Orchestrator distribution folder, browse to OrchestratorClient>EnergyWise Orchestrator Agent.msi, and click Open.
In the Open dialog box, from the Orchestrator distribution folder, browse to OrchestratorClient>EnergyWise Orchestrator Agent.msi, and click Open.
Step 5 ![]() In the Deploy Software dialog box, click Advanced, and click OK.
In the Deploy Software dialog box, click Advanced, and click OK.
Step 6 ![]() In the properties dialog box for the package, in the Modifications tab, click Add.
In the properties dialog box for the package, in the Modifications tab, click Add.
Step 7 ![]() In the Open dialog box, go to the transform file that you created for the Orchestrator Client installer, and click Open.
In the Open dialog box, go to the transform file that you created for the Orchestrator Client installer, and click Open.
Step 8 ![]() Make sure that you are done configuring any modifications, and in the Orchestrator Client AgentProperties window, click OK.
Make sure that you are done configuring any modifications, and in the Orchestrator Client AgentProperties window, click OK.
Note ![]() The package is immediately assigned or published when you click OK. If the modifications are not properly configured, you have to uninstall or upgrade the package with a correctly configured version.
The package is immediately assigned or published when you click OK. If the modifications are not properly configured, you have to uninstall or upgrade the package with a correctly configured version.
Step 9 ![]() Close the Group Policy Object Editor.
Close the Group Policy Object Editor.
Step 10 ![]() To put the Group Policy updates into effect, either restart the computers, or run the command gpupdate /force to refresh the Group Policy settings.
To put the Group Policy updates into effect, either restart the computers, or run the command gpupdate /force to refresh the Group Policy settings.
Note ![]() If you get an error that validation of the installer package has failed, try editing the default language properties of the package. To do this, right-click the package and choose Properties. On the Deployment tab, click Advanced, and then select the Ignore language when deploying this package check box.
If you get an error that validation of the installer package has failed, try editing the default language properties of the package. To do this, right-click the package and choose Properties. On the Deployment tab, click Advanced, and then select the Ignore language when deploying this package check box.
Distributing the Orchestrator Client Agent through a Microsoft ConfigMgr Package
Creating a ConfigMgr package for Orchestrator Client Agent Installation
Step 1 ![]() From the Orchestrator distribution, copy the Client folder to a Configuration Manager site server or to a shared network folder.
From the Orchestrator distribution, copy the Client folder to a Configuration Manager site server or to a shared network folder.
Step 2 ![]() Open the Configuration Manager console, and go to Site Database>Computer Management> Software Distribution>Packages.
Open the Configuration Manager console, and go to Site Database>Computer Management> Software Distribution>Packages.
Step 3 ![]() Right-click Packages, and choose New>Package.
Right-click Packages, and choose New>Package.
Step 4 ![]() Follow the New Package Wizard instructions:
Follow the New Package Wizard instructions:
a. ![]() On the General page, enter a name for the package, and complete any additional fields that you want.
On the General page, enter a name for the package, and complete any additional fields that you want.
b. ![]() On the Data Source page, select This Package Contains Source Files, and click Set. In the Set Source Directory dialog box, under Source directory location, click the type of connection, enter the source directory, and click OK.
On the Data Source page, select This Package Contains Source Files, and click Set. In the Set Source Directory dialog box, under Source directory location, click the type of connection, enter the source directory, and click OK.
c. ![]() On the Distribution Settings page, select High for Sending Priority.
On the Distribution Settings page, select High for Sending Priority.
Step 5 ![]() When you complete the wizard steps, click Close.
When you complete the wizard steps, click Close.
The package appears under the Packages node of the site tree in the Configuration Manager console.
Step 6 ![]() Expand the package, right-click Distribution Points, and choose New Distribution Points.
Expand the package, right-click Distribution Points, and choose New Distribution Points.
Step 7 ![]() Check the check box beside the name of each server that you want to make distribution points, and click Next.
Check the check box beside the name of each server that you want to make distribution points, and click Next.
The wizard creates the distribution points.
Step 8 ![]() Click Close to return to the site tree.
Click Close to return to the site tree.
Step 9 ![]() Right-click Programs, choose New / Program, and follow the New Program wizard instructions, entering the specific setting for this program:
Right-click Programs, choose New / Program, and follow the New Program wizard instructions, entering the specific setting for this program:
On the General page, for Command line, enter the command with the parameters that you want to install the client agent.
For a sample command line and a list of available parameters, see the "Installing or Uninstalling Orchestrator Client Agent By Using the Command Line" section.
Creating an Advertisement to Distribute a Orchestrator Client Package
After you create the installation package, select distribution points, and create the program that runs the installer to distribute the Orchestrator agent through Configuration Manager.
If you have not created the package for the Orchestrator client agent, see the "Creating a ConfigMgr package for Orchestrator Client Agent Installation" section.
Step 1 ![]() In the Configuration Manager console, set up a collection of clients that you want to target for the Orchestrator client agent distribution.
In the Configuration Manager console, set up a collection of clients that you want to target for the Orchestrator client agent distribution.
You can base the collection on a query or on direct membership rules.
Step 2 ![]() Right-click the collection, and choose Distribute> Software.
Right-click the collection, and choose Distribute> Software.
Step 3 ![]() Follow the Distribute Software to Collection Wizard instructions:
Follow the Distribute Software to Collection Wizard instructions:
a. ![]() On the Package page, select Select an existing package, click Browse, and select the Orchestrator Client installation package that you created.
On the Package page, select Select an existing package, click Browse, and select the Orchestrator Client installation package that you created.
b. ![]() On the Advertise Program page, show that you want to advertise a program from this package.
On the Advertise Program page, show that you want to advertise a program from this package.
c. ![]() On the Select Program page, click the program that you created for this distribution.
On the Select Program page, click the program that you created for this distribution.
d. ![]() On the Advertisement pages, configure the settings for the name, any subcollections to advertise to, and the schedule.
On the Advertisement pages, configure the settings for the name, any subcollections to advertise to, and the schedule.
e. ![]() On the Assign Program page, select Yes, to assign the program.
On the Assign Program page, select Yes, to assign the program.
f. ![]() Complete the wizard.
Complete the wizard.
After the installation has completed, validate the installation.
Validating Orchestrator Client Installation through ConfigMgr
After you distribute Orchestrator client agent through a Configuration Manager, use the Orchestrator Administrator console to confirm that the distribution was successful.
If you have not distributed the Orchestrator client agent to a collection, see the "Creating a ConfigMgr package for Orchestrator Client Agent Installation" section.
Step 1 ![]() On the Orchestrator server computer, open the Orchestrator Administrator console in a browser.
On the Orchestrator server computer, open the Orchestrator Administrator console in a browser.
Step 2 ![]() On the Manage Devices page, use the device filters to select the groups in the PC device family that represents the computers that received the Configuration Manager distribution.
On the Manage Devices page, use the device filters to select the groups in the PC device family that represents the computers that received the Configuration Manager distribution.
Step 3 ![]() Confirm that the PC clients appear in the device list and that they each show these status settings:
Confirm that the PC clients appear in the device list and that they each show these status settings:
•![]() Last Connected: Today
Last Connected: Today
•![]() Licensed: Yes
Licensed: Yes
•![]() Profile: current
Profile: current
•![]() Monitor: current
Monitor: current
Note ![]() If the number of PCs that match your search criteria exceeds the number that appear in the device list, you need to refine the search to see all of them.
If the number of PCs that match your search criteria exceeds the number that appear in the device list, you need to refine the search to see all of them.
 Feedback