- New and Changed Information
- Index
- Preface
- Overview
- Configuring AAA
- Configuring RADIUS
- Configuring TACACS+
- Configuring SSH and Telnet
- Configuring PKI
- Configuring User Accounts and RBAC
- Configuring 802.1X
- Configuring NAC
- Configuring Cisco TrustSec
- Configuring IP ACLs
- Configuring MAC ACLs
- Configuring VLAN ACLs
- Configuring Port Security
- Configuring DHCP Snooping
- Configuring Dynamic ARP Inspection
- Configuring Source Guard
- Configuring Keychain Management
- Configuring Traffic Storm Control
- Configuring Unicast RPF
- Configuring Control Plane Policing
- Configuring Rate Limits
Cisco Nexus 7000 Series NX-OS Security Configuration Guide, Release 4.1
Bias-Free Language
The documentation set for this product strives to use bias-free language. For the purposes of this documentation set, bias-free is defined as language that does not imply discrimination based on age, disability, gender, racial identity, ethnic identity, sexual orientation, socioeconomic status, and intersectionality. Exceptions may be present in the documentation due to language that is hardcoded in the user interfaces of the product software, language used based on RFP documentation, or language that is used by a referenced third-party product. Learn more about how Cisco is using Inclusive Language.
- Updated:
- December 19, 2008
Chapter: Configuring 802.1X
- Information About 802.1X
- Licensing Requirements for 802.1X
- Prerequisites for 802.1X
- 802.1X Guidelines and Limitations
- Configuring 802.1X
- Process for Configuring 802.1X
- Enabling the 802.1X Feature
- Configuring AAA Authentication Methods for 802.1X
- Controlling 802.1X Authentication on an Interface
- Enabling Global Periodic Reauthentication
- Enabling Periodic Reauthentication for an Interface
- Manually Reauthenticating Supplicants
- Manually Initializing 802.1X Authentication
- Changing Global 802.1X Authentication Timers
- Changing 802.1X Authentication Timers for an Interface
- Enabling Single Host or Multiple Hosts Mode
- Enabling MAC Address Authentication Bypass
- Disabling 802.1X Authentication on the NX-OS Device
- Disabling the 802.1X Feature
- Resetting the 802.1X Global Configuration to the Default Values
- Resetting the 802.1X Interface Configuration to the Default Values
- Setting the Global Maximum Authenticator-to-Supplicant Frame Retransmission Retry Count
- Configuring the Maximum Authenticator-to-Supplicant Frame Retransmission Retry Count for an Interface
- Enabling RADIUS Accounting for 802.1X Authentication
- Configuring AAA Accounting Methods for 802.1X
- Setting the Maximum Reauthentication Retry Count on an Interface
- Verifying the 802.1X Configuration
- Displaying 802.1X Statistics
- 802.1X Example Configurations
- Default Settings
- Additional References
- Feature History for 802.1X
Configuring 802.1X
This chapter describes how to configure IEEE 802.1X port-based authentication on NX-OS devices.
This chapter includes the following sections:
•![]() Licensing Requirements for 802.1X
Licensing Requirements for 802.1X
•![]() 802.1X Guidelines and Limitations
802.1X Guidelines and Limitations
•![]() Verifying the 802.1X Configuration
Verifying the 802.1X Configuration
•![]() 802.1X Example Configurations
802.1X Example Configurations
Information About 802.1X
802.1X defines a client-server-based access control and authentication protocol that restricts unauthorized clients from connecting to a LAN through publicly accessible ports. The authentication server authenticates each client connected to an NX-OS device port.
Until the client is authenticated, 802.1X access control allows only Extensible Authentication Protocol over LAN (EAPOL) traffic through the port to which the client is connected. After authentication is successful, normal traffic can pass through the port.
This section includes the following topics about 802.1X port-based authentication:
•![]() Authentication Initiation and Message Exchange
Authentication Initiation and Message Exchange
•![]() Ports in Authorized and Unauthorized States
Ports in Authorized and Unauthorized States
•![]() MAC Address Authentication Bypass
MAC Address Authentication Bypass
Device Roles
With 802.1X port-based authentication, the devices in the network have specific roles as shown in Figure 8-1.
Figure 8-1 802.1X Device Roles
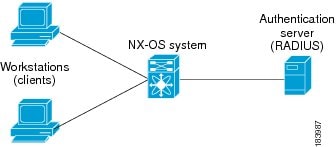
The specific roles shown in Figure 8-1 are as follows:
•![]() Supplicant—The client device that requests access to the LAN and NX-OS device services and responds to requests from the NX-OS device. The workstation must be running 802.1X-compliant client software such as that offered in the Microsoft Windows XP operating device.
Supplicant—The client device that requests access to the LAN and NX-OS device services and responds to requests from the NX-OS device. The workstation must be running 802.1X-compliant client software such as that offered in the Microsoft Windows XP operating device.

Note ![]() To resolve Windows XP network connectivity and 802.1X port-based authentication issues, read the Microsoft Knowledge Base article at this URL: http://support.microsoft.com/support/kb/articles/Q303/5/97.ASP
To resolve Windows XP network connectivity and 802.1X port-based authentication issues, read the Microsoft Knowledge Base article at this URL: http://support.microsoft.com/support/kb/articles/Q303/5/97.ASP
•![]() Authentication server—The authentication server performs the actual authentication of the supplicant. The authentication server validates the identity of the supplicant and notifies the NX-OS device regarding whether the supplicant is authorized to access the LAN and NX-OS device services. Because the NX-OS device acts as the proxy, the authentication service is transparent to the supplicant. The Remote Authentication Dial-In User Service (RADIUS) security device with Extensible Authentication Protocol (EAP) extensions is the only supported authentication server; it is available in Cisco Secure Access Control Server, version 3.0. RADIUS uses a supplicant-server model in which secure authentication information is exchanged between the RADIUS server and one or more RADIUS clients.
Authentication server—The authentication server performs the actual authentication of the supplicant. The authentication server validates the identity of the supplicant and notifies the NX-OS device regarding whether the supplicant is authorized to access the LAN and NX-OS device services. Because the NX-OS device acts as the proxy, the authentication service is transparent to the supplicant. The Remote Authentication Dial-In User Service (RADIUS) security device with Extensible Authentication Protocol (EAP) extensions is the only supported authentication server; it is available in Cisco Secure Access Control Server, version 3.0. RADIUS uses a supplicant-server model in which secure authentication information is exchanged between the RADIUS server and one or more RADIUS clients.
•![]() Authenticator—The authenticator controls the physical access to the network based on the authentication status of the supplicant. The authenticator acts as an intermediary (proxy) between the supplicant and the authentication server, requesting identity information from the supplicant, verifying the requested identity information with the authentication server, and relaying a response to the supplicant. The authenticator includes the RADIUS client, which is responsible for encapsulating and decapsulating the EAP frames and interacting with the authentication server.
Authenticator—The authenticator controls the physical access to the network based on the authentication status of the supplicant. The authenticator acts as an intermediary (proxy) between the supplicant and the authentication server, requesting identity information from the supplicant, verifying the requested identity information with the authentication server, and relaying a response to the supplicant. The authenticator includes the RADIUS client, which is responsible for encapsulating and decapsulating the EAP frames and interacting with the authentication server.
When the authenticator receives EAPOL frames and relays them to the authentication server, the authenticator strips off the Ethernet header and encapsulates the remaining EAP frame in the RADIUS format. This encapsulation process does not modify or examine the EAP frames, and the authentication server must support EAP within the native frame format. When the authenticator receives frames from the authentication server, the authenticator removes the server's frame header, leaving the EAP frame, which the authenticator then encapsulates for Ethernet and sends to the supplicant.
Note ![]() The NX-OS device can only be a 802.1X authenticator.
The NX-OS device can only be a 802.1X authenticator.
Authentication Initiation and Message Exchange
Either the authenticator (NX-OS device) or the supplicant (client) can initiate authentication. If you enable authentication on a port, the authenticator must initiate authentication when it determines that the port link state transitions from down to up. The authenticator then sends an EAP-request/identity frame to the supplicant to request its identity (typically, the authenticator sends an initial identity/request frame followed by one or more requests for authentication information). When the supplicant receives the frame, it responds with an EAP-response/identity frame.
If the supplicant does not receive an EAP-request/identity frame from the authenticator during bootup, the supplicant can initiate authentication by sending an EAPOL-start frame, which prompts the authenticator to request the supplicant's identity.
Note ![]() If 802.1X is not enabled or supported on the network access device, the NX-OS device drops any EAPOL frames from the supplicant. If the supplicant does not receive an EAP-request/identity frame after three attempts to start authentication, the supplicant transmits data as if the port is in the authorized state. A port in the authorized state means that the supplicant has been successfully authenticated. For more information, see the "Ports in Authorized and Unauthorized States" section.
If 802.1X is not enabled or supported on the network access device, the NX-OS device drops any EAPOL frames from the supplicant. If the supplicant does not receive an EAP-request/identity frame after three attempts to start authentication, the supplicant transmits data as if the port is in the authorized state. A port in the authorized state means that the supplicant has been successfully authenticated. For more information, see the "Ports in Authorized and Unauthorized States" section.
When the supplicant supplies its identity, the authenticator begins its role as the intermediary, passing EAP frames between the supplicant and the authentication server until authentication succeeds or fails. If the authentication succeeds, the authenticator port becomes authorized. For more information, see the "Ports in Authorized and Unauthorized States" section.
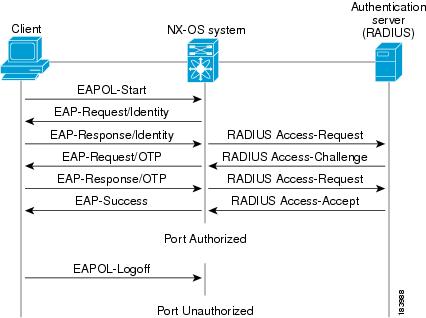
The specific exchange of EAP frames depends on the authentication method being used. Figure 8-2 shows a message exchange initiated by the supplicant using the One-Time-Password (OTP) authentication method with a RADIUS server. OTP authentication device uses a secret pass-phrase to generate a sequence of one-time (single use) passwords. The user's secret pass-phrase never crosses the network at any time such as during authentication or during pass-phrase changes.
Figure 8-2 Message Exchange
Ports in Authorized and Unauthorized States
The authenticator port state determines if the supplicant is granted access to the network. The port starts in the unauthorized state. In this state, the port disallows all ingress and egress traffic except for 802.1X protocol packets. When a supplicant is successfully authenticated, the port transitions to the authorized state, allowing all traffic for the supplicant to flow normally.
If a client that does not support 802.1X is connected to an unauthorized 802.1X port, the authenticator requests the client's identity. In this situation, the client does not respond to the request, the port remains in the unauthorized state, and the client is not granted access to the network.
In contrast, when an 802.1X-enabled client connects to a port that is not running the 802.1X protocol, the client initiates the authentication process by sending the EAPOL-start frame. When no response is received, the client sends the request for a fixed number of times. Because no response is received, the client begins sending frames as if the port is in the authorized state.
Ports can have the following authorization states:
•![]() Force authorized—Disables 802.1X port-based authentication and transitions to the authorized state without requiring any authentication exchange. The port transmits and receives normal traffic without 802.1X-based authentication of the client. This authorization state is the default.
Force authorized—Disables 802.1X port-based authentication and transitions to the authorized state without requiring any authentication exchange. The port transmits and receives normal traffic without 802.1X-based authentication of the client. This authorization state is the default.
•![]() Force unauthorized—Causes the port to remain in the unauthorized state, ignoring all attempts by the client to authenticate. The authenticator cannot provide authentication services to the client through the interface.
Force unauthorized—Causes the port to remain in the unauthorized state, ignoring all attempts by the client to authenticate. The authenticator cannot provide authentication services to the client through the interface.
•![]() Auto—Enables 802.1X port-based authentication and causes the port to begin in the unauthorized state, allowing only EAPOL frames to be sent and received through the port. The authentication process begins when the link state of the port transitions from down to up or when an EAPOL-start frame is received from the supplicant. The authenticator requests the identity of the client and begins relaying authentication messages between the client and the authentication server. Each supplicant that attempts to access the network is uniquely identified by the authenticator by using the supplicant's MAC address.
Auto—Enables 802.1X port-based authentication and causes the port to begin in the unauthorized state, allowing only EAPOL frames to be sent and received through the port. The authentication process begins when the link state of the port transitions from down to up or when an EAPOL-start frame is received from the supplicant. The authenticator requests the identity of the client and begins relaying authentication messages between the client and the authentication server. Each supplicant that attempts to access the network is uniquely identified by the authenticator by using the supplicant's MAC address.
If the supplicant is successfully authenticated (receives an Accept frame from the authentication server), the port state changes to authorized, and all frames from the authenticated supplicant are allowed through the port. If the authentication fails, the port remains in the unauthorized state, but authentication can be retried. If the authentication server cannot be reached, the authenticator can retransmit the request. If no response is received from the server after the specified number of attempts, authentication fails, and the supplicant is not granted network access.
When a supplicant logs off, it sends an EAPOL-logoff message, which causes the authenticator port to transition to the unauthorized state.
If the link state of a port transitions from up to down, or if an EAPOL-logoff frame is received, the port returns to the unauthorized state.
MAC Address Authentication Bypass
You can configure the NX-OS device to authorize a supplicant based on the supplicant MAC address by using the MAC authentication bypass feature. For example, you can enable this feature on interfaces configured for 802.1X that are connected to devices such as printers.
If 802.1X authentication times out while waiting for an EAPOL response from the supplicant, the NX-OS device tries to authorize the client by using MAC authentication bypass.
When you enable the MAC authentication bypass feature an interface, the NX-OS device uses the MAC address as the supplicant identity. The authentication server has a database of supplicant MAC addresses that are allowed network access. After detecting a client on the interface, the NX-OS device waits for an Ethernet packet from the client. The NX-OS device sends the authentication server a RADIUS-access/request frame with a username and password based on the MAC address. If authorization succeeds, the NX-OS device grants the client access to the network. If authorization fails, the NX-OS device assigns the port to the guest VLAN if one is configured.
If an EAPOL packet is detected on the interface during the lifetime of the link, the NX-OS device determines that the device connected to that interface is an 802.1X-capable supplicant and uses 802.1X authentication (not MAC authentication bypass) to authorize the interface. EAPOL history is cleared if the interface link status goes down.
If the NX-OS device already authorized an interface by using MAC authentication bypass and detects an 802.1X supplicant, the NX-OS device does not unauthorize the client connected to the interface. When reauthentication occurs, the NX-OS device uses 802.1X authentication as the preferred reauthentication process if the previous session ended because the Termination-Action RADIUS attribute value is DEFAULT.
Clients that were authorized with MAC authentication bypass can be reauthenticated. The reauthentication process is the same as that for clients that were authenticated with 802.1X. During reauthentication, the port remains in the previously assigned VLAN. If reauthentication is successful, the switch keeps the port in the same VLAN. If reauthentication fails, the switch assigns the port to the guest VLAN, if one is configured.
If reauthentication is based on the Session-Timeout RADIUS attribute (Attribute[27]) and the Termination-Action RADIUS attribute (Attribute [29]) and if the Termination-Action RADIUS attribute (Attribute [29]) action is Initialize, (the attribute value is DEFAULT), the MAC authentication bypass session ends, and connectivity is lost during reauthentication. If MAC authentication bypass is enabled and the 802.1X authentication times out, the switch uses the MAC authentication bypass feature to initiate reauthorization. For more information about these AV pairs, see RFC 3580, "IEEE 802.1X Remote Authentication Dial In User Service (RADIUS) Usage Guidelines."
MAC authentication bypass interacts with the features:
802.1X authentication—You can enable MAC authentication bypass only if 802.1X authentication is enabled on the port.
Port security—See the "802.1X with Port Security" section.
Network admission control (NAC) Layer 2 IP validation—This feature takes effect after an 802.1X port is authenticated with MAC authentication bypass, including hosts in the exception list.
Single Host and Multiple Hosts Support
The 802.1X feature can restrict traffic on a port to only one endpoint device (single-host mode) or allow traffic from multiple endpoint devices on a port (multi-host mode).
Single-host mode allows traffic from only one endpoint device on the 802.1X port. Once the endpoint device is authenticated, the NX-OS device puts the port in the authorized state. When the endpoint device leaves the port, the NX-OS device put the port back into the unauthorized state. A security violation in 802.1X is defined as a detection of frames sourced from any MAC address other than the single MAC address authorized as a result of successful authentication. In this case, the interface on which this security association violation is detected (EAPOL frame from the other MAC address) will be disabled. Single host mode is applicable only for host-to-switch topology and when a single host is connected to the Layer 2 (Ethernet access port) or Layer 3 port (routed port) of the NX-OS device.
Only the first host has to be authenticated on the 802.1X port configured with multiple host mode. The port is moved to the authorized state after the successful authorization of the first host. Subsequent hosts are not required to be authorized to gain network access once the port is in the authorized state. If the port becomes unauthorized when reauthentication fails or an EAPOL logoff message is received, all attached hosts are denied access to the network. The capability of the interface to shutdown upon security association violation is disabled in multiple host mode. This mode is applicable for both switch-to-switch and host-to-switch topologies.
802.1X with Port Security
On NX-OS devices, you can configure 802.1X authentication and port security on the same Layer 2 ports. 802.1X uses RADIUS servers to authenticate the endpoint devices connected to a port. Port security secures ports based on MAC addresses, up to a maximum number of MAC addresses on a port. This difference allows the two features to work together. The NX-OS software supports 802.1X authentication with port security for Layer 2 ports in both host-to-switch and switch-to-switch topologies.
When 802.1X works with port security, both 802.1X and port security must authenticate supplicant MAC addresses. In multi-host mode, port security authenticates only the first supplicant MAC address. After the successful authentication of the first supplicant, the NX-OS device sends subsequent traffic from other supplicants to port security.
For more information on port security, see Chapter 14, "Configuring Port Security."
Supported Topologies
The 802.1X port-based authentication is supported in two topologies:
•![]() Point-to-point
Point-to-point
•![]() Wireless LAN
Wireless LAN
In a point-to-point configuration (see Figure 8-1), only one supplicant (client) can connect to the 802.1X-enabled authenticator (NX-OS device) port. The authenticator detects the supplicant when the port link state changes to the up state. If a supplicant leaves or is replaced with another supplicant, the authenticator changes the port link state to down, and the port returns to the unauthorized state.
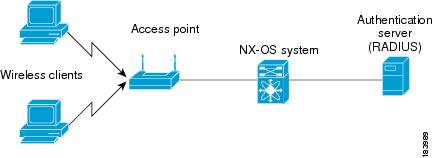
Figure 8-3 shows 802.1X port-based authentication in a wireless LAN. The 802.1X port is configured as a multiple-host port that becomes authorized as soon as one supplicant is authenticated. When the port is authorized, all other hosts indirectly attached to the port are granted access to the network. If the port becomes unauthorized (reauthentication fails or an EAPOL-logoff message is received), the NX-OS device denies access to the network to all of the attached supplicants.
Figure 8-3 Wireless LAN Example
Virtualization Support
802.1X configuration and operation are local to the virtual device context (VDC). For more information on VDCs, see the Cisco Nexus 7000 Series NX-OS Virtual Device Context Configuration Guide, Release 4.1.
Licensing Requirements for 802.1X
The following table shows the licensing requirements for this feature:
Prerequisites for 802.1X
802.1X has the following prerequisites:
•![]() One or more RADIUS servers accessible in the network.
One or more RADIUS servers accessible in the network.
•![]() 802.1X supplicants are attached to the ports, unless you enable MAC address authentication bypass (see the "Enabling MAC Address Authentication Bypass" section).
802.1X supplicants are attached to the ports, unless you enable MAC address authentication bypass (see the "Enabling MAC Address Authentication Bypass" section).
802.1X Guidelines and Limitations
802.1X port-based authentication has the following configuration guidelines and limitations:
•![]() The NX-OS software supports 802.1X only on physical ports.
The NX-OS software supports 802.1X only on physical ports.
•![]() The NX-OS software does not support 802.1X on subinterfaces or port channels.
The NX-OS software does not support 802.1X on subinterfaces or port channels.
•![]() When you enable 802.1X authentication, supplicants are authenticated before any other Layer 2 or Layer 3 features are enabled on an Ethernet interface.
When you enable 802.1X authentication, supplicants are authenticated before any other Layer 2 or Layer 3 features are enabled on an Ethernet interface.
•![]() The NX-OS software supports 802.1X authentication only on Ethernet interfaces that are in a port channel or a trunk.
The NX-OS software supports 802.1X authentication only on Ethernet interfaces that are in a port channel or a trunk.
•![]() The NX-OS software does not support single host mode on trunk interfaces or member interfaces in a port channel.
The NX-OS software does not support single host mode on trunk interfaces or member interfaces in a port channel.
•![]() The NX-OS software does not support MAC address authentication bypass on trunk interfaces.
The NX-OS software does not support MAC address authentication bypass on trunk interfaces.
•![]() The NX-OS software does not support the following 802.1X protocol enhancements:
The NX-OS software does not support the following 802.1X protocol enhancements:
–![]() One-to-many logical VLAN name to ID mapping
One-to-many logical VLAN name to ID mapping
–![]() Web authorization
Web authorization
–![]() Dynamic domain bridge assignment
Dynamic domain bridge assignment
–![]() IP telephony
IP telephony
–![]() Guest VLANs
Guest VLANs
Configuring 802.1X
This section includes the following topics:
•![]() Process for Configuring 802.1X
Process for Configuring 802.1X
•![]() Configuring AAA Authentication Methods for 802.1X
Configuring AAA Authentication Methods for 802.1X
•![]() Controlling 802.1X Authentication on an Interface
Controlling 802.1X Authentication on an Interface
•![]() Enabling Global Periodic Reauthentication
Enabling Global Periodic Reauthentication
•![]() Enabling Periodic Reauthentication for an Interface
Enabling Periodic Reauthentication for an Interface
•![]() Manually Reauthenticating Supplicants
Manually Reauthenticating Supplicants
•![]() Manually Initializing 802.1X Authentication
Manually Initializing 802.1X Authentication
•![]() Changing Global 802.1X Authentication Timers
Changing Global 802.1X Authentication Timers
•![]() Changing 802.1X Authentication Timers for an Interface
Changing 802.1X Authentication Timers for an Interface
•![]() Enabling Single Host or Multiple Hosts Mode
Enabling Single Host or Multiple Hosts Mode
•![]() Enabling MAC Address Authentication Bypass
Enabling MAC Address Authentication Bypass
•![]() Disabling 802.1X Authentication on the NX-OS Device
Disabling 802.1X Authentication on the NX-OS Device
•![]() Resetting the 802.1X Global Configuration to the Default Values
Resetting the 802.1X Global Configuration to the Default Values
•![]() Resetting the 802.1X Interface Configuration to the Default Values
Resetting the 802.1X Interface Configuration to the Default Values
•![]() Setting the Global Maximum Authenticator-to-Supplicant Frame Retransmission Retry Count
Setting the Global Maximum Authenticator-to-Supplicant Frame Retransmission Retry Count
•![]() Enabling RADIUS Accounting for 802.1X Authentication
Enabling RADIUS Accounting for 802.1X Authentication
•![]() Configuring AAA Accounting Methods for 802.1X
Configuring AAA Accounting Methods for 802.1X
•![]() Setting the Maximum Reauthentication Retry Count on an Interface
Setting the Maximum Reauthentication Retry Count on an Interface
Note ![]() If you are familiar with the Cisco IOS CLI, be aware that the Cisco NX-OS commands for this feature might differ from the Cisco IOS commands that you would use.
If you are familiar with the Cisco IOS CLI, be aware that the Cisco NX-OS commands for this feature might differ from the Cisco IOS commands that you would use.
Process for Configuring 802.1X
Follow these steps to configure 802.1X authentication:
Step 1 ![]() Enable the 802.1X feature (see the "Enabling the 802.1X Feature" section).
Enable the 802.1X feature (see the "Enabling the 802.1X Feature" section).
Step 2 ![]() Configure the connection to the remote RADIUS server (see the "Configuring AAA Authentication Methods for 802.1X" section).
Configure the connection to the remote RADIUS server (see the "Configuring AAA Authentication Methods for 802.1X" section).
Step 3 ![]() Enable 802.1X authentication on the Ethernet interfaces (see the "Controlling 802.1X Authentication on an Interface" section).
Enable 802.1X authentication on the Ethernet interfaces (see the "Controlling 802.1X Authentication on an Interface" section).
You can perform the following optional maintenance tasks for 802.1X authentication:
•![]() Enable periodic automatic reauthentication (see the "Enabling Periodic Reauthentication for an Interface" section)
Enable periodic automatic reauthentication (see the "Enabling Periodic Reauthentication for an Interface" section)
•![]() Perform manual reauthentication (see the "Manually Reauthenticating Supplicants" section)
Perform manual reauthentication (see the "Manually Reauthenticating Supplicants" section)
•![]() Initialize the state of the 802.1X feature (see the "Manually Initializing 802.1X Authentication" section)
Initialize the state of the 802.1X feature (see the "Manually Initializing 802.1X Authentication" section)
•![]() Change the global 802.1X authentication timers (see the "Changing Global 802.1X Authentication Timers" section)
Change the global 802.1X authentication timers (see the "Changing Global 802.1X Authentication Timers" section)
•![]() Change the interface 802.1X authentication timers (see the "Changing 802.1X Authentication Timers for an Interface" section)
Change the interface 802.1X authentication timers (see the "Changing 802.1X Authentication Timers for an Interface" section)
•![]() Enable multiple hosts on an interface (see the "Enabling Single Host or Multiple Hosts Mode" section)
Enable multiple hosts on an interface (see the "Enabling Single Host or Multiple Hosts Mode" section)
•![]() Enable MAC address authentication bypass on an interface (see the "Enabling MAC Address Authentication Bypass" section)
Enable MAC address authentication bypass on an interface (see the "Enabling MAC Address Authentication Bypass" section)
•![]() Disallow 802.1X authentication (see the "Disabling 802.1X Authentication on the NX-OS Device" section)
Disallow 802.1X authentication (see the "Disabling 802.1X Authentication on the NX-OS Device" section)
•![]() Disable the 802.1X feature (see the "Disabling the 802.1X Feature" section)
Disable the 802.1X feature (see the "Disabling the 802.1X Feature" section)
•![]() Reset the global 802.1X configuration to default values (see the "Resetting the 802.1X Global Configuration to the Default Values" section)
Reset the global 802.1X configuration to default values (see the "Resetting the 802.1X Global Configuration to the Default Values" section)
•![]() Reset the interface 802.1X configuration to default values (see the "Resetting the 802.1X Interface Configuration to the Default Values" section)
Reset the interface 802.1X configuration to default values (see the "Resetting the 802.1X Interface Configuration to the Default Values" section)
•![]() Change the frame retransmission retry count (see the "Configuring the Maximum Authenticator-to-Supplicant Frame Retransmission Retry Count for an Interface" section)
Change the frame retransmission retry count (see the "Configuring the Maximum Authenticator-to-Supplicant Frame Retransmission Retry Count for an Interface" section)
•![]() Enable RADIUS accounting for 802.1X authentication (see the "Configuring AAA Accounting Methods for 802.1X" section)
Enable RADIUS accounting for 802.1X authentication (see the "Configuring AAA Accounting Methods for 802.1X" section)
•![]() Configure AAA accounting for 802.1X (see the "Configuring AAA Accounting Methods for 802.1X" section)
Configure AAA accounting for 802.1X (see the "Configuring AAA Accounting Methods for 802.1X" section)
•![]() Change the maximum 802.1X authentication requests (see the "Configuring the Maximum Authenticator-to-Supplicant Frame Retransmission Retry Count for an Interface" section)
Change the maximum 802.1X authentication requests (see the "Configuring the Maximum Authenticator-to-Supplicant Frame Retransmission Retry Count for an Interface" section)
•![]() Change the maximum 802.1X reauthentication requests (see the "Setting the Maximum Reauthentication Retry Count on an Interface" section)
Change the maximum 802.1X reauthentication requests (see the "Setting the Maximum Reauthentication Retry Count on an Interface" section)
Enabling the 802.1X Feature
You must enable the 802.1X feature on the NX-OS device before authenticating any supplicant devices.
BEFORE YOU BEGIN
Ensure that you are in the correct VDC (or use the switchto vdc command).
SUMMARY STEPS
1. ![]() configure terminal
configure terminal
2. ![]() feature dot1x
feature dot1x
3. ![]() exit
exit
4. ![]() show feature
show feature
5. ![]() copy running-config startup-config
copy running-config startup-config
DETAILED STEPS
Configuring AAA Authentication Methods for 802.1X
You can use remote RADIUS servers for 802.1X authentication. You must configure RADIUS servers and RADIUS server groups and specify the default AAA authentication method before the NX-OS device can perform 802.1X authentication.
For more information on configuring RADIUS servers, see Chapter 3, "Configuring RADIUS." For information on configuring RADIUS server groups, see Chapter 2, "Configuring AAA."
BEFORE YOU BEGIN
Ensure that you are in the correct VDC (or use the switchto vdc command).
Obtain the names or addresses for the remote RADIUS server groups.
SUMMARY STEPS
1. ![]() configure terminal
configure terminal
2. ![]() aaa authentication dot1x default group group-list
aaa authentication dot1x default group group-list
3. ![]() exit
exit
4. ![]() show radius-server
show radius-server
5. ![]() show radius-server group [group-name]
show radius-server group [group-name]
6. ![]() copy running-config startup-config
copy running-config startup-config
DETAILED STEPS
Controlling 802.1X Authentication on an Interface
You can control the 802.1X authentication performed on an interface. An interface can have the following 802.1X authentication states:
•![]() Auto—Enables 802.1X authentication on the interface.
Auto—Enables 802.1X authentication on the interface.
•![]() Force-authorized—Disables 802.1X authentication on the interface and allows all traffic on the interface without authentication. This state is the default.
Force-authorized—Disables 802.1X authentication on the interface and allows all traffic on the interface without authentication. This state is the default.
•![]() Force-unauthorized—Disallows all traffic on the interface.
Force-unauthorized—Disallows all traffic on the interface.
BEFORE YOU BEGIN
Ensure that you are in the correct VDC (or use the switchto vdc command).
Enable the 802.1X feature on the NX-OS device (see the "Enabling the 802.1X Feature" section).
SUMMARY STEPS
1. ![]() configure terminal
configure terminal
2. ![]() interface ethernet slot/port
interface ethernet slot/port
3. ![]() dot1x port-control {auto | forced-authorized | forced-unauthorized}
dot1x port-control {auto | forced-authorized | forced-unauthorized}
4. ![]() exit
exit
5. ![]() show dot1x all
show dot1x all
6. ![]() show dot1x interface ethernet slot/port
show dot1x interface ethernet slot/port
7. ![]() copy running-config startup-config
copy running-config startup-config
DETAILED STEPS
Enabling Global Periodic Reauthentication
You can enable global periodic 802.1X reauthentication and specify how often it occurs. If you do not specify a time period before enabling reauthentication, the number of seconds between reauthentication attempts is 3600 (1 hour).
To manually reauthenticate supplicants, see the "Manually Reauthenticating Supplicants" section.
Note ![]() During the reauthentication process, the status of an already authenticated supplicant is not disrupted.
During the reauthentication process, the status of an already authenticated supplicant is not disrupted.
BEFORE YOU BEGIN
Ensure that you are in the correct VDC (or use the switchto vdc command).
Enable the 802.1X feature on the NX-OS device (see the "Enabling the 802.1X Feature" section).
SUMMARY STEPS
1. ![]() configure terminal
configure terminal
2. ![]() dot1x re-authentication
dot1x re-authentication
3. ![]() dot1x timeout re-authperiod seconds
dot1x timeout re-authperiod seconds
4. ![]() exit
exit
5. ![]() show dot1x all
show dot1x all
6. ![]() copy running-config startup-config
copy running-config startup-config
DETAILED STEPS
Enabling Periodic Reauthentication for an Interface
You can enable periodic 802.1X reauthentication on an interface and specify how often it occurs. If you do not specify a time period before enabling reauthentication, the number of seconds between reauthentication defaults to the global value.
To manually reauthenticate supplicants, see the "Manually Reauthenticating Supplicants" section.
Note ![]() During the reauthentication process, the status of an already authenticated supplicant is not disrupted.
During the reauthentication process, the status of an already authenticated supplicant is not disrupted.
BEFORE YOU BEGIN
Ensure that you are in the correct VDC (or use the switchto vdc command).
Enable the 802.1X feature on the NX-OS device (see the "Enabling the 802.1X Feature" section).
SUMMARY STEPS
1. ![]() configure terminal
configure terminal
2. ![]() interface ethernet slot/port
interface ethernet slot/port
3. ![]() dot1x re-authentication
dot1x re-authentication
4. ![]() dot1x timeout re-authperiod seconds
dot1x timeout re-authperiod seconds
5. ![]() exit
exit
6. ![]() show dot1x all
show dot1x all
7. ![]() copy running-config startup-config
copy running-config startup-config
DETAILED STEPS
Manually Reauthenticating Supplicants
You can manually reauthenticate the supplicants for the entire NX-OS device or for an interface.
Note ![]() During the reauthentication process, the status of an already authenticated supplicant is not disrupted.
During the reauthentication process, the status of an already authenticated supplicant is not disrupted.
BEFORE YOU BEGIN
Ensure that you are in the correct VDC (or use the switchto vdc command).
Enable the 802.1X feature on the NX-OS device (see the "Enabling the 802.1X Feature" section).
SUMMARY STEPS
1. ![]() dot1x re-authenticate [interface ethernet slot/port]
dot1x re-authenticate [interface ethernet slot/port]
DETAILED STEPS
|
|
|
|
|---|---|---|
Step 1 |
dot1x re-authenticate [interface slot/port] Example: switch# dot1x re-authenticate interface 2/1 |
Reauthenticates the supplicants on the NX-OS device or on an interface. |
Manually Initializing 802.1X Authentication
You can manually initialize the authentication for all supplicants on an NX-OS device or for a specific interface.
Note ![]() Initializing the authentication clears any existing authentication status before starting the authentication process for the client.
Initializing the authentication clears any existing authentication status before starting the authentication process for the client.
BEFORE YOU BEGIN
Ensure that you are in the correct VDC (or use the switchto vdc command).
Enable the 802.1X feature on the NX-OS device (see the "Enabling the 802.1X Feature" section).
SUMMARY STEPS
1. ![]() dot1x initialize [interface ethernet slot/port]
dot1x initialize [interface ethernet slot/port]
DETAILED STEPS
Changing Global 802.1X Authentication Timers
The following global 802.1X authentication timers are supported on the NX-OS device:
•![]() Quiet-period timer—When the NX-OS device cannot authenticate the supplicant, the NX-OS device remains idle for a set period of time, and then tries again. The quiet-period timer value determines the idle period. An authentication failure might occur because the supplicant provided an invalid password. You can provide a faster response time to the user by entering a number smaller than the default. The default is 60 seconds. The range is from 1 to 65535.
Quiet-period timer—When the NX-OS device cannot authenticate the supplicant, the NX-OS device remains idle for a set period of time, and then tries again. The quiet-period timer value determines the idle period. An authentication failure might occur because the supplicant provided an invalid password. You can provide a faster response time to the user by entering a number smaller than the default. The default is 60 seconds. The range is from 1 to 65535.
•![]() Switch-to-supplicant retransmission period timer—The client responds to the EAP-request/identity frame from the NX-OS device with an EAP-response/identity frame. If the NX-OS device does not receive this response, it waits a set period of time (known as the retransmission time) and then retransmits the frame. The default is 30. The range is from 1 to 65535 seconds.
Switch-to-supplicant retransmission period timer—The client responds to the EAP-request/identity frame from the NX-OS device with an EAP-response/identity frame. If the NX-OS device does not receive this response, it waits a set period of time (known as the retransmission time) and then retransmits the frame. The default is 30. The range is from 1 to 65535 seconds.
Note ![]() You can also configure the quiet-period timer and switch-to-supplicant transmission period timer at the interface level (see the "Changing 802.1X Authentication Timers for an Interface" section).
You can also configure the quiet-period timer and switch-to-supplicant transmission period timer at the interface level (see the "Changing 802.1X Authentication Timers for an Interface" section).
Note ![]() You should change the default values only to adjust for unusual circumstances such as unreliable links or specific behavioral problems with certain supplicants and authentication servers.
You should change the default values only to adjust for unusual circumstances such as unreliable links or specific behavioral problems with certain supplicants and authentication servers.
BEFORE YOU BEGIN
Ensure that you are in the correct VDC (or use the switchto vdc command).
Enable the 802.1X feature on the NX-OS device (see the "Enabling the 802.1X Feature" section).
SUMMARY STEPS
1. ![]() configure terminal
configure terminal
2. ![]() dot1x timeout quiet-period seconds
dot1x timeout quiet-period seconds
3. ![]() dot1x timeout tx-period seconds
dot1x timeout tx-period seconds
4. ![]() exit
exit
5. ![]() show dot1x all
show dot1x all
6. ![]() copy running-config startup-config
copy running-config startup-config
DETAILED STEPS
Changing 802.1X Authentication Timers for an Interface
You can change the following 802.1X authentication timers on the NX-OS device interfaces:
•![]() Quiet-period timer—When the NX-OS device cannot authenticate the supplicant, the switch remains idle for a set period of time and then tries again. The quiet-period timer value determines the idle period. An authentication failure might occur because the supplicant provided an invalid password. You can provide a faster response time to the user by entering a smaller number than the default. The default is the value of the global quiet period timer. The range is from 1 to 65535 seconds.
Quiet-period timer—When the NX-OS device cannot authenticate the supplicant, the switch remains idle for a set period of time and then tries again. The quiet-period timer value determines the idle period. An authentication failure might occur because the supplicant provided an invalid password. You can provide a faster response time to the user by entering a smaller number than the default. The default is the value of the global quiet period timer. The range is from 1 to 65535 seconds.
•![]() Rate-limit timer—The rate-limit period throttles EAPOL-Start packets from supplicants that are sending too many EAPOL-Start packets. The authenticator ignores EAPOL-Start packets from supplicants that have successfully authenticated for the rate-limit period duration. The default value is 0 seconds and the authenticator processes all EAPOL-Start packets. The range is from 1 to 65535 seconds.
Rate-limit timer—The rate-limit period throttles EAPOL-Start packets from supplicants that are sending too many EAPOL-Start packets. The authenticator ignores EAPOL-Start packets from supplicants that have successfully authenticated for the rate-limit period duration. The default value is 0 seconds and the authenticator processes all EAPOL-Start packets. The range is from 1 to 65535 seconds.
•![]() Switch-to-authentication-server retransmission timer for Layer 4 packets—The authentication server notifies the switch each time that it receives a Layer 4 packet. If the switch does not receive a notification after sending a packet, the NX-OS device waits a set period of time and then retransmits the packet. The default is 30 seconds. The range is from 1 to 65535 seconds.
Switch-to-authentication-server retransmission timer for Layer 4 packets—The authentication server notifies the switch each time that it receives a Layer 4 packet. If the switch does not receive a notification after sending a packet, the NX-OS device waits a set period of time and then retransmits the packet. The default is 30 seconds. The range is from 1 to 65535 seconds.
•![]() Switch-to-supplicant retransmission timer for EAP response frames—The supplicant responds to the EAP-request/identity frame from the NX-OS device with an EAP-response/identity frame. If the NX-OS device does not receive this response, it waits a set period of time (known as the retransmission time) and then retransmits the frame. The default is 30 seconds. The range is from 1 to 65535 seconds.
Switch-to-supplicant retransmission timer for EAP response frames—The supplicant responds to the EAP-request/identity frame from the NX-OS device with an EAP-response/identity frame. If the NX-OS device does not receive this response, it waits a set period of time (known as the retransmission time) and then retransmits the frame. The default is 30 seconds. The range is from 1 to 65535 seconds.
•![]() Switch-to-supplicant retransmission timer for EAP request frames—The supplicant notifies the NX-OS device it that received the EAP request frame. If the authenticator does not receive this notification, it waits a set period of time and then retransmits the frame. The default is the value of the global retransmission period timer. The range is from 1 to 65535 seconds.
Switch-to-supplicant retransmission timer for EAP request frames—The supplicant notifies the NX-OS device it that received the EAP request frame. If the authenticator does not receive this notification, it waits a set period of time and then retransmits the frame. The default is the value of the global retransmission period timer. The range is from 1 to 65535 seconds.
Note ![]() You should change the default values only to adjust for unusual circumstances such as unreliable links or specific behavioral problems with certain supplicants and authentication servers.
You should change the default values only to adjust for unusual circumstances such as unreliable links or specific behavioral problems with certain supplicants and authentication servers.
BEFORE YOU BEGIN
Ensure that you are in the correct VDC (or use the switchto vdc command).
Enable the 802.1X feature on the NX-OS device (see the "Enabling the 802.1X Feature" section).
SUMMARY STEPS
1. ![]() configure terminal
configure terminal
2. ![]() interface ethernet slot/port
interface ethernet slot/port
3. ![]() dot1x timeout quiet-period seconds
dot1x timeout quiet-period seconds
4. ![]() dot1x timeout ratelimit-period seconds
dot1x timeout ratelimit-period seconds
5. ![]() dot1x timeout server-timeout seconds
dot1x timeout server-timeout seconds
6. ![]() dot1x timeout supp-timeout seconds
dot1x timeout supp-timeout seconds
7. ![]() dot1x timeout tx-period seconds
dot1x timeout tx-period seconds
8. ![]() exit
exit
9. ![]() show dot1x all
show dot1x all
10. ![]() copy running-config startup-config
copy running-config startup-config
DETAILED STEPS
Enabling Single Host or Multiple Hosts Mode
You can enable single host or multiple hosts mode on an interface.
BEFORE YOU BEGIN
Ensure that you are in the correct VDC (or use the switchto vdc command).
Enable the 802.1X feature on the NX-OS device (see the "Enabling the 802.1X Feature" section).
SUMMARY STEPS
1. ![]() configure terminal
configure terminal
2. ![]() interface ethernet slot/port
interface ethernet slot/port
3. ![]() dot1x host-mode {multi-host | single-host}
dot1x host-mode {multi-host | single-host}
4. ![]() exit
exit
5. ![]() show dot1x all
show dot1x all
6. ![]() copy running-config startup-config
copy running-config startup-config
DETAILED STEPS
Enabling MAC Address Authentication Bypass
You can enable MAC address authentication bypass on an interface that has no supplicant connected.
BEFORE YOU BEGIN
Ensure that you are in the correct VDC (or use the switchto vdc command).
Enable the 802.1X feature on the NX-OS device (see the "Enabling the 802.1X Feature" section).
SUMMARY STEPS
1. ![]() configure terminal
configure terminal
2. ![]() interface ethernet slot/port
interface ethernet slot/port
3. ![]() dot1x mac-auth-bypass [eap]
dot1x mac-auth-bypass [eap]
4. ![]() exit
exit
5. ![]() show dot1x all
show dot1x all
6. ![]() copy running-config startup-config
copy running-config startup-config
DETAILED STEPS
Disabling 802.1X Authentication on the NX-OS Device
You can disable 802.1X authentication on the NX-OS device. By default, the NX-OS software enables 802.1X authentication after you enable the 802.1X feature. However, when you disable the 802.1x feature, the configuration is removed from the NX-OS device. The NX-OS software allow you to disable 802.1X authentication without losing the 802.1X configuration.
Note ![]() When you disable 802.1X authentication, the port mode for all interfaces defaults to force-authorized regardless of the configured port mode (see the "Controlling 802.1X Authentication on an Interface" section). When you reenable 802.1X authentication, the NX-OS software restores the configured port mode on the interfaces.
When you disable 802.1X authentication, the port mode for all interfaces defaults to force-authorized regardless of the configured port mode (see the "Controlling 802.1X Authentication on an Interface" section). When you reenable 802.1X authentication, the NX-OS software restores the configured port mode on the interfaces.
BEFORE YOU BEGIN
Ensure that you are in the correct VDC (or use the switchto vdc command).
Enable the 802.1X feature on the NX-OS device (see the "Enabling the 802.1X Feature" section).
SUMMARY STEPS
1. ![]() configure terminal
configure terminal
2. ![]() no dot1x system-auth-control
no dot1x system-auth-control
3. ![]() exit
exit
4. ![]() show dot1x
show dot1x
5. ![]() copy running-config startup-config
copy running-config startup-config
DETAILED STEPS
Disabling the 802.1X Feature
You can disable the 802.1X feature on the NX-OS device.

BEFORE YOU BEGIN
Ensure that you are in the correct VDC (or use the switchto vdc command).
Enable the 802.1X feature on the NX-OS device (see the "Enabling the 802.1X Feature" section).
SUMMARY STEPS
1. ![]() configure terminal
configure terminal
2. ![]() no feature dot1x
no feature dot1x
3. ![]() exit
exit
4. ![]() copy running-config startup-config
copy running-config startup-config
DETAILED STEPS
Resetting the 802.1X Global Configuration to the Default Values
You can set the 802.1X global configuration to the default values.
BEFORE YOU BEGIN
Ensure that you are in the correct VDC (or use the switchto vdc command).
Enable the 802.1X feature on the NX-OS device (see the "Enabling the 802.1X Feature" section).
SUMMARY STEPS
1. ![]() configure terminal
configure terminal
2. ![]() dot1x default
dot1x default
3. ![]() exit
exit
4. ![]() show dot1x all
show dot1x all
5. ![]() copy running-config startup-config
copy running-config startup-config
DETAILED STEPS
Resetting the 802.1X Interface Configuration to the Default Values
You can reset the 802.1X configuration for an interface to the default values.
BEFORE YOU BEGIN
Ensure that you are in the correct VDC (or use the switchto vdc command).
Enable the 802.1X feature on the NX-OS device (see the "Enabling the 802.1X Feature" section).
SUMMARY STEPS
1. ![]() configure terminal
configure terminal
2. ![]() interface ethernet slot/port
interface ethernet slot/port
3. ![]() dot1x default
dot1x default
4. ![]() exit
exit
5. ![]() show dot1x all
show dot1x all
6. ![]() copy running-config startup-config
copy running-config startup-config
DETAILED STEPS
Setting the Global Maximum Authenticator-to-Supplicant Frame Retransmission Retry Count
In addition to changing the authenticator-to-supplicant retransmission time, you can set the number of times that the NX-OS device sends an EAP-request/identity frame (assuming no response is received) to the supplicant before restarting the authentication process.
Note ![]() You should change the default value of this command only to adjust for unusual circumstances such as unreliable links or specific behavioral problems with certain supplicants and authentication servers.
You should change the default value of this command only to adjust for unusual circumstances such as unreliable links or specific behavioral problems with certain supplicants and authentication servers.
BEFORE YOU BEGIN
Ensure that you are in the correct VDC (or use the switchto vdc command).
Enable the 802.1X feature on the NX-OS device (see the "Enabling the 802.1X Feature" section).
SUMMARY STEPS
1. ![]() configure terminal
configure terminal
2. ![]() dot1x max-req retry-count
dot1x max-req retry-count
3. ![]() exit
exit
4. ![]() show dot1x all
show dot1x all
5. ![]() copy running-config startup-config
copy running-config startup-config
DETAILED STEPS
Configuring the Maximum Authenticator-to-Supplicant Frame Retransmission Retry Count for an Interface
You can configure the maximum number of times that the NX-OS device retransmits authentication requests to the supplicant on an interface before the session times out. The default is 2 times and the range is from 1 to 10.
BEFORE YOU BEGIN
Ensure that you are in the correct VDC (or use the switchto vdc command).
Enable the 802.1X feature on the NX-OS device (see the "Enabling the 802.1X Feature" section).
SUMMARY STEPS
1. ![]() configure terminal
configure terminal
2. ![]() interface ethernet slot/port
interface ethernet slot/port
3. ![]() dot1x max-req count
dot1x max-req count
4. ![]() exit
exit
5. ![]() show dot1x all
show dot1x all
6. ![]() copy running-config startup-config
copy running-config startup-config
DETAILED STEPS
Enabling RADIUS Accounting for 802.1X Authentication
You can enable RADIUS accounting for the 802.1X authentication activity.
BEFORE YOU BEGIN
Ensure that you are in the correct VDC (or use the switchto vdc command).
Enable the 802.1X feature on the NX-OS device (see the "Enabling the 802.1X Feature" section).
SUMMARY STEPS
1. ![]() configure terminal
configure terminal
2. ![]() dot1x radius-accounting
dot1x radius-accounting
3. ![]() exit
exit
4. ![]() show dot1x
show dot1x
5. ![]() copy running-config startup-config
copy running-config startup-config
DETAILED STEPS
Configuring AAA Accounting Methods for 802.1X
You can enable AAA accounting Methods for the 802.1X feature.
BEFORE YOU BEGIN
Ensure that you are in the correct VDC (or use the switchto vdc command).
Enable the 802.1X feature on the NX-OS device (see the "Enabling the 802.1X Feature" section).
SUMMARY STEPS
1. ![]() configure terminal
configure terminal
2. ![]() aaa accounting dot1x default group group-list
aaa accounting dot1x default group group-list
3. ![]() exit
exit
4. ![]() show aaa accounting
show aaa accounting
5. ![]() copy running-config startup-config
copy running-config startup-config
DETAILED STEPS
Setting the Maximum Reauthentication Retry Count on an Interface
You can set the maximum number of times that the NX-OS device retransmits reauthentication requests to the supplicant on an interface before the session times out. The default is 2 times and the range is from 1 to 10.
BEFORE YOU BEGIN
Ensure that you are in the correct VDC (or use the switchto vdc command).
Enable the 802.1X feature on the NX-OS device (see the "Enabling the 802.1X Feature" section).
SUMMARY STEPS
1. ![]() configure terminal
configure terminal
2. ![]() interface ethernet slot/port
interface ethernet slot/port
3. ![]() dot1x max-reauth-req retry-count
dot1x max-reauth-req retry-count
4. ![]() exit
exit
5. ![]() show dot1x all
show dot1x all
6. ![]() copy running-config startup-config
copy running-config startup-config
DETAILED STEPS
Verifying the 802.1X Configuration
To display 802.1X information, perform one of the following tasks:
For detailed information about the fields in the output from these commands, see the Cisco Nexus 7000 Series NX-OS Security Command Reference, Release 4.1.
Displaying 802.1X Statistics
You can display the statistics that the NX-OS device maintains for the 802.1X activity.
BEFORE YOU BEGIN
Ensure that you are in the correct VDC (or use the switchto vdc command).
Enable the 802.1X feature on the NX-OS device (see the "Enabling the 802.1X Feature" section).
SUMMARY STEPS
1. ![]() show dot1x {all | interface ethernet slot/port} statistics
show dot1x {all | interface ethernet slot/port} statistics
DETAILED STEPS
|
|
|
|
|---|---|---|
Step 1 |
switch# show dot1x {all | interface ethernet slot/port} statistics Example: switch# show dot1x all statistics |
Displays the 802.1X statistics. |
For detailed information about the fields in the output from this command, see the Cisco Nexus 7000 Series NX-OS Security Command Reference, Release 4.1.
802.1X Example Configurations
The following example shows how to configure 802.1X:
feature dot1x
aaa authentication dot1x default group rad2
interface Ethernet2/1
dot1x port-control auto
Note ![]() Repeat the dot1x port-control auto command for all interfaces that require 802.1X authentication.
Repeat the dot1x port-control auto command for all interfaces that require 802.1X authentication.
Default Settings
Table 8-1 lists the default settings for 802.1X parameters.
Additional References
For additional information related to implementing 802.1X, see the following sections:
•![]() MIBs
MIBs
Related Documents
Standards
MIBs
|
|
|
|---|---|
• |
To locate and download MIBs, go to the following URL: http://www.cisco.com/public/sw-center/netmgmt/cmtk/mibs.shtml |
Feature History for 802.1X
Table 8-2 lists the release history for this feature.
|
|
|
|
|---|---|---|
802.1X |
4.0(1) |
This feature was introduced. |
 Feedback