- Preface
- New and Changed Information
- Overview
- Configuring CDP
- Configuring the Domain
- Managing Server Connections
- Managing the Configuration
- Working with Files
- Managing Users
- Configuring NTP
- Configuring Local SPAN and ERSPAN
- Configuring SNMP
- Configuring NetFlow
- Configuring System Message Logging
- Configuring iSCSI Multipath
- Configuring VSM Backup and Recovery
- Enabling vTracker
- Configuring Virtualized Workload Mobility
- Index
Cisco Nexus 1000V System Management Configuration Guide, Release 4.2(1)SV2(2.1)
Bias-Free Language
The documentation set for this product strives to use bias-free language. For the purposes of this documentation set, bias-free is defined as language that does not imply discrimination based on age, disability, gender, racial identity, ethnic identity, sexual orientation, socioeconomic status, and intersectionality. Exceptions may be present in the documentation due to language that is hardcoded in the user interfaces of the product software, language used based on RFP documentation, or language that is used by a referenced third-party product. Learn more about how Cisco is using Inclusive Language.
- Updated:
- July 14, 2014
Chapter: Configuring VSM Backup and Recovery
Configuring VSM Backup and Recovery
This chapter contains the following sections:
- Information About VSM Backup and Recovery
- Guidelines and Limitations
- Configuring VSM Backup and Recovery
Information About VSM Backup and Recovery
You can use the VSM backup and recovery procedure to create a template from which the VSMs can be re-created in the event that both VSMs fail in a high availability (HA) environment.
 Note | We recommend that you do periodic backups after the initial backup to ensure that you have the most current configuration. See the Performing a Periodic Backup section for more information. |
Guidelines and Limitations
VSM backup and recovery has the following configuration guidelines and limitations:
Backing up the VSM VM is a onetime task.
Backing up the VSM VM requires coordination between the network administrator and the server administrator.
These procedures are not for upgrades and downgrades.
These procedures require that the restoration is done on the VSM with the same release as the one from which the backup was made.
Configuration files do not have enough information to re-create a VSM.
Configuring VSM Backup and Recovery
This section includes the following topics:
Note | Be aware that Cisco NX-OS commands might differ from the Cisco IOS commands. |
Backing Up the VSM
This section provides information and procedure to back up the VSM on ESX and Cisco Nexus Cloud Services Platform. This section includes the following topics:
Follow the section based on your platform.
- Backing Up the VSM on ESX Server
- Exporting a Backup VSB Configuration on Cisco Nexus Cloud Services Platform Server
Backing Up the VSM on ESX Server
This section includes the following topics:
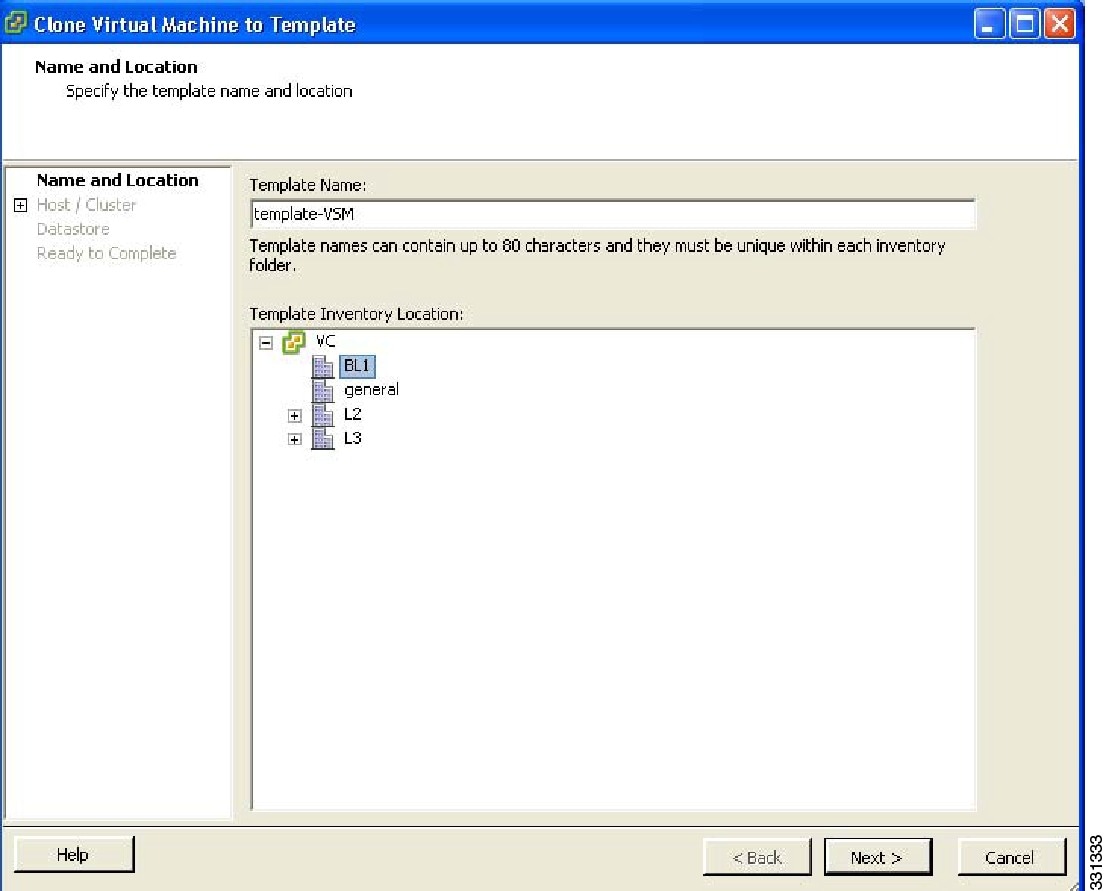
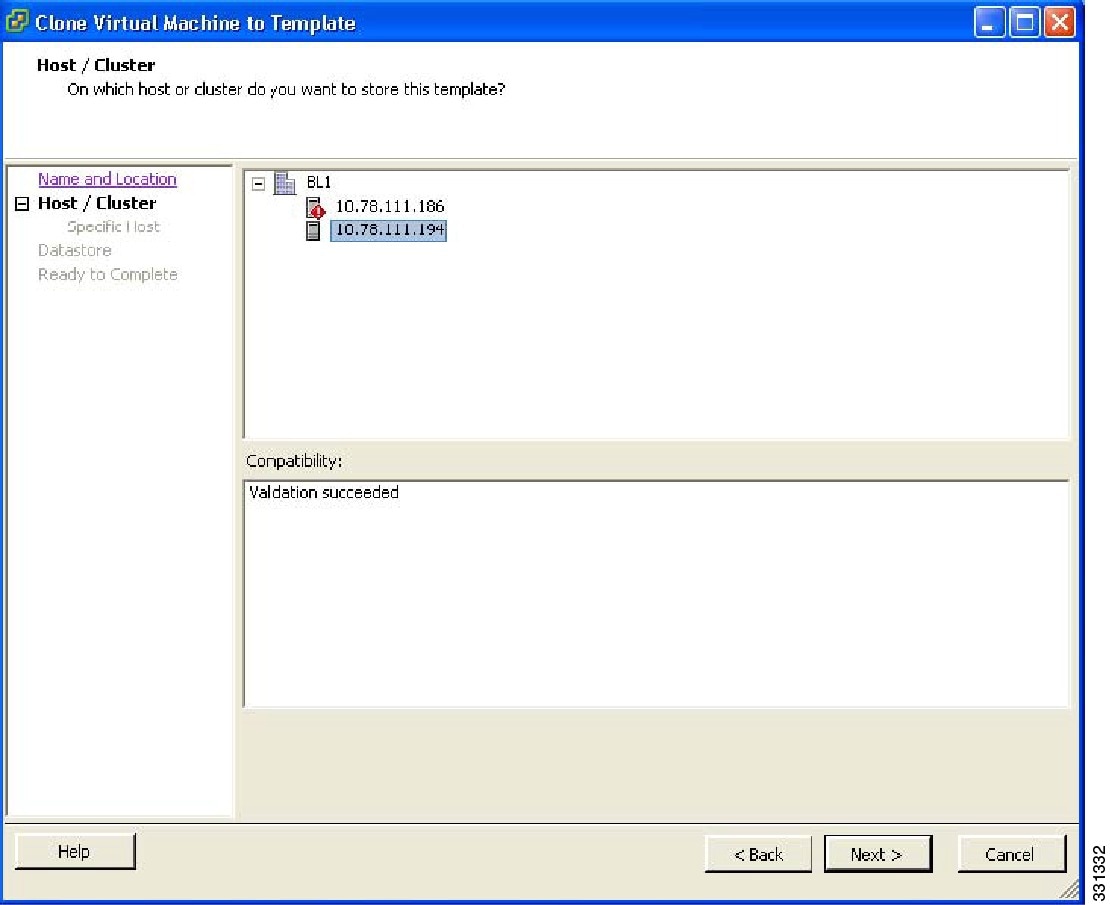
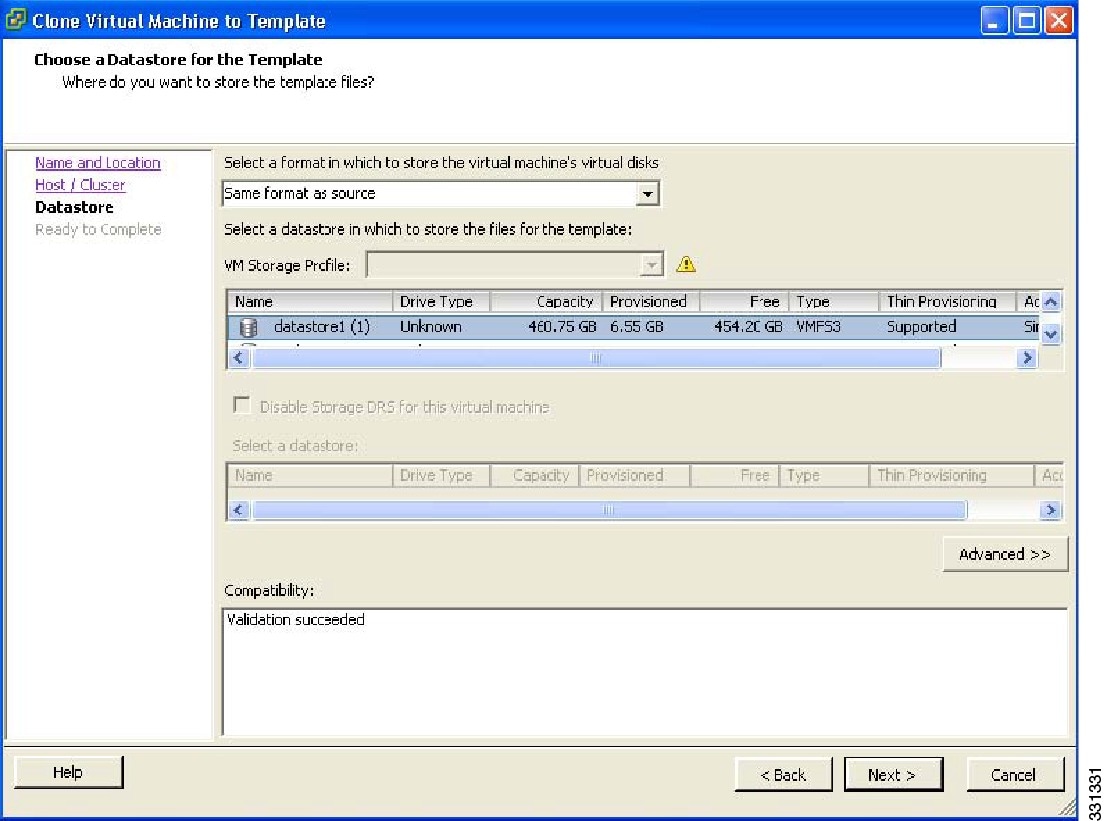
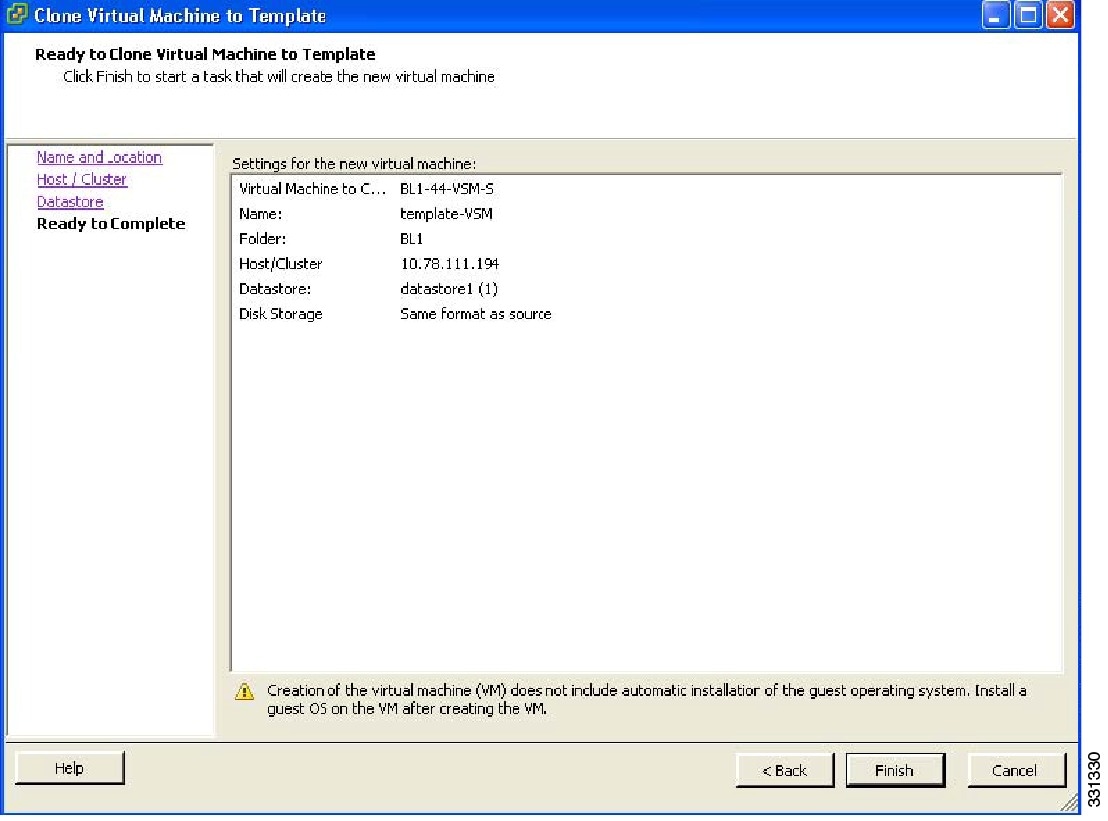
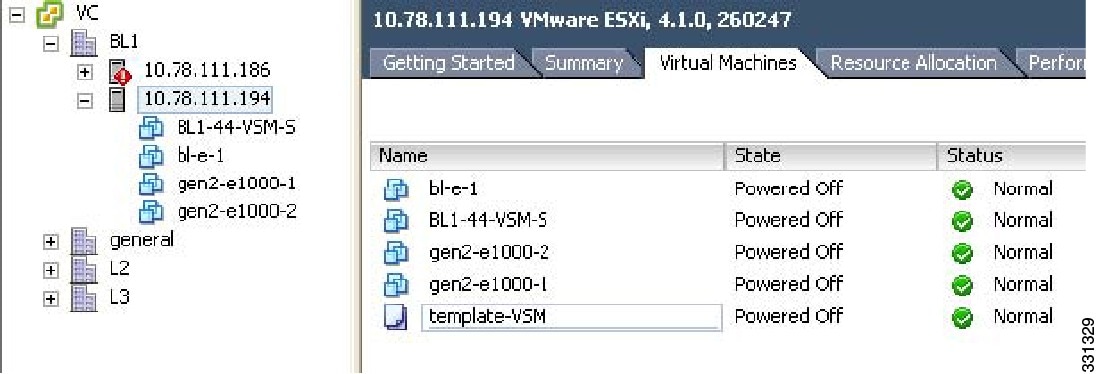
Performing a Backup of the VSM VM
This section describes how to create a backup of the VSM.
Before beginning this procedure, you must know or do the following:
If the VSM is on a Virtual Ethernet Module (VEM) host, you must configure the management VLAN as a system VLAN.
Enter the copy running-config startup-config command at the VSM before beginning this procedure.
This procedure is required when there is a Certificate change, Extension key change, after an upgrade to a new release, and installation of the license.

Performing a Periodic Backup
This section describes how to back up the active VSM after the initial backup of the standby VSM has been performed.
The following lists some instances when you should run this procedure:
Exporting a Backup VSB Configuration on Cisco Nexus Cloud Services Platform Server
You can export or import a VSB on the Cisco Nexus Cloud Services Platforms by creating a copy of the VSB backup file. You can store the backup copy remotely to use as a recovery mechanism or when you need to move a VSB between Cisco Nexus Cloud Services Platforms. Use the procedures in the following sections to export and import a VSB on the Cisco Nexus Cloud Services Platform.
Exporting a VSB
You can create a file for exporting a VSB.
Note | You can create multiple files. Do not change the file suffix for numbering purposes. If you change the prefix for one file, you must change it for all files. |
Ensure that you are on Cisco Nexus Cloud Services Platform. If you want to perform this procedure on ESX platform refer to Performing a Backup of the VSM VM.
-
Log in to the CLI of theCisco Nexus Cloud Services Platform in EXEC mode.
-
Know the name of the VSB for which you are creating a file to export.
-
Verify that the bootflash: export-import directory is empty. If files are present in this directory, you must delete them before starting this procedure.
Enter the copy running-config startup-config command at the VSB before beginning this procedure.
-
Shut down the VSB that you want to back up before creating the file to export. This procedure includes a step for shutting down the VSB and then a step to restart the VSB after creating the file.
| Command or Action | Purpose | |||
|---|---|---|---|---|
| Step 1 | switch # dir bootflash:export-import |
Displays the contents of the export-import directory for verification that the directory is empty. If there is anything in this directory, you must use the next step to delete it before proceeding. | ||
| Step 2 | switch (config-vsb-config) # delete bootflash:export-import foldername |
(Optional) Deletes the VSB compressed tar file and its folder created for export. | ||
| Step 3 | switch # configure terminal |
Enters global configuration mode. | ||
| Step 4 | switch (config) # virtual-service-blade name |
Enters the configuration mode for the named virtual service blade. | ||
| Step 5 | switch (config-vsb-config) # shutdown [primary | secondary] |
Shuts down the VSB that you are exporting from. If you have a redundant pair of Cisco Nexus Cloud Services Platforms, you must specify whether to shut down the primary or secondary. | ||
| Step 6 | switch (config-vsb-config)# show virtual-service-blade summary |
(Optional) Displays the virtual service blade configuration for verification. | ||
| Step 7 | switch (config-vsb-config) # export [primary | secondary] |
Creates a directory named for the slot ID of the exported VSB that contains a compressed tar image of the VSB.
| ||
| Step 8 | switch (config-vsb-config) # dir bootflash:export-import |
Displays the contents of the bootflash: export-import directory, including the directory name of the folder that contains the compressed tar image of the VSB, for verification. You need this folder name in Step 11. | ||
| Step 9 | switch (config-vsb-config) # no shutdown [primary | secondary] |
Powers on the VSB that was powered off when creating the file for export. If you have a redundant pair of Cisco Nexus Cloud Services Platforms, you must specify primary or secondary. | ||
| Step 10 | switch (config-vsb-config)# show virtual-service-blade summary |
Displays the virtual service blade configuration for verification. | ||
| Step 11 | switch (config-vsb-config) # dir bootflash:export-import /directory-name |
|
The following example shows how to create a VSB Backup file:
switch# dir bootflash:export-import
DOCS-CPPA# dir export-import

Usage for bootflash://sup-local
  496164864 bytes used
 3495215104 bytes free
 3991379968 bytes total

switch-1(config-vsb-config)# delete bootflash:/export-import/1/*.*
switch-1(config-vsb-config)# delete bootflash:/export-import/1

switch-1(config-vsb-config)#
switch-1# configure terminal
switch-1(config)#
switch-1(config)# virtual-service-blade vsm-1
switch-1(config-vsb-config)#
switch-1(config-vsb-config)# shutdown secondary
switch-1(config-vsb-config)#
Example:
switch-1(config-vsb-config)# show virtual-service-blade summary

-------------------------------------------------------------------------------
Name                Role        State                    Nexus1010-Module
-------------------------------------------------------------------------------
VSM1                 PRIMARY     VSB POWERED ON          Nexus1010-PRIMARY
VSM1                 SECONDARY   VSB POWERED OFF          Nexus1010-SECONDARY


Example of a successful completion of a VSB

switch-1(config-vsb-config)# export secondary
Note: export started..
Note: please be patient..
Note: please be patient..
Note: please be patient..
Note: export completed...switch-1(config-vsb-config)#


Example of an error condition while exporting a VSB

switch-1(config-vsb-config)# export primary
ERROR: Please clean export-import directory first, then proceed.
switch-1(config-vsb-config)#


Example of an error condition while exporting a secondary VSB

switch-1(config-vsb-config)# export secondary
ERROR: Cannot export active virtual-service-blade, please shut and retry.

switch-1(config-vsb-config)# dir bootflash:export-import
     4096      Sep 08 19:12:52 2011 1/

Usage for bootflash://sup-local
310870016 bytes used
3680509952 bytes free
3991379968 bytes total

switch-1(config-vsb-config)# no shutdown secondary

switch-1(config-vsb-config)#
switch-1(config-vsb-config)# show virtual-service-blade summary

-------------------------------------------------------------------------------
Name                Role        State                    Nexus1010-Module
-------------------------------------------------------------------------------
VSM1                 PRIMARY     VSB POWERED ON          Nexus1010-PRIMARY
VSM1                 SECONDARY   VSB POWERED ON          Nexus1010-SECONDARY

switch-1(config-vsb-config)# dir bootflash:export-import/1
  279955021     Sep 08 19:13:21 2011  Vdisk1.img.tar.00

Usage for bootflash://sup-local
  310870016 bytes used
 3680509952 bytes free
 3991379968 bytes total
Copying the Exported VSB to an External Storage Location
-
You have created a file to export using the Exporting a VSB section and you know the name of this file and the name of the folder it resides in.
Note
You can create multiple files. If so, use the first filename in this procedure. Do not change the file suffix for numbering purposes. If you change the prefix for one file, you must change it for all files.
-
Log in to the CLI of the Cisco Nexus Cloud Services Platform in EXEC mode.
-
Know the name of the path to a remote storage location.
-
After copying the export backup file, delete the contents, including the files and folders, of the export-import directory. Do not delete the export-import folder.
The following example shows how to copy a VSB file to an external location:
switch# copy bootflash:export-import/1/Vdisk1.img.tar.00 ftp:
Enter vrf (If no input, current vrf 'default' is considered):
Enter hostname for the ftp server: 10.78.109.51
Enter username: administrator
Password:
***** Transfer of file Completed Successfully *****
switch# delete bootflash:/export-import/1/Vdisk1.img.tar.00
switch# delete bootflash:/export-import/1
switch# dir
switch#
Recovering the VSM
This section describes how to deploy a VSM on ESX platform by using the backup template and on Cisco Nexus Cloud Services Platform by importing a backup configuration file. This section includes the following topics:
- Recovering the VSM on ESX Server
- Recovering a VSM with a Backup Configuration File on Cisco Nexus Cloud Services Platform Server
Recovering the VSM on ESX Server
This section describes how to deploy a VSM by using the backup template. This section includes the following topics:
- Deploying the Backup VSM VM
- Erasing the Old Configuration
- Restoring the Backup Configuration on the VSM
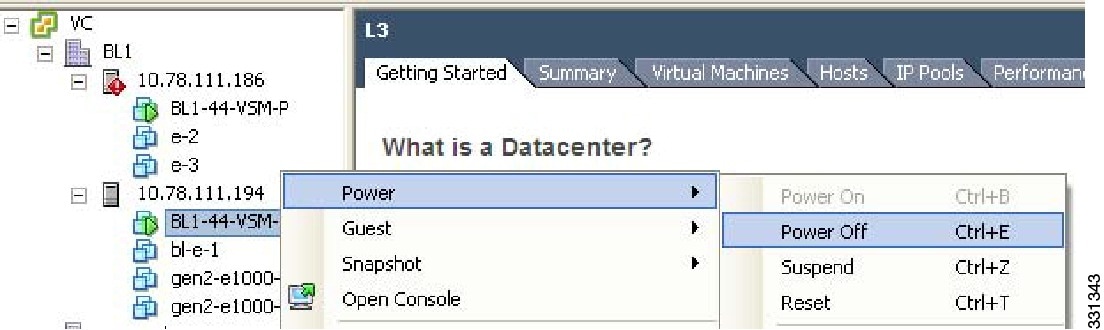
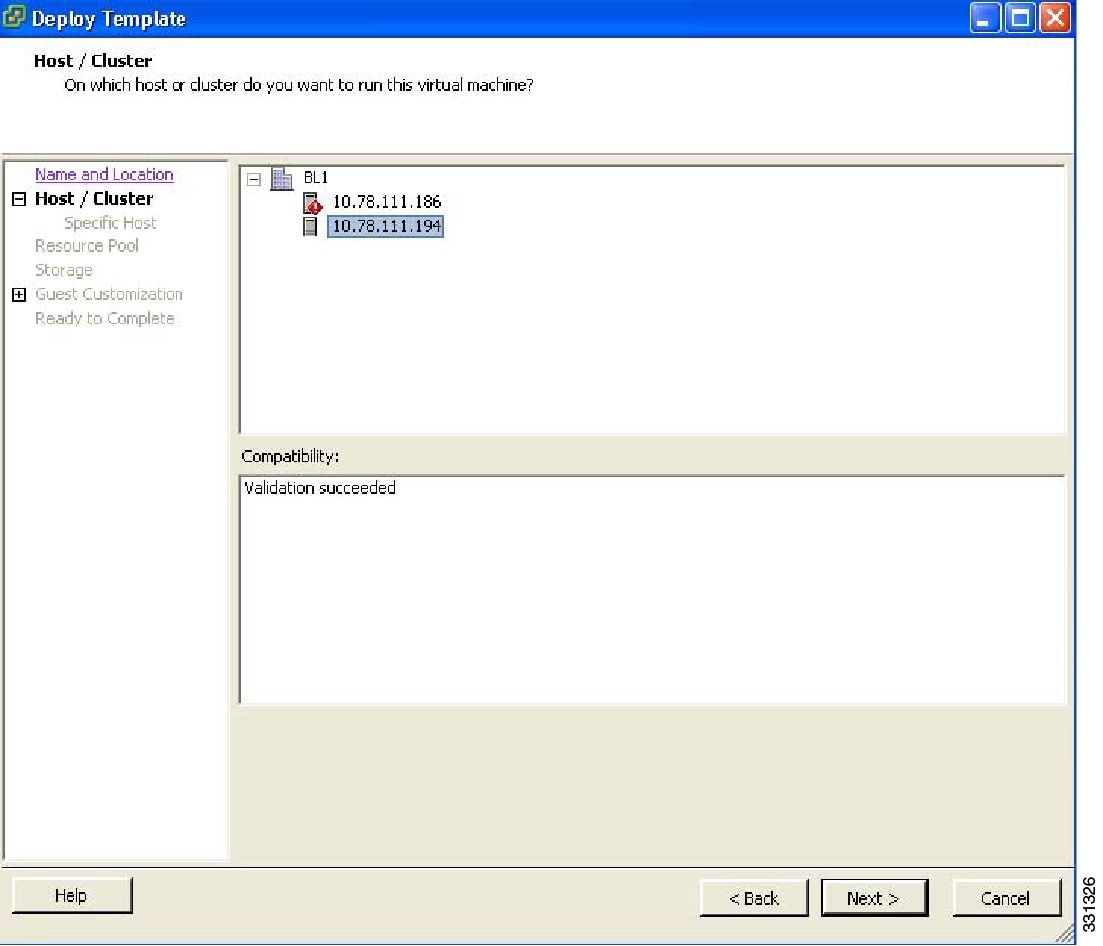
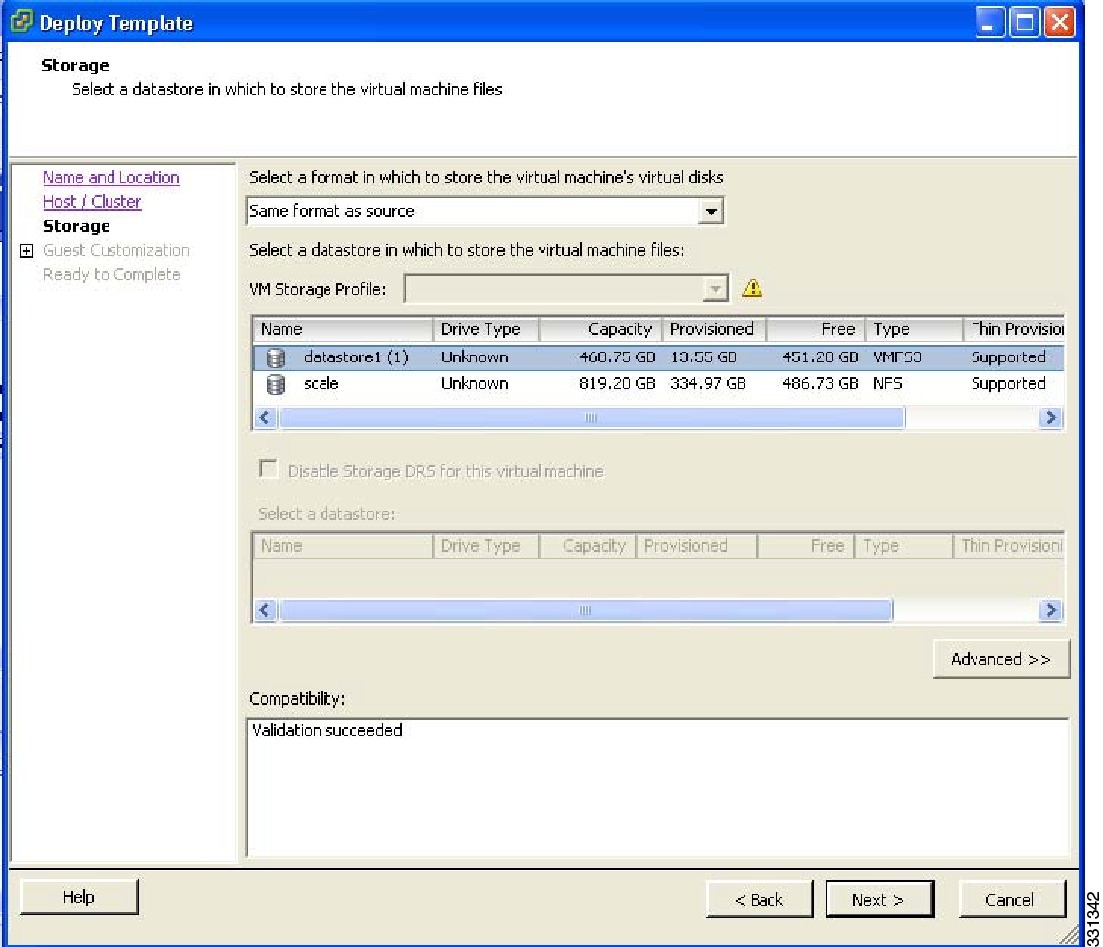
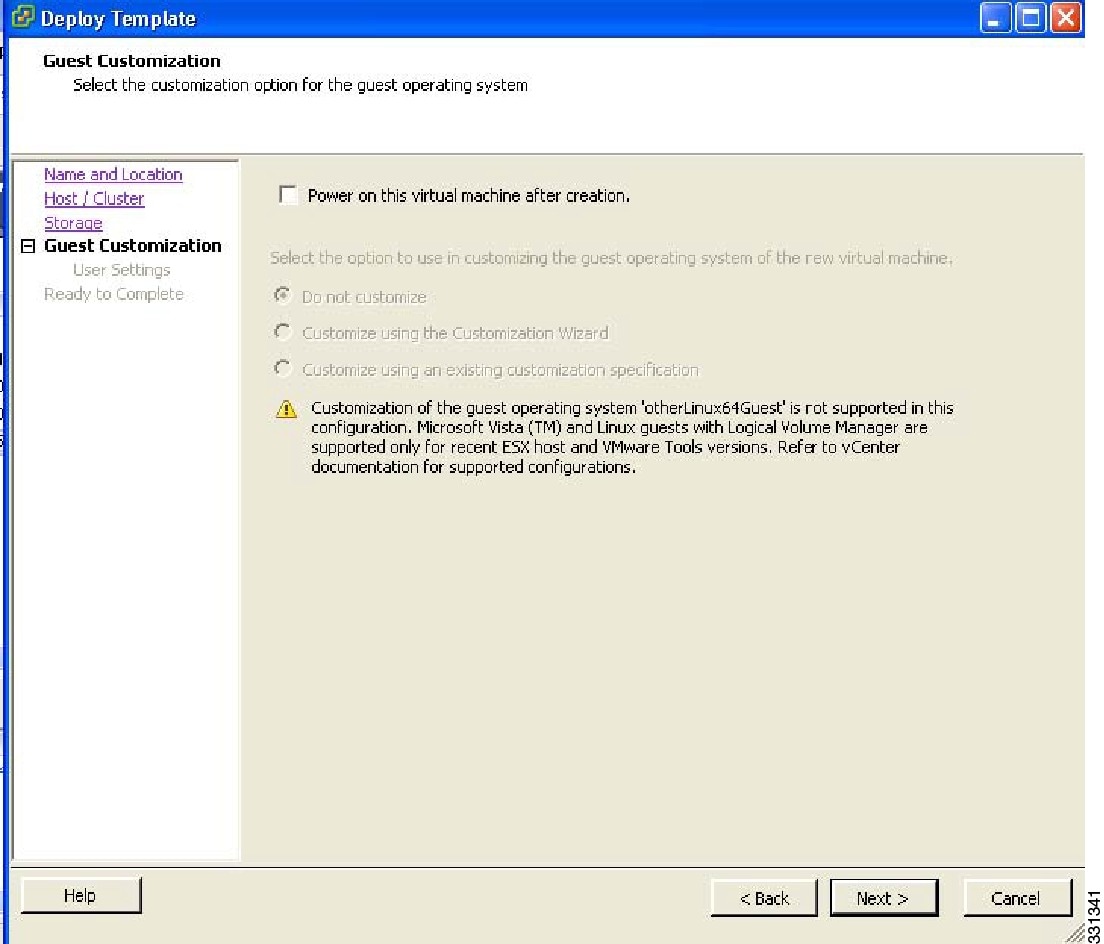
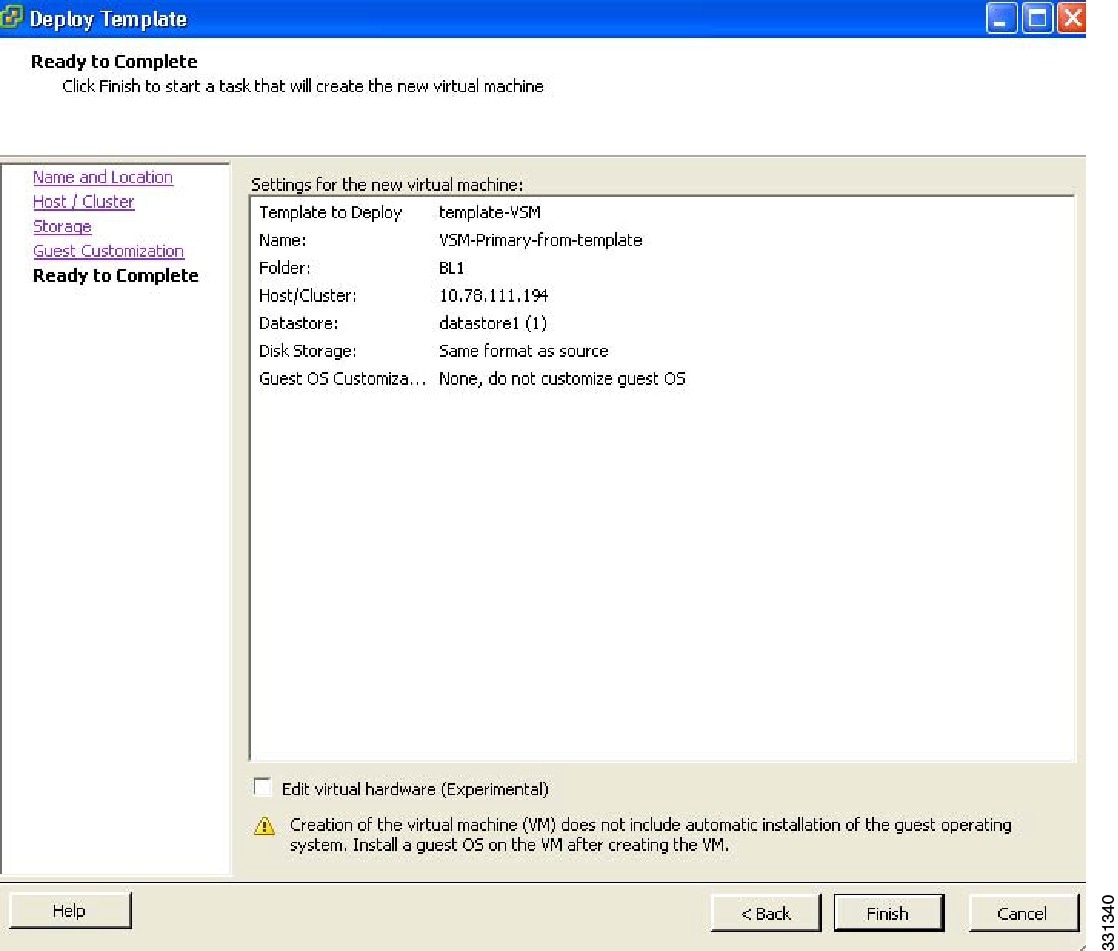
Deploying the Backup VSM VM
This section describes how to deploy the backup VSM VM when the primary and secondary VSMs are not present.
Note | While deploying the VSM VM, do not power it on. |

Erasing the Old Configuration
This section describes how to erase the startup configuration of the newly deployed VSM.
This example describes how to erase the startup configuration of the newly deployed VSM
switch# system redundancy role primary
Setting will be activated on next reload
switch# copy running-config startup-config
scp:        sftp:           startup-config
[####################################] 100%
switch# write erase
Warning: The command will erase the startup-configurations.
Do you wish to proceed anyway? (y/n) [n] y
switch# reload
This command will reboot the system. (y/n)? [n] y
switch# reload
This command will reboot the system. (y/n)? [n] y
Restoring the Backup Configuration on the VSM
This section describes how to restore the backup configuration on the VSM.
Recovering a VSM with a Backup Configuration File on Cisco Nexus Cloud Services Platform Server
Note | This procedure is only for Cisco Nexus Cloud Services Platform. If you want to perform this procedure on ESX platform refer to Deploying the Backup VSM VM. |
- Importing a VSB
- Recovering a VSM with a Backup Configuration File
- Verifying the Export and Import of a VSB
Importing a VSB
-
Log in to the CLI of the activeCisco Nexus Cloud Services Platformin EXEC mode.
-
You have previously created and saved a copy of the VSB configuration in a remote storage location using the Exporting a Backup VSB Configuration.
Note
You can create multiple. If so, use only the first filename with the import command. Do not change the file suffix for numbering purposes. If you change the prefix for one file, then you must change it for all files.
-
Know the name of the VSB and the path to the remote storage location.
-
Verify that the bootflash: export-import directory is empty. If files are present in this directory, you must delete them before importing a VSB configuration file.
The following example shows how to import a VSB backup file:
switch# dir bootflash export-import
DOCS-CPPA# dir export-import
Usage for bootflash://sup-local
496164864 bytes used
3495215104 bytes free
3991379968 bytes total
switch#
switch-1(config-vsb-config)# delete Vdisk1.img.tar.00
switch-1(config-vsb-config)#
switch# copy ftp:Vdisk1.img.tar.00 bootflash:export-import
Enter vrf (If no input, current vrf 'default' is considered):
Enter hostname for the ftp server: 10.78.109.51
Enter username: administrator
Password:
***** Transfer of file Completed Successfully *****
switch-1# configure terminal
switch-1(configure)#
switch-1(config)# virtual-service-blade vsm-5
switch-1(config-vsb-config)#
switch-1(config-vsb-config)# import primary Vdisk1.img.tar.00
Note: import started..
Note: please be patient..
Note: Import cli returns check VSB status for completion
switch-1(config-vsb-config)#
Example:
switch-1(config-vsb-config)# show virtual-service-blade summary
-------------------------------------------------------------------------------
Name Role State Nexus1010-Module
-------------------------------------------------------------------------------
VSM1 PRIMARY VSB POWERED OFF Nexus1010-PRIMARY
VSM1 SECONDARY VSB POWERED ON Nexus1010-SECONDARY
switch-1(config)# virtual-service-blade VSM1
switch-1(config)# no shutdown primary
switch-1(config)#
switch-1(config-vsb-config)# show virtual-service-blade name VSM1
virtual-service-blade VSM1
Description:
Slot id: 1
Host Name:
Management IP:
VSB Type Name : VSM-1.1
vCPU: 1
Ramsize: 2048
Disksize: 3
Heartbeat: 0
HA Admin role: Primary
HA Oper role: NONE
Status: VSB POWERED OFF
Location: PRIMARY
SW version:
VsbEthernet1/1/1: control vlan: 1306 state: up
VsbEthernet1/1/2: management vlan: 1304 state: up
VsbEthernet1/1/3: packet vlan: 1307 state: up
Interface: internal vlan: NA state: up
HA Admin role: Secondary
HA Oper role: NONE
Status: VSB POWERED ON
Location: SECONDARY
SW version:
VSB Info:
switch-1(config-vsb-config)# copy running-config startup-config
Recovering a VSM with a Backup Configuration File
You can recover a VSM using a backup configuration file.
-
You have imported your backup copy of the configuration file using the instructions in Importing a VSB.
-
You have a copy of the VSM running configuration in remote storage location.
-
Log in to the CLI of the Cisco Nexus Cloud Services Platform in EXEC mode.
-
This procedure includes a step for updating Cisco Nexus 1000V licenses. For more information, see the Cisco Nexus 1000V License Configuration Guide.
-
This procedure requires you to shut down the VSM management and control ports to prevent communication with VEMs and vCenter during the recovery. You must know the IDs of the VSM control and management ports and the VSB serial port.
-
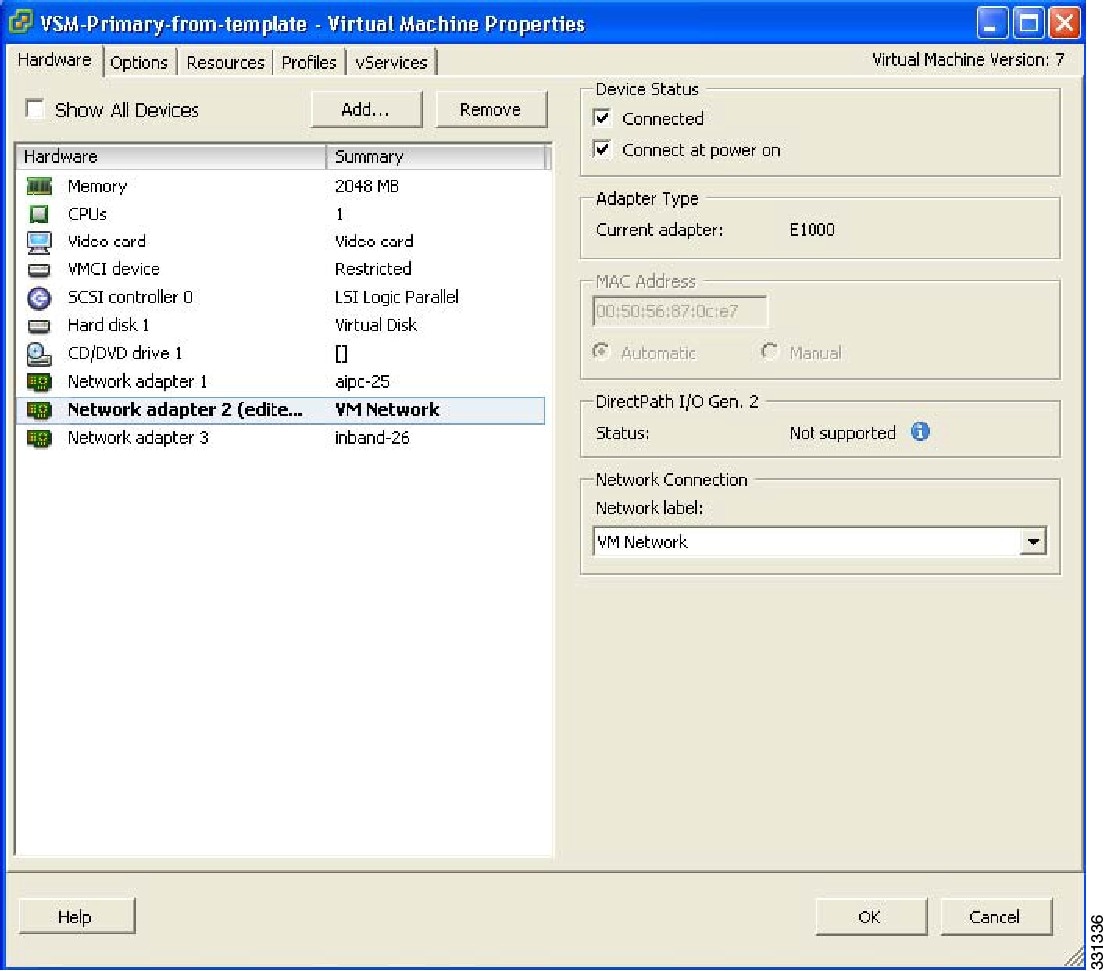
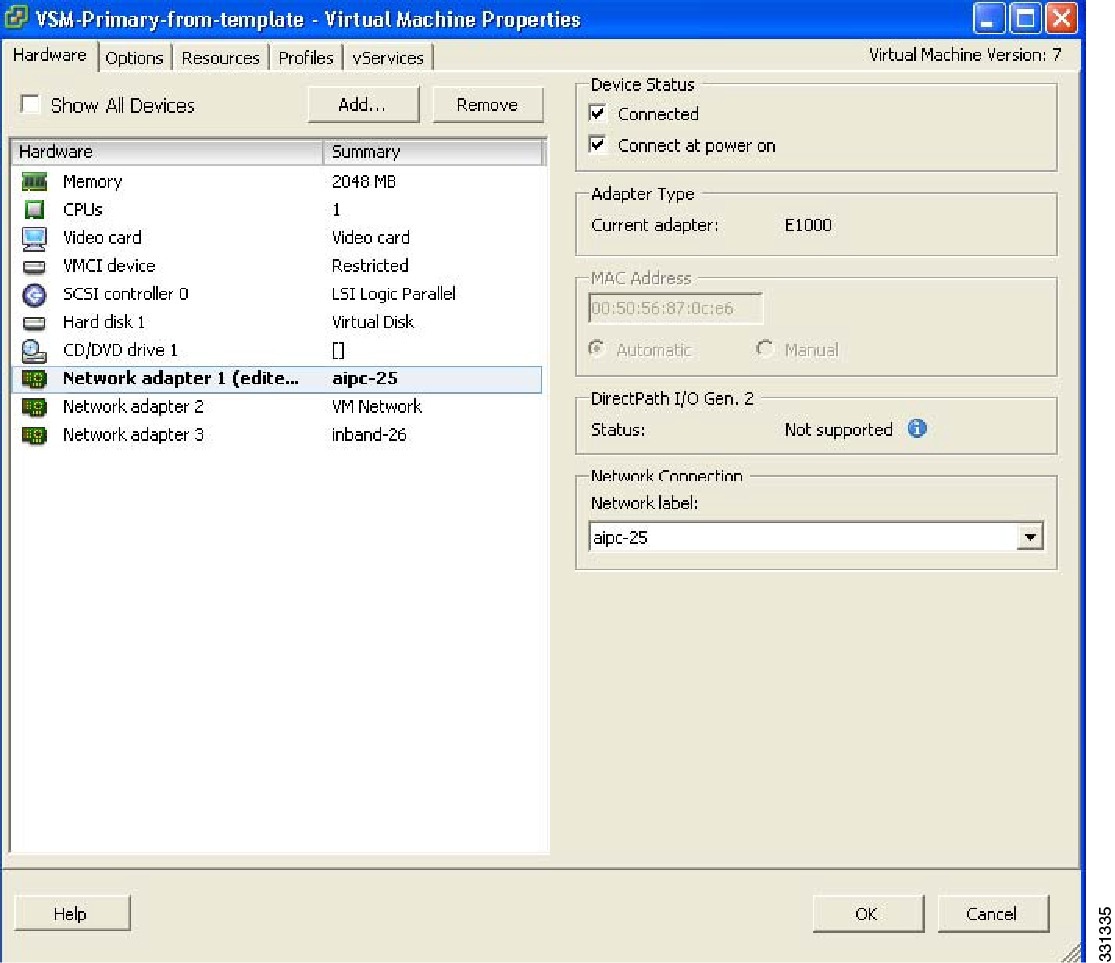
This procedure requires you to setup the VSM software. You must have the following information available for the VSM VSB:
switch-1# configure terminal switch-1(config)# interface vethernet1/1 switch-1(config-if)# shut
switch-1(config)# show virtual-service-blade name VSM1
virtual-service-blade VSM1
Description:
Slot id: 1
Host Name:
Management IP:
VSB Type Name : VSM-1.1
vCPU: 1
Ramsize: 2048
Disksize: 3
Heartbeat: 0
HA Admin role: Primary
HA Oper role: NONE
Status: VSB POWERED OFF
Location: PRIMARY
SW version:
VsbEthernet1/1/1: control vlan: 1306 state: down
VsbEthernet1/1/2: management vlan: 1304 state: down
VsbEthernet1/1/3: packet vlan: 1307 state: up
Interface: internal vlan: NA state: up
HA Admin role: Secondary
HA Oper role: NONE
Status: VSB POWERED ON
Location: SECONDARY
SW version:
VSB Info:
switch-1(config)# virtual-service-blade VSM1
switch-1(config)# no shutdown primary
switch-1(config)#
n1000v# configure terminal
n1000v(config)# write erase
Warning: This command will erase the startup-configuration.
Do you wish to proceed anyway? (y/n) [n] y
n1000v# reload
This command will reboot the system. (y/n)? [n] y
2009 Oct 30 21:51:34 s1 %$ VDC-1 %$ %PLATFORM-2-PFM_SYSTEM_RESET: Manual system restart
from Command Line Interface
n1000v#
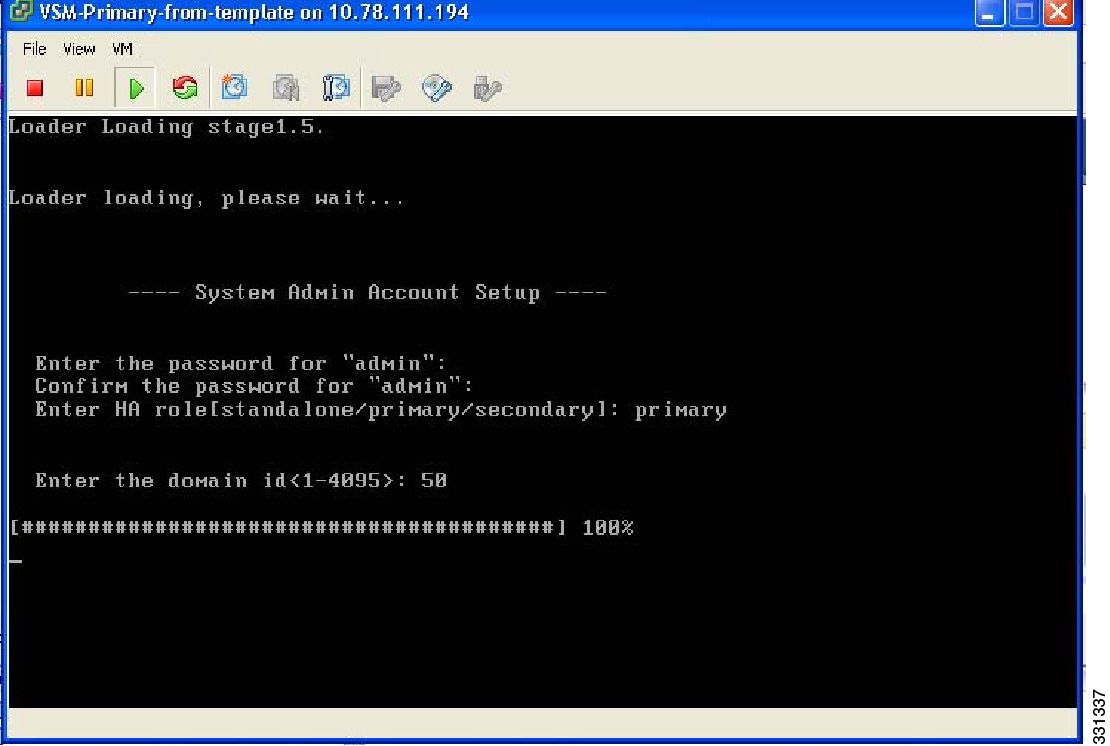
---- System Admin Account Setup ----
Enter the password for "admin":
Confirm the password for "admin":
Enter the domain id<1-4095>: 152
Enter HA role[standalone/primary/secondary]: primary
[#########################################] 100%
---- Basic System Configuration Dialog ----
This setup utility will guide you through the basic configuration of
the system. Setup configures only enough connectivity for management
of the system.
*Note: setup is mainly used for configuring the system initially,
when no configuration is present. So setup always assumes system
defaults and not the current system configuration values.
Press Enter at anytime to skip a dialog. Use ctrl-c at anytime
to skip the remaining dialogs.
Would you like to enter the basic configuration dialog (yes/no): yes
Create another login account (yes/no) [n]: no
Configure read-only SNMP community string (yes/no) [n]: no
Configure read-write SNMP community string (yes/no) [n]: no
Enter the switch name: n1000v
Continue with Out-of-band (mgmt0) management configuration? [yes/no] [y]: yes
Mgmt0 IPv4 address: 172.28.15.152
Mgmt0 IPv4 netmask: 255.255.255.0
Configure the default-gateway: (yes/no) [y]: yes
IPv4 address of the default gateway : 172.23.233.1
Enable the telnet service? (yes/no) [y]: no
Enable the ssh service? (yes/no) [y]: no
Enable the http-server? (yes/no) [y]: no
Configure NTP server? (yes/no) [n]: no
Configure svs domain parameters? (yes/no) [y]: no
Vem feature level will be set to 4.2(1)SV1(4),
Do you want to reconfigure? (yes/no) [n] no
Example:
n1000v# copy running-config startup-config
[########################################] 100%
n1000v#
switch-1# configure terminal
switch-1(config)# interface vethernet1/2
switch-1(config-if)# no shut
switch-1(config)# show virtual-service-blade name VSM1
virtual-service-blade VSM1
. . .
VsbEthernet1/1/1:   control    vlan:   1306    state:     down
  VsbEthernet1/1/2:  management    vlan:   1304    state:     up
  VsbEthernet1/1/3:    packet    vlan:   1307    state:     up
  Interface:         internal    vlan:     NA    state:     up
. . .
switch-1(config)#


Example:
switch-1(config)# copy bootflash:VSM1-periodic-startup-config.txt running-config
switch-1(config)#

n1000v# copy running-config startup-config
[########################################] 100%
n1000v#

config t
interface vethernet slot/port
no shut

Example:
switch-1# config t
switch-1(config)# interface vethernet1/1
switch-1(config-if)# no shut

switch-1(config)# show virtual-service-blade name VSM1
virtual-service-blade VSM1
. . .
VsbEthernet1/1/1:   control    vlan:   1306    state:     up
  VsbEthernet1/1/2:  management    vlan:   1304    state:     up
  VsbEthernet1/1/3:    packet    vlan:   1307    state:     up
  Interface:         internal    vlan:     NA    state:     up
. . .
switch-1(config)#
Example:
n1000v(config)# show module
Mod Ports Module-Type                      Model              Status
--- ----- -------------------------------- ------------------ ------------
1   0     Virtual Supervisor Module        Nexus1000V         active *
2   0     Virtual Supervisor Module        Nexus1000V         ha-standby
3   248   Virtual Ethernet Module          NA                 ok
4   248   Virtual Ethernet Module          NA                 ok

Mod Sw               Hw
--- ---------------- ------------------------------------------------
1   4.2(1)SV1(4a)    0.0
2   4.2(1)SV1(4a)    0.0
3   4.2(1)SV1(4a)    VMware ESXi 4.0.0 Releasebuild-208167 (1.9)
4   4.2(1)SV1(4a)    VMware ESX 4.1.0 Releasebuild-260247 (2.0)

Mod MAC-Address(es) Serial-Num
--- -------------------------------------- ----------
1 00-19-07-6c-5a-a8 to 00-19-07-6c-62-a8 NA
2 00-19-07-6c-5a-a8 to 00-19-07-6c-62-a8 NA
3 02-00-0c-00-03-00 to 02-00-0c-00-03-80 NA
4 02-00-0c-00-04-00 to 02-00-0c-00-04-80 NA

Mod Server-IP       Server-UUID                          Server-Name
--- --------------- ------------------------------------ --------------------
1   10.78.109.44    NA                                   NA
2   10.78.109.44    NA                                   NA
3   10.78.109.72    44454c4c-4300-1046-8043-b6c04f563153 10.78.109.72
4   10.78.109.71    44454c4c-3300-1056-8057-b3c04f583153 10.78.109.71

* this terminal session

n1000v(config)#

switch-1(config)# enable secondary
Verifying the Export and Import of a VSB
switch-1(config-vsb-config)# dir bootflash:export-import/1
279955021 Sep 08 19:13:21 2011 Vdisk1.img.tar.00
Usage for bootflash://sup-local
310870016 bytes used
3680509952 bytes free
3991379968 bytes total
The following example shows Virtual Service Blade Summary:
switch-1(config-vsb-config)# show virtual-service-blade summary
-------------------------------------------------------------------------------
Name Role State Nexus1010-Module
-------------------------------------------------------------------------------
VSM1 PRIMARY VSB POWERED OFF Nexus1010-PRIMARY
VSM1 SECONDARY VSB POWERED ON Nexus1010-SECONDARY
switch# show virtual-service-blade name VSM1
virtual-service-blade VSM1
Description:
Slot id: 1
Host Name:
Management IP:
VSB Type Name : VSM-1.1
vCPU: 1
Ramsize: 2048
Disksize: 3
Heartbeat: 0
HA Admin role: Primary
HA Oper role: NONE
Status: VSB POWERED OFF
Location: PRIMARY
SW version:
VsbEthernet1/1/1: control vlan: 1306 state: down
VsbEthernet1/1/2: management vlan: 1304 state: down
VsbEthernet1/1/3: packet vlan: 1307 state: up
Interface: internal vlan: NA state: up
HA Admin role: Secondary
HA Oper role: NONE
Status: VSB POWERED ON
Location: SECONDARY
SW version:
VSB Info:
switch-1(config)#
Feature History for VSM Backup and Recovery
This section provides the VSM backup and Recovery feature release history.
Feature Name |
Releases |
Feature Information |
|---|---|---|
VSM Backup and Recovery |
4.2(1)SV1(4a) |
This feature was introduced. |
 Feedback