- New and Changed Information
- Preface
- Overview
- Configuring CDP
- Configuring the Domain
- Managing Server Connections
- Managing the Configuration
- Working with Files
- Managing Users
- Configuring NTP
- Configuring Local SPAN and ERSPAN
- Configuring SNMP
- Configuring NetFlow
- Configuring System Message Logging
- Configuring iSCSI Multipath
- Configuring VSM Backup and Recovery
- Virtualized Workload Mobility (DC to DC vMotion)
- Configuration Limits
- Index
Cisco Nexus 1000V System Management Configuration Guide, Release 4.2(1)SV1(4a)
Bias-Free Language
The documentation set for this product strives to use bias-free language. For the purposes of this documentation set, bias-free is defined as language that does not imply discrimination based on age, disability, gender, racial identity, ethnic identity, sexual orientation, socioeconomic status, and intersectionality. Exceptions may be present in the documentation due to language that is hardcoded in the user interfaces of the product software, language used based on RFP documentation, or language that is used by a referenced third-party product. Learn more about how Cisco is using Inclusive Language.
- Updated:
- May 7, 2014
Chapter: Configuring Local SPAN and ERSPAN
Configuring Local SPAN and ERSPAN
This chapter describes how to configure the local and encapsulated remote (ER) switched port analyzer (SPAN) feature to monitor traffic and includes the following topics:
Information About SPAN and ERSPAN
The Switched Port Analyzer (SPAN) feature (sometimes called port mirroring or port monitoring) allows network traffic to be analyzed by a network analyzer such as a Cisco SwitchProbe or other Remote Monitoring (RMON) probe.
SPAN lets you monitor traffic on one or more ports, or one or more VLANs, and send the monitored traffic to one or more destination ports where the network analyzer is attached.
This section includes the following topics:
SPAN Sources
The interfaces from which traffic can be monitored are called SPAN sources. These include Ethernet, virtual Ethernet, port-channel, port profile, and VLAN. When a VLAN is specified as a SPAN source, all supported interfaces in the VLAN are SPAN sources. When a port profile is specified as a SPAN source, all ports which inherit the port profile are SPAN sources. Traffic can be monitored in the receive direction, the transmit direction, or both directions for Ethernet and virtual Ethernet source interfaces.
Characteristics of SPAN Sources
A Local SPAN source has these characteristics:
- Can be port type Ethernet, virtual Ethernet, port channel, port profile, or VLAN.
- Cannot be a destination port or port profile.
- Can be configured to monitor the direction of traffic —receive, transmit, or both.
- Source ports can be in the same or different VLANs.
- For VLAN SPAN sources, all active ports in the source VLAN are included as source ports.
- Local SPAN sources must be on the same host (VEM) as the destination port.
- For port profile sources, all active interfaces attached to the port profile are included as source ports.
SPAN Destinations
SPAN destinations refer to the interfaces that monitor source ports. This section includes the following topics:
Characteristics of Local SPAN Destinations
Each local SPAN session must have at least one destination port (also called a monitoring port) that receives a copy of traffic from the source ports or VLANs. A destination port has these characteristics:
- Can be any physical or virtual Ethernet port, a port channel, or a port profile.
- Cannot be a source port or port profile.
- Is excluded from the source list and is not monitored if it belongs to a source VLAN of any SPAN session or a source port profile.
- Receives copies of transmitted and received traffic for all monitored source ports in the same VEM module. If a destination port is oversubscribed, it can become congested. This congestion can affect traffic forwarding on one or more of the source ports.
- Must not be private VLAN mode.
- A destination port can only monitor sources on the same host (VEM). See Figure 9-1, Local SPAN.
- Destination ports in access mode receive monitored traffic on all the VLANs.
- Destination ports in trunk mode receive monitored traffic only on the allowed VLANs in the trunk configuration.
Characteristics of ERSPAN Destinations
- An ERSPAN destination is specified by an IP address.
- In ERSPAN, the source SPAN interface and destination SPAN interface may be on different devices interconnected by an IP network. ERSPAN traffic is GRE-encapsulated. See Figure 9-2, ERSPAN.
Local SPAN
In Local SPAN, the source interface and destination interface are on the same VEM. The network analyzer is attached directly to the SPAN destination port. The SPAN source can be a port, a VLAN interface or port profile.The destination can be a port or port profile.
Figure 9-1 shows that traffic transmitted by host A is received on the SPAN source interface. Traffic (ACLs, QoS, and so forth) is processed as usual. Traffic is then replicated. The original packet is forwarded on toward host B. The replicated packet is then sent to the destination SPAN interface where the monitor is attached.
Local SPAN can replicate to one or more destination ports. Traffic can be filtered so that only traffic of interest is sent out the destination SPAN interface.
Local SPAN can monitor all traffic received on the source interface including BPDUs.

Encapsulated Remote SPAN
Encapsulated remote (ER) SPAN monitors traffic in multiple network devices across an IP network and sends that traffic in an encapsulated envelope to destination analyzers. In contrast, Local SPAN cannot forward traffic through the IP network. ERSPAN can be used to monitor traffic remotely. ERSPAN sources can be ports, VLANs, or port profiles.
In Figure 9-2, the ingress and egress traffic for host A are monitored using ERSPAN. Encapsulated ERSPAN packets are routed from host A through the routed network to the destination device where they are de-capsulated and forwarded to the attached network analyzer. The destination may also be on the same L2 network as the source.

Network Analysis Module
You can also use the Cisco Network Analysis Module (NAM) to monitor ERSPAN data sources for application performance, traffic analysis, and packet header analysis.
To use NAM for monitoring the Cisco Nexus 1000V ERSPAN data sources see the Cisco Nexus 1010 Network Analysis Module Installation and Configuration Note, 4.2 .
SPAN Sessions
You can create up to 64 total SPAN sessions (Local SPAN plus ERSPAN) on the VEM.
You must configure an ERSPAN session ID that is added to the ERSPAN header of the encapsulated frame to differentiate between ERSPAN streams of traffic at the termination box. You can also configure the range of flow ID numbers. For more information, see Configuring the Allowable ERSPAN Flow IDs.
When trunk ports are configured as SPAN sources and destinations, you can filter VLANs to send to the destination ports from among those allowed. Both sources and destinations must be configured to allow the VLANs.
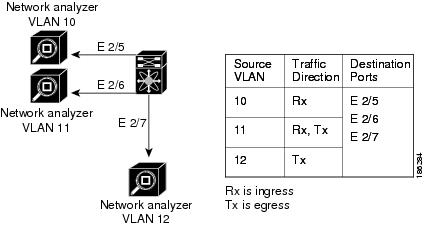
Figure 9-3 shows one example of a VLAN-based SPAN configuration in which traffic is copied from three VLANs to three specified destination ports. You can choose which VLANs to allow on each destination port to limit the traffic transmitted. In Figure 9-3, the device transmits packets from one VLAN at each destination port. The destinations in this example are trunks on which allowed VLANs are configured.

Note VLAN-based SPAN sessions cause all source packets to be copied to all destinations, whether the packets are required at the destination or not. VLAN traffic filtering occurs at transmit destination ports.
Figure 9-3 VLAN-based SPAN Configuration Example
SPAN Guidelines and Limitations
SPAN has the following configuration guidelines and limitations:
- A maximum of 64 SPAN sessions (Local SPAN plus ERSPAN) can be configured on the VSM.
- A maximum of 32 source VLANs are allowed in a session.
- A maximum of 32 destinations are allowed for a Local SPAN session.
- A maximum of 128 source interfaces are allowed in a session.

Caution Overload Potential
To avoid an overload on uplink ports, use caution when configuring ERSPAN, especially when sourcing VLANs.
To avoid an overload on uplink ports, use caution when configuring ERSPAN, especially when sourcing VLANs.
- A port can be configured in a maximum of 4 SPAN sessions.
- The destination port used in one SPAN session cannot also be used as the destination port for another SPAN session.
- You cannot configure a port as both a source and destination port.
- In a SPAN session, packets that source ports receive may be replicated even though they are not transmitted on the ports. The following are examples of this behavior:
Default Settings
Table 9-1 lists the SPAN default settings.
Configuring SPAN
This section describes how to configure SPAN and includes the following procedures.
- Configuring a Local SPAN Session
- Configuring an ERSPAN Port Profile
- Configuring an ERSPAN Session
- Shutting Down a SPAN Session
- Resuming a SPAN Session
- Verifying the SPAN Configuration
Configuring a Local SPAN Session
Use this procedure to configure a SPAN session.
Note If you are configuring ERSPAN, see the Configuring an ERSPAN Session.
BEFORE YOU BEGIN
- You are logged in to the CLI in EXEC mode.
- You know the number of the SPAN session you are going to configure.
- The source and destination ports are already configured in either access or trunk mode. For more information, see the Cisco Nexus 1000V Interface Configuration Guide, Release 4.2(1)SV1(4a) .
- SPAN sessions are created in the shut state by default.
- When you create a SPAN session that already exists, any additional configuration is added to that session. To make sure the session is cleared of any previous configuration, you can delete the session first (see Step 2, no monitor session).
- This procedure involves creating the SPAN session in Monitor Configuration mode; and then, optionally, configuring allowed VLANs in Interface Configuration mode.
SUMMARY STEPS
2.![]() no monitor session
session-number
no monitor session
session-number
3.![]() monitor session
session-number
monitor session
session-number
5.![]() source
{interface {type} {id | range} | vlan {id | range} | port-profile {
name}
} [
rx
|
tx
|
both
]
source
{interface {type} {id | range} | vlan {id | range} | port-profile {
name}
} [
rx
|
tx
|
both
]
6.![]() (Optional) Repeat Step 5 to configure additional SPAN sources.
(Optional) Repeat Step 5 to configure additional SPAN sources.
7.![]() (Optional)
filter vlan
{number | range}
(Optional)
filter vlan
{number | range}
8.![]() (Optional) Repeat Step 7 to configure all source VLANs to filter.
(Optional) Repeat Step 7 to configure all source VLANs to filter.
9.![]() destination {interface {type} {id } | port-profile
{
name}
}
destination {interface {type} {id } | port-profile
{
name}
}
10.![]() (Optional) Repeat Step 9 to configure all SPAN destination ports.
(Optional) Repeat Step 9 to configure all SPAN destination ports.
13.![]() (Optional) show monitor session session-number
(Optional) show monitor session session-number
DETAILED STEPS
monitor session session-number |
Creates a session with the given session number and places you in the CLI Monitor Configuration mode to further configure the session. |
|
source
{interface {type} {id} | n1000v(config-monitor)# source interface ethernet 2/1-3, ethernet 3/1 rx n1000v(config-monitor)# source interface port-channel 2 n1000v(config-monitor)# source interface vethernet 12 both |
For the specified session, configures the sources and the direction of traffic to monitor.
|
|
|
(Optional) Repeat Step 5 to configure additional SPAN sources. |
||
(Optional) For the specified SPAN session, configures the filter from among the source VLANs. |
||
|
(Optional) Repeat Step 7 to configure all source VLANs to filter. |
||
destination {interface {type} {id | range} | port-profile { name} } n1000v(config-monitor)# destination interface ethernet 2/5, ethernet 3/7 |
For the specified SPAN session, configures the destination(s) for copied source packets.
Note SPAN destination ports must already be configured as either access or trunk ports. |
|
|
(Optional) Repeat Step 9 to configure all SPAN destination ports. |
||
Enables the SPAN session. By default, the session is created in the shut state. |
||
(Optional) Exits Monitor Configuration mode and places you in CLI Configuration mode. |
||
(Optional) Displays the configured port including allowed VLANs. |
||
(Optional) Saves the running configuration persistently through reboots and restarts by copying it to the startup configuration. |
||
Configuring an ERSPAN Port Profile
Use this procedure to configure a port profile on the VSM to carry ERSPAN packets through the IP network to a remote destination analyzer.
BEFORE YOU BEGIN
- You are logged in to the CLI in EXEC mode.
- This configuration must be completed for all hosts in the vCenter Server.
- You know the name to be used for this port profile.
Note The port profile name is used to configure the VMKNIC. A VMKNIC is required on each ESX host to send ERSPAN encapsulated IP packets, and must have IP connectivity to the ERSPAN destination IP address.
- You know the name of the VMware port group to which this profile maps.
- You have the VMware documentation for adding a new virtual adapter.
- You have already created the system VLAN that sends IP traffic to the ERSPAN destination; and you know its VLAN ID which will be used in this configuration.
For more information about system port profiles, see the Cisco Nexus 1000V Port Profile Configuration Guide, Release 4.2(1)SV1(4) .
- The port profile used for ERSPAN must be configured for Layer 3 control. This procedure includes a step for making this configuration.
- Only one VM kernel NIC can be assigned to this Layer 3 control port profile per host.
- The port profile must be an access port profile. It cannot be a trunk port profile. This procedure includes steps to configure the port profile as an access port profile.
- For more information about creating a Layer 3 control port profile, see the Creating a Port Profile for Layer 3 Control.
DETAILED STEPS
Configuring an ERSPAN Session
Use this procedure to configure an ERSPAN session.
Note If you are configuring Local SPAN, see the Configuring a Local SPAN Session.
BEFORE YOU BEGIN
- You are logged in to the CLI in EXEC mode.
- You know the number of the SPAN session you are going to configure.
- You have already configured an ERSPAN-capable port profile on the VSM using the Configuring an ERSPAN Port Profile.
- Using the VMware documentation for adding a new virtual adapter, you have already configured the required VMKNIC on each of the ESX hosts. The VMKNIC must have IP connectivity to the ERSPAN destination IP address for sending ERSPAN encapsulated packets.
- SPAN sessions are created in the shut state by default.
- When you create a SPAN session that already exists, any additional configuration is added to that session. To make sure the session is cleared of any previous configuration, you can delete the session first (see Step 2, no monitor session).
- This procedure involves creating the SPAN session in ERSPAN source configuration mode (config-erspan-source).
SUMMARY STEPS
2.![]() no monitor session
session-number
no monitor session
session-number
3.![]() monitor session
session-number
type erspan-source
monitor session
session-number
type erspan-source
5.![]() source
{interface type {
number
|
range
} | vlan {
number
|
range
} | port-profile
name
}} [
rx
|
tx
|
both
]
source
{interface type {
number
|
range
} | vlan {
number
|
range
} | port-profile
name
}} [
rx
|
tx
|
both
]
6.![]() (Optional) Repeat Step 5 to configure additional ERSPAN sources.
(Optional) Repeat Step 5 to configure additional ERSPAN sources.
7.![]() (Optional)
filter vlan
{number | range}
(Optional)
filter vlan
{number | range}
8.![]() (Optional) Repeat Step 7 to configure all source VLANs to filter.
(Optional) Repeat Step 7 to configure all source VLANs to filter.
10.![]() (Optional)
ip ttl
ttl_value
(Optional)
ip ttl
ttl_value
11.![]() (Optional)
ip prec
ipp_value
(Optional)
ip prec
ipp_value
12.![]() (Optional)
ip dscp
dscp_value
(Optional)
ip dscp
dscp_value
14.![]() (Optional)
header-type
value
(Optional)
header-type
value
DETAILED STEPS
monitor session session-number type erspan-source |
Creates a session with the given session number and places you in the CLI ERSPAN Source Configuration mode. This configuration is saved in the running configuration. |
|
For the specified ERSPAN session, adds a description and saves it in the running configuration. |
||
source { interface type { number | range } | vlan { number | range } | port-profile name }} [ rx | tx | both ] n1000v(config-erspan-src)# source interface ethernet 2/1-3, ethernet 3/1 rx n1000v(config-erspan-src)# source interface port-channel 2 n1000v(config-erspan-src)# source interface vethernet 12 both n1000v(config-erspan-src)# source vlan 3, 6-8 tx n1000v(config-erspan-src)# source port-profile my_port_profile |
For the specified session, configures the source(s) and the direction of traffic to monitor, and saves them in the running configuration.
|
|
|
(Optional) Repeat Step 5 to configure additional ERSPAN sources. |
||
(Optional) For the specified ERSPAN session, configures the VLANs, VLAN lists, or VLAN ranges to be monitored; and saves this in the running configuration. On the monitor port, only the traffic from the VLANs which match the VLAN filter list are replicated to the destination. |
||
|
(Optional) Repeat Step 7 to configure all source VLANs to filter. |
||
Configures the IP address of the host to which the encapsulated traffic is sent in this monitor session and saves it in the running configuration. |
||
(Optional) Specifies the IP time-to-live value, from 1-255, for ERSPAN packets in this monitor session, and saves it in the running configuration. |
||
(Optional) Specifies the IP precedence value, from 0-7, for the ERSPAN packets in this monitor session, and saves it in the running configuration. |
||
(Optional) Specifies the IP DSCP value, from 0-63. for the ERSPAN packets in this monitor session, and saves it in the running configuration. |
||
(Optional) Specifies an MTU size (50 - 1500) for ERSPANed packets in this monitor session, and saves it in the running configuration. The 1500 MTU size limit includes a 50-byte overhead added to monitored packets by ERSPAN. Packets larger than this size are truncated. Note If the ERSPAN destination is a Cisco 6500 switch, truncated ERSPAN packets are dropped unless the no mls verify ip length consistent command is configured on the Cisco 6500. |
||
(Optional) Specifies the ERSPAN header type |
||
Adds an ERSPAN ID (1-1023) to the session configuration and saves it in the running configuration. The session ERSPAN ID is added to the ERSPAN header of the encapsulated frame and can be used at the termination box to differentiate between various ERSPAN streams of traffic. |
||
Enables the ERSPAN session and saves it in the running configuration. |
||
(Optional) Displays the ERSPAN session configuration as it exists in the running configuration. |
||
copy running-config startup-config n1000v(config-erspan-src)# copy running-config startup-config |
(Optional) Saves the running configuration persistently through reboots and restarts by copying it to the startup configuration. |
|
Shutting Down a SPAN Session
Use this procedure to discontinue the copying of packets for a SPAN session. You can discontinue copying packets from one source and destination; and then resume for another source and destination.
SUMMARY STEPS
From Global Configuration mode:
2.![]() monitor session
{session-number |
session-range
|
all
}
shut
monitor session
{session-number |
session-range
|
all
}
shut
4.![]() copy running-config startup-config
copy running-config startup-config
From Monitor Configuration mode:
2.![]() monitor session
{session-number |
session-range
|
all
}
[type erspan-source]
monitor session
{session-number |
session-range
|
all
}
[type erspan-source]
DETAILED STEPS
Resuming a SPAN Session
Use this procedure to resume the copying of packets for a SPAN session. You can discontinue copying packets from one source and destination; and then resume for another source and destination.
SUMMARY STEPS
From Global Configuration mode:
2.![]() no monitor session
{session-number |
session-range
|
all
}
shut
no monitor session
{session-number |
session-range
|
all
}
shut
4.![]() copy running-config startup-config
copy running-config startup-config
From Monitor Configuration mode:
2.![]() monitor session
{session-number |
session-range
|
all
}
[type erspan-source]
monitor session
{session-number |
session-range
|
all
}
[type erspan-source]
DETAILED STEPS
Configuring the Allowable ERSPAN Flow IDs
Use this procedure to restrict the allowable range of flow IDs that can be assigned to ERSPAN sessions.
DETAILED STEPS
Verifying the SPAN Configuration
To verify the SPAN configuration, use the following commands:
Example Configurations
This section includes the following example configurations:
Example Configuration for a SPAN Session
To configure a SPAN session, follow these steps:
Step 1![]() Configure destination ports in access or trunk mode, and enable SPAN monitoring.
Configure destination ports in access or trunk mode, and enable SPAN monitoring.
Step 2![]() Configure a SPAN session.
Configure a SPAN session.
Additional References
For additional information related to implementing SPAN, see the following sections:
 Feedback