Cisco Smart+Connected Spaces User Guide
Bias-Free Language
The documentation set for this product strives to use bias-free language. For the purposes of this documentation set, bias-free is defined as language that does not imply discrimination based on age, disability, gender, racial identity, ethnic identity, sexual orientation, socioeconomic status, and intersectionality. Exceptions may be present in the documentation due to language that is hardcoded in the user interfaces of the product software, language used based on RFP documentation, or language that is used by a referenced third-party product. Learn more about how Cisco is using Inclusive Language.
- Updated:
- February 5, 2015
Chapter: Flexible Working by Using Personalized Spaces
- Overview
- Using the Web Portal for Workspaces
- About the Portal
- Understanding the User Interface
- Viewing the Booking Calendar
- Booking a Workspace or Office
- Saving a Search and Booking from a Saved Search
- Copying a Booking
- Editing a Booking
- Deleting a Booking
- Creating a Proxy Booking
- Checking In Using the Web Portal for Workspaces
- Checking Out Using the Web Portal for Workspaces
- Using Kiosks
- Using Cisco IP Phones
- Personalizing a Workspace or Office
Flexible Working by Using Personalized Spaces
This chapter describes how you can book and manage workspaces and offices by using the web portal for workspaces, kiosks, and Cisco IP Phones.
Overview
The Smart+Connected Spaces solution allows you to manage the utilization of workspaces and offices and personalize them according to your preferences. You can book these spaces for yourself or other users, check in and check out, and report any issue that you face while using the workspaces and offices. The interfaces that you use to perform these tasks are:
Using the Web Portal for Workspaces
- About the Portal
- Understanding the User Interface
- Viewing the Booking Calendar
- Booking a Workspace or Office
- Saving a Search and Booking from a Saved Search
- Copying a Booking
- Editing a Booking
- Deleting a Booking
- Creating a Proxy Booking
About the Portal
The web portal for workspaces allows you to search for the available workspaces or offices based on your requirements such as date, time, location, workspace type, and so on and reserve them. You can also view the current and upcoming workspace bookings, personalize your workspace, check in and check out of a reserved workspace or office, and raise cases to report the faults in the workspaces and offices.
Logging In
You can log in to the web portal for workspaces by using any of the browsers certified for the application. The portal can be accessed using http:// host-name : port /ipsapp. You can log in using your enterprise login credentials.
To log in to the web portal for workspaces, perform the following steps:
Step 1![]() Enter the URL in the address field of the web browser, and click Enter.
Enter the URL in the address field of the web browser, and click Enter.
The login page of the web portal for workspaces appears.
Step 2![]() Enter the username and password.
Enter the username and password.
The home page of the web portal for workspaces appears. It displays your booking calendar. By default, the Day View tab with the current day is displayed.
After logging in, if you do not use the portal for a while, your browsing session will time out. In such a situation, you must re-log in to the portal.
Logging Out
To log out of the portal, click the Logout option displayed in the top right corner of the page, next to your username.
Understanding the User Interface
Figure 3-1 User Interface of the Web Portal for Workspaces
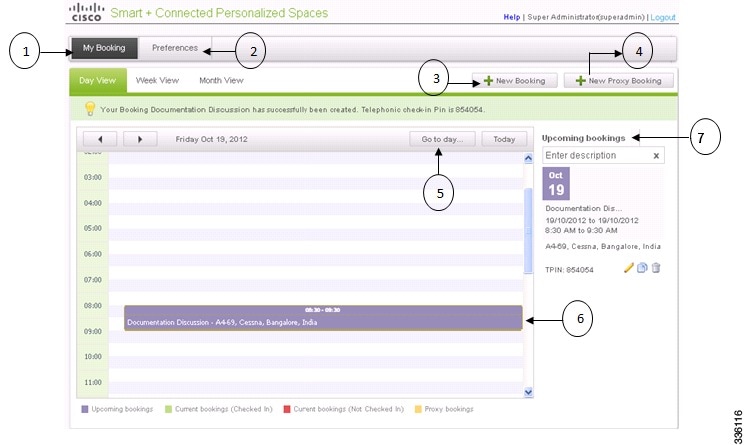
Booking Legend
Table 3-2 describes the available color code indicators that are displayed on the booking bar.
|
|
|
|---|---|

|
|

|
|

|
|

|
Viewing the Booking Calendar
When you log in to the web portal for workspaces, you can view your booking calendar for a particular day, week, or month.
To view the booking calendar, perform the following steps:
Step 1![]() In the home page of the web portal for workspaces, choose the My Bookings > Day View, Week View, or Month View tab.
In the home page of the web portal for workspaces, choose the My Bookings > Day View, Week View, or Month View tab.
Your booking details for the current day, week, or month will be displayed.
Step 2![]() (Optional) Click Go to day, Go to week, or Go to month and choose the required date, week, or month from the calendar.
(Optional) Click Go to day, Go to week, or Go to month and choose the required date, week, or month from the calendar.

Note![]() Either of the three buttons will be available depending on the choice that you made in Step 1, that is, the current tab that is open.
Either of the three buttons will be available depending on the choice that you made in Step 1, that is, the current tab that is open.
The booking details are displayed for the selected time period.
Booking a Workspace or Office
The web portal for workspaces allows you to search for and book workspaces and offices. You can also save your search results to help you book a nearby workspace or office the next time, if your first choice of a workspace or office has already been booked by someone else.
Booking a workspace or office is a three-step process, as reflected by the following three tabs in the Booking Details page:
To book a workspace or office, perform the following steps:
Step 1![]() In the home page of the web portal for workspaces, click New Booking.
In the home page of the web portal for workspaces, click New Booking.
The Booking Details page appears.
Step 2![]() In the Booking Details page, do the following:
In the Booking Details page, do the following:
a.![]() In the Description field, enter a description for your booking.
In the Description field, enter a description for your booking.
b.![]() In the From and To date fields, click the calendar
In the From and To date fields, click the calendar  icon to select the start date and end date for your booking.
Note![]() You cannot choose an earlier date in the calendar.
You cannot choose an earlier date in the calendar.
c.![]() Check the Whole day booking check box to book the workspace or office for an entire day. Alternatively, choose the required timings from the From and To time drop-down lists.
Check the Whole day booking check box to book the workspace or office for an entire day. Alternatively, choose the required timings from the From and To time drop-down lists.
Note![]() You cannot choose a earlier time from the drop-down list.
You cannot choose a earlier time from the drop-down list.
d.![]() From the Country, City, and Campus drop-down lists, choose your location.
From the Country, City, and Campus drop-down lists, choose your location.
e.![]() Based on your workspace requirement, check either the Workspace or Office check box.
Based on your workspace requirement, check either the Workspace or Office check box.
f.![]() Click the appropriate Services icon to choose the type of services that you want for your workspace or office.
Click the appropriate Services icon to choose the type of services that you want for your workspace or office.


g.![]() Click Search Spaces to search for the available workspaces and offices for the defined criteria, otherwise click Cancel to cancel the search. If you want to clear the entered booking details, click Reset.
Click Search Spaces to search for the available workspaces and offices for the defined criteria, otherwise click Cancel to cancel the search. If you want to clear the entered booking details, click Reset.
The search results for the available workspaces and offices appear in the location hierarchy tree in the left pane, and the booking schedule appears in the right pane.
Step 3![]() In the Select a Space page, do the following:
In the Select a Space page, do the following:
a.![]() (Optional) To edit the search criteria, such as date range, time range, location, room type, or service, click the pencil
(Optional) To edit the search criteria, such as date range, time range, location, room type, or service, click the pencil  edit icon next to the defined criterion, then edit the criterion, and click OK. The location hierarchy tree in the left pane displays the new search results.
b.![]() Alternatively, if you want to edit the search criteria and search for a workspace or office again, click Modify Search to return to the Booking Details page.
Alternatively, if you want to edit the search criteria and search for a workspace or office again, click Modify Search to return to the Booking Details page.
Note![]() You can also click a workspace or office in the location hierarchy and then click Mark as Favorite so that after checking the Show only
You can also click a workspace or office in the location hierarchy and then click Mark as Favorite so that after checking the Show only  check box, only your preferred workspaces and offices are displayed in the search results.
c.![]() Select the required workspace or office in the left pane, and click Book in the right pane.
Select the required workspace or office in the left pane, and click Book in the right pane.
The Book the Space page appears.
Step 4![]() In the Book the Space page, do the following:
In the Book the Space page, do the following:
a.![]() Check the Personalize this space check box, and select a preference profile from the Saved Preferences list in the right pane.
Check the Personalize this space check box, and select a preference profile from the Saved Preferences list in the right pane.
The preference setting details appear.
Note![]() If do not have any previously saved preferences, click the Add New Preference link. If you want to add a new preference setting other than those available in the Saved Preferences list, click the Preference tab. For more information on adding preferences, see the “Adding Preferences” section.
If do not have any previously saved preferences, click the Add New Preference link. If you want to add a new preference setting other than those available in the Saved Preferences list, click the Preference tab. For more information on adding preferences, see the “Adding Preferences” section.
You are redirected to the home page and the booking appears in the calendar view. The booking details are also shown in the Upcoming Bookings pane along with a telephonic check-in PIN number. This TPIN number is also sent to you through email. You are required to log in to the Smart+Connected Spaces application through the Cisco IP Phone only.
Note![]() You can also book a workspace or office by dragging the cursor over the calendar in the My Bookings calendar page. Release the cursor, click Yes for the prompt to book the workspace or office, and enter the appropriate data in the Booking Details page that appears.
You can also book a workspace or office by dragging the cursor over the calendar in the My Bookings calendar page. Release the cursor, click Yes for the prompt to book the workspace or office, and enter the appropriate data in the Booking Details page that appears.
Saving a Search and Booking from a Saved Search
To save a search and book from a saved search, perform the following steps:
Step 1![]() In the home page of the web portal for workspaces, click New Booking.
In the home page of the web portal for workspaces, click New Booking.
The Booking Details page appears.
Step 2![]() In the Booking Details page, enter the workspace or office search criteria. For more information, see the “Booking a Workspace or Office” section.
In the Booking Details page, enter the workspace or office search criteria. For more information, see the “Booking a Workspace or Office” section.
The Select a Space page appears. This page displays the workspace search results in the location hierarchy tree in the left pane.
Step 3![]() Click Save Search to save the search result of the available workspaces and offices.
Click Save Search to save the search result of the available workspaces and offices.
Step 4![]() Click Save in the confirmation dialog box that appears.
Click Save in the confirmation dialog box that appears.
This saves the data for the following fields:
The workspace and office search result entry is saved in the Saved Searches column in the Booking Details page. You can refer to this search result entry to book the available workspaces and offices.
(Optional) Click Cancel if you do not wish to save the search results.
Step 5![]() To book a workspace or office from a previously saved search, click the appropriate workspace or office in the Saved Searches list on the Booking Details page and edit the details as required.
To book a workspace or office from a previously saved search, click the appropriate workspace or office in the Saved Searches list on the Booking Details page and edit the details as required.
Note![]() If the date or time for the saved space precedes the current date, edit the date and time to search for the currently available workspaces or offices. You cannot, however, book a workspace or office for more than the configured number of days in advance.
If the date or time for the saved space precedes the current date, edit the date and time to search for the currently available workspaces or offices. You cannot, however, book a workspace or office for more than the configured number of days in advance.
Step 6![]() Book the workspace or office, if available.
Book the workspace or office, if available.
Copying a Booking
The Smart+Connected Spaces solution allows you to copy or duplicate a previously booked workspace or office.
To duplicate your booking, perform the following steps:
Step 1![]() In the home page of the web portal for workspaces, in the Upcoming Bookings pane, click the copy
In the home page of the web portal for workspaces, in the Upcoming Bookings pane, click the copy  icon for the booking item that you want to duplicate.
The Copy Booking page appears with the pre-populated details of the booking that you want to duplicate.
Note![]() If you have logged in as an administrator or a proxy user, a message appears prompting you to copy the booking either for a proxy user or for self. Click Self, if you want to copy the booking for yourself, otherwise click Proxy User if you want to copy the booking for another user.
If you have logged in as an administrator or a proxy user, a message appears prompting you to copy the booking either for a proxy user or for self. Click Self, if you want to copy the booking for yourself, otherwise click Proxy User if you want to copy the booking for another user.
Step 2![]() Update the details for your new booking, for example, the date and time. If it is a proxy booking, then you must enter the user ID of the proxy user.
Update the details for your new booking, for example, the date and time. If it is a proxy booking, then you must enter the user ID of the proxy user.
Step 3![]() Click Check Availability to check if the workspace or office is available for the specified period.
Click Check Availability to check if the workspace or office is available for the specified period.
A message indicating the availability status appears. An error message appears if the workspace or office is unavailable.
Step 4![]() (Optional) If you want to select a nearby space, click the workspace or office link in the Nearest Available Spaces pane.
(Optional) If you want to select a nearby space, click the workspace or office link in the Nearest Available Spaces pane.
Step 5![]() (Optional) Click Search for Another Space to search for a workspace or office on a different floor.
(Optional) Click Search for Another Space to search for a workspace or office on a different floor.
Step 6![]() Click Revert to Previous to retrieve the original pre-populated booking details.
Click Revert to Previous to retrieve the original pre-populated booking details.
Step 7![]() (Optional) Click Cancel to cancel copying the current booking details, and to return to the My Booking page.
(Optional) Click Cancel to cancel copying the current booking details, and to return to the My Booking page.
Step 8![]() Click I am Done to complete your booking.
Click I am Done to complete your booking.
The duplicate booking item now appears in the Upcoming Bookings pane in My Bookings page. A confirmation message that appears displays a telephonic check-in PIN number.
Note![]() Alternatively, to duplicate a booking, click New Booking, and in the Booking Details page, in the Repeat Bookings column, click the relevant booking item. You can then update the date and other criteria to search and book the currently available workspaces or offices.
Alternatively, to duplicate a booking, click New Booking, and in the Booking Details page, in the Repeat Bookings column, click the relevant booking item. You can then update the date and other criteria to search and book the currently available workspaces or offices.
Editing a Booking
To edit an existing booking, perform the following steps:
Step 1![]() In the home page of the web portal for workspaces, in the Upcoming Bookings pane, click the pencil edit icon for the required booking. You can also enter the description in the Search field to search for other booking entries.
In the home page of the web portal for workspaces, in the Upcoming Bookings pane, click the pencil edit icon for the required booking. You can also enter the description in the Search field to search for other booking entries.
The Edit Booking page appears.
Step 2![]() Edit the booking parameters, such as the start date, end date, start time, end time, room type, and the services.
Edit the booking parameters, such as the start date, end date, start time, end time, room type, and the services.
For more information on the Booking Details fields, see the “Booking a Workspace or Office” section.
Note![]() You may choose to edit only the description for the booking, while retaining the same booking criteria.
You may choose to edit only the description for the booking, while retaining the same booking criteria.
Step 3![]() Click Check Availability to check if the workspace or office is available for the specified period.
Click Check Availability to check if the workspace or office is available for the specified period.
A message indicating the availability status appears. An error message appears if the workspace or office is unavailable.
Step 4![]() (Optional) If you want to select a nearby space, click the workspace or office link in the Nearest Available Spaces column.
(Optional) If you want to select a nearby space, click the workspace or office link in the Nearest Available Spaces column.
Step 5![]() (Optional) Click Search for Another Space to search for a workspace or office from another floor.
(Optional) Click Search for Another Space to search for a workspace or office from another floor.
Step 6![]() Click Revert to Previous to revert to the original pre-populated booking details.
Click Revert to Previous to revert to the original pre-populated booking details.
Step 7![]() (Optional) Click Cancel Edit to cancel editing the current booking details, and to return to the My Booking Calendar home page.
(Optional) Click Cancel Edit to cancel editing the current booking details, and to return to the My Booking Calendar home page.
The page displays the edited booking details updated successfully for the specified dates and time range, with the booking details for your chosen workspace or office.
Note![]() While you can edit the details of an upcoming booking, you cannot edit or delete a booking that has already been checked in.
While you can edit the details of an upcoming booking, you cannot edit or delete a booking that has already been checked in.
Deleting a Booking
To delete an existing booking, perform the following steps:
Step 1![]() In the home page of the web portal for workspaces, in the Upcoming Bookings pane, click the pencil edit icon for the required booking. You can also enter the description in the Search field to search for other booking entries.
In the home page of the web portal for workspaces, in the Upcoming Bookings pane, click the pencil edit icon for the required booking. You can also enter the description in the Search field to search for other booking entries.
The Edit Booking page appears.
Alternatively, you can click the delete  icon next to a booking item in the Upcoming Bookings list, to delete that booking item.
A confirmation message asking you to confirm the deletion appears.
Note![]() The booking items do not appear in the Upcoming Bookings list after you delete it.
The booking items do not appear in the Upcoming Bookings list after you delete it.
Creating a Proxy Booking
The Proxy booking feature allows you to book a workspace on behalf of another user. This feature is available for you if you have been granted proxy booking privileges by the Smart+Connected Spaces administrator.
To create a proxy booking, perform the following steps:
Step 1![]() In the home page of the web portal for workspaces, click New Proxy Booking.
In the home page of the web portal for workspaces, click New Proxy Booking.
The Proxy Bookings Details page appears.
Step 2![]() In the Proxy Booking Details page, do the following:
In the Proxy Booking Details page, do the following:
a.![]() In the Description field, enter a description for your booking.
In the Description field, enter a description for your booking.
b.![]() In the For User field, enter the name or ID of the user for whom you want to create a booking.
In the For User field, enter the name or ID of the user for whom you want to create a booking.
A list of relevant names appears as you enter the alphabetic characters of the username.
c.![]() (Optional) Click the Advanced Search link.
(Optional) Click the Advanced Search link.
A list of relevant users appears, as you enter the characters in the filter field.
d.![]() Click the User ID link to choose the required user.
Click the User ID link to choose the required user.
The chosen user ID is populated in the For User field.
e.![]() In the From and To date fields, click the calendar
In the From and To date fields, click the calendar  icon to select the start date and the end date for your booking.
Note![]() You cannot choose an earlier date in the calendar.
You cannot choose an earlier date in the calendar.
f.![]() Check the Whole day booking check box to book the workspace or office for an entire day. Alternatively, choose the required timings from the From and To time drop-down lists.
Check the Whole day booking check box to book the workspace or office for an entire day. Alternatively, choose the required timings from the From and To time drop-down lists.
Note![]() You cannot choose an earlier time from the drop-down list.
You cannot choose an earlier time from the drop-down list.
g.![]() From the Country, City, and Campus drop-down lists, choose your location.
From the Country, City, and Campus drop-down lists, choose your location.
h.![]() Based on your workspace or office requirement, check either the Workspace or Office check box.
Based on your workspace or office requirement, check either the Workspace or Office check box.
i.![]() Click the appropriate Services icon to choose the type of services that you want for your workspace or office.
Click the appropriate Services icon to choose the type of services that you want for your workspace or office.
j.![]() Click Search Spaces to search for the available workspaces or offices for the defined criteria, otherwise click Cancel to cancel the search. If you want to clear the entered booking details, click Reset.
Click Search Spaces to search for the available workspaces or offices for the defined criteria, otherwise click Cancel to cancel the search. If you want to clear the entered booking details, click Reset.
The search results for the available workspaces or office appear in the location hierarchy tree in the left pane, and the booking schedule appears in the right pane.
Step 3![]() On the Select a Space page, do the following:
On the Select a Space page, do the following:
a.![]() (Optional) To edit the search criteria, such as proxy user ID, date range, time range, location, room type, or service, click the pencil edit icon next to the defined criterion, then edit the criterion, and click OK.
(Optional) To edit the search criteria, such as proxy user ID, date range, time range, location, room type, or service, click the pencil edit icon next to the defined criterion, then edit the criterion, and click OK.
The location hierarchy tree in the left pane displays the new applicable search results on editing any of the search criteria.
b.![]() Alternatively, if you want to edit your workspace or office search criteria to search for a workspace or office again, click Modify Search to return to the Booking Details page.
Alternatively, if you want to edit your workspace or office search criteria to search for a workspace or office again, click Modify Search to return to the Booking Details page.
Note![]() You can also click a workspace or office in the location hierarchy and then click Mark as Favorite so that after checking the Show only check box, only your preferred workspaces and offices are displayed in the search results.
You can also click a workspace or office in the location hierarchy and then click Mark as Favorite so that after checking the Show only check box, only your preferred workspaces and offices are displayed in the search results.
c.![]() Select the appropriate workspace or office in the left pane, and click Book in the right pane.
Select the appropriate workspace or office in the left pane, and click Book in the right pane.
The Book the Space page appears.
Step 4![]() In the Book the Space page, do the following:
In the Book the Space page, do the following:
a.![]() Check the Personalize this Space check box, and select a preference profile from the Saved Preferences list in the right pane.
Check the Personalize this Space check box, and select a preference profile from the Saved Preferences list in the right pane.
The preference setting details appear.
Note![]() If do not have any previously saved preferences, click the Add New Preference link. If you want to add a new preference setting other than those available in the Saved Preferences list, click the Preference tab. For more information on adding preferences, see the “Adding Preferences” section.
If do not have any previously saved preferences, click the Add New Preference link. If you want to add a new preference setting other than those available in the Saved Preferences list, click the Preference tab. For more information on adding preferences, see the “Adding Preferences” section.
The booking confirmation message appears.
Checking In Using the Web Portal for Workspaces
After you book a Smart+Connected Spaces workspace or office, you must check in to the booked workspace or office. You can check in to a workspace or an office to use it for the maximum allowed check in duration (normally eight hours). Checking in automatically signs into your Extension Mobility on the Cisco IP Phone in the workspace or office (if configured) and updates your dynamic workplace location on the Smart+Connected Spaces kiosk.
To check in to a booked workspace or office using the web portal, perform the following steps:
Step 1![]() In the home page of the web portal for workspaces, click Checkin.
In the home page of the web portal for workspaces, click Checkin.
Note![]() If you do not check in to the workspace or office at this scheduled time, the system displays the auto-cancellation timelines.
If you do not check in to the workspace or office at this scheduled time, the system displays the auto-cancellation timelines.
The Checkin page appears with a message to validate your preference for your booking, and to proceed to check in.
Step 2![]() (Optional) Choose another preference from the Personalize this space drop-down list.
(Optional) Choose another preference from the Personalize this space drop-down list.
Step 3![]() Click Checkin to check in to the workspace or office.
Click Checkin to check in to the workspace or office.
A successful check-in confirmation message appears with a confirmation of your selected preference, and the reservation in the booking bar within the calendar is highlighted in green. The remaining time for auto checkout is displayed every minute, as per your booking schedule.
If required, you can edit the service preference settings in your checked in workspace or office, such as lights control, air conditioning, or blinds. These settings are applicable only during the current meeting duration.
Note![]() If you click Change Settings when a booked workspace or office does not have devices/configuration set for it, then an error message indicating the unavailability of services appears.
If you click Change Settings when a booked workspace or office does not have devices/configuration set for it, then an error message indicating the unavailability of services appears.
Checking Out Using the Web Portal for Workspaces
To check out of a workspace or office by using the web portal for workspaces, click Checkout in the Check In page to check out from your current workspace or office. A checkout confirmation message that appears indicates a successful checkout.
Using Kiosks
You can use Smart+Connected Spaces kiosks to search for workspaces and check in to them. Additionally, the kiosk web portal provides you with the option to check out from workspaces. For more information, see the“Understanding the Kiosk Interface” section in Chapter 2, “Collaborating by Using Meeting Spaces”.
- Searching for Workspaces Using Kiosks
- Checking In Using Kiosks
- Checking Out Using the Kiosk Web Portal
Searching for Workspaces Using Kiosks
To search for workspaces by using a kiosk, perform the following steps:
Step 1![]() Tap the Search tab on the kiosk.
Tap the Search tab on the kiosk.
The tab details area displays the Facilities, People, Workspaces, and Conference/Telepresence Rooms search panes.
Step 2![]() In the Facilities pane, tap inside the Building field and choose a building. Choose a floor from the drop-down list that appears after you choose the building. This is required because the workspace is searched for only in the selected building and floor.
In the Facilities pane, tap inside the Building field and choose a building. Choose a floor from the drop-down list that appears after you choose the building. This is required because the workspace is searched for only in the selected building and floor.
Step 3![]() In the Workspaces pane, tap inside the Name/ID field. Enter the name or ID of the workspace that you want to search for and tap Search. (Alternatively) Tap Search without entering any data in the Name/ID field to view the list of all of the workspaces on the floor.
In the Workspaces pane, tap inside the Name/ID field. Enter the name or ID of the workspace that you want to search for and tap Search. (Alternatively) Tap Search without entering any data in the Name/ID field to view the list of all of the workspaces on the floor.
The search results appear in place of the floor plan and display the workspace icon, workspace type, floor where it is located, locate icon, and the Check-In button.
Step 4![]() Tap the locate
Tap the locate  icon in the result view.
The floor plan appears with a dialog box showing the exact location of the workspace. The dialog box displays the workspace name/ID, availability status, and the Cancel button. Tap the Check-in button to check into the workspace. The Check-in button is displayed only for the available workspaces.
Step 5![]() (Alternatively) Tap the Check-In button in the result view to directly check into the workspace.
(Alternatively) Tap the Check-In button in the result view to directly check into the workspace.
The updated floor plan appears with the workspace shown in red indicating that it is occupied. Tapping the workspace opens a dialog box that shows the room name/ID, the room status as ‘Occupied’, and your details. Tap Cancel to close the dialog box.
Checking In Using Kiosks
After you check into a workspace or an office, the icon for that workspace or office appears in red in the floor plan displayed on the kiosk indicating that it is occupied. If you or another employee taps on the workspace or office in the floor plan, the dialog box shows that you have occupied the workspace or office. Details such as your photograph (if available), user ID, designation, and the team to which you belong are displayed.
To check into a workspace or an office, perform the following steps:
Step 1![]() Tap the Workspaces or the Offices tab on the default view (the floor plan and the details of the location where the kiosk is placed) depending on whether you want to occupy a workspace or an office.
Tap the Workspaces or the Offices tab on the default view (the floor plan and the details of the location where the kiosk is placed) depending on whether you want to occupy a workspace or an office.
The list of workspaces or offices appears. It displays the following details:
- Vacant, Occupied, and Available Soon—The number of reservable workspaces or offices with each of the three statuses are displayed with a green icon for available, red for occupied, and yellow for the workspaces or offices that will be available soon.
- List of Workspaces or Offices—All of the workspaces or offices on the floor are listed. The workspace or office name and the status is displayed for the available workspaces or offices. For the occupied workspaces or offices, the employee name, ID, and the photograph of the occupier (if available), and Cisco Jabber status icon is also displayed. For the workspaces or offices that cannot be reserved, the grey icon and the status ‘Not Reservable’ is displayed.
All of the workspaces or offices get highlighted in the floor plan and the conference/TP rooms appear dimmed.
Step 2![]() (Alternatively) Navigate to another floor in the building where you want to check in by using the floor navigation button and tap the Workspaces or Offices tab. If you want to check into a workspace or office in another building, navigate to the building using the Search tab and then tap the Workspaces or Offices tab to check into the required workspace or office.
(Alternatively) Navigate to another floor in the building where you want to check in by using the floor navigation button and tap the Workspaces or Offices tab. If you want to check into a workspace or office in another building, navigate to the building using the Search tab and then tap the Workspaces or Offices tab to check into the required workspace or office.
Step 3![]() Tap and drag the list to scroll it and tap any available workspace or office.
Tap and drag the list to scroll it and tap any available workspace or office.
A dialog box appears in the floor plan indicating where the workspace or office is located. It displays the workspace or office ID and the status ‘Available’ along with a green icon indicating availability. The Check-in, Route, and Close buttons are also displayed.
Step 4![]() Tap Check-in in the dialog box.
Tap Check-in in the dialog box.
Step 5![]() Enter your employee ID or user ID (as enabled by the administrator for checking in using kiosks) and your kiosk PIN in the dialog that appears, using the onscreen keyboard. (Optional) You can swipe your badge to check in.
Enter your employee ID or user ID (as enabled by the administrator for checking in using kiosks) and your kiosk PIN in the dialog that appears, using the onscreen keyboard. (Optional) You can swipe your badge to check in.
Note![]() Either the badge swipe or the kiosk PIN option is available depending on what is configured by your administrator.
Either the badge swipe or the kiosk PIN option is available depending on what is configured by your administrator.
A dialog box confirming the check in appears and displays the following:
Checking Out Using the Kiosk Web Portal
Checking out of the workspace or office makes it available for other users and displays it in green on the floor plan to indicate availability. The check out can be either automatic, thorough the Smart+Connected Spaces kiosk web portal, the web portal for workspaces, or a Cisco IP Phone. When you are checked out, the Recent Activities list displays this activity and shows the place and time of the check out.
You are automatically checked out of a checked in workspace or office when you check into another workspace or offices. The Recent Activities list shows the details the latest workspace or office that you have checked into without displaying any information about the check out from the previous workspace or office.
You are automatically checked out of a checked in workspace or office after the lapse of a specific time period that has been configured by the Smart+Connected Spaces administrator. The workspace or office becomes available again and the Recent Activities list displays the details of your check out from the workspace or office.
Using Cisco IP Phones
Checking In Using a Cisco IP Phone
To check in to a booked workspace or office by using a Cisco IP Phone available at the workspace or office, perform the following steps:
Step 1![]() Access the Smart+Connected Spaces Services menu on the Cisco IP Phone.
Access the Smart+Connected Spaces Services menu on the Cisco IP Phone.
The Cisco IP Phone home page appears. For more information on using Cisco IP Phone, see the “Using Cisco IP Phones” section in Chapter 2, “Collaborating by Using Meeting Spaces”.
Note![]() If you have no booking for the workspace or office at the given time, the Cisco IP Phone prompts you to visit (http://host-name:port/ipsapp) from your web browser to create a booking first.
If you have no booking for the workspace or office at the given time, the Cisco IP Phone prompts you to visit (http://host-name:port/ipsapp) from your web browser to create a booking first.
In the Check In field, enter your user ID and TPIN that you received via email at the time of booking, and tap Check In.
The system validates your credentials, and the Cisco IP Phone checks you in to the workspace or office. The page displays your location, the booking time period, and the description of your booking.
Note![]() If the chosen workspace is already booked by another user, the Cisco IP Phone denies access.
If the chosen workspace is already booked by another user, the Cisco IP Phone denies access.
If required, you can edit the service preference settings in your checked-in workspace or office by clicking the Change Settings button. For example, for lights control, blinds, or air conditioner. These settings are applicable only during the current meeting duration. For more information, see the “Customizing the Workspace or Office Settings” section.
Checking Out Using a Cisco IP Phone
To check out from your currently checked-in workspace or office using a Cisco IP Phone, tap the  checkout icon. A checkout confirmation message indicating a successful check out appears.
Personalizing a Workspace or Office
You can personalize your workspace or office settings by setting your preference for the available building system services, such as for dimmers, air conditioner, light setting controls, digital signage, and blinds. Your personal preference settings are saved as a profile that you can choose to be activated when you check in to a workspace or office.
Adding Preferences
To add a preference, perform the following steps:
Step 1![]() In the home page of the web portal for workspaces, click the Preferences tab.
In the home page of the web portal for workspaces, click the Preferences tab.
The list of Saved Preferences appears in the left pane, and the right pane displays the preference setting details.
Note![]() If you want to make a particular preference profile your default preference, check the Make this my default preference check box.
If you want to make a particular preference profile your default preference, check the Make this my default preference check box.
Step 2![]() Click Add a New Preference.
Click Add a New Preference.
Step 3![]() Enter a name in the Preference Name field.
Enter a name in the Preference Name field.
Step 4![]() To set your preferences, click either the Open or Close radio button for blinds, and click either the On or Off radio buttons for the lights control and digital signage, and drag the slider to adjust the brightness percentage for the dimmer, and the temperature for the air conditioner, as desired.
To set your preferences, click either the Open or Close radio button for blinds, and click either the On or Off radio buttons for the lights control and digital signage, and drag the slider to adjust the brightness percentage for the dimmer, and the temperature for the air conditioner, as desired.
Step 5![]() Click Save Preference to save your new preference.
Click Save Preference to save your new preference.
A confirmation message stating that the new preference is added appears.
Editing Preferences
To edit an existing preference, perform the following steps:
Step 1![]() In the home page of the web portal for workspaces, click the Preferences tab.
In the home page of the web portal for workspaces, click the Preferences tab.
Step 2![]() In the left pane, select the preference profile that you want to edit, and change the preference settings in the right pane.
In the left pane, select the preference profile that you want to edit, and change the preference settings in the right pane.
Step 3![]() Click Save Preference to save the edited preference profile.
Click Save Preference to save the edited preference profile.
Deleting Preferences
To delete an existing preference profile, perform the following steps:
Step 1![]() On the home page of the web portal for workspaces, click the Preferences tab.
On the home page of the web portal for workspaces, click the Preferences tab.
Step 2![]() In the left pane, select the preference profile that you want to delete, and click Delete in the upper right corner.
In the left pane, select the preference profile that you want to delete, and click Delete in the upper right corner.
A confirmation message asking you to confirm the deletion appears.
Note![]() You cannot delete a preference profile that is associated with a booking.
You cannot delete a preference profile that is associated with a booking.
Step 3![]() Click Yes to delete the preference.
Click Yes to delete the preference.
Step 4![]() (Optional) Click No to cancel the deletion.
(Optional) Click No to cancel the deletion.
Managing Signage Content
The Digital Signage Settings feature allows you to manage the content that you want to display at your workspace or office, such as images, messages, and the layout. For example, the photographs on a digital signage.
Types of Digital Signage Layouts
The content that you add for the digital signage can be displayed based on the layout that you choose while adding this content.
The types of layout available are as follows:
The New Centric, Photo Centric, Notes Centric, and Minimalistic layouts allow you to add RSS feeds, notes, and images. While the Schedule Centric layout allows you to display your upcoming meeting schedule, along with the RSS feeds, notes, and images. By default, all of these layouts display the current time, date, and location.
Enabling and Adding Digital Signage
To enable digital signage and add digital signage content, perform the following steps:
Step 1![]() Choose the Preferences > Digital Signage Settings tab.
Choose the Preferences > Digital Signage Settings tab.
The Digital Signage Settings page appears.
Step 2![]() Click the type of layout in the Layout Types pane.
Click the type of layout in the Layout Types pane.
The corresponding layout is displayed in the left pane.
Step 3![]() In the Slideshow pane, click Add and then click OK in the confirmation dialog box that appears.
In the Slideshow pane, click Add and then click OK in the confirmation dialog box that appears.
Step 4![]() Click Browse to search for the appropriate images from your local system.
Click Browse to search for the appropriate images from your local system.
Note![]() You can delete the added slideshow image by clicking the delete icon in the Slideshow pane.
You can delete the added slideshow image by clicking the delete icon in the Slideshow pane.
Step 5![]() Enter the URL for the RSS (Real Simple Syndication) feed that you want to subscribe to in the Enter Feed URL field in the RSS Reader pane.
Enter the URL for the RSS (Real Simple Syndication) feed that you want to subscribe to in the Enter Feed URL field in the RSS Reader pane.
Step 6![]() Enter the notes in the Notes pane.
Enter the notes in the Notes pane.
Step 7![]() Click Save this Display to save the settings, otherwise click Reset to Previous to cancel the new settings.
Click Save this Display to save the settings, otherwise click Reset to Previous to cancel the new settings.
Customizing the Workspace or Office Settings
You can customize your workspace or office settings using either two channels:
Using the Web Portal
After you check in to the workspace or office at the scheduled time, you can customize your workspace or office settings by updating your preference details by using the web portal. The new preference settings are applicable only during the duration of the current meeting. It will not be saved as a preference profile for future reference.
To customize your workspace or office settings using the web portal, perform the following steps:
Step 1![]() On the home page of the web portal for workspaces, click Check In to check in to your workspace or office at the scheduled time.
On the home page of the web portal for workspaces, click Check In to check in to your workspace or office at the scheduled time.
The Checkin page appears with the booking description, and the details of your preference.
Step 3![]() If you want to customize your workspace or office settings, click either the Open or Close radio button for blinds, and the On or Off radio buttons for the lights control and digital signage, and drag the slider to adjust the brightness percentage for the dimmer, and the temperature for the air conditioner, as desired.
If you want to customize your workspace or office settings, click either the Open or Close radio button for blinds, and the On or Off radio buttons for the lights control and digital signage, and drag the slider to adjust the brightness percentage for the dimmer, and the temperature for the air conditioner, as desired.
Step 4![]() If you want to apply your Digital Signage preference settings in your workspace or office, click the Digital Signage Settings tab, and click Activate Now.
If you want to apply your Digital Signage preference settings in your workspace or office, click the Digital Signage Settings tab, and click Activate Now.
Using a Cisco IP Phone
After checking in, you can edit your workspace or office settings using a Cisco IP Phone.
To customize your workspace or office settings using a Cisco IP Phone, perform the following steps:
Step 1![]() Access the Smart+Connected Spaces Services menu on the Cisco IP Phone.
Access the Smart+Connected Spaces Services menu on the Cisco IP Phone.
Step 2![]() Check in to your workspace or office at the scheduled time.
Check in to your workspace or office at the scheduled time.
Step 3![]() Tap the icon corresponding to the service that you want to customize for your workspace, for example, tap the
Tap the icon corresponding to the service that you want to customize for your workspace, for example, tap the  icon for light, the
  icon for air conditioner, and so on.
The corresponding options appear for adjusting the settings.
Step 4![]() Select the light intensity or the temperature from the options, as desired.
Select the light intensity or the temperature from the options, as desired.
Raising a Case
You can raise a case only through the Cisco IP Phone if you face any issues while using your booked workspace or office and availing yourself of the services. For example, non-functioning lights control or air conditioner in your workspace or office.
To raise a case, perform the following steps:
Step 1![]() Access the Smart+Connected Spaces Services menu on the Cisco IP Phone.
Access the Smart+Connected Spaces Services menu on the Cisco IP Phone.
The Cisco IP Phone home page appears.
The list of saved Service names appears.
Step 3![]() Choose S+CC and enter the TPIN that you received via email during the time of booking.
Choose S+CC and enter the TPIN that you received via email during the time of booking.
Step 4![]() Tap the raise case
Tap the raise case  icon.
icon.
The Fault Input page that appears displays a list of predefined fault messages.
Step 5![]() Tap the appropriate fault message.
Tap the appropriate fault message.
An email notification is sent to the administrator, along with a copy to you, with the following details: Details, Ticket ID, Name, and Operational Category.
 Feedback