Overview of Zero Trust Network Access
Zero Trust Secure Access Using Cisco Secure Firewall
Zero trust access is based on a security model that establishes trust through continuous authentication and monitoring of each network access attempt. You can use the Secure Firewall Management Center web interface to create a Zero Trust Application Policy that allows you to define private applications and assign threat policies to them. The policy is application-specific where the administrator decides the inspection levels based on the threat perception for that application.
This document outlines a scenario demonstrating the complete process of securing an application and implementing threat and malware protection. The document also includes the validation steps to access the application, protect it from threat and malware, and monitor the zero trust sessions.
Features of Zero Trust Access in Secure Firewall Management Center
The features are:
-
Supports multiple SAML based identity providers such as Duo, Azure AD, Okta, and other identity providers.
-
Client applications such as Cisco AnyConnect are not required on the endpoint (client devices) for secure access.
-
Access and authentication are through the browser.
-
Supports only web applications (HTTPS).
-
Client device posture is supported through agents such as Duo Health, using which the posture of the device can be evaluated against a policy in Duo, and access can be provided based on the same. The same functionality can be performed in conjunction with third-party identity providers that support posture evaluation with their agents such as Okta or PingID.
-
Supports HTTP-Redirect SAML binding.
-
Supports Application Groups that make it easier to enable zero trust protection on a set of applications.
-
Leverages threat defense intrusion and malware protection on zero trust application traffic.
Prerequisites
This document assumes that you have a basic understanding of zero trust concepts and have gone through the "Zero Trust Access" chapter in the Cisco Secure Firewall Management Center Device Configuration Guide, version 7.4 or later.
Is This Use Case For You?
This use case outlines the process for accessing private applications and resources using the clientless Zero Trust Network Access model. We recommend using Cisco Secure Client for the client-based secure network and application access. For more information, see Cisco Secure Client.
This use case assists network administrators who plan to use the zero trust feature in the Secure Firewall Management Center to enable their hybrid workforce to access protected resources and web applications. They also aim to safeguard the protected resources and applications against malware.
Scenario for Implementing Zero Trust Access
A large enterprise has a distributed workforce, with employees and contractors working from various locations and accessing private applications and resources hosted behind the company's firewall. The administrator wants to prevent the workforce from performing malicious activity when accessing the protected application.
What is at risk?
The workforce gains full network access, which can increase the attack surface and make the network more vulnerable to attacks. They also can upload files, including those that may potentially contain malicious content.
How does the Secure Firewall Management Center Zero Trust Access Policy protect your applications?
The network administrator incorporates zero trust access to the firewall, enabling secure remote access to important resources and applications without needing software installed on every endpoint device. This functionality boosts performance but also limits authorization to a single application, thereby minimizing potential attack points. Access to sensitive information or applications is granted only after verifying the user's identity, checking the request's context, and performing a risk analysis. Furthermore, a malware and file policy is in place to safeguard zero-trust application traffic.
Network Topology
The following network topology includes a threat defense device, which is set up at the data center. A security zone is established on the device's outbound interface.
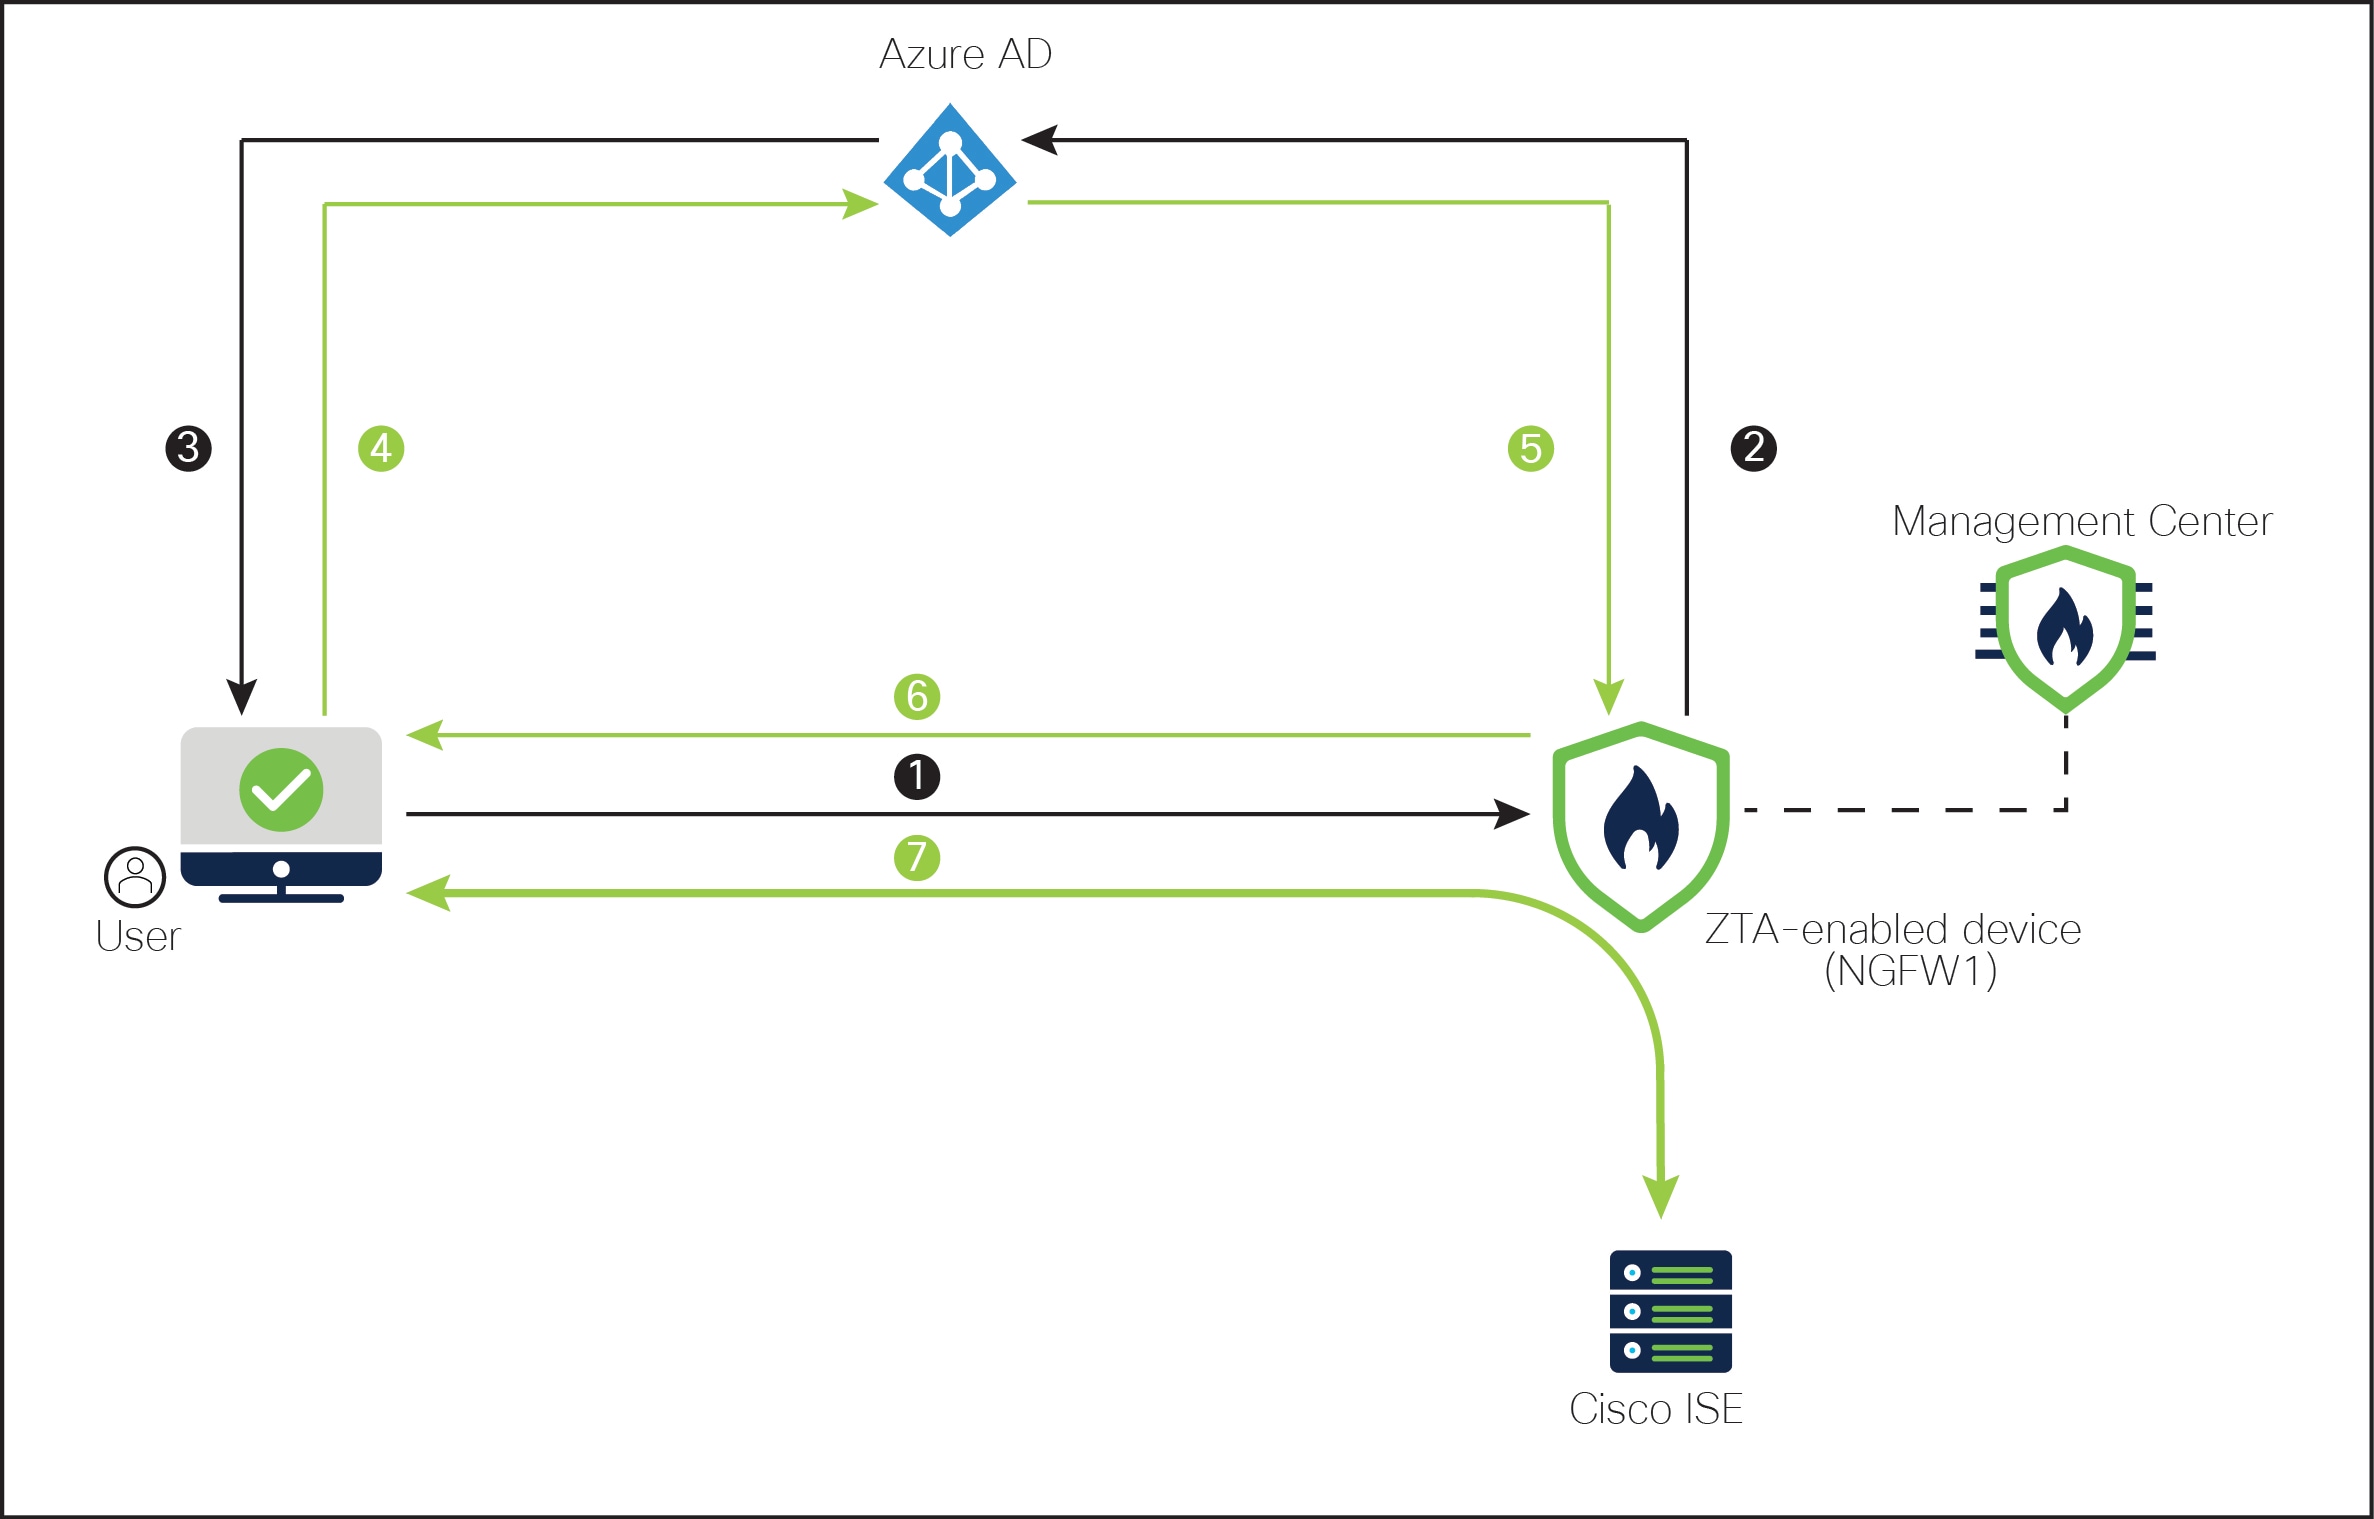
In the above figure, the network administrator is using the management center to configure and deploy the zero trust policy to the threat defense labeled NGFW1. The Cisco ISE application is hosted in a data center behind the firewall, which the user accesses through the Zero Trust Application. Note: ISE is not being used for AAA (Authentication, Authorization, and Accounting). Microsoft Azure Active Directory is the SAML IdP server that is used for authentication and authorization. A network object is created to translate a public network source IP address of an incoming request to a routable IP address inside the corporate network.
-
The user types the application URL in the browser.
-
The ZTA-enabled managed device directs the user to the configured IdP.
-
The IdP prompts the user to enter their credentials.
-
The user enters the username and password.
-
The IdP sends a SAML response to the firewall. The user ID and other necessary parameters are retrieved from the SAML response through the browser.
-
The user is redirected to the application after validation is successful.
-
The user is allowed access to the application. Optionally, threat and malware protection is applied while accessing the application.
Limitations for Zero Trust Access
-
Only web applications (HTTPS) are supported. Scenarios requiring decryption exemption are not supported.
-
Supports only SAML IdPs.
-
IPv6 is not supported. NAT66, NAT64, and NAT46 scenarios are not supported.
-
The feature is available on threat defense only if Snort 3 is enabled.
-
All hyperlinks in protected web applications must have a relative path and are not supported on individual mode clusters.
-
Protected web applications running on a virtual host or behind internal load balancers must use the same external and internal URL.
-
Not supported on individual mode clusters.
-
Not supported on applications with strict HTTP Host Header validation enabled.
-
If the application server hosts multiple applications and serves content based on the Server Name Indication (SNI) header in the TLS Client Hello, the external URL of the zero trust application configuration must match the SNI of that specific application.
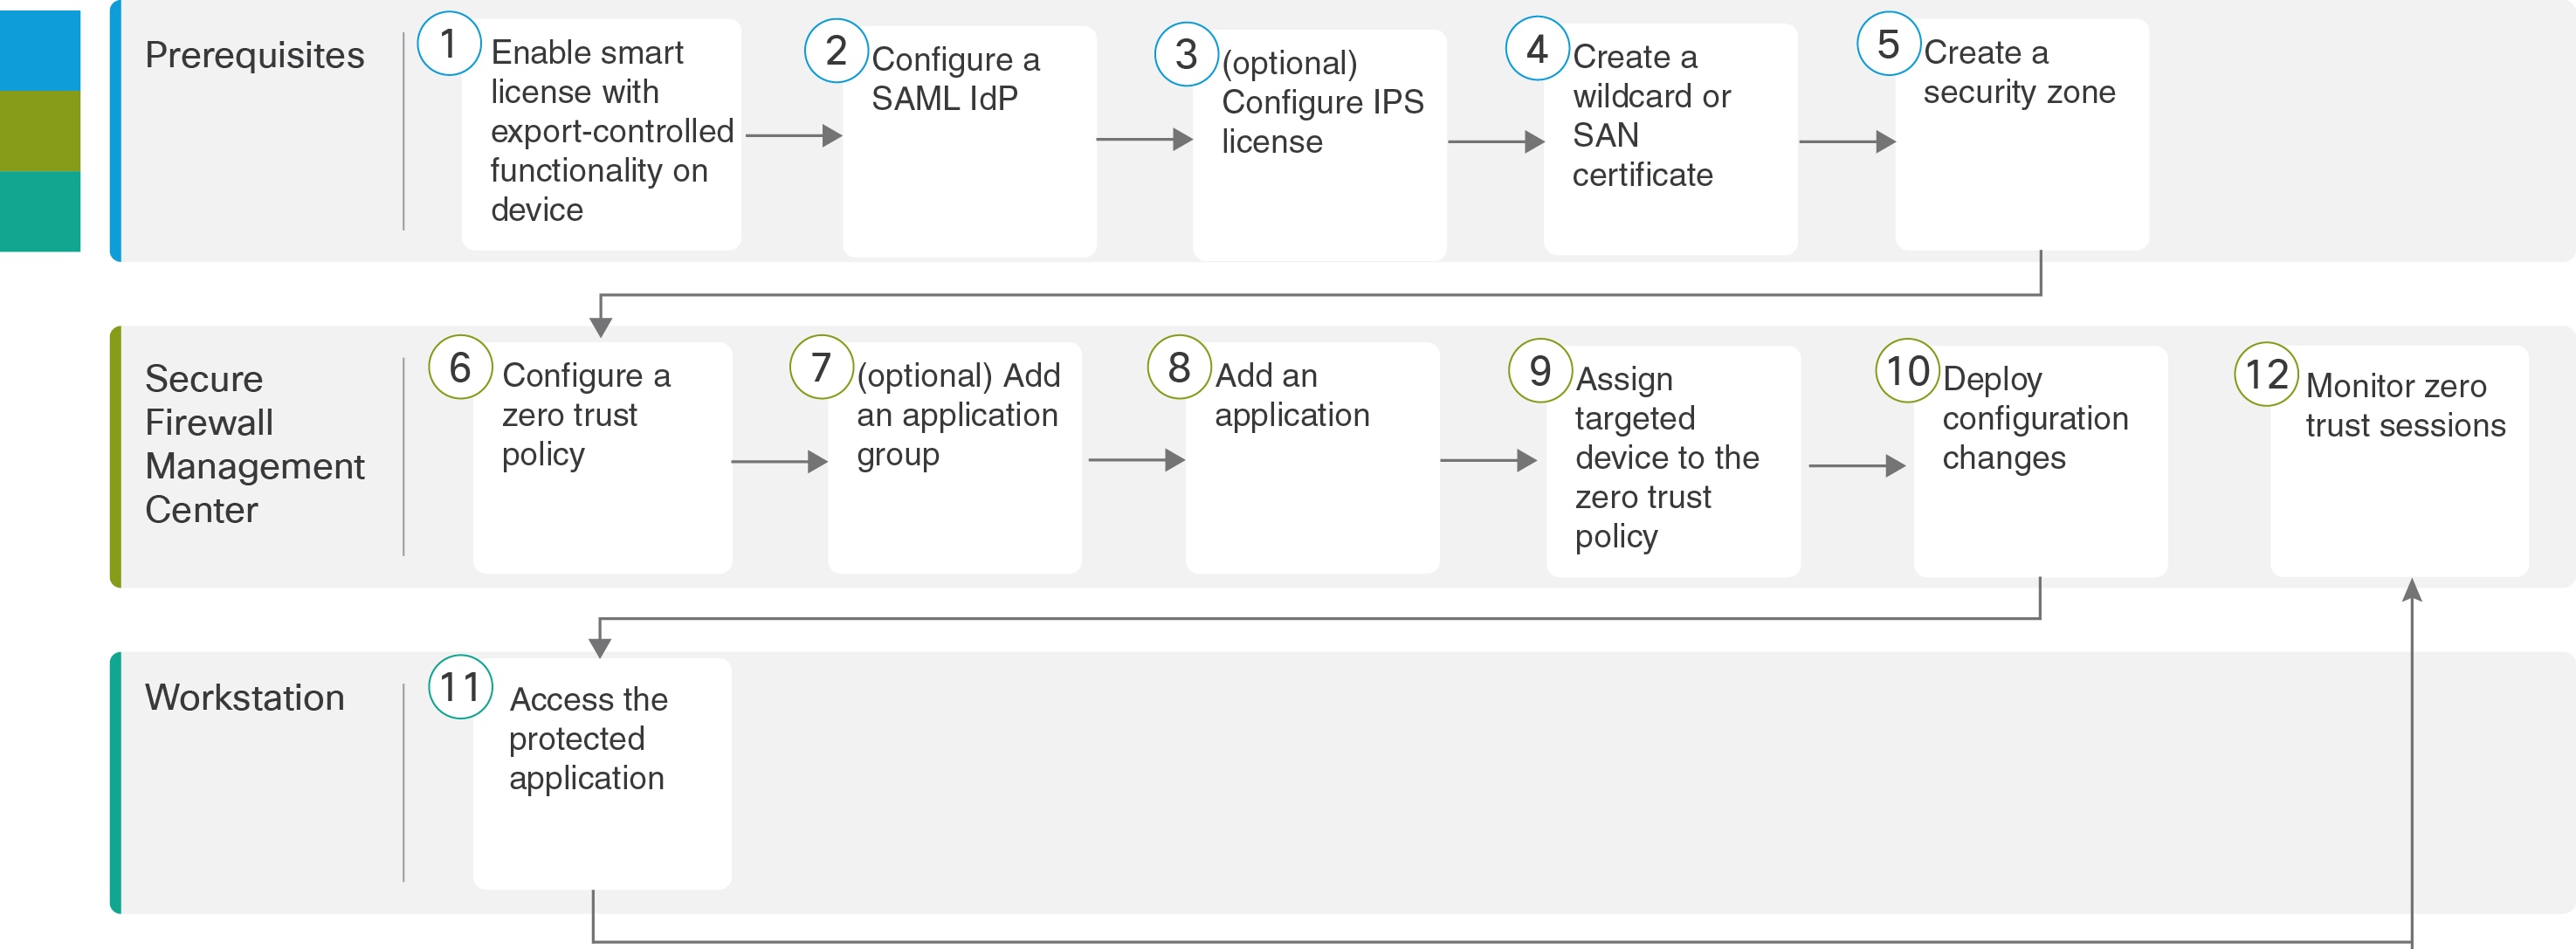
End-to-End Procedure for Configuring Zero Trust Application
The following flowchart illustrates the workflow for configuring zero trust access in the Secure Firewall Management Center.
|
Step |
Description |
|---|---|
|
|
(Prerequisite) Enable smart license with export-controlled functionality on threat defense. |
|
|
(Prerequisite) Configure a SAML IdP. |
|
|
(Prerequisite) (optional) Configure IPS license. |
|
|
(Prerequisite) Create a wildcard or Subject Alternative Name (SAN) certificate. |
|
|
(Prerequisite) Create a security zone. |
|
|
|
|
|
|
|
|
|
|
|
|
|
|
|
|
|
|
|
|
Prerequisites for Zero Trust Application Policy
Ensure that you have:
-
Smart license account with export-controlled features.
-
Configured a SAML Identity Provider (IdP) for authentication and authorization to access the private application.
-
Configured IPS and Threat licenses for enabling security controls.
-
Created a wildcard or Subject Alternative Name (SAN) certificate that matches the FQDN of private applications. For more information, see the "Adding Certificate Enrollment Objects" section in the "Object Management" chapter of Cisco Secure Firewall Management Center Device Configuration Guide, X.Y.
-
Created a security zone in the management center through which access to private applications is regulated. For more information, see the "Create Security Zone and Interface Group Object" section in the "Interface Overview" chapter of Cisco Secure Firewall Management Center Device Configuration Guide, X.Y.
-
Public DNS updates are required.
Certificates
Ensure you create the following certificates:
-
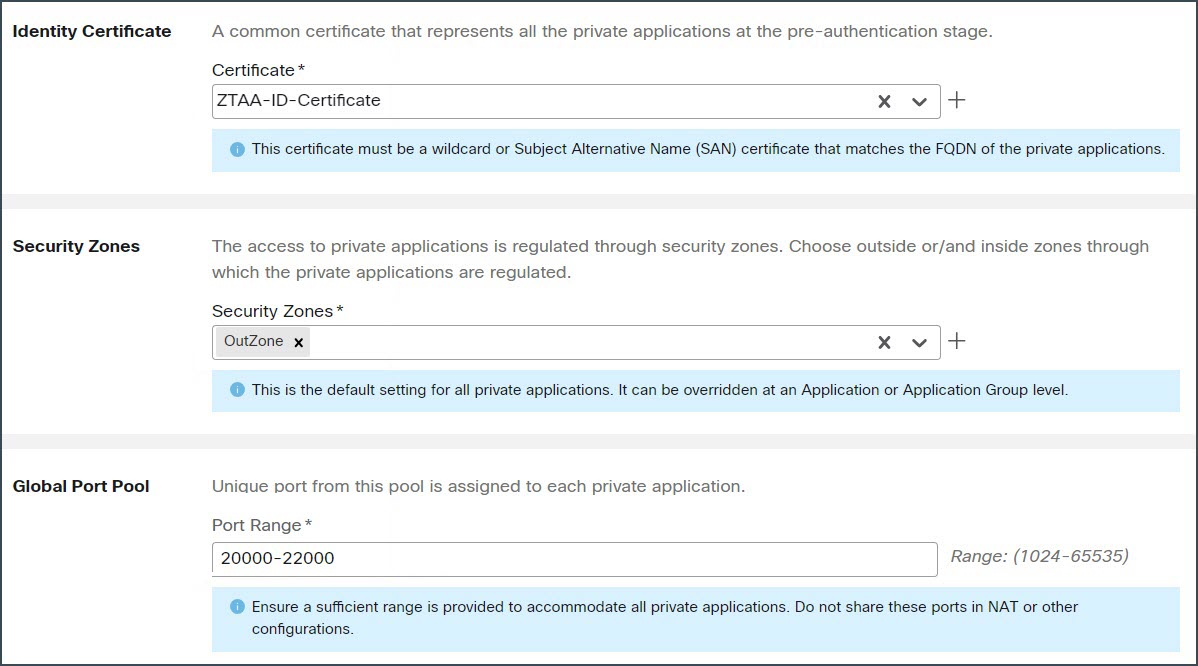
Identity Certificate—This certificate is used by threat defense to masquerade as the applications. Threat Defense behaves as a SAML Service Provider (SP). This certificate must be a wildcard or Subject Alternative Name (SAN) certificate that matches the FQDN of the private applications.
For more information, see the "Adding Certificate Enrollment Objects" section in the "Object Management" chapter of Cisco Secure Firewall Management Center Device Configuration Guide, X.Y.
For this example, we created an identity certificate ZTAA-ID-Certificate.
-
IdP Certificate—The IdP provides a certificate for each defined Application or Application Group. This certificate must be configured so that threat defense can verify the IDP’s signature on incoming SAML assertions.
For more information, see the "Add Certificate Enrollment" section in the "Object Management" chapter of Cisco Secure Firewall Management Center Device Configuration Guide, X.Y.
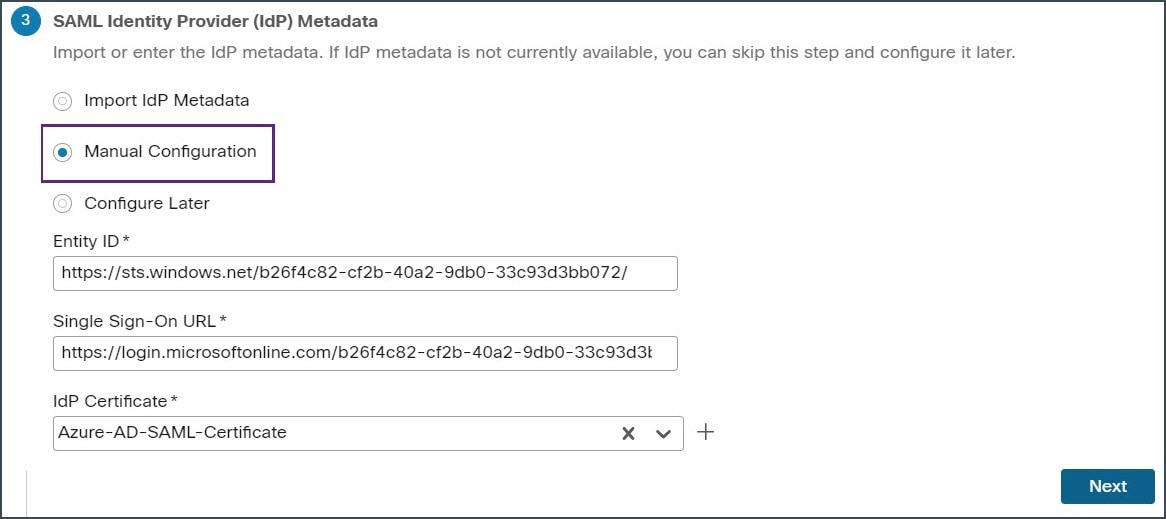
For this example, we create an IdP certificate, Azure-AD-SAML-Certificate.
-
Application Certificate—The encrypted traffic from the user to the application is decrypted by threat defense using this certificate for inspection.
For more information, see the "Adding Internal Certificate Objects" section in the "Object Management" chapter of Cisco Secure Firewall Management Center Device Configuration Guide, X.Y.
For this example, we created an internal certificate for the application, ZTAA-ISE-GUI-Certificate.

Note
This certificate is required to verify the cookies in the header to authorize connections, even if we are not conducting an IPS/Malware inspection.
Create a Zero Trust Application Policy
This task configures a Zero Trust Application Policy.
Before you begin
Ensure that you have:
-
Domain name to resolve to the threat defense gateway interface from where the application is accessed.
-
Security zones to regulate access to the private applications. For more information, see the "Create Security Zone and Interface Group Objects" section in the "Interface Overview" chapter of Cisco Secure Firewall Management Center Device Configuration Guide, X.Y.
Procedure
|
Step 1 |
In the management center, choose Policies > Access Control > Zero Trust Application. |
|
Step 2 |
Click Add Policy. |
|
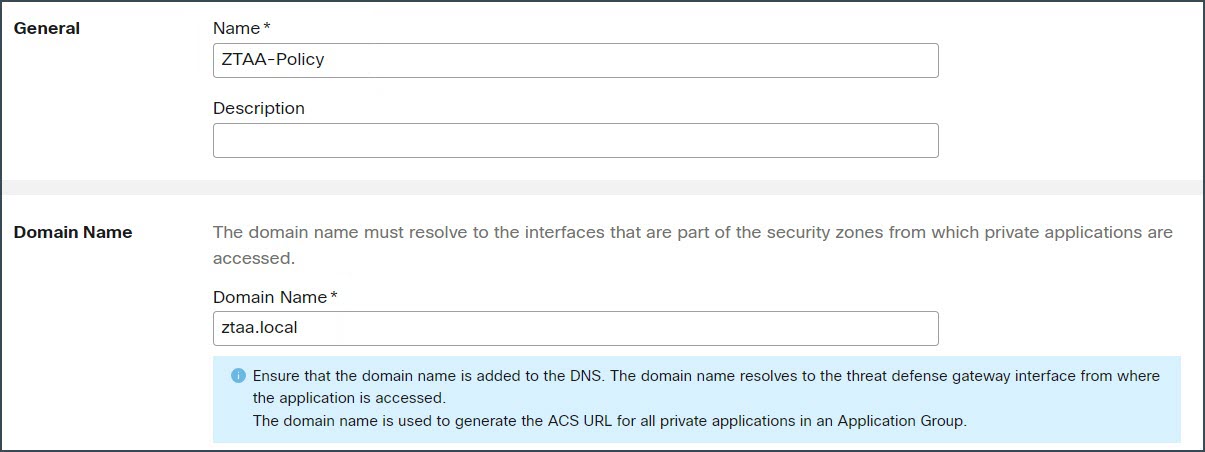
Step 3 |
Configure the zero trust policy settings as described below:
|
|
Step 4 |
In the Security Controls section, add an Intrusion or Malware and File policy. This configuration provides intrusion and malware protection on the zero trust application traffic.
|
|
Step 5 |
Click Save. |
 ) icon to create a new custom intrusion policy. For more information, see Creating a Custom Snort 3 Intrusion Policy topic
in the latest version of the
) icon to create a new custom intrusion policy. For more information, see Creating a Custom Snort 3 Intrusion Policy topic
in the latest version of the 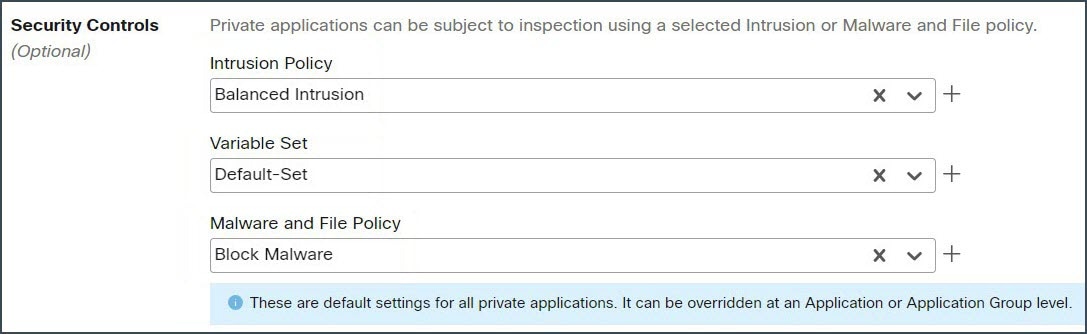
Create an Application Group
Procedure
|
Step 1 |
In the management center, choose Policies > Access Control > Zero Trust Application. |
|
Step 2 |
Click edit policy. |
|
Step 3 |
Click Add Application Group. |
|
Step 4 |
In the Application Group section, type the name in the Name field and click Next. In this example, the application group name is ZTAA-Group. 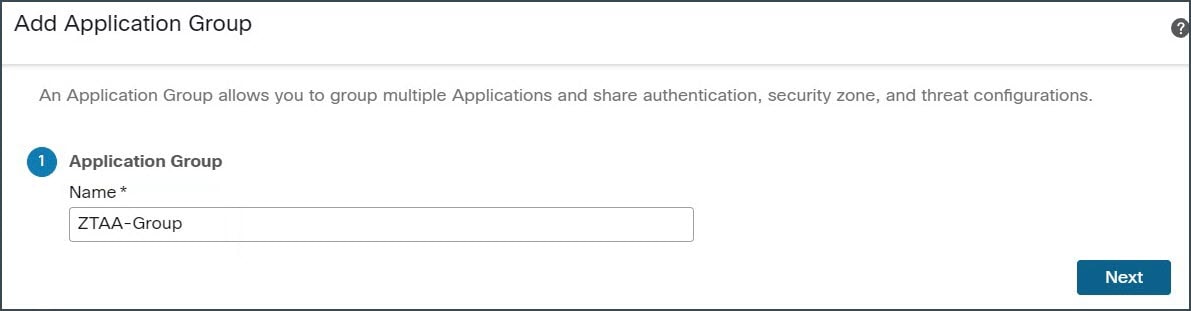 |
|
Step 5 |
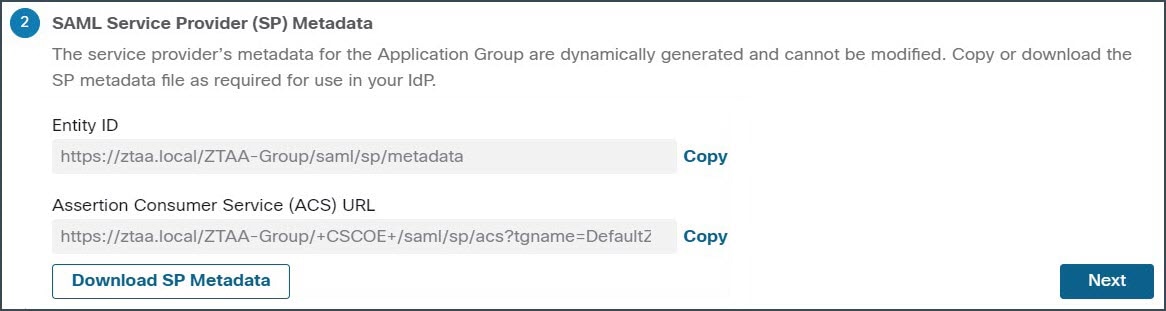
In the SAML Service Provider (SP) Metadata section, the data is dynamically generated from configuration elements you provided in the previous steps:
Copy the values of the Entity ID and Assertion Consumer Service (ACS) URL fields or click Download SP Metadata to download this data in XML format for adding it to the IdP. For this example, the data is downloaded in the XML format and uploaded to the Azure Active Directory IdP.
Click Next. |
|
Step 6 |
In the SAML Identity Provider (IdP) Metadata section, add the metadata. In this example, the meta data is entered manually. Select Manual Configuration to enter the meta data.
In this example, the manual configuration is selected. Click Next. |
|
Step 7 |
In the Re-authentication Interval section, enter the value in the Timeout Interval field and click Next. The re-authentication interval allows you to provide a value that determines when a user must authenticate again. In this example, we use the default value, 1440. |
|
Step 8 |
In the Security Zones and Security Controls, the security zones and threat settings are inherited from the parent. In this example, the default values are retained. Click Next. |
|
Step 9 |
Review the configuration summary. Click Finish. 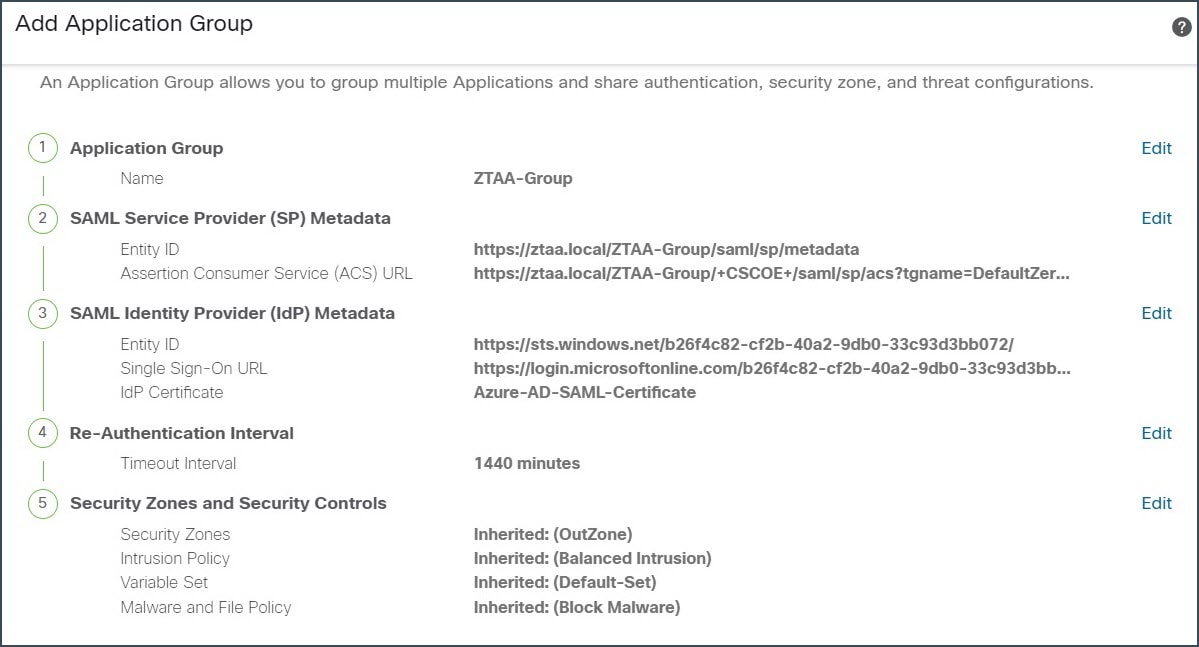 |
|
Step 10 |
Click Save. The Application Group is created and is displayed on the Zero Trust Application page. |
Create an Application
Procedure
|
Step 1 |
Choose Policies > Access Control > Zero Trust Application. |
||||
|
Step 2 |
Choose the policy. In this example, we select ZTAA-Policy. |
||||
|
Step 3 |
Click Add Application.  |
||||
|
Step 4 |
In the Application Settings, configure the following fields:
In this example, we use ZTAA-Group application group. 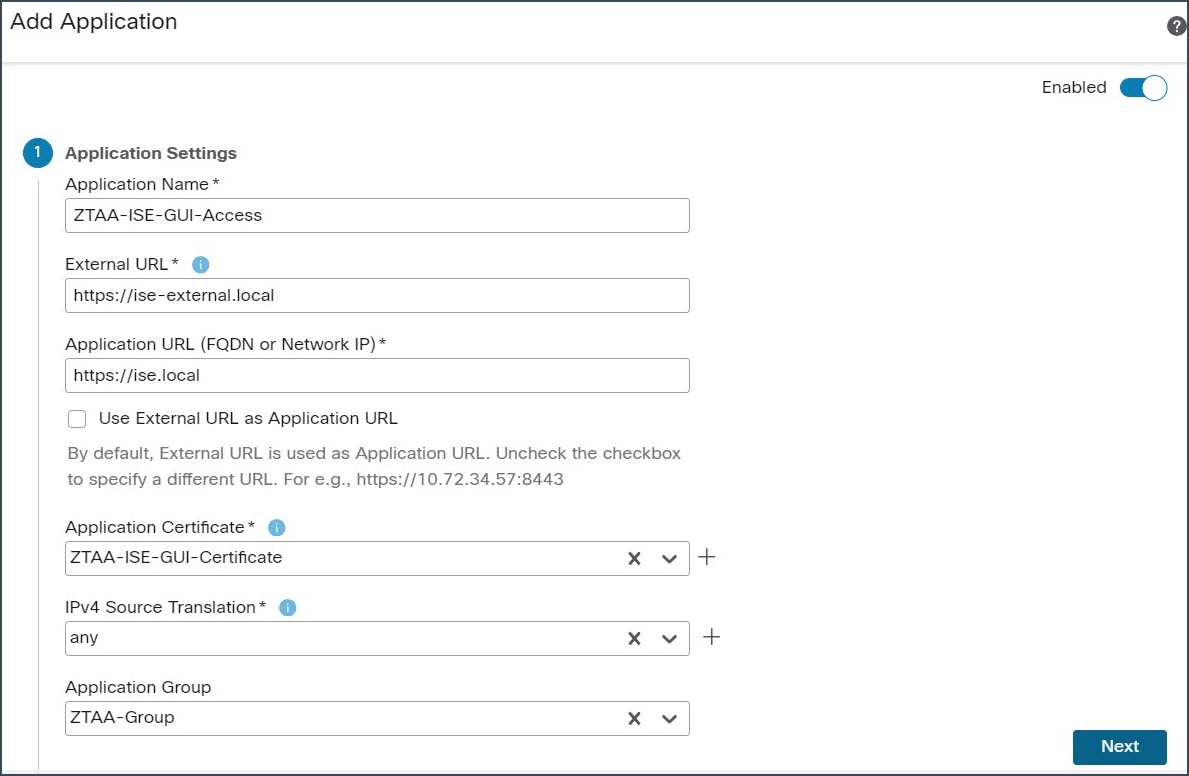 Click Next. |
||||
|
Step 5 |
Review the configuration summary and click Finish. |
||||
|
Step 6 |
Click Save. The Application is listed on the Zero Trust Application page and is enabled by default.
|
Set Targeted Devices for Zero Trust Access Policy
Each Zero Trust Application policy can target multiple devices; each device can have one deployed policy at a time.
Procedure
|
Step 1 |
Choose Policies > Access Control > Zero Trust Application. |
|
Step 2 |
Choose the policy. In this example, we select ZTAA-Policy. |
|
Step 3 |
Click Targeted Devices. |
|
Step 4 |
Choose the device you want to deploy. In this example, we select NGFW1.  |
|
Step 5 |
Click Apply to save policy assignments. |
|
Step 6 |
Click Save. |
What to do next
Deploy Configuration to Devices
After you complete all the configurations, deploy them to the managed device.
Procedure
|
Step 1 |
On the management center menu bar, click Deploy. This displays the list of devices that are Ready for Deployment. |
|
Step 2 |
Check the checkboxes adjacent to the device on which you want to deploy configuration changes. In this example, the device is NGFW1. |
|
Step 3 |
Click Deploy. Wait till the deployment is marked Completed on the Deploy dialog box. |
|
Step 4 |
If the system identifies errors or warnings in the changes to be deployed, it displays them in the Validation Errors or Validation Warnings window. To view complete details, click the Validation Errors or Validation Warnings link. You have the following choices:
|
Access the Protected Application
After a successful configuration deployment, you can access the application by using the external URL of the application.
Procedure
|
Step 1 |
In the client machine, open a browser and access the protected application using the external URL. In this example, the external URL used is https://ise-external.local. The user is redirected to the login page, and the SAML IdP prompts them to enter their credentials. In this example, the SAML IdP used is Microsoft Azure Active Directory. 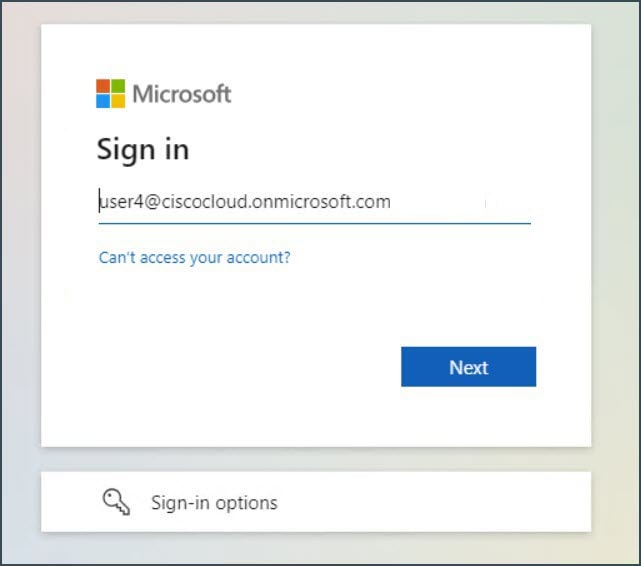 |
|
Step 2 |
After submitting the credentials, the user is redirected to the application once IdP authenticates and authorizes the user and sends the SAML assertion in the response to the threat defense device. |
|
Step 3 |
After a successful authentication, the user can access the application. In this example, the Cisco ISE home page is displayed. |
|
Step 4 |
The user logs in to Cisco ISE using their credentials. |
Test Malware Protection on Zero Trust Application Traffic
If the user attempts to upload a malware file to the protected application, ZTA policy blocks the malware file upload on their network.
Procedure
|
Step 1 |
Log in to the Cisco ISE application. |
|
Step 2 |
In the Cisco ISE GUI, click the Menu icon ( 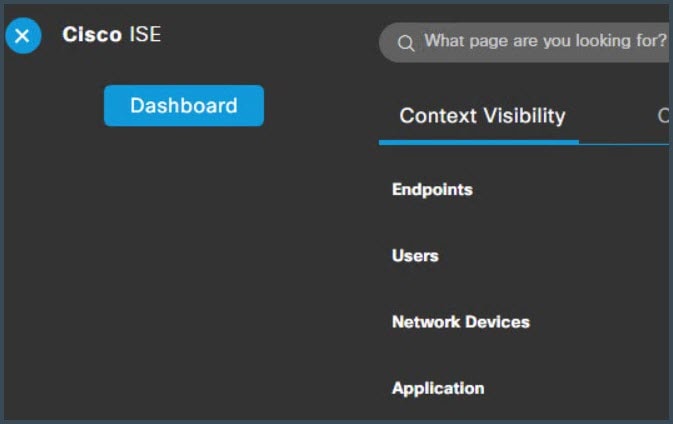 |
|
Step 3 |
Scroll down this page to locate the list of endpoints and choose Import > Import From File. 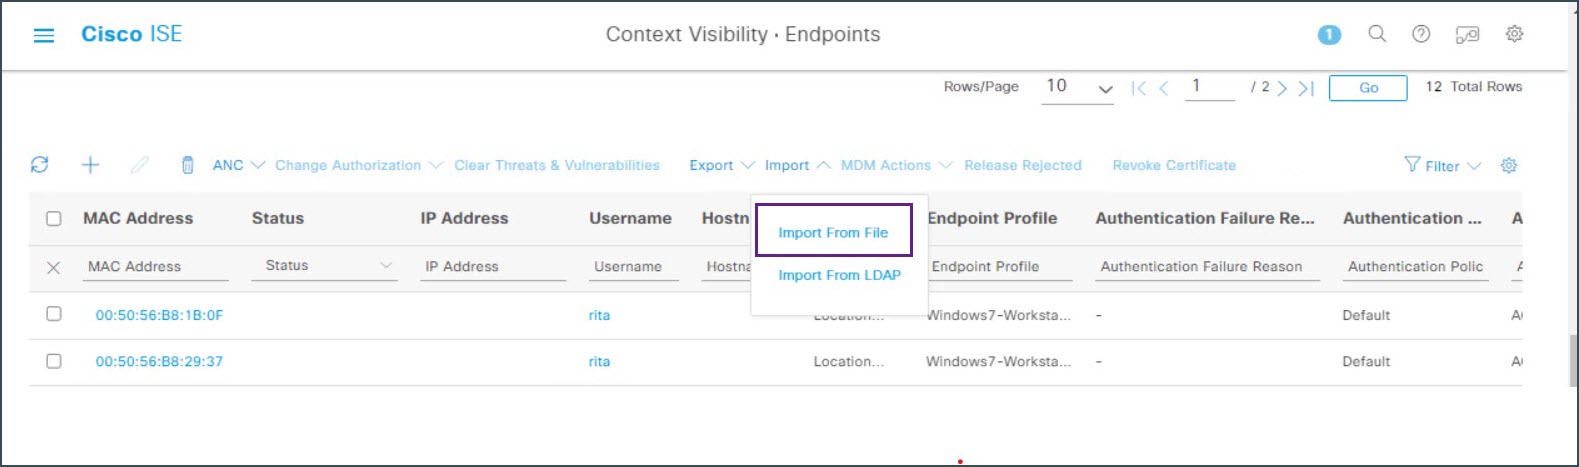 |
|
Step 4 |
Click Choose File and select the file you want to upload. The navigation steps to select a file may differ depending on your operating system. In this example, we are selecting a precreated sample malware file. |
|
Step 5 |
Click Import. The upload action doesn't progress beyond 0%. This is a malware file and ZTA policy has blocked the file from being uploaded. 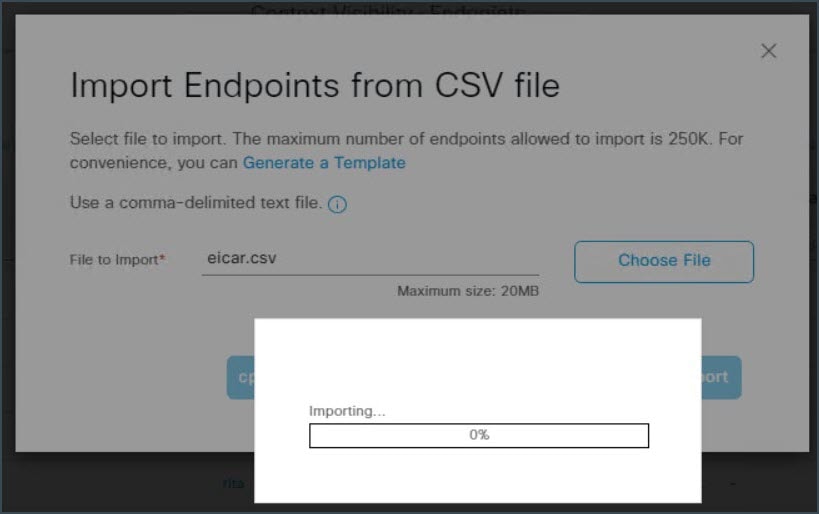 |
|
Step 6 |
Log in to the management center, and choose Analysis > Unified Events. |
|
Step 7 |
In the search bar, set the filter Event Type to Intrusion and click Apply. 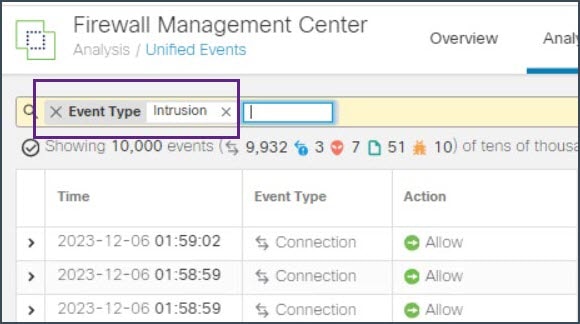 In this example, we are configuring a sliding default time window to 5 minutes. Click Sliding Time Range.  The eventing page displays that a malicious file was detected and blocked.  Double-click the event to see more information in the Event Details page. 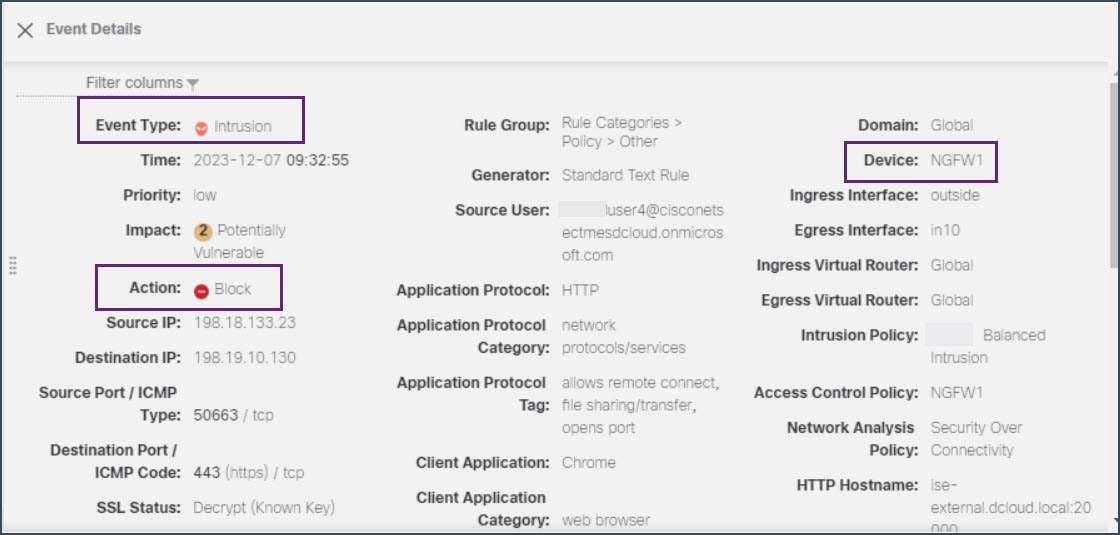 |
Monitor Zero Trust Sessions
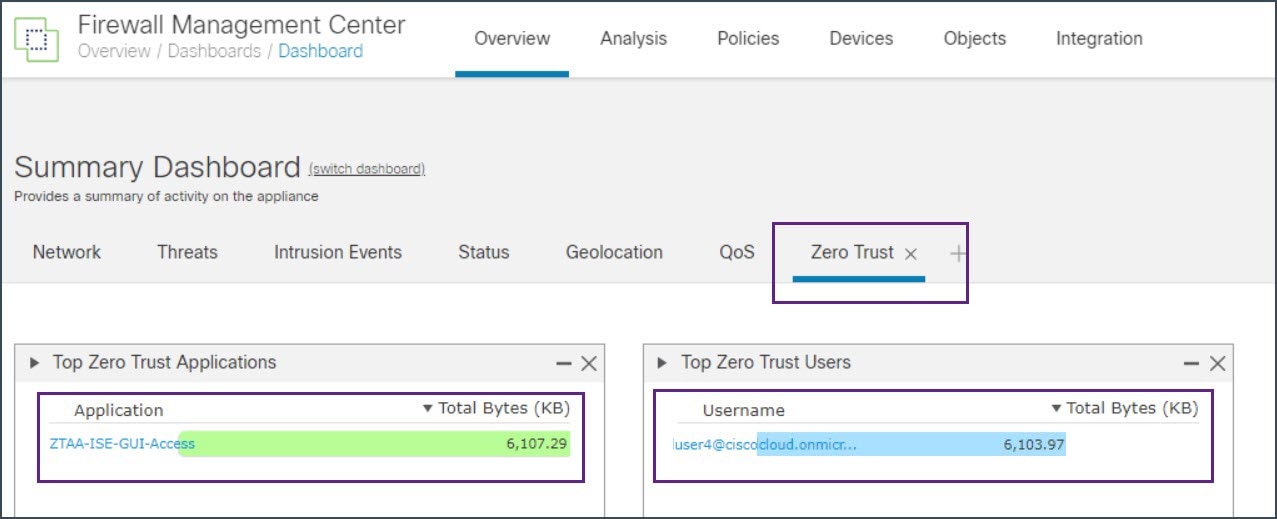
Zero Trust Dashboard
The Zero Trust dashboard allows you to monitor real-time data from active zero trust sessions on the devices. The Zero Trust dashboard provides a summary of the top zero trust applications and zero trust users that are managed by the management center.
Choose Overview > Dashboards > Zero Trust to access the dashboard.
In this example, the Top Zero Trust Applications widget shows the zero trust application ZTAA_ISE_GUI_Access and the username of the user accessing the application.
Connection Events
After establishing zero trust sessions, you can view the events that are associated with those sessions and monitor the activity of the users.
-
In the management center, choose Analysis > Unified Events.
-
In the Search bar, search for Zero Trust Application, Zero Trust Application Group, or Zero Trust Application Policy and enter the corresponding name that you specified while creating it.
In this example, we use the Zero Trust Application Group, which is ZTAA-Group, to search for the events.

You can scroll the slider to the right to see the Authentication Source, Zero Trust Application, and Zero Trust Application Policy.
 Feedback