- New and Changed Information
- Preface
- Documentation Roadmap
- Introduction
- Getting Started
- Licensing Requirements
- Using configTOOL
- Using perfectHOST
- Ports and Protocols
- KNX Deployment
- Getting Started with Mediator Web Client
- Managing Events
- Managing Security
- Managing Trends
- Managing Schedules
- Customizing HTML Pages with Web Express
- Energywise Manager
- Using Enterprise Navigation Tree
- Global Setpoints
- ADR Client
Cisco Network Building Mediator User Guide
Bias-Free Language
The documentation set for this product strives to use bias-free language. For the purposes of this documentation set, bias-free is defined as language that does not imply discrimination based on age, disability, gender, racial identity, ethnic identity, sexual orientation, socioeconomic status, and intersectionality. Exceptions may be present in the documentation due to language that is hardcoded in the user interfaces of the product software, language used based on RFP documentation, or language that is used by a referenced third-party product. Learn more about how Cisco is using Inclusive Language.
- Updated:
- February 16, 2012
Chapter: Global Setpoints
Global Setpoints
This chapter describes how to configure and manage Global Setpoints and includes the following topics:
•![]() Managing Global Setpoint Groups
Managing Global Setpoint Groups
•![]() Configuring Global Setpoints Within a Group
Configuring Global Setpoints Within a Group
About Global Setpoints
Global Setpoints lets you control various devices. The global setpoint group is a list of setpoints and a list of devices controlled by those setpoints. The global setpoint group lets you to monitor and modify the setpoints across different devices and systems connected to the Mediator.
While you can define and manage the different setpoint groups, you can also exclude a device from the list of devices that are being controlled by a setpoint group.
This section includes the following topics:
Global Setpoint Terminology
The following terms are used in this section:
•![]() Setpoint—A target value that an automatic control system aims to reach.
Setpoint—A target value that an automatic control system aims to reach.
•![]() Global setpoint group—A list of setpoints and a list of devices controlled by these setpoints.
Global setpoint group—A list of setpoints and a list of devices controlled by these setpoints.
•![]() Entity—Any device that is connected to the Mediator network.
Entity—Any device that is connected to the Mediator network.
Global Setpoints Tab
The Global Setpoints tab lets you to modify the global setpoint and the defined values for these setpoints.
The Global Setpoints tab displays the following:
•![]() The current values for the global setpoints.
The current values for the global setpoints.
•![]() The priorities you have set for each global setpoint.
The priorities you have set for each global setpoint.
•![]() The list of devices controlled by the global setpoints.
The list of devices controlled by the global setpoints.
•![]() The list of devices with values that do not match the available global setpoints.
The list of devices with values that do not match the available global setpoints.
Managing Global Setpoint Groups
This section includes the following topics:
•![]() Viewing Global Setpoint Groups
Viewing Global Setpoint Groups
•![]() Adding Global Setpoint Groups
Adding Global Setpoint Groups
•![]() Deleting Global Setpoint Groups
Deleting Global Setpoint Groups
Viewing Global Setpoint Groups
To view the list of setpoints in the global setpoint group, perform the following steps:
Step 1 ![]() Log in to the Mediator web client homepage.
Log in to the Mediator web client homepage.
Step 2 ![]() In the Navigation pane, click the Global Setpoints tab.
In the Navigation pane, click the Global Setpoints tab.
The Global Setpoints tab displays a list of setpoints that are defined for the nodes that you select.
The controls on the Global Setpoints tab are enabled or disabled based on the node that you select, such as the following:
–![]() If you select a valid entity, then the global setpoints associated for that entity are displayed in the list and the View button is enabled.
If you select a valid entity, then the global setpoints associated for that entity are displayed in the list and the View button is enabled.
–![]() If the selected entity does not have defined setpoints, then all of the controls are disabled.
If the selected entity does not have defined setpoints, then all of the controls are disabled.
–![]() If the selected entity displays incorrect setpoints, then an error message is displayed.
If the selected entity displays incorrect setpoints, then an error message is displayed.
Adding Global Setpoint Groups
There are no default global setpoint groups; you create global setpoint groups as needed.
To add a new global setpoint group, perform the following steps:
Step 1 ![]() Log in to the Mediator web client hompage, and click the Global Setpoints tab.
Log in to the Mediator web client hompage, and click the Global Setpoints tab.
Step 2 ![]() Click Add.
Click Add.
Step 3 ![]() In the New Global Setpoint Group dialog box that appears, enter an appropriate, unique name in the Name text box, and click Add.
In the New Global Setpoint Group dialog box that appears, enter an appropriate, unique name in the Name text box, and click Add.

Note ![]() If you enter an existing name, the Add button is disabled and an error message appears. If the new name is appropriate, a progress bar appears that indicates the creation of a new setpoint appears.
If you enter an existing name, the Add button is disabled and an error message appears. If the new name is appropriate, a progress bar appears that indicates the creation of a new setpoint appears.
Step 4 ![]() Click Cancel to cancel the addition of a new global setpoint group.
Click Cancel to cancel the addition of a new global setpoint group.
Deleting Global Setpoint Groups
To remove an existing global setpoint group, perform the following steps:
Step 1 ![]() Log in to the Mediatorweb client, and click the Global Setpoints tab.
Log in to the Mediatorweb client, and click the Global Setpoints tab.
Step 2 ![]() Choose the global setpoint group that you want to delete, and click Remove.
Choose the global setpoint group that you want to delete, and click Remove.
Step 3 ![]() In the Remove Global Setpoint Group confirmation dialog box that appears, click OK.
In the Remove Global Setpoint Group confirmation dialog box that appears, click OK.
Step 4 ![]() Click Cancel to cancel this procedure.
Click Cancel to cancel this procedure.
Configuring Global Setpoints Within a Group
This section includes the following topics:
•![]() Viewing Global Setpoints- View Mode
Viewing Global Setpoints- View Mode
•![]() Editing Global Setpoint Groups
Editing Global Setpoint Groups
Viewing Global Setpoints- View Mode
This view allows you to view the entity values based on the setpoint you specifiy.
To view the Global Setpoints tab in a view mode, perform the following steps:
Step 1 ![]() Log in to the Mediator web client, and click the Global Setpoints tab.
Log in to the Mediator web client, and click the Global Setpoints tab.
Step 2 ![]() Choose the global setpoint group that you want to view, and click View.
Choose the global setpoint group that you want to view, and click View.
Step 3 ![]() (Optional) Double-click the global setpoint group to view it in the view mode.
(Optional) Double-click the global setpoint group to view it in the view mode.
The Global Setpoints tab appears in the view mode (see Figure 16-1).
Figure 16-1 Global Setpoints Tab - View Mode
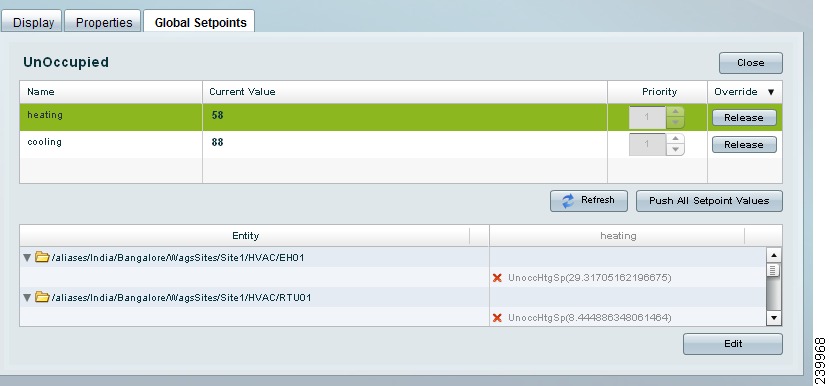
Table 16-1 describes the different elements in the view mode of the Global Setpoints tab.
|
|
|
|---|---|
Name |
Displays the setpoint name. |
Current Value |
Displays the current value that has been set for the setpoint. |
Priority |
Displays the current priority that has been set for the setpoint. You cannot change the priority values in this mode. |
Override |
Click the Release button to release the set priority of the selected setpoint. |
Refresh |
Click this button to refresh the setpoint values. |
Push All Setpoint Values |
Click this button to push the all the setpoint values to the Mediator network. For more information, see Pushing Global Setpoint Values. |
Entity |
Displays all the devices that are managed by the selected setpoint. |
Heating(or the column next to the entity column) |
This column display the name of the property and the current values that are set for the property. This column display colored icons that provide the status of the current setpoint values, such as the following: • • |
Edit |
Click this button to navigate to the edit mode of the Global Setpoints tab. For more information, see Editing Global Setpoint Groups. |
Close |
Click this button to close the Global Setpoints View page. |
Editing Global Setpoint Groups
You can edit a newly created global setpoint group or an existing group. The Global Setpoints tab enables you to edit the setpoint names, current values defined for a setpoints, reset the priority of the setpoint, and push the values to the server.
Note ![]() Changes to the Global Setpoints tab are not effective until you save the changes. If you click the Cancel button, you will lose all the changes done.
Changes to the Global Setpoints tab are not effective until you save the changes. If you click the Cancel button, you will lose all the changes done.
This section includes the following topics:
•![]() Viewing Global Setpoints - Edit Mode
Viewing Global Setpoints - Edit Mode
•![]() Pushing Global Setpoint Values
Pushing Global Setpoint Values
Viewing Global Setpoints - Edit Mode
To view the Global Setpoints tab in an edit mode, perform the following steps:
Step 1 ![]() Log in to the Mediator web client and click the Global Setpoints tab.
Log in to the Mediator web client and click the Global Setpoints tab.
Step 2 ![]() Select the Global Setpoint Group that you want to view, and click View.
Select the Global Setpoint Group that you want to view, and click View.
Step 3 ![]() Optional) Double-click the global setpoint group to view it in the view mode.
Optional) Double-click the global setpoint group to view it in the view mode.
The Global Setpoints tab appears in the edit mode.
Step 4 ![]() Select the Setpoint that you want to edit and click Edit.
Select the Setpoint that you want to edit and click Edit.
The Global Setpoints tab appears in the edit mode (see Figure 16-2).
Figure 16-2 Global Setpoints Tab - Edit Mode
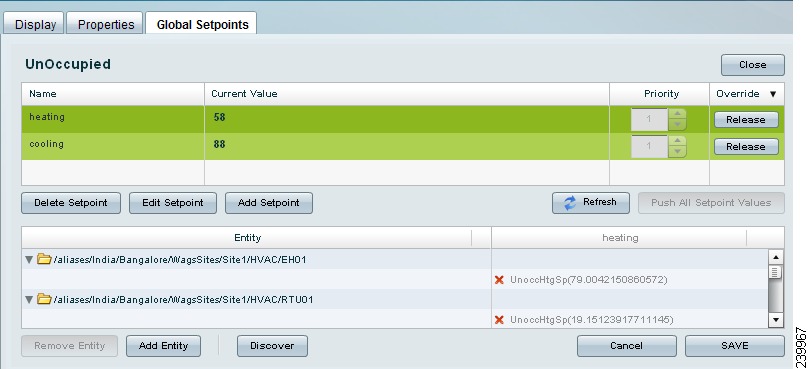
Table 16-2 describes the different elements in the edit mode of the Global Setpoints tab.
|
|
|
|---|---|
Name |
Displays the setpoint name. |
Current Value |
Displays the current value that has been set for the setpoint. Double-click to reset the values. |
Priority |
Displays the current priority that has been set for the setpoint. Double-click the existing priority value to reset these values. You are allowed to reset the values between 1-16. |
Override |
Click the Release button to release the set priority of the selected setpoint. |
Delete Setpoint |
Click this button to delete the selected setpoint within a group. For more information, see Deleting Global Setpoints. |
Edit Setpoint |
Click this button to edit an existing setpoint within a group. For more information, see Editing Global Setpoints. |
Add Setpoint |
Click this button to add a new setpoint to the group. For more information, see Adding Global Setpoints. |
Refresh |
Click this button to refresh the setpoint values. |
Push All Setpoint Values |
Click this button to push the values to the Mediator network. This button is disabled by default. It is enabled when you save any changes that you make. For more information, see Pushing Global Setpoint Values. |
Entity |
Displays all the devices that are managed by the setpoints. |
Remove Entity |
Click this button to remove an existing entity within a setpoint. For more information, see Deleting Entities. |
Heating (or the columns next to the entity column) |
This column display the name of the property and the current values that are set for the property. This column display colored icons that provide the status of the current setpoint values, such as the following: • • |
Add Entity |
Click this button to add a new entity to an existing setpoint. For more information, see Adding Entities. |
Discover |
You can add an entity by discovering the existing entities. Click this button to discover existing entities. For more information, see Discovery. |
Cancel |
Click this button to cancel the changes made to the Global Setpoints tab. |
Save |
Click this button to save the changes made to the Global Setpoints tab. |
Close |
Click this button to close the Global Setpoints tab. |
Adding Global Setpoints
Every setpoint requires specific data type and the Global Setpoints tab enables you to add set points based on different types of data types.
The following data types are currently available:
•![]() Text—Enables you to enter a free-form text value.
Text—Enables you to enter a free-form text value.
•![]() Numeric—Enables you to enter numeric values such as integers, decimal points, and negative or positive numbers. You can configure maximum and minimum values allowed in the input text box.
Numeric—Enables you to enter numeric values such as integers, decimal points, and negative or positive numbers. You can configure maximum and minimum values allowed in the input text box.
•![]() Enumerated—Enables you to choose a value from a list of displayed values.
Enumerated—Enables you to choose a value from a list of displayed values.
Note ![]() If you try to add a Global Setpoint when you do not have the necessary permissions, you are allowed to add the Global Setpoint, and the Global Setpoint appears on the Global Setpoints tab window. When you click the Save button to save this Global Setpoint, you get an error message that indicates that you are not authorized to add the Global Setpoint and the addition fails. However, the Global Setpoint continues to appear on the Global Setpoints tab window. To view the actual list of all the Global Setpoints, you should either clear the browser cache, refresh the window, or logout and login again.
If you try to add a Global Setpoint when you do not have the necessary permissions, you are allowed to add the Global Setpoint, and the Global Setpoint appears on the Global Setpoints tab window. When you click the Save button to save this Global Setpoint, you get an error message that indicates that you are not authorized to add the Global Setpoint and the addition fails. However, the Global Setpoint continues to appear on the Global Setpoints tab window. To view the actual list of all the Global Setpoints, you should either clear the browser cache, refresh the window, or logout and login again.
This section describes how you can add global setpoints based on the data types that you select and includes the following topics:
Text Data Type
To add a global setpoint with a text data type value, perform the following steps:
Step 1 ![]() Navigate to the Global Setpoints tab in the edit mode and click Add Setpoint.
Navigate to the Global Setpoints tab in the edit mode and click Add Setpoint.
The Add New Setpoint dialog box appears (see Figure).
Figure 16-3 Add New Setpoint Dialog Box - Text
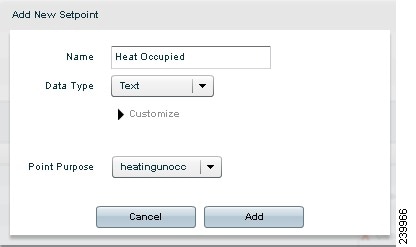
Step 2 ![]() Enter the following information:
Enter the following information:
–![]() Name—Enter an appropriate name for the new global setpoint.
Name—Enter an appropriate name for the new global setpoint.
–![]() Data Type—Choose Text from the Data Type drop-down list.
Data Type—Choose Text from the Data Type drop-down list.
–![]() Point Purpose—Choose the appropriate Point Purpose from the drop-down list.
Point Purpose—Choose the appropriate Point Purpose from the drop-down list.
Step 3 ![]() Click Add. This button is disabled if a name is not defined for the new setpoint.
Click Add. This button is disabled if a name is not defined for the new setpoint.
Step 4 ![]() Click Cancel to cancel the operation.
Click Cancel to cancel the operation.
Numeric Data Type
To add a global setpoint with a numeric data type value, perform the following steps:
Step 1 ![]() Navigate to the global setpoints tab in the edit mode and click Add Setpoint.
Navigate to the global setpoints tab in the edit mode and click Add Setpoint.
The Add New Setpoint dialog box appears (see Figure 16-4).
Figure 16-4 Add New Setpoint Dialog Box - Numeric
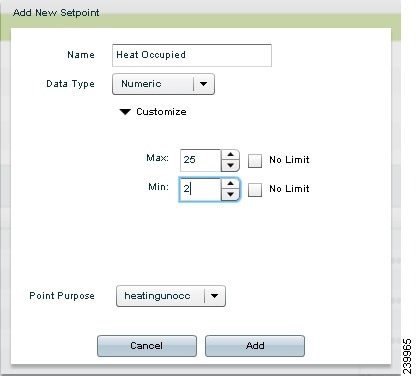
Step 2 ![]() In the Name text box, enter an appropriate name for the new setpoint.
In the Name text box, enter an appropriate name for the new setpoint.
Step 3 ![]() From the Data Type drop-down list, choose Numeric. The Customize option is enabled.
From the Data Type drop-down list, choose Numeric. The Customize option is enabled.
Step 4 ![]() (Optional) Enter the following information:
(Optional) Enter the following information:
–![]() Max—Enter the maximum allowed value.
Max—Enter the maximum allowed value.
–![]() Min—Enter the minimum allowed value.
Min—Enter the minimum allowed value.
–![]() No Limit—Select the check boxes if you do not want to set any limits.
No Limit—Select the check boxes if you do not want to set any limits.
Note ![]() If you specify the minimum and maximum values, you see a numeric slider in the edit mode of the Global Setpoints tab. If you do not specify a limit, then all types of values are accepted. In this case, the numeric slider in the Global Setpoints edit mode is not displayed.
If you specify the minimum and maximum values, you see a numeric slider in the edit mode of the Global Setpoints tab. If you do not specify a limit, then all types of values are accepted. In this case, the numeric slider in the Global Setpoints edit mode is not displayed.
Step 5 ![]() From the Point Purpose drop-down list, choose the valid value.
From the Point Purpose drop-down list, choose the valid value.
Step 6 ![]() Click Add.
Click Add.
Note ![]() The Add button is disabled if a name is not defined for the new setpoint.
The Add button is disabled if a name is not defined for the new setpoint.
Step 7 ![]() Click Cancel to cancel this procedure.
Click Cancel to cancel this procedure.
Enumerated Data Type
To add a global setpoint with an enumerated data type value, perform the following steps:
Step 1 ![]() Navigate to the Global Setpoints tab in the edit mode and click Add Setpoint.
Navigate to the Global Setpoints tab in the edit mode and click Add Setpoint.
The Add New Setpoint dialog box appears (see Figure 16-5).
Figure 16-5 Add New Setpoint Dialog Box - Enumerated
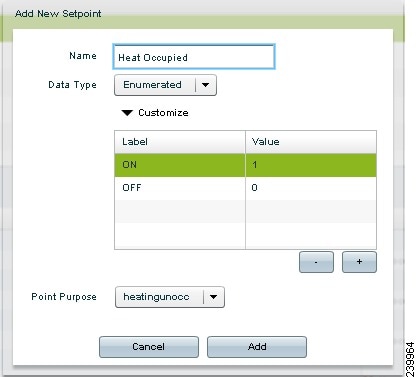
Step 2 ![]() In the Name text box, enter an appropriate name for the new setpoint.
In the Name text box, enter an appropriate name for the new setpoint.
Step 3 ![]() From the Data Type drop-down list, choose Enumerated. The Customize option is enabled.
From the Data Type drop-down list, choose Enumerated. The Customize option is enabled.
Step 4 ![]() (Optional) Click Customize to view additional configurational options. A table that displays labels and the corresponding values appears.
(Optional) Click Customize to view additional configurational options. A table that displays labels and the corresponding values appears.
Step 5 ![]() Click the "+" button to enter a new label and a corresponding value.
Click the "+" button to enter a new label and a corresponding value.
Step 6 ![]() Click the "-" button to delete an existing label and its corresponding value.
Click the "-" button to delete an existing label and its corresponding value.
Step 7 ![]() From the Point Purpose drop-down list, choose the valid value.
From the Point Purpose drop-down list, choose the valid value.
Step 8 ![]() Click Add.
Click Add.
Note ![]() This button is disabled if a name is not defined for the new setpoint.
This button is disabled if a name is not defined for the new setpoint.
Step 9 ![]() Click Cancel to cancel this operation.
Click Cancel to cancel this operation.
Editing Global Setpoints
You are allowed to edit global setpoints based on the data types, but you cannot change the defined data type of any global setpoint.
This section describes how you can edit the global setpoints and includes the following topics:
Text Data Type
To edit a global setpoint with a text data type value, perform the following steps:
Step 1 ![]() Navigate to the Global Setpoints tab in the edit mode and click Edit Setpoint.
Navigate to the Global Setpoints tab in the edit mode and click Edit Setpoint.
The Edit Setpoint dialog box appears.
Step 2 ![]() To modify the global setpoint, change the following information:
To modify the global setpoint, change the following information:
–![]() Name—Change the name of the global setpoint.
Name—Change the name of the global setpoint.
–![]() Point Purpose—Choose the appropriate Point Purpose from the drop-down list.
Point Purpose—Choose the appropriate Point Purpose from the drop-down list.
Step 3 ![]() Click Update to update the modified values.
Click Update to update the modified values.
Step 4 ![]() Click Cancel to cancel this procedure.
Click Cancel to cancel this procedure.
Numeric Data Type
To edit an existing global setpoint with a numeric data type value, perform the following steps:
Step 1 ![]() Navigate to the Global Setpoints tab in the edit mode and click Edit Setpoint.
Navigate to the Global Setpoints tab in the edit mode and click Edit Setpoint.
The Edit Setpoint dialog box appears.
Step 2 ![]() To modify the global setpoint, change the following information:
To modify the global setpoint, change the following information:
–![]() Name—Change the name of the global setpoint.
Name—Change the name of the global setpoint.
–![]() Max—Choose the maximum allowed value.
Max—Choose the maximum allowed value.
–![]() Min—Choose the minimum allowed value.
Min—Choose the minimum allowed value.
–![]() No Limit—Select the check boxes if you do not want to set any limits.
No Limit—Select the check boxes if you do not want to set any limits.
–![]() Point Purpose—Choose the appropriate Point Purpose from the drop-down list.
Point Purpose—Choose the appropriate Point Purpose from the drop-down list.
Step 3 ![]() Click Update to update the modified values.
Click Update to update the modified values.
Step 4 ![]() Click Cancel to cancel this operation.
Click Cancel to cancel this operation.
Enumerated Data Type
To edit an existing global setpoint with an enumerated data type value, perform the following steps:
Step 1 ![]() Navigate to the Global Setpoints tab in the edit mode and click Edit Setpoint.
Navigate to the Global Setpoints tab in the edit mode and click Edit Setpoint.
The Edit Setpoint dialog box appears.
Step 2 ![]() To modify the global setpoint, change the following information:
To modify the global setpoint, change the following information:
a. ![]() In the Name text box, enter a new name for the global setpoint.
In the Name text box, enter a new name for the global setpoint.
b. ![]() Click the "+" button to enter a new label and a corresponding value.
Click the "+" button to enter a new label and a corresponding value.
c. ![]() Click the "-" button to delete an existing label and its corresponding value.
Click the "-" button to delete an existing label and its corresponding value.
d. ![]() Choose the appropriate Point Purpose from the drop-down list.
Choose the appropriate Point Purpose from the drop-down list.
Step 3 ![]() Click Update to update the modified values.
Click Update to update the modified values.
Step 4 ![]() Click Cancel to cancel the operation.
Click Cancel to cancel the operation.
Deleting Global Setpoints
To delete a global setpoint within a group, perform the following steps:
Step 1 ![]() Navigate to the edit mode of the Global Setpoints tab.
Navigate to the edit mode of the Global Setpoints tab.
Step 2 ![]() Select the global setpoint that you want to delete, and click Delete Setpoint.
Select the global setpoint that you want to delete, and click Delete Setpoint.
Step 3 ![]() In the Remove Setpoint dialog box that appears, click OK.
In the Remove Setpoint dialog box that appears, click OK.
Step 4 ![]() On the Global Setpoints tab, click Save to save the changes.
On the Global Setpoints tab, click Save to save the changes.
Adding Entities
Entities are devices that are added to the Mediator. These can be added to existing global setpoint groups using the following two methods:
Manually
To manually add entities to the global setpoints group, perform the following steps:
Step 1 ![]() Navigate to the Global Setpoints tab, and click Add Entity. The Add Entity dialog box appears.
Navigate to the Global Setpoints tab, and click Add Entity. The Add Entity dialog box appears.
The nodes that you select in the navigation tree appear in the Add Entity dialog box. The left column displays check boxes; the entities that are used in another global setpoint group are disabled and cannot be selected. All entities appear in an alphabetical order.
Step 2 ![]() Select the check box next to the desired entity, and click OK. The selected entities are added to the entity group.
Select the check box next to the desired entity, and click OK. The selected entities are added to the entity group.
Discovery
You can discover entities that match one or more of the entity type setpoints defined in a group.
Note ![]() We recommend that you configure the list of point types using Mediator configTOOL before you create the setpoints. Doing so helps you to discover the listed points during the discovery methods.
We recommend that you configure the list of point types using Mediator configTOOL before you create the setpoints. Doing so helps you to discover the listed points during the discovery methods.
You can discover entities using the following two methods:
•![]() Name
Name
Device Purpose
You can discover the entities by the device type only if you specified the devices while creating the entities.
To discover an entity by the device purpose, perform the following steps:
Step 1 ![]() Navigate to the Global Setpoints tab, and click Discover.
Navigate to the Global Setpoints tab, and click Discover.
Step 2 ![]() In the Auto Discovery dialog box that appears, select the Discover device by purpose radio button.
In the Auto Discovery dialog box that appears, select the Discover device by purpose radio button.
Step 3 ![]() Click Next. The Auto Discovery dialog box appears.
Click Next. The Auto Discovery dialog box appears.
The nodes that you selected in the Navigation tree appear in the Auto Discovery dialog box. The left column displays check boxes; the entities that are used in another global setpoint group are disabled and cannot be selected.
Step 4 ![]() Select the check box next to the desired entity, and click Finish.
Select the check box next to the desired entity, and click Finish.
The selected entities are added to the entity group.
Step 5 ![]() On the Global Setpoints tab, click Save to save the changes.
On the Global Setpoints tab, click Save to save the changes.
Name
To discover an entity by the device name, perform the following steps:
Step 1 ![]() Navigate to the Global Setpoints tab, and click Discover.
Navigate to the Global Setpoints tab, and click Discover.
Step 2 ![]() In the Auto Discovery dialog box, select the Discover device by name radio button.
In the Auto Discovery dialog box, select the Discover device by name radio button.
Step 3 ![]() Click Next. The Auto Discovery dialog box appears.
Click Next. The Auto Discovery dialog box appears.
The nodes that you selected in the Navigation tree appear in the Auto Discovery dialog box. The left column displays check boxes; the entities that are used in another global setpoint group are disabled and cannot be selected.
Step 4 ![]() Enter text in the Name text box, and click Find. A list of entities that match the search criteria appear.
Enter text in the Name text box, and click Find. A list of entities that match the search criteria appear.
Step 5 ![]() Select the check box next to the desired entity, and click Finish.
Select the check box next to the desired entity, and click Finish.
The selected entities are added to the entity group.
Step 6 ![]() On the Global Setpoints tab, click Save to save the changes.
On the Global Setpoints tab, click Save to save the changes.
Deleting Entities
To delete an entity, select the entity that you want to delete, and click Remove Entity. You can select one or more entities to delete.
Pushing Global Setpoint Values
You can push the setpoint values to the properties of the entities that are managed by the setpoint group. These values, when pushed appear on all points on the downstream Mediators. Pushing the setpoint values pushes all the setpoint values and is not based on the selection of any setpoint.
To push the values for a select global setpoint group, click Push All Setpoint Values. The Pushing Values progress bar appears.
The Pushing Values progress bar closes once the values are pushed to the network successfully.
Note ![]() Clicking Push All Setpoint Values, pushes all the setpoint values and is not based on the setpoint selection.
Clicking Push All Setpoint Values, pushes all the setpoint values and is not based on the setpoint selection.
 Feedback