- Introduction to the Firepower System
- Deploying on a Management Network
- Deploying Firepower Managed Devices
- Preparing for the Installation
- Installing a Firepower Managed Device
- Setting Up Firepower Managed Devices
- Using the LCD Panel on a Firepower Device
- Hardware Specifications
- Restoring a Firepower System Appliance to Factory Defaults
- Power Requirements for Firepower Devices
- Using SFP Transceivers in Firepower 71x5 and AMP7150 Devices
- Inserting and Removing Firepower 8000 Series Modules
- Scrubbing the Hard Drive
- Preconfiguring Firepower Managed Devices
Cisco Firepower 7000 and 8000 Series Installation Guide, Version 6.x
Bias-Free Language
The documentation set for this product strives to use bias-free language. For the purposes of this documentation set, bias-free is defined as language that does not imply discrimination based on age, disability, gender, racial identity, ethnic identity, sexual orientation, socioeconomic status, and intersectionality. Exceptions may be present in the documentation due to language that is hardcoded in the user interfaces of the product software, language used based on RFP documentation, or language that is used by a referenced third-party product. Learn more about how Cisco is using Inclusive Language.
- Updated:
- November 10, 2015
Chapter: Setting Up Firepower Managed Devices
Setting Up Firepower Managed Devices
After you deploy and install a Firepower device, you must complete a setup process that allows the new appliance to communicate on your trusted management network. You must also change the administrator password and accept the end user license agreement (EULA).
The setup process also allows you to perform many initial administrative-level tasks, such as setting the time, registering and licensing devices, and scheduling updates. The options you choose during setup and registration determine the default interfaces, inline sets, zones, and policies that the system creates and applies.
The purpose of these initial configurations and policies is to provide an out-of-the-box experience and to help you quickly set up your deployment, not to restrict your options. Regardless of how you initially configure a device, you can change its configuration at any time using the Firepower Management Center. In other words, choosing a detection mode or access control policy during setup, for example, does not lock you into a specific device, zone, or policy configuration.
For more information on each of the steps in the initial setup process, see the following sections:
- Understanding the Setup Process outlines the setup process.

Note![]() If you are not already familiar with the setup process, Cisco strongly recommends you read this section first.
If you are not already familiar with the setup process, Cisco strongly recommends you read this section first.
- Performing Initial Setup on a Firepower Device Using the CLI explains how to use an interactive command line interface (CLI) to perform the setup process on a Firepower device.
- Initial Setup Page: Firepower Devices explains how to use any device’s web interface to complete its initial setup.
- Next Steps contains guidance on the post-setup tasks you may want to perform as you set up your Firepower System deployment.

system shutdown command from the CLI on a Firepower device, or the
shutdown -h now command from an appliance’s shell (sometimes called expert mode).
Understanding the Setup Process
After you deploy and install a new Firepower device as described in earlier chapters of this guide, you must complete a setup process. Before you begin the setup, make sure that you can meet the following conditions.
You must know which appliance you are setting up. For more information, see Firepower System Appliances.
To set up a new appliance, you must connect using either keyboard and monitor/KVM (keyboard, video, and mouse) or a direct Ethernet connection to the appliance’s management interface. After initial setup, you can configure the appliance for serial access. For more information, see Rack-Mounting a Firepower Device.
Note![]() Do not use a KVM console with USB mass storage to access the appliance for the initial setup because the appliance may attempt to use the mass storage device as a boot device.
Do not use a KVM console with USB mass storage to access the appliance for the initial setup because the appliance may attempt to use the mass storage device as a boot device.
You have, at minimum, the information needed to allow the appliance to communicate on your management network: an IPv4 or IPv6 management IP address, a netmask or prefix length, and a default gateway.
If you know how the appliance is deployed, the setup process is also a good time to perform many initial administrative-level tasks, including registration and licensing.

Tip![]() If you are deploying multiple appliances, set up your devices first, then their managing Firepower Management Center. The initial setup process for a device allows you to preregister it to a Firepower Management Center; the setup process for a Firepower Management Center allows you to add and license preregistered managed devices.
If you are deploying multiple appliances, set up your devices first, then their managing Firepower Management Center. The initial setup process for a device allows you to preregister it to a Firepower Management Center; the setup process for a Firepower Management Center allows you to add and license preregistered managed devices.
After you complete setup, you will use the Firepower Management Center‘s web interface to perform most management and analysis tasks for your deployment. Firepower devices have a restricted web interface that you can use only to perform basic administration. For more information, see Next Steps.
Tip![]() If you are setting up an appliance after restoring it to factory defaults (see Restoring a Firepower System Appliance to Factory Defaults) and you did not delete the appliance’s license and network settings, you can use a computer on your management network to browse directly to the appliance’s web interface to perform the setup. Skip to Initial Setup Page: Firepower Devices.
If you are setting up an appliance after restoring it to factory defaults (see Restoring a Firepower System Appliance to Factory Defaults) and you did not delete the appliance’s license and network settings, you can use a computer on your management network to browse directly to the appliance’s web interface to perform the setup. Skip to Initial Setup Page: Firepower Devices.
Beginning the Setup
The following diagram illustrates the choices you can make when setting up Firepower devices:
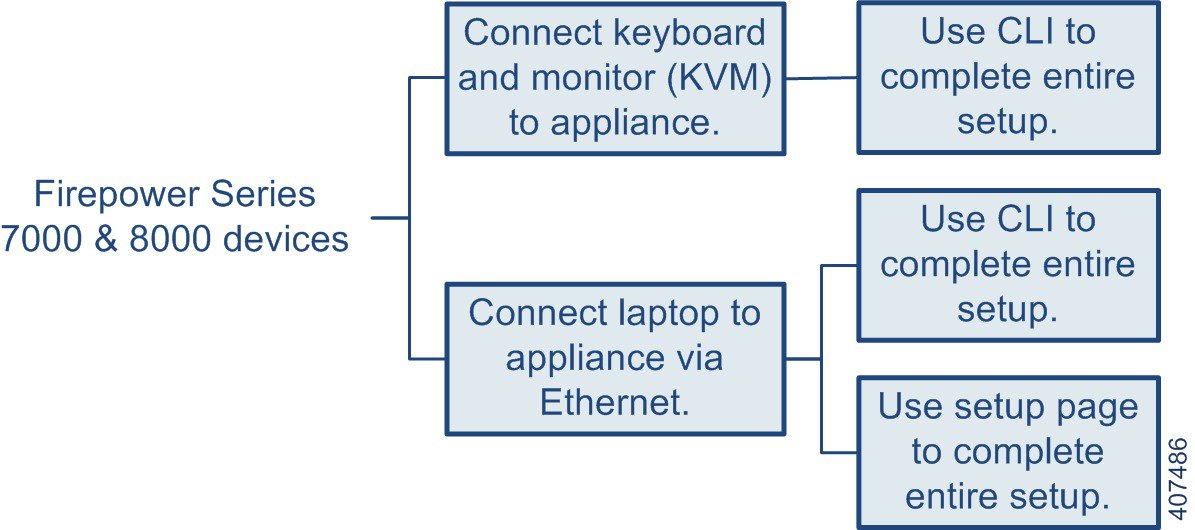
Your access to a Firepower device determines how you set it up. You have the following options:
- Regardless of how you are connected to the device, you can use the CLI to set it up; see Performing Initial Setup on a Firepower Device Using the CLI.
- If you are accessing the appliance via a direct Ethernet connection, you can browse to the appliance’s web interface from a local computer; see Initial Setup Page: Firepower Devices.
If you are setting up a reimaged device and you kept your network settings as part of the restore process, you can access the CLI via SSH or a Lights-Out Management (LOM) connection. You can also browse to the device’s web interface from a computer on your management network.
Performing Initial Setup on a Firepower Device Using the CLI
Optionally, you can use the CLI to configure Firepower devices instead of using the device’s web interface. When you first log in to a newly configured device using the CLI, you must read and accept the EULA. Then, follow the setup prompts to change the administrator password, configure the device’s network settings and detection mode. Finally, register the device to the Firepower Management Center that will manage it.
When following the setup prompts, options are listed in parentheses, such as (y/n). Defaults are listed in square brackets, such as [y]. Press Enter to confirm a choice.
Note that the CLI prompts you for much of the same setup information that a device’s setup web page does. For detailed information on these options, see Initial Setup Page: Firepower Devices.
To complete the initial setup on a Firepower device using the CLI:
Step 1![]() Log into the device. Use
Log into the device. Use admin as the username and Admin123 as the password.
The device immediately prompts you to read the EULA.
Step 2![]() Read and accept the EULA.
Read and accept the EULA.
Step 3![]() Change the password for the
Change the password for the admin account. This account has Administrator privileges and cannot be deleted.
This password allows the admin user to log into the device’s web interface and its CLI; the admin user has Configuration CLI access. Changing any user’s password for the web interface also changes the password for the CLI, and vice versa.
Cisco recommends that you use strong password that is at least eight alphanumeric characters of mixed case and includes at least one numeric character. Avoid using words that appear in a dictionary. For more information, see Change Password.
Step 4![]() Configure network settings for the device.
Configure network settings for the device.
First configure (or disable) IPv4 management settings, then IPv6. If you manually specify network settings, you must:
For more information, see Network Settings. The console may display messages as your settings are implemented.
Step 5![]() Select whether you want to allow changing of the device’s network settings using the LCD panel.
Select whether you want to allow changing of the device’s network settings using the LCD panel.
Step 6![]() Specify the detection mode based on how you deployed the device.
Specify the detection mode based on how you deployed the device.
For more information, see Detection Mode. The console may display messages as your settings are implemented. When finished, the device reminds you to register this device to a Firepower Management Center, and displays the CLI prompt.
Step 7![]() To use the CLI to register the device to the Firepower Management Center that will manage it, continue with the next section, Registering a Firepower Device to a Management Center Using the CLI.
To use the CLI to register the device to the Firepower Management Center that will manage it, continue with the next section, Registering a Firepower Device to a Management Center Using the CLI.
You must manage devices with a Firepower Management Center. If you do not register the device now, you must log in later and register it before you can add it to a Firepower Management Center.
Registering a Firepower Device to a Management Center Using the CLI
If you configured a Firepower device using the CLI, Cisco recommends that you use the CLI to register the device to a Firepower Management Center at the conclusion of the setup script. It is easiest to register a device to its Firepower Management Center during the initial setup process, because you are already logged into the device’s CLI.
To register a device, use the configure manager add command. A unique alphanumeric registration key is always required to register a device to a Firepower Management Center. This is a simple key that you specify, up to 37 characters in length, and is not the same as a license key.
In most cases, you must provide the Firepower Management Center’s hostname or the IP address along with the registration key, for example:
However, if the device and the Firepower Management Center are separated by a NAT device, enter a unique NAT ID along with the registration key, and specify DONTRESOLVE instead of the hostname, for example:
To register a device to a Firepower Management Center:
Step 1![]() Log in to the device as a user with Configuration CLI access level:
Log in to the device as a user with Configuration CLI access level:
Step 2![]() At the prompt, register the device to a Firepower Management Center using the
At the prompt, register the device to a Firepower Management Center using the configure manager add command, which has the following syntax:
configure manager add {hostname | IPv4_address | IPv6_address | DONTRESOLVE} reg_key [nat_id]
-
{hostname|IPv4_address|IPv6_address| DONTRESOLVE}specifies either the fully qualified host name or IP address of the Firepower Management Center. If the Firepower Management Center is not directly addressable, useDONTRESOLVE. - reg_key is the unique alphanumeric registration key, up to 37 characters in length, required to register a device to the Firepower Management Center.
- nat_id is an optional alphanumeric string used during the registration process between the Firepower Management Center and the device. It is required if the hostname is set to
DONTRESOLVE.
The device is ready to be added to a Firepower Management Center.
Initial Setup Page: Firepower Devices
In most cases, complete the setup process by logging into the device’s web interface and specifying initial configuration options on a setup page. You can skip this step if you already used the CLI to perform initial setup; see Performing Initial Setup on a Firepower Device Using the CLI.
You must change the administrator password, specify network settings if you have not already, and accept the EULA. You can also preregister the device to a Firepower Management Center and specify a detection mode; the detection mode and other options you choose during registration determine the default interfaces, inline sets, and zones that the system creates, as well as the policies that it initially applies to managed devices.
To complete the initial setup on a Firepower device using its web interface:
Step 1![]() Direct your browser to
Direct your browser to https:// mgmt_ip /, where mgmt_ip is the IP address of the device’s management interface.
- For a device connected to a computer with an Ethernet cable, direct the browser on that computer to the default management interface IPv4 address:
https://192.168.45.45/. - For a device where network settings are already configured, use a computer on your management network to browse to the IP address of the device’s management interface.
Step 2![]() Log in using
Log in using admin as the username and Admin123 as the password.
See the following sections for information on completing the setup:
Step 3![]() When you are finished, click Apply.
When you are finished, click Apply.
The device is configured according to your selections. You are logged into the web interface as the admin user, which has the Administrator role.
The device is ready to be added to its Firepower Management Center.
Note![]() If you connected directly to the device using an Ethernet cable, disconnect the computer and connect the device’s management interface to the management network. If you need to access the device’s web interface at any time, direct a browser on a computer on the management network to the IP address or host name that you configured during setup.
If you connected directly to the device using an Ethernet cable, disconnect the computer and connect the device’s management interface to the management network. If you need to access the device’s web interface at any time, direct a browser on a computer on the management network to the IP address or host name that you configured during setup.
Change Password
You must change the password for the admin account. This account has Administrator privileges and cannot be deleted.
This password allows the admin user to log into the device’s web interface and its CLI; the admin user has Configuration CLI access. Changing any user’s password for the web interface also changes the password for the CLI, and vice versa.
Cisco recommends that you use a strong password that is at least eight alphanumeric characters of mixed case and includes at least one numeric character. Avoid using words that appear in a dictionary.
Network Settings
A device’s network settings allow it to communicate on your management network. If you already configured the device’s network settings, this section of the page may be prepopulated.
The Firepower System provides a dual stack implementation for both IPv4 and IPv6 management environments. You must specify the management network protocol ( IPv4, IPv6, or Both). Depending on your choice, the setup page displays various fields where you must set the IPv4 or IPv6 management IP address, netmask or prefix length, and default gateway:
- For IPv4, you must set the address and netmask in dotted decimal form (for example: a netmask of 255.255.0.0).
- For IPv6 networks, you can select the Assign the IPv6 address using router autoconfiguration check box to automatically assign IPv6 network settings. Otherwise, you must set the address in colon-separated hexadecimal form and the number of bits in the prefix (for example: a prefix length of 112).
You can also specify up to three DNS servers, as well as the host name and domain for the device.
Firepower Device LCD Panel Configuration
Select whether you want to allow changing of a Firepower device’s network settings using the LCD panel.
Remote Management
You must manage a Cisco device with a Firepower Management Center. In this two-step process, you first configure remote management on the device, then add the device to a Firepower Management Center. For your convenience, the setup page allows you to preregister the device to the Firepower Management Center that will manage it.
Leave the Register This Device Now check box enabled, then specify the IP address or fully qualified domain name of the managing Firepower Management Center as the Management Host. Also, type the alphanumeric Registration Key you will later use to register the device to the Firepower Management Center. Note that this is a simple key that you specify, up to 37 characters in length, and is not the same as the license key.
Note![]() If the device and Firepower Management Center are separated by a network address translation (NAT) device, defer device registration until after you complete the initial setup. See the Managing Devices chapter in the Firepower Management Center Configuration Guide for more information.
If the device and Firepower Management Center are separated by a network address translation (NAT) device, defer device registration until after you complete the initial setup. See the Managing Devices chapter in the Firepower Management Center Configuration Guide for more information.
Time Settings
You can set the time for a device either manually or via network time protocol (NTP) from an NTP server, including the Firepower Management Center. Cisco recommends that you use the Firepower Management Center as the NTP server for its managed devices.
You can also specify the time zone used on the local web interface for the admin account. Click the current time zone to change it using a pop-up window.
Detection Mode
The detection mode you choose for a device determines how the system initially configures the device’s interfaces, and whether those interfaces belong to an inline set or security zone.
The detection mode is not a setting you can change later; it is simply an option you choose during setup that helps the system tailor the device’s initial configurations. In general, you should choose a detection mode based on how your device is deployed:
Choose this mode if your device is deployed passively, as an intrusion detection system (IDS). In a passive deployment, you can perform file and malware detection, Security Intelligence monitoring, as well as network discovery.
Choose this mode if your device is deployed inline, as an intrusion prevention system. An intrusion prevention system usually fails open and allows non-matching traffic.
In an inline deployment, you can also use AMP for Networks, file control, Security Intelligence filtering, and network discovery.
Although you can select the inline mode for any device, keep in mind that inline sets using the following interfaces lack bypass capability:
–![]() non-bypass NetMods on 8000 Series devices
non-bypass NetMods on 8000 Series devices
–![]() SFP transceivers on 71xx Family devices
SFP transceivers on 71xx Family devices
Note![]() Reimaging resets devices in inline deployments to a non-bypass configuration; this disrupts traffic on your network until you reconfigure bypass mode. For more information, see Traffic Flow During the Restore Process.
Reimaging resets devices in inline deployments to a non-bypass configuration; this disrupts traffic on your network until you reconfigure bypass mode. For more information, see Traffic Flow During the Restore Process.
Choose this mode if your device is deployed inline as part of an access control deployment, that is, if you want to perform application, user, and URL control. A device configured to perform access control usually fails closed and blocks non-matching traffic. Rules explicitly specify the traffic to pass.
You should also choose this mode if you want to take advantage of your device’s specific hardware-based capabilities, which include (depending on model): high availability, strict TCP enforcement, fast-path rules, switching, routing, DHCP, NAT, and VPN.
In an access control deployment, you can also perform AMP for Networks, file control, Security Intelligence filtering, and network discovery.
Choose this mode if your device is deployed passively, to perform host, application, and user discovery only.
The following table lists the interfaces, inline sets, and zones that the system creates depending on the detection mode you choose.
|
|
|
|
|
|---|---|---|---|
first pair added to Default Inline Set—one to the Internal and one to the External zone |
|||
Note that security zones are a Firepower Management Center-level configuration which the system does not create until you actually register the device to the Firepower Management Center. Upon registration, if the appropriate zone (Internal, External, or Passive) already exists on the Firepower Management Center, the registration process adds the listed interfaces to the existing zone. If the zone does not exist, the system creates it and adds the interfaces. For detailed information on interfaces, inline sets, and security zones, see the Firepower Management Center Configuration Guide.
Automatic Backups
The device provides a mechanism for archiving data so that configuration and event data can be restored in case of failure. As part of the initial setup, you can Enable Automatic Backups.
Enabling this setting creates a scheduled task that creates a weekly backup of the configurations on the device.
End User License Agreement
Read the EULA carefully and, if you agree to abide by its provisions, select the check box. Make sure that all the information you provided is correct, and click Apply. The device is configured according to your selections and is ready to be added to its managing Firepower Management Center.
Next Steps
After you complete the initial setup process for an appliance and verify its success, Cisco recommends that you complete various administrative tasks that make your deployment easier to manage. You should also complete any tasks you skipped during the initial setup, such as device registration and licensing. For detailed information on any the tasks described in the following sections, as well as information on how you can begin to configure your deployment, see the Firepower Management Center Configuration Guide.
Tip![]() If you want to use a serial or LOM/SOL connection to access your appliance’s console, you should redirect console output; see Testing an Inline Bypass Interface Installation. If you want to use LOM specifically, you must enable the feature as well as enable at least one LOM user; see Enabling LOM and LOM Users.
If you want to use a serial or LOM/SOL connection to access your appliance’s console, you should redirect console output; see Testing an Inline Bypass Interface Installation. If you want to use LOM specifically, you must enable the feature as well as enable at least one LOM user; see Enabling LOM and LOM Users.
After you complete the initial setup, the only user on the system is the admin user, which has the Administrator role and access. Users with that role have full menu and configuration access to the system, including via the shell or CLI. Cisco recommends that you limit the use of the admin account (and the Administrator role) for security and auditing reasons.
Creating a separate account for each person who will use the system allows your organization not only to audit actions and changes made by each user, but also to limit each person’s associated user access role or roles. This is especially important on the Firepower Management Center, where you perform most of your configuration and analysis tasks. For example, an analyst needs access to event data to analyze the security of your network, but may not require access to administrative functions for the deployment.
The system includes ten predefined user roles designed for a variety of administrators and analysts. You can also create custom user roles with specialized access privileges.
By default, all appliances have an initial system policy applied. The system policy governs settings that are likely to be similar for multiple appliances in a deployment, such as mail relay host preferences and time synchronization settings. Cisco recommends that you use the Firepower Management Center to apply the same system policy to itself and all the devices it manages.
By default, the Firepower Management Center also has a health policy applied. A health policy, as part of the health monitoring feature, provides the criteria for the system continuously monitoring the performance of the appliances in your deployment. Cisco recommends that you use the Firepower Management Center to apply a health policy to all the devices it manages.
You should update the system software on your appliances before you begin any deployment. Cisco recommends that all the appliances in your deployment run the most recent version of the Firepower System. If you are using them in your deployment, you should also install the latest intrusion rule updates, VDB, and GeoDB.
 Feedback