ASDM Book 2: Cisco ASA Series Firewall ASDM Configuration Guide, 7.2
Bias-Free Language
The documentation set for this product strives to use bias-free language. For the purposes of this documentation set, bias-free is defined as language that does not imply discrimination based on age, disability, gender, racial identity, ethnic identity, sexual orientation, socioeconomic status, and intersectionality. Exceptions may be present in the documentation due to language that is hardcoded in the user interfaces of the product software, language used based on RFP documentation, or language that is used by a referenced third-party product. Learn more about how Cisco is using Inclusive Language.
- Updated:
- March 17, 2014
Chapter: Connection Limits and Timeouts
Connection Settings
This chapter describes how to configure connection settings for connections that go through the ASA, or for management connections, that go to the ASA. Connection settings include:
Information About Connection Settings
This section describes why you might want to limit connections and includes the following topics:
- TCP Intercept and Limiting Embryonic Connections
- Disabling TCP Intercept for Management Packets for Clientless SSL Compatibility
- Dead Connection Detection (DCD)
- TCP Sequence Randomization
- TCP Normalization
- TCP State Bypass
TCP Intercept and Limiting Embryonic Connections
Limiting the number of embryonic connections protects you from a DoS attack. The ASA uses the per-client limits and the embryonic connection limit to trigger TCP Intercept, which protects inside systems from a DoS attack perpetrated by flooding an interface with TCP SYN packets. An embryonic connection is a connection request that has not finished the necessary handshake between source and destination. TCP Intercept uses the SYN cookies algorithm to prevent TCP SYN-flooding attacks. A SYN-flooding attack consists of a series of SYN packets usually originating from spoofed IP addresses. The constant flood of SYN packets keeps the server SYN queue full, which prevents it from servicing connection requests. When the embryonic connection threshold of a connection is crossed, the ASA acts as a proxy for the server and generates a SYN-ACK response to the client SYN request. When the ASA receives an ACK back from the client, it can then authenticate the client and allow the connection to the server.

Note![]() When you use TCP SYN cookie protection to protect servers from SYN attacks, you must set the embryonic connection limit lower than the TCP SYN backlog queue on the server that you want to protect. Otherwise, valid clients can nolonger access the server during a SYN attack.
When you use TCP SYN cookie protection to protect servers from SYN attacks, you must set the embryonic connection limit lower than the TCP SYN backlog queue on the server that you want to protect. Otherwise, valid clients can nolonger access the server during a SYN attack.
To view TCP Intercept statistics, including the top 10 servers under attack, see Chapter25, “Threat Detection”
Disabling TCP Intercept for Management Packets for Clientless SSL Compatibility
By default, TCP management connections have TCP Intercept always enabled. When TCP Intercept is enabled, it intercepts the 3-way TCP connection establishment handshake packets and thus deprives the ASA from processing the packets for clientless SSL. Clientless SSL requires the ability to process the 3-way handshake packets to provide selective ACK and other TCP options for clientless SSL connections. To disable TCP Intercept for management traffic, you can set the embryonic connection limit; only after the embryonic connection limit is reached is TCP Intercept enabled.
Dead Connection Detection (DCD)
DCD detects a dead connection and allows it to expire, without expiring connections that can still handle traffic. You configure DCD when you want idle, but valid connections to persist.
When you enable DCD, idle timeout behavior changes. With idle timeout, DCD probes are sent to each of the two end-hosts to determine the validity of the connection. If an end-host fails to respond after probes are sent at the configured intervals, the connection is freed, and reset values, if configured, are sent to each of the end-hosts. If both end-hosts respond that the connection is valid, the activity timeout is updated to the current time and the idle timeout is rescheduled accordingly.
Enabling DCD changes the behavior of idle-timeout handling in the TCP normalizer. DCD probing resets the idle timeout on the connections seen in the show conn command. To determine when a connection that has exceeded the configured timeout value in the timeout command but is kept alive due to DCD probing, the show service-policy command includes counters to show the amount of activity from DCD.
TCP Sequence Randomization
Each TCP connection has two ISNs: one generated by the client and one generated by the server. The ASA randomizes the ISN of the TCP SYN passing in both the inbound and outbound directions.
Randomizing the ISN of the protected host prevents an attacker from predecting the next ISN for a new connection and potentially hijacking the new session.
TCP initial sequence number randomization can be disabled if required. For example:
- If another in-line firewall is also randomizing the initial sequence numbers, there is no need for both firewalls to be performing this action, even though this action does not affect the traffic.
- If you use eBGP multi-hop through the ASA, and the eBGP peers are using MD5. Randomization breaks the MD5 checksum.
- You use a WAAS device that requires the ASA not to randomize the sequence numbers of connections.
TCP Normalization
The TCP normalization feature identifies abnormal packets that the ASA can act on when they are detected; for example, the ASA can allow, drop, or clear the packets. TCP normalization helps protect the ASA from attacks. TCP normalization is always enabled, but you can customize how some features behave.
The TCP normalizer includes non-configurable actions and configurable actions. Typically, non-configurable actions that drop or clear connections apply to packets that are always bad. Configurable actions (as detailed in Customizing the TCP Normalizer with a TCP Map) might need to be customized depending on your network needs.
TCP State Bypass
By default, all traffic that goes through the ASA is inspected using the Adaptive Security Algorithm and is either allowed through or dropped based on the security policy. The ASA maximizes the firewall performance by checking the state of each packet (is this a new connection or an established connection?) and assigning it to either the session management path (a new connection SYN packet), the fast path (an established connection), or the control plane path (advanced inspection). See the general operations configuration guide for more detailed information about the stateful firewall.
TCP packets that match existing connections in the fast path can pass through the ASA without rechecking every aspect of the security policy. This feature maximizes performance. However, the method of establishing the session in the fast path using the SYN packet, and the checks that occur in the fast path (such as TCP sequence number), can stand in the way of asymmetrical routing solutions: both the outbound and inbound flow of a connection must pass through the same ASA.
For example, a new connection goes to ASA 1. The SYN packet goes through the session management path, and an entry for the connection is added to the fast path table. If subsequent packets of this connection go through ASA 1, then the packets will match the entry in the fast path, and are passed through. But if subsequent packets go to ASA 2, where there was not a SYN packet that went through the session management path, then there is no entry in the fast path for the connection, and the packets are dropped. Figure 20-1 shows an asymmetric routing example where the outbound traffic goes through a different ASA than the inbound traffic:
Figure 20-1 Asymmetric Routing
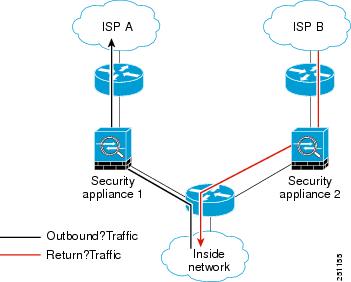
If you have asymmetric routing configured on upstream routers, and traffic alternates between two ASAs, then you can configure TCP state bypass for specific traffic. TCP state bypass alters the way sessions are established in the fast path and disables the fast path checks. This feature treats TCP traffic much as it treats a UDP connection: when a non-SYN packet matching the specified networks enters the ASA, and there is not an fast path entry, then the packet goes through the session management path to establish the connection in the fast path. Once in the fast path, the traffic bypasses the fast path checks.
Licensing Requirements for Connection Settings
|
|
|
|---|---|
Guidelines and Limitations
Supported in single and multiple context mode.
Supported in routed and transparent mode.
TCP State Bypass Unsupported Features
The following features are not supported when you use TCP state bypass:
- Application inspection—Application inspection requires both inbound and outbound traffic to go through the same ASA, so application inspection is not supported with TCP state bypass.
- AAA authenticated sessions—When a user authenticates with one ASA, traffic returning via the other ASA will be denied because the user did not authenticate with that ASA.
- TCP Intercept, maximum embryonic connection limit, TCP sequence number randomization—The ASA does not keep track of the state of the connection, so these features are not applied.
- TCP normalization—The TCP normalizer is disabled.
- SSM and SSC functionality—You cannot use TCP state bypass and any application running on an SSM or SSC, such as IPS or CSC.
TCP State Bypass NAT Guidelines
Because the translation session is established separately for each ASA, be sure to configure static NAT on both ASAs for TCP state bypass traffic; if you use dynamic NAT, the address chosen for the session on ASA 1 will differ from the address chosen for the session on ASA 2.
Maximum Concurrent and Embryonic Connection Guidelines
Depending on the number of CPU cores on your ASA model, the maximum concurrent and embryonic connections may exceed the configured numbers due to the way each core manages connections. In the worst case scenario, the ASA allows up to n -1 extra connections and embryonic connections, where n is the number of cores. For example, if your model has 4 cores, if you configure 6 concurrent connections and 4 embryonic connections, you could have an additional 3 of each type. To determine the number of cores for your model, enter the show cpu core command.
Default Settings
Configuring Connection Settings
This section includes the following topics:
- Customizing the TCP Normalizer with a TCP Map
- Configuring Connection Settings
- Configuring Global Timeouts
Task Flow For Configuring Connection Settings
Step 1![]() For TCP normalization customization, create a TCP map according to the Customizing the TCP Normalizer with a TCP Map.
For TCP normalization customization, create a TCP map according to the Customizing the TCP Normalizer with a TCP Map.
Step 2![]() For all connection settings except for global timeouts, configure a service policy according to Chapter1, “Service Policy”
For all connection settings except for global timeouts, configure a service policy according to Chapter1, “Service Policy”
Step 3![]() Configure connection settings according to the Configuring Connection Settings.
Configure connection settings according to the Configuring Connection Settings.
Step 4![]() Configure global timeouts according to the Configuring Global Timeouts.
Configure global timeouts according to the Configuring Global Timeouts.
Customizing the TCP Normalizer with a TCP Map
To customize the TCP normalizer, first define the settings using a TCP map.
Detailed Steps
Step 1![]() Choose the Configuration > Firewall > Objects > TCP Maps pane, and click Add.
Choose the Configuration > Firewall > Objects > TCP Maps pane, and click Add.
The Add TCP Map dialog box appears.
Step 2![]() In the TCP Map Name field, enter a name.
In the TCP Map Name field, enter a name.
Step 3![]() In the Queue Limit field, enter the maximum number of out-of-order packets, between 0 and 250 packets.
In the Queue Limit field, enter the maximum number of out-of-order packets, between 0 and 250 packets.
The Queue Limit sets the maximum number of out-of-order packets that can be buffered and put in order for a TCP connection. The default is 0, which means this setting is disabled and the default system queue limit is used depending on the type of traffic:
- Connections for application inspection, IPS, and TCP check-retransmission have a queue limit of 3 packets. If the ASA receives a TCP packet with a different window size, then the queue limit is dynamically changed to match the advertised setting.
- For other TCP connections, out-of-order packets are passed through untouched.
If you set the Queue Limit to be 1 or above, then the number of out-of-order packets allowed for all TCP traffic matches this setting. For example, for application inspection, IPS, and TCP check-retransmission traffic, any advertised settings from TCP packets are ignored in favor of the Queue Limit setting. For other TCP traffic, out-of-order packets are now buffered and put in order instead of passed through untouched.
Step 4![]() In the Timeout field, set the maximum amount of time that out-of-order packets can remain in the buffer, between 1 and 20 seconds.
In the Timeout field, set the maximum amount of time that out-of-order packets can remain in the buffer, between 1 and 20 seconds.
If they are not put in order and passed on within the timeout period, then they are dropped. The default is 4 seconds. You cannot change the timeout for any traffic if the Queue Limit is set to 0; you need to set the limit to be 1 or above for the Timeout to take effect.
Step 5![]() In the Reserved Bits area, click Clear and allow, Allow only, or Drop.
In the Reserved Bits area, click Clear and allow, Allow only, or Drop.
Allow only allows packets with the reserved bits in the TCP header.
Clear and allow clears the reserved bits in the TCP header and allows the packet.
Drop drops the packet with the reserved bits in the TCP header.
Step 6![]() Check any of the following options:
Check any of the following options:
- Clear urgent flag—Clears the URG flag through the ASA. The URG flag is used to indicate that the packet contains information that is of higher priority than other data within the stream. The TCP RFC is vague about the exact interpretation of the URG flag, therefore end systems handle urgent offsets in different ways, which may make the end system vulnerable to attacks.
- Drop connection on window variation—Drops a connection that has changed its window size unexpectedly. The window size mechanism allows TCP to advertise a large window and to subsequently advertise a much smaller window without having accepted too much data. From the TCP specification, “shrinking the window” is strongly discouraged. When this condition is detected, the connection can be dropped.
- Drop packets that exceed maximum segment size—Drops packets that exceed MSS set by peer.
- Check if transmitted data is the same as original—Enables the retransmit data checks.
- Drop packets which have past-window sequence—Drops packets that have past-window sequence numbers, namely the sequence number of a received TCP packet is greater than the right edge of the TCP receiving window. If you do not check this option, then the Queue Limit must be set to 0 (disabled).
- Drop SYN Packets with data—Drops SYN packets with data.
- Enable TTL Evasion Protection—Enables the TTL evasion protection offered by the ASA. Do not enable this option if you want to prevent attacks that attempt to evade security policy.
- For example, an attacker can send a packet that passes policy with a very short TTL. When the TTL goes to zero, a router between the ASA and the endpoint drops the packet. It is at this point that the attacker can send a malicious packet with a long TTL that appears to the ASA to be a retransmission and is passed. To the endpoint host, however, it is the first packet that has been received by the attacker. In this case, an attacker is able to succeed without security preventing the attack.
- Verify TCP Checksum—Enables checksum verification.
- Drop SYNACK Packets with data—Drops TCP SYNACK packets that contain data.
- Drop packets with invalid ACK—Drops packets with an invalid ACK. You might see invalid ACKs in the following instances:
–![]() In the TCP connection SYN-ACK-received status, if the ACK number of a received TCP packet is not exactly same as the sequence number of the next TCP packet sending out, it is an invalid ACK.
In the TCP connection SYN-ACK-received status, if the ACK number of a received TCP packet is not exactly same as the sequence number of the next TCP packet sending out, it is an invalid ACK.
–![]() Whenever the ACK number of a received TCP packet is greater than the sequence number of the next TCP packet sending out, it is an invalid ACK.
Whenever the ACK number of a received TCP packet is greater than the sequence number of the next TCP packet sending out, it is an invalid ACK.
Note![]() TCP packets with an invalid ACK are automatically allowed for WAAS connections.
TCP packets with an invalid ACK are automatically allowed for WAAS connections.
Step 7![]() To set TCP options, check any of the following options:
To set TCP options, check any of the following options:
- Clear Selective Ack—Sets whether the selective-ack TCP option is allowed or cleared.
- Clear TCP Timestamp—Sets whether the TCP timestamp option is allowed or cleared.
- Clear Window Scale—Sets whether the window scale timestamp option is allowed or cleared.
- Range—Sets the valid TCP options ranges, which should fall within 6-7 and 9-255. The lower bound should be less than or equal to the upper bound. Choose Allow or Drop for each range.
Configuring Connection Settings
Detailed Steps
Step 1![]() Configure a service policy on the Configuration > Firewall > Service Policy Rules pane according to Chapter1, “Service Policy”
Configure a service policy on the Configuration > Firewall > Service Policy Rules pane according to Chapter1, “Service Policy”
You can configure connection limits as part of a new service policy rule, or you can edit an existing service policy.
Step 2![]() On the Rule Actions dialog box, click the Connection Settings tab.
On the Rule Actions dialog box, click the Connection Settings tab.
Step 3![]() To set maximum connections, configure the following values in the Maximum Connections area:
To set maximum connections, configure the following values in the Maximum Connections area:
- TCP & UDP Connections—Specifies the maximum number of simultaneous TCP and UDP connections for all clients in the traffic class, up to 2000000. The default is 0 for both protocols, which means the maximum possible connections are allowed.
- Embryonic Connections—Specifies the maximum number of embryonic connections per host up to 2000000. An embryonic connection is a connection request that has not finished the necessary handshake between source and destination. This limit enables the TCP Intercept feature. The default is 0, which means the maximum embryonic connections. TCP Intercept protects inside systems from a DoS attack perpetrated by flooding an interface with TCP SYN packets. When the embryonic limit has been surpassed, the TCP intercept feature intercepts TCP SYN packets from clients to servers on a higher security level. SYN cookies are used during the validation process and help to minimize the amount of valid traffic being dropped. Thus, connection attempts from unreachable hosts will never reach the server.
- Per Client Connections—Specifies the maximum number of simultaneous TCP and UDP connections for each client up to 2000000. When a new connection is attempted by a client that already has opened the maximum per-client number of connections, the ASA rejects the connection and drops the packet.
- Per Client Embryonic Connections—Specifies the maximum number of simultaneous TCP embryonic connections for each client up to 2000000. When a new TCP connection is requested by a client that already has the maximum per-client number of embryonic connections open through the ASA, the ASA proxies the request to the TCP Intercept feature, which prevents the connection.
Step 4![]() To configure connection timeouts, configure the following values in the TCP Timeout area:
To configure connection timeouts, configure the following values in the TCP Timeout area:
- Connection Timeout—Specifies the idle time until a connection slot (of any protocol, not just TCP) is freed. Enter 0:0:0 to disable timeout for the connection. This duration must be at least 5 minutes. The default is 1 hour.
- Send reset to TCP endpoints before timeout—Specifies that the ASA should send a TCP reset message to the endpoints of the connection before freeing the connection slot.
- Embryonic Connection Timeout—Specifies the idle time until an embryonic (half-open) connection slot is freed. Enter 0:0:0 to disable timeout for the connection. The default is 30 seconds.
- Half Closed Connection Timeout—Sets the idle timeout period until a half-closed connection is closed, between 0:5:0 (for 9.1(1) and earlier) or 0:0:30 (for 9.1(2) and later) and 1193:0:0. The default is 0:10:0. Half-closed connections are not affected by DCD. Also, the ASA does not send a reset when taking down half-closed connections.
Step 5![]() To disable randomized sequence numbers, uncheck Randomize Sequence Number.
To disable randomized sequence numbers, uncheck Randomize Sequence Number.
TCP initial sequence number randomization can be disabled if another in-line firewall is also randomizing the initial sequence numbers, because there is no need for both firewalls to be performing this action. However, leaving ISN randomization enabled on both firewalls does not affect the traffic.
Each TCP connection has two ISNs: one generated by the client and one generated by the server. The security appliance randomizes the ISN of the TCP SYN passing in the outbound direction. If the connection is between two interfaces with the same security level, then the ISN will be randomized in the SYN in both directions.
Randomizing the ISN of the protected host prevents an attacker from predecting the next ISN for a new connection and potentially hijacking the new session.
Step 6![]() To configure TCP normalization, check Use TCP Map. Choose an existing TCP map from the drop-down list (if available), or add a new one by clicking New.
To configure TCP normalization, check Use TCP Map. Choose an existing TCP map from the drop-down list (if available), or add a new one by clicking New.
The Add TCP Map dialog box appears. See Customizing the TCP Normalizer with a TCP Map.
Step 8![]() To set the time to live, check Decrement time to live for a connection.
To set the time to live, check Decrement time to live for a connection.
Step 9![]() To enable TCP state bypass, in the Advanced Options area, check TCP State Bypass.
To enable TCP state bypass, in the Advanced Options area, check TCP State Bypass.
Configuring Global Timeouts
The Configuration > Firewall > Advanced > Global Timeouts pane lets you set the timeout durations for use with the ASA. All durations are displayed in the format hh : mm : ss. It sets the idle time for the connection and translation slots of various protocols. If the slot has not been used for the idle time specified, the resource is returned to the free pool. TCP connection slots are freed approximately 60 seconds after a normal connection close sequence.
In all cases, except for Authentication absolute and Authentication inactivity, unchecking the check boxes means there is no timeout value. For those two cases, clearing the check box means to reauthenticate on every new connection.
- Connection—Modifies the idle time until a connection slot is freed. Enter 0:0:0 to disable timeout for the connection. This duration must be at least 5 minutes. The default is 1 hour.
- Half-closed—Modifies the idle time until a TCP half-closed connection closes. The minimum is 5 minutes. The default is 10 minutes. Enter 0:0:0 to disable timeout for a half-closed connection.
- UDP—Modifies the idle time until a UDP protocol connection closes. This duration must be at least 1 minute. The default is 2 minutes. Enter 0:0:0 to disable timeout.
- ICMP—Modifies the idle time after which general ICMP states are closed.
- H.323—Modifies the idle time until an H.323 media connection closes. The default is 5 minutes. Enter 0:0:0 to disable timeout.
- H.225—Modifies the idle time until an H.225 signaling connection closes. The H.225 default timeout is 1 hour (1:0:0). Setting the value of 0:0:0 means never close this connection. To close this connection immediately after all calls are cleared, a value of 1 second (0:0:1) is recommended.
- MGCP—Modifies the timeout value for MGCP which represents the idle time after which MGCP media ports are closed. The MGCP default timeout is 5 minutes (0:5:0). Enter 0:0:0 to disable timeout.
- MGCP PAT—Modifies the idle time after which an MGCP PAT translation is removed. The default is 5 minutes (0:5:0). The minimum time is 30 seconds. Uncheck the check box to return to the default value.
- TCP Proxy Reassembly—Configures the idle timeout after which buffered packets waiting for reassembly are dropped, between 0:0:10 and 1193:0:0. The default is 1 minute (0:1:0).
- Floating Connection—When multiple static routes exist to a network with different metrics, the ASA uses the one with the best metric at the time of connection creation. If a better route becomes available, then this timeout lets connections be closed so a connection can be reestablished to use the better route. The default is 0 (the connection never times out). To take advantage of this feature, change the timeout to a new value between 0:1:0 and 1193:0:0.
- SUNRPC—Modifies the idle time until a SunRPC slot is freed. This duration must be at least 1 minute. The default is 10 minutes. Enter 0:0:0 to disable timeout.
- SIP—Modifies the idle time until an SIP signalling port connection closes. This duration must be at least 5 minutes. The default is 30 minutes.
- SIP Media—Modifies the idle time until an SIP media port connection closes. This duration must be at least 1 minute. The default is 2 minutes.
- SIP Provisional Media—Modifies the timeout value for SIP provisional media connections, between 0:1:0 and 1193:0:0. The default is 2 minutes.
- SIP Invite—Modifies the idle time after which pinholes for PROVISIONAL responses and media xlates will be closed. The minimum value is 0:1:0, the maximum value is 0:30:0. The default value is 0:3:0.
- SIP Disconnect—Modifies the idle time after which SIP session is deleted if the 200 OK is not received for a CANCEL or a BYE message. The minimum value is 0:0:1, the maximum value is 0:10:0. The default value is 0:2:0.
- Authentication absolute—Modifies the duration until the authentication cache times out and you have to reauthenticate a new connection. This duration must be shorter than the Translation Slot value. The system waits until you start a new connection to prompt you again. Enter 0:0:0 to disable caching and reauthenticate on every new connection.
Note![]() Do not set this value to 0:0:0 if passive FTP is used on the connections.
Do not set this value to 0:0:0 if passive FTP is used on the connections.
Note![]() When Authentication Absolute = 0, HTTPS authentication may not work. If a browser initiates multiple TCP connections to load a web page after HTTPS authentication, the first connection is permitted through, but subsequent connections trigger authentication. As a result, users are continuously presented with an authentication page, even after successful authentication. To work around this, set the authentication absolute timeout to 1 second. This workaround opens a 1-second window of opportunity that might allow non-authenticated users to go through the firewall if they are coming from the same source IP address.
When Authentication Absolute = 0, HTTPS authentication may not work. If a browser initiates multiple TCP connections to load a web page after HTTPS authentication, the first connection is permitted through, but subsequent connections trigger authentication. As a result, users are continuously presented with an authentication page, even after successful authentication. To work around this, set the authentication absolute timeout to 1 second. This workaround opens a 1-second window of opportunity that might allow non-authenticated users to go through the firewall if they are coming from the same source IP address.
- Authentication inactivity—Modifies the idle time until the authentication cache times out and users have to reauthenticate a new connection. This duration must be shorter than the Translation Slot value.
- Translation Slot—Modifies the idle time until a translation slot is freed. This duration must be at least 1 minute. The default is 3 hours. Enter 0:0:0 to disable the timeout.
- (8.4(3) and later, not including 8.5(1) and 8.6(1)) PAT Translation Slot—Modifies the idle time until a PAT translation slot is freed, between 0:0:30 and 0:5:0. The default is 30 seconds. You may want to increase the timeout if upstream routers reject new connections using a freed PAT port because the previous connection might still be open on the upstream device.
Feature History for Connection Settings
Table 20-1 lists each feature change and the platform release in which it was implemented. ASDM is backwards-compatible with multiple platform releases, so the specific ASDM release in which support was added is not listed.
 Feedback