- Preface
- New and Changed Information in Release 4.3.x
- Implementing MPLS Layer 2 VPNs
- Implementing Virtual Private LAN Services
- Implementing IPv6 VPN Provider Edge Transport over MPLS
- Implementing Layer 2 Tunnel Protocol Version 3
- Implementing MPLS VPNs over IP Tunnels
- Implementing MPLS Layer 3 VPNs
- Index
Cisco IOS XR Virtual Private Network Configuration Guide for the Cisco XR 12000 Series Router, Release 4.3.x
Bias-Free Language
The documentation set for this product strives to use bias-free language. For the purposes of this documentation set, bias-free is defined as language that does not imply discrimination based on age, disability, gender, racial identity, ethnic identity, sexual orientation, socioeconomic status, and intersectionality. Exceptions may be present in the documentation due to language that is hardcoded in the user interfaces of the product software, language used based on RFP documentation, or language that is used by a referenced third-party product. Learn more about how Cisco is using Inclusive Language.
- Updated:
- December 20, 2012
Chapter: Implementing MPLS VPNs over IP Tunnels
- Contents
- Prerequisites for Configuring MPLS VPNs over IP Tunnels
- Restrictions for Configuring MPLS VPNs over IP Tunnels
- Information About MPLS VPNs over IP Tunnels
- Overview: MPLS VPNs over IP Tunnels
- Advertising Tunnel Type and Tunnel Capabilities Between PE Routers—BGP
- PE Routers and Address Space
- Packet Validation Mechanism
- Quality of Service Using the Modular QoS CLI
- BGP Multipath Load Sharing for MPLS VPNs over IP Tunnels
- Inter-AS and CSC Support over IP Tunnels
- Multiple Tunnel Source Address
- How to Configure MPLS VPNs over IP Tunnels
Implementing MPLS VPNs over IP Tunnels
The MPLS VPNs over IP Tunnels feature lets you deploy Layer 3 Virtual Private Network (L3VPN) services, over an IP core network, using L2TPv3 multipoint tunneling instead of MPLS. This allows L2TPv3 tunnels to be configured as multipoint tunnels to transport IP VPN services across the core IP network.
Feature History for Implementing MPLS VPNs over IP Tunnels on Cisco IOS XR
|
|
|
Contents
Prerequisites for Configuring MPLS VPNs over IP Tunnels
The following prerequisites are required to implement MPLS VPNs over IP Tunnels:
- To perform these configuration tasks, your Cisco IOS XR software system administrator must assign you to a user group associated with a task group that includes the corresponding command task IDs. All command task IDs are listed in individual command references and in the Cisco IOS XR Task ID Reference Guide.
If you need assistance with your task group assignment, contact your system administrator.
Restrictions for Configuring MPLS VPNs over IP Tunnels
The following restriction applies when you configure MPLS VPNs over IP tunnels:
Information About MPLS VPNs over IP Tunnels
To implement MPLS VPNs over IP Tunnels, you must understand the following concepts:
- Overview: MPLS VPNs over IP Tunnels
- Advertising Tunnel Type and Tunnel Capabilities Between PE Routers—BGP
- PE Routers and Address Space
- Packet Validation Mechanism
- Quality of Service Using the Modular QoS CLI
- BGP Multipath Load Sharing for MPLS VPNs over IP Tunnels
- Inter-AS and CSC Support over IP Tunnels
- Multiple Tunnel Source Address
Overview: MPLS VPNs over IP Tunnels
Traditionally, VPN services are deployed over IP core networks using MPLS, or L2TPv3 tunnels using point-to-point links. However, an L2TPv3 multipoint tunnel network allows L3VPN services to be carried through the core without the configuration of MPLS.
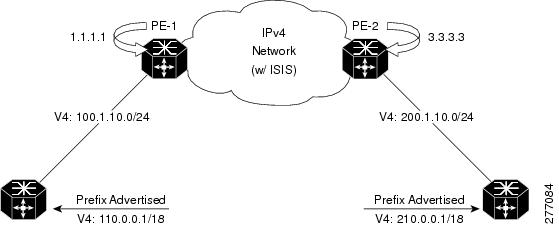
L2TPv3 multipoint tunneling supports multiple tunnel endpoints, which creates a full-mesh topology that requires only one tunnel to be configured on each PE router. This permits VPN traffic to be carried from enterprise networks across cooperating service provider core networks to remote sites.
Figure 24 illustrates the topology used for the configuration steps.
Figure 24 Basic MPLS VPN over IP Topology
Advertising Tunnel Type and Tunnel Capabilities Between PE Routers—BGP
Border Gateway Protocol (BGP) is used to advertise the tunnel endpoints and the subaddress family identifier (SAFI) specific attributes (which contains the tunnel type, and tunnel capabilities). This feature introduces the tunnel SAFI and the BGP SAFI-Specific Attribute (SSA) attribute.
These attributes allow BGP to distribute tunnel encapsulation information between PE routers. VPNv4 traffic is routed through these tunnels. The next hop, advertised in BGP VPNv4 updates, determines which tunnel to use for routing tunnel traffic.
SAFI
The tunnel SAFI defines the tunnel endpoint and carries the endpoint IPv4 address and next hop. It is identified by the SAFI number 64.
BGP SSA
The BGP SSA carries the BGP preference and BGP flags. It also carries the tunnel cookie, tunnel cookie length, and session ID. It is identified by attribute number 19.
PE Routers and Address Space
One multipoint L2TPv3 tunnel must be configured on each PE router. To create the VPN, you must configure a unique Virtual Routing and Forwarding (VRF) instance. The tunnel that transports the VPN traffic across the core network resides in its own address space. A special purpose VRF called a Resolve in VRF (RiV) is created to manage the tunnel address space. You also configure the address space under the RiV that is associated with the tunnel and a static route in the RiV to route outgoing traffic through the tunnel.
Packet Validation Mechanism
The MPLS VPNs over IP Tunnels feature provides a simple mechanism to validate received packets from appropriate peers. The multipoint L2TPv3 tunnel header is automatically configured with a 64-bit cookie and L2TPv3 session ID. This packet validation mechanism protects the VPN from illegitimate traffic sources. The cookie and session ID are not user-configurable, but they are visible in the packet as it is routed between the two tunnel endpoints. Note that this packet validation mechanism does not protect the VPN from hackers who are able to monitor legitimate traffic between PE routers.
Quality of Service Using the Modular QoS CLI
To configure the bandwidth on the encapsulation and decapsulation interfaces, use the modular QoS CLI (MQC).

Use the MQC to configure the IP precedence or Differentiated Services Code Point (DSCP) value set in the IP carrier header during packet encapsulation. To set these values, enter a standalone set command or a police command using the keyword tunnel. In the input policy on the encapsulation interface, you can set the precedence or DSCP value in the IP payload header by using MQC commands without the keyword tunnel.
Note![]() You must attach a QoS policy to the physical interface—not to the tunnel interface.
You must attach a QoS policy to the physical interface—not to the tunnel interface.
If Modified Deficit Round Robin (MDRR)/Weighted Random Early Detection (WRED) is configured for the encapsulation interface in the input direction, the final value of the precedence or DSCP field in the IP carrier header is used to determine the precedence class for which the MDRR/WRED policy is applied. On the decapsulation interface in the input direction, you can configure a QoS policy based on the precedence or DSCP value in the IP carrier header of the received packet. In this case, an MQC policy with a class to match on precedence or DSCP value will match the precedence or DSCP value in the received IP carrier header. Similarly, the precedence class for which the MDRR/WRED policy is applied on the decapsulation input direction is also determined by precedence or DSCP value in the IP carrier header.
BGP Multipath Load Sharing for MPLS VPNs over IP Tunnels
BGP Multipath Load Sharing for EBGP and IBGP lets you configure multipath load balancing with both external BGP and internal BGP paths in BGP networks that are configured to use MPLS VPNs. (When faced with multiple routes to the same destination, BGP chooses the best route for routing traffic toward the destination so that no individual router is overburdened.)
BGP Multipath Load Sharing is useful for multihomed autonomous systems and PE routers that import both EBGP and IBGP paths from multihomed and stub networks.
Inter-AS and CSC Support over IP Tunnels
The L3VPN Inter-AS feature provides a method of interconnecting VPNs between different VPN service providers. Inter-AS supports connecting different VPN service providers to provide native IP L3VPN services. For more information about Inter-AS, see Implementing MPLS VPNs over IP Tunnels .
Carrier Supporting Carrier (CSC) is implemented in circumstances in which one service provider needs to use the transport services provided by another service provider. The service provider that provides the transport is called the backbone carrier. The service provider, which uses the services provided by the backbone carrier, is called a customer carrier. Backbone carriers with CSC, bridge two or more customer carrier sites through an MPLS VPN/MPLS VPN over IP tunnels backbone.
Multiple Tunnel Source Address
Currently, L2TPv3 tunnel encapsulation transports the VPN traffic across the IP core network between PEs with a /32 loopback addresses of PEs, and ingress PE uses a single /32 loopback address as the source IP address of tunnel encapsulation. This results in an imbalance on the load. In order to achieve load balance in the core, the ingress PE sends the VPN traffic with the source IP address of a L2TPv3 tunnel header taken from the pool for a /28 IP address instead of a single /32 address. This is called the Multiple Tunnel Source Address.
To support the /28 IP address, a keyword source-pool is used as an optional configuration command for the tunnel template. This keyword is located in the source address configuration. The source address is published to remote PEs through the BGP’s tunnel SAFI messages.
Once the optional source-pool address is configured, it is sent to the forwarding information base (FIB). FIB uses a load balancing algorithm to get one address from the pool, and uses that address to call the tunnel infra DLL API to construct the tunnel encapsulation string.
The Multiple Tunnel Source Address infrastructure uses two primary models:
Tunnel MA
The Tunnel MA tunnel is used for the tunnel-template configuration and communicating with the BGP. It supports the /28 IP address by performing these basic tasks:
- Verifies and applies the /28 address pool configuration
- Extends the tunnel information to include the new address pool
- Sends the address pool information to Tunnel EA through the data path control (DPC)
Note![]() Sending the address pool information to BGP is not mandatory.
Sending the address pool information to BGP is not mandatory.
Tunnel EA
Tunnel EA sends the address pool information to FIBand also supports the /28 IP address by performing these basic tasks:
How to Configure MPLS VPNs over IP Tunnels
The following procedures are required to configure MPLS VPN over IP:
- Configuring the Global VRF Definition (required)
- Configuring a Route-Policy Definition (required)
- Configuring a Static Route (required)
- Configuring an IPv4 Loopback Interface (required)
- Configuring a CFI VRF Interface (required)
- Configuring the Core Network (required)
- Configuring Inter-AS and CSC Support over IP Tunnels
- Verifying MPLS VPN over IP (optional)
- Configuring Source Pool Address for MPLS VPNs over IP Tunnels (optional)
Note![]() All procedures occur on the local PE (PE1). Corresponding procedures must be configured on the remote PE (PE2).
All procedures occur on the local PE (PE1). Corresponding procedures must be configured on the remote PE (PE2).
Configuring the Global VRF Definition
SUMMARY STEPS
3.![]() address-family ipv4 unicast
address-family ipv4 unicast
4.![]() import route-target [ 0-65535. 0-65535 : 0-65535 | as-number:nn | ip-address:nn ]
import route-target [ 0-65535. 0-65535 : 0-65535 | as-number:nn | ip-address:nn ]
5.![]() export route-target [ 0-65535. 0-65535 : 0-65535 | as-number:nn | ip-address:nn ]
export route-target [ 0-65535. 0-65535 : 0-65535 | as-number:nn | ip-address:nn ]
7.![]() address-family ipv6 unicast
address-family ipv6 unicast
8.![]() import route-target [ 0-65535. 0-65535 : 0-65535 | as-number:nn | ip-address:nn ]
import route-target [ 0-65535. 0-65535 : 0-65535 | as-number:nn | ip-address:nn ]
9.![]() export route-target [ 0-65535. 0-65535 : 0-65535 | as-number:nn | ip-address:nn ]
export route-target [ 0-65535. 0-65535 : 0-65535 | as-number:nn | ip-address:nn ]
DETAILED STEPS
Configuring a Route-Policy Definition
Perform this task to configure a route-policy definition for CE-PE EBGP.
SUMMARY STEPS
DETAILED STEPS
|
|
|
|
|---|---|---|
|
|
||
|
|
||
|
|
Configuring a Static Route
Perform this task to add more than 4K static routes (Global/VRF).
SUMMARY STEPS
DETAILED STEPS
Configuring an IPv4 Loopback Interface
The following task describes how to configure an IPv4 Loopback interface.
SUMMARY STEPS
DETAILED STEPS
Configuring a CFI VRF Interface
Perform this task to associate a VPN routing and forwarding (VRF) instance with an interface or a subinterface on the PE routers.
SUMMARY STEPS
DETAILED STEPS
Configuring the Core Network
To configure the core network, refer to the procedures documented in Implementing MPLS Layer 3 VPNs on Cisco IOS XR Software.
Configuring Inter-AS and CSC Support over IP Tunnels
These tasks describe how to configure Inter-AS and CSC support over IP tunnels:
Configuring the ASBRs to Exchange VPN-IPv4 Addresses for IP Tunnels
Perform this task to configure an external Border Gateway Protocol (eBGP) autonomous system boundary router (ASBR) to exchange VPN-IPv4 routes with another autonomous system for IP tunnels
SUMMARY STEPS
2.![]() router bgp autonomous-system-number
router bgp autonomous-system-number
3.![]() address-family { ipv4 tunnel }
address-family { ipv4 tunnel }
4.![]() address-family { vpnv4 unicast }
address-family { vpnv4 unicast }
6.![]() remote-as autonomous-system-number
remote-as autonomous-system-number
7.![]() address-family { vpnv4 unicast }
address-family { vpnv4 unicast }
8.![]() route-policy route-policy-name { in }
route-policy route-policy-name { in }
9.![]() route-policy route-policy-name { out }
route-policy route-policy-name { out }
11.![]() remote-as autonomous-system-number
remote-as autonomous-system-number
12.![]() update-source type interface-path-id
update-source type interface-path-id
13.![]() address-family {i pv4 tunnel }
address-family {i pv4 tunnel }
DETAILED STEPS
Configuring the Backbone Carrier Core for IP Tunnels
Configuring the backbone carrier core requires setting up connectivity and routing functions for the CSC core and the CSC-PE routers. To do so, you must complete the following high-level tasks:
Configuring CSC-PE Routers for IP Tunnels
Perform this task to configure a CSC-PE for IP tunnels.
For information on how to configure CSC-CE routers, see the Implementing MPLS Layer 3 VPNs module.
SUMMARY STEPS
3.![]() address-family { vpnv4 unicast }
address-family { vpnv4 unicast }
4.![]() address-family { ipv4 tunnel }
address-family { ipv4 tunnel }
7.![]() update-source interface-type interface-number
update-source interface-type interface-number
8.![]() address-family { vpnv4 unicast }
address-family { vpnv4 unicast }
9.![]() address-family { ipv4 tunnel }
address-family { ipv4 tunnel }
11.![]() rd { as-number:nn | ip-address:nn | auto }
rd { as-number:nn | ip-address:nn | auto }
12.![]() address-family { ipv4 unicast }
address-family { ipv4 unicast }
16.![]() address-family { ipv4 labeled-unicast }
address-family { ipv4 labeled-unicast }
17.![]() route-policy route-policy-name in
route-policy route-policy-name in
DETAILED STEPS
Verifying MPLS VPN over IP
To verify the configuration of end-end (PE-PE) MPLS VPN over IP provisioning, use the following show commands:
- show cef recursive-nexthop
- show bgp ipv4 tunnel
- show bgp vpnv4 unicast summary
- show bgp vrf v1 ipv4 unicast summary
- show bgp vrf v1 ipv4 unicast prefix
- show cef vrf v1 ipv4 prefix
- show cef ipv6 recursive-nexthop
- show bgp vpnv6 unicast summary
- show bgp vrf v1 ipv6 unicast summary
- show bgp vrf v1 ipv6 unicast prefix
- show cef vrf v1 ipv6 prefix
Configuring Source Pool Address for MPLS VPNs over IP Tunnels
Perform this task to configure the Multiple Tunnel Source Address.
SUMMARY STEPS
DETAILED STEPS
Configuration Examples for MPLS VPNs over IP Tunnels
This section provides the following examples:
- Configuring an L2TPv3 Tunnel: Example
- Configuring the Global VRF Definition: Example
- Configuring a Route-Policy Definition: Example
- Configuring a Static Route: Example
- Configuring an IPv4 Loopback Interface: Example
- Configuring a CFI VRF Interface: Example
- Configuring Source Pool Address for MPLS VPNs over IP Tunnels: Example
Configuring an L2TPv3 Tunnel: Example
The following example shows how to configure an L2TPv3 tunnel:
Configuring the Global VRF Definition: Example
The following example shows how to configure an L2TPv3 tunnel:
Configuring a Route-Policy Definition: Example
The following example shows how to configure a route-policy definition:
Configuring a Static Route: Example
The following example shows how to configure a static route:
Configuring an IPv4 Loopback Interface: Example
The following example shows how to configure an IPv4 Loopback Interface:
Configuring a CFI VRF Interface: Example
The following example shows how to configure an L2TPv3 tunnel:
Configuring Source Pool Address for MPLS VPNs over IP Tunnels: Example
Additional References
For additional information related to this feature, refer to the following references:
Related Documents
Standards
|
|
|
|---|---|
No new or modified standards are supported by this feature, and support for existing standards has not been modified by this feature. |
MIBs
|
|
|
|---|---|
To locate and download MIBs using Cisco IOS XR software, use the Cisco MIB Locator found at the following URL and choose a platform under the Cisco Access Products menu: http://cisco.com/public/sw-center/netmgmt/cmtk/mibs.shtml |
RFCs
|
|
|
|---|---|
 Feedback