- Preface
-
- Introduction to Dynamic Host Configuration
- Configuring Scopes and Networks
- Configuring Policies and Options
- Managing Leases
- Advanced DHCP Server Properties
- Configuring Client-Classes and Clients
- Using Expressions
- Managing DHCPv6 Addresses
- Configuring DHCP Failover
- Configuring DNS Update
- Using Extension Points
Cisco Prime Network Registrar 8.1 User Guide
Bias-Free Language
The documentation set for this product strives to use bias-free language. For the purposes of this documentation set, bias-free is defined as language that does not imply discrimination based on age, disability, gender, racial identity, ethnic identity, sexual orientation, socioeconomic status, and intersectionality. Exceptions may be present in the documentation due to language that is hardcoded in the user interfaces of the product software, language used based on RFP documentation, or language that is used by a referenced third-party product. Learn more about how Cisco is using Inclusive Language.
- Updated:
- December 25, 2011
Chapter: Managing Router Interface Configurations
Managing Router Interface Configurations
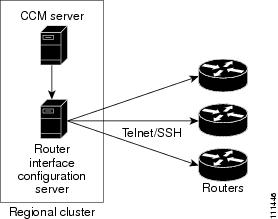
The regional Router Interface Configuration (RIC) server is used to manage router interfaces on Cisco Systems Universal Broadband Routers (uBRs) that manage cable modem termination systems (CMTSs). This module interacts with the CMTS servers to push the required cable modem configuration to edge devices, such as routers and switches (see Figure 11-1). The RIC server module is accessible only if you are assigned the ric-management subrole of the cfg-admin or central-cfg-admin role.
Figure 11-1 Router Interface Configuration (RIC) Server Module

Tip ![]() Add routers before you add any other subnets. This prevents the subnets that the router creates from possibly overlapping with those explicitly added, and prevents router synchronization errors later on.
Add routers before you add any other subnets. This prevents the subnets that the router creates from possibly overlapping with those explicitly added, and prevents router synchronization errors later on.
The view of the routers is available on the View Tree of Routers page. The tree levels are the routers, their router interfaces, and any child interfaces. Parent/child relationships can be either physical/virtual (as in Cable2/0 and Cable2/0.1) or primary/secondary (as in router interface bundling, where the bundle is identified by one of the interfaces; see the "Bundling Interfaces" section). This listing of router interfaces is available only after you create routers in the system and synchronize with them.
Related Topics
Adding Routers
Editing Routers
Resynchronizing Routers
Pushing and Reclaiming Subnets for Routers
Viewing and Editing the Router Interfaces
Adding Routers
The routers that the RIC server manages can be Cisco Universal Broadband Routers in the family uBR72xx and uBR10xxx. (For an example of adding a router, see the "Add a Router and Modify an Interface" section.)
Local Advanced and Regional Web UI
Step 1 ![]() From the Routers menu, choose Router List. This opens the List/Add Routers page.
From the Routers menu, choose Router List. This opens the List/Add Routers page.
Step 2 ![]() Click Add Router. This opens the Add Router page.
Click Add Router. This opens the Add Router page.
Step 3 ![]() You can set a router to managed or virtual (see the "Managed Versus Virtual Routers" section). If the router is managed, you must enter its type and IP address. The selections for the Type field are Ubr72xx or Ubr10k. If managed, you also need to check with the router administrator about the username, password, and enable password, and enter these values.
You can set a router to managed or virtual (see the "Managed Versus Virtual Routers" section). If the router is managed, you must enter its type and IP address. The selections for the Type field are Ubr72xx or Ubr10k. If managed, you also need to check with the router administrator about the username, password, and enable password, and enter these values.
Step 4 ![]() Click Add Router.
Click Add Router.
CLI Commands
Add a router using router name create. For example:
nrcmd> router router-1 create 192.168.121.121
Related Topics
Managed Versus Virtual Routers
Secure Mode Connections with Routers
Alternative Login Method to Routers
Creating a Login Template
Managed Versus Virtual Routers
Managed routers are updated in the database as well as being physically updated and synchronized. When you edit a managed router in the web UI or CLI, the router is also automatically updated and synchronized with the newest data.
Virtual routers are updated in the Cisco Prime Network Registrar database only. However, you can create, push, and reclaim subnets for a virtual router. You might define a virtual router when the RIC server cannot directly manage the router, but the virtual router should still be considered part of the topology.
You can define a virtual router by omitting the router type or connection credentials on the Add Router page or Edit Router page.
Secure Mode Connections with Routers
To enable secure communication between the RIC server and the routers, you must have the Cisco Prime Network Registrar Communications Security Option Release 1.1 installed. By default, secure connectivity is disabled and accessible over Telnet. However, you can specify whether you require or desire a Secure Shell (SSH) connection. Use the use-ssh attribute in the (expandable) Reserved attributes section of the Edit Router page in the web UI. This attribute has the following values:
•![]() disabled (preset value)—Uses simple Telnet for the connection.
disabled (preset value)—Uses simple Telnet for the connection.
•![]() required—The router communicates with the edge device using SSH only, and not Telnet.
required—The router communicates with the edge device using SSH only, and not Telnet.
•![]() desired—The router tries to communicate using SSH, but if it cannot, it uses Telnet.
desired—The router tries to communicate using SSH, but if it cannot, it uses Telnet.

Note ![]() The SSH server should be set up so that the key length (modulus) is at least 1024 bits, using, for example, the command crypto key generate rsa general-keys modulus 1024.
The SSH server should be set up so that the key length (modulus) is at least 1024 bits, using, for example, the command crypto key generate rsa general-keys modulus 1024.
Alternative Login Method to Routers
There are two types of login mechanisms provided in the RIC server that you can affect using the login-template attribute on the Add Router page:
•![]() Discovery mode—The default mechanism, designed to understand login prompts on edge devices and respond to those dynamically. It does not force a particular login sequence, but supports the various login sequences and login prompts most customers use with these default prompts:
Discovery mode—The default mechanism, designed to understand login prompts on edge devices and respond to those dynamically. It does not force a particular login sequence, but supports the various login sequences and login prompts most customers use with these default prompts:
Username prompt - Username:
Password prompt - Password:
Login-prompt - >
Enable password prompt - Password:
Enable prompt - #
•![]() Template mode—Use this in case the RIC server cannot log in using the discovery mechanism for some reason, such as nonstandard prompts or a login sequence that the discovery mechanism does not understand. The login-template is the name of an optional login template to use to further customize the RIC server login and enable interactive sessions. To create this template you must:
Template mode—Use this in case the RIC server cannot log in using the discovery mechanism for some reason, such as nonstandard prompts or a login sequence that the discovery mechanism does not understand. The login-template is the name of an optional login template to use to further customize the RIC server login and enable interactive sessions. To create this template you must:
1. ![]() In the API, create an ScpObj of class CCMRouterLoginTemplate.
In the API, create an ScpObj of class CCMRouterLoginTemplate.
2. ![]() Add the object to the database using the RICAdminSession.addRouterLoginTemplate method.
Add the object to the database using the RICAdminSession.addRouterLoginTemplate method.
3. ![]() Enter the name of the added template (CCMRouterLoginTemplate.name) as the value of the login-template.
Enter the name of the added template (CCMRouterLoginTemplate.name) as the value of the login-template.
Creating a Login Template
Local and Regional Advanced Web UI
Step 1 ![]() From the Routers menu, choose Login Templates. This displays the List/Add Router Login Templates page.
From the Routers menu, choose Login Templates. This displays the List/Add Router Login Templates page.
Step 2 ![]() Click Add Template to display the Add Router Login Templates.
Click Add Template to display the Add Router Login Templates.
Step 3 ![]() Enter the desired name for the template in the Name field, the desired string value to be used as the login prompt by the router in the login-prompt field, and the desired string value to be used as the prompt by the router in enable mode in the enable-prompt field.
Enter the desired name for the template in the Name field, the desired string value to be used as the login prompt by the router in the login-prompt field, and the desired string value to be used as the prompt by the router in enable mode in the enable-prompt field.
Step 4 ![]() Click Add Login Template to add the template or click Cancel to return to the List/Add Router Login Templates page.
Click Add Login Template to add the template or click Cancel to return to the List/Add Router Login Templates page.
Editing Routers
Editing routers involves modifying some of the router attributes.
Local Advanced and Regional Web UI
Click the router name on the View Tree of Routers page or List/Add Routers page. The Edit Router page is essentially the same as the Add Router page, except for an additional attribute unset function. Make your changes, then click Modify Router.
CLI Commands
Edit a router attribute using router name set attribute. For example:
nrcmd> router router-1 set owner=owner-1
Resynchronizing Routers
As soon as you add the router to the regional cluster, it is synchronized over the network. You can also explicitly resynchronize the router if you know that changes occurred. On the List/Add Routers page, click the Resynchronize icon next to the router name. If the synchronization could not occur or timed out, you get an error message to that effect.
Pushing and Reclaiming Subnets for Routers
You can push subnets to, and reclaim subnets from, a router interface (see the "Reclaiming Subnets" section). When you push or reclaim a subnet with a managed or virtual router, all primary and secondary relationships that are set for the router are also set for the related subnets and scopes.
Viewing and Editing the Router Interfaces
Editing a router interface involves modifying some of its attributes.
Local Advanced and Regional Web UI
If you click the Interface icon associated with the router on the List/Add Routers page, the list of related cable or Ethernet interfaces appears on the List Router Interfaces page. Both from this page and the View Tree of Routers page, you can click the interface name to edit it. The List Router Interfaces page includes an additional attribute unset function and the ability to delete the interface. You can add, edit, or delete interfaces for virtual routers without restrictions. There are restricted attributes for managed routers, described in the "Changeable Router Interface Attributes" section.
CLI Commands
Edit a router interface attribute using router-interface name set attribute. For example:
nrcmd> router-interface Ethernet1/0 set ip-helper=192.168.121.122
Related Topics
Changeable Router Interface Attributes
Bundling Interfaces
Changeable Router Interface Attributes
Editing the router interface opens the Edit Router Interface page. You cannot change the name, state, or MAC address of the interface on this page. However, you can change the following attributes:
•![]() Description
Description
•![]() Address of the primary subnet address on the interface
Address of the primary subnet address on the interface
•![]() Addresses of the secondary subnets on the interface
Addresses of the secondary subnets on the interface
•![]() Address of any IP helper (DHCP relay agent) for the interface
Address of any IP helper (DHCP relay agent) for the interface
•![]() Address of any cable helper of the DHCP server to accept unicast packets for the interface
Address of any cable helper of the DHCP server to accept unicast packets for the interface
Bundling Interfaces
An interface bundle provides load balancing among the router interfaces. When you define a bundle, all the participating interfaces in the bundle must have the same bundle identifier (ID), which is the name of the interface specified as the master.
If you want to use bundling, the following attributes are in the Interface Bundling Settings section of the Edit Router Interface page, or set them using the router-interface command in the CLI:
•![]() bundle-id—Interface bundle identifier, the name of the master interface. All participating interfaces in the bundle must have the same bundle ID.
bundle-id—Interface bundle identifier, the name of the master interface. All participating interfaces in the bundle must have the same bundle ID.
•![]() is-master—This interface is the master interface in the bundle.
is-master—This interface is the master interface in the bundle.
•![]() is-virtual—This interface is a virtual interface in the bundle.
is-virtual—This interface is a virtual interface in the bundle.
 Feedback