Overview of the Prime Central Portal
Cisco Prime Carrier Management provides end-to-end management, from access to the core, helping enable carrier-class delivery of next-generation voice, mobile, cloud, and managed services. With the modular architecture, you have the flexibility to deploy the entire integrated suite or do it incrementally as you grow your business, depending on your needs.
The Prime Central portal is the main console for operator workflows across multiple applications. The applications listed in the following table are accessible through the Prime Central portal.
|
Component |
Description |
|---|---|
|
Prime Network |
Provides management of packet networks, including access, aggregation, edge, MPLS core, and Evolved Packet Core (EPC). |
|
Prime Optical |
Provides efficient and productive optical infrastructure management for fault, configuration, performance, and security. |
|
Prime Performance Manager |
Provides performance statistics and reports for service provider and large enterprise networks, including access, edge, distribution, core, mobile backhaul, Carrier Ethernet, MPLS core, and EPC networks. |
|
Prime Provisioning |
Provides automated resource management and rapid profile-based provisioning capabilities for Carrier Ethernet, Radio Access Network (RAN) backhaul, Multiprotocol Label Switching (MPLS), and Packet Transport technologies. |
|
Broadband Access Center (BAC) |
It is a versatile TR-069 management system that provides all essential Femtocell management functions whether it is AP configuration, firmware, data retrieval, troubleshooting, and so on. Cisco RMS uses BAC as the TR-069 Auto Configuration Server (ACS), which contains the Regional Data Unit (RDU) and Device Provisioning Engine (DPE). |
|
Cisco Prime Access Registrar (CPAR) |
The Prime Access Registrar (PAR) is used for AAA authentication. It provides AP authentication on the HNB-GW and delivers AP whitelists to HNB-GW via RADIUS. CPAR is an integral part of RMS solution. |
|
Cisco Prime Network Registrar (CPNR) |
The Prime Network Registrar (PNR), also called the DHCP server, is used to allocate IPSec addresses for SeGW via DHCP. The lease database can then be queried to discover the current IP address of an AP. CPNR is an integral part of RMS solution. |
|
Cisco RAN Mangement System (RMS) Solution |
It provides different workflows and services to support enhanced provisioning and managing capabilities for both, 3G and LTE Femtocells. These services include provisioning and management functions such as, device configuration, status monitoring, firmware upgrade, data retrieval, and troubleshooting. |
See the Cisco Prime Central 2.1 Release Notesfor the latest application versions that are compatible with Prime Central 2.1
Key Features
The Prime Central portal plays the role of the presentation tier for the entire suite. The portal provides:
-
A single point of access (single sign-on) to Prime Central and the individual applications.
-
Support for Lightweight Directory Access Protocol (LDAP), TACACS+, and RADIUS authentication plugins.
-
Common customer management and user management with role-based access control (RBAC).
-
Security settings you can configure for all users in your network, such as:
-
Maximum login attempts
-
Maximum active user sessions
-
User inactivity period before deactivation
-
-
Customizable login advisory messages.
-
Email and SMS notifications when critical and major alarms occur.
-
Bulk import of users specified in an Excel spreadsheet.
-
Bulk reporting of user logins.
-
Management of alarm and trap information sources in the Fault Source Management portlet.
-
Database and application monitoring.
-
Common physical inventory management:
-
Detailed physical inventory and Device 360° views.
-
Filter and search capabilities.
-
Seamless drill-down to individual applications.
-
Support for multiple instances of Prime Network and Prime Optical.
-
Support for Gigabit-capable Passive Optical Network (GPON) and Metro Ethernet Forum (MEF)-compliant devices.
-
-
Common cross-application alarm management:
-
Aggregation, correlation, and deduplication of alarms.
-
Portlets with customized views and filters.
-
Seamless cross-launch of the source application.
-
Seamless access from alarms to common inventory.
-
Pregenerated reports for active and historical alarms.
-
SNMPv1, v2c, and v3 forwarding (OSS integration).
-
In addition to the Prime Central Fault Management GUI, the ability to perform tasks from Prime Network, Prime Optical, and Prime Performance Manager (when configured for Suite mode).
-
-
Security audit information, which can be viewed in the Audit Log portlet.
-
Synchronization of alarm information provided by Prime Central and associated Prime applications.
-
Virtualization on VMware configurations.
- Red Hat Enterprise Linux (RHEL) 6.5, 6.7 , 6.8 and 6.9 support.
- Operational redundancy and
disaster recovery:
-
You can install Prime Central and an embedded Oracle database in a local redundancy, high availability (HA) configuration that uses the Red Hat Cluster Suite (RHCS) in both Bare Metal and VMware environments.
-
You can also configure switchover and failover to mitigate the impact of a Cisco Prime application (like Prime Network) going down.

Note
The HA and switchover/failover options must be purchased and installed separately from Prime Central 2.1
-
-
Cross-launch to Cisco InTracer, a high-performance, subscriber troubleshooting and monitoring solution.
-
Cross-launch to the Cisco ME 4600 Series Agora-NG network provisioning platform.
-
Northbound interfaces supports MTOSI and 3GPP APIs.
Security
Prime Central security features include:
-
HTTPS support for transporting user credentials.
-
SSL encryption of all single sign-on (SSO) traffic.
-
URL-based SSL traffic encryption available upon configuration.
-
Configurable session timeout with a default value.
-
Role-based, password-protected access for multiple users.
-
Password enforcement policies, such as aging, minimum length, and lockouts.
-
Audit trails of all user actions and all access through the web interface.
-
Cleanup of session states and expiration of cookies upon session timeout.
-
Cross-site scripting and SQL injection guard.
-
Mutual authentication between SSO and all SSO participating applications: Prime Network, Prime Optical, Prime Performance Manager, and Prime Provisioning.
Note
For HTTPS communication, only Secure Sockets Layer version 3 (SSLv3) and Transport Layer Security version 1 (TLSv1) are allowed. The highest exportable SSL ciphers for encryption communication are used.
Logging In to the Prime Central Portal
Prime Central features single sign-on (SSO), meaning that when you log in to the Prime Central portal, you do not have to log in separately to each application within your domain.
Using an open-source product called Central Authentication Service (CAS), the SSO solution offers a central authoritative source that is shared by the Prime Central portal and applications.
With an SSO CAS solution, different applications can authenticate to one authoritative source of trust. You then log in to that single source; you do not have to log in to each application separately. Any authentication provider (such as RADIUS, TACACS+, or LDAP) can use the eXtensible Management Platform (XMP) login mechanism within the CAS authentication handler. CAS SSO applies to all web applications that are running under the same browser session.
Procedure
| Step 1 |
Open a Prime Central-supported web browser and enter https:// server-hostname: https-port-number , where:
The login window (see the following figure) opens. |
||
| Step 2 |
Enter your username and password. If you are an administrator logging in for the first time, enter the username centraladmin and the password that you configured during installation. |
||
| Step 3 |
Click Log In. |
||
| Step 4 |
Click Agree. |
||
| Step 5 |
Accept the self-signed, untrusted security certificates.
|

Customizing Login Advisory Messages
Advisory messages are shown both before and after a user logs into Prime Central. By default, these messages read as follows:
-
Pre-login message—Warning: This system is restricted to authorized users only. Unauthorized access is a violation of the law.
-
Post-login terms-of-use message—Warning: You are accessing a private network. Unauthorized access is a violation of the law.
Customizing the Pre-Login Advisory Message
Procedure
| Step 1 |
Log in to the Prime Central portal as the primeusr user. |
| Step 2 |
In a text editor, open the $XMP_HOME/tomcat-7.0.23/webapps/ROOT/html/xmp/xwt/nls/en-us/sso_login.js file. |
| Step 3 |
Update the login_disclosure variable with the desired text changes. |
| Step 4 |
Save your changes to the sso_login.js file. |
| Step 5 |
Restart the Prime Central portal. |
| Step 6 |
Log out of the Prime Central portal, clear your browser cache, and log back in. |
Customizing the Terms-of-Use Message That Appears After Login
Procedure
| Step 1 |
Log in to the Prime Central portal as a user with administrator-level privileges. |
| Step 2 |
From the Prime Central menu, choose . |
| Step 3 |
In the Global Settings portlet (see the following figure), modify the terms-of-use text as desired. |
| Step 4 |
To configure when users see the terms-of-use message, click one of the following radio buttons:
|
| Step 5 |
Click Save.  |
Maximum Number of User Accounts Supported
Prime Central supports up to 150 simultaneous users, all of whom can see their own customized view of the Prime Central portal.
Note the following:
-
In Prime Central, 30 users can perform all portal operations concurrently. The remaining 120 users can monitor data, but it is not recommended that they perform memory-intensive operations such as application cross-launch or user management.
-
A single user can have up to ten cross-launched application windows open simultaneously. If a user tries to open an eleventh window, the user cannot proceed without first closing one of the open windows.
-
Prime Central supports up to 30 simultaneous application cross-launches across multiple users.
-
The number of application cross-launches Prime Central supports depends on:
-
CPU and memory available on a user’s machine.
-
CPU, memory, and connections available on the machines on which the individual applications run.
-
Customizing the Prime Central Portal
When you log in to Prime Central, the portlets that you see on the home page depend on your user privileges and which applications are installed and available. The following figure shows the Prime Central home page with the Alarm Browser portlet partially visible.

|
1 |
Content area, with content that depends on your portlet selections |
9 |
Refresh Current Page icon |
|
2 |
Menu bar, with main menu choices |
10 |
Help icon |
|
3 |
Home menu and icon |
11 |
Remove icon |
|
4 |
Logged-in user link |
12 |
Maximize icon |
|
5 |
Log Out link |
13 |
Minimize icon |
|
6 |
About link |
14 |
Message Center |
|
7 |
Add Portlets icon |
15 |
Alarm Summary |
|
8 |
Change Layout icon |
Adding a Portlet
Note the following about portlet management:
-
By default, administrators can see all available portlets.
-
Administrators can assign different portlets and layouts for each user role. The portlets are added automatically to a user’s Prime Central home page.
-
At first login, the user sees a set of portlets in a particular layout based on the logged-in user's role. The user can then customize the portlet selection and layout.
Procedure
| Step 1 |
On the Prime Central home page, click the Add Portlets icon. |
| Step 2 |
In the Add Portlets dialog box, click Cisco Prime. |
| Step 3 |
Select the desired portlet and click Add. Alternatively, drag and drop the portlet to the desired location on the home page. |
| Step 4 |
Click the Close (X) icon to close the Add Portlets dialog box. |
Maximizing or Minimizing a Portlet
Procedure
| Step 1 |
Click the Maximize or Minimize icon in the top-right corner of the portlet. |
| Step 2 |
To exit the view, do one of the following:
|
Removing a Portlet
Procedure
| Step 1 |
In the top-right corner of the portlet, click the Remove icon. |
| Step 2 |
At the confirmation prompt, click OK. |
Adding or Removing Columns in a Portlet
Procedure
| Step 1 |
In the top-right corner of the portlet, click the Settings icon.
|
||
| Step 2 |
Click Columns. A list of all available columns in that portlet is displayed. Columns with a check mark are shown in the portlet; columns without a check mark are not shown in the portlet. |
||
| Step 3 |
Uncheck the columns that you do not want displayed in the portlet. Check the columns that you want displayed. |
||
| Step 4 |
Click Close. |
Changing the Layout of the Home Page
Note the following layout constraints:
-
Large portlets—such as User Management and Common Inventory—cannot be positioned together in a single row.
-
Portlets are not rearranged automatically, unless you choose one of the following options:
-
Free (free-form)
-
1 col (1 column)
-
-
When a window is minimized or maximized, you cannot drag and drop portlets to rearrange them.
-
If you choose the Free layout option, portlets are not aligned automatically; instead, you must rearrange them manually. In contrast with other layouts, the Free layout takes up the entire browser window instead of only the content area.
Procedure
| Step 1 |
On the Prime Central home page, click the Change Layout icon. |
| Step 2 |
Click the radio button that corresponds to the desired layout (one column, 50/50, and so on). |
| Step 3 |
Click Save. |
Changing the Time Zone
Prime Central stores events in the database in Coordinated Universal Time (UTC). The Prime Central portal converts events to the time zone that is configured on the client’s workstation.
You can use the User Preferences portlet to change the default time zone used for time stamp displays.
Procedure
| Step 1 |
From the Prime Central menu, choose . |
||
| Step 2 |
In the User Preferences portlet, select a time zone from the Time Zone drop-down list. Time zone options are shown as offsets from UTC. The offset range is –11 to +14 hours from UTC.
|
||
| Step 3 |
Click Save. |
||
| Step 4 |
On the Prime Central home page, click the Refresh Current Page icon to see the time zone change. |
Changing the Prime Central Session Timeout
By default, the Prime Central session times out after 60 minutes of inactivity. You are prompted to extend the session 10 minutes before it times out. If you do not extend the session before the timeout, you are logged out automatically from Prime Central and from any applications.
When a session times out, the login window appears. When you log back in, you return to the Prime Central home page. It is recommended that you clear your browser cache and delete cookies before logging in again.
Note |
If the User Session Timeout is disabled (session timeout can be enabled or disabled for specific users from create/edit user option), no warning message is displayed to extend the session and session will not expire even in case of inactivity. The default time configured in the User Management -Configuration window shall be applicable only for the users whose session timeout status is enabled (default value is enabled for all users during user creation). For centraladmin user, session timeout is enabled by default and cannot be modified. |
Changing the Fault Management Session Timeout
By default, the Prime Central Fault Management session times out after 24 hours of inactivity. If you set the portal timeout to longer than 24 hours, you must change the Fault Management timeout to align with the portal timeout.
Procedure
| Step 1 |
Log out of the Prime Central portal. |
||
| Step 2 |
As the primeusr user, log in to the Prime Central Fault Management server. |
||
| Step 3 |
Enter the following command to stop the server: $NCHOME/fmctl stop |
||
| Step 4 |
Open the $NCHOME/tipv2/profiles/TIPProfile/config/cells/TIPCell/security.xml file and locate the following section: |
||
| Step 5 |
Change the value of the timeout attribute as necessary. The default is 1440 minutes (24 hours).
|
||
| Step 6 |
Save and close the security.xml file. |
||
| Step 7 |
Enter the following command to start the Prime Central Fault Management server: $NCHOME/fmctl start |
||
| Step 8 |
Log in to the Prime Central portal. |
Menu Structure
When you log in to Prime Central, the menu structure that you can access depends on your user privileges and which applications are installed and available. The following menus are visible to users with administrator-level privileges:
-
Note
Although some browsers allow you to open multiple tabs within a single browser instance, you should not try to access the Prime Central portlets across multiple tabs within the same browser instance. You can, however, cross-launch to an application in a new browser tab.
Home Menu
The Home menu (see the following figure) takes you to the Prime Central home page. When a portlet is maximized, the Return to Home icon returns you to the home page.

Design Menu
From the Design menu (see the following figure), network designers can define the resources needed to build service profiles. Operators can then use these service profiles to fulfill service requests, provision, and activate the service.
The Design menu cross-launches Prime Provisioning, where you can perform the following functions:
-
Customers—Create and manage customers. A customer is typically an enterprise or large corporation that receives network services from a service provider.
-
Providers—Create and manage provider accounts. A provider is typically a “service provider” or large corporation that provides network services to a customer.
-
Resource Pools—Create and manage pools for IP address, multicast address, route distinguisher, site of origin, virtual circuit ID (VC ID), and VLAN.
-
Route Targets—Create and manage route targets. A VPN can be organized into subsets called route targets, which describe how the customer edge (CE) router in a virtual private network (VPN) communicate with each other.
-
Template Manager—Create and manage templates and associated data. Templates provide a means to deploy commands and configurations not normally supported by Prime Provisioning to a device. Templates are written in the Velocity Template Language (VTL) and are generally comprised of IOS and IOS XR device CLI configurations.
-
Policy Manager—Create and manage policies for licensed services. Policies are used to define common tunnel attributes such as bandwidth pools, hold and setup priority, and affinity bits.
-
Create New Policy—Create a new service policy, which can be applied to multiple provider edge (PE)-CE links in a single service request. A network operator defines service policies. A service operator uses a service policy to create service requests.
For details about using Prime Provisioning to provision your network, see the Cisco Prime Provisioning 6.6 User Guide.

Fulfill Menu
The Fulfill menu (see the following figure) cross-launches Prime Provisioning, where you can perform the following functions:
-
Service Request Manager—Manage Prime Provisioning service requests.
-
Create Service Request—Create a new Prime Provisioning service request.
-
Task Manager—View pertinent information about current and expired tasks of all types, create and schedule new tasks, delete specified tasks, and delete the active and expired tasks.
-
Task Logs—View task logs, which can be used to understand the status of a task, know whether it completed successfully, and troubleshoot why a task failed.
For details about Prime Provisioning service requests and tasks, see the Cisco Prime Provisioning 6.6 User Guide.

Assure Menu
The Assure menu (see the following figure) contains the following menu options:
-
Prime Central Fault Management—Cross-launches the following portlets that let you locate, diagnose, and report network problems:
-
Alarm Browser—See Monitoring Affected Services and Customers.
-
Alarm Report—See Analyzing Fault Data.
-
-
Prime Optical > Optical Management—Cross-launches Prime Optical. If your network includes multiple instances of Prime Optical, you can choose which instance to launch. For details about using Prime Optical to manage your optical network, see the Cisco Prime Optical 10.0 User Guide.
- Services > Data Center—Opens the Data Center portlet, where you can view information about data center compute services, network, and storage devices.
-
Prime Network > Vision or Events—Cross-launches the selected Prime Network application. If your network includes multiple instances of Prime Network, you can choose which instance to launch. For details about using Prime Network to discover and manage your packet network, see the Cisco Prime Network 4.1 User Guide.
- Agora-NG > OLT/ONU Network Management—Cross-launches the Cisco ME 4600 Series Agora-NG network provisioning platform. For more information, refer to this datasheet.
-
Prime Performance Manager > Performance Management—Cross-launches Prime Performance Manager. For details about using Prime Performance Manager to view the performance statistics and reports for a network, see the Cisco Prime Performance Manager 1.5 User Guide.

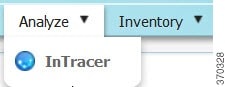
Analyze Menu
The Analyze menu (see the following figure) cross-launches Cisco InTracer, a high-performance, subscriber troubleshooting and monitoring solution. It performs call tracing, control data acquisition, processing, and analysis of both active and historical subscriber sessions. Cisco InTracer provides a framework for operators to analyze and investigate call flows and call events for subscriber sessions in near-real time. For more information about InTracer, see the Cisco InTracer Installation and Administration Guide, Version 15.0.
Inventory Menu
The Inventory menu (see the following figure) lets you view detailed inventory information for all devices in your network.

Administration Menu
The Administration menu (see the following figure) contains the following menu options:
-
Discovery/Adding Devices—Cross-launches Prime Network, Prime Optical, or Prime Provisioning. If your network includes multiple instances of Prime Network or Prime Optical, you can choose which instance to launch.
-
User and Privilege Management > Users—Lets you perform user management operations, including defining users and passwords and configuring RBAC.
-
Customer Management > Customers—Lets you add, edit, and delete customers; associate customers with network resources; disable and enable customer accounts; and export customer data.
-
Scope Management—Lets you assign device scopes (in Prime Network and Agora-NG) or network elements (in Prime Optical) to Prime Central users. If your network includes multiple instances of Prime Network or Prime Optical, you can choose which instance to launch.
-
Group Management > Groups—Lets you logically group network devices and services.
-
System:
-
Audit Log—Lets you view user activity in Prime Central.
-
Global Settings—Lets you customize the terms-of-use message and configure when users see it.
-
Suite Monitoring—Lets you monitor Prime Central and the individual applications.
-
User Preferences—Lets you change the default time zone used for time stamp displays.
-

Filtering and Searching
In some tables, the amount of detail can be overwhelming. In such cases, filtering helps eliminate unnecessary details, while searching helps you quickly locate data that you want to examine further.
By filtering a table’s contents, you can view only those items that are of interest to you. This feature can be extremely helpful when working with tables that contain many entries.
Filtering Using the Quick Filter
Most portlets have a Show drop-down list with a Quick Filter option, as shown in the following figure.

Procedure
| Step 1 |
From the Show drop-down list, choose Quick Filter. |
||
| Step 2 |
In the text field for each column, enter the search criteria.
|
Filtering Using the Advanced Filter
Most portlets have a Show drop-down list with an Advanced Filter option, as shown in the following figure.
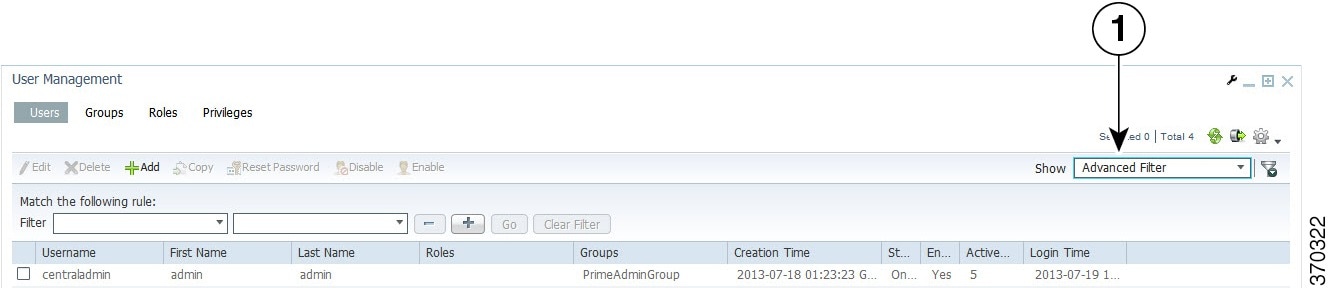
Procedure
| Step 1 |
From the Show drop-down list, choose Advanced Filter. |
| Step 2 |
Specify the required information for each criterion. For more information, see Configuring an Advanced Filter Criterion. |
| Step 3 |
Click the + icon to add another criterion for this filter. |
| Step 4 |
Add additional criteria as required. To remove a criterion, click the - icon. |
| Step 5 |
When you have specified all criteria for the filter, click Go. The table data is displayed using the defined filter. |
| Step 6 |
To clear a filter, click Clear Filter. The table is refreshed and all entries are displayed. |
Configuring an Advanced Filter Criterion
The following table describes the actions you need to take when you configure an Advanced Filter criterion.
|
Field |
Action/Description |
|---|---|
|
First drop-down list |
Choose the primary match category. The drop-down list contains all columns in the current table. |
|
Second drop-down list |
Choose the rule to use for this criterion. The options are:
|
|
Third field (either drop-down list or entry field) |
The third field either lists the available values or allows you to enter text:
|
Sorting
To sort data in a table, simply click a column heading. By clicking the column heading, you can toggle between ascending and descending sort order. The column tooltip indicates whether the column is sortable, not sortable, or currently sorted.
Note |
You can sort only one column at a time. |
A triangle next to the column heading indicates the sort order:
-
indicates the column is sorted in ascending order.
-
indicates the column is sorted in descending order.
Finding the Prime Central Version
To find the Prime Central version you are running, click the About link on the portal home page.
The About window (see the following figure) displays the Prime Central version. Use the vertical scroll bar to view the Prime Central build and patch numbers, as well as version information for any installed applications.
This image is not available in preview/cisco.com

Logging Out of the Prime Central Portal
Prime Central features single sign-off. When you log out of the Prime Central portal home page, you are automatically logged out of any suite applications. If you cross-launched an application in a new browser tab or window, you must manually close that browser window after you log out of Prime Central.
Closing the Prime Central Browser Without Logging Out
If your user account has a maximum number of active sessions (for example, one active session), and if you close your browser without logging out of Prime Central, your session is still in use, and you cannot log back in. When you try to log back in, the following error appears:
You are running the maximum number of allowed sessions for this user account.
Log out from one or more sessions and try again.
To restore your login, do the following:
-
Check for the active sessions. If there is active sessions, then logout the first active user.
-
Wait for the user session timeout (by default, 60 minutes), at which point your session expires. 10 minutes after expiration, all expired sessions are cleared automatically.
-
Ask your system administrator to disable and then enable your user account in the User Management portlet. See Enabling or Disabling a User Account.
You cannot log back in to the Prime Central if: -
The Sesion Timeout checkbox is unchecked.
-
The session timeout has reached maximum number of active sessions.
-
You close your browser without loging out of Prime Central.
Restart the Prime Central portal to clear rhe already in use sessions, otherwise the sessions will never expire.
-
Managing the Self-Signed Certificates
When you log in to Prime Central for the first time, some browsers display a warning that the site is untrusted. When this happens, you must accept the self-signed, untrusted security certificates.
Note |
For more detailed information on Managing the Self-Signed Certificates, refer to Cisco Prime Central Managing Certificates. |
Importing an Existing Certificate into WebSphere
Procedure
| Step 1 |
On a supported browser, go to https:// Fault-Management-server-IP-address: Fault-Management-web-service-listener-port/primefm/console .
|
||
| Step 2 |
Log in with the username and password that you configured for the Prime Central Fault Management application user during installation. |
||
| Step 3 |
Choose . |
||
| Step 4 |
From the left-pane menu bar in the Integrated Solutions Console tab, choose . |
||
| Step 5 |
From the Related Items list in the center pane, choose Key stores and certificates. |
||
| Step 6 |
From the table of keystores and certificates, choose the appropriate keystore. The default is NodeDefaultKeystore. |
||
| Step 7 |
At the right of the Properties menu, choose Personal certificates from the Additional Properties list. |
||
| Step 8 |
At the top of the certificates table, click the Import button. |
||
| Step 9 |
From the General Properties menu, choose either Managed key store or Key store file, and fill out the required information for the option you chose. See the WebSphere General Properties Menu table for field descriptions. |
||
| Step 10 |
Click Apply and Save. |
WebSphere General Properties Menu
The following table describes the WebSphere General Properties menu and the actions you need to take.
|
Field |
Action |
|---|---|
|
Managed key store option |
Imports the certificate from another keystore that is already being managed by the WebSphere Application Server. If you choose this option, do not:
|
|
Key store file option |
Imports the certificate from a keystore contained in a file. If you choose this option, do not:
|
|
Key store drop-down list |
Choose a keystore to import. |
|
Key store password field |
Enter the keystore password. The default password is WebAS. |
|
Key file name field |
Enter the full filename of the keystore from which you want to import the certificate. |
|
Type drop-down list |
Choose the format type of the certificate. |
|
Key file password field |
Enter the key file password. |
|
Certificate alias to import drop-down list |
Choose the alias for the certificate you want to import. |
|
Imported certificate alias field |
Enter an alias for the certificate in the keystore. |
Placing Certificates in the Internet Explorer Trusted Store
When you use Internet Explorer to log in to Prime Central, if you accept the security certificates without placing them in the trusted certificate store, they reappear upon subsequent logins.
To place certificates in the trusted store so they do not reappear upon subsequent logins:
Internet Explorer 10 and 11
Procedure
| Step 1 |
With the Prime Central login window open, click Certificate error in the browser's address bar. The Untrusted Certificate dialog box opens. |
| Step 2 |
Click View certificates. The Certificate dialog box opens. |
| Step 3 |
Click Install Certificate... to launch the certificate import wizard. |
| Step 4 |
Click Next. |
| Step 5 |
Select the Place all certificates in the following store radio button option and then click Browse.... |
| Step 6 |
Navigate to the Trusted Root Certification Authorities folder and select it. |
| Step 7 |
Click OK. |
| Step 8 |
Click Next. |
| Step 9 |
Click Finish to complete the wizard. A security warning appears. |
| Step 10 |
Click Yes to confirm that you want to install the certificate. A message appears, indicating that the certificate import was successful. |
| Step 11 |
Click OK to close the message. |
| Step 12 |
Click OK to close the Certificate dialog box. |
 Feedback