Cisco Prime Central 1.5.2 User Guide
Bias-Free Language
The documentation set for this product strives to use bias-free language. For the purposes of this documentation set, bias-free is defined as language that does not imply discrimination based on age, disability, gender, racial identity, ethnic identity, sexual orientation, socioeconomic status, and intersectionality. Exceptions may be present in the documentation due to language that is hardcoded in the user interfaces of the product software, language used based on RFP documentation, or language that is used by a referenced third-party product. Learn more about how Cisco is using Inclusive Language.
- Updated:
- October 13, 2016
Chapter: Monitoring Prime Central and the Applications
- Monitoring the Health of Prime Central and the Applications
- Prime Central and Application Monitoring Information
- Suite Monitoring Information in the Quick View
- Prioritizing Application Instances
- Monitoring System Activity
- Monitoring Prime Provisioning Service Requests
- Changing the Prime Central Transport Type Policy
- Removing an Application Manager from the Suite Monitoring Portlet
Monitoring Prime Central and the Applications
This section describes how to monitor the health status of Prime Central and the individual applications. It contains the following topics:
Monitoring the Health of Prime Central and the Applications
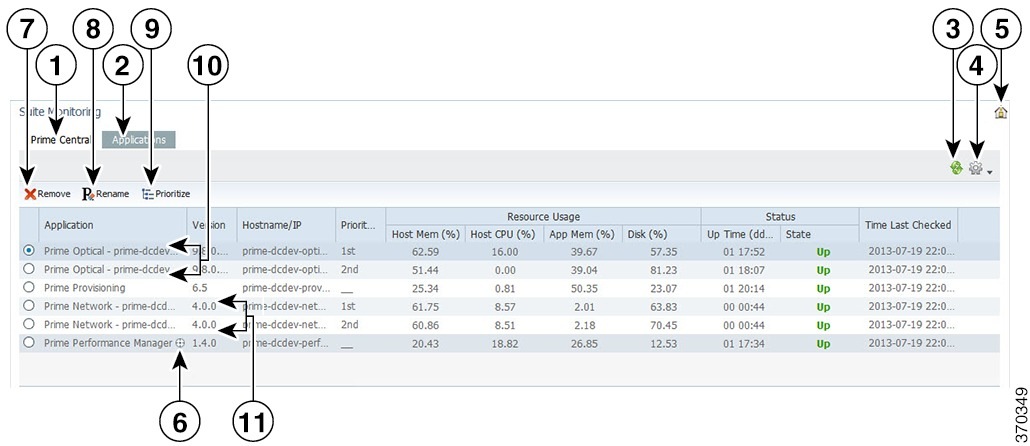
The following figure shows the Suite Monitoring portlet, where you monitor Prime Central and the individual applications for any changing conditions that might impact operation.
|
Remove icon |
|||
|
8 |
Rename icon |
||
|
9 |
Prioritize icon |
||
|
10 |
Multiple instances of Prime Optical |
||
|
11 |
Multiple instances of Prime Network |
||
|
6 |
— |
— |
| Step 1 | From the Prime Central menu, choose . | ||
| Step 2 | In the Suite Monitoring
portlet, click the
Prime Central tab, where you can monitor the
information described in the
Prime
Central and Application Monitoring Information table.
If multiple Prime Central integration layer profiles are installed, all profiles are shown. For example: | ||
| Step 3 | Click the
Applications tab. For each application, you can
monitor the information described in the
Prime
Central and Application Monitoring Information table. If multiple
instances of Prime Network or Prime Optical are installed, all instances are
shown by their service name (not their hostname).
Prime Central supports multiple instances of Prime Network and Prime Optical, for a total of five instances, in any combination. For example:
| ||
| Step 4 | To rename
multiple instances of Prime Network or Prime Optical:
|
Prime Central and Application Monitoring Information
The following table describes the high-level information you can monitor for Prime Central and the applications running in your network.
Suite Monitoring Information in the Quick View
In the Suite Monitoring portlet, the quick view displays additional component or application information when the cursor rests over the icon shown in the following figure.

Prioritizing Application Instances
If multiple instances of Prime Network or Prime Optical are installed, specify which instance has priority for functions such as cross-launching and collecting data. When the instance with the highest priority is down, Prime Central will cross-launch or collect data from the next instance in line.
| Step 1 | From the Prime Central menu, choose . |
| Step 2 | In the Suite Monitoring portlet, click the Applications tab. |
| Step 3 | Click Prioritize. |
| Step 4 | In the Prioritize window, click the application instance and use the Move up and Move down arrows to configure the desired priority. |
| Step 5 | Click
OK.
The instance priority is displayed in the Applications tab. For example, the Prime Network instance with the highest priority is the instance that cross-launches when you choose . |
Monitoring System Activity
At the bottom of the Prime Central home page, all users can view a tabular listing of bulk system activity. Click the Message Center (item 10 in the following figure), which shows bulk system requests that affect applications, including jobs that succeed or fail on the individual applications.
The quick view displays detailed job information when the cursor rests over the icon (item 11) in the following figure.

| 1 |
Number of selected table rows |
7 |
Show drop-down list and Filter icon |
| 2 |
Total table rows |
8 |
Filter parameters area |
| 3 |
Pull up/pull down toggle icon |
9 |
Properties pane |
| 4 |
Pull out icon |
10 |
Message Center area |
| 5 |
Close icon |
11 |
Quick view icon |
| 6 |
Refresh icon, with last updated time stamp |
12 |
Clear icon |
The following table describes the Message Center information, where:
-
Users with administrator-level privileges can see their own bulk job records, plus any system-generated jobs.
-
Users without administrator-level privileges can see only their own bulk job records.
|
Field |
Description |
|---|---|
|
Status |
Whether the job succeeded, failed, or is still pending. |
|
ID |
ID that Prime Central assigns to the bulk job. |
|
Description |
Description of the bulk job. The following are the four most common operations logged in the Message Center:
|
|
Time Stamp |
Date and time the job was logged. |
|
Source |
Name of the entity on which the bulk job ran; for example, a username for a user management-related job. |
|
Creator |
Name of the user who created the bulk job. |
|
Domain |
Prime Central component or application on which the bulk job occurred. |
Note the following:
-
After using the CLI to import new users into Prime Central 1.5.2 the messages that are normally generated after adding new users are not logged in to the Message Center.
-
A user cannot view the messages generated for another user that performed fault or user management operations.
-
A DM User Delta Update message is logged whenever a Prime Carrier Management application is brought online after being in the Down state previously.
-
You are not allowed to clear Message Center items whose status is Pending.
Monitoring Prime Provisioning Service Requests
Users with the appropriate role can add the following portlets to monitor Prime Provisioning service requests (SRs):
-
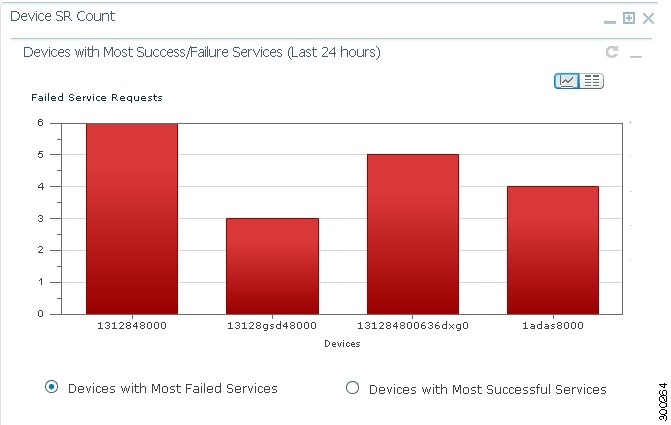
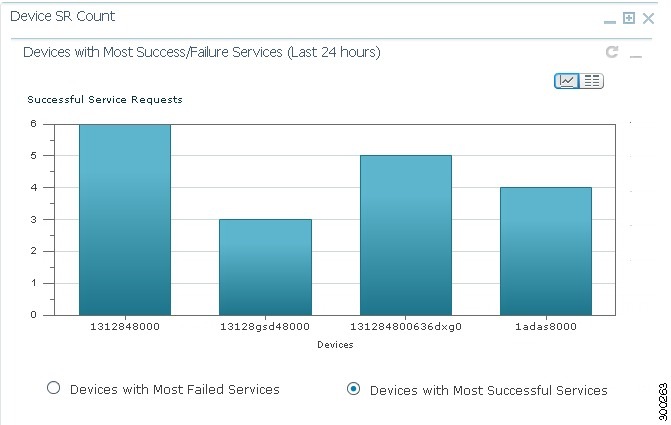
Device SR Count portlet (Most Failed Services and Most Successful Services figures)
-
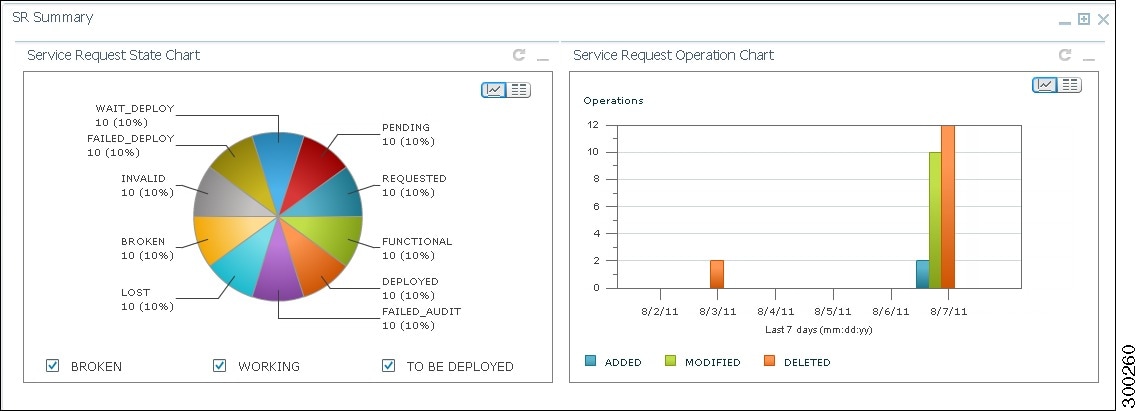
SR Summary portlet (SR Summary Portlet figure)
Device SR Count Portlet
The Device SR Count portlet displays in bar chart format the top 10 devices with the most failed or successful SRs for the last 24 hours. Note that:
Devices with failed SRs are shown in red (first figure below).
Devices with successful SRs are shown in blue (second figure below).
You can toggle the display between successful and failed SRs by clicking the radio buttons Devices with Most Failed Services and Devices with Most Successful Services.
You can view the data in table format by clicking View as Grid.
SR Summary Portlet
The SR Summary portlet (see the following figure) provides a count of Prime Provisioning SRs in different states and lists the SRs deployed for the last seven days. The portlet contains the following charts:
Service Request State pie chart—Displays the number of SRs in different states. SRs are grouped into three main categories:
Service Request Operation bar chart—Displays the number of SRs that were added, modified, or deleted in the last seven days. The date is displayed in mm/dd/yy format.
You can view either chart in table format by clicking View as Grid.
Changing the Prime Central Transport Type Policy
From the UNIX command line, you can configure Prime Central to use SSL or Java New I/O (NIO) as the connection transport type.
The following procedure is optional. Complete it only if you want to change the Prime Central transport type from SSL to NIO (or vice versa) after installation.
| Step 1 | As the primeusr user, log in to the Prime Central portal with the primeusr password that you specified during installation. | ||
| Step 2 | Change directories to the installation-directory/install/scripts folder. | ||
| Step 3 | Enter the following command:
./ilModifyTransportTypeUtil | ||
| Step 4 | At the following prompts,
enter your Prime Central administrative username and password
Enter Prime Central admin username: Enter Prime Central admin user password: | ||
| Step 5 | At the following prompt,
enter
nio or
ssl:
Enter Connection Transport
Type [ssl/nio]:
For example, to change the transport type to SSL, the script usage is as follows: primeusr@prime-dev-lnx [~/install/scripts]# ./ilModifyTransportTypeUtil Enter Prime Central admin username: centraladmin Enter Prime Central admin user password: Enter Connection Transport Type [ssl/nio]: ssl
| ||
| Step 6 | As the primeusr user, log in
to the Prime Central portal and enter the following commands to restart it:
portalctl stop portalctl start |
Removing an Application Manager from the Suite Monitoring Portlet
The following steps remove application information—including the user roles specific to that application—from the Prime Central database.
To completely unregister an application from Prime Central, see "Unregistering an Application from Prime Central" in the .
| Step 1 | From the Prime Central menu, choose . |
| Step 2 | In the Suite Monitoring portlet, click the Prime Central or the Applications tab. |
| Step 3 | Click the radio button for the application that you want to remove. |
| Step 4 | Click
Remove.
In the Prime Central tab, if a component cannot be removed, the Remove icon is dimmed. |
| Step 5 | At the confirmation prompt, click Yes. |
 Feedback