Cisco Prime Central 1.5.2 User Guide
Bias-Free Language
The documentation set for this product strives to use bias-free language. For the purposes of this documentation set, bias-free is defined as language that does not imply discrimination based on age, disability, gender, racial identity, ethnic identity, sexual orientation, socioeconomic status, and intersectionality. Exceptions may be present in the documentation due to language that is hardcoded in the user interfaces of the product software, language used based on RFP documentation, or language that is used by a referenced third-party product. Learn more about how Cisco is using Inclusive Language.
- Updated:
- October 13, 2016
Chapter: Managing Users and Configuring Role-Based Access Control
- User Management Portlet
- Managing Users
- Managing Groups
- Managing Roles
- Managing Privileges
- Exporting User Data
- Auditing User Activity
- Using an External Authentication Provider (LDAP or AAA Server) for User Authentication
Managing Users and Configuring Role-Based Access Control
This section describes how to manage users in Prime Central, including defining users and passwords and configuring role-based access control (RBAC).
Prime Central provides role-based access to various functions. Through RBAC, Prime Central allows a user to access some resources but not others, and to perform specific tasks based on the logged-in user’s roles.
Authorization of tasks is controlled by user roles within Prime Central and user roles and scopes within the applications.
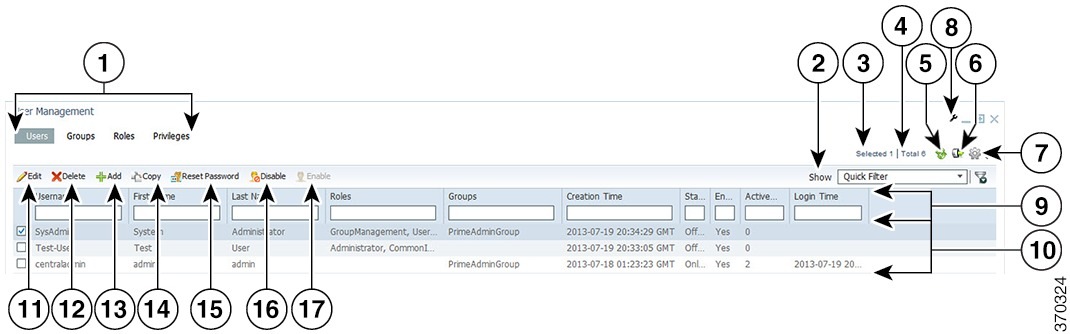
User Management Portlet
The following figure shows the User Management portlet, where users with administrator-level privileges can perform all user management tasks.
- Managing Users
- Managing Groups
- Managing Roles
- Managing Privileges
- Exporting User Data
- Auditing User Activity
- Using an External Authentication Provider (LDAP or AAA Server) for User Authentication
Managing Users
You can add, edit, copy, and delete users; reset user passwords; disable and enable user accounts; and configure user security settings.
Each user can be assigned any number of roles, and each role can aggregate any number of privileges.
Prime Central includes a default user named centraladmin whose account cannot be deleted or disabled. The centraladmin user has local authentication, user management, and administrator privileges, but initially does not have any privileges on the various applications.
- Adding a User
- Name, Password, Phone, and Note Constraints
- User Information in the Quick View
- Editing a User
- Copying a User
- Deleting a User
- Resetting Another User’s Password
- Resetting Your User Password
- Resetting a Lost Password
- Enabling or Disabling a User Account
- Configuring User Security Settings
Adding a User
| Step 1 | From the Prime Central menu, choose . |
| Step 2 | In the User Management portlet, click Add. |
| Step 3 | In the Add User window:
|
| Step 4 | In the
Application Access Privilege area, grant user access to the appropriate
applications and assign individual roles:
Note the following:
|
| Step 5 | Add the new user
as a member of one or more groups:
All users that belong to the group share the same role. |
| Step 6 | Click
Add.
The new user is displayed in the User Management portlet. |
| Step 7 | Assign device scopes (in Prime Network and Agora-NG) or
NEs (in Prime Optical) to the new user:
|
Name, Password, Phone, and Note Constraints
When adding, editing, or copying a user, the variables that you define must adhere to the constraints listed in the following table.
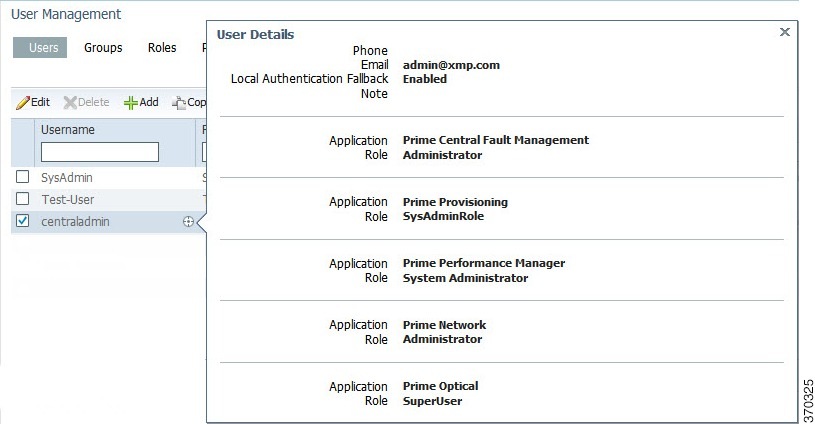
User Information in the Quick View
In the User Management portlet, the quick view displays additional user information when the cursor rests over the icon shown in the following figure.
Editing a User
| Step 1 | From the Prime Central menu, choose . |
| Step 2 | In the User Management portlet, select the user that you want to edit and click Edit. |
| Step 3 | In the Edit User window:
|
| Step 4 | In the
Application Access Privilege area, click the
Roles tab and update the user's application access
and roles, as required. If an application is not installed, it is not listed
here.
Note the following:
|
| Step 5 | In the Application Access Privilege area, click the Groups tab and update the user's assigned groups and group roles, as required. |
| Step 6 | Click
Update. The updated user is displayed in the User
Management portlet..
If you changed a user's assigned roles or access privileges, that user must log out of Prime Central and log back in to see the changes. The changes do not take effect until the user logs in next. You can also use Update to deactivate an user. |
| Step 7 | (Optional) Reassign device scopes to the user you
edited:
|
Copying a User
You can easily create a new user by copying an existing user’s assigned privileges, groups, and roles.
| Step 1 | From the Prime Central menu, choose . |
| Step 2 | In the User Management portlet, select the user that you want to copy and click Copy. |
| Step 3 | In the Add User window, make
the following entries (this information is unique to each user and is therefore
not copied from the existing user):
|
| Step 4 | For each of the following items, make any changes needed for the new user (the current information is copied from the existing user): |
| Step 5 | Click
Add.
The new user is displayed in the User Management portlet. |
| Step 6 | Assign device
scopes (in Prime Network and Agora-NG) or NEs (in Prime Optical) to the new
user:
|
Deleting a User
| Step 1 | From the Prime Central menu, choose . |
| Step 2 | In the User Management portlet, select the user that you want to delete and click Delete. |
| Step 3 | At the confirmation prompt,
click
Yes.
If the user exists on an application that is down when you delete the user from Prime Central, that user will persist on that particular application as a local user. |
Resetting Another User’s Password
Users with administrator-level privileges can reset another user’s password.
| Step 1 | From the Prime Central menu, choose . |
| Step 2 | In the User Management portlet, select the user whose password you want to reset and click Reset Password. |
| Step 3 | In the Reset Password dialog box, enter a new password that adheres to the constraints described in Name, Password, Phone, and Note Constraints. |
| Step 4 | Enter the new password again to confirm the entry. |
| Step 5 | Click Save. |
Resetting Your User Password
Users of any privilege level can use the My Account portlet to reset their own Prime Central password. The password reset applies to the Prime Central user who is currently logged in.
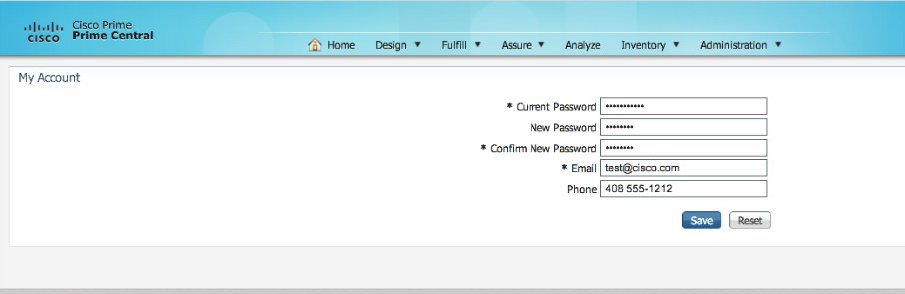
| Step 1 | On the portal home page, place your cursor over your login name (to the left of the Log Out link) and click My Account. In the example shown in the following figure, the name is Test User. |
| Step 2 | In the My Account portlet, enter your current password in the Current Password field. |
| Step 3 | In the New Password field, enter a new password that adheres to the constraints described in Name, Password, Phone, and Note Constraints. |
| Step 4 | Enter the new password again to confirm the entry. |
| Step 5 | (Optional) In the Email field, edit the email address that will be displayed in the User Management portlet. This field is dimmed for the centraladmin user. |
| Step 6 | (Optional) In the Phone field, edit the phone number that will be displayed in the User Management portlet. This field is dimmed for the centraladmin user. |
| Step 7 | Click
Save.
 |
Resetting a Lost Password
From the UNIX command line, the Linux root user on the Prime Central portal can reset any Prime Central portal user’s password, including an administrator password.
Complete this procedure only after trying Resetting Another User’s Password and Resetting Your User Password.
| Step 1 | As the primeusr user, log in to the Prime Central portal with the primeusr password that you specified during installation. |
| Step 2 | Enter the following command: su root |
| Step 3 | When prompted, enter the root user password. |
| Step 4 | Change directories to the $XMP_HOME/bin folder. |
| Step 5 | Enter the following command: resetUserPassword.ksh |
| Step 6 | When prompted, enter the
Prime Central username and the new password. In the following example, the
Prime Central username is
User_XYZ
Please enter username:
User_XYZ
Please enter new password:
Please enter confirm password:
When the script finishes, output similar to the following is displayed: Loading USER - User_XYZ Validating new password.. Resetting password .. Resetting password COMPLETED. EXECUTION STATUS : Success |
Enabling or Disabling a User Account
Users with administrator-level privileges can enable or disable another user’s account. However, you cannot disable the centraladmin user account.
Configuring User Security Settings
Users with the appropriate privileges can configure security settings that apply to all other users.
The following security settings do not apply to the centraladmin user, who has administrator-level privileges:
 Note |
|
| Step 1 | From the Prime Central menu, choose . |
| Step 2 | In the top-right corner of the User Management portlet, click the Options icon. |
| Step 3 | Click the Configuration link. The User Management - Configuration dialog box (see the following figure) opens. |
| Step 4 | Configure the security settings that will apply to all users. See the User Security Setting Descriptions table for more information. |
| Step 5 | Click
Save.
 |
User Security Setting Descriptions
The following table describes the security settings you can configure for the users in your network.
|
The maximum number of failed login attempts allowed before the user account is denied access to Prime Central. The default is 6 retries. |
|
|
The number of concurrent sessions allowed. The default is 1 session. |
|
|
The number of minutes a user’s session is inactive before Prime Central automatically locks the user out. By default, the session times out after 60 minutes of inactivity. You are prompted to extend the session 10 minutes before it times out. If you do not extend the session before the timeout, you are logged out automatically from Prime Central and from any applications. |
|
|
The number of days before the password expires. The default is 60 days. |
|
|
The early warning period for password expiration. The default is 10 days. The value in this field must be less than the value in the Password Expiration field. |
|
|
The number of different passwords a user must use before being allowed to reuse the first password. The default is 4 passwords. This field takes priority over the Used Password Re-enablement Period field. For example, assume that: If the user password is test, you can change it to sample the next day, and then to basic on the second day. You can then change it back to test before 5 days elapses, because the Number of Passwords Before Reuse field takes priority. |
|
|
The number of days before an old password can be reused. The default is 120 days. |
|
|
The number of days a user must wait between password changes. The default is 0 days. |
|
|
Number of Prohibited Consecutive Characters From Previous Password |
The number of consecutive characters by which the new password must differ from the previous one. The default is 3 characters. |
|
Reset Password after User Creation |
Specify whether newly added users will be prompted to reset their password before their first login. |
|
The number of days a user’s session is inactive before Prime Central automatically deactivates the user. The default is 30 days. |
|
|
Specify whether to disable or delete an inactive user account. The default is Disable Account. |
Managing Groups
All users that belong to a particular group share the same role and have access to a specific set of functions. User groups can be tied to one or more roles. The idea is to easily create groups of users who all share the same access privileges. A user can be assigned to more than one group, but this is not typical, as a single group should define an overall operational role within the suite.
Prime Central includes a default group named PrimeAdminGroup that cannot be edited or deleted.
Adding a Group
Editing a Group
| Step 1 | From the Prime Central menu, choose . |
| Step 2 | In the User Management portlet, click the Groups tab. |
| Step 3 | Select the group that you want to edit and click Edit. |
| Step 4 | Edit the group description or assigned roles, as required. The group description can contain from 1 to 50 alphanumeric or special characters. |
| Step 5 | Click Update. |
Deleting a Group
Managing Roles
Users have access to functions based on the role to which they are assigned. Roles define the functions or tasks a user can perform. A user can be assigned more than one role.
Prime Central includes a set of default roles for security and access control that allow different system functions. The following table lists the default roles, the privileges that each role inherits, and the portlets that each role can access. (The default privileges are explained in Managing Privileges.) The default roles cannot be edited or deleted.
User roles inherit privileges as a union of role types. For example, the Fault Management role (which has no Common Inventory access) paired with the User role (which has Common Inventory access) results in Common Inventory access.
|
Group Management |
||||||||||
|---|---|---|---|---|---|---|---|---|---|---|
|
Yes |
||||||||||
|
No |
||||||||||
|
No |
||||||||||
|
No |
||||||||||
|
Group Management |
Group Management Privilege |
Yes |
Yes |
No |
No |
Yes |
No |
No |
No |
No |
|
User Privilege |
||||||||||
|
No |
||||||||||
|
No |
||||||||||
Note | In the GUI, there are no spaces in the role or privilege names. |
Adding a Role
Editing a Role
| Step 1 | From the Prime Central menu, choose . |
| Step 2 | In the User Management portlet, click the Roles tab. |
| Step 3 | Select the role that you want to edit and click Edit. |
| Step 4 | Edit the role description or assigned privileges, as required. The role description can contain from 1 to 50 alphanumeric or special characters. |
| Step 5 | Click Update. |
Deleting a Role
Managing Privileges
Privileges control the portlets, menu options, and back-end URLs that a role is authorized to access in Prime Central.
Prime Central provides the default privileges shown in the following table. The default privileges cannot be edited or deleted.
|
Group Management Privilege |
|
Note | In the GUI, there are no spaces in the privilege names. |
Adding a Privilege
| Step 1 | From the Prime Central menu, choose . |
| Step 2 | In the User Management portlet, click the Privileges tab. |
| Step 3 | Click Add. |
| Step 4 | In the Add
Privilege window:
|
| Step 5 | Click Add. |
| Step 6 | Create a new role and assign it the newly created privilege in the Privileges tab. See Adding a Role. |
Editing a Privilege
| Step 1 | From the Prime Central menu, choose . |
| Step 2 | In the User Management portlet, click the Privileges tab. |
| Step 3 | Select the privilege that you want to edit and click Edit. |
| Step 4 | In the Edit Privilege window, update the privilege description, URL filter expressions, assigned portlets, and menu options, as required. The description can contain from 1 to 50 alphanumeric or special characters. |
| Step 5 | Click Update. |
Deleting a Privilege
Exporting User Data
Prime Central allows you to export user data to Microsoft Excel. Opening the exported file with any program other than Excel is not recommended.
If you sort or filter the data before exporting it, the exported data is likewise sorted or filtered. If you check the left-most check box for a row, the exported data contains a check box for each checked row.
| Step 1 | From the Prime Central menu, choose. | ||
| Step 2 | In the User Management portlet, click the tab that contains the data you want to export. | ||
| Step 3 | Click the Export to Excel icon. | ||
| Step 4 | At the prompt to open or save
the Excel file, click
Open. The default filename depends on the tab you
selected in Step 2.:
| ||
| Step 5 | Click
Yes at the following prompt:
The file you are trying to open, ’filename’, is in a different format than specified by the file extension. Verify that the file is not corrupted and is from a trusted source before opening the file. Do you want to open the file now? |
Auditing User Activity
Prime Central collects and stores security audit information, which you can use to track user activity such as logins or logouts, updates of user information, and application cross launches.
Using an External Authentication Provider (LDAP or AAA Server) for User Authentication
By default, Prime Central uses internal authentication, which means passwords are stored in and verified against the data that is stored in the Prime Central database. You can also use a Lightweight Directory Access Protocol (LDAP) server or AAA server to manage user authentication externally. If you use external authentication, user information is checked against what is stored in the external LDAP or AAA server (instead of the Prime Central database). The external authentication server only stores login and password information; information pertaining to user roles is stored in the Prime Central database. The same user must exist in both the Prime Central database and the external authentication server.
- Configuring Prime Central to Communicate with an External LDAP Server
- Configuring Prime Central to Communicate with an External AAA Server
Configuring Prime Central to Communicate with an External LDAP Server
When you configure Prime Central for external user authentication via an Lightweight Directory Access Protocol (LDAP) server, you can choose to add another layer of security by enabling the use of SSL encryption. Complete one of the following procedures to configure an LDAP server connection.
Configuring a Standard LDAP Server Connection
This procedure uses LDAP terminology, such as distinguished name (DN), common name (CN), and domain component (DC). An LDAP distinguished name uniquely identifies a user in the LDAP database, similar to a full filename but in reverse order. CNs and DCs are attributes of the domain name.
| Step 1 | In the User Management portlet, create a new user as described in Adding a User. For example, create a Prime Central user named test-admin. |
| Step 2 | If the test-admin user does not already exist on the LDAP server, use an LDAP application to create the test-admin user. |
| Step 3 | Reset the test-admin user's LDAP password, ensuring that you enter this same password in Step 4d. |
| Step 4 | Do the following to enable
LDAP authentication on the Prime Central portal:
|
| Step 5 | As the primeusr user, enter
the following commands to restart the Prime Central portal:
portalctl stop portalctl start You can now use the external authentication server for Prime Central authentication. In this example, the credentials to log in to the Prime Central portal are: |
Sample LDAP Server Settings
The following table provides samples of the settings you would specify when configuring an LDAP server for Prime Central authentication.
|
LDAP server IP address or hostname and directory server port number. |
||||
|
LDAP server user ID to log in to the LDAP server. To obtain the value you need to specify for this setting, run the following command: dsquery user -name test-admin
|
||||
Configuring an SSL-Encrypted LDAP Server Connection
| Step 1 | In the User Management portlet, create a new user as described in Adding a User. For example, create a Prime Central user named test-admin. |
| Step 2 | If the test-admin user does not already exist on the LDAP server, use an LDAP application to create the test-admin user. |
| Step 3 | Enable SSL encryption on your LDAP server, following the instructions provided in the documentation for your server. |
| Step 4 | In the first
line of the extprovider.properties file, which can be found in the
installation-directory/XMP_Platform/conf/prime/conf
folder:
For example, if port number 10636 is designated for SSL use on your server, the first line of the extprovider.properties file should look like this: ldapServerName=ldaps://$Your_Server:10636 |
| Step 5 | Export the LDAP
SSL keystore certification by entering the following command:
keytool -export -keystore Your_LDAP.ks -alias Your_Domain -file Your_LDAP.cer This command will create the keystore certificate (in this example, Your_LDAP.cer). Make sure to specify the same .ks file you set up when you enabled SSL encryption on your LDAP server. |
| Step 6 | Import the
keystore certificate into the Prime Central keystore by entering the following
command:
keytool -import -alias Your_Domain -file Your_LDAP.cer -keystore $XMP_Home/jre/lib/security/cacerts where XMP_Home is the Prime Central installation directory. |
| Step 7 | As the root user, enter the keystore password. |
| Step 8 | Restart the Prime Central portal. |
| Step 9 | (Optional) To
verify that you have set up the LDAP server connection correctly using an LDAP
client, such as jexplorer, import the keystone certificate to your local client
machine by entering the following command:
keytool -import -alias Your_Domain -file Your_LDAP.cer –keystore $JAVA_Home/jre/lib/security/cacerts where JAVA_Home is the JDK installation directory. |
Configuring Prime Central to Communicate with an External AAA Server
Use this procedure to configure the Prime Central portal to communicate with the AAA (RADIUS or TACACS+) server, and to test the connection after it is configured. This procedure uses AAA terminology.
| Step 1 | In the User Management portlet, create a new user as described in Adding a User. For example, create a Prime Central user named test-admin. |
| Step 2 | If the test-admin user does not already exist on the AAA server, use an AAA application to create the test-admin user. |
| Step 3 | Do the following to enable
AAA authentication on the Prime Central portal:
|
| Step 4 | As the primeusr user, enter
the following commands to restart the Prime Central portal:
portalctl stop portalctl start |
| Step 5 | You can now use the external authentication server for Prime Central authentication. In this example, the credentials to log in to the Prime Central portal are: |
Sample AAA Server Settings
The following table provides samples of the settings you would specify when configuring a AAA server for Prime Central authentication.
|
JaasSecretKey |
(Encrypted)
zhEaxSqhTpJY0R2vStJJBQ== |
TACACS+ server secret key |
||
|
RADIUS server authentication type
|
||||
 Feedback