User Guide for Cisco Network Registrar 7.2
Bias-Free Language
The documentation set for this product strives to use bias-free language. For the purposes of this documentation set, bias-free is defined as language that does not imply discrimination based on age, disability, gender, racial identity, ethnic identity, sexual orientation, socioeconomic status, and intersectionality. Exceptions may be present in the documentation due to language that is hardcoded in the user interfaces of the product software, language used based on RFP documentation, or language that is used by a referenced third-party product. Learn more about how Cisco is using Inclusive Language.
- Updated:
- March 20, 2015
Chapter: Managing the Central Configuration
- Central Configuration Tasks
- Configuring Server Clusters
- Adding Local Clusters
- Editing Local Clusters
- Listing Related Servers for DHCP, DNS, and TCP Listener Servers
- Connecting to Local Clusters
- Synchronizing with Local Clusters
- Replicating Local Cluster Data
- Viewing Replica Data
- Deactivating, Reactivating, and Recovering Data for Clusters
- Polling Subnet Utilization and Lease History Data
- Enabling Subnet Utilization Collection
- Enabling Lease History Collection
- Managing DHCP Scope Templates
- Managing DHCP Policies
- Managing DHCP Client-Classes
- Managing Virtual Private Networks
- Managing DHCP Failover Pairs
- Managing Lease Reservations
Managing the Central Configuration
This chapter explains how to manage the central configuration at the Cisco Network Registrar regional cluster.
See Also
Central Configuration Tasks
Configuring Server Clusters
Managing DHCP Scope Templates
Managing DHCP Policies
Managing DHCP Client-Classes
Managing Virtual Private Networks
Managing DHCP Failover Pairs
Managing Lease Reservations
Central Configuration Tasks
Central configuration management at the regional cluster can involve:
•![]() Setting up server clusters, replicating their data, and polling subnet utilization and lease history data from them.
Setting up server clusters, replicating their data, and polling subnet utilization and lease history data from them.
•![]() Setting up routers (see Chapter 11, "Managing Router Interface Configurations").
Setting up routers (see Chapter 11, "Managing Router Interface Configurations").
•![]() Managing network objects such as DHCP scope templates, policies, client-classes, options, networks, and virtual private networks (VPNs).
Managing network objects such as DHCP scope templates, policies, client-classes, options, networks, and virtual private networks (VPNs).
•![]() Managing DHCP failover server pairs.
Managing DHCP failover server pairs.
These functions are available only to administrators assigned the central-cfg-admin role. (The full list of functions for the central-cfg-admin are listed in Table 5-2 on page 5-4.) Note that central configuration management does not involve setting up administrators and checking the status of the regional servers. These functions are performed by the regional administrator, as described in the "Licensing" section on page 5-20 and "Managing Servers" section on page 7-1.
Configuring Server Clusters
Server clusters are groupings of CCM, DNS, DHCP, and TFTP servers at local cluster locations. For example, an organization might have Boston and Chicago clusters of DNS and DHCP servers. A central administrator might want to affect how addresses are allocated at these clusters, or poll subnet utilization or lease history data from them. The central administrator might even want to connect to those local clusters, if the required permissions exist, to view changes there or restart the servers.
View the created clusters on the View Tree of Cluster Servers page. To get there, click Clusters. Once the page is populated with clusters, it shows some rich information and provides some useful functions. The Go Local icon ( ) allows single sign-on to a local cluster web UI, if an equivalent administrator account exists at the local cluster.
The View Tree of Clusters page might have been populated by manually adding clusters on the List/Add Remote Clusters page, or automatically when adding and synchronizing with routers, which also creates server clusters. The cluster names are links that you can click to edit the cluster information. The resynchronization, replication, and polling functions are described further on in this chapter.
The DHCP server may have the Related Servers icon ( ) next to the DHCP server for the cluster. Click this icon to open the List Related Servers for DHCP Server page (see the "Listing Related Servers for DHCP, DNS, and TCP Listener Servers" section). These servers can be DNS, TFTP, or DHCP failover servers.
See Also
Adding Local Clusters
Editing Local Clusters
Listing Related Servers for DHCP, DNS, and TCP Listener Servers
Connecting to Local Clusters
Synchronizing with Local Clusters
Replicating Local Cluster Data
Viewing Replica Data
Deactivating, Reactivating, and Recovering Data for Clusters
Polling Subnet Utilization and Lease History Data
Enabling Subnet Utilization Collection
Enabling Lease History Collection
Adding Local Clusters
Adding local clusters to the regional cluster is the core functionality of the central-cfg-admin role.
To enable subnet utilization and lease history data collection, see the "Polling Subnet Utilization and Lease History Data" section.
The minimum required values to add a cluster are its name, IP address of the machine, administrator username, and password. The cluster name must be unique and its IP address must match that of the host where the CNRDB database is located. Obtain the SCP and HTTP ports, username, and password from the local cluster administrator. The preset value at Cisco Network Registrar installation for the SCP port is 1234 and the HTTP port is 8080.
You can also set whether you want outbound connections to local servers to be secure by setting the use-ssl attribute to optional or required. It is set to optional by default, and it requires the Cisco Network Registrar Communications Security Option installed to be effective.
Regional Web UI
View local clusters on the List/Add Remote Clusters page. You can also add server clusters on the List/Add Remote Clusters page. The List/Add Remote Clusters page provide the following functions:
•![]() Connect to a local cluster web UI for local administration.
Connect to a local cluster web UI for local administration.
•![]() Resynchronize with a local cluster to reconcile updates there.
Resynchronize with a local cluster to reconcile updates there.
•![]() Pull data over to a regional cluster replica database.
Pull data over to a regional cluster replica database.
•![]() Query subnet utilization data from a local cluster. This function appears only if you are assigned the regional-addr-admin role with at least the subnet-utilization subrole.
Query subnet utilization data from a local cluster. This function appears only if you are assigned the regional-addr-admin role with at least the subnet-utilization subrole.
•![]() Query lease history data from a local cluster. This function appears only if you are assigned the regional-addr-admin role with at least the lease-history subrole.
Query lease history data from a local cluster. This function appears only if you are assigned the regional-addr-admin role with at least the lease-history subrole.
To add a cluster, click Add Cluster. This opens the Add Remote Cluster page. For an example of adding a local cluster, see the "Create the Local Clusters" section on page 5-40. Click Add Cluster to return to the List/Add Remote Clusters page.
Local Web UI
You can also manage clusters in the local web UI. See the "Configuring Clusters in the Local Web UI" section on page 2-11 for details.
CLI Commands
To add a cluster, use cluster name create address to give the cluster a name and address and set the important attributes. For example:
nrcmd> cluster example-cluster create 192.168.100.101 admin=admin password=changeme
Note that the administrator must be a superuser to fully synchronize at the local cluster.
Editing Local Clusters
Editing local clusters at the regional cluster is the core functionality of the central-cfg-admin role.
Regional Web UI
To edit a local cluster, click its name on the List/Add Remote Clusters page to open the Edit Server Cluster page. This page is essentially the same as the Add Server Cluster page, except for an additional attribute unset function. Make your changes, then click Modify Cluster.
Local Web UI
You can also edit clusters in the local web UI. See the "Configuring Clusters in the Local Web UI" section on page 2-11 for details.
CLI Commands
To edit a local cluster, use cluster name set attribute to set or reset the attributes. For example:
nrcmd> cluster Example-cluster set poll-replica-interval=8h
Listing Related Servers for DHCP, DNS, and TCP Listener Servers
If you have related DNS, TFTP, or DHCP failover servers (see the "Creating and Synchronizing Failover Server Pairs" section on page 27-6), you can access the attributes for these servers.
Regional Web UI
On the List/Add DHCP Failover Pairs page, click the Related Servers icon () next to the DHCP server for the cluster to open the List Related Servers for DHCP Server page. This page shows the communication and failover states the servers are in. Table 6-1 describes the attributes on this page. (For this page to appear, you must be assigned the central-cfg-admin role with the dhcp-management subrole.)
|
|
|
|---|---|
Related Server Type |
Type of related server: DHCP, DNS, or LDAP. |
Related Server IP Address |
IP address of the related server. For DHCP failover partners, click this link to open the View Failover Related Server page (see Table 6-2). |
Communications |
State of the communication—None, OK, or Interrupted. |
Requests |
Applies to DNS or LDAP related servers only, the number of requests from these servers. |
State |
For DHCP failover—None, Startup, Normal, Communications-interrupted, Partner-down, Potential-conflict, Recover, Paused, Shutdown, or Recover-done. For High-Availability (HA) DNS—Send-Update, Probe, or ha-state-unknown. Only the server that is successfully updating can be in Send-Update state. The partner server not sending updates is then always in Probe or unknown state. When the DHCP server comes up if there is no client activity, both DNS servers are often in the unknown state. This changes when the DHCP server tries to do DNS updates. |
Partner Role |
For DHCP failover only, the failover role of the partner—Main or Backup. |
Partner State |
For DHCP failover only, the partner's state—None, Startup, Normal, Communications-interrupted, Partner-down, Potential-conflict, Recover, Paused, Shutdown, or Recover-done. |
Update Response Complete |
For DHCP failover only, the percentage of completed update responses, valid only if there are outstanding update responses. |
Other controls are available on these pages:
•![]() To refresh the data on the View Failover Related Server page, click Refresh Data.
To refresh the data on the View Failover Related Server page, click Refresh Data.
•![]() On the View Failover Related Server page, if the partner is in the Communications-interrupted failover state, you can click Set Partner Down in association with an input field for the partner-down date setting. This setting is initialized to the value of the start-of-communications-
On the View Failover Related Server page, if the partner is in the Communications-interrupted failover state, you can click Set Partner Down in association with an input field for the partner-down date setting. This setting is initialized to the value of the start-of-communications-
interrupted attribute. (In Normal web UI mode, you cannot set this date to be an earlier value than the initialized date. In Expert web UI mode, you can set this value to any date.) After clicking Set Partner Down, you return to the List Related Servers for DHCP Server page to view the result of the partner-down action. Never set both partners to Partner Down mode.
•![]() To return from the List Related Servers for DHCP Server page or View Failover Related Server page, click OK.
To return from the List Related Servers for DHCP Server page or View Failover Related Server page, click OK.
CLI Commands
To list the related servers for a DHCP server, use dhcp getRelatedServers.
Connecting to Local Clusters
In the web UI, if you have an equivalent administrator account at the local cluster, you can single sign-on to the local cluster Manage Servers page by clicking the Go Local icon () next to the cluster name on the List/Add Remote Clusters page. To return to the regional cluster web UI, click the Go Regional icon ( ) at the top right corner of the local cluster page. If you do not have an equivalent account at the local cluster, the Go Local icon opens the local cluster login page.
Synchronizing with Local Clusters
Synchronization is configuring regional and local clusters so that they can work together in a unified fashion. When you synchronize:
1. ![]() The list of local servers are copied to the regional cluster.
The list of local servers are copied to the regional cluster.
2. ![]() A shared secret is established between the regional and local clusters for single sign-on.
A shared secret is established between the regional and local clusters for single sign-on.
Synchronization occurs once when you create a local cluster at the regional cluster. However, changes might occur at the local cluster periodically, requiring you to resynchronize with it. For example, you might change the username and password used to make local connections. Resynchronization does not happen automatically—you must click the Resynchronize icon ( ) next to the cluster name on the List/Add Remote Clusters page. The result is a positive confirmation for success or an error message for a failure.
When you upgrade the local cluster, you should also resynchronize the cluster. For synchronization to be effective, the user account specified for the local cluster must be a superuser. If you get a synchronization error message, check the local cluster to ensure that it is running properly.

Note ![]() When you resynchronize clusters at the regional cluster, an automatic reinitialization of replica data occurs. The result is that for larger server configurations, resynchronization might take several minutes. The benefit, however, is that you do not need a separate action to update the replica data.
When you resynchronize clusters at the regional cluster, an automatic reinitialization of replica data occurs. The result is that for larger server configurations, resynchronization might take several minutes. The benefit, however, is that you do not need a separate action to update the replica data.
Replicating Local Cluster Data
Replication is copying the configuration data from a local server to the regional cluster replica database. Replication needs to occur before you can pull DHCP object data into the regional server database. During replication:
1. ![]() The current data from the local database is copied to the regional cluster. This usually occurs once.
The current data from the local database is copied to the regional cluster. This usually occurs once.
2. ![]() Any changes made in the master database since the last replication are copied over.
Any changes made in the master database since the last replication are copied over.
Replication happens at a given time interval. You can also force an immediate replication by clicking the Replicate icon ( ) in the Replicate Data column on the List/Add Remote Clusters page.
You can set the automatic replication interval on the Add Server Cluster page, or adjust it on the Edit Server Cluster page, using the poll-replica-interval attribute. This interval is preset at four hours. You can also set the fixed time of day to poll replica data by using the poll-replica-offset attribute; its default value is zero hours (no offset).

Viewing Replica Data
In the web UI, you can view the replica data cached in the replica database at the regional cluster by choosing Replica Data from the Clusters menu. This opens the View Replica Class List page (see Figure 6-1).
Regional Web UI
Figure 6-1 View Replica Class List Page (Regional)
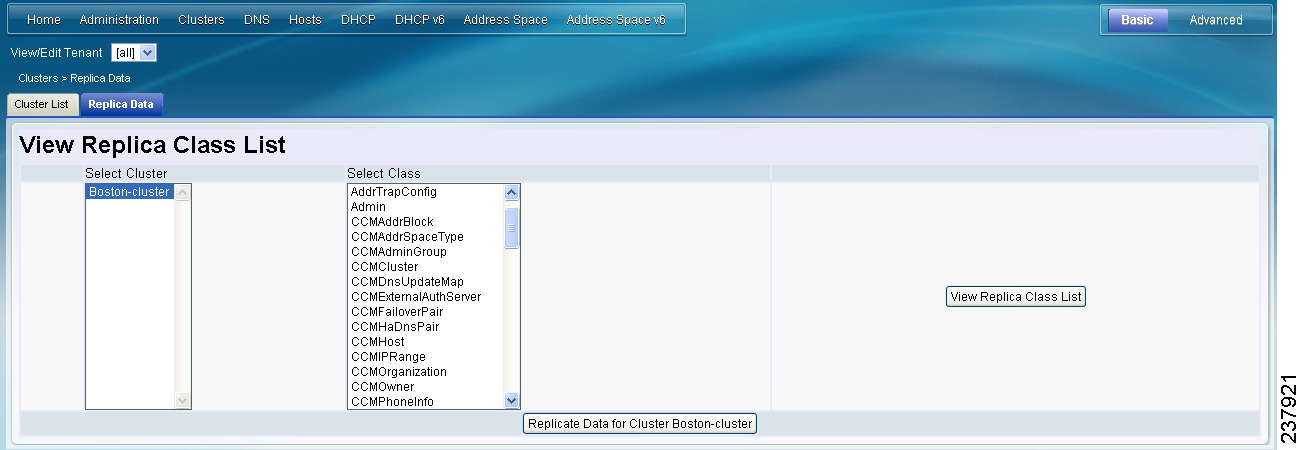
On this page, select the:
1. ![]() Cluster in the Select Cluster list.
Cluster in the Select Cluster list.
2. ![]() Object class in the Select Class list.
Object class in the Select Class list.
3. ![]() Replicate the data for the cluster and class chosen. Click the Replicate icon ().
Replicate the data for the cluster and class chosen. Click the Replicate icon ().
4. ![]() View the replica data. Click View Replica Class List, which opens a List Replica Data for Cluster page for the cluster and specific class of object you choose. On this page, you can:
View the replica data. Click View Replica Class List, which opens a List Replica Data for Cluster page for the cluster and specific class of object you choose. On this page, you can:
•![]() Click the name of an object to open a View page at the regional cluster. Return to the List Replica page by clicking Return to object List.
Click the name of an object to open a View page at the regional cluster. Return to the List Replica page by clicking Return to object List.
Note ![]() The List Replica Address Blocks and List Replica Subnets pages do not provide this function. To view the address blocks or subnets for the local cluster, use the Go Local icon ().
The List Replica Address Blocks and List Replica Subnets pages do not provide this function. To view the address blocks or subnets for the local cluster, use the Go Local icon ().
•![]() Click the Go Local icon () to go to the List page for the object at the local cluster. Return to the List Replica object page by clicking the Go Regional icon ().
Click the Go Local icon () to go to the List page for the object at the local cluster. Return to the List Replica object page by clicking the Go Regional icon ().
Click Return on the List Replica Data for Cluster page to return to the View Replica Class List page.
Deactivating, Reactivating, and Recovering Data for Clusters
Deactivating a cluster might be necessary if you suspect that a hard disk error occurred where configuration data could have been lost. You can deactivate the cluster, remedy the problem, recover cluster data from the replica database, then reactivate the cluster. This saves you from having to delete and then recreate the cluster with all of its data lost in the process.
Deactivating, reactivating, and recovering the data for a cluster is available only in the web UI, and you must be an administrator assigned the central-config-admin role.
Data that is not recovered (and that you need to manually restore) includes:
•![]() Contents of the cnr.conf file (see the "Modifying the cnr.conf File" section on page 7-26)
Contents of the cnr.conf file (see the "Modifying the cnr.conf File" section on page 7-26)
•![]() Web UI configuration files
Web UI configuration files
•![]() Unprotected DNS resource records
Unprotected DNS resource records
•![]() Product licenses
Product licenses
•![]() Administrator accounts
Administrator accounts
•![]() Lease history
Lease history
•![]() Extension scripts
Extension scripts
Note ![]() Restoring the data to a different IP address requires some manual reconfiguration of such things as DHCP failover server pair and High-Availability (HA) DNS server pair addresses.
Restoring the data to a different IP address requires some manual reconfiguration of such things as DHCP failover server pair and High-Availability (HA) DNS server pair addresses.
Regional Web UI
Deactivate a cluster by clicking the Activated icon ( ) in the Activation column for the cluster. This immediately changes the icon to the Deactivated (
 ) icon to show the status of the cluster. Deactivating a cluster disables deleting, synchronizing, replicating data, and polling subnet utilization and lease history. These operations are not available while the cluster is deactivated.
Deactivating the cluster also displays the Recover icon ( ) in the Recover Data column of the cluster. Click this icon to recover the replica data. This opens a separate "in process" status window that prevents any operations on the web UI pages while the recovery is in process. As soon as the recovery is successful, the disabled functions are again enabled and available.
To reactivate the cluster, click the Deactivated icon () to change back to the Activated icon () and show the status as active.
Polling Subnet Utilization and Lease History Data
Subnet utilization and lease history data are automatically collected at any regional cluster where these features are enabled for the DHCP server or failover pair. The default polling interval to update the regional databases is 4 hours. You can poll the servers immediately by clicking the Poll icon ( ) for the cluster in the Poll Subnet Utilization column or Poll Lease History column on the List/Add Remote Clusters page. For this manual polling, if the server is in a failover relationship, data is only retrieved for the subnets where the server is the main.
If you have address space privileges (you are assigned the regional-addr-admin role with at least the subnet-utilization and lease-history subroles), you can query the subnet utilization or lease history data by choosing Subnet Utilization or Lease History from Address Space (see the "Generating Subnet Utilization History Reports" section on page 9-13, or the "Running IP Lease Histories" section on page 22-23).
See Also
Polling Process
Adjusting the Polling Intervals
Polling Process
When the regional cluster polls the local cluster for subnet utilization or lease history, it first requests all available data up to the current time. This time is recorded in the history databases, and subsequent polls request only new data from this time forward. All times are stored relative to each local cluster time, adjusted for that cluster time zone.
If the times on each server are not synchronized, you might observe odd query results. For example, if the regional cluster time lags behind that of a local cluster, the collected history might be in the future relative to the time range queries at the regional cluster. If so, the result of the query would be an empty list. Data merged from the several clusters could also appear out of sequence, because of the different time skews between local clusters. This type of inconsistency would make it difficult to interpret trends. To avoid these issues, using a network time service for all clusters is strongly recommended.
Adjusting the Polling Intervals
You can adjust the automatic polling interval for subnet utilization and lease history, along with other attributes. These attributes are set in three places at the regional cluster, with the following priority:
1. ![]() Failover pair (see the "Managing DHCP Failover Pairs" section)—These values override the cluster settings (only for subnets in the failover pair), and set additional attributes to control how polling to the backup server occurs if the main server is not available:
Failover pair (see the "Managing DHCP Failover Pairs" section)—These values override the cluster settings (only for subnets in the failover pair), and set additional attributes to control how polling to the backup server occurs if the main server is not available:
–![]() If the main failover server is unavailable, the subnets on the backup server are polled.
If the main failover server is unavailable, the subnets on the backup server are polled.
–![]() If there are no failover pair settings for these attributes, the main server values are used.
If there are no failover pair settings for these attributes, the main server values are used.
In the CLI, set the attributes listed in Table 6-5 using the failover-pair command.
2. ![]() Cluster—These values override the server-wide settings, unless they are unset, in which case the server values are used. The cluster values are set when adding or editing the cluster. In the CLI, set the attributes listed in Table 6-5, using the cluster command.
Cluster—These values override the server-wide settings, unless they are unset, in which case the server values are used. The cluster values are set when adding or editing the cluster. In the CLI, set the attributes listed in Table 6-5, using the cluster command.
3. ![]() Regional CCM server (the preset polling interval is 4 hours)—This is set on the Edit CCM Server page, accessible by clicking Servers, then the Local CCM Server link. In the CLI, set the attributes listed in Table 6-5 using the ccm command.
Regional CCM server (the preset polling interval is 4 hours)—This is set on the Edit CCM Server page, accessible by clicking Servers, then the Local CCM Server link. In the CLI, set the attributes listed in Table 6-5 using the ccm command.
Note ![]() If subnet utilization or lease history collection is not explicitly turned on at the local cluster DHCP server (see the "Enabling Subnet Utilization Collection" section and the "Enabling Lease History Collection" section), no data is collected, even though polling is on by default. Subnet utilization collection at the DHCP server is distinct from polling at the regional cluster, and polling does not automatically trigger collection. Subnet utilization collection must occur before new polling picks up any new data. Because this collection is preset to every 15 minutes, the polling interval should be set higher than this interval (the automatic polling interval is preset to every 4 hours). This also means that subsequent explicit polling performed before the next collect-addr-util-interval will not return any new subnet utilization data.
If subnet utilization or lease history collection is not explicitly turned on at the local cluster DHCP server (see the "Enabling Subnet Utilization Collection" section and the "Enabling Lease History Collection" section), no data is collected, even though polling is on by default. Subnet utilization collection at the DHCP server is distinct from polling at the regional cluster, and polling does not automatically trigger collection. Subnet utilization collection must occur before new polling picks up any new data. Because this collection is preset to every 15 minutes, the polling interval should be set higher than this interval (the automatic polling interval is preset to every 4 hours). This also means that subsequent explicit polling performed before the next collect-addr-util-interval will not return any new subnet utilization data.
The polling offset attribute ensures that polling occurs at a specific hour of the day, set as 24-hour time, in relation to the polling interval. For example, if you set the interval to 4h and the offset to 6h (6 A.M.), the polling occurs at 2 A.M., 6 A.M., 10 A.M., 2 P.M., 6 P.M., and 10 P.M. each day.
Enabling Subnet Utilization Collection
Step 1 ![]() Configure the local cluster DHCP server with scopes and address ranges so that clients have requested leases.
Configure the local cluster DHCP server with scopes and address ranges so that clients have requested leases.
Step 2 ![]() Explicitly enable subnet utilization collection. The DHCP server attributes to set are:
Explicitly enable subnet utilization collection. The DHCP server attributes to set are:
•![]() collect-addr-util-duration—Maximum period the DHCP server maintains data. You must change this from the preset value of 0 (no collection) to some reasonable value (see the context sensitive help for this attribute for the impact on memory).
collect-addr-util-duration—Maximum period the DHCP server maintains data. You must change this from the preset value of 0 (no collection) to some reasonable value (see the context sensitive help for this attribute for the impact on memory).
If you are configuring simple DHCP failover, disable individual polling of the main and backup DHCP servers. Instead, enable the failover pair polling by setting the failover pair attribute poll-subnet-util-interval, so as to collect one set of data from both servers.
•![]() collect-addr-util-interval—Frequency the server collects snapshots of the data (preset to 15 minutes). How you juggle this value with that of the collect-addr-util-duration attribute determines how much memory you use (see the context sensitive help for this attribute).
collect-addr-util-interval—Frequency the server collects snapshots of the data (preset to 15 minutes). How you juggle this value with that of the collect-addr-util-duration attribute determines how much memory you use (see the context sensitive help for this attribute).
In the CLI, set the attributes using the dhcp set command.
Step 3 ![]() If you are in staged dhcp edit mode, reload the local cluster DHCP server.
If you are in staged dhcp edit mode, reload the local cluster DHCP server.
Step 4 ![]() At the regional cluster, create the cluster that includes this DHCP server.
At the regional cluster, create the cluster that includes this DHCP server.
Step 5 ![]() Go to the Subnet Utilization Settings section of the Add Server Cluster or Edit Server Cluster page. Set the attributes described in Table 6-5.
Go to the Subnet Utilization Settings section of the Add Server Cluster or Edit Server Cluster page. Set the attributes described in Table 6-5.
Step 6 ![]() Click Modify Cluster.
Click Modify Cluster.
Step 7 ![]() In the regional web UI, click the Poll Subnet Utilization icon () for the cluster to obtain the initial set of subnet utilization data. This data is refreshed automatically at each polling interval. Note that if you subsequently click the Poll Subnet Utilization icon, new subnet utilization data does not appear until after the next collection interval (collect-addr-util-interval) on the DHCP server (preset to 15 minutes).
In the regional web UI, click the Poll Subnet Utilization icon () for the cluster to obtain the initial set of subnet utilization data. This data is refreshed automatically at each polling interval. Note that if you subsequently click the Poll Subnet Utilization icon, new subnet utilization data does not appear until after the next collection interval (collect-addr-util-interval) on the DHCP server (preset to 15 minutes).
Enabling Lease History Collection
Step 1 ![]() Configure the local cluster DHCP server with scopes and address ranges so that clients have requested leases.
Configure the local cluster DHCP server with scopes and address ranges so that clients have requested leases.
Step 2 ![]() Explicitly enable lease history data collection. The DHCP server attributes to set are:
Explicitly enable lease history data collection. The DHCP server attributes to set are:
•![]() ip-history—Set this to v4-only.
ip-history—Set this to v4-only.
•![]() ip-history-detail—Set this to enabled if you want to collect detailed history data.
ip-history-detail—Set this to enabled if you want to collect detailed history data.
•![]() ip-history-max-age—Limit on the age of the history records (preset to 4 weeks).
ip-history-max-age—Limit on the age of the history records (preset to 4 weeks).
In the CLI, set the attributes using the dhcp set command.
Step 3 ![]() If in staged dhcp edit mode, reload the local cluster DHCP server.
If in staged dhcp edit mode, reload the local cluster DHCP server.
Step 4 ![]() At the regional cluster, create the cluster that includes this DHCP server.
At the regional cluster, create the cluster that includes this DHCP server.
Step 5 ![]() In the regional web UI, go to the Lease History Settings section of the Add Server Cluster or Edit Server Cluster page.
In the regional web UI, go to the Lease History Settings section of the Add Server Cluster or Edit Server Cluster page.
Step 6 ![]() Set the attributes in Table 6-5.
Set the attributes in Table 6-5.
Step 7 ![]() Click Modify Cluster.
Click Modify Cluster.
Step 8 ![]() On the List/Add Remote Clusters page, click the Replica icon () next to the cluster name.
On the List/Add Remote Clusters page, click the Replica icon () next to the cluster name.
Step 9 ![]() Click the Poll Lease History icon () for the cluster involved to obtain the initial set of lease history data. This data is refreshed automatically at each polling interval.
Click the Poll Lease History icon () for the cluster involved to obtain the initial set of lease history data. This data is refreshed automatically at each polling interval.
Managing DHCP Scope Templates
Scope templates apply certain common attributes to multiple scopes. These common attributes include a scope name based on an expression, policies, address ranges, and an embedded policy options based on an expression. The scope templates you add or pull from the local clusters are visible on the List DHCP Scope Templates page.
For details on creating and editing scope templates, and applying them to scopes, see the "Creating and Applying Scope Templates" section on page 20-3. The regional cluster web UI has the added feature of pushing scope templates to local clusters and pulling them from local clusters.
See Also
Pushing Scope Templates to Local Clusters
Pulling Scope Templates from Replica Data
Pushing Scope Templates to Local Clusters
You can push the scope templates you create from the regional cluster to any of the local clusters. In the web UI, if you want to push a specific template to a cluster, click Push Scope Template on the List DHCP Scope Templates page. If you want to push all of them, click Push All Scope Templates. Both open the Push Scope Template Data to Local Clusters page.
Regional Web UI
The Push Scope Template Data to Local Clusters page identifies the data to push, how to synchronize it with the local cluster, and the cluster or clusters to which to push it. The data synchronization modes are:
•![]() Ensure (preset value)—Ensures that the local cluster has new data without affecting any existing data.
Ensure (preset value)—Ensures that the local cluster has new data without affecting any existing data.
•![]() Replace—Replaces data without affecting other objects unique to the local cluster.
Replace—Replaces data without affecting other objects unique to the local cluster.
•![]() Exact—Available for "push all" operations only. Use this with caution, because it overwrites the data and deletes any other objects unique to the local cluster.
Exact—Available for "push all" operations only. Use this with caution, because it overwrites the data and deletes any other objects unique to the local cluster.
Choose the destination cluster or clusters in the Available field and move it or them to the Selected field.

Tip ![]() The synchronization mode and cluster choice settings are persistent for the duration of the current login session, so that they are in effect each time you access this page, unless you change them.
The synchronization mode and cluster choice settings are persistent for the duration of the current login session, so that they are in effect each time you access this page, unless you change them.
After making these choices, click Push Data to Clusters. This opens the View Push Scope Template Data Report page.
Pulling Scope Templates from Replica Data
You may choose to pull scope templates from the replica data of the local clusters instead of explicitly creating them. (You may first want to update the policy replica data by clicking the Replicate icon [] next to the cluster name.) To pull the scope templates in the regional web UI, click Pull Replica Scope Templates.
Regional Web UI
The Select Replica DHCP Scope Template Data to Pull page shows a tree view of the regional server replica data for the local clusters' scope templates. The tree has two levels, one for the local clusters and one for the scope templates in each cluster. You can pull individual scope templates from the clusters, or you can pull all of their scope templates. To pull individual scope templates, expand the tree for the cluster, then click Pull Scope Template next to its name. To pull all the scope templates from a cluster, click Pull All Scope Templates from Cluster.
To pull the scope templates, you must also choose a synchronization mode:
•![]() Ensure—Ensures that the regional cluster has new data without affecting any existing data.
Ensure—Ensures that the regional cluster has new data without affecting any existing data.
•![]() Replace (preset value)—Replaces data without affecting other objects unique to the regional cluster.
Replace (preset value)—Replaces data without affecting other objects unique to the regional cluster.
•![]() Exact—Available for "pull all" operations only. Use this with caution, because it overwrites the data and deletes any other objects unique to the regional cluster.
Exact—Available for "pull all" operations only. Use this with caution, because it overwrites the data and deletes any other objects unique to the regional cluster.
Managing DHCP Policies
Every DHCP server must have one or more policies defined for it. Policies define lease duration, gateway routers, and other configuration parameters, in what are called DHCP options. Policies are especially useful if you have multiple scopes, because you need only define a policy once and apply it to the multiple scopes.
For details on creating and editing DHCP policies, and applying them to scopes, see the "Configuring DHCP Policies" section on page 21-1. The regional cluster web UI has the added feature of pushing policies to, and pulling them from, the local clusters.
See Also
Pushing Policies to Local Clusters
Pulling Policies from Replica Data
Pushing Policies to Local Clusters
You can also push the policies you create from the regional cluster to any of the local clusters. In the regional web UI, if you want to push a specific policy to a cluster, click Push DHCP Policy on the List/Add DHCP Policies page. If you want to push all of them, click Push All DHCP Policies.
Regional Web UI
The Push DHCP Policy Data to Local Clusters page identifies the data to push, how to synchronize it with the local cluster, and the cluster or clusters to which to push it. The data synchronization modes are:
•![]() Ensure (preset value)—Ensures that the local cluster has new data without affecting any existing data.
Ensure (preset value)—Ensures that the local cluster has new data without affecting any existing data.
•![]() Replace—Replaces data without affecting other objects unique to the local cluster.
Replace—Replaces data without affecting other objects unique to the local cluster.
•![]() Exact—Available for push-all operations only. Use this with caution, because it overwrites the data and deletes any other objects unique to the local cluster.
Exact—Available for push-all operations only. Use this with caution, because it overwrites the data and deletes any other objects unique to the local cluster.
Choose the destination cluster or clusters in the Available field and move it or them to the Selected field. Then click Push Data to Clusters to open the View Push Policy Data Report page.
Tip ![]() The synchronization mode and cluster choice settings are persistent for the duration of the current login session, so that they are in effect each time you access this page, unless you change them.
The synchronization mode and cluster choice settings are persistent for the duration of the current login session, so that they are in effect each time you access this page, unless you change them.
Pulling Policies from Replica Data
You may choose to pull policies from the replica data of the local clusters instead of explicitly creating them. (In the regional web UI, you may first want to update the policy replica data by clicking the Replicate icon [] next to the cluster name.) To pull the policies, click Pull Replica DHCP Policy.
Regional Web UI
The Select Replica DHCP Policy Data to Pull page shows a tree view of the regional server replica data for the local clusters' policies. The tree has two levels, one for the local clusters and one for the policies in each cluster. You can pull individual policies from the clusters, or you can pull all of their policies. To pull individual policies, expand the tree for the cluster, then click Pull Policy next to its name. To pull all the policies from a cluster, click Pull All Policies.
To pull all the policies, you must also choose a synchronization mode:
•![]() Ensure—Ensures that the regional cluster has new data without affecting any existing data.
Ensure—Ensures that the regional cluster has new data without affecting any existing data.
•![]() Replace (preset value)—Replaces data without affecting other objects unique to the regional cluster.
Replace (preset value)—Replaces data without affecting other objects unique to the regional cluster.
•![]() Exact—Available for "pull all" operations only. Use this with caution, because it overwrites the data and deletes any other objects unique to the regional cluster.
Exact—Available for "pull all" operations only. Use this with caution, because it overwrites the data and deletes any other objects unique to the regional cluster.
Managing DHCP Client-Classes
Client-classes provide differentiated services to users that are connected to a common network. You can group your user community based on administrative criteria, and then ensure that each user receives the appropriate class of service. Although you can use the Cisco Network Registrar client-class facility to control any configuration parameter, the most common uses are for:
•![]() Address leases—How long a set of clients should keep its addresses.
Address leases—How long a set of clients should keep its addresses.
•![]() IP address ranges—From which lease pool to assign clients addresses.
IP address ranges—From which lease pool to assign clients addresses.
•![]() DNS server addresses—Where clients should direct their DNS queries.
DNS server addresses—Where clients should direct their DNS queries.
•![]() DNS hostnames—What name to assign clients.
DNS hostnames—What name to assign clients.
•![]() Denial of service—Whether unauthorized clients should be offered leases.
Denial of service—Whether unauthorized clients should be offered leases.
For details on creating and editing client-classes, see Chapter 24, "Configuring Client-Classes and Clients." The regional cluster web UI has the added feature of pushing client-classes to, and pulling them from, the local clusters.
See Also
Pushing Client-Classes to Local Clusters
Pulling Client-Classes from Replica Data
Pushing Client-Classes to Local Clusters
You can also push the client-classes you create from the regional cluster to any of the local clusters. If you want to push a specific client-class to a cluster in the web UI, click Push Client-Class on the List/Add DHCP Client Classes page. If you want to push all of them, click Push All Client-Classes.
Regional Web UI
The Push Client-Class Data to Local Clusters page identifies the data to push, how to synchronize it with the local cluster, and the cluster or clusters to which to push it. The data synchronization modes are:
•![]() Ensure (preset value)—Ensures that the local cluster has new data without affecting any existing data.
Ensure (preset value)—Ensures that the local cluster has new data without affecting any existing data.
•![]() Replace—Replaces data without affecting other objects unique to the local cluster.
Replace—Replaces data without affecting other objects unique to the local cluster.
•![]() Exact—Available for "push all" operations only. Use this with caution, because it overwrites the data and deletes any other objects unique to the local cluster.
Exact—Available for "push all" operations only. Use this with caution, because it overwrites the data and deletes any other objects unique to the local cluster.
Choose the destination cluster or clusters in the Available field and move it or them to the Selected field. Then click Push Data to Clusters to open the View Push Client-Class Data Report page.
Tip ![]() The synchronization mode and cluster choice settings are persistent for the duration of the current login session, so that they are in effect each time you access this page, unless you change them.
The synchronization mode and cluster choice settings are persistent for the duration of the current login session, so that they are in effect each time you access this page, unless you change them.
Pulling Client-Classes from Replica Data
You may choose to pull client-classes from the replica data of the local clusters instead of explicitly creating them. (In the web UI, you might first want to update the client-class replica data by clicking the Replicate icon [] next to the cluster name.) To pull the client-classes, click Pull Replica Client-Classes.
Regional Web UI
The Select Replica DHCP Client-Class Data to Pull page shows a tree view of the regional server replica data for the local clusters' client-classes. The tree has two levels, one for the local clusters and one for the client-classes in each cluster. You can pull individual client-classes from the clusters, or you can pull all of their client-classes. To pull individual client-classes, expand the tree for the cluster, then click Pull Client-Class next to its name. To pull all the client-classes from a cluster, click Pull All Client-Classes from Cluster.
To pull the client-classes, you must also choose a synchronization mode:
•![]() Ensure—Ensures that the regional cluster has new data without affecting any existing data.
Ensure—Ensures that the regional cluster has new data without affecting any existing data.
•![]() Replace (preset value)—Replaces data without affecting other objects unique to the regional cluster.
Replace (preset value)—Replaces data without affecting other objects unique to the regional cluster.
•![]() Exact—Available for "pull all" operations only. Use this with caution, because it overwrites the data and deletes any other objects unique to the regional cluster.
Exact—Available for "pull all" operations only. Use this with caution, because it overwrites the data and deletes any other objects unique to the regional cluster.
Managing Virtual Private Networks
A virtual private network (VPN) is a specialized address space identified by a key. A VPN allows address overlap in a network, because the addresses are distinguished by separate keys. Most IP addresses exist in the global address space outside of a VPN. You can create regional VPNs only if you are an administrator assigned the dhcp-management subrole of the central-cfg-admin role.
For details on creating and editing VPNs, and applying them to various network objects, see the "Configuring Virtual Private Networks Using DHCP" section on page 23-17. The regional web UI has the added feature of pushing VPNs to local clusters and pulling them from local clusters.
See Also
Pushing VPNs to Local Clusters
Pulling VPNs from Replica Data
Pushing VPNs to Local Clusters
You can push the VPNs you create from the regional cluster to any of the local clusters. In the web UI, if you want to push a specific VPN to a cluster, click Push VPN on the List/Add VPNs page. If you want to push all of them, click Push All VPNs.
Regional Web UI
The Push VPN Data to Local Clusters page identifies the data to push, how to synchronize it with the local cluster, and the cluster or clusters to which to push it. The data synchronization modes are:
•![]() Ensure (preset value)—Ensures that the local cluster has new data without affecting any existing data.
Ensure (preset value)—Ensures that the local cluster has new data without affecting any existing data.
•![]() Replace—Replaces data without affecting other objects unique to the local cluster.
Replace—Replaces data without affecting other objects unique to the local cluster.
•![]() Exact—Available for "push all" operations only. Use this with caution, because it overwrites the data and deletes any other objects unique to the local cluster.
Exact—Available for "push all" operations only. Use this with caution, because it overwrites the data and deletes any other objects unique to the local cluster.
Choose the destination cluster or clusters in the Available field and move it or them to the Selected field. Then click Push Data to Clusters to open the View Push VPN Data Report page.
Tip ![]() The synchronization mode and cluster choice settings are persistent for the duration of the current login session, so that they are in effect each time you access this page, unless you change them.
The synchronization mode and cluster choice settings are persistent for the duration of the current login session, so that they are in effect each time you access this page, unless you change them.
Pulling VPNs from Replica Data
Instead of explicitly creating VPNs, you can pull them from the local clusters. (In the regional web UI, you may first want to update the VPN replica data by clicking the Replica icon [] next to the cluster name.) To pull the replica data, click Pull Replica VPNs to open the Select Replica VPN Data to Pull page.
This page shows a tree view of the regional server replica data for the local clusters' VPNs. The tree has two levels, one for the local clusters and one for the VPNs in each cluster. You can pull individual VPNs or you can pull all of them. To pull individual VPNs, expand the tree for the cluster, then click Pull VPN next to its name. To pull all the VPNs, click Pull All VPNs.
To pull the VPNs, you must choose a synchronization mode:
•![]() Ensure—Ensures that the regional cluster has new data without affecting any existing data.
Ensure—Ensures that the regional cluster has new data without affecting any existing data.
•![]() Replace (preset value)—Replaces data without affecting other objects unique to the regional cluster.
Replace (preset value)—Replaces data without affecting other objects unique to the regional cluster.
•![]() Exact—Available for "pull all" operations only. Use this with caution, because it overwrites the data and deletes any other objects unique to the regional cluster.
Exact—Available for "pull all" operations only. Use this with caution, because it overwrites the data and deletes any other objects unique to the regional cluster.
Managing DHCP Failover Pairs
With DHCP failover, a backup DHCP server can take over for a main server if the latter comes off the network for any reason. You can use failover to configure two servers to operate as a redundant pair. If one server is down, the other server seamlessly takes over so that new DHCP clients can get, and existing clients can renew, their addresses. Clients requesting new leases need not know or care about which server responds to their lease request. These clients can obtain leases even if the main server is down.
In the regional web UI, you can view any created failover pairs on the List/Add DHCP Failover Pairs page. To access this page, click DHCP, then Failover. This functionality is available only to administrators who are assigned the dhcp-management subrole of the central-cfg-admin role.
For details on creating and editing failover pairs, see the "Creating and Synchronizing Failover Server Pairs" section on page 27-6. The regional cluster web UI has the added feature of pulling addresses from local clusters to create the failover pairs.
To pull the address space for a failover pair, you must have regional-addr-admin privileges.
Regional Web UI
Step 1 ![]() On the List/Add DHCP Failover Pairs page or View Unified Address Space page, click Pull Data.
On the List/Add DHCP Failover Pairs page or View Unified Address Space page, click Pull Data.
Step 2 ![]() Choose the data synchronization mode (Update, Complete, or Exact) on the Select Pull Replica Address Space page. The results of choosing these modes are described in the table on the page.
Choose the data synchronization mode (Update, Complete, or Exact) on the Select Pull Replica Address Space page. The results of choosing these modes are described in the table on the page.
Step 3 ![]() Click Report at the bottom of the page.
Click Report at the bottom of the page.
Step 4 ![]() Click Run on the Report Pull Replica Address Space page.
Click Run on the Report Pull Replica Address Space page.
Step 5 ![]() Click OK on the Run Pull Replica Address Space page.
Click OK on the Run Pull Replica Address Space page.
Managing Lease Reservations
You can push lease reservations you create from the regional cluster to any of the local clusters. In the regional cluster web UI, click Push All Reservations on the List/Add DHCP Reservations page (click DHCP, then Reservations). Note that you cannot push individual reservations. If the cluster pushed to is part of a DHCP failover configuration, pushing a reservation also pushes it to the partner server.
See Also
DHCPv4 Reservations
DHCPv6 Reservations
DHCPv4 Reservations
To create DHCPv4 reservations, the parent subnet object must exist on the regional server. If there are pending reservation edits at regional, these can be pushed to the subnet local cluster or failover pair. If the subnet has never been pushed, the parent scope is added to the local cluster or pair.
Once a subnet is pushed to a local cluster or pair, reservations are pushed to that cluster or pair. To move the scopes and subnet to another local cluster or failover pair, the subnet must first be reclaimed.
DHCPv6 Reservations
To create DHCPv6 reservations, the parent prefix must exist on the regional server. When there are pending reservation or prefix changes, you can push the updates to the local cluster.
Once a prefix is pushed to a local cluster, it can only update that local cluster. To move the prefix to another local cluster, it must first be reclaimed.
Regional Web UI
The ensuing page identifies the data to push, how to synchronize it with the local cluster, and the cluster or clusters to which to push it. The data synchronization modes are:
•![]() Ensure—Ensures that the local cluster has new data without affecting any existing data.
Ensure—Ensures that the local cluster has new data without affecting any existing data.
•![]() Replace (preset value)—Replaces data without affecting other objects unique to the local cluster.
Replace (preset value)—Replaces data without affecting other objects unique to the local cluster.
•![]() Exact—Available for "push all" operations only. Use this with caution, because it overwrites the data and deletes any other objects unique to the local cluster.
Exact—Available for "push all" operations only. Use this with caution, because it overwrites the data and deletes any other objects unique to the local cluster.
Choose the destination cluster or clusters in the Available field and move it or them to the Selected field.
Tip ![]() The synchronization mode and cluster choice settings are persistent for the duration of the current login session, so that they are in effect each time you access this page, unless you change them.
The synchronization mode and cluster choice settings are persistent for the duration of the current login session, so that they are in effect each time you access this page, unless you change them.
After making these choices, click Push Data to Clusters. This opens the View Push Reservations Data Report page. Click OK on this page.
You can also pull the replica address space on the List/Add DHCP v6 Reservations page, and opt whether to omit reservations when doing so. You should use this option only to reduce processing time when you are sure that there are no pending changes to reservations to merge. To omit reservations for the pull, check the Omit Reservations? check box, then click Pull Data.
See the Managing DHCPv6 Addresses, page 26-1.
 Feedback