Inventory and Reporting User Guide
Bias-Free Language
The documentation set for this product strives to use bias-free language. For the purposes of this documentation set, bias-free is defined as language that does not imply discrimination based on age, disability, gender, racial identity, ethnic identity, sexual orientation, socioeconomic status, and intersectionality. Exceptions may be present in the documentation due to language that is hardcoded in the user interfaces of the product software, language used based on RFP documentation, or language that is used by a referenced third-party product. Learn more about how Cisco is using Inclusive Language.
- Updated:
- November 20, 2008
Chapter: User Registration
- Terminology Overview
- Overview of the User Registration Process
- Launch the Inventory and Reporting Application
- Overview Page Functions for Different Users
- Legal Agreement
- User Registration Task Pre-Reqs
- User Registration Tasks
User Registration
This chapter provides an overview of the Cisco Smart Call Home service and covers the following areas:
•![]() Overview of the User Registration Process
Overview of the User Registration Process
•![]() Launch the Inventory and Reporting Application
Launch the Inventory and Reporting Application
•![]() Overview Page Functions for Different Users
Overview Page Functions for Different Users
•![]() User Registration Task Pre-Reqs
User Registration Task Pre-Reqs
Terminology Overview
There are some key terms that are used in the registration process, these terms are listed below:
•![]() Customer - is a person working for an Entitled Company that is a Cisco customer.
Customer - is a person working for an Entitled Company that is a Cisco customer.
•![]() Entitled Company - name of a Company that has a service contract with Cisco.
Entitled Company - name of a Company that has a service contract with Cisco.
•![]() Service - there is one available service in the Inventory and Reporting application:
Service - there is one available service in the Inventory and Reporting application:
–![]() Inventory Services - Provides the capability to upload network inventories to the IR backend and use the Inventory and Reporting web application to access network inventories uploaded by the customer.
Inventory Services - Provides the capability to upload network inventories to the IR backend and use the Inventory and Reporting web application to access network inventories uploaded by the customer.
•![]() Registration - there are 2 types of registration flows in the Inventory and Reporting application:
Registration - there are 2 types of registration flows in the Inventory and Reporting application:
–![]() Cisco employee - registers first customer admin for an Entitled Company.
Cisco employee - registers first customer admin for an Entitled Company.
–![]() Customer - after being registered as an administrator, registers other Admins/ Users that belong to the same Entitled Compan(ies).
Customer - after being registered as an administrator, registers other Admins/ Users that belong to the same Entitled Compan(ies).
•![]() Function - there are 2 available functions in the Inventory and Reporting application:
Function - there are 2 available functions in the Inventory and Reporting application:
–![]() Administrator - Only one that can create new user registrations (users or administrators)
Administrator - Only one that can create new user registrations (users or administrators)
–![]() User - Can manage only their own personal registrations; cannot register anyone for an Entitled Company + Service.
User - Can manage only their own personal registrations; cannot register anyone for an Entitled Company + Service.
•![]() Types of contracts:
Types of contracts:
A customer can register for one or more entitled companies in the Inventory and Reporting application using one of the following types of branded contracts:
–![]() Partner Branded - End customer buys Cisco product via partner and the customer contacts the partner if they need support.
Partner Branded - End customer buys Cisco product via partner and the customer contacts the partner if they need support.
–![]() Cisco Branded - Direct: Customer bought product directly from Cisco and contacts Cisco directly if they need support.
Cisco Branded - Direct: Customer bought product directly from Cisco and contacts Cisco directly if they need support.
–![]() Cisco Branded - CBR (Cisco Branded Reseller): Customer bought product from Cisco reseller and customer contacts Cisco directly if they need support.
Cisco Branded - CBR (Cisco Branded Reseller): Customer bought product from Cisco reseller and customer contacts Cisco directly if they need support.
•![]() Types of customers:
Types of customers:
There are two types of customers:
–![]() AS Customer - Advanced Services Customers upload their inventory data via Network Profiler and have Transport Gateway(s) installed on the IR backend.
AS Customer - Advanced Services Customers upload their inventory data via Network Profiler and have Transport Gateway(s) installed on the IR backend.
–![]() TS Customer - Technical services Customers upload their inventory data directly to the IR backend and have Transport Gateway(s) installed in their network.
TS Customer - Technical services Customers upload their inventory data directly to the IR backend and have Transport Gateway(s) installed in their network.
•![]() Types of programs:
Types of programs:
In addition to being any of the two customer types, both customer types can be enrolled in any one of the following programs:
–![]() NLS
NLS
–![]() TS Grow
TS Grow
–![]() Other
Other
•![]() Types of IR Users:
Types of IR Users:
There are several types of Inventory and Reporting users, which are noted below:
–![]() Cisco employee - creates Customer Admins (CA) for the customer. The Cisco employee can maintain and delete, only those CA's they created in Inventory and Reporting.
Cisco employee - creates Customer Admins (CA) for the customer. The Cisco employee can maintain and delete, only those CA's they created in Inventory and Reporting.
–![]() Customer Admin (CA) - A CA can perform the following tasks:
Customer Admin (CA) - A CA can perform the following tasks:
•![]() Create and maintain other Customer Admins or Customer Users that are registered to the same Entitled Company as them self.
Create and maintain other Customer Admins or Customer Users that are registered to the same Entitled Company as them self.
•![]() Change other user's functions (Administrator / User).
Change other user's functions (Administrator / User).
•![]() View the reports for of the Entitled Compan(ies) they are associated to.
View the reports for of the Entitled Compan(ies) they are associated to.
–![]() Customer User - can see inventory information for only those Entitled Companies they are associated to.
Customer User - can see inventory information for only those Entitled Companies they are associated to.
•![]() AAC (Automatic Account Creation) - automatic account creation for IAM (IntelliShield Alert Manager) is applicable to only the NLS customer type.
AAC (Automatic Account Creation) - automatic account creation for IAM (IntelliShield Alert Manager) is applicable to only the NLS customer type.
•![]() IAM (IntelliShield Alert Manager) - The Cisco Security IntelliShield Alert Manager Service filters through the multitude of alerts from reporting organizations to provide the strategic, targeted security intelligence customers can use to proactively respond to potential IT threats, mitigate risk, and increase business continuity.
IAM (IntelliShield Alert Manager) - The Cisco Security IntelliShield Alert Manager Service filters through the multitude of alerts from reporting organizations to provide the strategic, targeted security intelligence customers can use to proactively respond to potential IT threats, mitigate risk, and increase business continuity.
Overview of the User Registration Process
This section discusses the following user registration topics:
•![]() User creation; who can create and maintain what type of user functions (Administrator / User).
User creation; who can create and maintain what type of user functions (Administrator / User).
•![]() The different types of customer environments (AS/TS) that are involved in the user registration.
The different types of customer environments (AS/TS) that are involved in the user registration.
•![]() The differences between AS an TS customers regarding the following tasks:
The differences between AS an TS customers regarding the following tasks:
–![]() Transport Gateway registration
Transport Gateway registration
–![]() Legal Agreement acceptance
Legal Agreement acceptance
User Creation Process Overview
This section describes the different types of user functions and identifies who can create and maintain them.
There are two types of user functions:
•![]() Administrator (Cisco employee and Customer Admin)
Administrator (Cisco employee and Customer Admin)
•![]() User (Customer only)
User (Customer only)
The following steps explain how different types of users are created in IR in a customer environment:
Step 1 ![]() A Cisco employee creates the first Customer Admin (CA), for a specific Entitled Company.
A Cisco employee creates the first Customer Admin (CA), for a specific Entitled Company.
Step 2 ![]() The first CA can now create other CA's and customer users that belong to the same Entitled Company as them self.
The first CA can now create other CA's and customer users that belong to the same Entitled Company as them self.

Note ![]() Newly created CA's can also create other CA's and customer users, for the same Entitled Company. Customer Admins cannot register additional users when there are one or more CBR contracts in the user's profile (i.e. via Cisco Branded Reseller). Additional users can be registered by a Cisco Employee.
Newly created CA's can also create other CA's and customer users, for the same Entitled Company. Customer Admins cannot register additional users when there are one or more CBR contracts in the user's profile (i.e. via Cisco Branded Reseller). Additional users can be registered by a Cisco Employee.
A Cisco employee can perform the following tasks:
•![]() Create additional CA's for an entitled company; no Customer users for an entitled company can be created by the Cisco employee, unless there is a CBR contract specified in the customer user's profile.
Create additional CA's for an entitled company; no Customer users for an entitled company can be created by the Cisco employee, unless there is a CBR contract specified in the customer user's profile.
•![]() Can maintain and delete only those CA's they created.
Can maintain and delete only those CA's they created.
•![]() Create an IAM account for a registered person whose Entitled Company is participating in the NLS program.
Create an IAM account for a registered person whose Entitled Company is participating in the NLS program.
A CA can perform the following tasks:
•![]() Can maintain other CA and User accounts, for persons that are registered to the same Entitled Company as them self.
Can maintain other CA and User accounts, for persons that are registered to the same Entitled Company as them self.
•![]() Can delete a user.
Can delete a user.
•![]() Can change the function of a User to an Administrator or User function.
Can change the function of a User to an Administrator or User function.
•![]() When the CA has an IAM account, create an IAM account for another person (applicable to NLS customers only).
When the CA has an IAM account, create an IAM account for another person (applicable to NLS customers only).
Customer Environments for User Registration
The customer environment determines the following items:
•![]() Where the Transport Gateway is located.
Where the Transport Gateway is located.
•![]() Who performs the Transport Gateway setup.
Who performs the Transport Gateway setup.
•![]() If the customer needs to accept a legal agreement when logging into Inventory and Reporting the first time.
If the customer needs to accept a legal agreement when logging into Inventory and Reporting the first time.
There are two customer environments involved in Inventory and Reporting service:
•![]() AS customer
AS customer
•![]() TS customer
TS customer
The AS customer has the following environment:
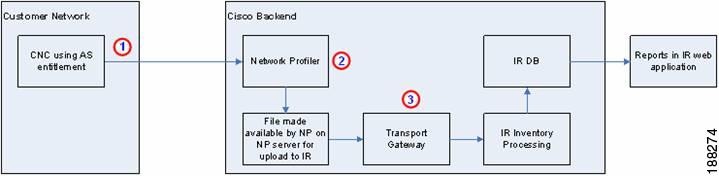
•![]() AS team installs / configures the CNC
AS team installs / configures the CNC  in the customer network.
•![]() CNC automatically uploads the inventory data to Network Profiler.
CNC automatically uploads the inventory data to Network Profiler. 
•![]() Network Profiler automatically creates the inventory data file, which is made available to IR via the Transport Gateway.
Network Profiler automatically creates the inventory data file, which is made available to IR via the Transport Gateway.
•![]() The AS customer has Transport Gateways
The AS customer has Transport Gateways  located in the IR backend.
Note ![]() The Transport Gateway is installed on the IR backend by the support group and the registration is performed by a Cisco employee. The Transport Gateway retrieves the inventory data file from the Network Profiler and uploads this data to IR. Up to 35 Transport Gateways can be auto-registered on the IR backend.
The Transport Gateway is installed on the IR backend by the support group and the registration is performed by a Cisco employee. The Transport Gateway retrieves the inventory data file from the Network Profiler and uploads this data to IR. Up to 35 Transport Gateways can be auto-registered on the IR backend.
The TS customer has the following environment:
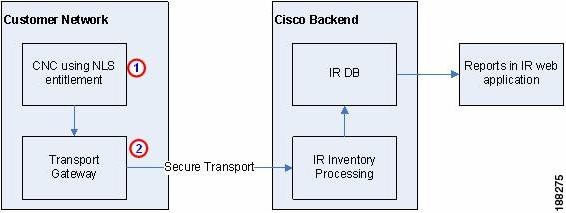
•![]() TS customer installs / configures the CNC in their customer network.
TS customer installs / configures the CNC in their customer network.
•![]() The TS customer installs / configures the Transport Gateways in their network.
The TS customer installs / configures the Transport Gateways in their network.
User Registration Process for AS and TS Customers
When user registration occurs for the AS customer, the Cisco employee performs the following tasks as part of the user registration process:
•![]() Registers a Transport Gateway, the install/configure/registration is performed for the customer on the IR backend. Up to 35 Transport Gateways can be auto-registered.
Registers a Transport Gateway, the install/configure/registration is performed for the customer on the IR backend. Up to 35 Transport Gateways can be auto-registered.
•![]() For AS customers, indicates if the customer needs to Accept the license agreement.
For AS customers, indicates if the customer needs to Accept the license agreement.
When user registration occurs the TS customer has to perform the following tasks:
•![]() Register a Transport Gateway, if not already done.
Register a Transport Gateway, if not already done.
•![]() Accept a license agreement, before using any functions in the Inventory and Reporting application.
Accept a license agreement, before using any functions in the Inventory and Reporting application.
Launch the Inventory and Reporting Application
Step 1 ![]() Go to the Inventory and Reporting application at URL: https://tools.cisco.com/nls/; the Inventory and Reporting Log In window opens.
Go to the Inventory and Reporting application at URL: https://tools.cisco.com/nls/; the Inventory and Reporting Log In window opens.
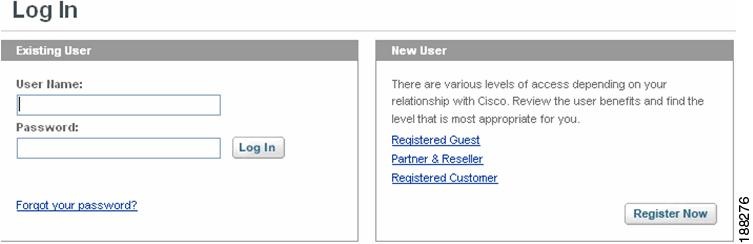
Step 2 ![]() Enter your Cisco.com ID user name and password.
Enter your Cisco.com ID user name and password.
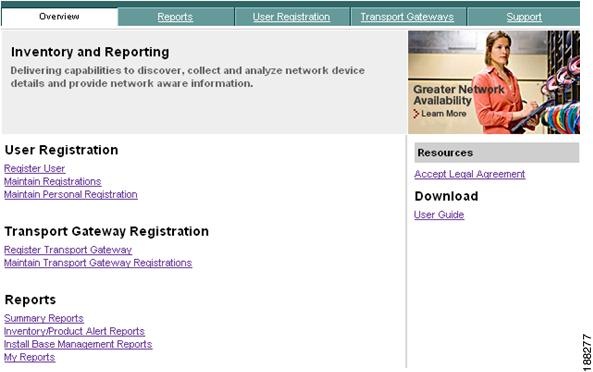
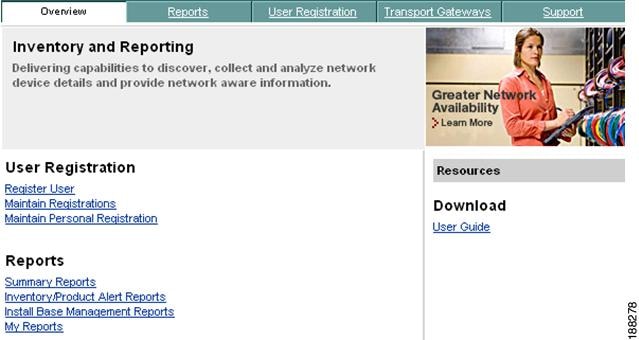
Step 3 ![]() Click Log In; the Inventory and Reporting application's window opens and displays the Overview page.
Click Log In; the Inventory and Reporting application's window opens and displays the Overview page.
Overview Page Functions for Different Users
The functions that are displayed and available for use on the Overview page are dependent upon the function associated during user registration (Administrator or User).
Administrator Function
A customer with function of "Administrator" has the following functions available through the Overview page.
Note ![]() A customer, who has not yet accepted the Legal Agreement, logs in and is requested to first accept the Legal Agreement. See Legal Agreement for more information. After the Legal Agreement is accepted the Overview page is displayed.
A customer, who has not yet accepted the Legal Agreement, logs in and is requested to first accept the Legal Agreement. See Legal Agreement for more information. After the Legal Agreement is accepted the Overview page is displayed.
There are restrictions on what an administrator can do depending upon the type contract the administrator has (see table).
* The CBR customer administrators can not create additional customer administrators or customer users; additional users (Administrator, User) must all be created by a Cisco employee.
User Function
A customer with a function of "User" has the following functions available through the Overview page.
A customer with a function of "User" can maintain only their personal registrations and view reports. The user function has no other privileges; they can not create user registrations, or perform any Transport Gateway functions.
Legal Agreement
There are three different aspects to legal agreements:
•![]() A customer must accept the Legal Agreement before they can access the Inventory and Reporting functions.
A customer must accept the Legal Agreement before they can access the Inventory and Reporting functions.
•![]() An administrator can view those users that have a status of "Pending Legal Agr." (Pending-Legal Agreements).
An administrator can view those users that have a status of "Pending Legal Agr." (Pending-Legal Agreements).
•![]() An administrator can send those users an email to "Renotify" them that they need to accept the Legal Agreement.
An administrator can send those users an email to "Renotify" them that they need to accept the Legal Agreement.
Accepting the Legal Agreement
A customer who logs in, and has not yet accepted the Legal Agreement, will automatically be prompted to accept the Legal Agreement and be requested to perform the following steps:
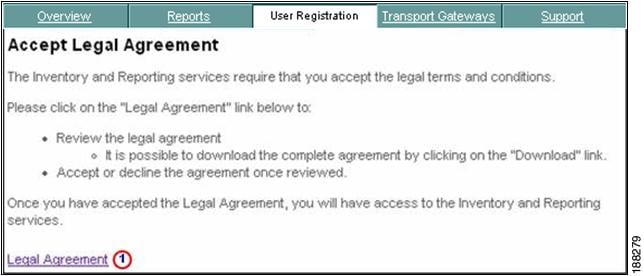
Step 1 ![]() Click Legal Agreement; the Legal Agreement is displayed for viewing and acceptance.
Click Legal Agreement; the Legal Agreement is displayed for viewing and acceptance.
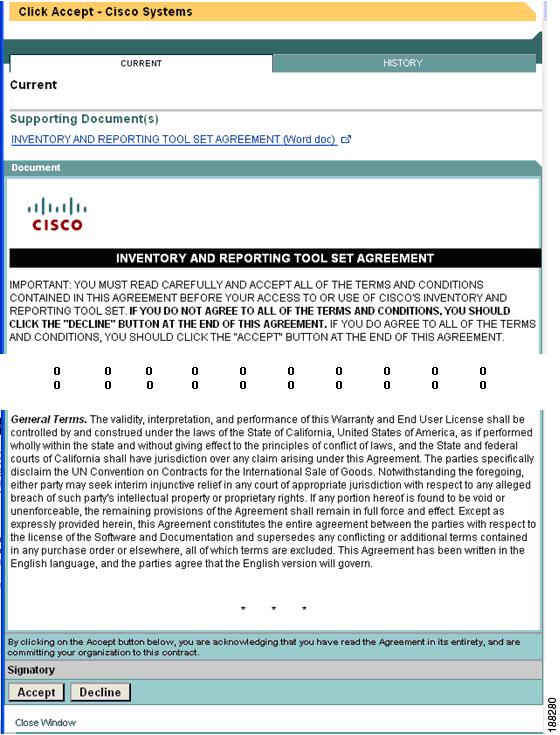
Step 2 ![]() Read the legal agreement and at the bottom click either Accept or Decline.
Read the legal agreement and at the bottom click either Accept or Decline.
Note ![]() If you click Decline, then you will not be able to access the functions of the Inventory and Reporting application until you accept the Legal Agreement. If you do not accept the Legal Agreement, you can do so at another time.
If you click Decline, then you will not be able to access the functions of the Inventory and Reporting application until you accept the Legal Agreement. If you do not accept the Legal Agreement, you can do so at another time.
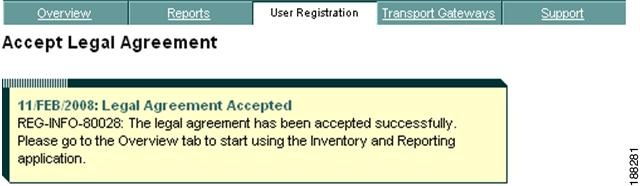
Step 3 ![]() When you click Accept, the Inventory and Reporting application displays a "Legal Agreement Accepted" message on the User Registration tab. You are now able to use the Inventory and Reporting functions.
When you click Accept, the Inventory and Reporting application displays a "Legal Agreement Accepted" message on the User Registration tab. You are now able to use the Inventory and Reporting functions.
Step 4 ![]() Follow the directions in the next section to view all users that have a Pending Legal Agreement status for the same Entitled Company.
Follow the directions in the next section to view all users that have a Pending Legal Agreement status for the same Entitled Company.
Viewing Users with Pending Legal Agreement Status
An administrator can view those users who have not yet accepted the Legal Agreement. The Administrators' can view those users that have a "Pending Legal Agr." status in a list with all the other users or by filtering the entries, by performing the following steps:
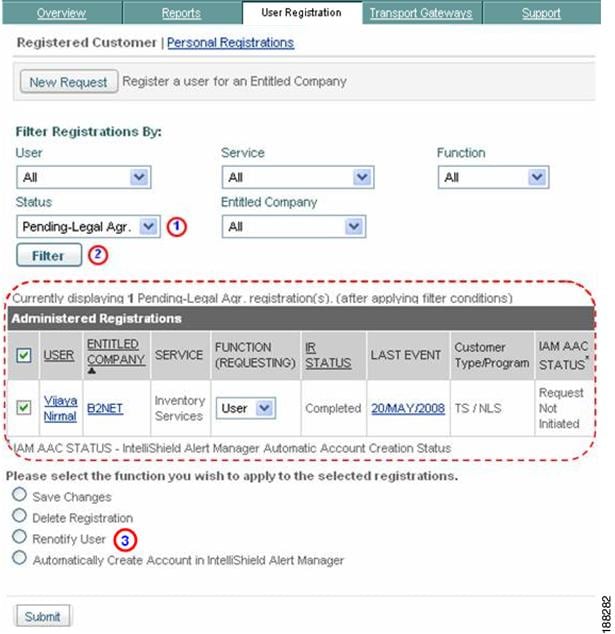
Step 1 ![]() Click the User Registration tab if you are not currently on that page.
Click the User Registration tab if you are not currently on that page.
Step 2 ![]() Choose Pending Legal Agr. in the Status drop-down.
Choose Pending Legal Agr. in the Status drop-down.
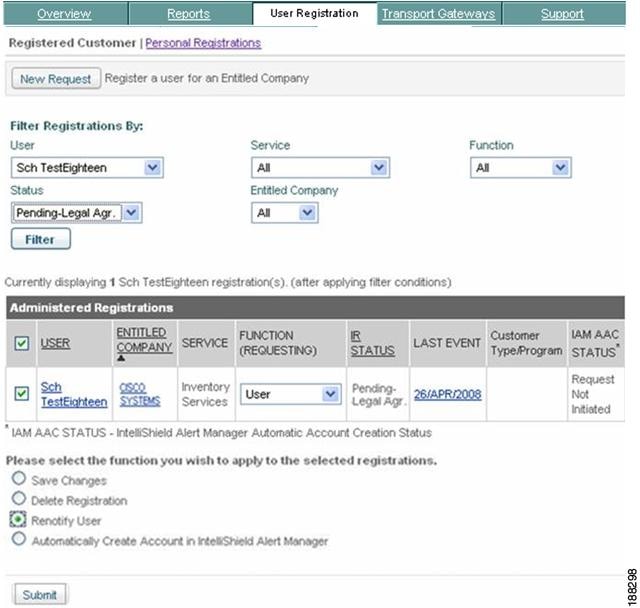
Step 3 ![]() Click Filter; only those Users that have a Pending Legal Agr. status are displayed in the Administered Registrations area.
Click Filter; only those Users that have a Pending Legal Agr. status are displayed in the Administered Registrations area. 
Step 4 ![]() Click the Renotify User radio button option to let the users know that they still have a Legal Agreement Pending.
Click the Renotify User radio button option to let the users know that they still have a Legal Agreement Pending.
User Registration Task Pre-Reqs
The following tasks must be performed before registering a new user:
•![]() The new user must have a valid Cisco.com ID
The new user must have a valid Cisco.com ID
Note ![]() To obtain a Cisco.com ID (CCO Id) go to http://www.cisco.com/ and in the top right corner of the web page click Register.
To obtain a Cisco.com ID (CCO Id) go to http://www.cisco.com/ and in the top right corner of the web page click Register. 

•![]() For New User Registration, the new user must have at least one Inventory and Reporting supported contract in their CCO LDAP profile.
For New User Registration, the new user must have at least one Inventory and Reporting supported contract in their CCO LDAP profile.
Note ![]() When retrieving the contracts that exist in the to-be registered user's Cisco.com profile, the system will check if the contract status of the contract is valid. Valid contract statuses are: 'Active', 'Overdue', 'Signed', 'QA_Hold'.
When retrieving the contracts that exist in the to-be registered user's Cisco.com profile, the system will check if the contract status of the contract is valid. Valid contract statuses are: 'Active', 'Overdue', 'Signed', 'QA_Hold'.
User Registration Tasks
The User registration task lets you do the following tasks
•![]() Create new user registrations (Register User).
Create new user registrations (Register User).
•![]() Maintain user registrations (Maintain Registrations).
Maintain user registrations (Maintain Registrations).
•![]() Maintain your personal registration (Maintain Personal Registration).
Maintain your personal registration (Maintain Personal Registration).
Register User
There is one type of new user registration processes for AS and TS customers, this four step process is used when a Customer Admin is registering another person to their entitled company, either as 'Administrator' or as 'User'.
To use the User Registration function, perform the following steps:
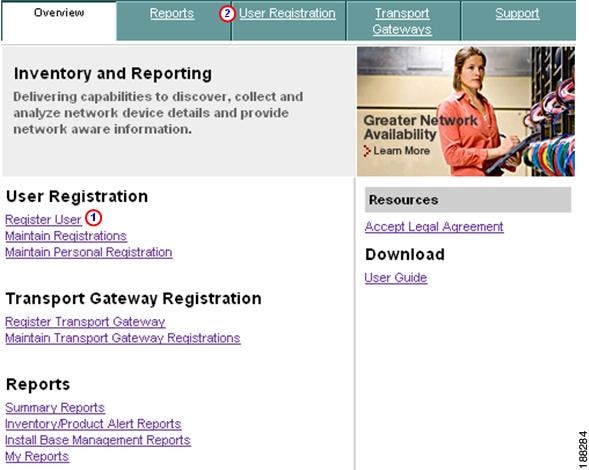
Step 1 ![]() There are two different ways to start a user registration:
There are two different ways to start a user registration:
•![]() Click Register User.
Click Register User.
•![]() Click the User Registration tab, then on the next window click New Request.
Click the User Registration tab, then on the next window click New Request.

In both cases the first New User Registration page appears.
Customer Admin Registering Additional Persons for Entitled Company
This section describes the process a Customer Admin uses to register additional people to an Entitled Company as either an Administrator or a User.
Note ![]() A Customer Admin cannot register someone when this person has a Cisco Branded - CBR contract in their profile. Additional persons can be registered by the Cisco Employee.
A Customer Admin cannot register someone when this person has a Cisco Branded - CBR contract in their profile. Additional persons can be registered by the Cisco Employee.
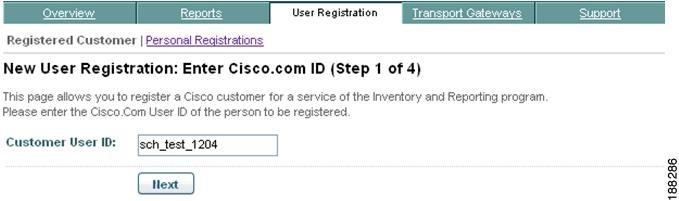
Step 2 ![]() Enter the Cisco.com ID of the person you want to register.
Enter the Cisco.com ID of the person you want to register.
Step 3 ![]() Click Next; the second of four User Registration pages appear.
Click Next; the second of four User Registration pages appear.
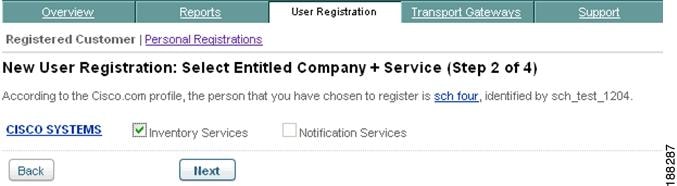
Step 4 ![]() Check the check boxes for those services you want the new user registered for.
Check the check boxes for those services you want the new user registered for.
Note ![]() The Customer admin can choose only those Entitled Companies for which they are an admin and the user has the same contract for the Entitled Company in the user's profile.
The Customer admin can choose only those Entitled Companies for which they are an admin and the user has the same contract for the Entitled Company in the user's profile.
Step 5 ![]() Click Next; the third of four User Registration pages appear. This page lets you specify what type function the new user will have.
Click Next; the third of four User Registration pages appear. This page lets you specify what type function the new user will have.
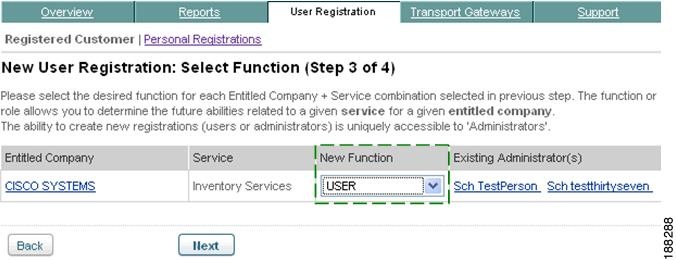
Step 6 ![]() Choose what new function
Choose what new function  you want for each service by choosing a new function from each corresponding drop-down list (i.e. Administrator, User).
Note ![]() The function that you specify in the New Function section (User or Administrator) determines the functions that are displayed and available for use on the Overview page.
The function that you specify in the New Function section (User or Administrator) determines the functions that are displayed and available for use on the Overview page.
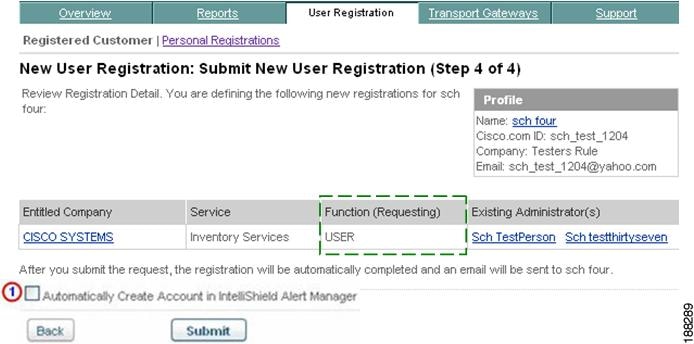
Step 7 ![]() Click Next; the fourth of four User Registration pages appear
Click Next; the fourth of four User Registration pages appear
.
Step 8 ![]() Verify that the selections you made are correct, if not click Back to modify your previous selections.
Verify that the selections you made are correct, if not click Back to modify your previous selections.
Note ![]() The function that is specified in the Function (Requesting) section (User or Administrator) determines the functions that are displayed and available for use on the Overview page.
The function that is specified in the Function (Requesting) section (User or Administrator) determines the functions that are displayed and available for use on the Overview page.
When the Customer Admin registering this person has an IAM account, the administrator can indicate that an IAM account needs to be created for this person by checking the Automatically Create Account in IntelliSheild Alert Manager check box.
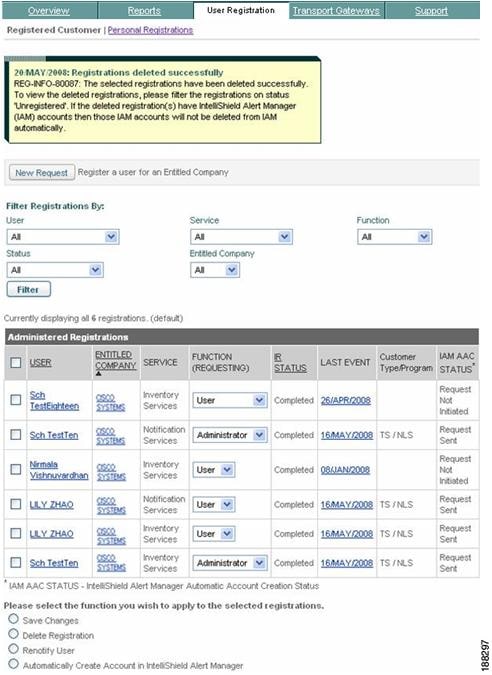
Step 9 ![]() Click Submit when the selections you made are correct; the Registered Customer page appears with a "New Registration Completed Successfully" message at the top (see next graphic). The new user is also in the list.
Click Submit when the selections you made are correct; the Registered Customer page appears with a "New Registration Completed Successfully" message at the top (see next graphic). The new user is also in the list.
.
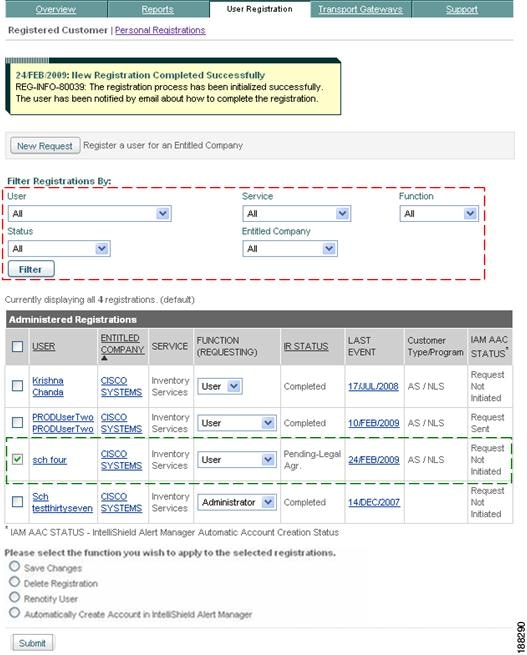
Note ![]() The new user registration is added to the list of Administered Registrations; the IR status column has the registration status as "Pending-Legal Agr." (Pending-Legal Agreement).
The new user registration is added to the list of Administered Registrations; the IR status column has the registration status as "Pending-Legal Agr." (Pending-Legal Agreement).

Tip ![]() You can use the filter options to see a more selective view of all the users in the list; for more information see Filter Registrations.
You can use the filter options to see a more selective view of all the users in the list; for more information see Filter Registrations.
Note ![]() A Customer who logs in but has not yet accepted the Legal Agreement is requested to accept the Legal Agreement. The customer must first accept the Legal Agreement before they can use the Inventory and Reporting application.
A Customer who logs in but has not yet accepted the Legal Agreement is requested to accept the Legal Agreement. The customer must first accept the Legal Agreement before they can use the Inventory and Reporting application.
Maintain Registrations
The topics in this section describe how to maintain customer registrations, by performing the following tasks:
•![]() Delete Administered Registration
Delete Administered Registration
•![]() View Details from Administered Registrations
View Details from Administered Registrations
To access the Maintain Registration function, perform the following step:
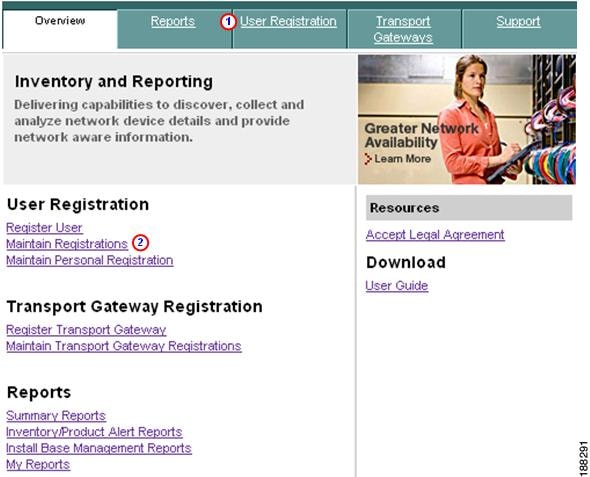
Step 1 ![]() On the Inventory and Reporting main menu click one of the following items:
On the Inventory and Reporting main menu click one of the following items:
•![]() User Registration tab
User Registration tab
•![]() Maintain Registrations
Maintain Registrations
Clicking either of the above options displays the Registered Customer page. By default this page displays all the registered users and all the Entitled Companies and services they are associated.
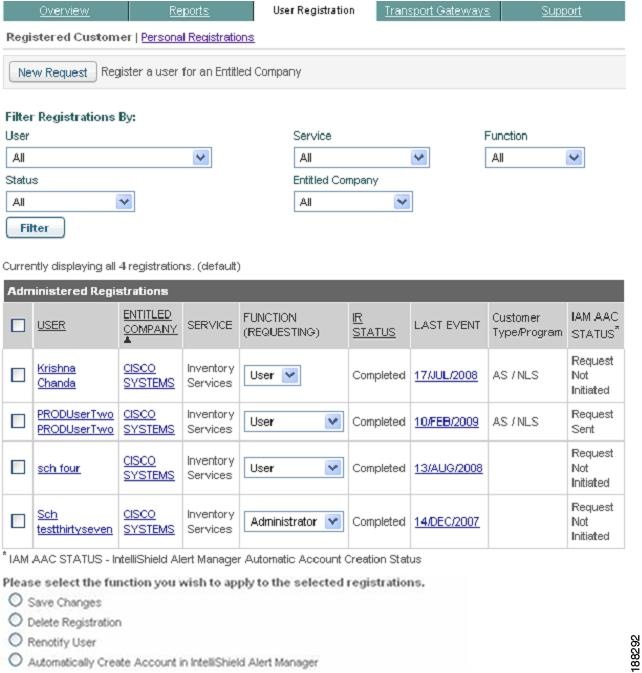
Note ![]() All user registrations associated to Entitled Companies that you administer are displayed in a table, with one row per registration. The status for each registration is included, along with relevant actions required for each registration with the Pending status (not Completed status).
All user registrations associated to Entitled Companies that you administer are displayed in a table, with one row per registration. The status for each registration is included, along with relevant actions required for each registration with the Pending status (not Completed status).
Filter Registrations
Filtering registrations allows you to see a more selective view of all the data that is listed in the default view. To filter the view of registered customers, perform the following steps:
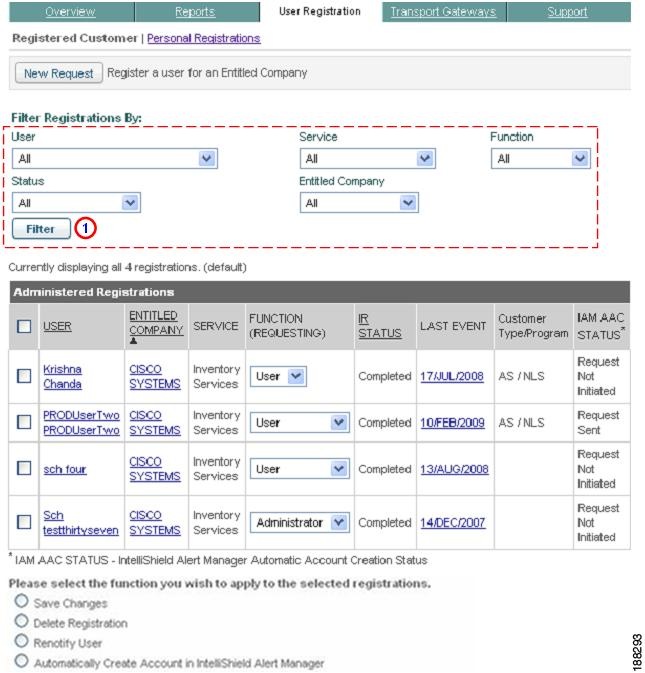
Step 1 ![]() Choose those items you want to be your filter criteria from the various drop-downs in the "Filter Registrations By:" area.
Choose those items you want to be your filter criteria from the various drop-downs in the "Filter Registrations By:" area.
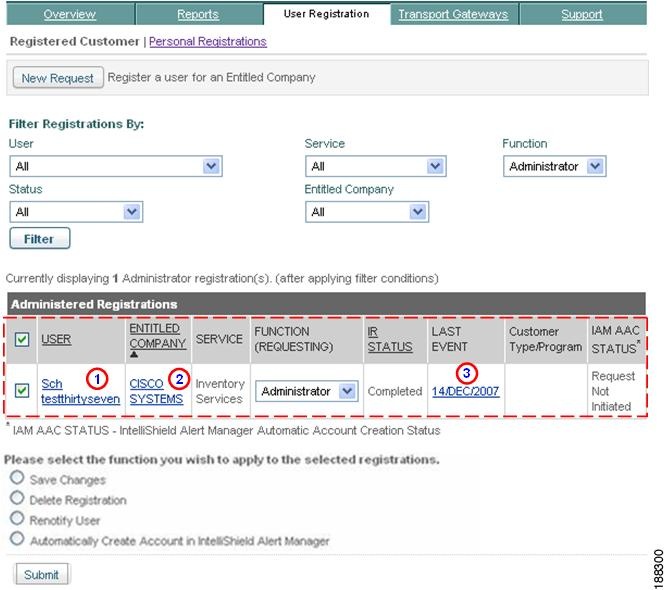
Step 2 ![]() After choosing your filter criteria, click Filter; this displays all the entries that meet the specified criteria
After choosing your filter criteria, click Filter; this displays all the entries that meet the specified criteria
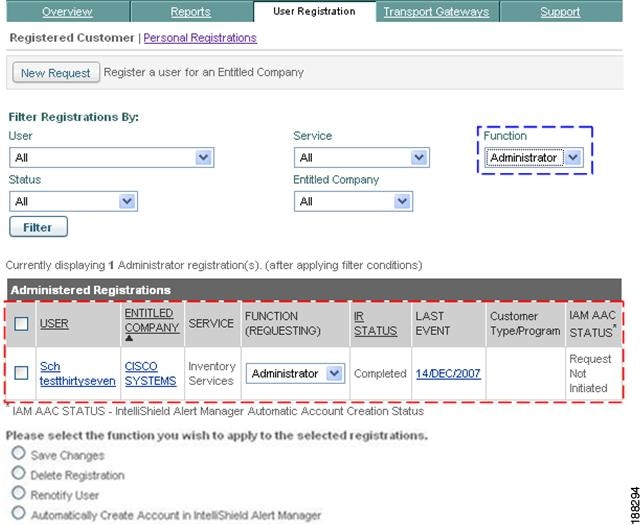
.
The example in the previous figure used only the Function criteria  (i.e. Administrator); the Administered Registrations table displays each entitled company and service that Administrator is associated.
Note ![]() Click the hyperlink in the Administered Registrations table to access additional information about a User, Entitled Company, or Last Event (the registration history) by clicking the date in that column.
Click the hyperlink in the Administered Registrations table to access additional information about a User, Entitled Company, or Last Event (the registration history) by clicking the date in that column.
Tip ![]() To select all the users in the table at one time, check the User check box
To select all the users in the table at one time, check the User check box  at the top of the user column.
Save Changes Function
This function determines the future abilities of the user as they relate to a given service for an entitled company. You can change an assigned function for all or some of the registrations that are part of the entitled companies that you administer.
To change the function for a registration, complete the following steps:
Step 1 ![]() Check the check box next to each user whose assigned function is to be updated.
Check the check box next to each user whose assigned function is to be updated.
Step 2 ![]() Choose the new function for each registration to be updated from the Function (Requesting) drop-down list, if a new option is available from the list.
Choose the new function for each registration to be updated from the Function (Requesting) drop-down list, if a new option is available from the list.
Step 3 ![]() Click Save Changes, located below the Administered Registrations table.
Click Save Changes, located below the Administered Registrations table.
Step 4 ![]() Click Submit when you are finished maintaining registrations.
Click Submit when you are finished maintaining registrations.
Note ![]() After any action is taken, the user to whom the modified registration belongs, is notified by e-mail that the registration has been modified. The system then returns to this window and displays the most current information for each registration.
After any action is taken, the user to whom the modified registration belongs, is notified by e-mail that the registration has been modified. The system then returns to this window and displays the most current information for each registration.
Delete Administered Registration
You can delete a user's registration to a particular entitled Company + Service; the deletion does not affect the registrations for the same service with other entitled companies.
To delete a user registration to an entitled Company + Service, complete the following steps:

Step 1 ![]() Check the check box next to each user whose registration to an Entitled Company and associated service you want to delete.
Check the check box next to each user whose registration to an Entitled Company and associated service you want to delete.
Step 2 ![]() Click the Delete Registration radio button.
Click the Delete Registration radio button.
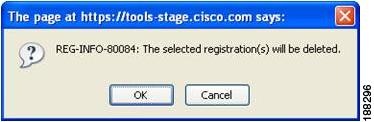
Step 3 ![]() Click Submit; an informational message appears that indicates the selected user(s) will be deleted.
Click Submit; an informational message appears that indicates the selected user(s) will be deleted.
Step 4 ![]() After the user(s) have been deleted then IR displays another message indicating that the deletion(s) were successful. The Administered Registrations table will no longer display the deleted user(s).
After the user(s) have been deleted then IR displays another message indicating that the deletion(s) were successful. The Administered Registrations table will no longer display the deleted user(s).
Note ![]() When the user is deleted, the user information is not deleted from IAM.
When the user is deleted, the user information is not deleted from IAM.
Renotify User
Registrations that have Pending Legal Agreement Acceptance statuses require action before the owner can use the Inventory and Reporting application. You can send a reminder to a user to finalize the registration.
To send a reminder to the owner of registrations that have Pending Legal Agreement Acceptance statuses, perform the following steps:
Step 1 ![]() Check the check box next to each user who you want to remind that their pending registration requires attention.
Check the check box next to each user who you want to remind that their pending registration requires attention.
Step 2 ![]() Check Renotify User.
Check Renotify User.
Step 3 ![]() Click Submit, the selected user(s) receive an e-mail that requests them to finalize the pending registrations.
Click Submit, the selected user(s) receive an e-mail that requests them to finalize the pending registrations.
Automatically Create Account in IAM
The user can initiate an IAM automatic account creation by selecting a user then clicking the Automatically Create Account in IntelliShield Alert Manager radio button.
To Automatically Create an Account (ACA) in IAM for a user, perform the following steps.:
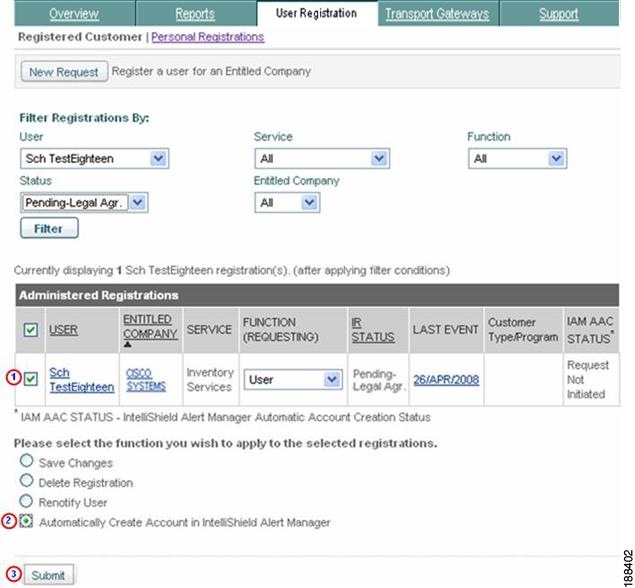
Step 1 ![]() Check the check box next to the user you want to have an IAM account automatically created for.
Check the check box next to the user you want to have an IAM account automatically created for.
Step 2 ![]() Click the Automatically Create Account in IntelliShield Alert Manager radio button.
Click the Automatically Create Account in IntelliShield Alert Manager radio button.
Step 3 ![]() Click Submit; the selected user has an IAM account automatically created.
Click Submit; the selected user has an IAM account automatically created.
A user can also initiate the ACA request for IAM only when the account request failed or not sent for user.
View Details from Administered Registrations
Obtain additional information on the following items in the Administered Registrations table by clicking one of the following hyperlinks in the table.
•![]() A User in the User column.
A User in the User column.
•![]() A company in the Entitled Company column.
A company in the Entitled Company column.
•![]() A date in the Last Event column, which opens the Registration Event Log.
A date in the Last Event column, which opens the Registration Event Log.
Maintain Personal Registration
The topics in this section describe how to maintain your Personal Registrations by doing the following tasks:
•![]() View Details from Personal Registrations
View Details from Personal Registrations
Use the Personal Registrations option to maintain your user registrations. These registrations apply to Entitled Company + Services for which you are a user or administrator.
To access the above Personal Registration options perform the following steps:

Step 1 ![]() Choose one of the following options to access the Personal Registration page:
Choose one of the following options to access the Personal Registration page:
•![]() If you are on the Inventory and Reporting Overview menu click Maintain Personal Registrations.
If you are on the Inventory and Reporting Overview menu click Maintain Personal Registrations.

•![]() If you are on the User Registrations tab
If you are on the User Registrations tab  (see above graphic) click Personal Registrations.
Both of the above options have the Personal Registrations page appear, with a list of all your registrations in the Personal Registration table.
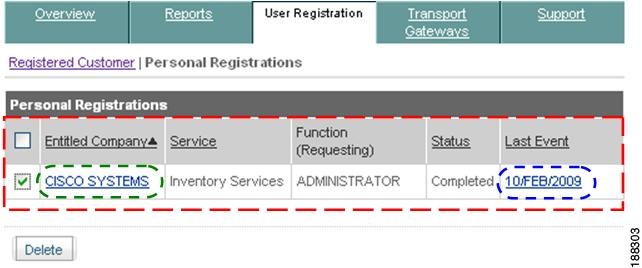
Note ![]() All your registrations display in the Personal Registrations table, with one registration per row. The status for each registration is included, along with relevant actions required for each registration with the Pending status.
All your registrations display in the Personal Registrations table, with one registration per row. The status for each registration is included, along with relevant actions required for each registration with the Pending status.
Delete Personal Registration
You can delete your registration to a particular entitled Company + Service; the deletion does not affect the registrations for the same service with other entitled companies.
To delete a user registration to an entitled Company + Service, complete the following steps:
Step 1 ![]() Check the check box
Check the check box  next to each registration/service option you want to delete.
Step 2 ![]() Click Delete, located below the Personal Registrations table, a Confirm Deletion window appears.
Click Delete, located below the Personal Registrations table, a Confirm Deletion window appears.
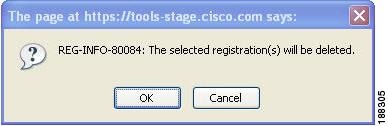
Step 3 ![]() Click OK to confirm the deletion, or click Cancel to cancel the registration deletion.
Click OK to confirm the deletion, or click Cancel to cancel the registration deletion.
Note ![]() The Inventory and Reporting application performs the following actions:
The Inventory and Reporting application performs the following actions:
•![]() Displays a successful deletion message stating the following information:
Displays a successful deletion message stating the following information:
05/JUL/2006: Registrations deleted successfully
REG-INFO-80088: The selected registrations have been deleted
successfully.
•![]() Re-displays the Personal Registrations page with the deleted registration still displayed in the registration table; however, the status has changed to "Declined".
Re-displays the Personal Registrations page with the deleted registration still displayed in the registration table; however, the status has changed to "Declined".
View Details from Personal Registrations
Obtain additional information on the following items in the Personal Registrations table, by clicking one of the following hyperlinks in the table:
•![]() Click a company in the Entitled Company column,
Click a company in the Entitled Company column,  which displays a new window that contains the Entitled Company Details.
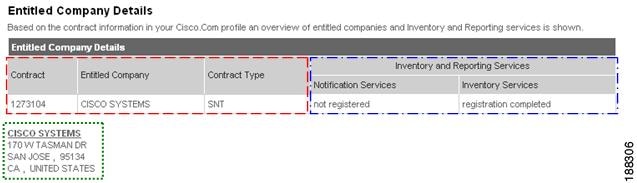
•![]() The Entitled Company Details window contains the following information:
The Entitled Company Details window contains the following information:
–![]() Contract information
Contract information
–![]() Types of services being utilized
Types of services being utilized 
–![]() Company address
Company address 
–![]() In the Personal Registrations table, a date in the Last Event column,
In the Personal Registrations table, a date in the Last Event column,  which displays a new window and shows the following details in the Registration Event Log:
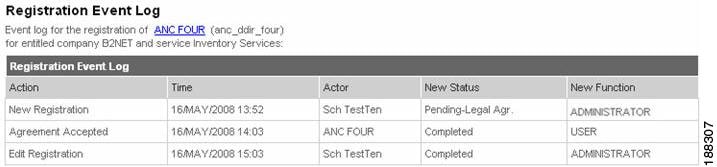
•![]() Action - Lists the actions performed by the user.
Action - Lists the actions performed by the user.
•![]() Time - Identifies when the actions were performed.
Time - Identifies when the actions were performed.
•![]() Actor - Identifies who (what CCO Id) performed the actions.
Actor - Identifies who (what CCO Id) performed the actions.
•![]() New Status - Indicates the resulting status of the action being taken.
New Status - Indicates the resulting status of the action being taken.
•![]() New Function - Identifies what function (User or Administrator) performed the action.
New Function - Identifies what function (User or Administrator) performed the action.
 Feedback