- Preface
- Scheduler Concepts
- Understanding Offset Concepts
- Creating Your First Job
- Setting Up a Unix Job Dependency
- Scheduling Jobs in a Group
- Creating a Unix File Dependency
- Detecting Job Event Conditions
- Creating Variable Dependencies
- Managing Jobs in the Production Schedule
- Managing Command Parameters
- Setting Up Queues
- Using Scheduler Agents
- Using Scheduler Calendars
Cisco Tidal Enterprise Scheduler 6.2 Tutorial Guide for Unix
Bias-Free Language
The documentation set for this product strives to use bias-free language. For the purposes of this documentation set, bias-free is defined as language that does not imply discrimination based on age, disability, gender, racial identity, ethnic identity, sexual orientation, socioeconomic status, and intersectionality. Exceptions may be present in the documentation due to language that is hardcoded in the user interfaces of the product software, language used based on RFP documentation, or language that is used by a referenced third-party product. Learn more about how Cisco is using Inclusive Language.
- Updated:
- June 6, 2014
Chapter: Setting Up a Unix Job Dependency
Overview
In many cases, a job should run only after some external requirements are satisfied. For example, a job may need data generated by another job, or it can run only after another job has completed successfully.
Enteprise Scheduler has the flexibility to encompass the different scheduling needs encountered in a business environment. You use job dependencies to prevent a job from running until the preceding job completes or enters a predefined status. You can also set jobs to run only when manually released.
In this chapter, we are going to define (add) a job called Unix Test 2 . We will assign a calendar to this job, but we will also make it Require operator release . Even if according to its calendar, the job is due to run, it does not run until it is released from Waiting on Operator status. We will define a second job, Unix Test 3 , which depends on Unix Test 2 . Unix Test 3 does not run until Unix Test 2 completes normally. Finally, we release Unix Test 2 , and both jobs end with a Completed Normally status.
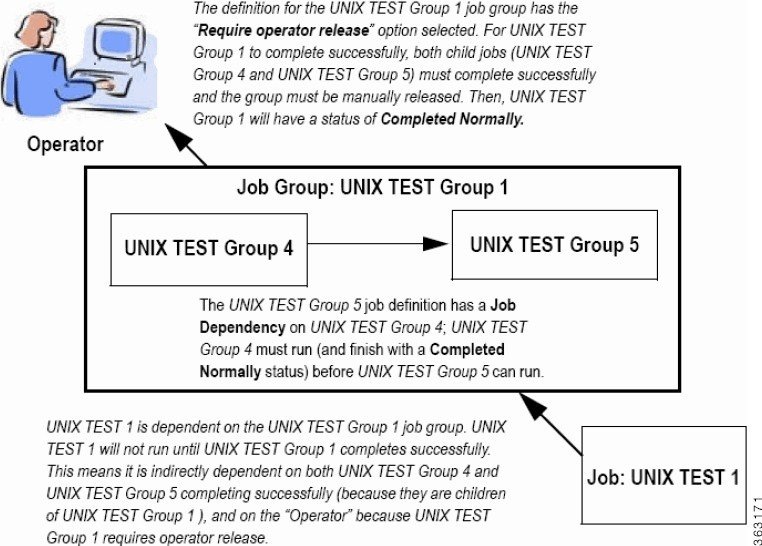
Figure 4-1 Interdependence of Unix Test 2, Unix Test 3, and the Operator
This chapter describes how to:
- Define a job that waits for an operator to release it
- Define a job that depends on the completion of another job
- Monitor jobs and job dependencies
- Release a job that requires operator intervention

Note To complete the exercises in this tutorial, you need to:
Install Enteprise Scheduler in the default directory Scheduler (or the examples in this tutorial will not work properly)
Select the Super User option in your User definition
Configure a default agent
Create and have available the work day calendar
Defining a Job for Operator Release
You can define a job requiring an operator to release it manually before running, after all its other dependencies are satisfied. Before the job is released, it enters the Waiting on Operator status. The job definition can include instructions for the operator.
Requiring an operator release is a good technique when testing a job or a set of sequential jobs for the first time. This is also good for jobs requiring operators to verify an event, or perform a related operation external to Enteprise Scheduler.
Setting the Require Operator Release Option
Step 1![]() From the
Navigator
pane, select
Definitions>Jobs
to display the
Jobs
pane.
From the
Navigator
pane, select
Definitions>Jobs
to display the
Jobs
pane.
Step 2![]() Right-click in the
Jobs
pane of the console and select
Add Job
from the context menu, or click the
Add Job
button on the Enterprise Scheduler toolbar.
Right-click in the
Jobs
pane of the console and select
Add Job
from the context menu, or click the
Add Job
button on the Enterprise Scheduler toolbar.
The Job Definition dialog displays.
Step 3![]() Set the following options:
Set the following options:
a.![]() In the
Job Name
field, enter the name
Unix Test 2
.
In the
Job Name
field, enter the name
Unix Test 2
.
b.![]() In the
Command
field, enter the full path to the file:
In the
Command
field, enter the full path to the file:
/UNIX_TEST_2.sh
Note Although the command executable has the same name as the job in this case, this is not required. The Job Name is any logical name that is meaningful to you. However, the command name refers to the physical file and must match the actual command.
Step 4![]() Click the
Schedule
tab.
Click the
Schedule
tab.
Step 5![]() From the
Calendar Name
list, select
work day
.
From the
Calendar Name
list, select
work day
.
Step 7![]() From the
Runtime User
list, select a runtime user who can use the Unix agent being used.
From the
Runtime User
list, select a runtime user who can use the Unix agent being used.
Figure 4-2 Job Definition Dialog, Options Tab
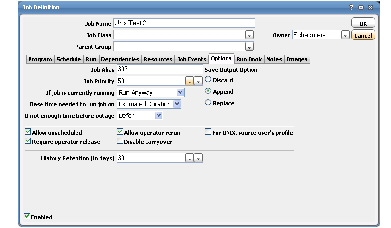
Step 9![]() Select the
Require operator release
option.
Select the
Require operator release
option.
Step 10![]() Click
OK
to save the job definition.
Click
OK
to save the job definition.
Step 11![]() Click
OK
in the
Effective Date
dialog to submit the job into today’s schedule.
Click
OK
in the
Effective Date
dialog to submit the job into today’s schedule.
Step 12![]() From the
Navigator
pane, select
Operations>Job Activity
to display the
Job Activity
pane.
From the
Navigator
pane, select
Operations>Job Activity
to display the
Job Activity
pane.
Unix Test 2 displays a Waiting On Operator status.
We will leave this job for now, and release it to the Production Schedule later after creating a second job with a dependency on Unix Test 2 completing normally.
Adding a Job with a Dependency
We will now create the Unix Test 3 job definition with a dependency on the Unix Test 2 job already in the production schedule.
To create the Unix Test 3 job definition with a dependency on the Unix Test 2 job:
Step 1![]() From the
Navigator
pane, select
Definitions>Jobs
to display the
Jobs
pane.
From the
Navigator
pane, select
Definitions>Jobs
to display the
Jobs
pane.
Step 2![]() Right-click in the
Jobs
pane of the console and select
Add Job
from the context menu, or click the
Add Job
button on the toolbar.
Right-click in the
Jobs
pane of the console and select
Add Job
from the context menu, or click the
Add Job
button on the toolbar.
The Job Definition dialog displays.
Step 3![]() Set the following options:
Set the following options:
a.![]() In the
Job Name
field, type the name
Unix Test 3
.
In the
Job Name
field, type the name
Unix Test 3
.
b.![]() In the
Command
field, enter the full path to the file:
In the
Command
field, enter the full path to the file:
/UNIX_TEST_3.sh
Step 4![]() Click the
Schedule
tab.
Click the
Schedule
tab.
Step 5![]() In the
Calendar Name
list, select the
work day
calendar.
In the
Calendar Name
list, select the
work day
calendar.
Step 6![]() Click the
Run
tab and in the
Runtime User
list, select a user that can access the Unix agent.
Click the
Run
tab and in the
Runtime User
list, select a user that can access the Unix agent.
Step 7![]() Display the
Dependencies
tab, by clicking its tab on the
Job
Definition
dialog.
Display the
Dependencies
tab, by clicking its tab on the
Job
Definition
dialog.
Step 8![]() Click the
Add
button to display the list.
Click the
Add
button to display the list.
Step 9![]() Select the
Add Job Dependency
option to display the
J
ob Dependency Definition
dialog.
Select the
Add Job Dependency
option to display the
J
ob Dependency Definition
dialog.
Step 10![]() Go to the
Job/Group
list, click the
down arrow
button and select
Unix Test 2
. It will display in the
Job/Group
field.
Go to the
Job/Group
list, click the
down arrow
button and select
Unix Test 2
. It will display in the
Job/Group
field.
Step 11![]() Accept the defaults and click
OK
. The defaults are preset to satisfy the dependency when
Unix Test 2
completes normally.
Accept the defaults and click
OK
. The defaults are preset to satisfy the dependency when
Unix Test 2
completes normally.
Now Unix Test 2 shows as a dependency for Unix Test 3 . The Unix Test 2 dependency is part of the job definition of Unix Test 3 .
Step 12![]() Click
OK
in the
Job Definition
dialog to close it.
Click
OK
in the
Job Definition
dialog to close it.
Step 13![]() Click
OK
in the
Effective Date
dialog.
Click
OK
in the
Effective Date
dialog.
The Unix Test 3 job is added to the production schedule.
Monitoring Your Jobs
Both jobs are now scheduled and ready to run. Use the Job Activity pane to monitor them.
From the Navigator pane, select Operations>Job Activity to display your scheduled jobs.
Notice that both jobs are in waiting mode. Unix Test 2 needs manual intervention before it can run ( Waiting On Operator ) and Unix Test 3 is waiting for Unix Test 2 to complete normally ( Waiting On Dependencies ).
Viewing Dependencies from the Job Activity Pane
To view the dependence Unix Test 3 has on Unix Test 2 :
Step 1![]() Double-click the
Unix Test 2
job in the
Job Activity
pane to display its
Job Detail
dialog.
Double-click the
Unix Test 2
job in the
Job Activity
pane to display its
Job Detail
dialog.
Step 2![]() Click the
Dependencies
tab.
Click the
Dependencies
tab.
The dependency appears in the Predecessors field.
This shows that Unix Test 3 is waiting for Unix Test 2 to complete normally. Currently Unix Test 2 is in Waiting on Operator status. Unix Test 3 cannot run until Unix Test 2 goes to Completed Normally status.
Releasing the Jobs
Step 1![]() Click the
Unix Test 2
job in the
Job Activity
pane.
Click the
Unix Test 2
job in the
Job Activity
pane.
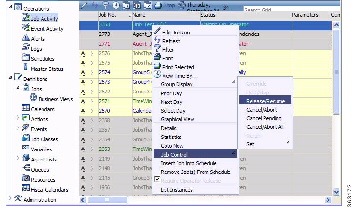
Step 2![]() Right-click the job to display the context menu.
Right-click the job to display the context menu.
Step 3![]() Select the
Job Control
option and then choose the
Release/Resume
option to release the job.
Select the
Job Control
option and then choose the
Release/Resume
option to release the job.
Figure 4-3 Selecting the Release/Resume Menu Option
Now Unix Test 2 is free to run. Once complete, Unix Test 2 enters a Completed Normally status. The color of Unix Test 2 changes to green and then to blue (if using the default status colors), and then Unix Test 3 runs. Unix Test 3 displays similar status and color changes.
Step 5![]() Click
OK
when the
Information
dialog displays.
Click
OK
when the
Information
dialog displays.
Congratulations! In this chapter, you have defined jobs requiring manual release and a job dependency. You have scheduled and monitored your jobs through the various states until completion.
 Feedback