- Preface
- Scheduler Concepts
- Understanding Offset Concepts
- Creating Your First Job
- Setting Up a Unix Job Dependency
- Scheduling Jobs in a Group
- Creating a Unix File Dependency
- Detecting Job Event Conditions
- Creating Variable Dependencies
- Managing Jobs in the Production Schedule
- Managing Command Parameters
- Setting Up Queues
- Using Scheduler Agents
- Using Scheduler Calendars
Cisco Tidal Enterprise Scheduler 6.2 Tutorial Guide for Unix
Bias-Free Language
The documentation set for this product strives to use bias-free language. For the purposes of this documentation set, bias-free is defined as language that does not imply discrimination based on age, disability, gender, racial identity, ethnic identity, sexual orientation, socioeconomic status, and intersectionality. Exceptions may be present in the documentation due to language that is hardcoded in the user interfaces of the product software, language used based on RFP documentation, or language that is used by a referenced third-party product. Learn more about how Cisco is using Inclusive Language.
- Updated:
- June 6, 2014
Chapter: Detecting Job Event Conditions
Overview
Using Enteprise Scheduler job events allows you to automatically trigger actions whenever certain event triggers (job conditions) arise. Actions include user notification via email, console alert messages, launching new jobs, job control commands, variable updates, log message posting and SNMP traps to HP OpenView or other network managers. This chapter describes how to:
- Define an operator alert action
- Add the action to the job by using the Job Events dialog
- Submit the job to production and watch the operator alert action occur

Caution To complete the exercises in this tutorial, you need to:
Install Enteprise Scheduler in the default directory Scheduler (or the examples in this tutorial will not work properly)
Select the Super User option in your User definition
Configure a default agent
Create and have available the work day calendar
Install Enteprise Scheduler in the default directory Scheduler (or the examples in this tutorial will not work properly)
Select the Super User option in your User definition
Configure a default agent
Create and have available the work day calendar
Understanding Actions
An action is a predefined response to a job event that is triggered by a job in the production schedule. You define event triggers for jobs in the Job Events dialog and associate them to actions. Actions can be linked to multiple jobs and job groups.
There are different types of actions that can be defined within Enteprise Scheduler. Some of these actions Each type of action can be triggered based on any job’s status, job control by an operator and/or an event triggered by the system. Furthermore, you can personalize actions from a set of included variables such as system, job, job event, action and user-defined information.
Creating an Alert Action
In the following exercise, you define an action that sends an alert to the Job Activity pane when the job Unix_Download (created in the previous chapter) ends with a Completed Abnormally status.
Step 1![]() From the
Navigator
pane, select
Definitions>Actions>Alert
to display the
Alert
Actions
pane.
From the
Navigator
pane, select
Definitions>Actions>Alert
to display the
Alert
Actions
pane.
Step 2![]() Click the
Add Action
button on the Scheduler toolbar or right-click the
Alert Actions
pane and select
Add Action
from the context menu to display the
Action Definition: Alert
dialog.
Click the
Add Action
button on the Scheduler toolbar or right-click the
Alert Actions
pane and select
Add Action
from the context menu to display the
Action Definition: Alert
dialog.
Step 3![]() In the
Action Name
field, enter
Job Failed
.
In the
Action Name
field, enter
Job Failed
.
Step 4![]() In the
Severity Level
section, check
Error
.
In the
Severity Level
section, check
Error
.
Step 5![]() Type the following message and select the variables shown in angle brackets from the
Variables
list. The variables appear between the brackets as
<variable>
.
Type the following message and select the variables shown in angle brackets from the
Variables
list. The variables appear between the brackets as
<variable>
.

Note This dialog does not accept carriage returns. Text automatically wraps to the next line.
The Job <Jobname>, owned by <JobOwner> went to <JobStatus> status on <SysDate.M/d/yy>. <JobOwner>’s pager number is <JobPager>
Step 6![]() This action is triggered, and an alert record is sent to the
Job Activity
pane for the operator to take action. Click
OK
to accept the action. The action is displayed in the
Actions
pane.
This action is triggered, and an alert record is sent to the
Job Activity
pane for the operator to take action. Click
OK
to accept the action. The action is displayed in the
Actions
pane.
Creating a Job to Trigger an Event with an Alert Action
To create a job to trigger an event with an Alert action:
Step 1![]() From the
Navigator
pane, select
Definitions>Jobs
to display the
Jobs
pane.
From the
Navigator
pane, select
Definitions>Jobs
to display the
Jobs
pane.
Step 2![]() Click the
Add Job
button or right-click and select
Add Job
from the context menu to display the
Job Definition
dialog.
Click the
Add Job
button or right-click and select
Add Job
from the context menu to display the
Job Definition
dialog.
Step 3![]() In the
Job Name
field, enter
Unix Test JEVENT.
In the
Job Name
field, enter
Unix Test JEVENT.
Step 4![]() In the
Command
field, enter the full path to the file:
In the
Command
field, enter the full path to the file:
/UNIX_TEST_JEVENT.sh
Step 5![]() Click the
Schedule
tab to display the
Schedule
tab.
Click the
Schedule
tab to display the
Schedule
tab.
Step 6![]() From the
Calendar Name
list, select
Daily
.
From the
Calendar Name
list, select
Daily
.
Step 7![]() Click the
Run
tab to display the
Run
tab.
Click the
Run
tab to display the
Run
tab.
Step 8![]() From the
Runtime User
list, select a user with access to the Unix agent.
From the
Runtime User
list, select a user with access to the Unix agent.
Step 9![]() Click
OK
to save the job definition.
Click
OK
to save the job definition.
Step 10![]() In the
Effective Date
dialog, click
Cancel
.
In the
Effective Date
dialog, click
Cancel
.
Associating the Action to the Job
You can assign the action to the Unix_Download job through the Job Events dialog.
To associate the action to the job:
Step 1![]() From the
Navigator
pane, select
Definitions>Events>Job Events
to display the
Job Events
pane.
From the
Navigator
pane, select
Definitions>Events>Job Events
to display the
Job Events
pane.
Step 2![]() Click the
Add Event
button on the Scheduler toolbar or right-click the
Events
pane and select
Add Event
from the context menu to display the
Job Event Definition
dialog.
Click the
Add Event
button on the Scheduler toolbar or right-click the
Events
pane and select
Add Event
from the context menu to display the
Job Event Definition
dialog.
Figure 7-1 Associating a Defined Action with a Job Event
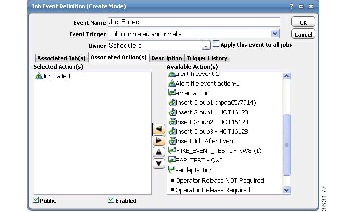
Step 3![]() In the
Job Event Name
field, enter
Job Failed
.
In the
Job Event Name
field, enter
Job Failed
.
Step 4![]() From the
Event Trigger
list, select
Job Completed Abnormally
.
From the
Event Trigger
list, select
Job Completed Abnormally
.
Step 5![]() In the
Available Action(s)
list, highlight
Job Failed
and click the left arrow button the
Job Failed
action to the
Selected Action(s)
field.
In the
Available Action(s)
list, highlight
Job Failed
and click the left arrow button the
Job Failed
action to the
Selected Action(s)
field.
Now, you can associate the Unix Test Event job to the job event.
Step 6![]() Click the
Associated Job(s)
tab.
Click the
Associated Job(s)
tab.
Step 7![]() Display the available jobs in the
Command
list and select the
Unix_Download
job by double-clicking it.
Display the available jobs in the
Command
list and select the
Unix_Download
job by double-clicking it.
Step 8![]() Select the
Public
option, if not already selected. This makes your event available to other Enteprise Scheduler users.
Select the
Public
option, if not already selected. This makes your event available to other Enteprise Scheduler users.
Step 9![]() Click
Add
and then click
OK
.
Click
Add
and then click
OK
.
The Unix Test Event job is now linked to the Job Failed alert action through the Job Failed job event.
Insert Unix Test Event
To insert the Unix Test Event job:
Step 1![]() In the
Jobs
pane, right-click the
Unix Test Event
job
and select
Insert Job Into Schedule
.
In the
Jobs
pane, right-click the
Unix Test Event
job
and select
Insert Job Into Schedule
.
Step 2![]() Click
OK
in the
Insert Job Into Schedule
dialog.
Click
OK
in the
Insert Job Into Schedule
dialog.
Step 3![]() Click
OK
in the
Information
dialog.
Click
OK
in the
Information
dialog.
Step 4![]() From the
Navigator
pane, select
Operations>Job Activity
to display the
Job Activity
pane.
From the
Navigator
pane, select
Operations>Job Activity
to display the
Job Activity
pane.
The job goes into the Active state and runs. Then the job terminates with an Completed Abnormally status, initiating the action and changing the Alerts light to red.
Changing the Status of the Alert 7
To change the status of the alert:
Step 1![]() On the Navigator pane, select
Operations>Alerts
to display the
Alerts
pane.
On the Navigator pane, select
Operations>Alerts
to display the
Alerts
pane.
Step 2![]() Double-click the alert to display its
Alert Detail
dialog.
Double-click the alert to display its
Alert Detail
dialog.
Step 3![]() Select the
Acknowledged
option.
Select the
Acknowledged
option.
Step 4![]() You can enter a response or comment in the
Response
field.
You can enter a response or comment in the
Response
field.
Step 5![]() Click
OK
to close the dialog.
Click
OK
to close the dialog.
The Alerts light at the bottom of the Scheduler window changes to yellow.
 Feedback