New and Changed Information
The following table provides an overview of the significant changes to the organization and features in this guide up to this current release. The table does not provide an exhaustive list of all changes made to the guide or of the new features up to this release.
|
Feature or Change |
Description |
Where Documented |
|---|---|---|
|
Initial release of document |
Initial release of document. |
About Express Route Gateway
 Note |
The following content refers to "Multi-Site Orchestrator" which has been rebranded to Nexus Dashboard Orchestrator. Same information is applicable to both products. |
Beginning with Release 5.1(2), support is now available for express route gateway deployment, where you can deploy an express route gateway in the hub VNet using redirect or without using redirect. The express route gateway is used to provide connectivity between a Cloud APIC-managed cloud site and a non-ACI remote site. The external EPG for the non-ACI remote site (in this case, connected by an express route gateway) has a contract with the cloud EPG in the hub or spoke VNet.
Guidelines and Limitations
You cannot deploy express route gateway in a new region if the following conditions are present:
-
There is an express route gateway deployed in another region
-
The site external EPG and related contract are configured on Cisco Cloud APIC
If either of these conditions are present, Azure will throw the following error:
Virtual network gateway can not be created since the virtual network <first_subscription> already uses remote gateways over peering <second_subscription>.To deploy express route gateway in a new region, you must disable VNet peering on the infra VNet in this region.
About Deploying Express Route Gateway Using Redirect
In situations where you are deploying a connection between a cloud endpoint and an external network through an express route gateway, you can insert a service device between them using redirect.
For this use case, the external EPG connected by the express route gateway has a contract with the cloud EPG in either the hub or the spoke VNet. In this situation:
-
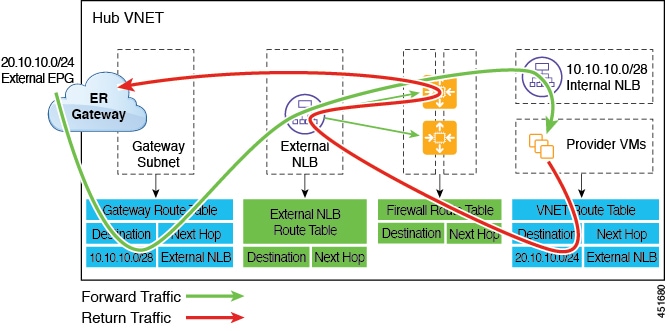
The redirect is configured on the gateway subnet route table by the Cloud APIC. The traffic destined to the provider cloud EPG is redirected to the service device deployed in the hub VNet as the next hop.
-
You should have the service device that is used in the redirect in the same VNet as the external EPG connected by the express route gateway (in this case, in the hub VNet).
-
Having the provider cloud EPG stretched across regions is supported in this case.
The following figure shows an example of a redirect for express route gateway to the provider EPG in the hub VNet.
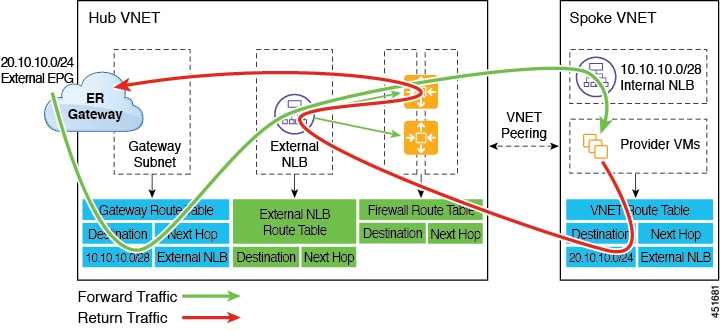
The following figure shows an example of a redirect for express route gateway to the provider EPG in the spoke VNet.
The following table describes how redirect is programmed, depending on whether the endpoint selector for the cloud EPG has a tag-based or a subnet-based configuration.
|
Consumer |
Provider |
Redirect on Gateway Subnet Route Table |
Redirect on Provider VNet |
|---|---|---|---|
|
External EPG connected by the express route gateway |
Cloud EPG with tag-based endpoint selector |
Redirect for the consumer-to-provider traffic using the CIDRs of the provider’s VNet |
Redirect for the provider-to-consumer traffic using the subnets of the external EPG |
|
External EPG connected by the express route gateway |
Cloud EPG with subnet-based endpoint selector |
Redirect for the consumer-to-provider traffic using the subnets of the provider |
Redirect for the provider-to-consumer traffic using the subnets of the external EPG |
Deploying Express Route Gateway Using Redirect
Before you begin
Review the information provided in About Deploying Express Route Gateway Using Redirect before proceeding with these procedures.
Procedure
| Step 1 |
Enable VNet peering. The gateway subnet in the hub VNet that is required for the express route gateway is deployed by the Cloud APIC when VNet peering is enabled. This is done to prepare the hub VNet for the deployment of the express route gateway. For additional conceptual information about VNet peering, see Configuring VNET Peering for Cloud APIC for Azure. |
| Step 2 |
Create an external EPG in the hub VNet that represents the network for the non-ACI remote site. |
| Step 3 |
Through the Azure portal, deploy the express route gateway in the hub VNet using the gateway subnet that you configured in Step 1. Depending on the number of regions that you selected when you enabled VNet peering in Step 1, if you need express route gateway access on multiple regions that the Cloud APIC will manage, deploy express route gateways in each of those regions separately. |
| Step 4 |
Configure the service device for the redirect. See the section "Cisco ACI Multi-Site Service Integration" in the Cisco ACI Multi-Site Fundamentals Guide located in the Cisco APIC documentation page. |
| Step 5 |
Configure a contract between the cloud EPG and the external EPG connected by the express route gateway. |
About Deploying Express Route Gateway Without Redirect
For this type of deployment, route propagation to the spoke VNet is automatically enabled by the Cloud APIC. This allows your non-ACI remote site subnet routes to be available to the spoke VNet through the hub VNet using VNet peering with gateway transit (also referred to as transit peering). VNet peering with gateway transit is also automatically enabled by the Cloud APIC in this situation.
As part of this configuration, you will deploy the express route gateway in the hub VNet. When the Cloud APIC detects that the express route gateway has been configured in the hub VNet, it automatically sets the transit peering properties, one for the hub → spoke peering and the other for the spoke → hub peering, in the Azure portal:
-
Hub VNet: Automatically set to Use this virtual network's gateway
-
Spoke VNet: Automatically set to Use remote virtual network's gateway in the spoke VNet that is managed by the Cloud APIC
In order to have the route propagation enabled for the egress route table of the spoke VNet, you must configure a contract between the cloud EPG in the spoke VNet and the external EPG connecting to the non-ACI remote site.
The following figure shows an example of this type of deployment.
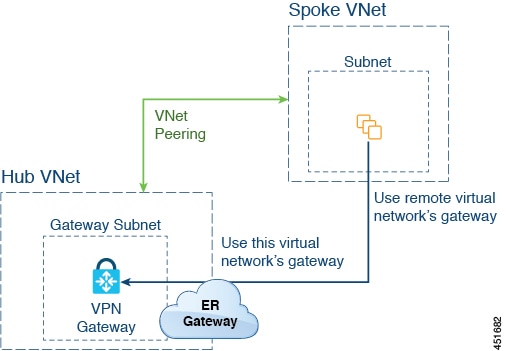
In this example:
-
The following configurations are done automatically by the Cloud APIC:
-
The spoke VNet uses VNet peering with gateway transit (transit peering)
-
The VPN gateway in the hub VNet is connected to an on-premises non-ACI remote site
-
When the Cloud APIC detects that the express route gateway is deployed in the hub VNet, the transit peering properties are automatically set on each side of the peering (hub → spoke and spoke → hub):
-
Hub VNet: Automatically set to Use this virtual network's gateway
-
Spoke VNet: Automatically set to Use remote virtual network's gateway in the spoke VNet that is managed by the Cloud APIC
-
-
-
The on-premises non-ACI routes learned by the VPN gateway are available to the spoke VNet if the EPG in the spoke VNet has a contract with the external EPG
-
The hub VNet allows traffic from the EPG in the spoke VNet destined to the on-premises non-ACI remote site through the VPN gateway
Deploying Express Route Gateway Without Redirect
Before you begin
Review the information provided in About Deploying Express Route Gateway Without Redirect before proceeding with these procedures.
Procedure
| Step 1 |
Enable VNet peering. The gateway subnet in the hub VNet that is required for the express route gateway is deployed by the Cloud APIC when VNet peering is enabled. This is done to prepare the hub VNet for the deployment of the express route gateway. For additional conceptual information about VNet peering, see Configuring VNET Peering for Cloud APIC for Azure. |
| Step 2 |
Create an external EPG in the hub VNet that represents the network for the non-ACI remote site. |
| Step 3 |
Through the Azure portal, deploy the express route gateway in the hub VNet using the gateway subnet that you configured in Step 1. Depending on the number of regions that you selected when you enabled VNet peering in Step 1, if you need express route gateway access on multiple regions that the Cloud APIC will manage, deploy express route gateways in each of those regions separately. |
| Step 4 |
Configure a contract between the cloud EPG and the external EPG connected by the express route gateway. |
Trademarks
THE SPECIFICATIONS AND INFORMATION REGARDING THE PRODUCTS REFERENCED IN THIS DOCUMENTATION ARE SUBJECT TO CHANGE WITHOUT NOTICE. EXCEPT AS MAY OTHERWISE BE AGREED BY CISCO IN WRITING, ALL STATEMENTS, INFORMATION, AND RECOMMENDATIONS IN THIS DOCUMENTATION ARE PRESENTED WITHOUT WARRANTY OF ANY KIND, EXPRESS OR IMPLIED.
The Cisco End User License Agreement and any supplemental license terms govern your use of any Cisco software, including this product documentation, and are located at: http://www.cisco.com/go/softwareterms.Cisco product warranty information is available at http://www.cisco.com/go/warranty. US Federal Communications Commission Notices are found here http://www.cisco.com/c/en/us/products/us-fcc-notice.html.
IN NO EVENT SHALL CISCO OR ITS SUPPLIERS BE LIABLE FOR ANY INDIRECT, SPECIAL, CONSEQUENTIAL, OR INCIDENTAL DAMAGES, INCLUDING, WITHOUT LIMITATION, LOST PROFITS OR LOSS OR DAMAGE TO DATA ARISING OUT OF THE USE OR INABILITY TO USE THIS MANUAL, EVEN IF CISCO OR ITS SUPPLIERS HAVE BEEN ADVISED OF THE POSSIBILITY OF SUCH DAMAGES.
Any products and features described herein as in development or available at a future date remain in varying stages of development and will be offered on a when-and if-available basis. Any such product or feature roadmaps are subject to change at the sole discretion of Cisco and Cisco will have no liability for delay in the delivery or failure to deliver any products or feature roadmap items that may be set forth in this document.
Any Internet Protocol (IP) addresses and phone numbers used in this document are not intended to be actual addresses and phone numbers. Any examples, command display output, network topology diagrams, and other figures included in the document are shown for illustrative purposes only. Any use of actual IP addresses or phone numbers in illustrative content is unintentional and coincidental.
The documentation set for this product strives to use bias-free language. For the purposes of this documentation set, bias-free is defined as language that does not imply discrimination based on age, disability, gender, racial identity, ethnic identity, sexual orientation, socioeconomic status, and intersectionality. Exceptions may be present in the documentation due to language that is hardcoded in the user interfaces of the product software, language used based on RFP documentation, or language that is used by a referenced third-party product.
Cisco and the Cisco logo are trademarks or registered trademarks of Cisco and/or its affiliates in the U.S. and other countries. To view a list of Cisco trademarks, go to this URL: www.cisco.com go trademarks. Third-party trademarks mentioned are the property of their respective owners. The use of the word partner does not imply a partnership relationship between Cisco and any other company. (1721R)
 Feedback