- About This Guide
- Getting Started with the Digital Media Player
- Planning the Digital Media Player Deployment
- Deploying the Digital Media Player
- Verifying the Deployment of the Digital Media Player
- Monitoring and Maintaining the Digital Media Player
- Troubleshooting the Digital Media Player
- Appendix A: Management Dashboard Commands for the Digital Media Player
- Appendix B: Display Parameters for the Digital Media Players
- Appendix C: Configuring an IOS DHCP Server to Support the Digital Media Players
Release 6.4: Cisco Vision Deployment Guide for Digital Media Players: Dynamic Signage Director
Bias-Free Language
The documentation set for this product strives to use bias-free language. For the purposes of this documentation set, bias-free is defined as language that does not imply discrimination based on age, disability, gender, racial identity, ethnic identity, sexual orientation, socioeconomic status, and intersectionality. Exceptions may be present in the documentation due to language that is hardcoded in the user interfaces of the product software, language used based on RFP documentation, or language that is used by a referenced third-party product. Learn more about how Cisco is using Inclusive Language.
- Updated:
- June 24, 2021
Chapter: Monitoring and Maintaining the Digital Media Player
- Performing a Regular Reboot of the Digital Media Players
- Verifying Digital Media Player Compliance
- Management Information Base (MIB) Variables
- Clearing the Storage on the Digital Media Player
- Clearing Registries on the Digital Media Player by Restoring Factory Defaults
- USB and SD Card Restrictions on DMPs
Monitoring and Maintaining the Digital Media Player
Series 2 DMPs: DMP-2K and SV-4K
Series 3 DMPs: CV-HD and CV-UHD
Series 4 DMPs: CV-HD2 and CV-UHD2
This module describes the workflow and tasks to monitor and maintain the working operation of the digital media player. It is intended for Cisco Vision Dynamic Signage Director administrators and installers.
For more information, see also the Release 6.4: Cisco Vision Dynamic Signage Director Operations Guide.
This module includes the following topics:
■![]() Performing a Regular Reboot of the Digital Media Players
Performing a Regular Reboot of the Digital Media Players
■![]() Verifying Digital Media Player Compliance
Verifying Digital Media Player Compliance
■![]() Management Information Base (MIB) Variables
Management Information Base (MIB) Variables
■![]() Clearing the Storage on the Digital Media Player
Clearing the Storage on the Digital Media Player
■![]() Clearing Registries on the Digital Media Player by Restoring Factory Defaults
Clearing Registries on the Digital Media Player by Restoring Factory Defaults
■![]() USB and SD Card Restrictions on DMPs
USB and SD Card Restrictions on DMPs
Performing a Regular Reboot of the Digital Media Players
Perform a regular reboot of the devices to maintain normal operation of the digital media players. We recommend a weekly reboot.
For information about how to configure the Reboot DMP system task, see the Task Note: Configure Reboot DMPs.
Note: The reboot task applies globally to all media player devices. It is not enabled by default.
Verifying Digital Media Player Compliance
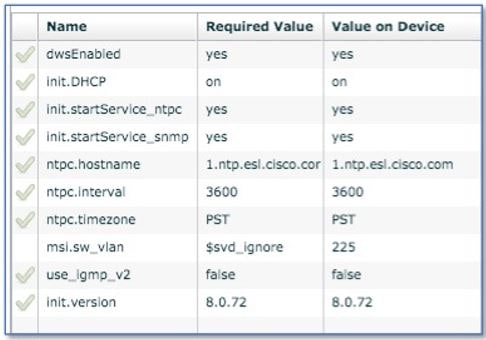
Cisco Vision Director allows you to compare values on the DMP device against required values configured in the Cisco Vision Dynamic Signage Director DMP settings.
Figure 1 shows how a DMP device should appear when it is fully compliant with the configured Cisco Vision Dynamic Signage Director settings:
■![]() Required Value—Value configured in Cisco Vision Dynamic Signage Director, or automatically set by the system.
Required Value—Value configured in Cisco Vision Dynamic Signage Director, or automatically set by the system.
■![]() Value on Device—Setting that the DMP device is running.
Value on Device—Setting that the DMP device is running.
Figure 1 Normal Compliance for a DMP Device
To verify digital media player compliance:
2.![]() In the Selected Devices panel, select all DMPs about which you want an updated status. The lower Status pane appears.
In the Selected Devices panel, select all DMPs about which you want an updated status. The lower Status pane appears.
Management Information Base (MIB) Variables
1.![]() Use an FTP client program to go to ftp.cisco.com.
Use an FTP client program to go to ftp.cisco.com.
2.![]() Log in and use anonymous as the user name and your email address as the password.
Log in and use anonymous as the user name and your email address as the password.
3.![]() Issue the cd /pub/mibs command to change directories to /pub/mibs/v2.
Issue the cd /pub/mibs command to change directories to /pub/mibs/v2.
Note: If you encounter any problems, try to log in with a minus sign (-) as the first character of your password. This turns off a feature that might be confusing your FTP client program. To download files from Cisco.com, you must use a passive-mode-capable FTP client. Contact your systems administrator to obtain one.
Send any questions, comments, or problem reports about FTP-related issues to Cisco.com Feedback.
The following table lists the DMP MIBs currently supported.
.1.3.6.1.4.1.9.9.1051.3.3.1 => PTP sync status (freerun/master) |
|
Clearing the Storage on the Digital Media Player
The DMP devices have different sizes of local storage:
■![]() The CV-HD2 DMPs have 128 GB of storage with approximately 100 GB available for content.
The CV-HD2 DMPs have 128 GB of storage with approximately 100 GB available for content.
■![]() The CV-UHD2 DMPs have 128 GB of solid-state storage with approximately 100 GB available for content.
The CV-UHD2 DMPs have 128 GB of solid-state storage with approximately 100 GB available for content.
■![]() The SV-4K and Series 3 DMPs have 120 GB of solid-state storage with approximately 100 GB available for content.
The SV-4K and Series 3 DMPs have 120 GB of solid-state storage with approximately 100 GB available for content.
■![]() The DMP-2K DMPs have 64 GB of solid-state storage with approximately 53 GB available for content.
The DMP-2K DMPs have 64 GB of solid-state storage with approximately 53 GB available for content.
If you are running out of storage or need to recover the SSD, clear the storage on the media player.
To find information about available storage:
1.![]() Select a DMP device in the Device Dashboard device list.
Select a DMP device in the Device Dashboard device list.
2.![]() Click the Settings tab > Storage in the device details area of the dashboard.
Click the Settings tab > Storage in the device details area of the dashboard.
Note: The HTML runtime must be running on the digital media player to use this task.
You also can find information about available storage if you view device details from thumbnail view in Device Management (CCM).
To clear the storage on the digital media player:
2.![]() Select the DMP devices that you want to clear.
Select the DMP devices that you want to clear.
3.![]() Use the drop-down arrow to select Reset Storage (Figure 2).
Use the drop-down arrow to select Reset Storage (Figure 2).
Figure 2 Reset Storage Command

The contents of the SSD storage is removed (including the Cisco Vision Dynamic Signage Director runtime software and script contents) on the devices. The devices will not automatically reboot after this command.
5.![]() Use the drop-down arrow to select Reboot Device (Figure 2).
Use the drop-down arrow to select Reboot Device (Figure 2).
The selected devices reboot and re-provision firmware and settings.
Clearing Registries on the Digital Media Player by Restoring Factory Defaults
To clear the registries on the digital media player:
2.![]() Select the devices that you want to clear.
Select the devices that you want to clear.
3.![]() Use the drop-down arrow to select Restore Default Settings (Figure 2).
Use the drop-down arrow to select Restore Default Settings (Figure 2).
5.![]() Any persistent device settings on the DMP s are erased and the box will be in factory default state. The DMP automatically reboots and re-provisions its firmware and settings.
Any persistent device settings on the DMP s are erased and the box will be in factory default state. The DMP automatically reboots and re-provisions its firmware and settings.
USB and SD Card Restrictions on DMPs
Release 6.4 introduces the ability to enable or disable the USB or SD card on groups or a single DMP using a new command in Device Management. For the command to work, we added a new registry to set in the System Configuration interface. The default is USB/SD card enabled.
Note: The CV-HD2 DMP has a micro SD card and this command is not supported.
To set the Compliance Value to Enable USB/SD card registry:
1.![]() Click Configuration > System Configuration > Global DMP Settings > Networking (Figure 3).
Click Configuration > System Configuration > Global DMP Settings > Networking (Figure 3).
Figure 3 Enable USB/SD Card Registry
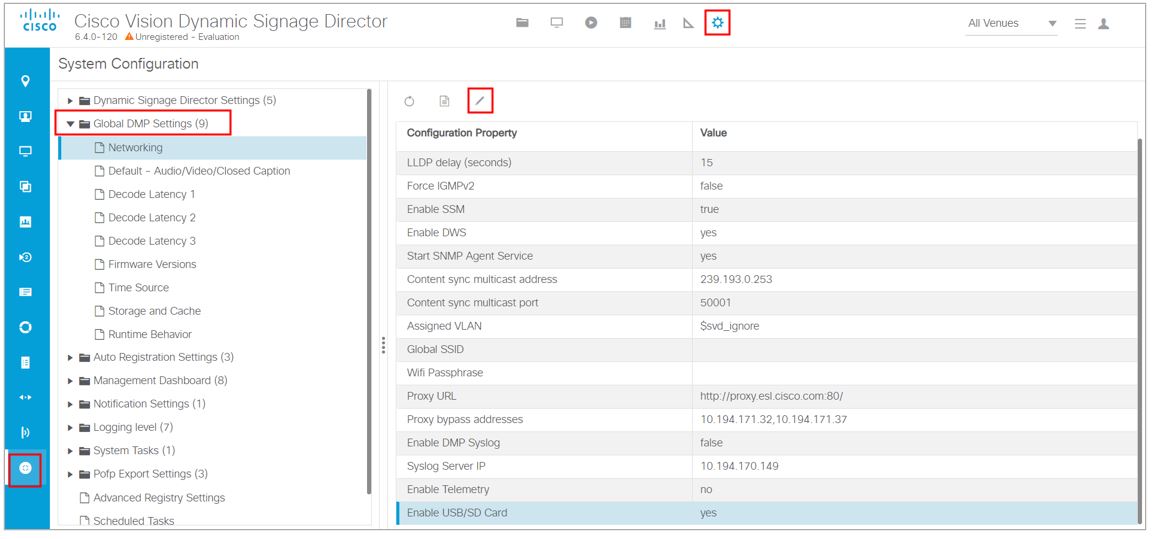
2.![]() Click the Enable USB/SD Card property.
Click the Enable USB/SD Card property.
3.![]() Click Edit. The Edit – Configuration Setting dialog box appears (Figure 4).
Click Edit. The Edit – Configuration Setting dialog box appears (Figure 4).
Figure 4 Enable USB/SD Card on the DMPs
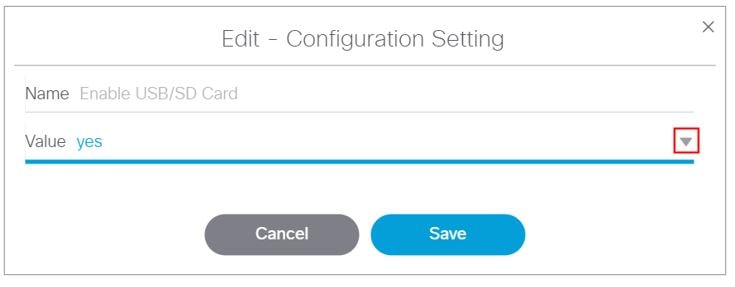
This sets the compliance value to enable the USB/SD cards on all the DMPs, making them able to accept a Command from Device Management.
To enable the USB/SD Cards on specific DMPs:
1.![]() Click Device Management and navigate to a DMP in the folders such as Zones and Groups.
Click Device Management and navigate to a DMP in the folders such as Zones and Groups.
2.![]() Select the DMPs on which you want to act.
Select the DMPs on which you want to act.
3.![]() Click the down arrow in the Action Box. Scroll to the bottom of the list (Figure 5).
Click the down arrow in the Action Box. Scroll to the bottom of the list (Figure 5).
Figure 5 Device Management Interface
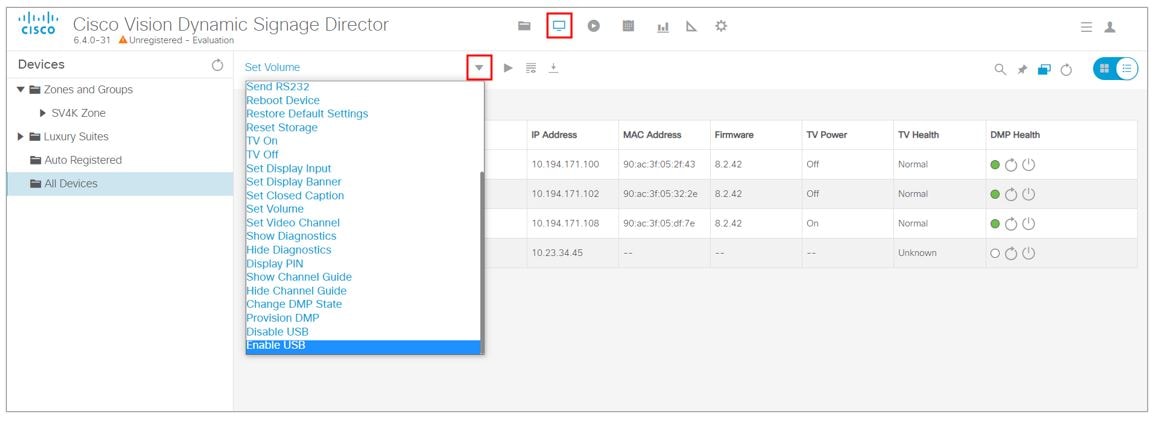
4.![]() Click Enable USB or Disable USB.
Click Enable USB or Disable USB.
5.![]() Click Play (Send Command). The Send Command dialog box appears telling you how many DMPs are selected and that action will execute.
Click Play (Send Command). The Send Command dialog box appears telling you how many DMPs are selected and that action will execute.
Note: When you run the Enable or Disable the USB/SD Card command, the selected DMPs reboot.
6.![]() Click OK to execute command.
Click OK to execute command.
Check the enable/disable status of your command in the Compliance tab.
7.![]() With a DMP selected in the list above, click Compliance. Verify the setting and values match (Figure 6).
With a DMP selected in the list above, click Compliance. Verify the setting and values match (Figure 6).
If the values do not match, Director notifies you that you are non-compliant for that DMP.
Figure 6 Check Compliance Values
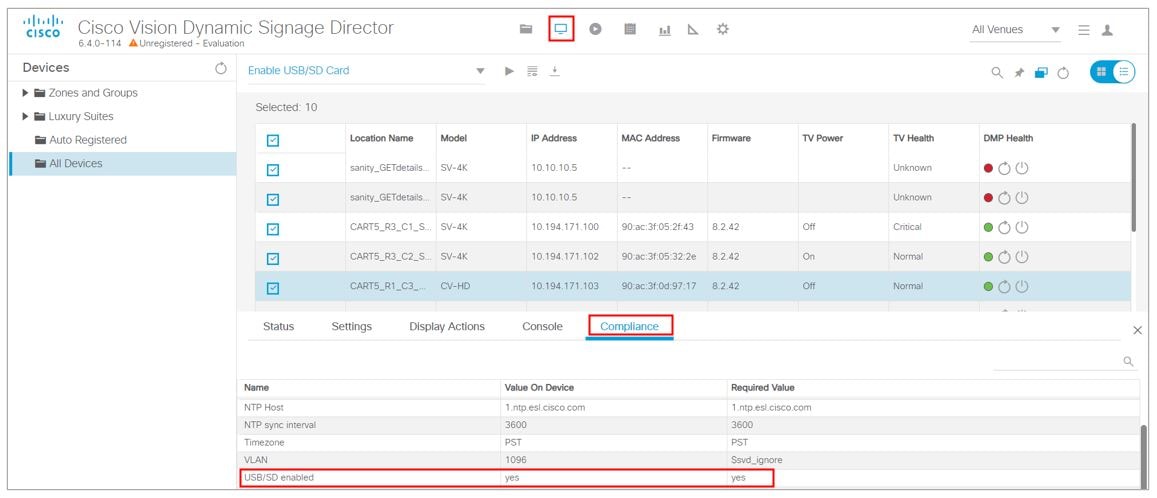
Note: The Value on the Device field is the individual DMP value. The Required Value field comes from the global setting. If they don’t match, a pale red highlighted region shows in the Compliance tab. The global setting only takes effect if you provision the DMPs. So if you set the global DMP value to Enable USB/SD Card, but change an individual DMP USB setting here to Disable USB/SD Card in Device Management, even though the DMP reboots, it will revert back to the global DMP setting until you reprovision the DMP.
 Feedback