- Cisco StadiumVision Director Dynamic Menu Board and Store Configuration Guide
- Preface
- Getting Started
- Overview of the Dynamic Menu Board Application
- Working with Stores in the DMB Application
- Working with Images in the DMB Application
- Working with the DMB Application User Interface
- Creating and Updating Menu Boards
- Appendix A: DMB Default Menu Theme Reference
- Appendix B: Advanced Architecture and DMB Customizations
Release 3.0 and Later Releases: Cisco StadiumVision Director Dynamic Menu Board and Store Configuration Guide
Bias-Free Language
The documentation set for this product strives to use bias-free language. For the purposes of this documentation set, bias-free is defined as language that does not imply discrimination based on age, disability, gender, racial identity, ethnic identity, sexual orientation, socioeconomic status, and intersectionality. Exceptions may be present in the documentation due to language that is hardcoded in the user interfaces of the product software, language used based on RFP documentation, or language that is used by a referenced third-party product. Learn more about how Cisco is using Inclusive Language.
- Updated:
- August 1, 2012
Chapter: Working with Images in the DMB Application
Working with Images in the DMB Application
The Cisco StadiumVision Director DMB application includes a set of images that can be used for the background, groups, headers, and items used in menu boards. This module describes some of the basic tasks for managing the images that are available for use in menu boards in the Image Gallery for the DMB application.
This module includes the following topics:
•![]() Accessing the DMB Image Gallery
Accessing the DMB Image Gallery
•![]() Viewing Available Images for the DMB Application
Viewing Available Images for the DMB Application
•![]() Uploading Images to the Image Gallery
Uploading Images to the Image Gallery
•![]() Displaying Image Characteristics
Displaying Image Characteristics
Image Guidelines
•![]() Images can be added to correspond to the menus, sub-menus, and items. The groups, items, and images are configured through the Dynamic Menu Board application interface for Cisco stores.
Images can be added to correspond to the menus, sub-menus, and items. The groups, items, and images are configured through the Dynamic Menu Board application interface for Cisco stores.
•![]() PoS stores define images within the PoS system and the content is retrieved by Cisco StadiumVision Director when the store is synchronized with the PoS system.
PoS stores define images within the PoS system and the content is retrieved by Cisco StadiumVision Director when the store is synchronized with the PoS system.
•![]() The Micros system does not have built-in support for images to be assigned to Major and Family Groups. To work around this, the Micros installer can create "dummy" placeholders for major groups and family groups that are assigned to a range of numbers that are not orderable in the Micros system. In this way, an image can be assigned to these groups in Micros. The starting number of these placeholders must be configured in the Cisco StadiumVision Director Vendor Installation Info panel under the "Menu family group number" and "Menu major group member" options in the "Configuring the Vendor Installation Information" section.
The Micros system does not have built-in support for images to be assigned to Major and Family Groups. To work around this, the Micros installer can create "dummy" placeholders for major groups and family groups that are assigned to a range of numbers that are not orderable in the Micros system. In this way, an image can be assigned to these groups in Micros. The starting number of these placeholders must be configured in the Cisco StadiumVision Director Vendor Installation Info panel under the "Menu family group number" and "Menu major group member" options in the "Configuring the Vendor Installation Information" section.
For more information about how to add these images in the Micros system, see the Micros integration guide available from your Cisco Systems representative.
•![]() The images (or graphics) are used to display the available items on the designated TV in the concession stand or suite.
The images (or graphics) are used to display the available items on the designated TV in the concession stand or suite.
•![]() The images for items should be a non-progressive or progressive JPEG stored in 265x265 resolution. Non-standard size images will still appear within the display area but their aspect ratio (if not a square image) is not preserved.
The images for items should be a non-progressive or progressive JPEG stored in 265x265 resolution. Non-standard size images will still appear within the display area but their aspect ratio (if not a square image) is not preserved.
Accessing the DMB Image Gallery
To access the DMB Image Gallery, complete the following steps:
Step 1 ![]() Log into Cisco StadiumVision Director as an administrator or concessionaire.
Log into Cisco StadiumVision Director as an administrator or concessionaire.
Step 2 ![]() From the main menu, click Dynamic Menu Boards (Figure 1).
From the main menu, click Dynamic Menu Boards (Figure 1).
Figure 1 Dynamic Menu Boards Icon on Cisco StadiumVision Director Main Menu

The Dynamic Menu Board application interface is displayed.
Step 3 ![]() In the menu bar on the Cisco StadiumVision Custom Applications screen, click Image Gallery (Figure 2).
In the menu bar on the Cisco StadiumVision Custom Applications screen, click Image Gallery (Figure 2).
Figure 2 Image Gallery Access

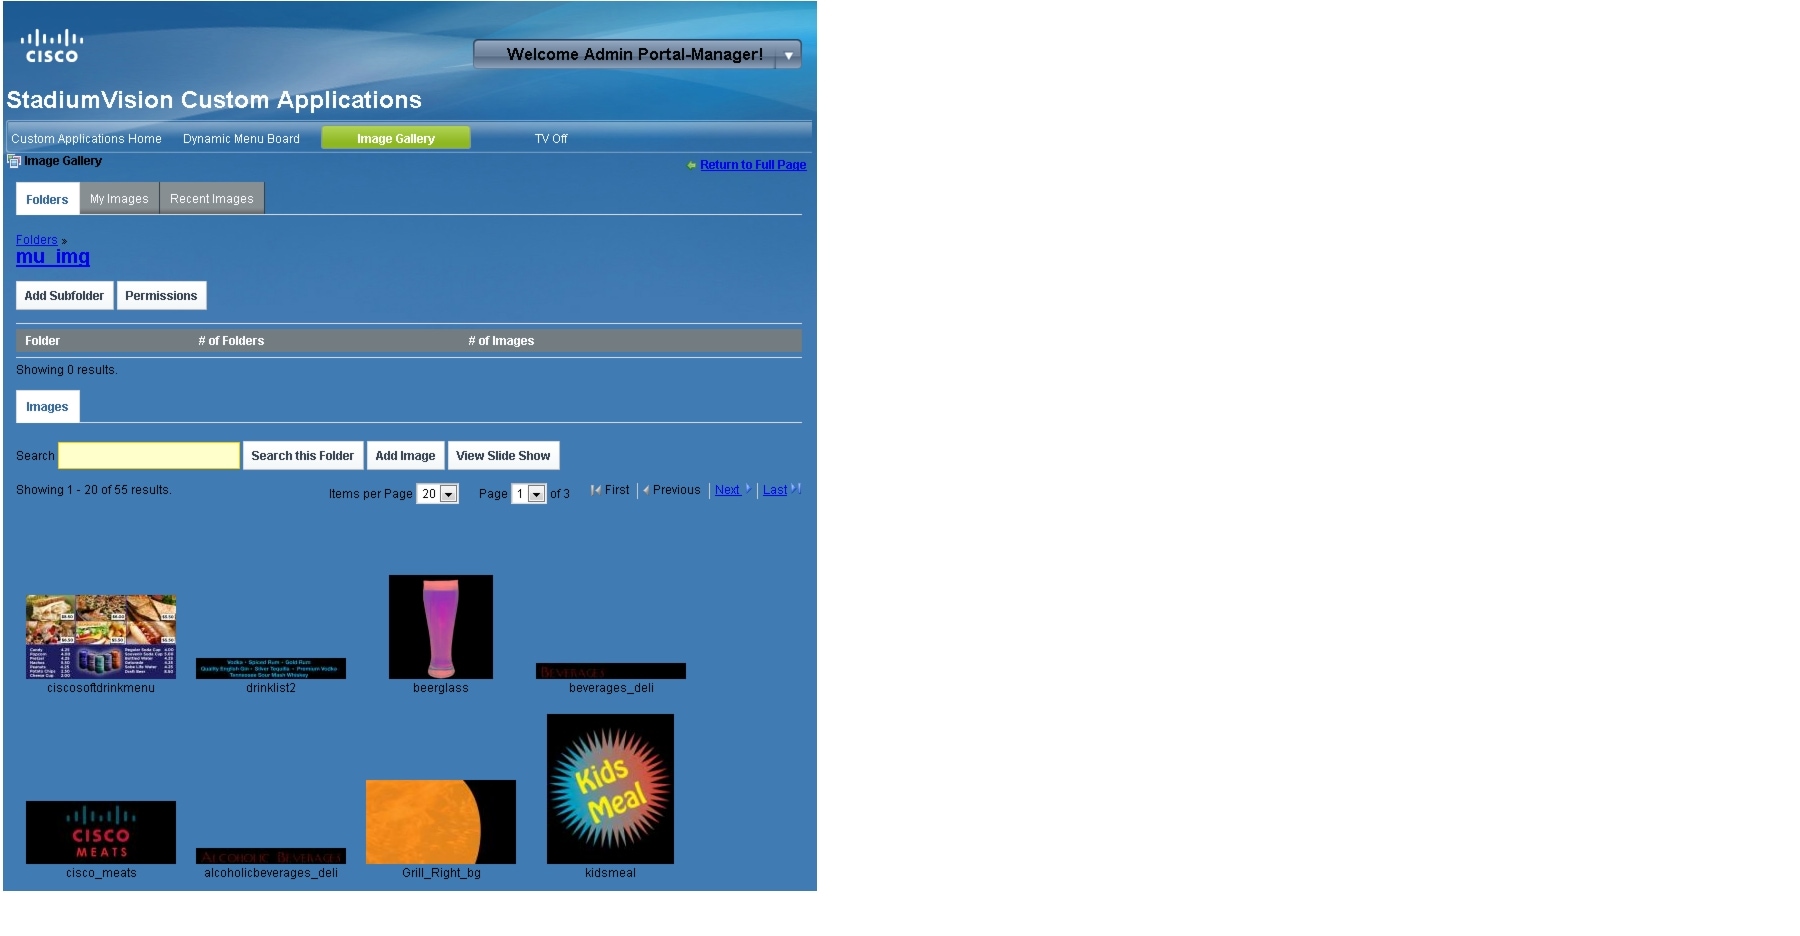
The Image Gallery folders panel is displayed showing the default mu_img folder (Figure 3).
Figure 3 Image Gallery Folders Panel

Viewing Available Images for the DMB Application
To view available images for the DMB application, complete the following steps:
Step 1 ![]() From the Folders panel in the Image Gallery, click the mu_img default folder.
From the Folders panel in the Image Gallery, click the mu_img default folder.
Figure 4 Image Gallery Folders Panel

The folder is opened and displays the first 20 images that are stored there.
Figure 5 mu_img Folder
Step 2 ![]() To view more images, do one of the following:
To view more images, do one of the following:
a. ![]() In the Items per Page box, change the number of images displayed at one time on the screen.
In the Items per Page box, change the number of images displayed at one time on the screen.
b. ![]() In the Page box, change the page number that is displayed.
In the Page box, change the page number that is displayed.
c. ![]() Move between pages by clicking First, Previous, Next, and Last.
Move between pages by clicking First, Previous, Next, and Last.
d. ![]() To automatically advance through all of the images, click View Slide Show.
To automatically advance through all of the images, click View Slide Show.
Figure 6 Image Item Controls

Uploading Images to the Image Gallery
To upload images to the Image Gallery, complete the following steps:
Step 1 ![]() From the Folders panel in the Image Gallery, click the mu_img or select another folder that you have created there.
From the Folders panel in the Image Gallery, click the mu_img or select another folder that you have created there.
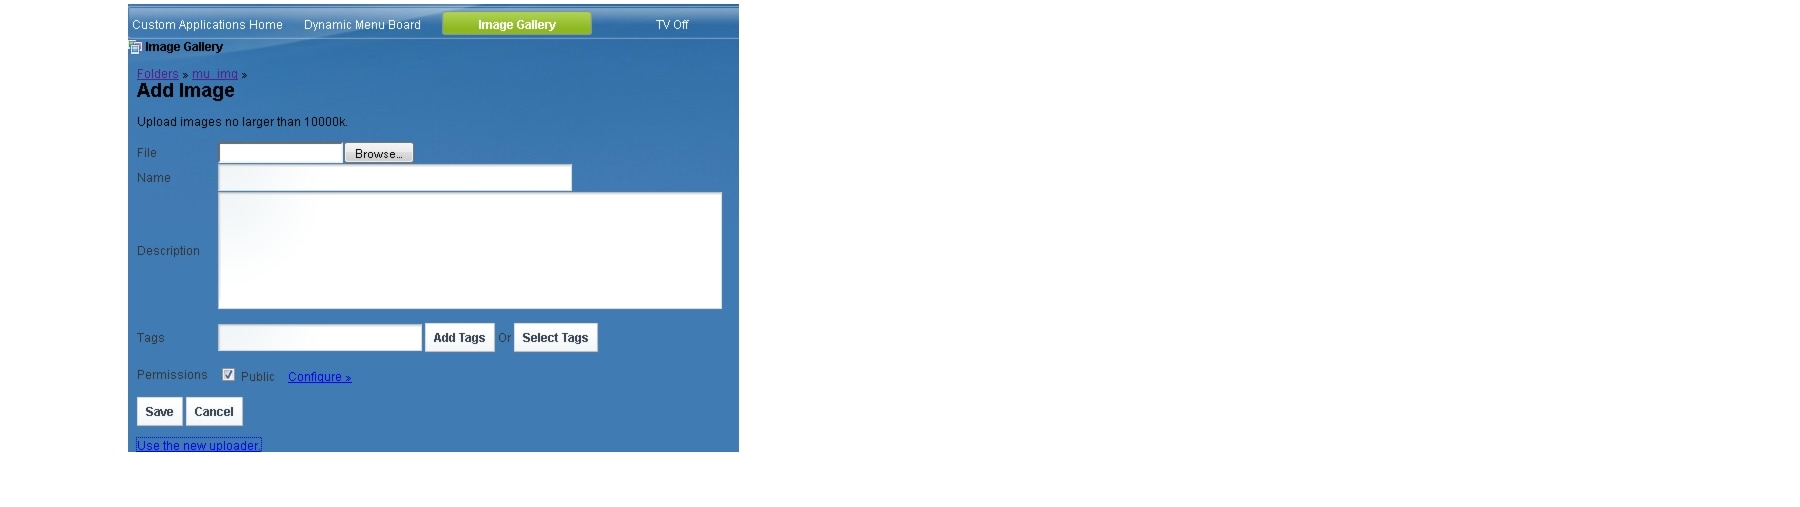
Step 2 ![]() Click Add Image (Figure 7).
Click Add Image (Figure 7).
Figure 7 Add Image Screen

Step 3 ![]() Do one of the following:
Do one of the following:
•![]() To immediately browse and select multiple images for upload from your local computer, click the Browse (you can select multiple files) link. Select one or more files and click Open.
To immediately browse and select multiple images for upload from your local computer, click the Browse (you can select multiple files) link. Select one or more files and click Open.
–![]() Confirm the files that you selected and click Upload Files (Figure 8).
Confirm the files that you selected and click Upload Files (Figure 8).
Or, to cancel the upload of a file, click Cancel Upload beside the file that you do not want to import. Click Cancel All Uploads to cancel the entire import operation.
Figure 8 Add Multiple Files

A checkmark appears beside each file when it has been successfully uploaded (Figure 9).
Figure 9 Successful Upload

–![]() Go the target folder or click My Images to view the images.
Go the target folder or click My Images to view the images.
•![]() To select and specify additional information for uploaded images, click the Use the classic uploader link. Click Browse to select one or more files (Figure 10).
To select and specify additional information for uploaded images, click the Use the classic uploader link. Click Browse to select one or more files (Figure 10).
–![]() Add Name, Description, or Tags values as desired.
Add Name, Description, or Tags values as desired.
–![]() Modify permissions for the image by clicking Configure.
Modify permissions for the image by clicking Configure.
–![]() Click Save.
Click Save.
Figure 10 Add Image Classic Uploader Interface

Note ![]() Only use the default permissions as set by the DMB application. Do not modify the permissions area or set up communities in the DMB application.
Only use the default permissions as set by the DMB application. Do not modify the permissions area or set up communities in the DMB application.
Displaying Image Characteristics
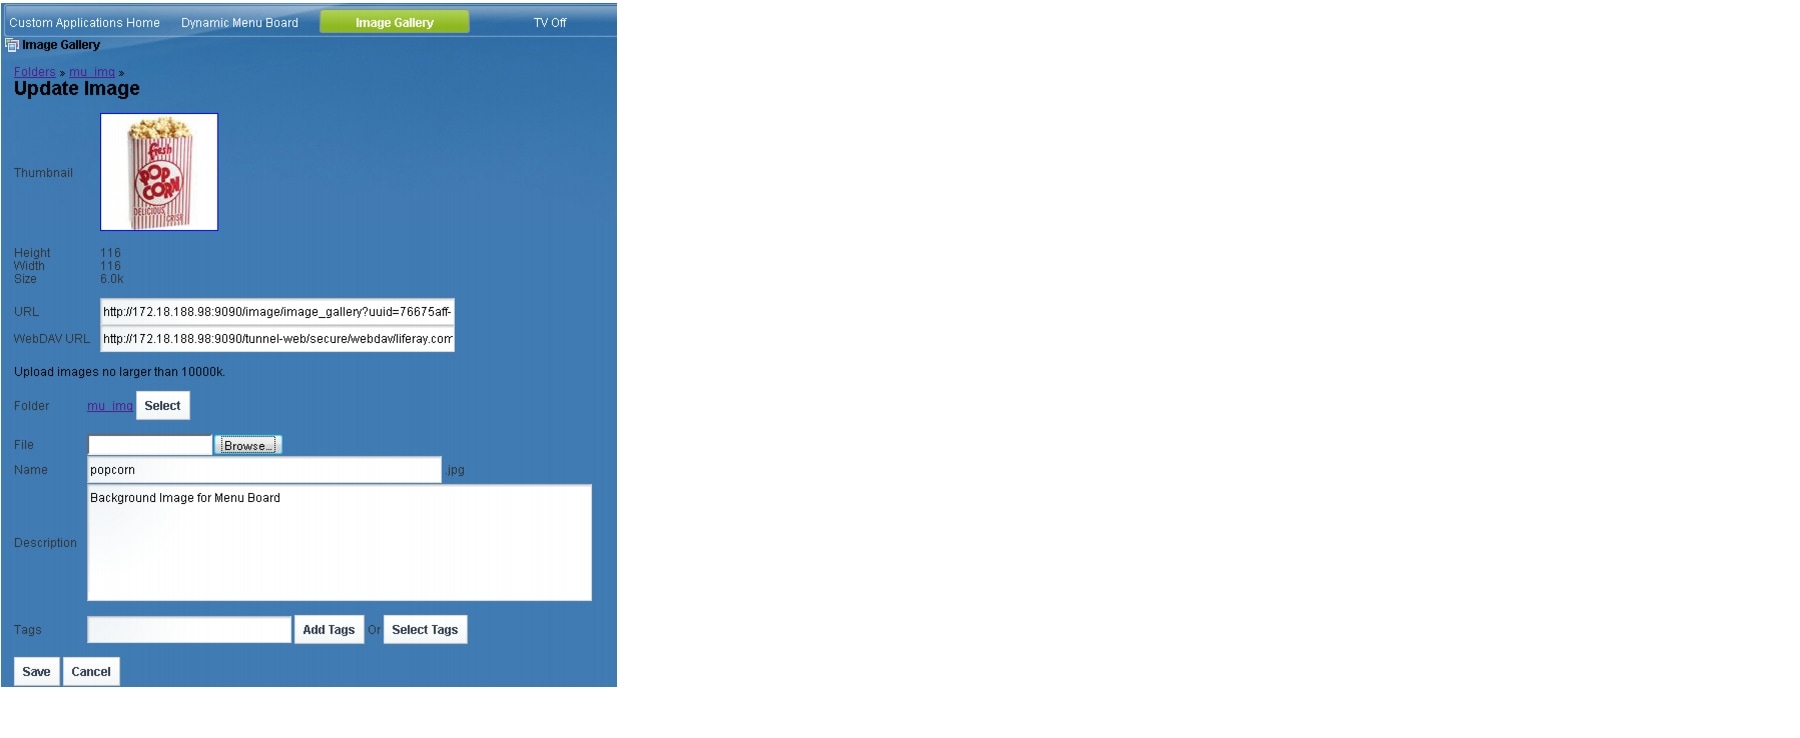
Information about an image such as its dimensions, size, description, file location, and reference URL are stored in the Image Gallery. You can view these characteristics by editing a file.
To display image characteristics, complete the following steps:
Step 1 ![]() From the Folders panel in the Image Gallery, select the folder of the image that you want information about.
From the Folders panel in the Image Gallery, select the folder of the image that you want information about.
Step 2 ![]() Click the image picture.
Click the image picture.
A dialog box opens with operations that you can for that image (Figure 11).
Figure 11 Image Operations

Step 3 ![]() Click Edit.
Click Edit.
The characteristics of the selected image are displayed. Figure 12 shows an example of image characteristics for the popcorn.jpg default image in the mu_img folder.
Figure 12 Image Characteristics
 Feedback