SSC FIPS 140-2 Level 1 Validation

Table Of Contents

SSC FIPS 140-2 Level 1 Validation

Overview

3eTI FIPS Certified Crypto Kernel Library (CKL)

FIPS Integration

3eTI CKL Driver Installer

Additional FIPS Information

Installing the 3eTI Driver

Important Notes

3eTI CKL Driver Installer Overview

Installer Command and Command-Line Options

Running the Installer without Using Command-Line Options

Uninstalling Previous 3eTI Driver Software

Silent Driver Installation for Enterprise Deployment

Installing the Driver without a Previously Installed Network Adapter

Manually Upgrading the 3eTI Driver Software

FIPS 140-2 Level I Compliant Deployment Example

Obtaining SSC and 3eTI Driver Installer Software


SSC FIPS 140-2 Level 1 Validation


This chapter contains these sections:

Overview

3eTI FIPS Certified Crypto Kernel Library (CKL)

Installing the 3eTI Driver

FIPS 140-2 Level I Compliant Deployment Example

Obtaining SSC and 3eTI Driver Installer Software

Overview

U.S. Federal agencies as well as Canadian government agencies are required to comply with the Federal Information Processing Standards Publication (FIPS) 140-2 when purchasing IT products that contain cryptographic modules. This release of SSC supports a FIPS 140-2 Level 1 module (currently in process for validation with the National Institute of Standards and Technology (NIST) and provides FIPS-compliant IEEE 802.11i (WPA2) security support.

An administrator can choose to allow enterprise employees to perform one of these operations:

Connect to only FIPS-compliant networks.

Connect to other non-FIPS-compliant networks.

This can be achieved by restricting the allowed association and encryption modes and the authentication methods in the policy section of the SSC schema.

The SSC FIPS module supports FIPS approved AES encryption modes including WPA2 Personal (WPA2-PSK) and WPA2 Enterprise (802.1X). The SSC FIPS module also supports EAP methods including EAP-TLS, EAP-PEAP, and EAP-FAST. SSC 5.1 enables administrators to support both FIPS-compliant WLAN profiles as well as optional non-compliant configurations, such as access to Wi-Fi hotspots with client VPN security enabled.

The administrator is responsible for naming the profile appropriately, to indicate whether the network is FIPS enabled.

A fully FIPS-compliant solution requires three components:

SSC 5.1 with the FIPS module

3eTI FIPS certified Crypto Kernel Library (CKL) with supported NIC adapter drivers

A FIPS-compliant network profile configuration created by the network administrator

3eTI FIPS Certified Crypto Kernel Library (CKL)

These NIC adapter chipsets are supported by the 3eTI FIPS certified CKL:

Intel 2100, 2200, 2915, and 3945 chipsets

Broadcom: All BCM 43xx chipsets that support driver version 4.100.27.0 or later

Atheros PCI chipset based NIC adapters, including Cisco AIR-CB21 wireless client adapter cards

Atheros: 5001, 5004, 5005, AR5211, and AR5212 chipsets

FIPS Integration

To ensure a FIPS-compliant solution, the network administrator is required to set up network profiles that allow only WPA2 handshakes with AES encryption with FIPS-compliant EAP types or WPA2-Personal (Pre-shared key).

The SSC Log Packager utility collects logs of the 3eTI packets.

3eTI CKL Driver Installer

For instructions on how to install the 3eTI FIPS validated CKL with supported drivers, see the "Installing the 3eTI Driver" section.

Additional FIPS Information

For additional FIPS information, refer to the "FIPS 140-2 Level I Compliant Deployment Example" section and the "Configuring a Single-User Account for FIPS" section on page C-1.

Installing the 3eTI Driver

This section provides instructions for installing the 3eTI FIPS validated Cryptographic Kernel Library (CKL) with supported drivers that integrate with SSC to provide a complete FIPS solution.

Important Notes

1. The 3eTI CKL driver installer is designed to allow only one 3eTI wireless driver to be installed on a system at any given time. A previous driver must be un-installed prior to installing a different type of driver. For a driver of the same type, uninstalling the previous driver is not necessary, because the next installation just updates the existing driver.

2. When the hardware is present and installed in the system, the installer updates the corresponding OEM wireless NIC adapter driver with the 3eTI modified driver that supports the 3eTI CKL.

3eTI CKL Driver Installer Overview

The 3eTI CKL driver installer can be started using one of these methods:

Double-clicking the .exe file—can only be used for normal driver installations in which the NIC adapter is installed in the PC before the installer is run.

Using the installer command without command-line options—can be used only for normal driver installations.

Using the installer command with command-line options—can be used for normal and pre-installed driver installations.

When you start the driver installer by double-clicking the .exe file or using the run command without command-line options, the installer performs these operations:

Detects and installs the 3eTI CKL with a supported NIC adapter driver for FIPS operation.

If multiple NIC adapters are detected that support the 3eTI CKL, the installer prompts the user for adapter selection.

If a compatible NIC adapter is not found on the PC, the installer aborts the installation and displays this error message:

The installer cannot auto-detect a NIC chipset to provide FIPS support. To enforce a pre-installation, you are required to run the installer using the command-line. For instructions or further assistance, please contact your network administrator.


Note Pre-installation scenarios are best supported with command-line options that allow the network administrator to specify specific installation options. Pre-installations are typically preformed by a network administrator and not a novice user.


Installer Command and Command-Line Options

The installer supports the following command and command-line options:

3eTI-drv-installer.exe -s -auto Type= XXXX

-s
Used to perform a silent installation without prompting the user.

-auto

Used to perform an intelligent installation, where the installer determines the supported NIC adapter in the PC and installs the appropriate driver. This causes the installer to perform the same operations as entering the command without command-line options.

Type=XXXX

Used to specify the NIC adapter chipset for a pre-installation or a normal installation.

Pre-installation means that the driver is installed before the specified NIC adapter is installed in the PC.

Normal installation means that the NIC adapter is installed before the driver is installed.

XXXX Value
Description
Intel3945

Specifies drivers for the Intel3945 chipset.

Centrino

Specifies drivers for Intel 2100, l2200, and 2915 chipsets.

Broadcom

Specifies drivers for Broadcom chipsets supported by the Installer.

Atheros

Specifies drivers for the Atheros 5001, 5004, 5005, AR5211, and AR5212 chipsets.

Cisco

Specifies drivers for the Cisco AIR-CB21 card with an Atheros chipset.


Note When using -s for silent installation, you must also specify -auto or Type=XXXX or both -auto and Type=XXXX.


Examples:

Using -auto in conjunction with -s:

Performs an intelligent installation by automatically detecting the NIC adapter that is installed.

Performs a silent installation without prompting the user.

If multiple NIC adapters are detected, selects any supported chipset.

Using -auto in conjunction with Type=XXXX:

Attempts to Install the driver for the NIC adapter chipset specified by Type=XXXX.

If the detected NIC adapters do not support the specified chipset, installs a driver for any NIC adapter with a supported chipset.

Using 3eTI-drv-installer.exe Type=Intel3945 -auto -s:

Attempts to install a driver for the Intel3945 chipset and do not prompt the user.

If a NIC adapter with the Intel3945 chipset is not detected, silently installs a driver for any other detected NIC adapter with a supported chipset.

If a NIC adapter with a supported chipset is not detected, does not pre-install any driver.

Using 3eTI-drv-installer.exe Type=Intel3945 -s:

Attempts to install a driver for the Intel3945 chipset and do not prompt the user.

If a supported NIC adapter chipset is not detected, performs a pre-install by installing the specified chipset driver.

Running the Installer without Using Command-Line Options

To perform a normal installation with the NIC adapter installed in the PC, follow these instructions:


Step 1 Start the installer by following one of these steps:

a. Use Windows Explorer to locate the 3eTI-drv-installer.exe file on your PC and double-click the filename.

b. Click Start > Run and enter this installer run command:

path / 3eTI-drv-installer.exe

Where path is the directory path to the installer file.

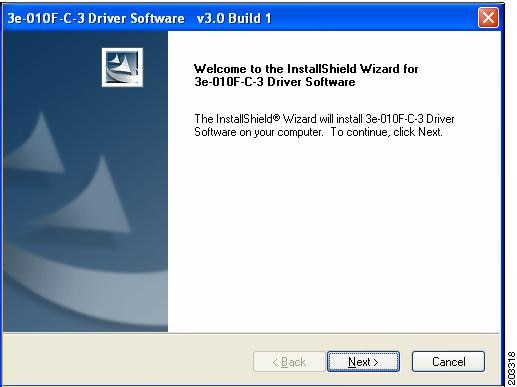
The Driver Welcome window appears (Figure 7-1).

Figure 7-1 Driver Welcome Window

Step 2 Click Next and the license agreement appears (see Figure 7-2).

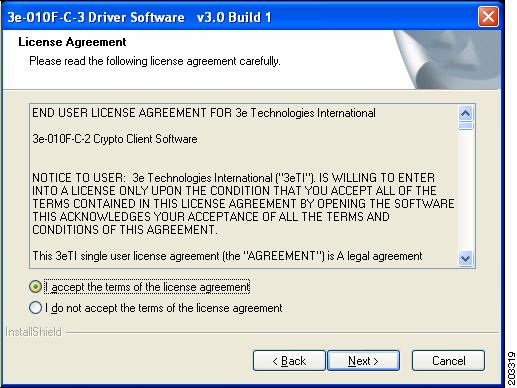
Figure 7-2 License Agreement

Step 3 Read and accept the license agreement and click Next. Figure 7-3 appears.

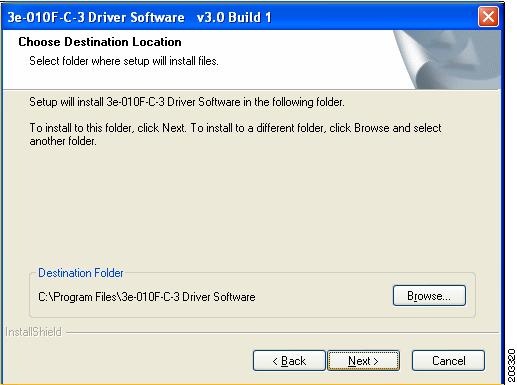
Figure 7-3 Destination Location Window

Step 4 Accept the driver software default destination folder or click Browse to locate the desired folder.

Step 5 Click Next and Figure 7-4 appears.

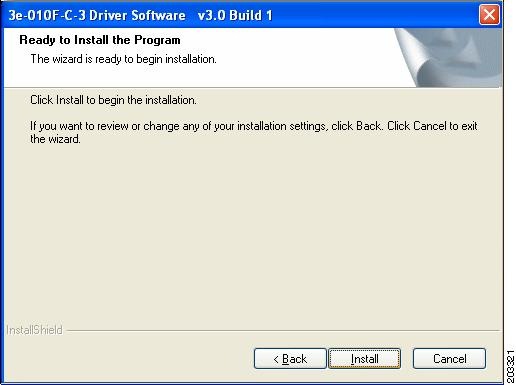
Figure 7-4 Ready to Install Window

Step 6 Click Install to start the installation process. When the installation completes, Figure 7-5 appears.

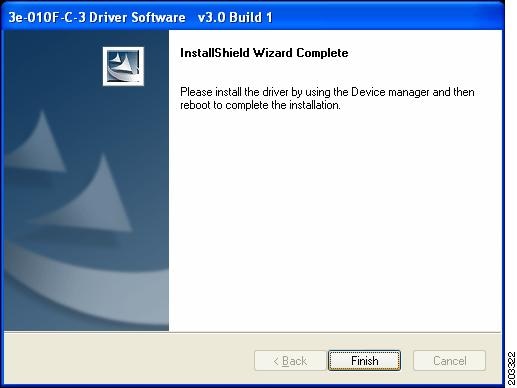
Figure 7-5 Wizard Complete Window

Step 7 Click Finish.


Uninstalling Previous 3eTI Driver Software

To uninstall previous 3eTI driver software, follow these steps:


Step 1 To uninstall the previous 3eTI driver software, click Start > Settings > Control Panel >
Add or Remove Programs.

Step 2 Choose the 3eTI driver software, such as 3e-010F-3 and click Remove. A pop-up window appears (see Figure 7-6).

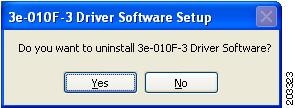
Figure 7-6 Uninstall Driver Software Pop Up

Step 3 Click Yes to uninstall the driver software. Figure 7-7 appears.

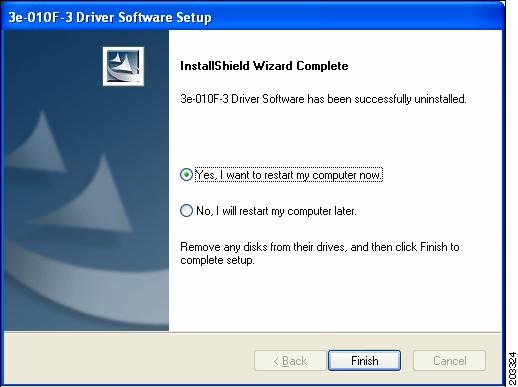
Figure 7-7 Restart Computer Now Window

Step 4 Check Yes to restart your computer.

Step 5 Click Finish. Your PC reboots to completely remove the driver software.


Silent Driver Installation for Enterprise Deployment

To run the installer using a silent mode, follow these steps:


Step 1 Run the installer by entering this command:

path / 3eTI-drv-installer.exe -s Type=XXXX

Where:

path is the directory path to the installer file.

-s indicates silent installation.

Type= XXXX specifies the chipset, such as Centrino, Intel3945, or Cisco (see the "Installer Command and Command-Line Options" section).

A pop-up status window appears indicating the driver installation is in progress and then disappears when the installation completes.


Installing the Driver without a Previously Installed Network Adapter

To pre-install the 3eTI driver on a PC without an installed NIC adapter, follow these steps:


Step 1 Start the installer by clicking Start > Run and enter this installer run command:

path / 3eTI-drv-installer.exe Type = XXXX

Where:

path is the directory path to the installer file.

Type=XXXX specifies the chipset, such as Centrino, Intel3945, or Cisco (see the "Installer Command and Command-Line Options" section).

Figure 7-1 appears.

Step 2 Perform Step 2 through Step 7 in the "Running the Installer without Using Command-Line Options" section.

Step 3 When the driver installation is complete, insert or install the NIC adapter in the PC.


Manually Upgrading the 3eTI Driver Software

Manual upgrade instructions are provided to help troubleshoot driver installation problems. This is not expected to be a part of an enterprise-wide deployment.

Follow these steps to manually upgrade the 3eTI driver software using the Windows Device Manager:


Step 1 Right-click the My Computer icon on your desktop and choose Properties.

Step 2 Click Hardware on the System Properties window, click Device Manager. Figure 7-8 appears.

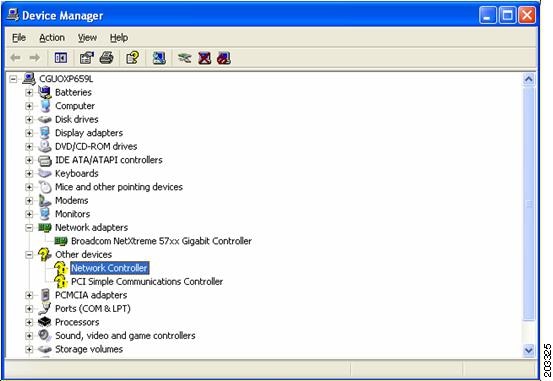
Figure 7-8 Windows Device Manager Window
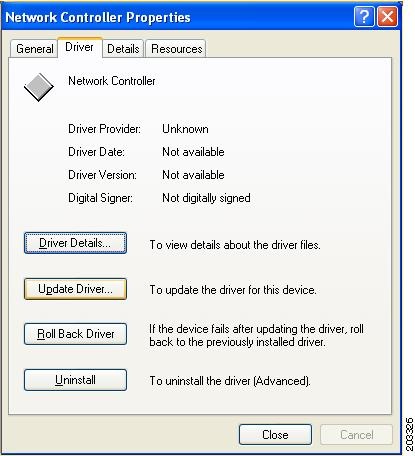
Step 3 If your Network Adapter is installed or inserted and the driver software is not installed, the device will be listed under Other devices and shown with a yellow question mark. Right-click on your network adapter and choose Properties. The Network Controller Properties window appears (see Figure 7-9).

Figure 7-9 Network Controller Properties Window
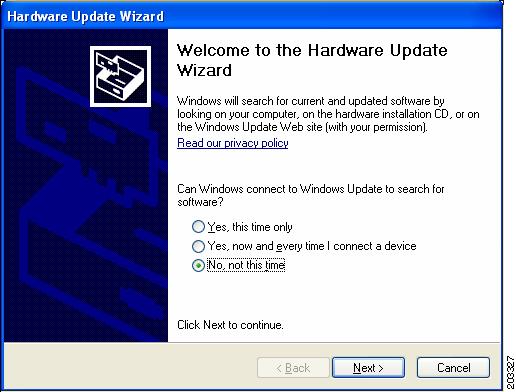
Step 4 Click Driver > Update Driver and Figure 7-10 appears.

Figure 7-10 Windows Hardware Update Wizard Window
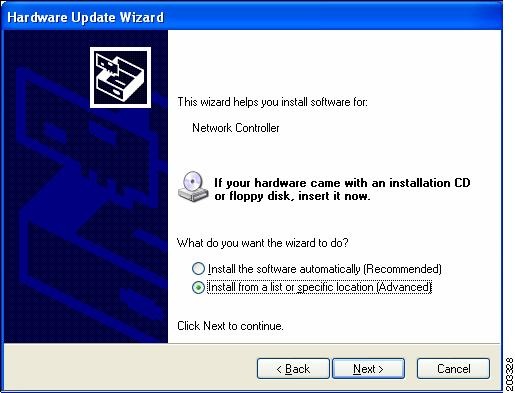
Step 5 Click No to prevent Windows from searching for the driver software and click Next. Figure 7-11 appears.

Figure 7-11 Installation CD or Floppy Disk Option Window
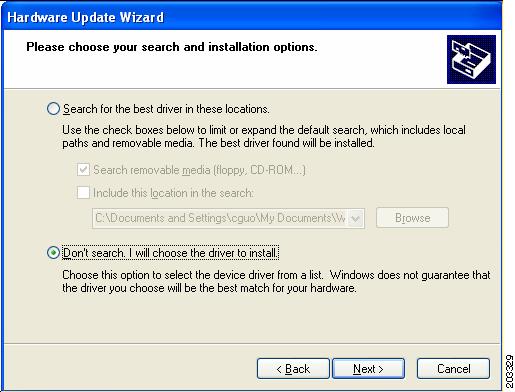
Step 6 Check Install from a list or specific location (Advanced) and click Next. Figure 7-12 appears.

Figure 7-12 Search and Installation Options Window

Step 7 Check Don't search. I will choose the driver to install and click Next. Figure 7-13 appears.

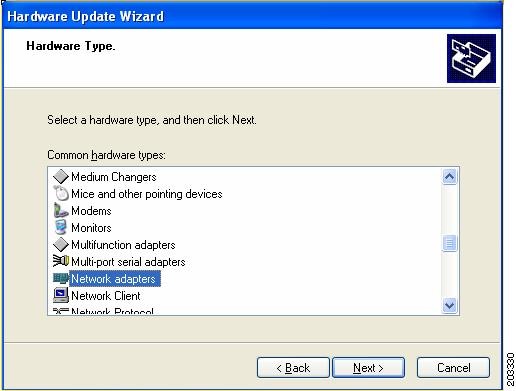
Figure 7-13 Windows Hardware Type Window

Step 8 Choose Network adapter and click Next. Figure 7-14 appears.

Figure 7-14 Select Network Adapter Window
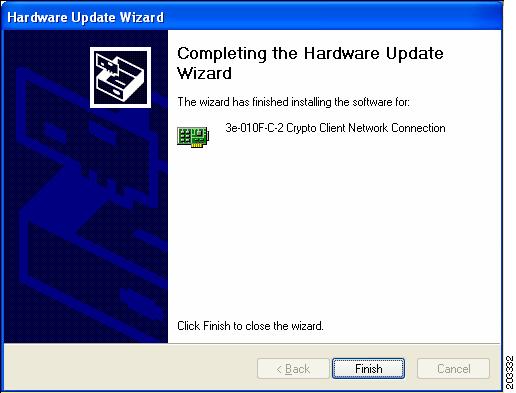
Step 9 Choose the 3eTI network connection and click Next. Figure 7-15 appears.

Figure 7-15 Installation Complete Window
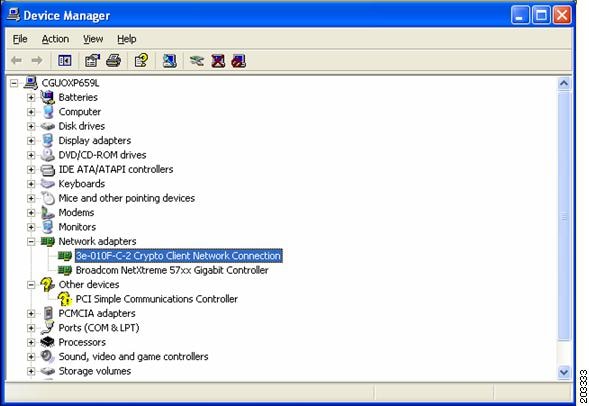
Step 10 The hardware driver installation is complete. Click Finish and the Device Manager window reappears (see Figure 7-16).

Figure 7-16 Updated Windows Device Manager Window

Step 11 To verify that the driver is installed properly, right click on the 3eTI network connection and choose Properties. Ensure that the adapter properties window indicates This device is working properly under the Device status.


FIPS 140-2 Level I Compliant Deployment Example

This section describes a deployment example that explains how to configure typical network authentication profiles for SSC to ensure compliance with FIPS 140-2 Level 1 requirements. SSC 5.1.0 is the first release that supports the Cisco SSC FIPS module, which is currently in process for validation with the National Institute of Standards and Technology (NIST). When the service starts up, it executes in the FIPS operating mode.

The network administrator is responsible to configure and deploy FIPS-compliant profiles for the intended user base. The SSC Management utility is used to create FIPS-compliant profiles for wired or wireless media.

A fully FIPS-compliant solution requires three components to be installed and configured on the client:

1. SSC running the SSC FIPS module (SSC 5.1).

2. A FIPS-compliant network profile configured by the network administrator.

3. An installed 3eTI FIPS CKL module with supported NIC adapter drivers.

When SSC and the management toolkit software are installed and running on the network administrator's PC, SSC scans for available wireless networks and displays the available networks.
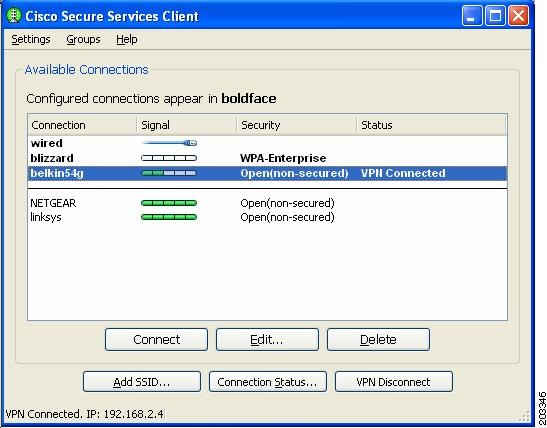

Note Only the wireless network devices with their SSID's enabled for broadcast are visible.


The configured connections displayed in bold (see Figure 7-17) can be configured by the network administrator or the user. The profiles configured by the network administrator are permanent and cannot be deleted or revised by the user.

Figure 7-17 Typical Cisco SSC Window

To configure typical SSC profiles for FIPS compliance, follow these instructions:


Step 1 Navigate to the directory in which the management toolkit is installed and double-click sscManagementUtility.exe. Figure 7-18 appears.

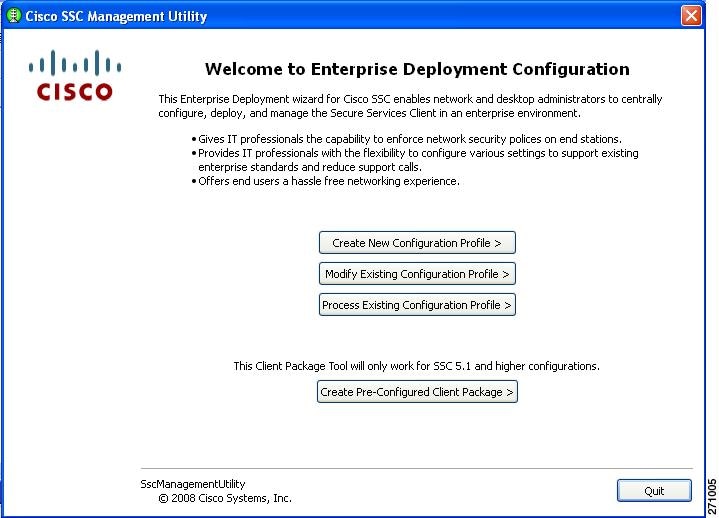
Figure 7-18 Cisco SSC Management Utility Main Window

Step 2 To create a new configuration profile, click Create New Configuration Profile. Figure 7-19 appears.

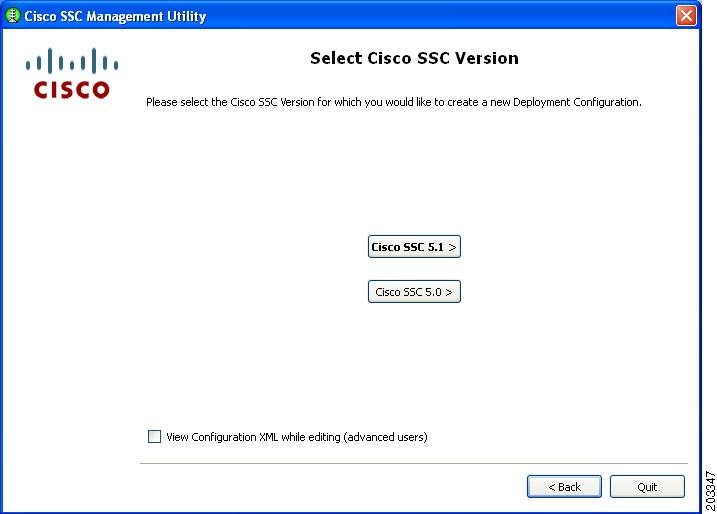
Figure 7-19 Select Cisco SSC Version Window

Step 3 Click Cisco SSC 5.1 and Figure 7-20 appears.

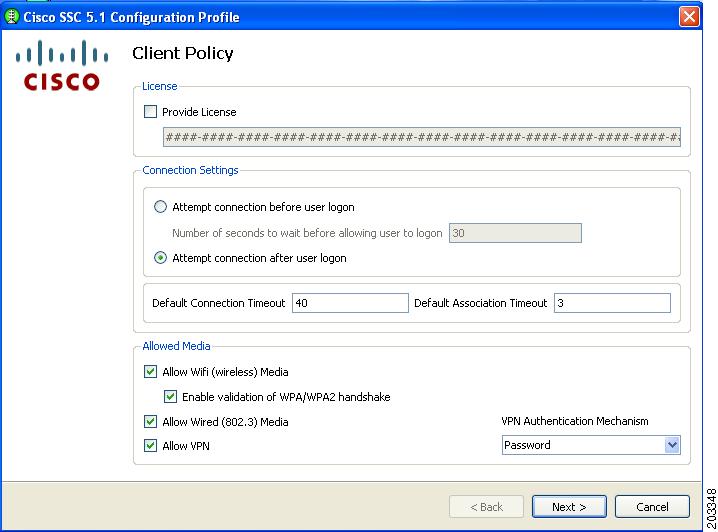
Figure 7-20 Client Policy Window

You must ensure that all needed options are checked in the Allowed Media area to allow that media to be configured, such as Allow Wired (802.3) Media.

Step 4 Follow these steps:

a. Check Allow Wi-Fi (wireless) Media.

b. Check Allow Wired (802.3) Media.

c. Check Provide License and enter the license if it is available.

d. If VPN is installed on the PC and supported on the enterprise network infrastructure, check Allow VPN. Choose the appropriate VPN Authentication Mechanism for your network.

e. Check Enable validation of WPA/WPA2 handshake. As a part of FIPS compliance, this option is enabled.


Note Some network adapter drivers might not work correctly when this option is checked.


f. Click Next and Figure 7-21 appears.

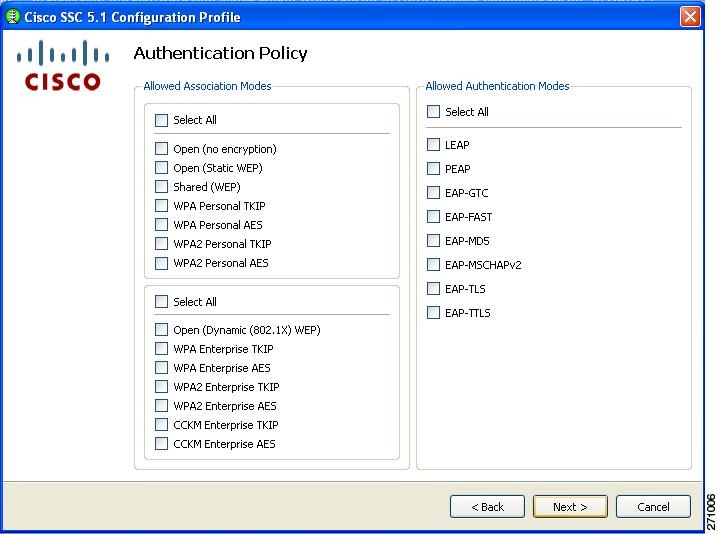
Figure 7-21 Authentication Policy Window

Step 5 Check the appropriate association and authentication modes that are allowed on your network and click Next. Figure 7-22 appears.

SSC can be configured to support both FIPS-compliant and non-compliant profiles. FIPS-compliant profiles include WPA2 Personal AES and WPA2 Enterprise AES. Supported EAP types with WPA2 Enterprise AES include: EAP TLS, PEAP, and EAP Fast.

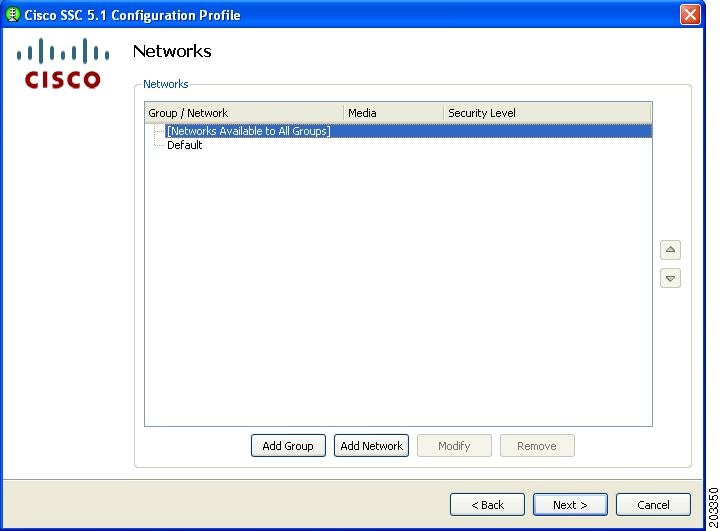
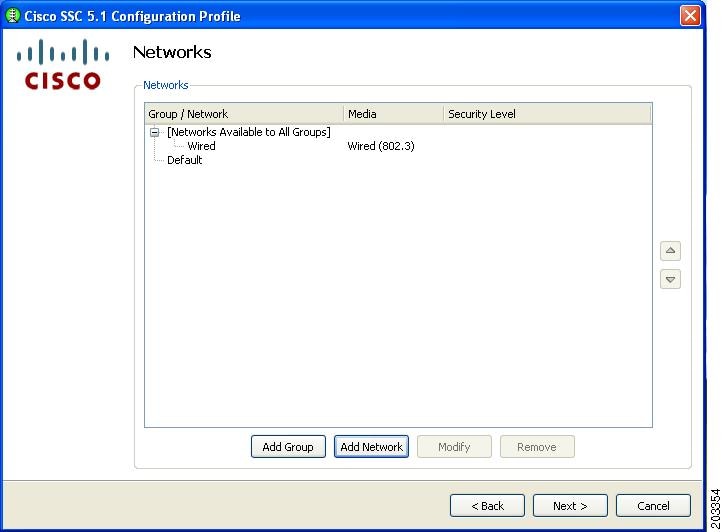
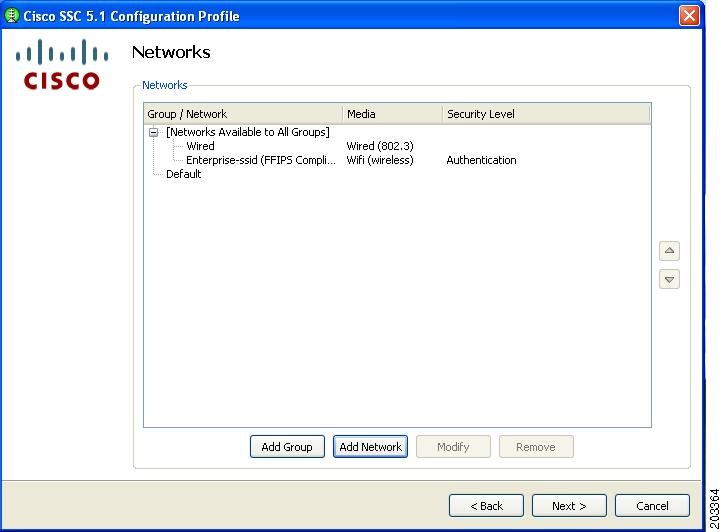
Figure 7-22 Networks Window

Step 6 Click Add Network. The first network to create is a wired network. This causes SSC to limit the connections to only one at a time. Figure 7-23 appears.

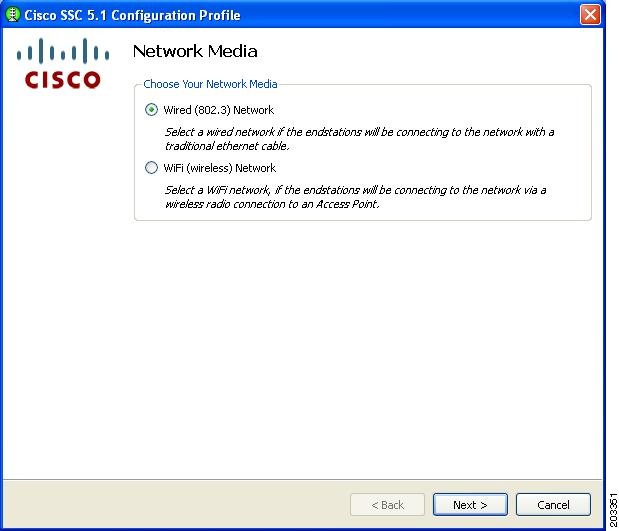
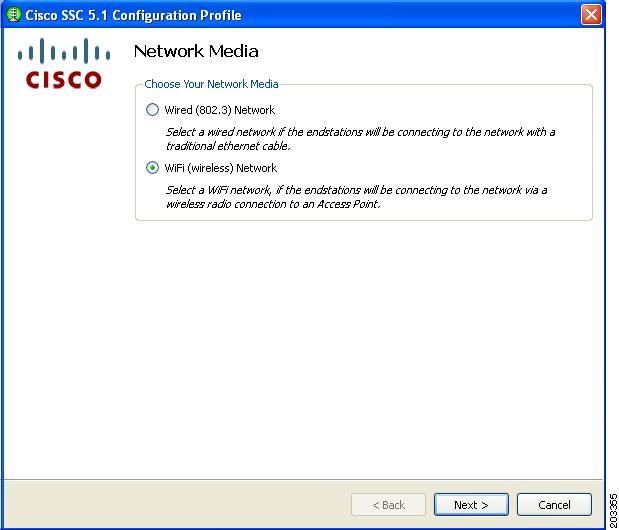
Figure 7-23 Network Media Window

Step 7 Check Wired (802/3) Network and click Next. Figure 7-24 appears.

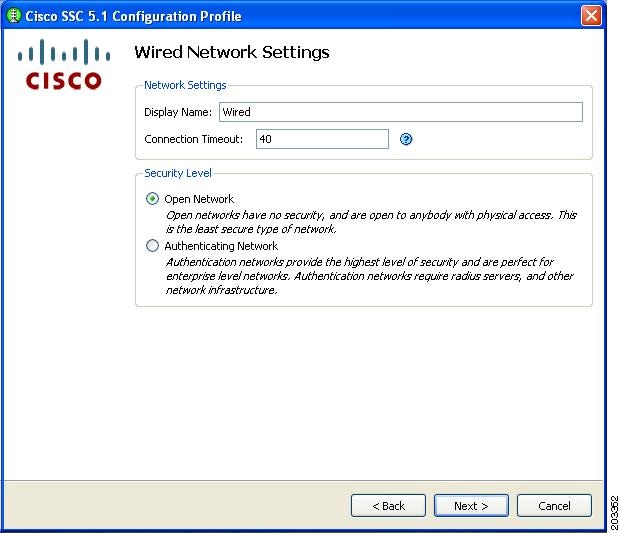
Figure 7-24 Wired Network Settings Window

Step 8 Enter Wired in the Display Name field and check Open Network.

Step 9 Click Next and Figure 7-25 appears.

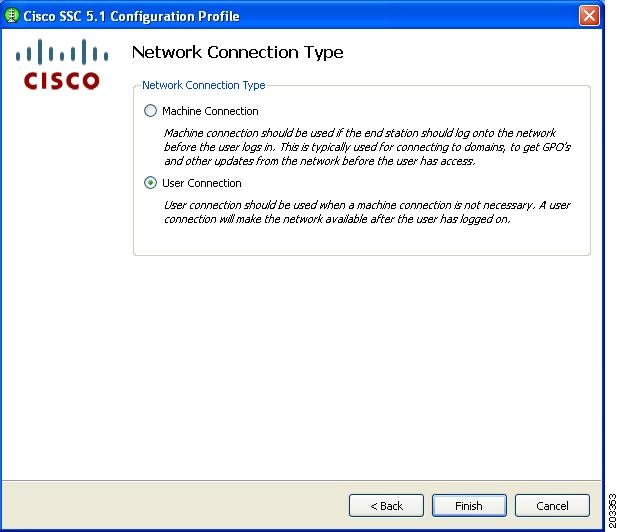
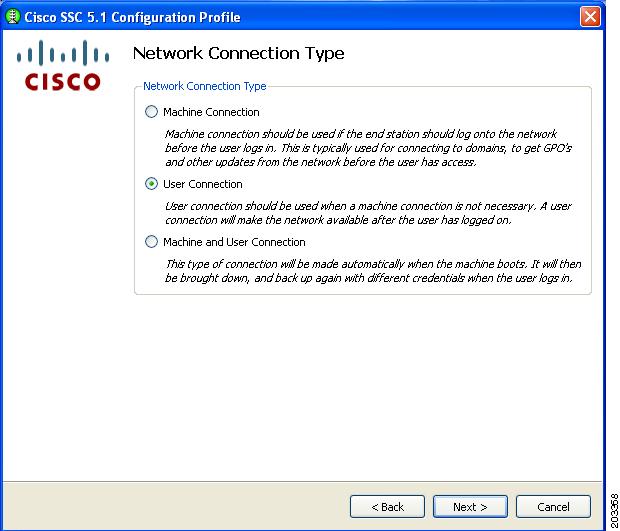
Figure 7-25 Network Connection Type Window

Step 10 Check User Connection and click Finish. You have configured your wired non-authentication port. The next operation is necessary to configure a FIPS-compliant wireless authentication profile.

Figure 7-26 appears.

Figure 7-26 Networks Window

In Figure 7-26, the wired network is shown configured.

Step 11 Click Add Network and Figure 7-27 appears.

Figure 7-27 Network Media Window

Step 12 Check Wi-Fi (wireless) Network and click Next. Figure 7-28 appears.

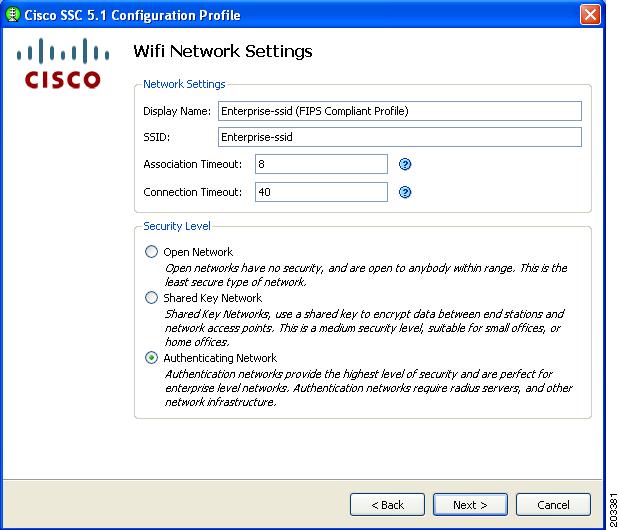
Figure 7-28 Wi-Fi Network Settings Window


Note Some smartcard authentication systems require almost 60 seconds to complete an authentication. When using a smartcard, it might be necessary to increase the Connection Timeout value.


Step 13 Follow these steps:

a. Enter the Display Name for the profile. It is recommended that the display name set by the network administrator to indicate that it is a FIPS-compliant profile, such as adding FIPS in addition to the display name (see Figure 7-28). This profile identification indicates that when connected using this administrator-deployed profile, the network authentication profile conforms to FIPS requirements.

b. Enter the SSID value in the SSID field.The SSID should be set to a valid enterprise SSID. The SSID value is case sensitive.

c. Change the Association Timeout from the default of 3 to value of 8 to 10 seconds.


Note The Cisco AIR-CB21client adapter is not sensitive to this value; however, other wireless client adapters, such as the Intel 3945 client adapter require the increased association timeout value.


d. Click Next.

Step 14 When the CCX Settings window appears, ignore the settings and click Next. Figure 7-29 appears.


Note The CCX Setting window options are not applicable to Windows XP or Windows 2000 environments.


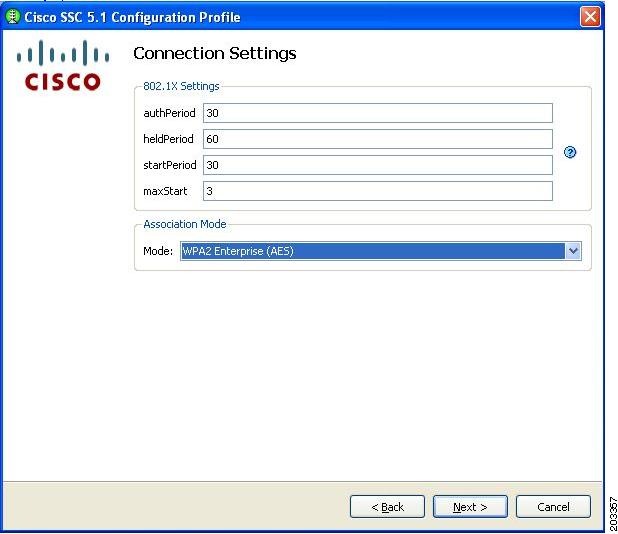
Figure 7-29 Connection Settings Window

Step 15 Click the Association Mode drop-down arrow and choose WPA2 Enterprise (AES).

Step 16 When configuring the 802.1X settings, Cisco recommends that you use the 802.1X default settings.

These settings are optimized for several different wireless environments and for a wired authenticating profile. Other setting values can be used, but they might not produce optimized operation.

Step 17 Click Next and Figure 7-30 appears.

Figure 7-30 Network Connection Type Window

Any of the three options can be selected and will be FIPS-compliant.

Step 18 For this example, check User Connection and click Next. Figure 7-31 appears.

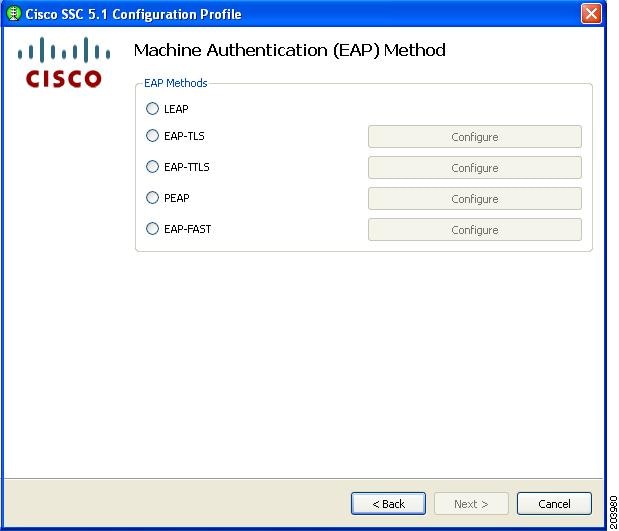
Figure 7-31 User Authentication (EAP) Method Window

Step 19 Perform one of these steps with the following EAP methods:

Check EAP-TLS and click Next. Go to Step 20.

Check PEAP and click Next. Go to Step 21.

Check EAP-Fast and click Next. Go to Step 22.

Step 20 If you checked EAP-TLS, Figure 7-31 appears. Follow these steps:

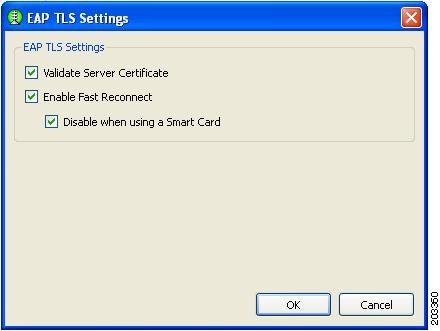
Figure 7-32 EAP-TLS Settings Window

a. In a FIPS-compliant profile, check Validate Server Certificate.

When using smartcards, there are two typical usage scenarios:

The smartcard must be inserted for every smartcard re-authentication.

The smartcard must be inserted for the first authentication, then the smartcard can be removed and only needs to be reinserted when the user logs out.

Both usage scenarios are acceptable for a FIPS-compliant profile.

b. Click OK. The User Authentication (EAP) Method window reappears.

c. Click Next on the User Authentication (EAP) Method window and go to Step 23.

Step 21 If you checked PEAP, Figure 7-33 appears.

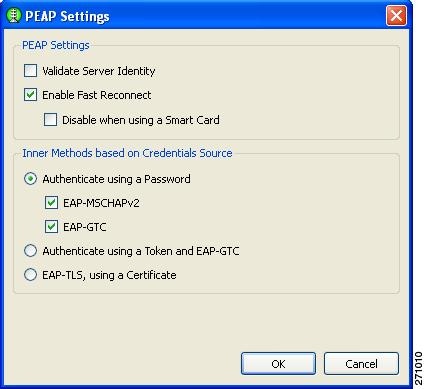
Figure 7-33 PEAP Settings Window

For a FIPS-compliant profile, follow these steps:

a. Check Validate Server Identity.

b. Click OK and the User Authentication (EAP) Method window reappears.

c. Click Next on the User Authentication (EAP) Method window and go to Step 23.

Step 22 If you checked EAP-Fast, Figure 7-34 appears.

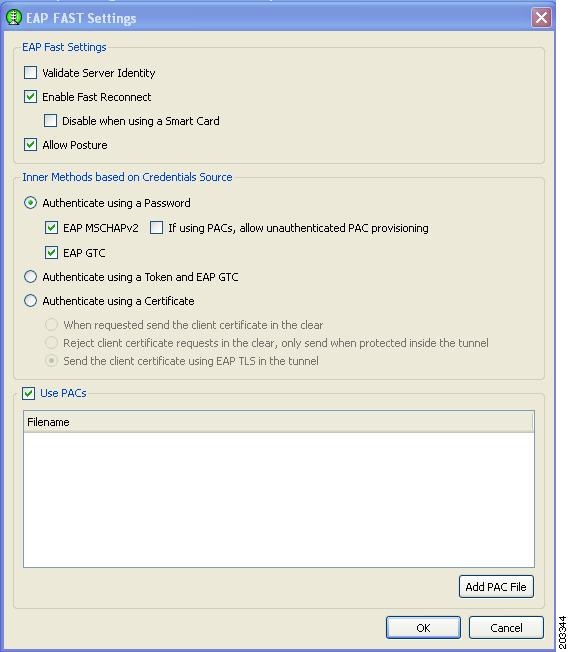
Figure 7-34 EAP-Fast Settings Window

For a FIPS-compliant profile, follow these steps:

a. Check Validate Server Identity.

b. Click OK the User Authentication (EAP) Method window reappears.

c. Click Next on the User Authentication (EAP) Method window and go to Step 23.

Step 23 If you previously checked Validate Server Identity, Figure 7-35 appears.

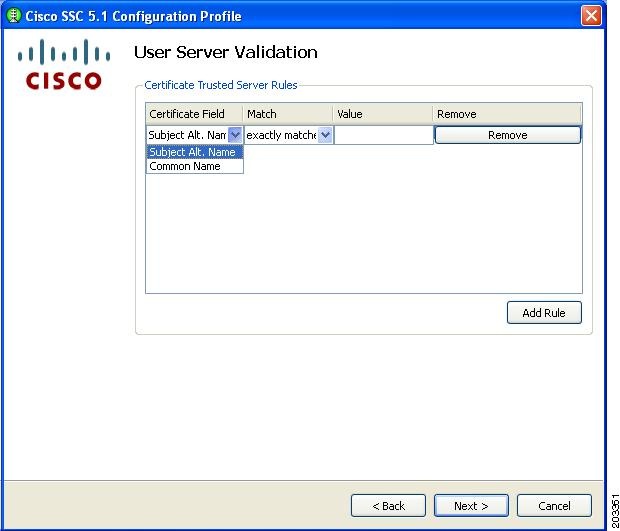
Figure 7-35 Certificate Trusted Server Validation Rules Window

Step 24 Optional, define server validation rules by following these steps:

a. Click Add Rule.

b. Click the drop-down arrows and highlight the desired options.

c. Enter a value in the Value field.


Note Click Remove to remove the rule.


d. When complete, click Next and Figure 7-36 appears.

Even when certificate rules are not created, these validations occur implicitly to satisfy FIPS:

The received server certificate has not expired.

The server certificate chain is valid.

The root node of the server certificate chain is trusted.

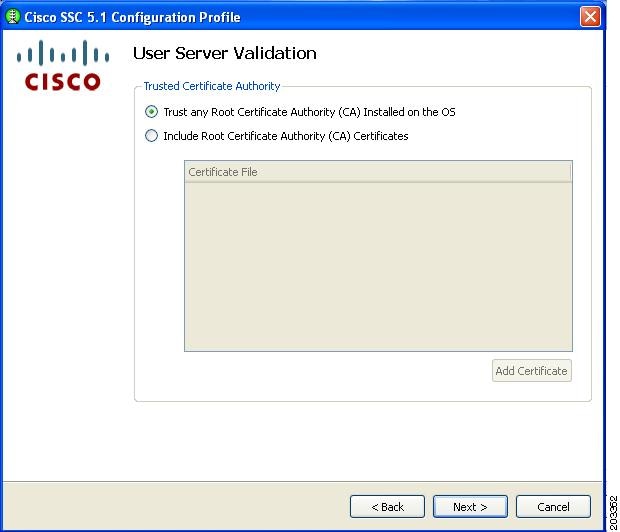
Figure 7-36 Trusted Server Authority Validation Window

Step 25 Accept the default setting or check the desired option. Click Next and Figure 7-37 appears.

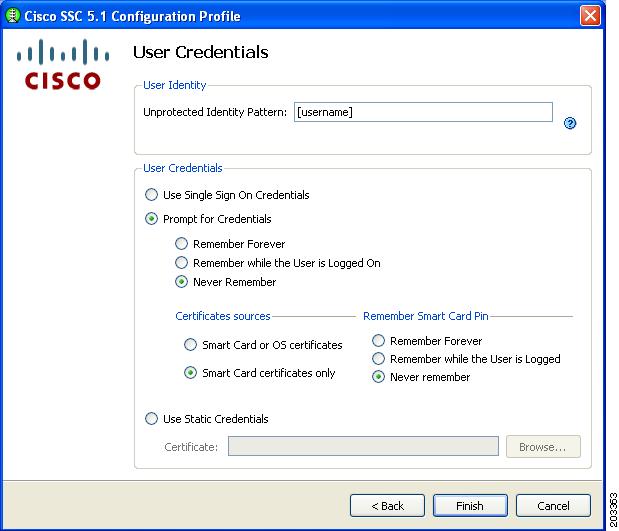
Figure 7-37 Credentials Window

Step 26 Follow these steps:

a. Enter a username the Unprotected Identity Pattern field.

b. Check one of these options:

Single Sign On Credentials

Prompt for Credentials

Use Static Credentials

c. If using Prompt for Credentials, check one of these options:

Never Remember

Remember while the User is Logged On

For FIPS-compliance, Never Remember and Remember while the User is Logged On are the only acceptable selections. All relevant security critical parameters are handled securely and cleared when no longer needed.


Note The Single Sign On and Use Static Credentials can be used in FIPS enabled mode.


d. Click Finish and Figure 7-38 appears.

Figure 7-38 Configured Networks Window

This window lists the networks that have been created for this profile.

Step 27 Click Next and Figure 7-39 appears.

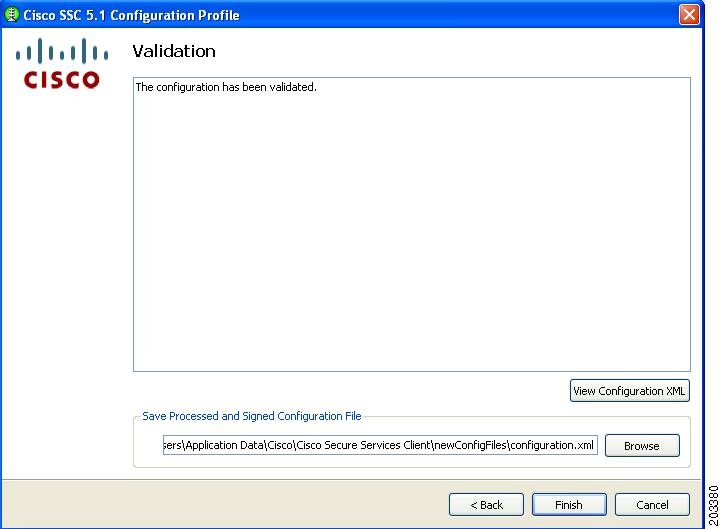
Figure 7-39 Validation Window

This window allows the administrator to view the configuration XML and save the configuration in an encrypted file for deployment. The administrator can also save an un-encrypted file for review, but this file must never be deployed.

Step 28 Follow these steps:

a. Accept the default location for storage of the encrypted configuration file or click Browse to browse to a different folder.

b. Optional, uncheck Save Original Configuration File.

c. Click Finish.

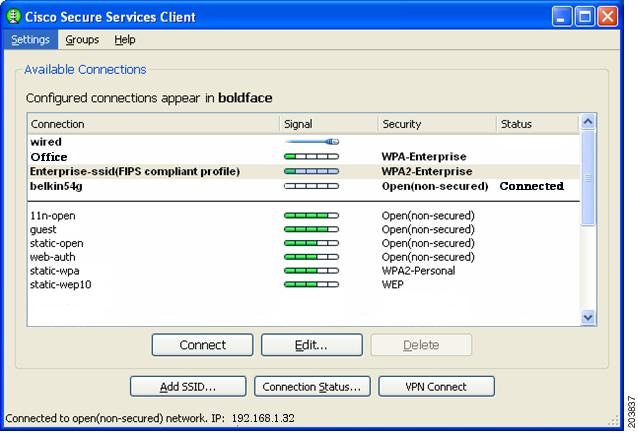
The configuration is now complete. If you open the SSC main window (see Figure 7-40), the new Enterprise-ssid (FIPS-compliant profile) have been added to the list of connections.

Figure 7-40 Available Connections Window

In Figure 7-40 the Enterprise-ssid profile is easily identified as a FIPS-compliant profile. For this profile, the delete button is disabled so that the user cannot delete the profile. Also, all the administrator configured credential settings are not available, when the Edit button is clicked. The only option that can be user-configured is to automatically initiate VPN connections on the FIPS-compliant network connection between the access point and the client PC.


Obtaining SSC and 3eTI Driver Installer Software

SSC 5.1.0 software is available from the Cisco Software Center:

SSCMgmtToolKit—Contains the sscManagementUtility and support files.

Cisco_SSC-XP2K_5.1.0.zip—Contains the SSC files. For SSC license information, refer to the "SSC License Information" section on page 2-2.

CiscoClientUtilities_5.1.0.zip—Contains the Log Packager.

The SSC software can be obtained from the Cisco Software Center at this URL:

http://www.cisco.com/public/sw-center/index.shtml

Click Wireless Software > Client Adapters and Client Software > Cisco Secure Services Client and follow the prompts to 5.1.0 under Latest Releases.


Note You must register with Cisco.com or be a registered user to download software.


The FIPS 3eTI CKL supported driver installer cannot be downloaded from the Cisco Software Center and must be ordered from Cisco. A non-expiring license for the SSC software can be ordered from Cisco using these product numbers:

AIR-SC5.0-XP2K—Cisco SSC Release 5.1 software license.

AIR-SSCFIPS-DRV—3eTI CKL supported driver installer

The ordered 3eTI CKL supported driver installer software is shipped to the customer on a product CD.


Note The SSCMgmtToolKit (SSC Management Utility) and the Cisco Client Utilities are only available for download from the Cisco Software Center.