Downloads |
 Feedback Feedback
|
Table Of Contents
Connecting Configured Connections
Configuring VPN Connection Options
Using an Open Non-Secured Network Connection
Configuring a WEP or Shared WEP Connection
Configuring a WPA Personal or a WPA2 Personal Connection
Configuring an 802.1X Connection
Configuring a New Connection Using the Add SSID Button
Managing Configured Connections
Editing a User-Created Configured Connection
Obtaining Connection Status Information
Managing Network Connection Groups
Using Cisco SSC
This chapter provides an overview of SSC and the main SSC GUI features. The chapter contains these sections:
•
Using the Main SSC GUI Window
Overview
SSC runs from two logical interfaces:
•
•
The SSC tray icon interface simplifies the user interface similarly to a Windows wired connection icon. The SSC tray icon allows the user to manage wireless connections using a few simple clicks.
The main SSC GUI interface adds functionality for configuring networks, enabling or disabling the client, configuring VPN, and viewing network information such as signal strength and the complete network scan list.
Using the Main SSC GUI Window
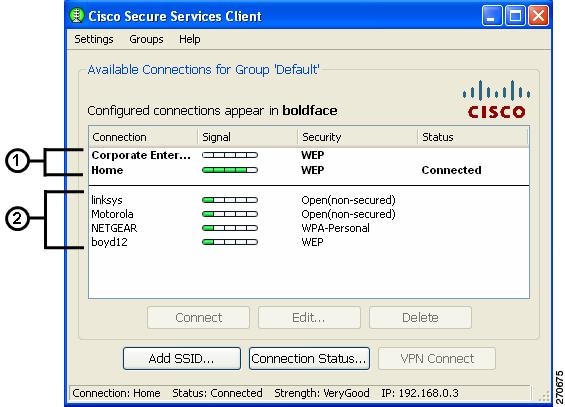
The main SSC GUI window contains three main areas to help the user configure, control, and manage networks:
•
•
•
Figure 4-1 Main SSC GUI Window
Table 4-1 describes the main SSC GUI window components.
Connecting Configured Connections
The main SSC GUI window contains a list of network administrator-deployed pre-configured connection profiles and a list of user-created configured connection profiles. SSC supports two modes for making connections:
•
•
Automatic Connections
In the normally preferred automatic connection mode, SSC automatically chooses the best available configured connection. If the group contains both wired and wireless connections, the wired connection has higher priority. When a connection is unsuccessful or broken, SSC attempts a connection with the next entry in the configured connections list.
Note
The SSC criteria for restarting at the top of the configured connection list include:
•
•
•
In automatic connection mode, the user can override the SSC connection criteria by performing one of these operations:
•
•
•
These operations cause SSC to break the current connection and attempt to initiate a connection with the selected configured connection profile. SSC remains in the automatic connection mode.
If the connection attempt is unsuccessful, SSC attempts to connect to the first configured connection in the list.
Exclusive Connection Mode
SSC allows the user to specify an exclusive connection (see Figure 4-2). This causes SSC to break an existing connection and forces SSC to exclusively attempt to connect to the new specified selection. If the connection fails or is broken, SSC does not attempt to switch to an alternate connection.
Figure 4-2 Connect Exclusively Option
The user can activate the exclusive connection option by right-clicking a configured connection and choosing the Connect Exclusively option.
To exit the exclusive connection mode and revert to automatic connection mode, the user must right-click the connection and choose the Connect Exclusively option again.
The typical reason for using the exclusive connection mode is to force SSC to drop an existing wired connection and to connect only to the specified wireless connection.
Creating New Connections
The user can manually configure a new connection several ways:
•
•
•
•
–
–
SSC Security Options
Using the SSC GUI, the user can create new connection profiles using these security options:
•
•
•
•
•
•
•
•
•
•
•
•
•
Note
Configuring VPN Connection Options
The bottom section of all the connection security configuration windows allows the user to configure VPN connection options. To configure the VPN options, the user performs these operations:
•
•
Note
Note
Note
Using an Open Non-Secured Network Connection
When the user selects an Open(non-secured) network from the scan-list, SSC automatically reassigns the connection as a configured connection, moves the connection to the bottom of the configured connections list, and initiates the connection (unless a higher priority wired connection is available).
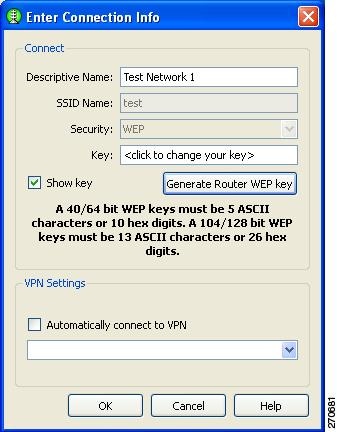
Configuring a WEP or Shared WEP Connection
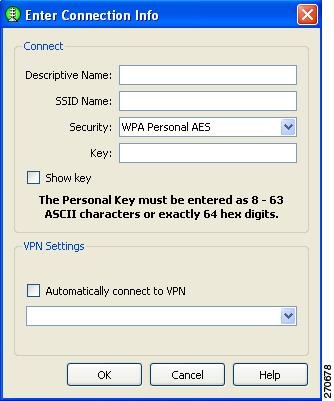
When a user selects a WEP or Shared-WEP network from the scan-list, the Enter Connection Info window appears (Figure 4-3). The user needs to provide the key or generate a pass-phrase-based WEP key.
Figure 4-3 WEP or Shared WEP Information
Some routers use a pass-phrase to create a unique WEP key. The Generate Router WEP key button can be used to enter a router pass-phrase of 64 bits (10 hexadecimal digits) or 126 bits (26 hexadecimal digits) that SSC uses to create a WEP key.
Configuring a WPA Personal or a WPA2 Personal Connection
When the user selects a network with WPA Personal or WPA2-Personal security options, the user needs to provide the personal key. SSC supports these WPA Personal and WPA2 Personal security types:
•
•
•
•
The Enter Connection Info window allows the user to configure WPA Personal or WPA2 Personal security settings. (Figure 4-4)
•
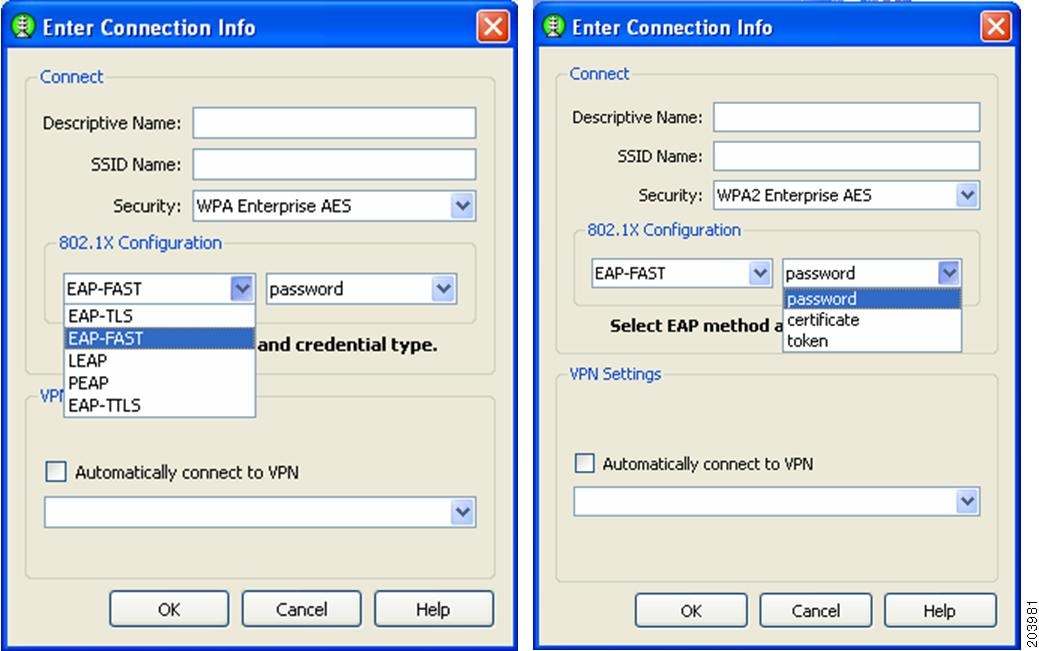
Configuring an 802.1X Connection
When the user selects a network with 802.1X security from the scan list, the user needs to choose the EAP method and the type of credentials that are used (see Figure 4-4).
Figure 4-4 802.1X Security Information
Note
SSC supports these 802.1X security types:
•
•
•
•
•
•
Note
Click the EAP method drop-down arrow and choose one of these SSC supported EAP methods:
•
•
•
•
•
Click the certificate type drop-down arrow and choose one of these SSC supported certificate types:
•
•
•
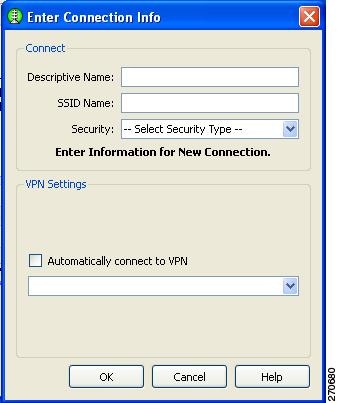
Configuring a New Connection Using the Add SSID Button
When the user clicks the Add SSID button, the window shown in Figure 4-5 appears.
Figure 4-5 New Connection Information
The user needs to configure these Security options:
1.
2.
3.
4.
Managing Configured Connections
From the main SSC GUI window, the user can edit or delete user-created configured connections.
Note
To delete a user-created configuration connection, the user needs to right-click the desired configuration connection and choose the Delete option.
Editing a User-Created Configured Connection
The main SSC GUI window provides these edit options for user-created configured connections:
•
•
Figure 4-6 Configured Connection Profile Fields
The user can edit these connection profile fields:
•
•
Note
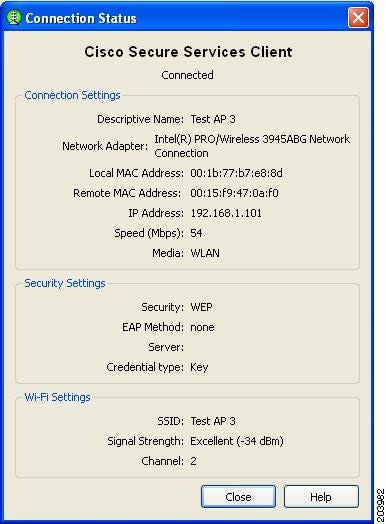
Obtaining Connection Status Information
The user can obtain current connection status information by performing one of these operations:
•
•
Figure 4-7 SSC Connection Status Window
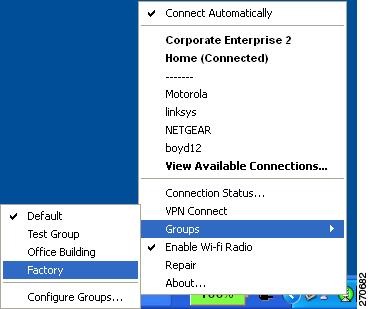
Selecting Network Groups
SSC supports a group feature that allows the user to partition network connections into convenient groups. SSC provides two ways for the user to select and activate a configured connection group:
•
–
•
–
Figure 4-8 SSC Tray Icon Right-Click Menu
Changing the active group causes SSC to perform these operations:
•
•
•
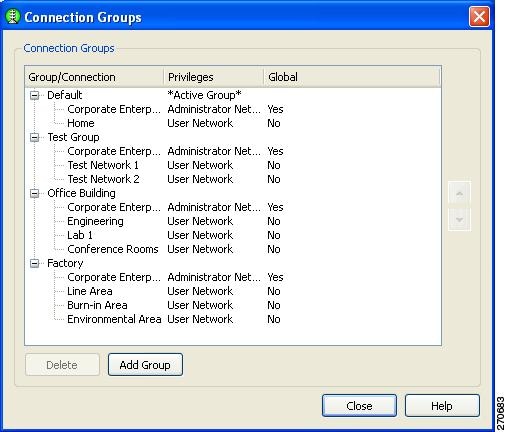
Managing Network Connection Groups
The user can manage network connection groups by using the Connection Groups window. To open the Connection Groups window, the user can perform one of these operations:
•
•
Figure 4-9 Connection Groups Window
From the Connection Groups window, the user can add new groups or delete user-created network connections or groups.
Note
Menu Controls
The main SSC GUI menu contains three menu selections:
•
•
•
Settings Menu
When the user clicks Settings, a drop-down list appears (see Figure 4-10).
Figure 4-10 Settings Menu Options
The Settings menu contains these options:
•
–
–
•
–
–
Groups Menu
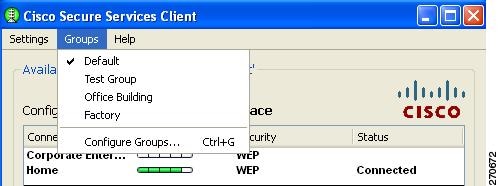
When the user clicks Groups, a drop-down list appears (see Figure 4-11).
Figure 4-11 Main SSC GUI Groups
The Groups menu provides these features:
•
–
–
•
Help Menu
When the user clicks Help, a drop-down menu appears with these options:
•
•
–
–
–
•
Using the SSC Tray Icon
The SSC tray icon provides two convenient ways for the user to activate a desired connection:
•
•
Note
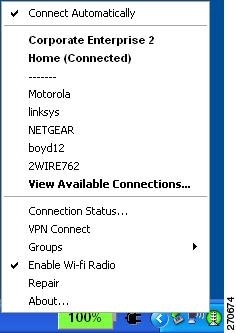
Figure 4-12 SSC Icon Right-Click Menu
The SSC icon right-click menu provides shortcuts to many of the controls available on the main SSC GUI window:
•
–
–
•
–
–
–
•
–
After the user enters the needed security information, if the connection attempt fails, SSC continues to search for the next best connection from the configured connection list. The new network connection remains in the configured connection list.
•
–
•
–
•
–
•
•
•