Feedback
Contents
- Managing Web Authentication
- Obtaining a Web Authentication Certificate
- Information About Web Authentication Certificates
- Obtaining a Web Authentication Certificate (GUI)
- Obtaining a Web Authentication Certificate (CLI)
- Web Authentication Process
- Guidelines and Limitations
- Choosing the Default Web Authentication Login Page
- Information About Default Web Authentication Login Page
- Guidelines and Limitations
- Choosing the Default Web Authentication Login Page (GUI)
- Choosing the Default Web Authentication Login Page (CLI)
- Example: Creating a Customized Web Authentication Login Page
- Example: Modified Default Web Authentication Login Page Example
- Using a Customized Web Authentication Login Page from an External Web Server
- Information About Customized Web Authentication Login Page
- Guidelines and Limitations
- Choosing a Customized Web Authentication Login Page from an External Web Server (GUI)
- Choosing a Customized Web Authentication Login Page from an External Web Server (CLI)
- Downloading a Customized Web Authentication Login Page
- Guidelines and Limitations
- Additional References
- Downloading a Customized Web Authentication Login Page (GUI)
- Downloading a Customized Web Authentication Login Page (CLI)
- Example: Customized Web Authentication Login Page
- Verifying the Web Authentication Login Page Settings (CLI)
- Assigning Login, Login Failure, and Logout Pages per WLAN
- Information About Assigning Login, Login Failure, and Logout Pages per WLAN
- Assigning Login, Login Failure, and Logout Pages per WLAN (GUI)
- Assigning Login, Login Failure, and Logout Pages per WLAN (CLI)
Managing Web Authentication
Obtaining a Web Authentication Certificate
Information About Web Authentication Certificates
The operating system of the controller automatically generates a fully functional web authentication certificate, so you do not need to do anything in order to use certificates with Layer 3 web authentication. However, if desired, you can prompt the operating system to generate a new web authentication certificate, or you can download an externally generated SSL certificate.
Obtaining a Web Authentication Certificate (GUI)
Obtaining a Web Authentication Certificate (CLI)
Web Authentication Process
Web authentication is a Layer 3 security feature that causes the controller to not allow IP traffic (except DHCP-related packets) from a particular client until that client has correctly supplied a valid username and password. When you use web authentication to authenticate clients, you must define a username and password for each client. When the clients attempt to join the wireless LAN, their users must enter the username and password when prompted by a login page.
Guidelines and Limitations
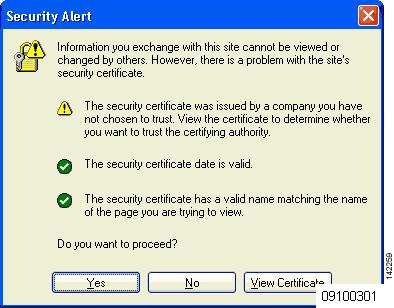
When web authentication is enabled (under Layer 3 Security), users might receive a web-browser security alert the first time that they attempt to access a URL.
NoteWhen clients connect to a WebAuth SSID with preauthorization ACL configured to allow VPN users, the clients will get disconnected from the SSID every few minutes. Webauth SSIDs must not connect without authenticating on the web page.
After the user clicks Yes to proceed (or if the client’s browser does not display a security alert), the web authentication system redirects the client to a login page.
To prevent the security alert from appearing, follow these steps:
- Click View Certificate on the Security Alert page.
- Click Install Certificate.
- When the Certificate Import Wizard appears, click Next.
- Choose Place all certificates in the following store and click Browse.
- At the bottom of the Select Certificate Store page, select the Show Physical Stores check box.
- Expand the Trusted Root Certification Authorities folder and choose Local Computer.
- Click OK.
- Click Next > Finish.
- When the “The import was successful” message appears, click OK.
- Reboot the PC. On the next web authentication attempt, the login page appears.
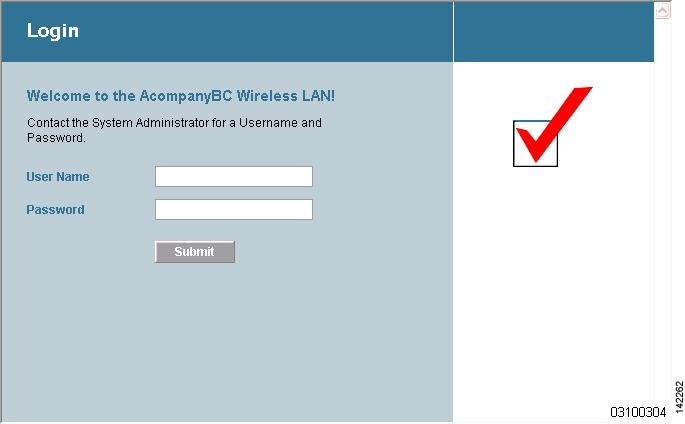
The default login page contains a Cisco logo and Cisco-specific text. You can choose to have the web authentication system display one of the following:
- The default login page
- A modified version of the default login page
- A customized login page that you configure on an external web server
- A customized login page that you download to the controller
The Choosing the Default Web Authentication Login Page section provides instructions for choosing how the web authentication login page appears.
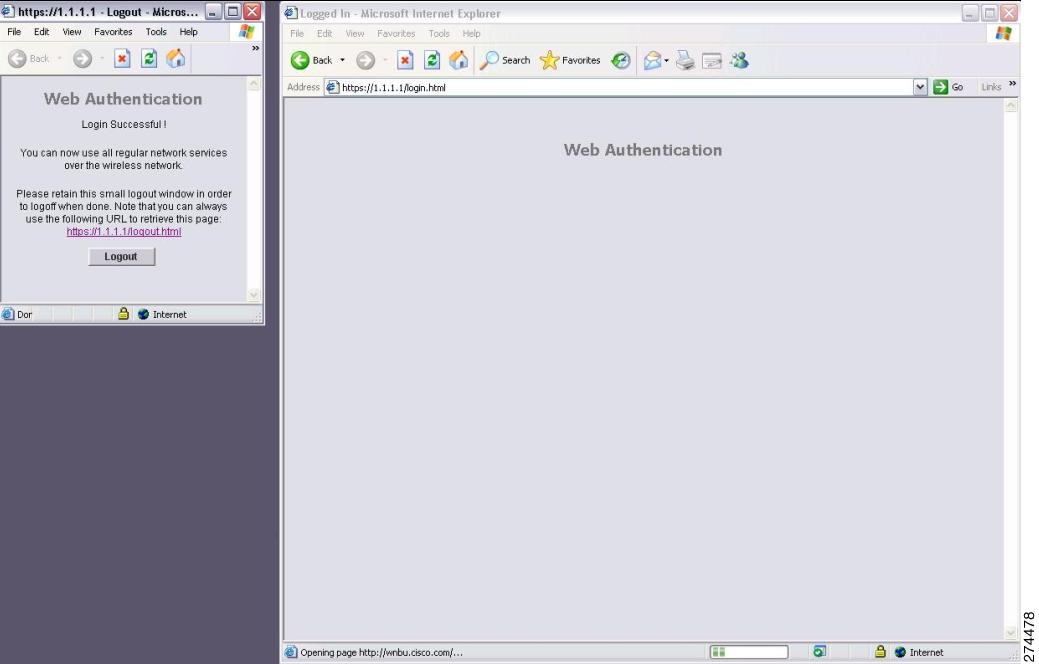
When the user enters a valid username and password on the web authentication login page and clicks Submit, the web authentication system displays a successful login page and redirects the authenticated client to the requested URL.
The default successful login page contains a pointer to a virtual gateway address URL: https://1.1.1.1/logout.html. The IP address that you set for the controller virtual interface serves as the redirect address for the login page
Choosing the Default Web Authentication Login Page
Information About Default Web Authentication Login Page
If you are using a custom web-auth bundle that is served by the internal controller web server, the page should not contain more than 5 elements (including HTML, CSS, and Images). This is because the internal controller web server implements a DoS protection mechanism that limits each client to open a maximum of 5 (five) concurrent TCP connections depending on the load. Some browsers may try to open more than 5 TCP sessions at the same time (For example Firefox 4) if the page contains more elements and this may result in the page loading slowly depending on how the browser handles the DoS protection.
NoteCisco TAC is not responsible for creating a custom webauth bundle.
If you have a complex custom web authentication module, it is recommended that you use an external web-auth config on the controller, where the full login page is hosted at an external web server.
Guidelines and Limitations
If you do not want users to connect to a web page using a browser that is configured with SSLv2 only, you can disable SSLv2 for web authentication by entering the config network secureweb cipher-option sslv2 disable command. If you enter this command, users must use a browser that is configured to use a more secure protocol such as SSLv3 or later releases. The default value is disabled.
Choosing the Default Web Authentication Login Page (GUI)
Step 1 Choose Security > Web Auth > Web Login Page to open the Web Login page. Step 2 From the Web Authentication Type drop-down list, choose Internal (Default). Step 3 If you want to use the default web authentication login page as is, go to Step 8. If you want to modify the default login page, go to Step 4. Step 4 If you want to hide the Cisco logo that appears in the top right corner of the default page, choose the Cisco Logo Hide option. Otherwise, click the Show option. Step 5 If you want the user to be directed to a particular URL (such as the URL for your company) after login, enter the desired URL in the Redirect URL After Login text box. You can enter up to 254 characters.
Note The controller supports web authentication redirects only to HTTP (HTTP over TCP) servers. It does not support web authentication redirects to HTTPS (HTTP over SSL) servers.
Step 6 If you want to create your own headline on the login page, enter the desired text in the Headline text box. You can enter up to 127 characters. The default headline is “Welcome to the Cisco wireless network.” Step 7 If you want to create your own message on the login page, enter the desired text in the Message text box. You can enter up to 2047 characters. The default message is “Cisco is pleased to provide the Wireless LAN infrastructure for your network. Please login and put your air space to work.” Step 8 Click Apply to commit your changes. Step 9 Click Preview to view the web authentication login page. Step 10 If you are satisfied with the content and appearance of the login page, click Save Configuration to save your changes. Otherwise, repeat any of the previous steps as necessary to achieve your desired results.
Choosing the Default Web Authentication Login Page (CLI)
Step 1 Specify the default web authentication type by entering this command: Step 2 If you want to use the default web authentication login page as is, go to Step 7. If you want to modify the default login page, go to Step 3. Step 3 To show or hide the Cisco logo that appears in the top right corner of the default login page, enter this command: Step 4 If you want the user to be directed to a particular URL (such as the URL for your company) after login, enter this command: config custom-web redirecturl url
You can enter up to 130 characters for the URL. To change the redirect back to the default setting, enter the clear redirecturl command.
Note The controller supports web authentication redirects only to HTTP (HTTP over TCP) servers. It does not support web authentication redirects to HTTPS (HTTP over SSL) servers.
Step 5 If you want to create your own headline on the login page, enter this command: config custom-web webtitle title
You can enter up to 130 characters. The default headline is “Welcome to the Cisco wireless network.” To reset the headline to the default setting, enter the clear webtitle command.
Step 6 If you want to create your own message on the login page, enter this command: config custom-web webmessage message
You can enter up to 130 characters. The default message is “Cisco is pleased to provide the Wireless LAN infrastructure for your network. Please login and put your air space to work.” To reset the message to the default setting, enter the clear webmessage command.
Step 7 To enable or disable the web authentication logout popup window, enter this command: config custom-web logout-popup {enable | disable}
Step 8 Enter the save config command to save your settings. Step 9 Import your own logo into the web authentication login page as follows:
- Make sure that you have a Trivial File Transfer Protocol (TFTP) server available for the file download. Follow these guidelines when setting up a TFTP server:
- If you are downloading through the service port, the TFTP server must be on the same subnet as the service port because the service port is not routable, or you must create static routes on the controller.
- If you are downloading through the distribution system network port, the TFTP server can be on the same or a different subnet because the distribution system port is routable.
- A third-party TFTP server cannot run on the same computer as the Cisco WCS because the WCS built-in TFTP server and the third-party TFTP server require the same communication port.
- Ensure that the controller can contact the TFTP server by entering this command: ping ip-address
- Copy the logo file (in .jpg, .gif, or .png format) to the default directory on your TFTP server. The maximum file size is 30 kilobits. For an optimal fit, the logo should be approximately 180 pixels wide and 360 pixels high.
- Specify the download mode by entering this command: transfer download mode tftp
- Specify the type of file to be downloaded by entering this command: transfer download datatype image
- Specify the IP address of the TFTP server by entering this command: transfer download serverip tftp-server-ip-address
Note Some TFTP servers require only a forward slash (/) as the TFTP server IP address, and the TFTP server automatically determines the path to the correct directory.
- Specify the download path by entering this command: transfer download path absolute-tftp-server-path-to-file
- Specify the file to be downloaded by entering this command: transfer download filename {filename.jpg | filename.gif | filename.png}
- View your updated settings and answer y to the prompt to confirm the current download settings and start the download by entering this command: transfer download start
- Save your settings by entering this command: save config
Note If you ever want to remove this logo from the web authentication login page, enter the clear webimage command.
Step 10 Follow the instructions in the Verifying the Web Authentication Login Page Settings (CLI) section to verify your settings.
Example: Creating a Customized Web Authentication Login Page
This section provides information on creating a customized web authentication login page, which can then be accessed from an external web server.
Here is a web authentication login page template. It can be used as a model when creating your own customized page:
<html> <head> <meta http-equiv="Pragma" content="no-cache"> <meta HTTP-EQUIV="Content-Type" CONTENT="text/html; charset=iso-8859-1"> <title>Web Authentication</title> <script> function submitAction(){ var link = document.location.href; var searchString = "redirect="; var equalIndex = link.indexOf(searchString); var redirectUrl = ""; if (document.forms[0].action == "") { var url = window.location.href; var args = new Object(); var query = location.search.substring(1); var pairs = query.split("&"); for(var i=0;i<pairs.length;i++){ var pos = pairs[i].indexOf('='); if(pos == -1) continue; var argname = pairs[i].substring(0,pos); var value = pairs[i].substring(pos+1); args[argname] = unescape(value); } document.forms[0].action = args.switch_url; } if(equalIndex >= 0) { equalIndex += searchString.length; redirectUrl = ""; redirectUrl += link.substring(equalIndex); } if(redirectUrl.length > 255) redirectUrl = redirectUrl.substring(0,255); document.forms[0].redirect_url.value = redirectUrl; document.forms[0].buttonClicked.value = 4; document.forms[0].submit(); } function loadAction(){ var url = window.location.href; var args = new Object(); var query = location.search.substring(1); var pairs = query.split("&"); for(var i=0;i<pairs.length;i++){ var pos = pairs[i].indexOf('='); if(pos == -1) continue; var argname = pairs[i].substring(0,pos); var value = pairs[i].substring(pos+1); args[argname] = unescape(value); } //alert( "AP MAC Address is " + args.ap_mac); //alert( "The Switch URL to post user credentials is " + args.switch_url); document.forms[0].action = args.switch_url; // This is the status code returned from webauth login action // Any value of status code from 1 to 5 is error condition and user // should be shown error as below or modify the message as it suits // the customer if(args.statusCode == 1){ alert("You are already logged in. No further action is required on your part."); } else if(args.statusCode == 2){ alert("You are not configured to authenticate against web portal. No further action is required on your part."); } else if(args.statusCode == 3){ alert("The username specified cannot be used at this time. Perhaps the username is already logged into the system?"); } else if(args.statusCode == 4){ alert("The User has been excluded. Please contact the administrator."); } else if(args.statusCode == 5){ alert("Invalid username and password. Please try again."); } else if(args.statusCode == 6){ alert("Invalid email address format. Please try again."); } } </script> </head> <body topmargin="50" marginheight="50" onload="loadAction();"> <form method="post" action="https://209.165.200.225/login.html"> <input TYPE="hidden" NAME="buttonClicked" SIZE="16" MAXLENGTH="15" value="0"> <input TYPE="hidden" NAME="redirect_url" SIZE="255" MAXLENGTH="255" VALUE=""> <input TYPE="hidden" NAME="err_flag" SIZE="16" MAXLENGTH="15" value="0"> <div align="center"> <table border="0" cellspacing="0" cellpadding="0"> <tr> <td> </td></tr> <tr align="center"> <td colspan="2"><font size="10" color="#336699">Web Authentication</font></td></tr> <tr align="center"> <td colspan="2"> User Name <input type="TEXT" name="username" SIZE="25" MAXLENGTH="63" VALUE=""> </td> </tr> <tr align="center" > <td colspan="2"> Password <input type="Password" name="password" SIZE="25" MAXLENGTH="24"> </td> </tr> <tr align="center"> <td colspan="2"><input type="button" name="Submit" value="Submit" class="button" onclick="submitAction();"> </td> </tr> </table> </div> </form> </body> </html>These parameters are added to the URL when the user’s Internet browser is redirected to the customized login page:
- ap_mac—The MAC address of the access point to which the wireless user is associated.
- switch_url—The URL of the controller to which the user credentials should be posted.
- redirect—The URL to which the user is redirected after authentication is successful.
- statusCode—The status code returned from the controller’s web authentication server.
- wlan—The WLAN SSID to which the wireless user is associated.
The available status codes are as follows:
- Status Code 1: “You are already logged in. No further action is required on your part.”
- Status Code 2: “You are not configured to authenticate against web portal. No further action is required on your part.”
- Status Code 3: “The username specified cannot be used at this time. Perhaps the username is already logged into the system?”
- Status Code 4: “You have been excluded.”
- Status Code 5: “The User Name and Password combination you have entered is invalid. Please try again.”
NoteFor additional information, see the External Web Authentication with Wireless LAN Controllers Configuration Example at this URL: http://www.cisco.com/en/US/tech/tk722/tk809/technologies_configuration_example09186a008076f974.shtml
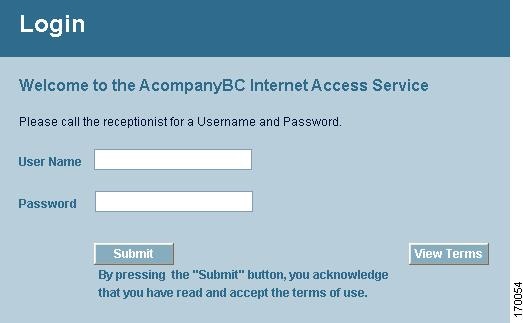
Using a Customized Web Authentication Login Page from an External Web Server
Choosing a Customized Web Authentication Login Page from an External Web Server (GUI)
Step 1 Choose to open the Web Login page. Step 2 From the Web Authentication Type drop-down list, choose External (Redirect to external server). Step 3 In the Redirect URL after login text box, enter the URL that you want the user to be redirected after a login. For example, you may enter your company's URL here and the users will be directed to that URL after login. The maximum length is 254 characters. By default, the user is redirected to the URL that was entered in the user's browser before the login page was served. of the customized web authentication login page on your web server. You can enter up to 252 characters.
Step 4 In the External Webauth URL text box, enter the URL that is to be used for external web authentication. Step 5 Click Apply. Step 6 Click Save Configuration.
Choosing a Customized Web Authentication Login Page from an External Web Server (CLI)
Step 1 Specify the web authentication type by entering this command: Step 2 Specify the URL of the customized web authentication login page on your web server by entering this command: Step 3 Specify the IP address of your web server by entering this command: config custom-web ext-webserver {add | delete} server_IP_address
Step 4 Enter the save config command to save your settings. Step 5 Follow the instructions in the Verifying the Web Authentication Login Page Settings (CLI) section to verify your settings.
Downloading a Customized Web Authentication Login Page
You can compress the page and image files used for displaying a web authentication login page into a.tar file for download to a controller. These files are known as the webauth bundle. The maximum allowed size of the files in their uncompressed state is 1 MB. When the .tar file is downloaded from a local TFTP server, it enters the controller’s file system as an untarred file.
NoteIf you load a webauth bundle with a .tar compression application that is not GNU compliant, the controller cannot extract the files in the bundle and the following error messages appear: “Extracting error” and “TFTP transfer failed.” Therefore, we recommend that you use an application that complies with GNU standards, such as PicoZip, to compress the .tar file for the webauth bundle.
NoteConfiguration backups do not include extra files or components, such as the webauth bundle or external licenses, that you download and store on your controller, so you should manually save external backup copies of those files or components.
NoteIf the customized webauth bundle has more than 3 separated elements, we advise you to use an external server to prevent page load issues that may be caused because of TCP rate-limiting policy on the controller.
- Guidelines and Limitations
- Additional References
- Downloading a Customized Web Authentication Login Page (GUI)
- Downloading a Customized Web Authentication Login Page (CLI)
- Example: Customized Web Authentication Login Page
- Verifying the Web Authentication Login Page Settings (CLI)
Guidelines and Limitations
- Name the login page login.html. The controller prepares the web authentication URL based on this name. If the server does not find this file after the webauth bundle has been untarred, the bundle is discarded, and an error message appears.
- Include input text boxes for both a username and password.
- Retain the redirect URL as a hidden input item after extracting from the original URL.
- Extract and set the action URL in the page from the original URL.
- Include scripts to decode the return status code.
- Make sure that all paths used in the main page (to refer to images, for example).
- Ensure that no filenames within the bundle are greater than 30 characters.
Downloading a Customized Web Authentication Login Page (GUI)
Step 1 Copy the .tar file containing your login page to the default directory on your server. Step 2 Choose Commands > Download File to open the Download File to Controller page. Step 3 From the File Type drop-down list, choose Webauth Bundle. Step 4 From the Transfer Mode drop-down list, choose from the following options: Step 5 In the IP Address text box, enter the IP address of the server. Step 6 If you are using a TFTP server, enter the maximum number of times the controller should attempt to download the .tar file in the Maximum Retries text box. Step 7 If you are using a TFTP server, enter the amount of time in seconds before the controller times out while attempting to download the *.tar file in the Timeout text box. Step 8 In the File Path text box, enter the path of the .tar file to be downloaded. The default value is “/.” Step 9 In the File Name text box, enter the name of the .tar file to be downloaded. Step 10 If you are using an FTP server, follow these steps:
- In the Server Login Username text box, enter the username to log into the FTP server.
- In the Server Login Password text box, enter the password to log into the FTP server.
- In the Server Port Number text box, enter the port number on the FTP server through which the download occurs. The default value is 21.
Step 11 Click Download to download the .tar file to the controller. Step 12 Choose Security > Web Auth > Web Login Page to open the Web Login page. Step 13 From the Web Authentication Type drop-down list, choose Customized (Downloaded). Step 14 Click Apply. Step 15 Click Preview to view your customized web authentication login page. Step 16 If you are satisfied with the content and appearance of the login page, click Save Configuration.
Downloading a Customized Web Authentication Login Page (CLI)
Step 1 Copy the .tar file containing your login page to the default directory on your server. Step 2 Specify the download mode by entering this command: Step 3 Specify the type of file to be downloaded by entering this command: Step 4 Specify the IP address of the TFTP server by entering this command: transfer download serverip tftp-server-ip-address.
Note Some TFTP servers require only a forward slash (/) as the TFTP server IP address, and the TFTP server automatically determines the path to the correct directory.
Step 5 Specify the download path by entering this command: Step 6 Specify the file to be downloaded by entering this command: Step 7 View your updated settings and answer y to the prompt to confirm the current download settings and start the download by entering this command: Step 8 Specify the web authentication type by entering this command: Step 9 Enter the save config command to save your settings.
Assigning Login, Login Failure, and Logout Pages per WLAN
Information About Assigning Login, Login Failure, and Logout Pages per WLAN
You can display different web authentication login, login failure, and logout pages to users per WLAN. This feature enables user-specific web authentication pages to be displayed for a variety of network users, such as guest users or employees within different departments of an organization.
Different login pages are available for all web authentication types (internal, external, and customized). However, different login failure and logout pages can be specified only when you choose customized as the web authentication type.
Assigning Login, Login Failure, and Logout Pages per WLAN (GUI)
Step 1 Choose WLANs to open the WLANs page. Step 2 Click the ID number of the WLAN to which you want to assign a web login, login failure, or logout page. Step 3 Choose Security > Layer 3. Step 4 Make sure that Web Policy and Authentication are selected. Step 5 To override the global authentication configuration web authentication pages, select the Override Global Config check box. Step 6 When the Web Auth Type drop-down list appears, choose one of the following options to define the web authentication pages for wireless guest users:
- Internal—Displays the default web login page for the controller. This is the default value.
- Customized—Displays custom web login, login failure, and logout pages. If you choose this option, three separate drop-down lists appear for login, login failure, and logout page selection. You do not need to define a customized page for all three options. Choose None from the appropriate drop-down list if you do not want to display a customized page for that option.
Note These optional login, login failure, and logout pages are downloaded to the controller as webauth.tar files.
- External—Redirects users to an external server for authentication. If you choose this option, you must also enter the URL of the external server in the URL text box. You can choose specific RADIUS or LDAP servers to provide external authentication on the WLANs > Edit (Security > AAA Servers) page. Additionally, you can define the priority in which the servers provide authentication.
Step 7 If you chose External as the web authentication type in Step 6, choose AAA Servers and choose up to three RADIUS and LDAP servers using the drop-down lists.
Note The RADIUS and LDAP external servers must already be configured in order to be selectable options on the WLANs > Edit (Security > AAA Servers) page. You can configure these servers on the RADIUS Authentication Servers page and LDAP Servers page.
Step 8 Establish the priority in which the servers are contacted to perform web authentication as follows:
Note
- Highlight the server type (local, RADIUS, or LDAP) that you want to be contacted first in the box next to the Up and Down buttons.
- Click Up and Down until the desired server type is at the top of the box.
- Click the < arrow to move the server type to the priority box on the left.
- Repeat these steps to assign priority to the other servers.
Step 9 Click Apply to commit your changes. Step 10 Click Save Configuration to save your changes.
Assigning Login, Login Failure, and Logout Pages per WLAN (CLI)
Step 1 Determine the ID number of the WLAN to which you want to assign a web login, login failure, or logout page by entering this command: Step 2 If you want wireless guest users to log into a customized web login, login failure, or logout page, enter these commands to specify the filename of the web authentication page and the WLAN for which it should display:
- config wlan custom-web login-page page_name wlan_id—Defines a customized login page for a given WLAN.
- config wlan custom-web loginfailure-page page_name wlan_id—Defines a customized login failure page for a given WLAN.
Note To use the controller’s default login failure page, enter the config wlan custom-web loginfailure-page none wlan_id command.
- config wlan custom-web logout-page page_name wlan_id—Defines a customized logout page for a given WLAN.
Note To use the controller’s default logout page, enter the config wlan custom-web logout-page none wlan_id command.
Step 3 Redirect wireless guess users to an external server before accessing the web login page by entering this command to specify the URL of the external server: Step 4 Define the order in which web authentication servers are contacted by entering this command: config wlan security web-auth server-precedence wlan_id {local | ldap | radius} {local | ldap | radius} {local | ldap | radius}
The default order of server web authentication is local, RADIUS and LDAP.
Note All external servers must be preconfigured on the controller. You can configure them on the RADIUS Authentication Servers page and the LDAP Servers page.
Step 5 Define which web authentication page displays for a wireless guest user by entering this command: config wlan custom-web webauth-type {internal | customized | external} wlan_id
- internal displays the default web login page for the controller. This is the default value.
- customized displays the custom web login page that was configured in Step 2.
Note You do not need to define the web authentication type in Step 5 for the login failure and logout pages as they are always customized.
- external redirects users to the URL that was configured in Step 3.
Step 6 Use a WLAN-specific custom web configuration rather than a global custom web configuration by entering this command: config wlan custom-web global disable wlan_id
Note If you enter the config wlan custom-web global enable wlan_id command, the custom web authentication configuration at the global level is used.
Step 7 Save your changes by entering this command: