-
Cisco Unity Troubleshooting Guide (With Microsoft Exchange), Release 4.0(5)
-
Index
-
Preface
-
Introduction
-
Diagnostic Trace Utilities and Logs
-
Internal and External Calls
-
Call Transfers
-
Messages
-
AMIS Networking
-
SMTP Networking Message Delivery Problems
-
Audio Quality
-
Message Waiting Indicators (MWIs)
-
Message Notification
-
Hardware
-
Error Messages
-
Third-Party Fax Integration
-
Utilities
-
Subscriber and Administrator Access
-
Reports
-
Failover
-
Cisco Personal Communications Assistant
-
Media Master Control Bar
-
Appendix: Cisco Unity Services and Their Functions
-
 Feedback
Table Of Contents
AMIS Messages Are Not Delivered Promptly
AMIS Messages Are Not Delivered at All
Double-Checking Newly Configured Systems
Troubleshooting AMIS Message Delivery
Following the Outbound AMIS Message Flow
Messages Are Not Delivered to the UAmis Mailbox
Messages Are Stuck in the UAmis Mailbox
Messages Leave the UAmis Mailbox But Are Not Delivered
Following the Inbound AMIS Message Flow
Gathering Logs and Resetting Traces to Default Values
AMIS Troubleshooting Procedures
"C" and "D" DTMF Hang-Up Tones Cause AMIS Calls to Fail
Advanced Troubleshooting: Viewing the Frames and Digits in an AMIS Call
AMIS Networking
Cisco Unity supports the Audio Messaging Interchange Specification analog (AMIS-a) protocol, which provides a mechanism for transferring voice messages between different voice messaging systems. The following sections provide information on troubleshooting AMIS Networking problems:
•
AMIS Messages Are Not Delivered Promptly
•
AMIS Messages Are Not Delivered Promptly
There are a number of reasons that AMIS messages may not be delivered promptly (or why subscribers may perceive that they are not being delivered promptly):
•
•
•
AMIS Messages Are Not Delivered at All
The following sections provide information on how to troubleshoot AMIS message delivery problems:
•
•
•
•
•
•
•
Double-Checking Newly Configured Systems
If you have just configured Cisco Unity for AMIS Networking, and AMIS messages are not being delivered, review the following list to verify that your configuration follows these basic guidelines.
1.
2.
3.
–
–
Troubleshooting AMIS Message Delivery
For either new or existing AMIS Networking configurations, use the following list as a starting point:
1.
2.
Unless you have moved the UAmis mailbox, it should be located on the Exchange server that is the partner to the Cisco Unity AMIS bridgehead server. If the UAmis mailbox has been moved, and there are errors in the Event Viewer indicating that Cisco Unity cannot locate the UAmis mailbox, refer to the "UAmis Mailbox" section in the "Cisco Unity Data and Log Files" chapter of the Cisco Unity Maintenance Guide for information on how to move the UAmis mailbox such that Cisco Unity is aware of the change. (The Cisco Unity Maintenance Guide is available at http://www.cisco.com/univercd/cc/td/doc/product/voice/c_unity/unity40/maint/maint405/ex/index.htm.)
If you have not determined what is causing the problem, continue with the next section, "Enabling Logs and Traces."
Enabling Logs and Traces
Before you continue troubleshooting the AMIS message delivery problem, do all of the following procedures to enable the applicable logs, traces, and other troubleshooting tools. The logs will be needed by Cisco TAC if you are unable to resolve the problem.
•
•
–
–
•
To Set AMIS Diagnostic Traces
Step 1
Step 2
Step 3
Step 4
Step 5
Step 6
To Change the Voice Connector Logging Settings (Exchange 2000 and Exchange 2003)
By default, the Voice Connector logs are located on the Exchange server on which the Voice Connector is installed in the directory <ExchangeServerPath>\VoiceGateway\LogFiles. The files are named in the format GwIvc_<YyMmDd >.log, where Yy in the year, Mm is the month, and Dd is the day.
Step 1
Step 2
Step 3
Step 4
Note that the properties pages for administering the Voice Connector are always displayed in English.
Step 5
Step 6
Step 7
Step 8
Step 9
Step 10
Step 11
To Change the Voice Connector Logging Settings (Exchange 5.5)
By default, the Voice Connector logs are located on the Exchange server on which the Voice Connector is installed in the directory <ExchangeServerPath>\VoiceGateway\LogFiles. The files are named in the format GwIvc_<YyMmDd >.log, where Yy in the year, Mm is the month, and Dd is the day.
Step 1
Caution
Step 2
Step 3
a.
b.
c.
Step 4
a.
b.
c.
d.
Step 5
a.
b.
c.
Step 6
Step 7
Step 8
Step 9
To Enable Message Tracking in Exchange 2000
You need to enable message tracking on each Exchange server that participates in message delivery: the Exchange server (or servers) on which the Voice Connector is installed, and the Exchange server on which the Cisco Unity subscriber mailbox is located.
Step 1
Step 2
Step 3
Step 4
Step 5
To Enable Messaging Tracking on Exchange 5.5
Step 1
Step 2
Step 3
Step 4
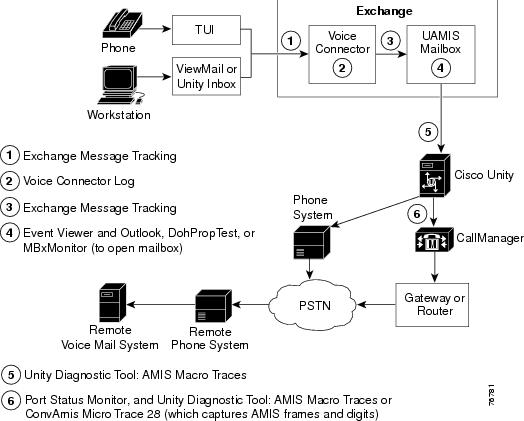
Following the Outbound AMIS Message Flow
Figure 6-1 shows at a high level the flow of outbound AMIS messages through Cisco Unity to the remote voice messaging system, and the logs and other tools that you can use to troubleshoot problems along the path.
Figure 6-1 Outbound AMIS Message Flow and Troubleshooting Tools
In the above illustration, the Cisco Unity server that is used by Cisco Unity subscribers to send messages may or may not be the same as the Cisco Unity AMIS bridgehead server, so it was left out for the sake of simplicity. Additionally, the path from the Cisco Unity bridgehead server to the PSTN depends on the phone system integration. Two paths are shown in the illustration because transmission problems can occur at the gateway or router used with Cisco CallManager integrations. If you do not have a Cisco CallManager integration, ignore that path.
Use Figure 6-1 in conjunction with the following task list to trace the path that outbound AMIS messages take, which will help you locate the problem. The links take you to procedures in the "AMIS Troubleshooting Procedures" section.
1.
2.
a.
b.
If you determine that the messages are not being delivered to the UAmis mailbox, see the "Messages Are Not Delivered to the UAmis Mailbox" section for information on how to troubleshoot the problem.
3.
4.
Messages Are Not Delivered to the UAmis Mailbox
When subscribers address messages to an AMIS recipient, the Voice Connector is responsible for delivering the messages to the UAmis mailbox. If messages are not showing up in the UAmis mailbox, the first thing to check is whether there is a problem with the Voice Connector.
If you have determined that messages are not being delivered to the UAmis mailbox, use the following list to troubleshoot why the Voice Connector is not delivering the AMIS messages.
To Troubleshoot Why Messages Are Not Delivered to the UAmis Mailbox
1.
2.
3.
For detailed instructions, see the following procedures:
–
–
–
–
4.
5.
Messages Are Stuck in the UAmis Mailbox
When the Voice Connector has delivered a message to the UAmis mailbox, the AMIS schedule and the AMIS restriction table determine when the message will be sent. When an AMIS delivery number is allowed by the restriction table, messages to the number are sent immediately from the UAmis mailbox—the schedule settings do not matter. On the other hand, when the delivery number is disallowed by the restriction table, messages to the number are queued in the UAmis mailbox until the active hours of the AMIS schedule.
An error is logged in the Windows Application Event log when messages remain in the UAmis mailbox for more than 24 hours. Only one error is logged in the Event log, no matter how many messages remain in the UAmis mailbox. An additional error is logged daily until the messages are either sent or deleted from the UAmis mailbox.
If necessary, you can delete messages that are stuck in the UAmis mailbox by using Outlook or DohPropTest. Do the "To View or Remove Messages in the UAmis Mailbox by Using DohPropTest" procedure.
To Determine Why Messages Are Stuck in the UAmis Mailbox
1.
2.
3.
4.
5.
If the total transmission time is approaching the limit of the ports dedicated to AMIS deliveries, all of the port resources available are being used. Review the AMIS schedule and port assignments again to determine whether additional resources (time and/or ports) should be dedicated to AMIS message traffic.
6.
–
–
7.
8.
Messages Leave the UAmis Mailbox But Are Not Delivered
Use the following steps to troubleshoot problems with messages that leave the UAmis mailbox but are not delivered to users of the remote voice messaging system.
To Troubleshoot Undelivered Messages
1.
2.
a.
b.
c.
3.
4.
5.
6.
7.
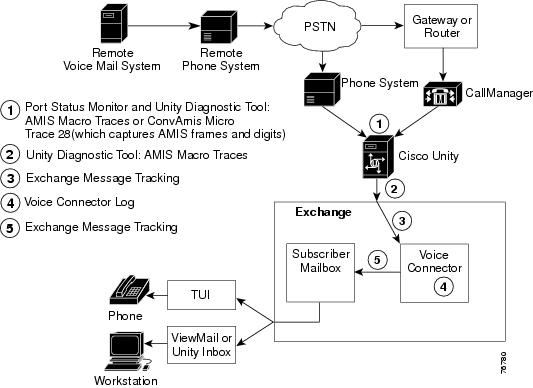
Following the Inbound AMIS Message Flow
Figure 6-2 shows at a high level the flow of inbound AMIS messages from the remote voice messaging system to Cisco Unity, and the logs and other tools that you can use to troubleshoot problems along the path
Figure 6-2 Inbound AMIS Message Flow and Troubleshooting Tools
In the above illustration, the Cisco Unity server used by Cisco Unity subscribers to listen to messages may or may not be the same as the Cisco Unity AMIS bridgehead server, so it was left out for the sake of simplicity. Additionally, the path from the PSTN to the Cisco Unity bridgehead server depends on the phone system integration. Two paths are shown in the illustration because transmission problems can occur at the gateway or router used with Cisco CallManager integrations. If you do not have a Cisco CallManager integration, ignore that path.
Use the following task list to troubleshoot problems with inbound AMIS messages:
1.
2.
3.
4.
–
–
<Delivery Location ID>_<Remote Mailbox Number>
and the alias of the recipient.–
Refer to your Exchange documentation for information on using Exchange Message Tracking.
5.
6.
7.
Gathering Logs and Resetting Traces to Default Values
If you have been unable to determine why messages are not being delivered, gather the diagnostic log files from the Unity Diagnostic tool along with the Voice Connector log file to provide to Cisco TAC. By default, the Voice Connector logs are located on the Exchange server on which the Voice Connector is installed in the directory <ExchangeServerPath>\VoiceGateway\LogFiles. The files are named in the format GwIvc_<YyMmDd >.log, where Yy in the year, Mm is the month, and Dd is the day. Be sure to set the traces back to their default values, as extensive logging takes up a great deal of disk space. See the following instructions:
•
•
–
–
•
To Retrieve Unity Diagnostic Tool Log Files
Step 1
Step 2
Step 3
Step 4
Step 5
Step 6
Step 7
Step 8
Step 9
Step 10
Step 11
Step 12
Step 13
To Decrease the Voice Connector Logging Settings (Exchange 2000 and Exchange 2003)
Step 1
Step 2
Step 3
Step 4
Note that the properties pages for administering the Voice Connector are always displayed in English.
Step 5
Step 6
Step 7
Step 8
Step 9
Step 10
To Decrease the Voice Connector Logging Settings (Exchange 5.5)
Step 1
Caution
Step 2
Step 3
a.
b.
c.
Step 4
Step 5
Step 6
Step 7
AMIS Troubleshooting Procedures
Use the following procedures as needed to troubleshoot problems with AMIS message delivery. Note that the procedures in this section are not necessarily in the order in which you need to do them. For information on when to use the procedures, and the correct order in which to do them, see the preceding topics:
•
•
•
To Confirm That Messages Are Being Delivered to the UAmis Mailbox
Step 1
For detailed instructions on changing the restriction table, see the "To Change the AMIS Restriction Table to Disallow All Delivery Numbers" procedure, and then continue with Step 2.
Step 2
For detailed instructions on changing the schedule, see the "To Change the AMIS Schedule so That It Is Inactive While Troubleshooting" procedure, and then continue with Step 3.
Step 3
•
Note
•
•
Step 4
Step 5
To Change the AMIS Restriction Table to Disallow All Delivery Numbers
Step 1
Step 2
Step 3
Step 4
Step 5
Step 6
To Change the AMIS Schedule so That It Is Inactive While Troubleshooting
Step 1
Step 2
Step 3
To Confirm That the Voice Connector Service Is Running
Step 1
Step 2
Step 3
In Exchange 2000 and Exchange 2003, the display name for the service is Exchange 2000 Voice Connector, and in Exchange 5.5, the display name is Internet Voice Connector.
Step 4
To Set Access Permissions on the Exchange 2000 Mailbox Store
Do this procedure if you need to gain access to the MTS-IN and MTS-OUT queues on the Exchange server on which the Voice Connector is installed.
Step 1
Step 2
Step 3
Step 4
Step 5
Step 6
Step 7
Step 8
Step 9
To View the Voice Connector MTS-OUT Queue in Exchange 2000
Step 1
Step 2
Step 3
Step 4
To View the Voice Connector Queue in Exchange 2003
Step 1
Step 2
Step 3
Step 4
Step 5
A queue window is displayed.
Step 6
To View the Voice Connector MTS-Out Queue in Exchange 5.5
Step 1
Step 2
Step 3
Step 4
Step 5
Step 6
To View or Remove Messages in the UAmis Mailbox by Using DohPropTest
DohPropTest is password protected, but it can be run in read-only mode; the steps below assume that you will be running in read-only mode. Keep in mind that in read-only mode, you cannot remove messages from the UAmis mailbox. If you want to use DohPropTest to remove messages from the UAmis Mailbox, you will need to log on with an appropriate password in Step 3.
Step 1
Step 2
Step 3
Step 4
Step 5
Step 6
Step 7
Step 8
Step 9
•
•
•
•
To View AMIS Subscriber Extension Addresses
Step 1
Step 2
Step 3
Step 4
To Use the Port Status Monitor to Watch Details of an AMIS Transmission
Step 1
Note
Step 2
Step 3
Step 4
Step 5
Step 6
Step 7
Step 8
You should see the dialout information and the states that the AMIS call goes through. An AMIS call goes through a finite number of states during an AMIS transmission, and as the call progresses, you should see the descriptive name of each state in the Port Status Monitor window. For detailed information about the AMIS transmission states, refer to the White Paper: AMIS Analog Networking Definitions, available at http://www.cisco.com/univercd/cc/td/doc/product/voice/c_unity/whitpapr/amis.htm.
"C" and "D" DTMF Hang-Up Tones Cause AMIS Calls to Fail
"C" and "D" DTMF tones, also known as fourth-column tones, are just like the twelve other DTMF tones ("0-9," "*," and "#") found on a regular analog phone. They are commonly used for in-band analog integrations and other "non-human" tasks.
The first action of an AMIS call is the handshake between the originating and receiving voice messaging systems. The originating system dials the number of the destination system. When the originating system detects that the destination system has answered the call, the originating system transmits a "C" tone to the destination. If the destination system answers the call and detects the "C" tone, it should respond with a "D" tone within 10 seconds. After transmitting the "D" tone, the destination system expects a Start Session frame.
Note
Many Toshiba phone systems use the "D" tone to indicate to voice messaging systems that a disconnect has occurred. Other phone systems may also use the "C" or "D" tones to indicate that a disconnect has occurred. When this is the case, a parameter of "HangUpTone=C" or "HangUpTone=D" will be defined in the active switch configuration file on the Cisco Unity server.
If "HangUpTone=C" is defined, the AMIS feature cannot be used on that system. When a remote voice messaging system dials Cisco Unity and sends the "C" tone to initiate the AMIS handshake, Cisco Unity interprets it as a disconnect signal from the phone system and hangs up on the call.
Similarly, if "HangUpTone=D" is defined, the AMIS feature cannot be used on that system. When Cisco Unity dials the remote voice messaging system and sends the "C" tone to initiate the AMIS handshake, and the remote system responds with the "D" tone, Cisco Unity interprets it as a disconnect signal from the phone system and hangs up on the call.
To fix this problem, configure the phone system to use another type of disconnect indication (such as the reorder tone, dial tone, or loop current reversal), then remove the HangUpTone parameter from the active switch file. However, if this recommended action is not possible, configure the phone system to use "A" or "B" as a hang-up tone, and then modify the HangUpTone parameter in the active switch file to match this new value.
The default values for the hang-up packets expected by Cisco Unity (defined in avanaglog.avd) have been chosen to work with AMIS. Changing these values may cause AMIS calls to fail.
To Obtain the Name(s) of the Active Switch File(s)
Step 1
Caution
Step 2
Step 3
HKEY_LOCAL_MACHINE\Software\Active Voice\Miu\1.0\Initialization\Switch 0.
For dual-switch integrations, also expand the key
HKEY_LOCAL_MACHINE\Software\Active Voice\Miu\1.0\Initialization\Switch 1.
Step 4
Step 5
To Edit the Active Switch File(s)
Step 1
Step 2
Step 3
Step 4
•
•
Step 5
Step 6
Advanced Troubleshooting: Viewing the Frames and Digits in an AMIS Call
If you have determined that AMIS calls (either outbound or inbound) are being made, but the call is failing for some reason, you may want to obtain a trace of the frames and digits sent during an AMIS call to see if you can determine what the problem is and resolve it. To obtain such a trace, you enable the Conv Amis 28 micro trace in the Unity Diagnostic tool, disable all other traces, and place another test call. Although the available macro traces—Extensive Incoming AMIS Message Traces, and Extensive Outgoing AMIS Message Traces—both include the Conv Amis 28 micro trace, they also include many other micro traces, which makes it more difficult to follow the call progress. (Note however that when you are asked to provide log files to Cisco TAC, you will need to provide the log file from the applicable macro trace.)
When using the Unity Diagnostic tool to gather the log file for the Conv Amis 28 micro trace, select the diagnostic log file within the AvCsMgr process. After obtaining a trace of the frames and digits, refer to the White Paper: AMIS Analog Networking Definitions for detailed information about the AMIS protocol. (The white paper is available at http://www.cisco.com/univercd/cc/td/doc/product/voice/c_unity/whitpapr/amis.htm.)