Feedback
Table Of Contents
Setting Up Cisco Unity to Use VPIM Networking
Task List: Setting Up Cisco Unity to Use VPIM Networking
Procedures for Setting Up Cisco Unity to Use VPIM Networking
Making Design Decisions and Gathering Needed Information
Verifying Connectivity Between Exchange and the Remote Voice Messaging System
Resolving Names with IP Addresses
Extending the Active Directory Schema
Verifying the Recipient Policies or Creating a New One
Setting Up the Voice Connector for VPIM Networking
Customizing the Primary Location
Creating VPIM Delivery Locations
Using the Cisco Unity Administrator to Create VPIM Delivery Locations
Using the Cisco Unity Bulk Import Wizard to Create VPIM Delivery Locations
Modifying Existing Delivery Locations by Using the Cisco Unity Bulk Import Wizard
Before Creating Subscriber Accounts
Using the Cisco Unity Bulk Import Wizard to Create Multiple Subscriber Accounts
Using the Cisco Unity Administrator to Create VPIM Subscriber Accounts
After Creating Subscriber Accounts
Extending Identified Subscriber Messaging to Include VPIM Subscribers
Installation with Multiple Cisco Unity Servers Networked via Digital Networking
Setting Permissions on Active Directory Containers Used for Importing Subscribers
Enabling Identified Subscriber Messaging
Extending Identified Subscriber Messaging
Gathering Information About Cisco Unity to Configure Another Voice Messaging System for VPIM
Migrating from SMTP Networking to VPIM Networking
Task List for Migrating from SMTP Networking to VPIM Networking
Procedures: Migrating from SMTP Networking to VPIM Networking
Extending the Active Directory Schema
Uninstalling the Cisco Unity Voice Connector
Running the Stored Procedure to Convert VPIM Delivery Locations and Subscribers
Manually Converting VPIM Delivery Locations and Subscribers
Setting Up the Voice Connector for VPIM Networking
VPIM Networking and the Voice Connector
How the Voice Connector Processes Outgoing VPIM Messages
How the Voice Connector Processes Incoming VPIM Messages
Messaging Similarities and Limitations
VPIM Networking and Blind Addressing
Subscriber Experience with Blind Addressing
Subscriber Experience with VPIM Subscribers
Identified Subscriber Messaging
Live Reply to VPIM Subscribers
Determining How VPIM Subscribers Appear in the Outlook Address Book
Preventing Contacts From Appearing in the Outlook Address Book
Modifying How Contacts Appear in the Outlook Address Book
Migrating Subscribers from Another Voice Messaging System to Cisco Unity
Migrating Subscribers One at a Time
Considerations for Digitally Networked Cisco Unity Servers
Messaging Between Cisco Unity Servers in Different Directories
Correspondence Between Locations
VPIM Subscribers Correspond to Remote Cisco Unity Subscribers
Audio Format Conversion Settings
Example 1: Both Cisco Unity Servers Use G.729a for Recording and Storage
Example 2: Both Cisco Unity Servers Use G.711 for Recording and Storage
Example 3: One Cisco Unity Server Uses G.711 and the Other Uses G.729a
VPIM Delivery Location Profile Settings
Call Transfer Settings and VPIM Subscribers
Inbound Messages Are Delivered Only to Primary Extensions
Running the Voice Connector Setup Program in Another Language
VPIM Networking
Overview: VPIM Networking
Cisco Unity supports the Voice Profile for Internet Messaging (VPIM) protocol, which is an industry standard that allows different voice messaging systems to exchange voice, fax, and text messages over the Internet or any TCP/IP network. VPIM is based on the Simple Mail Transfer Protocol (SMTP) and the Multi-Purpose Internet Mail Extension (MIME) protocol.
For a list of VPIM-compliant voice messaging systems that Cisco Unity supports, refer to Cisco Unity System Requirements, and Supported Hardware and Software, available at http://www.cisco.com/univercd/cc/td/doc/product/voice/c_unity/sysreq/40_sysrq.htm. Note that VPIM Networking can be used for messaging between Cisco Unity servers that are in different directories.
VPIM Networking is a licensed feature. If your organization has multiple Cisco Unity servers networked together, only one server needs to be licensed and configured for VPIM Networking. The Cisco Unity server configured for VPIM Networking is referred to as the bridgehead server. For more information on obtaining licenses for Cisco Unity features, refer to the White Paper: Licensing for Cisco Unity (All Versions), which is available at http://www.cisco.com/univercd/cc/td/doc/product/voice/c_unity/whitpapr/licenses.htm.
No special permissions are required for VPIM Networking beyond those required for Cisco Unity itself. For detailed information about the permissions required by Cisco Unity, refer to the Permissions Wizard Help, which is available in Tools Depot on the Cisco Unity server.
This chapter contains the following sections:
•
Setting Up Cisco Unity to Use VPIM Networking—This section describes the prerequisites for setting up VPIM Networking, and provides a task list containing a high-level view of all of the tasks you need to complete for the setup, and the order in which they should be completed.
•
•
•
•
•
•
•
See Also:
Troubleshooting VPIM Transport at http://www.ciscounitytools.com/Documents.htm.
Setting Up Cisco Unity to Use VPIM Networking
This section describes the prerequisites for setting up VPIM Networking, and provides a task list containing a high-level view of all of the tasks you need to complete for the setup, and the order in which they should be completed. If you are unfamiliar with VPIM Networking, you should first read the "VPIM Concepts and Definitions" section and then review the task list and procedures before beginning the setup. Planning is essential to a successful setup.
Prerequisites
Before starting the setup, verify that the following prerequisites have been met.
•
•
•
•
For installations with multiple Cisco Unity servers that access that same directory, you should first set up the servers for Digital Networking as described in the "Digital Networking" chapter before setting up VPIM Networking. After the Cisco Unity servers have been set up for Digital Networking, verify the following settings:
•
•
–
–
Task List: Setting Up Cisco Unity to Use VPIM Networking
Use the task list that follows to set up VPIM Networking in Cisco Unity. The cross-references take you to detailed procedures for the setup.
If you are setting up VPIM Networking for messaging between Cisco Unity servers in different directories, do these tasks in both Cisco Unity locations.
1.
2.
3.
4.
5.
6.
Do the Following Tasks on the Cisco Unity Server That Is Licensed for VPIM:
7.
8.
9.
10.
Finish the Setup:
11.
12.
Procedures for Setting Up Cisco Unity to Use VPIM Networking
This section contains all of the procedures necessary to set up Cisco Unity for VPIM Networking. If you are unfamiliar with VPIM Networking, you should first read the "VPIM Concepts and Definitions" section.
Making Design Decisions and Gathering Needed Information
Before you begin setting up Cisco Unity for VPIM Networking, be sure to plan for the following, and gather the applicable information:
•
•
•
•
Determining the Domain Name
In order for messages to be exchanged between the remote voice messaging system and Cisco Unity, the same domain name (for example "unity-vpim@domain.com") will need to be configured, as follows:
•
•
•
•
If the remote voice messaging system has already been configured with a domain name for messaging with Cisco Unity, use that domain name in the procedures that follow. Otherwise, consult with the Exchange administrator for your organization to determine an appropriate domain name to use.
Verifying Connectivity Between Exchange and the Remote Voice Messaging System
Verify that the Exchange server on which the Voice Connector and the VPIM Transport Event Sink will be installed has network and SMTP connectivity with the remote voice messaging server, and vice versa.
VPIM messages are sent over the Internet or any TCP/IP network via SMTP. With Cisco Unity, the processing of VPIM messages occurs on the Exchange server on which the Voice Connector and the VPIM Transport Event Sink are installed. Because an SMTP service runs on the Exchange server, the Cisco Unity server itself does not require an SMTP service.
For networking with another voice messaging server, you may need to install and configure an SMTP service or gateway on that server. Refer to the documentation of the other voice messaging system for information on installing the SMTP service or gateway. Before proceeding, verify that the SMTP service or gateway has been installed on the other voice messaging server.
To Verify Network Connectivity Between Exchange and the Remote Voice Messaging Server
Step 1
Step 2
If you receive no reply, troubleshoot the network connectivity problem until the problem is resolved. Then continue with Step 3.
Step 3
Note
Step 4
If you received a reply when pinging the IP address in Step 2, but no replies when pinging the domain name and server name in Step 3 and Step 4, see the "Resolving Names with IP Addresses" section. When the problem(s) are resolved, continue with Step 5.
Step 5
•
•
Step 6
If you receive no reply, troubleshoot the network connectivity problem until the problem is resolved. Then continue with Step 7.
Step 7
Note
Step 8
If the ping tests in Step 7 and Step 8 fail, there is a basic network connectivity problem that needs to be resolved before proceeding with the VPIM Networking setup.
When you verify that you have basic network connectivity, continue with the following "To Verify SMTP Connectivity Between Exchange and the Remote Voice Messaging Server" procedure.
To Verify SMTP Connectivity Between Exchange and the Remote Voice Messaging Server
Step 1
Step 2
Step 3
Step 4
•
•
Step 5
Step 6
If either of the telnet tests in Step 5 and Step 6 fails, there is a basic SMTP connectivity problem that must be resolved before proceeding with the VPIM Networking setup.
Resolving Names with IP Addresses
Both the Exchange and remote voice messaging servers require some mechanism for name resolution. While any method or combination of methods may be used, two common ways to accomplish name resolution are through Domain Name System (DNS), and by using HOSTS files.
If the Exchange server on which the Voice Connector will be installed and/or the remote voice messaging server are in a network that uses DNS, the servers should have a host address resource ("A") record and a mail exchange ("MX") record in DNS. If the A and MX records for the servers have not already been added, do so now before continuing. Refer to your operating system documentation for more information about adding A and MX records in DNS.
A HOSTS file is a text file that contains the mappings of IP addresses to host and domain names. If the Exchange server is in a network that does not use DNS or another method for name resolution, you will need to edit the HOSTS file to add host and domain entries for the remote voice messaging server. The HOSTS file on the Exchange server is located in the C:\Winnt\System32\Drivers\Etc directory. If the remote voice messaging server is in a network that does not use DNS, you will need to edit the HOSTS file on the remote voice messaging server to add host and domain entries for the Exchange server. The location of the HOSTS file on the remote voice messaging server depends on the operating system that is used. Some systems may have a user interface for editing the HOSTS file. Refer to the remote voice messaging system documentation for more information.
Extending the Active Directory Schema
Before Cisco Unity is installed, the Active Directory schema is extended to store Cisco Unity-specific information. To support VPIM Networking, the schema must be further extended. To see the schema changes that need to be made to support VPIM Networking, browse to the directory Schema\LdifScripts on Cisco Unity Disc 1, and view the file vpimgateway.ldf.
To Extend the Active Directory Schema for VPIM Networking
Do this procedure only if you did not already modify the Active Directory schema to support VPIM Networking during the Cisco Unity installation. You can verify whether the schema has already been modified by examining the log file that is generated each time the schema is updated. A shortcut to the directory where the log file is located is placed on the Windows desktop.
Step 1
Step 2
Step 3
Step 4
Step 5
Step 6
Step 7
Step 8
Note
Verifying the Recipient Policies or Creating a New One
Depending on your Exchange organization, you may be able to use the default recipient policy for the Voice Connector Exchange mailbox, or you may need to create a new recipient policy.
To Check the Recipient Policies
Step 1
Step 2
Step 3
Step 4
Step 5
If the SMTP address is the same as the domain name that you previously chose in the "Determining the Domain Name" section, then close the Properties page, exit Exchange System Manager, and skip to the "Setting Up the Voice Connector for VPIM Networking" section.
Step 6
If your chosen domain name does not match the SMTP address configured in any of the recipient polices, create a new recipient policy for the Voice Connector Exchange mailbox as described in the following "To Create a Recipient Policy for the Voice Connector Exchange Mailbox" procedure.
To Create a Recipient Policy for the Voice Connector Exchange Mailbox
Caution
Step 1
Step 2
Step 3
Step 4
Step 5
Step 6
Step 7
Step 8
Step 9
Step 10
When you click Set as Primary, the new address should change to bold text.
Step 11
Setting Up the Voice Connector for VPIM Networking
Although there are two Voice Connector installation programs included on Cisco Unity Disc 1, the Voice Connector for Exchange 2000 is the only one supported for VPIM Networking.
Install Voice Connector version 11.0(1) or later on any Exchange 2000 or Exchange 2003 server that is not part of an Exchange cluster (Microsoft does not support third-party connectors on an Exchange cluster server). Although the Voice Connector can be installed on the Cisco Unity server (if Exchange 2000 or Exchange 2003 is also on the server), this is not recommended for performance reasons.
If the Exchange server on which the Voice Connector will be installed is in a different routing group than the Exchange servers on which Cisco Unity subscribers are homed, routing group connectors must be configured between the routing groups.
The Voice Connector installation program does not prompt with a choice of languages for the installation; it always installs in English. To run the Voice Connector installation program by using one of the localized versions (FRA, DEU, or JPN) instead of English, see the "Running the Voice Connector Setup Program in Another Language" section.
To Install the Voice Connector for Exchange 2000
As a best practice, back up the Exchange server before installing the Voice Connector.
Step 1
Step 2
Step 3
Step 4
If you downloaded the Voice Connector files from the Software Center website, browse to the directory in which the files were extracted.
Step 5
Step 6
Step 7
Step 8
If you are installing the Voice Connector on multiple Exchange servers, in most cases you need to install the VPIM Transport Event Sink only once. The Exchange server on which the VPIM Transport Event Sink is installed should be the Exchange server that will receive incoming VPIM messages. Only one instance of the VPIM Transport Event Sink is necessary if all VPIM messages will be routed through a single Exchange server. If incoming VPIM messages will be routed through multiple Exchange servers, the Voice Connector and VPIM Transport Event Sink should be installed on each of these servers.
Step 9
Step 10
Step 11
Step 12
Step 13
Note
To Determine Whether the Microsoft Windows 2000 Script Host Should Be Updated
Step 1
Step 2
Step 3
Step 4
Step 5
To update the Windows Script Host, go to the downloads page on the Microsoft website, and do a keyword search for Windows Script Host. Follow the installation instructions.
To Verify the Voice Connector Installation
To verify that the Voice Connector for Exchange 2000 installed properly, verify that the Voice Connector service is running, and that the Voice Connector mailbox has been created.
Step 1
Step 2
Step 3
Step 4
Step 5
Step 6
Step 7
In the right pane, you should see the mailbox for "Exchange 2000 Voice Connector (<Server name>)" or "AvExchangeIVC_<Server name>." (The name changes from "AvExchangeIVC_<Server name>" to "Exchange 2000 Voice Connector (<Server name>)" after you run Cleanup Agent.)
Step 8
To Verify or Set the Recipient Policy for the Voice Connector Exchange Mailbox
Step 1
Step 2
Step 3
Step 4
a.
b.
If you created a new recipient policy for the Voice Connector Exchange mailbox:
a.
b.
Customizing the Primary Location
If your installation consists of multiple Cisco Unity servers networked via Digital Networking, you may have already customized the primary location. In this case, verify that the SMTP Domain Name has been entered on the primary locations of all Cisco Unity servers networked via Digital Networking. Otherwise, VPIM Networking will not work for the subscribers on the other Cisco Unity servers.
For detailed information about the settings, see the "Primary Location Profile Settings" section on page 7-1.
To Customize the Primary Location
Step 1
Step 2
Step 3
Step 4
Step 5
•
•
Note that the dialing domain name is case sensitive and must be entered exactly the same on all of the servers. To ensure that all servers are correctly added to the same dialing domain, enter the dialing domain name on one Cisco Unity server and wait for the name to replicate to the other Cisco Unity servers. By doing so, you also confirm that replication is working correctly among the servers. The time that it takes for the primary location data from other Cisco Unity servers to be reflected on the local server depends on your network configuration and replication schedule.
Step 6
Step 7
Creating VPIM Delivery Locations
Create a VPIM delivery location on your local Cisco Unity server for each remote voice messaging system to which subscribers will send messages. If Cisco Unity will be messaging with a large number of voice messaging systems, you may prefer to configure only a few delivery locations at this time and proceed with the rest of the setup. After verifying that messaging works correctly between Cisco Unity and the voice messaging systems for which delivery locations have been configured, you can create the rest of the delivery locations.
For detailed information about the VPIM delivery location settings, see the "VPIM Delivery Location Profile Settings" section. Carefully consider the Dial ID that you will assign to the delivery location. See the "Guidelines for Assigning Dial IDs and Extensions" section on page 7-2 for detailed information about choosing a Dial ID.
You can create VPIM delivery locations by using the Cisco Unity Administrator or the Cisco Unity Bulk Location Import wizard. See the following sections:
•
•
•
Using the Cisco Unity Administrator to Create VPIM Delivery Locations
You can create VPIM delivery locations one at a time by using the Cisco Unity Administrator.
To Create VPIM Delivery Locations by Using the Cisco Unity Administrator
Step 1
Step 2
Step 3
Step 4
Step 5
Step 6
Step 7
Step 8
Step 9
Subscribers do not enter this prefix when addressing messages. However, on outgoing messages, the Voice Connector adds the prefix to the beginning of the recipient mailbox number to form the To address.
Step 10
On outgoing messages, the Voice Connector adds this prefix to the beginning of the sender mailbox number to form the From address.
Step 11
Step 12
Step 13
Step 14
Using the Cisco Unity Bulk Import Wizard to Create VPIM Delivery Locations
The Cisco Unity Bulk Import wizard allows you to create or modify multiple delivery locations at once by importing data in a CSV file. If you have already created delivery locations, you can run Bulk Import to export the data about the delivery locations to a CSV file.
Use the following procedure to prepare your CSV file. To learn more about preparing a CSV file for use with the Cisco Unity Bulk Import wizard—including information on the required and optional column headers for your CSV file—refer to the Cisco Unity Bulk Import wizard Help.
To Prepare a CSV File for Creating VPIM Delivery Locations
Step 1
Step 2
DTMF_ACCESS_ID, DISPLAY_NAME, SMTP_DOMAIN_NAME
Step 3
Step 4
•
•
•
•
Step 5
Step 6
To Create VPIM Delivery Locations by Using the Cisco Unity Bulk Import Wizard
Step 1
Step 2
Step 3
Step 4
Step 5
Step 6
Step 7
Step 8
Step 9
If errors were found in any of the rows, you can click the Errors link at the bottom of the page to open the output CSV file to correct the errors, or you can ignore the errors for now and proceed with the import.
Step 10
Step 11
Step 12
To Correct Errors That Occurred When Importing Delivery Location Data from a CSV File
Step 1
This file contains all of the records that were not imported.
Step 2
Step 3
Step 4
Step 5
Step 6
Modifying Existing Delivery Locations by Using the Cisco Unity Bulk Import Wizard
If you want to use the Cisco Unity Bulk Import wizard to make modifications to existing delivery locations, you will need to create a CSV file for the modifications. We recommend that you run the Cisco Unity Bulk Import wizard to export your existing delivery location data to a CSV file, and then edit the CSV file to use for the modification.
Note that the DTMF_ACCESS_ID column is used as the primary key to find the existing delivery location, and therefore it cannot be modified by the Cisco Unity Bulk Import wizard.
Creating VPIM Subscribers
You may prefer to create only a few VPIM subscribers for testing purposes at this point until you verify that Cisco Unity and the remote system can successfully exchange messages. After you have confirmed that messaging between Cisco Unity and the remote system is working correctly, you can finish creating the VPIM subscribers. Note that the VPIM subscribers must be created on the same Cisco Unity server as the VPIM delivery locations.
You can create VPIM subscriber accounts by using the Cisco Unity Bulk Import wizard or the Cisco Unity Administrator. See the following sections:
•
•
•
•
Before Creating Subscriber Accounts
This section lists—in order—the issues that you must consider before creating VPIM subscribers. VPIM subscribers can be created only on a Cisco Unity bridgehead server. Do the following tasks on the Cisco Unity bridgehead server where you will be adding the VPIM subscribers.
1.
If you are unsure whether the account that you are using has sufficient rights and permissions to create subscribers, or whether Cisco Unity is properly configured to work with your message store, use the following "To Check Cisco Unity Setup and Permissions by Using the Cisco Unity SysCheck Tool" procedure.
To Check Cisco Unity Setup and Permissions by Using the Cisco Unity SysCheck Tool
Step 1
Step 2
Step 3
Step 4
Step 5
Step 6
Step 7
a.
b.
c.
Step 8
2.
A class of service (COS) defines limits and permissions for subscribers who use Cisco Unity. For example, a COS dictates the maximum length of subscriber messages and greetings. Although most COS settings are not applicable to VPIM subscribers, they still must be members of a COS. In the Cisco Unity Administrator, a COS is specified in each subscriber template; thus, a subscriber is assigned to the COS that is specified in the template upon which the subscriber account is based. Cisco Unity includes predefined classes of service, which you can modify. You can also create new classes of service. For details, refer to the "Class of Service Settings" chapter in the Cisco Unity System Administration Guide.
3.
Each COS specifies a restriction table for call transfers, one for message notification, and one for fax deliveries. Cisco Unity applies the restriction table associated with the COS of a subscriber, and displays an error message if the phone number is not allowed. Cisco Unity comes with predefined restriction tables, which you can modify.
Although most restriction table settings do not apply to VPIM subscribers because they cannot log on to Cisco Unity or use the Cisco Personal Communications Assistant (PCA), administrators can enter call transfer numbers for VPIM subscribers. For security purposes, you should modify the restriction table used for transfers in the COS to which VPIM subscribers belong, as necessary. For details, refer to the "Restriction Tables" chapter in the Cisco Unity System Administration Guide.
4.
Public distribution lists are used to send voice messages to multiple subscribers at the same time. Cisco Unity assigns new subscribers to the public distribution lists that are specified in the template on which the subscriber account is based. For details, refer to the "Public Distribution List Settings" chapter in the Cisco Unity System Administration Guide.
Public distribution lists correspond to distribution groups in Active Directory. The distribution lists are listed in the address book for Microsoft Outlook (or other e-mail client), unless they are explicitly hidden. To help prevent e-mail from being sent to VPIM subscribers, you may want to create lists that contain only VPIM subscribers, and hide these distribution lists from the Outlook address book. The option to hide distribution lists is available on the Subscribers > Public Distribution Lists > Profile page in the Cisco Unity Administrator. Additionally, you may also want to exclude VPIM subscribers from the All Subscribers distribution list or any other distribution list that contains regular subscribers.
5.
In the Cisco Unity Administrator, you can specify settings for a group of subscribers by using a subscriber template. Subscriber templates contain settings that are applicable for subscribers of a particular type, such as a department. The settings from the template you choose are applied to subscriber accounts as the accounts are created. Cisco Unity comes with a default subscriber template, which you can modify, and you can create an unlimited number of additional templates. For more details, refer to the "Subscriber Template Settings" chapter in the Cisco Unity System Administration Guide.
VPIM subscribers correspond to contacts in Active Directory. The contacts are listed in the address book for Microsoft Outlook (or other e-mail client), unless they are explicitly hidden. You may prefer that the associated contacts do not appear in the Outlook address book at all, or you may want to alter how contacts appear in the Outlook address book. See the "Determining How VPIM Subscribers Appear in the Outlook Address Book" section for details.
Note
Using the Cisco Unity Bulk Import Wizard to Create Multiple Subscriber Accounts
The Cisco Unity Bulk Import wizard allows you to create multiple subscriber accounts at the same time by importing user data from a comma-separated value (CSV) file. CSV is a common text file format for moving data from one data store to another. As long as the user data contained in the CSV file is formatted correctly, you can use it to create new Active Directory contacts at the same time that you create VPIM subscriber accounts, or you can use it to create VPIM subscriber accounts with existing Active Directory contact data.
If you choose to create VPIM subscriber accounts with existing Active Directory contact data, note that the e-mail addresses for the imported contacts are overwritten with extension addresses used for addressing voice messages to the remote voice messaging systems. Thus, the imported objects can no longer be used for outbound message addressing to remote e-mail addresses.
Use the following procedure to prepare your CSV file. To learn more about preparing a CSV file for use with the Cisco Unity Bulk Import wizard—including information on the required and optional column headers for your CSV file—refer to the Cisco Unity Bulk Import wizard Help.
To Prepare a CSV File for Creating VPIM Subscriber Accounts
Step 1
As a best practice, do not include more than 7,500 records in a single CSV file, as you may encounter unexpected results when the Cisco Unity Bulk Import wizard imports the data.
Step 2
Step 3
•
•
Step 4
Abade,Alex,2001,3000
Bader,Kelly,2002,3100
Campbell,Terry,2003,3200
Cho,Li,2004,3300Step 5
LAST_NAME,FIRST_NAME,DTMF_ACCESS_ID,REMOTE_USER_ID
Note
Step 6
•
•
Step 7
The DELIVERY_LOCATION_ID column contains the dial ID of a delivery location with which the external subscriber will be associated. This value corresponds to the Dial ID field on the Network > Delivery Locations > Profile Page in the Cisco Unity Administrator. If this column header is omitted, or if a row does not contain a value, the delivery location that the Cisco Unity Import wizard prompts for is used as a default. You can import external subscribers for multiple delivery locations by using one CSV file.
Step 8
A value of 1 indicates that subscribers will be hidden from the e-mail address book; a value of 0 indicates that subscribers will be displayed.
Step 9
Step 10
Step 11
Step 12
To Create VPIM Subscriber Accounts by Using the Cisco Unity Bulk Import Wizard
Step 1
Step 2
Step 3
To learn more about the options presented in the dialog boxes that appear as the wizard proceeds, click Help.
Step 4
Step 5
•
•
Step 6
Step 7
If you had no import errors, or if all errors have now been corrected, see the "After Creating Subscriber Accounts" section.
Correcting CSV Import Errors
The error log file contains data that the Cisco Unity Bulk Import wizard could not import. The wizard reports the first error it detects in a row in a CSV file. When you have corrected that error, the wizard may detect additional errors in the same row when the data is imported again. Thus, you may need to repeat the correction process—running the Cisco Unity Bulk Import wizard and correcting an error—several times to find and correct all errors.
The output log file contains all the records that were not imported. You can save it as a CSV file, and use it when you run the Cisco Unity Bulk Import wizard again. Note that each time you run the Cisco Unity Bulk Import wizard, the error and output log files are overwritten (unless you specify new names for the files).
To correct import errors, do the following "To Correct Errors That Occurred When Importing Data from a CSV File" procedure.
To Correct Errors That Occurred When Importing Data from a CSV File
Step 1
Step 2
Step 3
Step 4
Step 5
Step 6
Step 7
Step 8
Using the Cisco Unity Administrator to Create VPIM Subscriber Accounts
By using the Cisco Unity Administrator, you can create VPIM subscriber accounts one at a time. When you add a new VPIM subscriber account, Cisco Unity creates a contact in Active Directory.
To create an VPIM subscriber account, do the following "To Add a New VPIM Subscriber by Using the Cisco Unity Administrator" procedure.
To Add a New VPIM Subscriber by Using the Cisco Unity Administrator
Step 1
Step 2
Step 3
Step 4
Step 5
Step 6
Step 7
Step 8
Step 9
Step 10
After Creating Subscriber Accounts
After creating VPIM subscriber accounts, consider the following:
•
•
•
•
See the "Deleting VPIM Subscribers" section for details.
Extending Identified Subscriber Messaging to Include VPIM Subscribers
When a person on a remote voice messaging system who has a corresponding VPIM subscriber account calls a Cisco Unity subscriber and leaves a message, by default Cisco Unity will not identify the message as being from the VPIM subscriber. For Cisco Unity to identify callers whose calling number matches the extension or alternate extension of an VPIM subscriber, identified subscriber messaging (ISM) must be extended to include VPIM subscribers. See the following sections as applicable to your installation.
•
Installation with Multiple Cisco Unity Servers Networked via Digital Networking
In installations with multiple Cisco Unity servers networked via Digital Networking, enabling ISM to include VPIM subscribers requires the following:
1.
2.
3.
4.
5.
6.
Single-Server Installations
In installations with only one Cisco Unity server, enabling ISM to include VPIM subscribers requires the following:
1.
2.
3.
4.
Setting Permissions on Active Directory Containers Used for Importing Subscribers
If you will be importing contacts from two or more containers (for all of the Cisco Unity servers combined), the Cisco Unity message store services account on each Cisco Unity server must be granted SendAs permission on every container from which contacts will be imported on every Cisco Unity server in the forest. Otherwise, identified subscriber messaging may not work between Cisco Unity servers. For example, if CiscoUnityServer1 will import contacts from Container1 and Container2, and if CiscoUnityServer2 will import contacts from Container3 and Container4, Cisco Unity message store services account on each Cisco Unity server must have SendAs permission for all four containers.
To Set the Applicable Permissions
Step 1
Step 2
Step 3
Step 4
•
–
–
•
–
–
•
–
–
Step 5
Enabling Identified Subscriber Messaging
Note
To Enable Identified Subscriber Messaging
Step 1
Step 2
Identified subscriber messaging for subscribers on the same Cisco Unity server is enabled when the check box is unchecked. By default, the box is unchecked.
Step 3
Extending Identified Subscriber Messaging
After identified subscriber messaging has been enabled, you must extend it to include VPIM subscribers.
To Extend Identified Messaging
Step 1
Step 2
Step 3
Step 4
Step 5
Step 6
Step 7
Gathering Information About Cisco Unity to Configure Another Voice Messaging System for VPIM
Configuring another voice messaging system to exchange VPIM messages with Cisco Unity may require the following information:
•
•
•
Incoming VPIM messages must get routed to the Exchange 2000 or Exchange 2003 server on which the Voice Connector and VPIM Transport Event Sink are installed. When defining a location for Cisco Unity on the remote voice messaging system, use the domain name that you entered for the SMTP Transport Event Sink during the Voice Connector setup program.
Cisco Unity expects incoming VPIM messages to be formatted as follows: <UnityPhonePrefix+UnitySubscriberExtension@PrimaryLocationSMTPDomainName>. These specific properties are configured in Cisco Unity, but similar information will need to be configured in the other voice messaging system.
Migrating from SMTP Networking to VPIM Networking
Use the task list that follows to migrate from SMTP Networking to VPIM Networking for messaging between Cisco Unity servers that access different directories. The cross-references take you to detailed procedures. Do these tasks in both Cisco Unity locations.
Prerequisites
Before starting the migration, verify that the following prerequisites have been met.
•
•
•
Task List for Migrating from SMTP Networking to VPIM Networking
1.
2.
3.
–
–
4.
Procedures: Migrating from SMTP Networking to VPIM Networking
Extending the Active Directory Schema
Before Cisco Unity is installed, the Active Directory schema is extended to store Cisco Unity-specific information. To support VPIM Networking, the schema must be further extended. To see the schema changes that need to be made to support VPIM Networking, browse to the directory Schema\LdifScripts on Cisco Unity Disc 1, and view the file vpimgateway.ldf.
To Extend the Active Directory Schema for VPIM Networking
Do this procedure only if you did not already modify the Active Directory schema to support VPIM Networking during the Cisco Unity installation. You can verify whether the schema has already been modified by examining the log file that is generated each time the schema is updated. A shortcut to the directory where the log file is located is placed on the Windows desktop.
Step 1
Step 2
Step 3
Step 4
Step 5
Step 6
Step 7
Step 8
Note
Uninstalling the Cisco Unity Voice Connector
The uninstall procedure that you use depends on the Cisco Unity Voice Connector version that is installed, and whether it is installed on an Exchange 2000 (or Exchange 2003) server or on an Exchange 5.5 server. Beginning with Cisco Unity version 4.0(1), the Voice Connector was assigned a version number separate from the Cisco Unity version number. The Voice Connector version 11.0(1) is included with Cisco Unity 4.0(3).
To determine the version of an already installed Voice Connector, see the following procedures:
•
To uninstall the Voice Connector, see the following procedures:
•
To Determine the Voice Connector Version in Use: Cisco Unity 4.0 and Later, Voice Connector 10.0 and Later
Step 1
Step 2
or Exchange 2003<ExchangeServerPath>\VoiceGateway\Bin
<ExchangeServerPath>\Connect\Voice\Bin
Step 3
Step 4
Step 5
To Determine the Voice Connector Version in Use: Cisco Unity 3.0 through 3.1
Step 1
Step 2
<ExchangeServerPath>\VoiceGateway\Bin\LocalizedFiles\ENU
<ExchangeServerPath>\Voice\Bin\LocalizedFiles\ENU
Step 3
Step 4
To Uninstall the Voice Connector for Exchange 2000: Cisco Unity 3.1 and Later, Voice Connector 10.0 and Later
Step 1
Step 2
Step 3
Step 4
Step 5
The mailbox for the Voice Connector is named "AvExchangeIVC_<Servername>" or "Exchange 2000 Voice Connector (<Servername>)."
Step 6
Step 7
Step 8
To Uninstall the Voice Connector for Exchange 5.5: Cisco Unity 3.1(2) or Later, Voice Connector 10.0 and Later
Step 1
Step 2
Step 3
To Uninstall the Voice Connector for Exchange 5.5: Cisco Unity 2.4(6.x), 3.0(x), or 3.1(1)
Step 1
Step 2
Step 3
The Setup program detects that the Voice Connector is already installed, and the Uninstall dialog box appears.
Step 4
Step 5
Running the Stored Procedure to Convert VPIM Delivery Locations and Subscribers
If there are a large number of Internet subscribers to be converted to VPIM subscribers, we recommend that you run the stored procedure during off hours when the Cisco Unity server is not processing very many calls or messages.
To Run the VpimMigrateSMTP Stored Procedure
As a best practice, you should back up the Cisco Unity server before running the stored procedure.
Step 1
Step 2
Step 3
osql /d UnityDB /E csp_VpimMigrateSMTP
For more information about any of the osql options, enter osql /?
Step 4
Note that the stored procedure adds the VPIM subscribers to the SQL database on the Cisco Unity server and then finishes running. However, Cisco Unity still must synchronize the subscriber data with Active Directory. If there are a large number of VPIM subscribers, this synchronization could take up to several hours.
Step 5
Manually Converting VPIM Delivery Locations and Subscribers
If you prefer not to use the VpimMigrateSMTP stored procedure to convert SMTP delivery locations to VPIM delivery locations and Internet subscribers to VPIM subscribers, use the following task list and procedures to do the conversion manually. You do these tasks on the Cisco Unity bridgehead server.
1.
2.
3.
4.
5.
6.
To Record SMTP Delivery Location Data
Step 1
Step 2
Step 3
Step 4
Step 5
To Create VPIM Delivery Locations
Add the VPIM delivery locations by using the Display Names, Dial IDs, and Domain Names that had been entered on the SMTP delivery location pages.
Step 1
Step 2
Step 3
Step 4
Step 5
Step 6
Step 7
Step 8
Subscribers do not enter this prefix when addressing messages. However, on outgoing messages, the Voice Connector adds the prefix to the beginning of the recipient mailbox number to form the To address.
Step 9
On outgoing messages, the Voice Connector adds this prefix to the beginning of the sender mailbox number to form the From address.
Step 10
Step 11
Step 12
Step 13
Step 14
To Export Internet Subscriber Data to a CSV File
Step 1
Step 2
Step 3
Step 4
Step 5
By default, these fields are set respectively to "Commas" and "When the Data Includes a Comma."
Step 6
Step 7
Step 8
Step 9
To Modify the CSV File for Use with the Cisco Unity Bulk Import Wizard
Step 1
Step 2
Change:
First Name,Last Name,Primary Extension,RemoteAddress
to:
FIRST_NAME,LAST_NAME,DTMF_ACCESS_ID,REMOTE_ADDRESS
Step 3
Otherwise, add the DELIVERY_LOCATION column header to the first row and enter the applicable delivery location Dial ID in each data row. If a row does not contain a value for DELIVERY_LOCATION, the default delivery location that the Cisco Unity Bulk Import wizard prompts for will be used.
Step 4
Step 5
Step 6
VPIM:<Dial ID>_<Remote Mailbox Number>
Step 7
To Delete the Internet Subscribers and Associated Contacts
Step 1
Step 2
Step 3
Step 4
Step 5
The Cisco Unity directory monitor service will detect the change the next time it synchronizes with the directory, and the associated Internet subscribers will be deleted from Cisco Unity.
Step 6
Step 7
•
•
To Create VPIM Subscriber Accounts by Using the Cisco Unity Bulk Import Wizard
Step 1
Step 2
Step 3
Step 4
Step 5
Step 6
Step 7
If the wizard reports any errors, you can:
•
•
Step 8
Step 9
If you had no import errors, or if all errors have now been corrected, finish the migration by going to the "Setting Up the Voice Connector for VPIM Networking" section.
To Correct Errors That Occurred When Importing Data from a CSV File
The error log file contains data that the Cisco Unity Bulk Import wizard could not import. The wizard reports the first error it detects in a row in a CSV file. When you have corrected that error, the wizard may detect additional errors in the same row when the data is imported again. Thus, you may need to repeat the correction process—running the Cisco Unity Bulk Import wizard and correcting an error—several times to find and correct all errors.
The output log file contains all the records that were not imported. You can save it as a CSV file, and use it when you run the Cisco Unity Bulk Import wizard again. Note that each time you run the Cisco Unity Bulk Import wizard, the error and output log files are overwritten (unless you specify new names for the files).
Step 1
Step 2
Step 3
Step 4
Step 5
Step 6
Step 7
Setting Up the Voice Connector for VPIM Networking
Although there are two Voice Connector installation programs included on Cisco Unity Disc 1, the Voice Connector for Exchange 2000 is the only one supported for VPIM Networking.
Install Voice Connector version 11.0(1) or later on any Exchange 2000 or Exchange 2003 server that is not part of an Exchange cluster (Microsoft does not support third-party connectors on an Exchange cluster server). Although the Voice Connector can be installed on the Cisco Unity server (if Exchange 2000 or Exchange 2003 is also on the server), this is not recommended for performance reasons.
If the Exchange server on which the Voice Connector will be installed is in a different routing group than the Exchange servers on which Cisco Unity subscribers are homed, routing group connectors must be configured between the routing groups.
To Install the Voice Connector for Exchange 2000
As a best practice, back up the Exchange server before installing the Voice Connector.
Step 1
Step 2
Step 3
If you downloaded the Voice Connector files from the Software Center website, browse to the directory in which the files were extracted.
Step 4
Step 5
Step 6
Step 7
If you are installing the Voice Connector on multiple Exchange servers, in most cases you need to install the VPIM Transport Event Sink only once. The Exchange server on which the VPIM Transport Event Sink is installed should be the Exchange server that will receive incoming VPIM messages. Only one instance of the VPIM Transport Event Sink is necessary if all VPIM messages will be routed through a single Exchange server. If incoming VPIM messages will be routed through multiple Exchange servers, the Voice Connector and VPIM Transport Event Sink should be installed on each of these servers.
Step 8
Step 9
Step 10
Step 11
Step 12
Note
To Determine Whether the Microsoft Windows 2000 Script Host Should Be Updated
Step 1
Step 2
Step 3
Step 4
Step 5
To update the Windows Script Host, go to the downloads page on the Microsoft website, and do a keyword search for Windows Script Host. Follow the installation instructions.
To Verify the Voice Connector Installation
To verify that the Voice Connector for Exchange 2000 installed properly, verify that the Voice Connector service is running, and that the Voice Connector mailbox has been created.
Step 1
Step 2
Step 3
Step 4
Step 5
Step 6
Step 7
In the right pane, you should see the mailbox for "Exchange 2000 Voice Connector (<Server name>)" or "AvExchangeIVC_<Server name>." (The name changes from "AvExchangeIVC_<Server name>" to "Exchange 2000 Voice Connector (<Server name>)" after you run Cleanup Agent.)
Step 8
VPIM Concepts and Definitions
The following sections explain VPIM concepts in detail:
•
•
•
•
•
•
•
•
Introduction to VPIM
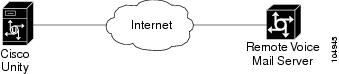
VPIM Networking allows the exchange of voice, fax, and text messages between different voice messaging systems over the Internet or any TCP/IP network. VPIM is an industry-standard protocol based on the Simple Mail Transfer Protocol (SMTP) and the Multi-Purpose Internet Mail Extension (MIME) protocol.
VPIM enables organizations to link different voice messaging systems and to provide seamless voice message sending, receiving, forwarding, and replying between these systems. An organization can exchange messages over a TCP/IP-based intranet, or over the Internet, or a combination of the two. In simplified terms, voice messages are exchanged between the systems like regular e-mail.
Figure 6-1 VPIM Networking Enables Messaging Between Different Systems Over a TCP/IP Network
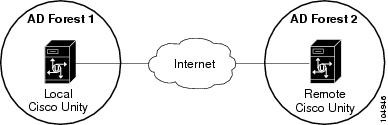
VPIM Networking also enables messaging between Cisco Unity servers that access different directories, specifically when the Cisco Unity servers are in different Active Directory forests. (When the Cisco Unity servers are in the same Active Directory forest, Digital Networking is the solution to use rather than VPIM Networking.)
Figure 6-2 VPIM Networking Enables Messaging Between Cisco Unity Servers in Different Directories
The VPIM specification defines the format of messages and message addresses, and how messages are exchanged between mail servers. VPIM does not specify how the mail servers interact with client applications, or how they interface with end users. This allows many different kinds of existing systems to support VPIM. For more information about VPIM, refer to the Open Group VPIM website.
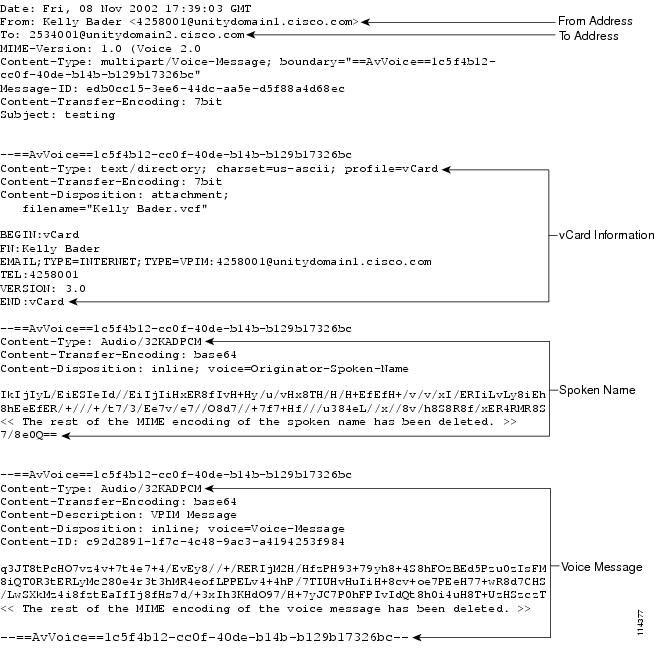
VPIM Messages
VPIM messages are made up of one or more MIME-encoded parts. The VPIM specification allows for optional MIME parts for spoken name and for forwarded, fax, and text messages. VPIM messages may also include a vCard, an electronic business card that includes phone number, text name, and e-mail address. Cisco Unity allows you to specify whether the voice name and vCard of the sender will be sent with outgoing messages. If incoming messages include a voice name, it is played as part of the message. If a vCard is attached to an incoming message, the recipient can look at the vCard data in ViewMail for Microsoft Outlook. Cisco Unity does not update the directory with the voice name or the vCard data from incoming messages.
VPIM fax encoding is based on the TIFF-F specification, and the vCard format is based on the Internet adaptation of the Versit vCard specification.
Figure 6-3 shows a sample VPIM message. Only a portion of the MIME encoding of the spoken name and voice message parts are shown because they are very long.
Figure 6-3 Sample VPIM Message
VPIM Addresses
A VPIM address is in the same format as a typical SMTP e-mail address: localpart@hostpart. The right-hand side of the address is the domain name of the system on the TCP/IP network that handles messages. The left-hand side of the address is a unique identifier for the user. Typically, the left-hand side is the subscriber mailbox number or the mailbox number with a prefix.
For example, an outgoing VPIM message to Terry Campbell with the remote mailbox number 2233 could be addressed:
To: 2233@remotevoicemailsystem.com
If it is necessary to accommodate the numbering plan for your organization, the address can also contain a prefix:
To: 8882233@remotevoicemailsystem.com
VPIM addresses are created by the Voice Connector when sending VPIM messages; they are not entered by subscribers when addressing messages.
VPIM Networking and Locations
Central to how you set up VPIM Networking is a Cisco Unity object called a location. Each Cisco Unity server is associated with one location referred to as the default or primary location, which is created during installation and which cannot be deleted. When setting up VPIM Networking, you use the Cisco Unity Administrator to give the primary location a new name and a Dial ID (which is an identifier for the location within Cisco Unity), enter the SMTP domain name, and customize other properties as applicable. See the "Primary Location Profile Settings" section on page 7-1 for more information.
You create a delivery location in the Cisco Unity Administrator to correspond to each remote voice messaging system with which Cisco Unity communicates. Delivery locations contain the information that Cisco Unity needs to exchange messages with other VPIM-compliant voice messaging systems. A VPIM delivery location contains the SMTP domain name of the system on the TCP/IP network that handles messages for the remote voice messaging system. See the "VPIM Delivery Location Profile Settings" section for more information.
Location data is stored both in the SQL database on the Cisco Unity server and in Active Directory. In organizations with multiple Cisco Unity servers networked together, the location data replicates to all of the Cisco Unity servers in the network. This means that delivery locations need to be created only on one Cisco Unity server in the network. The Cisco Unity server on which delivery locations are created is referred to as the bridgehead server. See the "Considerations for Digitally Networked Cisco Unity Servers" section for more information.
VPIM Networking and the Voice Connector
Cisco Unity makes use of Exchange 2000 or Exchange 2003 to provide messaging between Cisco Unity and other VPIM-compliant voice messaging systems. Exchange 2000 and Exchange 2003 are VPIM-transport compliant and provide the ability to send and receive messages across the Internet or any TCP/IP network to computers that support SMTP.
Before an outgoing message to a VPIM-compliant voice messaging system can be sent, it must be encoded as a MIME message. The Cisco Unity Voice Connector for Exchange 2000 handles the conversion to and from the MIME format.
The Voice Connector must be installed on an Exchange 2000 or Exchange 2003 server. If the Exchange and Cisco Unity servers are in different routing groups, a routing group connector must be installed. Although the Voice Connector can be installed on the Cisco Unity server (if Exchange 2000 or Exchange 2003 is also on the server), this is not recommended for performance reasons.
The Voice Connector must not be installed on a server in an Exchange cluster. Microsoft does not support third-party connectors on an Exchange cluster server.
How the Voice Connector Processes Outgoing VPIM Messages
When subscribers use the phone to address a message to a VPIM recipient, Cisco Unity constructs a To address for the message in the form VPIM:<Location Dial ID>_<Remote Mailbox>. As with any other message, Cisco Unity hands it off to Exchange for delivery. Because the message has a VPIM address type, it is first passed to the Voice Connector for processing.
The Voice Connector does the following tasks:
•
•
•
•
•
The newly formatted message is put in the SMTP pickup directory of the Windows 2000 server for delivery to the VPIM-compliant voice messaging system.
How the Voice Connector Processes Incoming VPIM Messages
When the Voice Connector is installed, it registers a transport event sink with the Windows 2000 SMTP server. A transport event sink is code that is activated through a defined trigger, such as the receipt of a new message.
The VPIM Transport Event Sink is registered by the Voice Connector and monitors all incoming messages. Messages that have the content type Multipart/Voice-Message and are addressed to the SMTP domain defined during the Voice Connector installation are readdressed to the Voice Connector by the VPIM Transport Event Sink.
When the Voice Connector receives the message, it first verifies that the message is from a domain specified in a VPIM delivery location. If a VPIM delivery location with a matching domain name is not found, the Voice Connector rejects the message and sends a non-delivery receipt (NDR) to the sender.
If a VPIM delivery location with a matching location is found, the Voice Connector does the following:
•
•
•
•
•
Message Addressing Options
Cisco Unity provides the following ways to address messages to individuals by using a VPIM-compliant voice messaging system:
•
•
Messaging Similarities and Limitations
For the most part, messaging between Cisco Unity subscribers and individuals on a VPIM-compliant voice messaging system is the same as messaging among Cisco Unity subscribers. For example:
•
•
•
•
Note the following exceptions:
•
•
•
•
•
VPIM Networking and Blind Addressing
Blind addressing is one of the methods that Cisco Unity provides for addressing VPIM messages to users of another voice messaging system. Blind addressing allows Cisco Unity to address messages without having specific information about the recipients on the remote voice messaging system (such as their names and mailbox numbers). One of the steps to setting up blind addressing is to change the Blind Addressing setting on the Primary Location > Addressing Options page to something other than None. You also create a VPIM delivery location that corresponds to each voice messaging system with which Cisco Unity communicates.
You provide the following key information for each delivery location:
•
•
When blind addressing a message, subscribers dial a number that is made up of the delivery location Dial ID and the mailbox number of the recipient. Before addressing the message, Cisco Unity parses the number that the subscriber enters and searches for a matching delivery location. If Cisco Unity does not find a matching location, it reports the error to the sender and does not address the message. If a matching delivery location is found, Cisco Unity addresses the message without verifying that the remote mailbox number exists. Cisco Unity does provide voice name confirmation that the delivery location exists before addressing the message (assuming that a voice name was recorded for the delivery location).
Subscriber Experience with Blind Addressing
Subscribers can address messages by using the phone, ViewMail for Microsoft Outlook, or the Cisco Unity Inbox. To address a message by using ViewMail or the Cisco Unity Inbox, subscribers enter the address in the following format:
[VPIM:<Delivery Location Dial ID>_<Remote Mailbox Number>]
Note
Because your Cisco Unity server does not have access to the names, extensions, and recorded voice names of the people who use the other voice messaging system, subscribers will encounter some limitations with blind addressing:
•
•
•
•
•
VPIM Subscribers
VPIM subscribers are a representation in Cisco Unity of individuals who use another voice messaging system. VPIM subscribers are created in Cisco Unity to enable Cisco Unity subscribers to find them in the directory and to send them messages as they would with any other subscriber. Voice messages addressed to VPIM subscribers are sent to the voice messaging system that they use.
To set up VPIM subscribers, you first create a VPIM delivery location that corresponds to each remote voice messaging system with which Cisco Unity communicates. After creating the delivery locations, you create a VPIM subscriber for each remote user. When creating each VPIM subscriber, you specify the user mailbox number on the other voice messaging system, and select a VPIM delivery location with which to associate the subscriber. The Voice Connector uses the information of the associated delivery location when delivering a message to the VPIM subscriber. Note that VPIM subscribers can be created only on the VPIM bridgehead server on which the associated VPIM delivery location has been created.
You create and manage VPIM subscriber accounts in much the same way that you do regular subscriber accounts. You can use the Cisco Unity Administrator to create, modify, and delete VPIM subscriber accounts one at a time, and you can use the Cisco Unity Bulk Import wizard to create and modify multiple VPIM subscriber accounts.
Extensions are mandatory for VPIM subscribers. The extension is the number that subscribers dial when addressing a message to a VPIM subscriber. This number may or may not be the same as the mailbox number of the VPIM subscriber on the remote voice messaging system. Callers who reach the opening greeting of your organization can dial the extension of a VPIM subscriber or look up a VPIM subscriber in directory assistance and leave a message.
VPIM subscribers in Cisco Unity are represented as contacts in Active Directory. When you delete VPIM subscribers in the Cisco Unity Administrator either by deleting individual accounts or by deleting a delivery location with which the VPIM subscribers are associated, the underlying contacts are deleted automatically.
Other than receiving messages, VPIM subscribers do not have access to other Cisco Unity features, and some sections of the Cisco Unity Administrator are disabled for VPIM subscribers. VPIM subscribers:
•
•
•
•
•
•
Setting up VPIM subscribers requires more overhead for administrators of Cisco Unity than blind addressing does. However, the VPIM subscriber option allows other subscribers to address messages to VPIM subscribers the same way that they address messages to regular subscribers. In general, setting up VPIM subscriber accounts is a good solution in the following circumstances:
•
•
•
Because of the administrative overhead of setting up and maintaining many VPIM subscriber accounts, you may prefer a combination of blind addressing and VPIM subscribers. For example, you might want to set up VPIM subscriber accounts for senior sales staff, but not for other employees.
Subscriber Experience with VPIM Subscribers
Provided that VPIM subscribers are listed in the phone directory and have had voice names and greetings recorded for them:
•
•
•
•
•
•
When Cisco Unity records a message from an unidentified caller for a VPIM subscriber, "non-mail-user@<Domain Name>" is used as the sender of the message, as required by the VPIM specification. Although VPIM subscribers are not prevented from replying to these messages, the reply messages are returned to the Unity Messaging System mailbox as NDRs.
Identified Subscriber Messaging
Identified subscriber messaging (ISM) affects what subscribers hear when they call other subscribers from their primary or alternate extensions and are forwarded to the greetings of the subscribers they call. If they then leave a message, ISM affects what the called subscriber hears and can do when listening to the message. When ISM is enabled, Cisco Unity recognizes that the calling extension is associated with a subscriber and accordingly plays the internal greeting of the called subscriber. Additionally, when the called subscriber later listens to the message, Cisco Unity plays the recorded voice name of the subscriber who left the message and allows the called subscriber to record a reply.
When a call to a Cisco Unity subscriber is forwarded to the subscriber greeting and ISM is enabled, Cisco Unity compares the calling number (ANI or caller ID) to the primary and alternate extensions of subscribers. If a match is found, Cisco Unity identifies the caller as a subscriber. When Cisco Unity compares the calling number to extensions, by default, only "regular" Cisco Unity subscribers on the local system are included in the comparison. Beginning with Cisco Unity 3.1(6) and 4.0(3), ISM can be expanded to include all Cisco Unity subscribers throughout a dialing domain.
In Cisco Unity 4.0(4), you can enable ISM for AMIS, Bridge, and VPIM subscribers (collectively referred to as external subscribers), so that Cisco Unity will include them when comparing calling numbers to extensions. Note the following:
•
•
•
•
Note the difference between leaving a messaging and sending a message. When a person on the remote voice messaging system with a corresponding external subscriber account records and sends a message to a Cisco Unity subscriber (as opposed to calling and leaving a message), all versions of Cisco Unity identify the message as being from the corresponding external subscriber.
The phone system provides the calling number to Cisco Unity. The number of digits included in the calling number is configurable in most phone systems. For Cisco Unity to find a matching subscriber extension, the phone system must be configured to provide the applicable number of digits in the calling number. You may also need to add alternate extensions to the subscriber accounts to match the calling number. Additionally, there may be other phone system-specific issues that prevent Cisco Unity from matching the calling number to a subscriber extension. Refer to your phone system documentation and the applicable Cisco Unity integration guide for details about the call information provided by the phone system.
Live Reply to VPIM Subscribers
Live reply allows subscribers who listen to their messages by phone to respond to messages from other subscribers by calling them. When live reply is enabled, subscribers listening to messages by phone can reply to a subscriber message by pressing 4-4 to have Cisco Unity call the subscriber directly. (Subscribers using Optional Conversation 1 press 8-8 for live reply.) Note that whether subscribers have access to the live reply feature depends on their class of service settings. (Live reply is enabled on the Subscribers > Class of Service > Messages page in the Cisco Unity Administrator.)
As of Cisco Unity 4.0(4), subscribers can live reply to messages from subscribers on other voice messaging systems who have corresponding VPIM subscriber accounts in Cisco Unity. In order for the live reply call to be successfully transferred, a call transfer number must be configured for the VPIM subscribers.
Note that a live reply to a VPIM subscriber is always done via a release to phone system transfer, even when both the Cisco Unity subscriber who is replying to a message and the VPIM subscriber have accounts on the same Cisco Unity server. On a release to switch transfer, Cisco Unity dials the call transfer number configured for the VPIM subscriber and hangs up, leaving the phone system to handle the call. Note the following limitations with release to switch transfers:
•
•
Note the following:
•
•
Deleting VPIM Subscribers
Each VPIM subscriber is associated with an Active Directory contact. When you delete VPIM subscribers in the Cisco Unity Administrator by deleting the subscriber accounts individually, the underlying contacts are automatically deleted. To delete all of the VPIM subscribers associated with a delivery location, the underlying contacts associated with the subscribers, and the delivery location itself, use the Global Subscriber Manager, available in Tools Depot.
Extension Addresses
When you create a VPIM subscriber, Cisco Unity automatically generates an e-mail address in the following format:
VPIM:<Delivery Location Dial ID>_<Remote Mailbox Number>
This special e-mail address is called an extension address or a remote address. The extension address is a combination of the delivery location Dial ID with which the VPIM subscriber is associated, and the Remote Mailbox Number of the VPIM subscriber. Each contact in Active Directory that corresponds to a VPIM subscriber contains an extension address.
When subscribers use the phone to address messages to a VPIM subscriber, they dial an extension. Cisco Unity recognizes the recipient as a VPIM subscriber and retrieves the extension address from the SQL database on the Cisco Unity server.
Extension addresses are generated automatically when you create VPIM subscribers, and beginning with Cisco Unity 4.0(3), extension addresses are automatically updated if you change the Dial ID of a delivery location. (Because the extension addresses are now updated automatically, the Extension Address utility is no longer included with the tools that ship with Cisco Unity.)
Determining How VPIM Subscribers Appear in the Outlook Address Book
Depending on your installation, the users of the remote voice messaging system may already have Windows accounts and Exchange mailboxes on your local network. Therefore, when VPIM subscriber accounts are created for them, the Exchange address lists will contain duplicate listings—the existing user account and a new contact. Both listings are included in the Outlook address book. This means that people may inadvertently send e-mail messages to the contact, which should be used only for addressing voice messages.
To discourage people from inadvertently sending e-mail messages to VPIM subscribers, you can prevent the associated contact from appearing in the Outlook address book. Alternatively, you can change how the display name for the contact appears in the Outlook address book so that subscribers can distinguish the contact from a user account. In this way, you can reduce the number of e-mail messages inadvertently sent to contacts and simplify addressing for those who send voice messages to VPIM subscribers at the same time.
If you prefer that the associated contacts for subscribers do not appear in the Outlook address book at all, see the "Preventing Contacts From Appearing in the Outlook Address Book" section.
Alternatively, if you want to alter how contacts appear in the Outlook address book, see the "Modifying How Contacts Appear in the Outlook Address Book" section.
Preventing Contacts From Appearing in the Outlook Address Book
Either before or after you create VPIM subscriber accounts, you can prevent the associated contact from appearing in the Outlook address book by hiding the contacts from Exchange address lists. When you do so, Exchange will still deliver e-mail messages addressed to an existing user account (if one exists) and to the contact. However, the number of e-mail messages sent to the contact may be reduced because subscribers cannot inadvertently pick the contact from the Outlook address book when addressing messages to them.
To prevent subscribers from appearing in Outlook address books, you can use the Cisco Unity Administrator, the Cisco Unity Bulk Import wizard, Bulk Edit, or Windows Active Directory for Users and Computers:
•
•
•
Modifying How Contacts Appear in the Outlook Address Book
As an alternative to preventing a contact from appearing in the Outlook address book altogether, you may want to alter the display name for the contact so that subscribers can distinguish the contact from the user account. For example, you could append " - Voice mail" to the display name of each VPIM subscriber, and the names would appear in the Outlook address book as follows:
Abade, Alex
Abade, Alex - Voice mail
Bader, Kelly
Bader, Kelly - Voice mail
Campbell, Terry
Campbell, Terry - Voice mail
Cho, Li
Cho, Li - Voice mailIn this way, subscribers can easily determine which address is appropriate to use when they send voice messages to VPIM subscribers. Additionally, when subscribers use the Outlook address book to address a message to a contact, they can be confident that the address is formatted correctly.
Migrating Subscribers from Another Voice Messaging System to Cisco Unity
If you are using VPIM to migrate from another voice messaging system to Cisco Unity, there are several tools that you can use to create Cisco Unity subscribers from VPIM subscriber information. See the following sections for more information:
•
•
Migrating Subscribers in Bulk
Following are the general steps for migrating VPIM subscribers to Cisco Unity subscribers, in bulk. Refer to the Help files of the applicable tools for more detailed information. (Click the Tools Depot icon on the Cisco Unity server, and click the applicable tool in the left pane to view the Help file.)
1.
2.
3.
4.
5.
6.
7.
Migrating Subscribers One at a Time
If you have set up VPIM subscriber accounts for the subscribers on another voice messaging system, and if they have existing Exchange mailboxes, you may want to use the Migrate Subscriber Data utility when the time comes to migrate them to Cisco Unity. The Migrate Subscriber Data utility creates a Cisco Unity subscriber account by combining the Cisco Unity-specific data from an existing VPIM subscriber account (such as the voice name) with an existing mail user. The utility then deletes the VPIM subscriber account and the associated Active Directory contact.
The Migrate Subscriber Data utility is available in Tools Depot (the Tools Depot icon is installed on the Cisco Unity server desktop). Refer to the Help file that comes with the utility for more information.
Considerations for Digitally Networked Cisco Unity Servers
A small subset of subscriber and distribution list data is stored in Active Directory, as is all location data. In organizations with multiple Cisco Unity servers networked together such that they access a common directory, the Cisco Unity-specific data replicates to all Cisco Unity servers in the network. Therefore, all Cisco Unity servers on the network have the information that subscribers need to address messages to users at a VPIM location.
Because of directory replication, VPIM delivery locations and VPIM subscribers need to be created only on one Cisco Unity server in the network. If allowed by the primary location addressing options on each server, all subscribers, no matter which Cisco Unity server they are associated with, can send messages to a VPIM delivery location or to a VPIM subscriber created on another server. The Cisco Unity server configured for VPIM acts as the VPIM "bridgehead" server for the other Cisco Unity servers in the network.
Phone Prefixes
Each VPIM delivery location provides the following prefixes, which are used to accommodate various numbering plans:
•
•
If all VPIM delivery locations have a unique domain name, prefixes are optional. If you have multiple delivery locations with the same domain name, the Remote Phone Prefix is required. Within the set of delivery locations with the same domain name, the Remote Phone Prefix must be a unique number.
For example, assume that an organization has implemented a 10-digit numbering plan, in which the mailbox numbers for Cisco Unity subscribers begin with 206, and the mailbox numbers of subscribers on a VPIM voice messaging system begin with 425.
Assume the following has been set on the VPIM delivery location:
•
•
By setting both the Remote Phone Prefix and the Dial ID to 425, the number that a subscriber enters when blind addressing a message to someone at the VPIM location is the same number that the subscriber enters when calling the person.
Because of the prefix, VPIM subscribers are assigned a 7-digit Remote Mailbox Number. In this example, for outgoing messages the Voice Connector would add the prefix 425 to the beginning of the remote mailbox number, creating a 10-digit recipient mailbox number.
Audio Format Considerations
The Audio Format Conversion settings on the VPIM delivery location page in the Cisco Unity Administrator allow you to control the audio format of outgoing and incoming VPIM messages, as follows:
•
•
To make decisions about these settings, consider the following:
•
•
•
We recommend that incoming VPIM messages be stored in the same audio format that the local Cisco Unity server(s) use for recording and playing messages. However, if you want incoming VPIM messages to be stored in some other audio format, you will need to verify that the applicable codec is installed on all Cisco Unity servers and on other computers that access these messages. In particular:
•
•
The Voice Connector converts the audio format of incoming and outgoing VPIM messages according to the settings on the VPIM delivery location. The Voice Connector requires both the codec that the VPIM message is being converted from and the codec that the VPIM message is being converted to. Depending on the audio format conversion, you may need to install the applicable codec on the Exchange server on which the Voice Connector is installed, as follows:
•
•
•
•
See Also:
•
•
•
Messaging Between Cisco Unity Servers in Different Directories
Generally, when setting up VPIM Networking for Cisco Unity servers in different directories, you configure the Cisco Unity servers just as you would for VPIM Networking with any other voice messaging system. However, there are some settings that need to be coordinated between the Cisco Unity servers, as explained in the following sections:
•
•
•
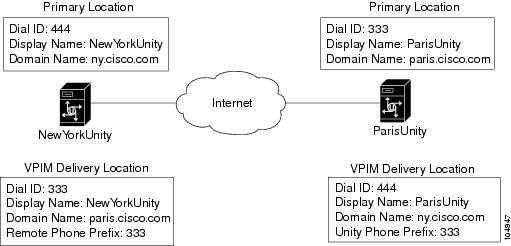
Correspondence Between Locations
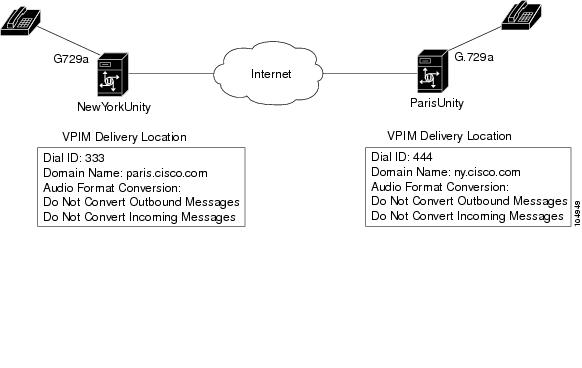
As Figure 6-4 illustrates, you create a VPIM delivery location on the local Cisco Unity server to correspond to each remote Cisco Unity bridgehead server. Typically, the Domain Name that you enter on the delivery location matches the Domain Name for the corresponding primary location on the remote Cisco Unity server and vice versa. However, the domain names that you enter depend on your e-mail addresses/recipient policy. Typically, the Dial ID and Display Name on the local delivery location should be the same as the Dial ID and Display Name on the remote primary location and vice versa (this is for convenience only and is not a requirement). If prefixes are needed to accommodate numbering plans and subscriber dialing habits, enter applicable prefixes on the local and/or remote delivery locations.
Figure 6-4 Correspondence Between Locations
VPIM Subscribers Correspond to Remote Cisco Unity Subscribers
If you do not want to use blind addressing, you can create VPIM subscriber accounts on the local server that correspond to subscribers on the remote Cisco Unity server. On the remote Cisco Unity server, VPIM subscriber accounts can be created that correspond to the Cisco Unity subscribers on your local server. Figure 6-5 illustrates the relationship of VPIM subscribers to remote Cisco Unity subscribers.
By creating VPIM subscribers, you manually duplicate the subscriber directory of the remote Cisco Unity server on the local server, and vice versa. Such a setup provides the benefits listed in the "Subscriber Experience with VPIM Subscribers" section.
Figure 6-5 VPIM Subscribers That Correspond to Remote Cisco Unity Subscribers
Audio Format Conversion Settings
When using VPIM Networking for messaging between Cisco Unity servers in different directories, the Audio Format Conversion Settings for outbound and incoming messages need to be coordinated on the Cisco Unity servers to avoid unnecessary conversions. When making decisions about the conversion settings:
•
•
The following examples show a few of the combinations of the Audio Format Conversion Settings to give you an idea of the options.
Example 1: Both Cisco Unity Servers Use G.729a for Recording and Storage
As shown in Figure 6-6, both the local and remote Cisco Unity servers record messages by using the same codec, G.729a. At 8 Kbps, the G.729a codec is recommended for use when network bandwidth is an issue. Because of theses considerations, no audio format conversions are needed when messages are transmitted between the servers.
Figure 6-6 No Audio Format Conversions
Example 2: Both Cisco Unity Servers Use G.711 for Recording and Storage
Now consider the case where both the local and remote Cisco Unity servers record messages by using the G.711 codec. At 64 Kbps, messages encoded by using the G.711 codec are very high quality, but because of their size, the messages may present a problem if network bandwidth is a concern. In this case, you have the following options:
•
•
•
•
Example 3: One Cisco Unity Server Uses G.711 and the Other Uses G.729a
Consider the case where one Cisco Unity server uses G.711 for recording and storage and the other uses G.729a. If network bandwidth is not an issue:
Cisco Unity can transcode messages recorded and stored in multiple formats, so the best option is to not convert outbound or incoming VPIM messages. This approach avoids the overhead of audio format conversions.
If network bandwidth is an issue, and you want to continue recording messages in G.711:
VPIM Reference
This section contains tables that define the fields on the Cisco Unity Administrator web pages related to VPIM setup, and briefly explain the options for correctly entering information in the fields.
VPIM Delivery Location Profile Settings
VPIM delivery locations are Cisco Unity objects that contain the addressing information that Cisco Unity needs to send messages to and receive messages from another voice messaging system. You create a VPIM delivery location that corresponds to each remote voice messaging system with which Cisco Unity communicates.
Use the following tables to learn more about the delivery location profile settings for a VPIM location.
Notable Behavior
This section describes notable behavior of VPIM Networking. See the following sections for more information:
•
•
•
Call Transfer Settings and VPIM Subscribers
In installations with multiple Cisco Unity servers networked via Digital Networking, the number that Cisco Unity uses for call transfers to a subscriber is the only number replicated among the Cisco Unity servers; none of the other settings on the Subscriber > Call Transfer page in the Cisco Unity Administrator are replicated. For example, in Figure 6-7, call transfers are set to ring the subscriber at the number 9,5551212. The only call transfer setting that is replicated to other Cisco Unity servers is the call transfer number 9,5551212. If the setting was "Yes, ring subscriber's extension" instead, the number 3047 would be replicated.
Figure 6-7 Only the Call Transfer Number Is Replicated
When the call transfer setting is set to "No (send directly to subscriber's greeting)," the call transfer number is automatically set to the subscriber extension (3047 in the example above), which is replicated to the other networked Cisco Unity servers.
Call transfers to VPIM subscribers created on other Cisco Unity servers are always handled by the phone system (release to switch)—rather than by Cisco Unity (supervised transfer)—even if the subscribers are set up for supervised transfers (as in the above example). The release to switch call transfers happen when:
•
•
•
On a release to switch transfer, Cisco Unity dials the call transfer number configured for the VPIM subscriber and hangs up, leaving the phone system to handle the call. Note the following limitations with release to switch transfers:
•
•
Inbound Messages Are Delivered Only to Primary Extensions
When addressing a message to a Cisco Unity subscriber, users on the remote voice messaging system must use the primary extension of the Cisco Unity subscriber; alternate extensions are not supported. Senders will receive an NDR if they address a message with an alternate extension of a Cisco Unity subscriber.
Note also that even though Cisco Unity public distribution lists, call handlers, and interview handlers have extensions, Cisco Unity accepts inbound messages from the remote voice messaging system only for subscribers, and only for the primary extension.
Inbound Search Scope
In installations with multiple Cisco Unity servers networked together, the search scope for a matching subscriber extension for inbound messages sent from another VPIM-compliant voice messaging system is set to the global directory. It is not possible to limit the inbound search scope to either a dialing domain or to the local Cisco Unity server.
If two (or more) Cisco Unity subscribers have identical extensions, messages from the remote voice messaging system will not be delivered by the Voice Connector to any of the Cisco Unity subscribers with the duplicate extensions. When the Voice Connector detects duplicate extensions, it logs a warning to the Windows Application Event log. If you are concerned that there might be duplicate extensions among Cisco Unity subscribers, you can check the Application Event log on the Exchange server on which the Voice Connector is installed for warnings from the Exchange 2000 Voice Connector.
Running the Voice Connector Setup Program in Another Language
The Voice Connector installation program does not prompt with a choice of languages for the installation; it always installs in English. To run the Voice Connector installation program by using one of the localized versions (FRA, DEU, or JPN) instead of English, do the following procedure.
To Run the Voice Connector Setup Program in Another Language
Step 1
Step 2
Step 3
Step 4
Step 5
Note