Feedback
Table Of Contents
Setting Up For a Diagnostic Test (Cisco CallManager Integration Only)
Setting Up for a Single-Line Test (Circuit-Switched Phone System Integrations Only)
Reporting Problems to Cisco TAC
Disaster Recovery of the Cisco Unity Server
Disaster Recovery Process Troubleshooting
Introduction
In this chapter you will find basic information that will help you prepare for troubleshooting Cisco Unity. Refer to the following sections:
•
Troubleshooting Preparation—This section includes instructions for setting up for a diagnostic test.
•
•
Troubleshooting Preparation
Problems with external and internal calls, message notification calls, and message waiting indicators can be caused by the phone system, by Cisco Unity, or by both, and are therefore difficult to diagnose. Several of the procedures for resolving problems use the single-line test, in which the phone lines connected to Cisco Unity are tested one at a time.
Most phone systems provide documentation on the codes that perform transfers, recalls, and other call progress functions. Have the phone system documentation available while performing the procedures in this section.
Setting Up For a Diagnostic Test (Cisco CallManager Integration Only)
To perform diagnostic tests you need three test extensions. Phone 1 is assigned to the Unity Example Subscriber. Phones 2 and 3 are set up only in CallManager and do not need to have a Cisco Unity subscriber assigned. All three extensions must be in the same calling search space as Cisco Unity.
To set up the test configuration
Step 1
Step 2
Step 3
Step 4
Step 5
Step 6
Step 7
Step 8
Step 9
Step 10
Step 11
Step 12
Step 13
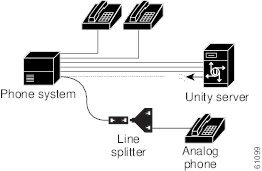
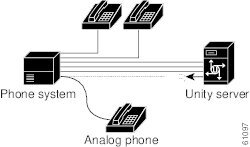
Setting Up for a Single-Line Test (Circuit-Switched Phone System Integrations Only)
To perform diagnostic tests, you need a lineman test set or an analog phone with a ringer. Additional equipment and the method you use to set up for a single-line test depend on the type of voice cards in the Cisco Unity server.
To set up a Dialogic D/120 card for single-line testing
These voice cards support two lines per jack, so you need a line splitter to test individual lines.
Step 1
.
Step 2
Step 3
To set up a Dialogic D/41E-series card for single-line testing
This voice card supports only one line per jack.
Step 1
Step 2
Reporting Problems to Cisco TAC
When you report a problem to the Cisco Technical Assistance Center (TAC), you will be asked to provide information about your system and about the problem. This section provides procedures for gathering the system information and problem descriptions that may be requested. The more data that can be gathered and communicated about a problem, the more likely it is that the problem will be diagnosed and fixed quickly.
System Information
Have the following system information ready when you call:
•
•
•
•
•
•
•
•
•
•
•
•
•
•
•
To determine the Cisco Unity version in use
Step 1
To determine the TSP version in use
Step 1
Step 2
Step 3
Step 4
To determine the switch.ini version in use
Step 1
Step 2
Step 3
Step 4
To determine the RealSpeak version in use
Step 1
Step 2
Step 3
Step 4
–
–
–
–
Problem Description
Be prepared to give a complete description of the problem including:
•
•
•
•
•
•
•
•
Logs and Traces
For problems in the Miu or TSP, Cisco TAC may ask for logs and traces before the problem can be diagnosed and fixed. Miu diagnostic logs, along with Event log and/or Dr. Watson logs, if available, are usually sufficient for the initial phase of diagnosing a problem. TSP traces are typically not required unless Cisco TAC determines that the problem is happening at a level below the Miu.
Caution
Refer to the following sections for details about third-party logs and traces:
Most Cisco Unity components such as the Miu, Arbiter, Notifier, Conversations, or SA can write diagnostic information to a log file. Diagnostic output of the problem occurring is critical to determining what caused the problem. If the problem seldom occurs, such as only once a day, it can be difficult to find the actual occurrence of the problem in the diagnostic log. Refer to the following sections for details about Cisco Unity diagnostic traces:
Dr. Watson Logs
Dr. Watson is a program invoked by Windows 2000 when a serious problem occurs that is not handled by Cisco Unity. When Dr. Watson is invoked, a dialog box appears containing an error message, for example, "Dr. Watson encountering an error in the AvCsMgr.exe process." Dr. Watson errors may occur in other processes such as tapisrv.exe, or dlgc_srv.exe.
To obtain a Dr. Watson log
Step 1
Step 2
Step 3
Step 4
Step 5
Step 6
Step 7
Step 8
Event Log Traces
The Event log is used by Windows applications to report errors or warnings. The Miu reports serious failures to the Event log, for example, "Component Miu: thread <XXX> had a failure on port <YYY> in AvWav."
To obtain an Event log trace
Step 1
Step 2
Step 3
Step 4
Step 5
MIU Diagnostics
Enable the Miu diagnostics when you are obtaining traces for an Miu problem. Enable any other diagnostics that seem appropriate (see Table 1-1). For example, if there are AvWav errors in the Event log, enable the AvWav diagnostics. However, keep in mind that running additional diagnostics can affect system performance and hard drive space.
To enable Miu diagnostics
Step 1
Step 2
Step 3
Step 4
Step 5
Step 6
Step 7
Step 8
Step 9
Step 10
Step 11
TSP Traces
TSP traces of a problem are normally not needed. However, if Cisco TAC determines that TSP traces are needed, they will ask you to provide them. Do the applicable procedure, depending on the TSP.
To obtain Dialogic analog or Libra TSP traces
Step 1
Step 2
Step 3
Step 4
Step 5
Locate the Debug TSP(s) and Wave Driver files for your system. For Dialogic analog systems, the Debug TSP file is D41mt.tsp. For Libra, the Debug TSP files needed are D41mt.tsp, Dlglibra.tsp, and Dlgarb.tsp. The Wave Driver for both Dialogic and Libra systems is Dlgwave.dll.
Step 6
Caution
Step 7
Step 8
Step 9
Step 10
Step 11
Step 12
Step 13
Step 14
Step 15
Step 16
Step 17
Step 18
To obtain Skinny TSP traces
Step 1
Step 2
Step 3
Step 4
Step 5
Step 6
Step 7
Step 8
Step 9
Step 10
Step 11
Step 12
Step 13
Step 14
Disaster Recovery of the Cisco Unity Server
The following procedures, done in the order listed, are recommended for restoring the entire Cisco Unity server in the event of a disaster, such as major system corruption or unrecoverable hardware problems. The procedures contain instructions for recovery by using Backup Exec, a data management program from the VERITAS Software Corporation. If Cisco Unity is installed on a domain controller or a domain controller/global catalog server, you need to take additional steps to restore Exchange, SQL, and the Active Directory. Refer to the Microsoft website for information about restoring Exchange, SQL, and the Active Directory.
Customized Cisco Unity call routing rules are not included in backup file sets. If you need to restore the Cisco Unity server, recreate custom call routing rules manually by using the Cisco Unity Administrator. For more information, see the "Overview: Call Routing Tables" section in the "Call Routing" chapter of the Cisco Unity System Administration Guide, available on Cisco.com at http://www.cisco.com/univercd/cc/td/doc/product/voice/c_unity/unity31/sag/index.htm.
To prepare the Cisco Unity server for recovery
Step 1
Step 2
Step 3
Step 4
To restore the Cisco Unity server
Step 1
Step 2
Step 3
Step 4
Step 5
Step 6
Step 7
Step 8
Step 9
Step 10
Step 11
•
•
•
•
•
•
Step 12
Step 13
Step 14
Step 15
Step 16
Step 17
Step 18
Step 19
Step 20
Step 21
Step 22
Step 23
Step 24
Do not restart the Cisco Unity server at this time.
Step 25
Step 26
To restore the Microsoft Exchange Message Transfer Agent
Step 1
Step 2
Step 3
Step 4
Step 5
Step 6
Step 7
Step 8
Step 9
Step 10
Step 11
To rebuild the information store
Step 1
Step 2
Step 3
Step 4
•
•
•
•
Optionally, run isinteg -pri -fix -test alltests and isinteg -pub -fix -test alltests. These optional commands check the information store and correct errors. If the information store is large, the commands will take a long time to complete. If you need to restore the Cisco Unity server quickly, you may want to skip the optional commands. The restore should work fine without running them, but it is a good idea to run them if you have time.
Step 5
Step 6
Step 7
Step 8
•
•
•
Optionally, run isinteg -pri -fix -test alltests and isinteg -pub -fix -test alltests.
Step 9
Step 10
To run Consistency Adjuster
Step 1
Step 2
Step 3
Step 4
Step 5
Step 6
Step 7
Step 8
Step 9
Disaster Recovery Process Troubleshooting
To check Microsoft Internet Information Server permissions
Step 1
Step 2
Step 3
Step 4
Step 5
Step 6
Step 7
Step 8
Step 9
Step 10
Step 11
Step 12
Step 13
Step 14
Step 15
To prepare for reregistering components (optional)
In this procedure, you create a simple batch file to use in the procedure that follows. If you prefer not to create a batch file, you can skip directly to the procedure, To reregister components.
Because there are so many DLLs, it is helpful to create a simple batch file to register the DLLs, instead of using the Windows Run dialog box to run Regsvr32.exe.
Step 1
Step 2
for %%x in (\commserver\components\*.dll) do regsvr32 %%x
Step 3
Step 4
Step 5
To reregister components
Step 1
•
•
•
–
–
–
–
Step 2