Cisco CallManager 3.1 Integration Guide for Cisco Unity 3.0
Cisco CallManager Integration

Table Of Contents

Cisco CallManager 3.1 Integration

Integration Overview

Integration Steps When Integrating with Cisco CallManager for the First Time

Integration Steps When Converting from a Dual Phone System Integration to a Cisco CallManager-Only Integration

Requirements

Integration Description

Integration Features

Setting up Cisco CallManager

Setting up the Gateways Servicing Cisco Unity

Installing, Configuring, and Testing the AV-Cisco Service Provider

Configuring Cisco Unity for the Integration

Testing the Integration

Switching Call Processing from a Failover Cisco CallManager Server to the Primary Server

Changing AV-Cisco Service Provider Settings

Changing the Number of Voice Mail Ports

Converting an Integration with a Traditional Phone System to an Integration with Cisco CallManager

Troubleshooting the Cisco CallManager Integration

Unity Does Not Answer When the Extension for Unity Is Dialed


Cisco CallManager 3.1 Integration


Integration Overview

Before performing the following integration steps, confirm that the Cisco Unity server is ready for the integration by completing the appropriate tasks in Chapters 1 through 3 of the Cisco Unity Installation Guide.

Integration Steps When Integrating with Cisco CallManager for the First Time

To set up a new integration with only Cisco CallManager, follow these steps.

1. Review the system and equipment requirements to confirm that all Cisco® CallManager and Cisco Unity system requirements have been met. See the "Requirements" section.

2. Set up Cisco CallManager. See the "Setting up Cisco CallManager" section.

3. Set up the gateways that service Cisco Unity. See the "Setting up the Gateways Servicing Cisco Unity" section.

4. Install and configure the AV-Cisco service provider on the Cisco Unity server. See the "Installing, Configuring, and Testing the AV-Cisco Service Provider" section.

5. Configure Cisco Unity for the integration. See the "Configuring Cisco Unity for the Integration" section.

6. Test the integration. See the "Testing the Integration" section.

Integration Steps When Converting from a Dual Phone System Integration to a Cisco CallManager-Only Integration

To convert from a dual phone system integration to a Cisco CallManager-only integration, follow these steps.

1. Upgrade the system key.

2. Confirm that the integration is enabled. See the "To confirm that the integration is enabled" section.

3. Remove the existing AV-Cisco TSP on Cisco Unity. See the "To remove the existing AV-Cisco service provider" section on page 2-9.

4. Remove the Dialogic voice cards from the Cisco Unity server.

5. Remove the Dialogic voice card software that is installed on the Cisco Unity server. See the "To remove Dialogic voice card software" section.

6. Reinstall the AV-Cisco TSP. See the "To reinstall the AV-Cisco service provider" section on page 2-9.

7. Change the Cisco Unity Administrator settings. See the "Changing Cisco Unity Administrator Settings" section on page 2-3.

Requirements

The Cisco CallManager integration supports configurations of the following components:

Phone System

A Cisco IP telephony applications server consisting of Cisco CallManager 3.1(1) or later, running on a Cisco Media Convergence Server (MCS) or customer-provided server meeting approved Cisco configuration standards.

Cisco licenses for all phone lines, IP phones, and other H.323-compliant devices or software (such as Cisco VirtualPhone and Microsoft NetMeeting clients) that will be connected to the network, as well as one license for each Cisco Unity port.

IP phones for the CallManager extensions.

A LAN connection in each location where you will plug an IP phone into the network.

Cisco Unity Server

Cisco Unity version 3.0(1) or later, installed and ready for the integration as described in the Cisco Unity Installation Guide.

A system key with the integration type set to "TAPI" and with the appropriate number of voice messaging ports enabled. If you are integrating Cisco Unity with two phone systems (Cisco CallManager and a second, non-IP phone system), the integration type on the system key must be set to "Multiple Integrations."

A Cisco license for each Cisco Unity port.

Integration Description

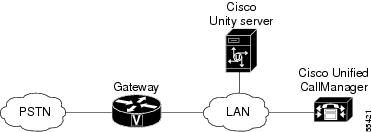
The following illustration shows a full-featured Cisco Unity installation integrating with the Cisco Architecture for Voice, Video, and Integrated Data (AVVID) network.

Figure 1-1 Connections Between the Phone System and Cisco Unity

Some countries require a phone system between the public phone network and the gateway.

The following steps give an overview of the path an external call takes through the Cisco AVVID network.

1. When an external call arrives, the Cisco gateway sends the call over the LAN to the machine on which Cisco CallManager is installed.

2. For Cisco CallManager lines that are configured to route calls to Cisco Unity, CallManager routes the call to an available Cisco Unity extension.

3. Cisco Unity answers the call and plays the opening greeting.

4. During the opening greeting, the caller enters either the name of a subscriber or an extension, for example, 1234.

5. Cisco Unity notifies Cisco CallManager that it has a call for extension 1234.

6. At this point, the path of the call depends on whether Cisco Unity is set up to perform supervised transfers or release transfers.

 
Supervised transfers

While Cisco Unity holds the call, Cisco CallManager attempts to establish a connection with extension 1234.

If the line is available, Cisco CallManager connects the call from Cisco Unity to extension 1234. Cisco CallManager and Cisco Unity drop out of the loop, and the call is connected directly from the Cisco gateway to extension 1234.

If the line is busy or unanswered, Cisco CallManager gives that information to Cisco Unity, and Cisco Unity performs the operation the subscriber has specified, for example, it takes a message.

 
Release transfers
(or blind transfers)

Cisco Unity passes the call to Cisco CallManager, and CallManager sends the call to extension 1234 without waiting to determine if the line is available. Then CallManager and Cisco Unity drop out of the loop. If Cisco Unity is set up to perform release transfers, and if you want Cisco Unity to take a message when a line is busy or unanswered, you must configure each phone to forward calls to Cisco Unity when the line is busy or unanswered.


Integration Features

The Cisco CallManager integration with Cisco Unity provides the following features:

Call forward to personal greeting

When an incoming call is routed to an unanswered or busy extension, the call is forwarded to the voice mail of the subscriber. The caller then hears the personal greeting of the subscriber and can leave a message.

Caller ID

Cisco Unity receives caller ID information from the phone system (if available). This information appears in the subject line of the message in the desktop messaging application.

Easy message access

A subscriber can retrieve messages without entering an ID. Cisco Unity identifies a subscriber based on the extension from which the call originated. A password may be required.

Identified subscriber messaging

Cisco Unity automatically identifies a subscriber who leaves a message during a forwarded internal call, based on the extension from which the call originated.

Message waiting indication

When a message is waiting for a subscriber, Cisco Unity notifies Cisco CallManager to activate the message waiting indicator (MWI) on the subscriber's extension.


Setting up Cisco CallManager

After Cisco CallManager software is installed, follow the procedures in this section to set up Cisco CallManager to work with Cisco Unity.

To add Voice Mail ports to Cisco CallManager

Add a Voice Mail port to Cisco CallManager for each port that you are connecting to Cisco Unity.


Caution Voice Mail ports and phones must be in the same calling search space, or the integration will not work.


Step 1 In Cisco CallManager Administration, click Device > Cisco Voice Mail Port.

Step 2 In the upper-right corner of the Cisco Voice Mail Port Configuration page, click Use the Cisco Voice Mail Port Wizard. The Cisco Voice Mail Port Wizard appears.

Step 3 Click Create a New Cisco Voice Mail Server and Add Ports to It and click Next.

Step 4 Accept the default name (recommended) for the Voice Mail server or enter a different name with no more than nine characters, then click Next.

The default name (even if you do not use it) becomes part of the name for ports: <the Voice Mail port name>-VI. For example, the default Voice Mail port name is CiscoUM1, and the device name prefix for ports is CiscoUM1-VI. The device name prefix is used by the AV-Cisco service provider. For details, see Table 1-4.

Step 5 Enter the number of ports you want to add but not more than is enabled on the system key, then click Next.

Step 6 Enter the following Voice Mail device settings, then click Next.

Table 1-1 Settings for the Voice Mail Devices

Field
Setting

Description

Enter Cisco Voice Mail Port or other description that you want.

Device Pool

Click Default.

Calling Search Space

Click the name of the calling search space that you have set up for the phones. Otherwise, the integration will not work.

Location

Accept the default of None.


Step 7 Enter the following Voice Mail pilot number settings, then click Next.

Table 1-2 Settings for the Voice Mail Pilot Number

Field
Setting

Pilot Number

Enter the pilot number (or the beginning number of the range) for the Voice Mail ports.

Route Partition

If you set up a route partition as described in the Cisco CallManager Installation Guide, click the name you gave it. Otherwise, accept the default of None.

Calling Search Space

If a route partition is selected, click the name of the calling search space that includes the route partition.

The calling search space must include the phones or the integration will not work.

Display

Accept the default of Voicemail.


Step 8 Enter the operator number or the number you want the last port to forward to when busy, if appropriate, and click Next.

Step 9 The settings for the new ports appear. Click Finish.

Step 10 To exit the Cisco Voice Mail Port Wizard, click Go to Cisco Voice Mail Ports page.

Step 11 Continue with the next procedure.


To specify MWI and voice mail extensions


Step 1 In Cisco CallManager Administration, click Service > Service Parameters.

Step 2 In the Server list on the Service Parameters Configuration page, click the server that you created in the preceding procedure. Then click Next.

Step 3 In the Services list, click Cisco CallManager. The list of parameters appears.

Step 4 Click one of the parameters shown in the following table.

Table 1-3 Settings for the Service Parameters

Service Parameter to Configure
Setting

AdvancedCallForwardHopFlag

Set to True.

MessageWaitingOffDN

The unique extension that turns MWIs off.

MessageWaitingOnDN

The unique extension that turns MWIs on.

MultiTenantMWIMode

Enables multitenant MWI notification. When set to True, CallManager uses any configured translation patterns to convert voice mail extensions into directory numbers when turning on or off an MWI.

VoiceMail

The extension that users call to access Cisco Unity. This is typically the extension number (Directory Number, in Cisco CallManager Administration) of the first Voice Mail port. If you specify an extension for VoiceMail, then users can call Cisco Unity by pressing the Messages button on their Cisco phones.

VoiceMailMaximumHopCount

Used together with "AdvancedCallForwardHopFlag," the maximum number of Voice Mail ports skipped to find the next available Voice Mail port. Specify a value that is twice the number of Cisco CallManager ports that are connected to the Cisco Unity server. For example, if you have a 48-port Cisco Unity system, enter 96 for this setting.


Step 5 Change or enter a setting, as appropriate.

Step 6 Click Update to save the setting.

Step 7 Repeat Steps 4 through 6 to specify the setting for the remaining parameters.

Step 8 Shut down and restart the Cisco CallManager server.


If the Cisco Unity server services multiple clusters of Cisco CallManager, perform the following procedure to enable MWIs to be activated on extensions in each cluster.

To set up MWI ports for multiple clusters of Cisco CallManager


Step 1 In the Cisco Unity Administrator, dedicate at least one port to send MWIs to each cluster. For details, see the "To enter port settings" section.

Step 2 In the Cisco CallManager Administration, click Device > Cisco Voice Mail Port.

Step 3 In the Cisco Voice Mail Ports list, click the name of the port before the first dedicated MWI port.

Step 4 Under Call Forwarding Information, change the extensions to the number of the first VoiceMail port or of the operator.

Step 5 Click Update.

Step 6 In the Cisco Voice Mail Ports list, click the name of a dedicated MWI port.

Step 7 Disable call forwarding for this port.

Step 8 Click Update.

Step 9 Repeat Steps 6 through 8 for all remaining dedicated MWI ports.


If you want to remap extension numbers (for example, when multiple subscribers use a single phone, or when multiple extension numbers on a single phone should go to a single subscriber greeting), see Appendix B, "Remapping Extension Numbers."

Setting up the Gateways Servicing Cisco Unity

In certain situations, DTMF digits are not recognized when processed through VoIP dial-peer gateways. To avoid this problem, certain gateways must be configured to enable DTMF relay. The DTMF relay feature is available in Cisco IOS software version 12.0(5) and later.

Cisco IOS software-based gateways that use H.245 out-of-band signaling must be configured to enable DTMF relay.

Enable dtmf-relay h245-alphanumeric on this dial-peer.

The Catalyst 6000 T1/PRI and FXS gateways enable DTMF relay by default and do not need additional configuration to enable this feature.

To enable DTMF relay


Step 1 On a VoIP dial-peer servicing Cisco Unity, use the following command:

dtmf-relay h245-alphanumeric

Step 2 Create a destination pattern that matches the Cisco CallManager Voice Mail port numbers. For example, if the system has Voice Mail ports 1001 through 1016, enter the dial-peer destination pattern 10xx.

Step 3 Repeat Steps 1 and 2 for all remaining VoIP dial-peers servicing Cisco Unity.


To install the G.729a codec for use by Cisco Unity


Step 1 Stop Cisco Unity (on the Cisco Unity server right-click the Cisco Unity icon in the system tray, then click Stop Unity).

Step 2 Browse to the CommServer\Utilities directory.

Step 3 Double-click the Sl_g729a_setup.exe file.

Step 4 Follow the on-screen instructions.

Step 5 When prompted, restart Windows.


For information on setting up the G.729a codec on Cisco CallManager, refer to the chapter "Regions" of the Cisco CallManager Administration Guide.

Installing, Configuring, and Testing the AV-Cisco Service Provider

Perform the following procedures in the order given.

If you are converting an integration with a traditional, circuit-switched phone system to an integration with Cisco CallManager, see the "Converting an Integration with a Traditional Phone System to an Integration with Cisco CallManager" section for additional instructions.

While the Cisco Unity compact disc has the most recent version of the AV-Cisco service provider at the time of publication, new versions are released periodically. The most recent version of the AV-Cisco service provider is available through Cisco Connection Online (CCO) at http://www.cisco.com.

To remove the existing AV-Cisco service provider

If the most recent version of the AV-Cisco service provider is already installed on the Cisco Unity server, or if the AV-Cisco service provider is not installed, skip to the procedure "To install the AV-Cisco service provider and wave driver."

In all other cases (for example, when upgrading Cisco Unity from an earlier version), perform this procedure.


Step 1 Stop Cisco Unity (right-click the Cisco Unity icon in the system tray, then click Stop Unity).

Step 2 On the Windows Start menu, click Settings > Control Panel > Add/Remove Programs.

Step 3 In the list, click AV-Cisco TSP.

Step 4 Click Remove.

Step 5 Click Yes.

Step 6 Close Control Panel.

Step 7 Continue with the next procedure.


To install the AV-Cisco service provider and wave driver

Cisco Unity 3.0(1) or later must be installed before you install the AV-Cisco service provider and wave driver.


Step 1 On the Cisco Unity server, exit the Cisco Unity software. For more information, see Appendix A, "Exiting and Starting the Cisco Unity Software and Server."

Step 2 Insert Cisco Unity Disc 1 into the CD-ROM drive on the Cisco Unity server.

Step 3 Browse to the \Cisco\CCM 3.1 directory.

Step 4 Run Setup.exe.

Step 5 Follow the on-screen instructions.

Step 6 When you are prompted to restart the server, remove the Cisco Unity disc from the CD-ROM drive, exit the Cisco Unity software, then restart the server. For more information, see Appendix A, "Exiting and Starting the Cisco Unity Software and Server."

Step 7 Continue with the next procedure.


To configure the AV-Cisco service provider


Step 1 Log on to Windows. The AV-Cisco Service Provider dialog box appears.

The AV-Cisco Service Provider dialog box appears automatically only the first time you log on after installing the AV-Cisco service provider and wave driver. To change settings later, see the "Changing AV-Cisco Service Provider Settings" section.

Step 2 Click Add. The Add CallManager IP Address dialog box appears.

Step 3 Enter the IP address of the Cisco CallManager server that is connected to Cisco Unity, and click OK.

Step 4 In the AV-Cisco Service Provider Settings dialog box, enter values as shown in the following table.

Table 1-4 Settings for the AV-Cisco Service Provider Settings Dialog Box

Field
Setting

Primary CallManager IP Address

The IP address of the Cisco CallManager server that Cisco Unity will usually receive calls from.

Number of Voice Ports

The number of Cisco CallManager Voice Mail ports that are connected to Cisco Unity.

Device Name Prefix

Enter the following characters without any spaces:

<the Voice Mail port name>

-VI

For example, if the Voice Mail port name is CiscoUM1, the device name prefix is CiscoUM1-VI.

Make sure you enter this prefix exactly as it appears in the Cisco CallManager Administration. Otherwise, the integration will not work.

The Voice Mail port name is set in the "To add Voice Mail ports to Cisco CallManager" section.

MessageWaitingOnDN

The extension that you specified, in Cisco CallManager Administration, for turning MWIs on. See the "To specify MWI and voice mail extensions" section.

MessageWaitingOffDN

The extension that you specified, in Cisco CallManager Administration, for turning MWIs off. See the "To specify MWI and voice mail extensions" section.

CallManager Failover IP Addresses

The IP addresses of backup Cisco CallManager servers, if any. Backup Cisco CallManager servers must be in the same cluster as the primary Cisco CallManager server.

CallManager Device List

A display-only list of the names of the Voice Mail ports that Cisco Unity looks for on the current Cisco CallManager server. This list is constructed by appending numbers starting with 1 to the setting of device name prefix.

The names in this list must exactly match the names of the Voice Mail ports in Cisco CallManager Administration. Otherwise, calls will not be correctly transferred to Cisco Unity.

Automatically Reconnect to the Primary CCM on Failover

A check box that enables Unity to reconnect to the primary Cisco CallManager after a failover is corrected.

If there is no secondary Cisco CallManager acting as a failover, uncheck this box.


Step 5 Repeat Steps 2 through 4 for each additional Cisco CallManager cluster that you want to link to Cisco Unity. Each IP address is the primary Cisco CallManager of a cluster.

Step 6 Click OK to close the AV-Cisco Service Provider Settings dialog box.

Step 7 Continue with the next procedure.


To test the AV-Cisco service provider


Step 1 If the AV-Cisco Service Provider dialog box is already displayed, skip to Step 7. Otherwise, continue with Step 2.

Step 2 On the Cisco Unity server, log on to Windows as an administrator.

Step 3 Click Start > Settings > Control Panel.

Step 4 Double-click Phone and Modem Options. The Phone and Modem Options dialog box appears.

Step 5 Click the Advanced tab.

Step 6 Click AV-Cisco Service Provider, then click Configure. The AV-Cisco Service Provider dialog box appears.

Step 7 Click Test. The settings you specified in Step 4 of the "To configure the AV-Cisco service provider" section are checked against the current settings in Cisco CallManager Administration.

If the test succeeds, a message box displays the message "The test completed successfully." If the test fails, one of the error messages shown in the following table appears. Troubleshoot the problem as described in the "Comments" column, and repeat this step until the test succeeds. Then continue with Step 8.

Table 1-5 Error Messages from the Integration Test

Error Message
Comments

Pinging CallManager server (<IP address>) failed. Make sure the IP address is valid, the server is running, and the network connection is working.

No computers on the network have the IP address that you specified in Primary CallManager IP Address. Confirm that this address is valid. If the value is correct, or if the problem persists after you change the value, troubleshoot the problem as you would a network connectivity problem.

The voice device named <device name> does not respond to registration requests. Ensure that the device has been created in the CallManager database and that the device name prefix is correct.

Confirm that the values in CallManager Device List (see Step 4 of the "To configure the AV-Cisco service provider" section) match the names of the Voice Mail ports that you created (see the "To add Voice Mail ports to Cisco CallManager" section). If not, change the setting for Device Name Prefix or the names of the Voice Mail ports, as necessary.

Could not connect to the CallManager. Confirm that all Cisco services are started on the CallManager server.

The IP address that you specified in Primary CallManager IP Address is a valid address, but Cisco CallManager services are not running on that computer, possibly because Cisco CallManager is not installed on the server with that IP address. Confirm that this address is correct and that the Cisco CallManager services are running.

No wave devices were found on the system. The wave driver is either not installed correctly or the computer needs to be rebooted to update its configuration.

Exit the Cisco Unity software, then restart the server. For more information, see Appendix A, "Exiting and Starting the Cisco Unity Software and Server."


Step 8 Click OK to close the AV-Cisco Service Provider dialog box. The following message appears:

This computer needs to be rebooted to update the wave driver.

Step 9 Click OK.

Step 10 Click Close to close the Phone and Modem Options dialog box.

Step 11 Close Control Panel.

Step 12 Exit the Cisco Unity software, then restart the server. For more information, see Appendix A, "Exiting and Starting the Cisco Unity Software and Server."


Configuring Cisco Unity for the Integration

After ensuring that the Cisco Unity server is ready for the integration, perform the following procedures to confirm that the integration is enabled and to enter the port settings.

To confirm that the integration is enabled


Step 1 On the Cisco Unity server, go to the Cisco Unity Administrator by doing one of the following:

In Internet Explorer, go to http://<server name>/web/sa.

Double-click the desktop shortcut to the Cisco Unity Administrator.

Step 2 Go to System > Licensing > Licensed Features.

Step 3 In the Integration field, confirm that the setting is TAPI for a single phone system integration or Multiple Integrations for a dual phone system integration.

Step 4 If the setting is not TAPI or Multiple Integrations, contact your sales representative for the necessary system key.

Step 5 Go to System > IP Switch. Confirm that the settings match those in the following table. If the settings are incorrect, integration features may not be enabled.

Table 1-6 Switch Settings

Switch Parameter
Required Setting

Manufacturer

Cisco

Model

CallManager

Switch PBX Software Version

3.01 or later

Integration

TAPI


Step 6 Click the Save icon.

Step 7 Close the Cisco Unity Administrator.

Step 8 For the phone system settings to take effect, exit the Cisco Unity software, then restart the server. For more information, see Appendix A, "Exiting and Starting the Cisco Unity Software and Server."


To enter port settings


Step 1 In the Cisco Unity Administrator, go to System > Ports.

Step 2 Select a port in the table.

Step 3 Indicate the settings for the port.

For the voice messaging ports assigned to a given Cisco CallManager cluster, use the first voice messaging ports for incoming calls and the last ports to dial out. This helps minimize the possibility of a collision, in which an incoming call arrives on a port at the same time that Cisco Unity takes the port off-hook to dial out. Set the ports assigned to each Cisco CallManager cluster in this manner.

If the Cisco Unity server is connected to multiple clusters of Cisco CallManager, dedicate one voice messaging port to each cluster and set the port to Dial Out MWI. Do not include these dedicated MWI voice messaging ports in the Cisco Call Manager hunt group for incoming calls but include the ports in a hunt group for sending MWIs to all clusters. For details, see the "To set up MWI ports for multiple clusters of Cisco CallManager" section.

Step 4 Repeat Steps 2 and 3 for the remaining ports.

Step 5 Click the Save icon.

Step 6 For the settings to take effect, exit and restart the Cisco Unity software. For more information, see Appendix A, "Exiting and Starting the Cisco Unity Software and Server."


Testing the Integration

To test whether Cisco Unity and the phone system are integrated correctly, perform the procedures in the order listed.

If any of the steps indicates a failure, see the following documentation as appropriate:

The installation guide for the phone system

Cisco Unity Troubleshooting Guide

This integration guide

To set up the test configuration


Step 1 Set up two test extensions (Phone 1 and Phone 2) on the same phone system that Cisco Unity is connected to.

Step 2 Set Phone 1 to forward calls to the Cisco Unity pilot number when calls are not answered.

Step 3 In the Cisco Unity Administrator, go to Subscribers > Subscribers > Profile.

If Example Subscriber is not displayed, click the Find icon (the magnifying glass) in the title bar, then click Find, and select Example Subscriber in the list that appears.

Step 4 In the Extension field, enter the extension of Phone 1.

Step 5 Click the Save icon.

Step 6 In the navigation bar, click Call Transfer to go to Subscribers > Subscribers > Call Transfer for Example Subscriber.

For more information on transfer settings, refer to the "Subscriber Template Call Transfer Settings" section in the Help for the Cisco Unity Administrator.

Step 7 Under Transfer Incoming Calls, click Yes, Ring Subscriber's Extension, and confirm that the extension number is for Phone 1.

Step 8 Under Transfer Type, click Release to Switch.

Step 9 Click the Save icon.

Step 10 In the navigation bar, click Messages to go to Subscribers > Subscribers > Messages for Example Subscriber.

Step 11 Under Message Waiting Indicators (MWIs), check Use MWI for Message Notification.

Step 12 In the Extension field, enter x.

Step 13 Click the Save icon.

Step 14 Open the Status Monitor by doing one of the following:

In Internet Explorer, go to http://<server name>/web/sm.

Double-click the desktop shortcut to the Status Monitor.

In the Windows systray, right-click the Cisco Unity icon and click Status Monitor.


To test an external call with release transfer


Step 1 From Phone 2, enter the access code necessary to get an outside line, then enter the number outside callers use to dial directly to Cisco Unity.

Step 2 On the Status Monitor, note the port that handles this call.

Step 3 When you hear the opening greeting, enter the extension for Phone 1. Hearing the opening greeting means that the port is configured correctly.

Step 4 Confirm that Phone 1 rings and that you hear a ringback tone on Phone 2. Hearing a ringback tone means that Cisco Unity released the call and transferred it to Phone 1.

Step 5 Do not answer Phone 1, and confirm that the state of the port handling the call changes to "Idle." This state means that release transfer succeeds.

Step 6 Confirm that, after the number of rings that the phone system is set to wait, the call is forwarded to Cisco Unity and that you hear the greeting for Example Subscriber. Hearing the greeting means that the phone system forwarded the unanswered call and the call-forward information to Cisco Unity, which correctly interpreted the information.

Step 7 On the Status Monitor, note the port that handles this call.

Step 8 Leave a message for Example Subscriber and hang up Phone 2.

Step 9 On the Status Monitor, confirm that the state of the port handling the call changes to "Idle." This state means that the port was successfully released when the call ended.

Step 10 Confirm that the MWI on Phone 1 is activated. The activated MWI means that the phone system and Cisco Unity are successfully integrated for turning on MWIs.


To test an internal call with release transfer


Step 1 From Phone 1, enter the internal pilot number for Cisco Unity.

Step 2 When asked for your password, enter 12345. Hearing the request for your password means that the phone system sent the necessary call information to Cisco Unity, which correctly interpreted the information.

Step 3 Confirm that you hear the recorded voice name for Example Subscriber. Hearing the voice name means that Cisco Unity correctly identified the subscriber by the extension.

Step 4 When asked whether you want to listen to your messages, press 1.

Step 5 After listening to the message, press 3 to delete the message.

Step 6 Confirm that the MWI on Phone 1 is deactivated. The deactivated MWI means that the phone system and Cisco Unity are successfully integrated for turning off MWIs.

Step 7 Hang up Phone 1.

Step 8 On the Status Monitor, confirm that the state of the port handling the call changes to "Idle." This state means that the port was successfully released when the call ended.


To set up supervised transfer on Cisco Unity


Step 1 In the Cisco Unity Administrator, go to Subscribers > Subscribers > Call Transfer.

If Example Subscriber is not displayed, click the Find icon (the magnifying glass) in the title bar, then click Find, and select Example Subscriber in the list that appears.

For more information on transfer settings, refer to the "Subscriber Template Call Transfer Settings" section in the Help for the Cisco Unity Administrator.

Step 2 Under Transfer Type, click Supervise Transfer.

Step 3 Set the Rings to Wait For field to 3.

Step 4 Click the Save icon.


To test supervised transfer


Step 1 From Phone 2, enter the access code necessary to get an outside line, then enter the number outside callers use to dial directly to Cisco Unity.

Step 2 On the Status Monitor, note the port that handles this call.

Step 3 When you hear the opening greeting, enter the extension for Phone 1. Hearing the opening greeting means that the port is configured correctly.

Step 4 Confirm that Phone 1 rings and that you do not hear a ringback tone on Phone 2. Instead, you should hear the indication your phone system uses to mean that the call is on hold (for example, music or beeps).

Step 5 Do not answer Phone 1, and confirm that the state of the port handling the call remains "Busy." This state and hearing an indication that you are on hold mean that Cisco Unity is supervising the transfer.

Step 6 Confirm that, after three rings, you hear the greeting for Example Subscriber. Hearing the greeting means that Cisco Unity successfully recalled the supervised-transfer call.

Step 7 During the greeting, hang up Phone 2.

Step 8 On the Status Monitor, confirm that the state of the port handling the call changes to "Idle." This state means that the port was successfully released when the call ended.


To return Example Subscriber to the default settings


Step 1 In the Cisco Unity Administrator, go to Subscribers > Subscribers > Call Transfer.

If Example Subscriber is not displayed, click the Find icon (the magnifying glass) in the title bar, then click Find, and select Example Subscriber in the list that appears.

Step 2 Under Transfer Incoming Calls, click No (Send Directly to Subscriber's Greeting).

Step 3 In the navigation bar, click Profile to go to Subscribers > Subscribers > Profile.

Step 4 In the Extension field, enter 99990.

Step 5 Click the Save icon.

Step 6 In the navigation bar, click Messages to go to Subscribers > Subscribers > Messages for Example Subscriber.

Step 7 Under Message Waiting Indicators (MWIs), uncheck Use MWI for Message Notification.

Step 8 Click the Save icon.


Switching Call Processing from a Failover Cisco CallManager Server to the Primary Server

If the primary Cisco CallManager server fails and a failover server starts processing calls, Cisco Unity automatically starts sending calls to the failover server. When the problem with the primary Cisco CallManager server has been resolved, Cisco Unity automatically resumes sending calls to that server.

If the primary Cisco CallManager server is not set up for automatic reconnect, and you are ready for that server to start processing calls again, perform the following procedure.

To switch call processing from a failover Cisco CallManager server to the primary Cisco CallManager server


Caution Do not perform this operation during regular business hours. When you switch from the failover Cisco CallManager to the primary Cisco CallManager, all current calls are immediately disconnected.


Step 1 On the Cisco Unity server, log on to Windows as an administrator.

Step 2 Click Start > Settings > Control Panel.

Step 3 Double-click Phone and Modem Options. The Phone and Modem Options dialog box appears.

Step 4 Click the Advanced tab.

Step 5 Click AV-Cisco Service Provider, then click Configure. The AV-Cisco Service Provider dialog box appears.

Step 6 Click Reset. The following message appears:

WARNING: This operation will reset the TSP and reconnect to the primary Cisco CallManager. Any current calls will be dropped. Proceed with the reset?

Step 7 Click Yes to reset.

Step 8 Click OK to close the AV-Cisco Service Provider dialog box.

Step 9 Click Close to close the Phone and Modem Options dialog box.

Step 10 Close Control Panel.


Changing AV-Cisco Service Provider Settings

If you want to change or review the values that you specified when you installed and configured the AV-Cisco service provider, perform the following procedure.

To change and test AV-Cisco service provider settings


Step 1 On the Cisco Unity server, log on to Windows as an administrator.

Step 2 Click Start > Settings > Control Panel.

Step 3 Double-click Phone and Modem Options. The Phone and Modem Options dialog box appears.

Step 4 Click the Advanced tab.

Step 5 Click AV-Cisco Service Provider, then click Configure. The AV-Cisco Service Provider dialog box appears.

Step 6 In the Select CallManager list, click the IP address of the Cisco CallManager server that is connected to Cisco Unity, then click Settings.

If the Select CallManager list does not contain the IP address you want, click Add, enter the IP address, and then click OK.

Step 7 In the AV-Cisco Service Provider Settings dialog box, enter values as shown in the following table.

Table 1-7 Settings for the AV-Cisco Service Provider Settings Dialog Box

Field
Setting

Primary CallManager IP Address

The IP address of the Cisco CallManager server that Cisco Unity will usually receive calls from.

Number of Voice Ports

The number of Cisco CallManager Voice Mail ports that are connected to Cisco Unity.

Device Name Prefix

Enter the following characters without any spaces:

<the Voice Mail port name>

-VI

For example, if the Voice Mail port name is CiscoUM1, the device name prefix is CiscoUM1-VI.

Make sure you enter this prefix exactly as it appears in the Cisco CallManager Administrator. Otherwise, the integration will not work.

MessageWaitingOnDN

The extension that you specified, in Cisco CallManager Administration, for turning MWIs on. See the "To specify MWI and voice mail extensions" section.

MessageWaitingOffDN

The extension that you specified, in Cisco CallManager Administration, for turning MWIs off. See the "To specify MWI and voice mail extensions" section.

CallManager Failover IP Addresses

The IP addresses of backup Cisco CallManager servers, if any. Backup Cisco CallManager servers must be in the same cluster as the primary Cisco CallManager server.

CallManager Device List

A display-only list of the names of the Voice Mail ports that Cisco Unity looks for on the current Cisco CallManager server. This list is constructed by appending numbers starting with 1 to the setting of device name prefix.

The names in this list must exactly match the names of the Voice Mail ports in Cisco CallManager Administration. Otherwise, calls will not be correctly transferred to Cisco Unity.


Step 8 Click OK to close the AV-Cisco Service Provider Settings dialog box.

Step 9 In the AV-Cisco Service Provider dialog box, click Test. The settings you specified in Step 7 are checked against the current settings in Cisco CallManager Administration.

If the test succeeds, a message box displays the message, "The test completed successfully." If the test fails, one of the error messages shown in the following table appears. Troubleshoot the problem as described in the "Comments" column, and repeat this step until the test succeeds. Then continue with Step 10.

Table 1-8 Error Messages from the AV-Cisco Service Provider Test

Error Message
Comments

Pinging CallManager server (<IP address>) failed. Make sure the IP address is valid, the server is running, and the network connection is working.

No computers on the network have the IP address that you specified in Primary CallManager IP Address. Confirm that this address is valid. If the value is correct, or if the problem persists after you change the value, troubleshoot the problem as you would a network connectivity problem.

The voice device named <device name> does not respond to registration requests. Ensure that the device has been created in the CallManager database and that the device name prefix is correct.

Confirm that the values in CallManager Device List match the names of the Voice Mail ports that you created in Cisco CallManager Administrator (see the "To add Voice Mail ports to Cisco CallManager" section). If not, change the setting in Device Name Prefix or the names of the Voice Mail ports, as necessary.

Could not connect to the CallManager. Verify that all Cisco services are started on the CallManager server.

The IP address that you specified in Primary CallManager IP Address is a valid address, but Cisco CallManager services are not running on that computer, possibly because Cisco CallManager is not installed on the server with that IP address. Confirm that this address is correct and that the Cisco CallManager services are running.

No wave devices were found on the system. The wave driver is either not installed correctly or the computer needs to be rebooted to update its configuration.

Exit the Cisco Unity software, then restart the server. For more information, see Appendix A, "Exiting and Starting the Cisco Unity Software and Server."


Step 10 Click OK to close the AV-Cisco Service Provider dialog box. The following message appears:

This computer needs to be rebooted to update the wave driver.

Step 11 Click OK.

Step 12 Click Close to close the Phone and Modem Options dialog box.

Step 13 Close Control Panel.

Step 14 Exit the Cisco Unity software, then restart the server. For more information, see Appendix A, "Exiting and Starting the Cisco Unity Software and Server."

Changing the Number of Voice Mail Ports

To change the number of Voice Mail ports after you have finished installing and setting up Cisco CallManager, perform the following procedures.

To change the number of Voice Mail ports in Cisco CallManager Administration


Step 1 On the Cisco CallManager server, use the Cisco Voice Mail Port Wizard to add or remove Voice Mail ports, as appropriate.

For information on adding Voice Mail ports, see the "To add Voice Mail ports to Cisco CallManager" section. For information on removing Voice Mail ports, see the online Help in the Cisco CallManager Administrator.

Step 2 Continue with the next procedure.


To update the Cisco Unity system key for additional Voice Mail ports


Step 1 If the Cisco Unity system key is not enabled for the additional Voice Mail ports you added, see your sales representative to request an upgrade activation code.

Step 2 Once you have the upgrade activation code, on the Cisco Unity server, click Programs > Unity > Upgrade License.

Step 3 Follow the on-screen instructions.


If you increase the number of Voice Mail ports from 16 or fewer to more than 16, perform the procedure "To install SQL Server 2000" in the chapter "Installing a Cisco Unity System" of the Cisco Unity Installation Guide. Otherwise, continue on to the procedure "To change the number of Voice Mail ports specified for the AV-Cisco service provider."

To change the number of Voice Mail ports specified for the AV-Cisco service provider


Step 1 On the Cisco Unity server, click Start > Settings > Control Panel.

Step 2 Double-click Phone and Modem Options. The Phone and Modem Options dialog box appears.

Step 3 Click the Advanced tab.

Step 4 Click AV-Cisco Service Provider, and click Configure. The AV-Cisco Service Provider dialog box appears.

Step 5 Select the IP address of the Cisco CallManager server that you added Voice Mail ports to.

Step 6 Click Settings. The AV-Cisco Service Provider Settings dialog box appears.

Step 7 Change Number of Voice Ports to the number of Voice Mail ports configured in Cisco CallManager Administration.

Step 8 Click OK to close the AV-Cisco Service Provider Settings dialog box.

Step 9 Click OK to close the AV-Cisco Service Provider dialog box.

Step 10 Click Close to close the Phone and Modem Options dialog box.

Step 11 Click OK to continue.

Step 12 Close Control Panel.

Step 13 Exit the Cisco Unity software, then restart the server. For more information, see Appendix A, "Exiting and Starting the Cisco Unity Software and Server."


Converting an Integration with a Traditional Phone System to an Integration with Cisco CallManager

To convert an existing integration of Cisco Unity and a traditional phone system to an integration of Cisco Unity and Cisco CallManager, perform the following steps.

1. Upgrade the system key. Contact your sales representative for the necessary key upgrade.

2. Confirm that the integration is enabled. See the "To confirm that the integration is enabled" section.

3. Install, configure, and test the AV-Cisco service provider. See the "Installing, Configuring, and Testing the AV-Cisco Service Provider" section.

4. Remove the Dialogic voice card software that is installed on the Cisco Unity server. See "To remove Dialogic voice card software" below.

To remove Dialogic voice card software


Step 1 Exit the Cisco Unity software, then restart the server. For more information, see Appendix A, "Exiting and Starting the Cisco Unity Software and Server."

Step 2 On the Windows Start menu, click Programs > Dialogic Systems Software > Dialogic Configuration Manager - DCM.

Dialogic Configuration Manager may display an error message about not detecting devices. This error is harmless. Click OK.

Step 3 On the Service menu, click Stop Service.

Step 4 Click Close.

Step 5 Close the DCM.

Step 6 On the Windows Start menu, click Settings > Control Panel > Phone and Modem Options.

Step 7 Click the Advanced tab.

Step 8 Click Dialogic Generation 2 Service Provider for NT.

Step 9 Click Remove.

Step 10 Click Yes.

Step 11 Click Close to close the Phone and Modem Options dialog box.

Step 12 In Control Panel, double-click Sounds and Multimedia.

Step 13 In the Sounds and Multimedia Options dialog box, click the Hardware tab.

Step 14 Click Legacy Audio Drivers.

Step 15 Click Properties. The Legacy Audio Drivers Properties dialog box appears.

Step 16 Click Properties.

Step 17 In the Legacy Audio Drivers Properties dialog box, click the Properties tab.

Step 18 Expand Audio Devices.

Step 19 Click Audio for Dialogic WAVE.

Step 20 Click Remove. The Legacy Audio Drivers Properties dialog box closes.

Step 21 Click Yes to confirm.

Step 22 When prompted to restart the server, click Don't Restart Now.


Caution If you restart now, the WAVE driver is not removed.

Step 23 Click OK to close the Legacy Audio Drivers Properties dialog box.

Step 24 Click OK to close the Sounds and Multimedia Properties dialog box.

Step 25 Close Control Panel.

Step 26 On the Windows Start menu, click Programs > Dialogic System Software > Uninstall.

Step 27 Follow the on-screen prompts until a dialog box asks whether you want to delete shared files.

Step 28 Click No to all.

Step 29 Click OK.

Step 30 click Yes to restart. (The Dialogic-triggered restart may not restart the session; in this case, manually restart the Cisco Unity server. For more information, see Appendix A, "Exiting and Starting the Cisco Unity Software and Server.")

Step 31 After the system restarts, log on.

Step 32 In the Windows Explorer, browse to the directory where Cisco Unity is installed (the default directory is C:\CommServer), and delete the Dialogic directory.


Troubleshooting the Cisco CallManager Integration

This section provides information about common integration problems.

Unity Does Not Answer When the Extension for Unity Is Dialed

If you hear a fast busy or number unobtainable signal when you dial Unity, perform the following procedure.

To confirm that phone system programming is complete


Step 1 Review the phone system programming to confirm that it is complete. Specific actions to take are:

Confirming that the Voice Mail ports are correctly set up. For details, see the "To add Voice Mail ports to Cisco CallManager" section.

Testing the AV-Cisco service provider. For details, see the "To test the AV-Cisco service provider" section.

Confirming that the Voice Mail ports and phones are in the same calling search space. For details, see the "To add Voice Mail ports to Cisco CallManager" section.

Confirming that the correct codec (G.711 or G.729a) is installed. For details, see the"To install the G.729a codec for use by Cisco Unity" section.

Step 2 Exit the Cisco Unity software, then restart the server. For more information, see Appendix A, "Exiting and Starting the Cisco Unity Software and Server."