Feedback Feedback
|
Table Of Contents
Related Cisco CallManager and Operating System Documentation
Server and Operating System Requirements
Preparation and Considerations
Configuring the Network Teaming Driver
Dissolving the Network Teaming Driver
Troubleshooting the Network Teaming Driver
Obtaining Technical Assistance
Cisco Technical Support Website
Definitions of Service Request Severity
Obtaining Additional Publications and Information
Using the Cisco Media Convergence Server Network Teaming Driver with Operating System Version 2000.2.7
The Cisco Media Convergence Server (MCS) Network Teaming Driver enables the functionality for the failover fault-tolerant network adapters. This driver works with Cisco Media Convergence Servers that have dual network interface cards (NICs) installed. With this functionality, the standby NIC can handle all IP traffic if the primary NIC fails.
Operating system version 2000.2.7 automatically installs the Network Teaming Driver as part of the installation process. You must perform configuration tasks, as described in this document, to set up and use the Network Teaming Driver.
Use this document with operating system version 2000.2.7 or later. For information about installing and configuring the Network Teaming Driver with earlier versions of the operating system, refer to previous versions of Using the Cisco Media Convergence Server Network Teaming Driver with Operating System, which are available at this URL:
http://www.cisco.com/univercd/cc/td/doc/product/voice/iptel_os/install/index.htm
Contents
This document contains the following topics:
•
Related Cisco CallManager and Operating System Documentation
•
•
•
•
•
•
Related Cisco CallManager and Operating System Documentation
Table 1 provides a list of Cisco CallManager and operating system documentation. You can navigate to the appropriate documentation by clicking the URLs that are shown in this table.
Table 1 Quick Reference for Documentation and Software URLs
Operating system documentation and Virtual Network Computing (VNC) documentation
(not readme documentation)
http://www.cisco.com/univercd/cc/td/doc/product/voice/iptel_os/index.htm
Cisco MCS data sheets
http://www.cisco.com/en/US/products/hw/
voiceapp/ps378/index.htmlSoftware-only servers (IBM, HP, Compaq, Aquarius)
http://www.cisco.com/en/US/products/hw/
voiceapp/ps378/prod_brochure_list.htmlCisco CallManager Compatibility Matrix
http://www.cisco.com/univercd/cc/td/doc/product/voice/c_callmg/index.htm
Cisco CallManager documentation, including installation and upgrade documentation
http://www.cisco.com/univercd/cc/td/doc/product/voice/c_callmg/index.htm
Cisco IP Telephony Applications Backup and Restore documentation
http://www.cisco.com/univercd/cc/td/doc/product/voice/backup/index.htm
Support patches and readme documentation
http://www.cisco.com/kobayashi/sw-center/
sw-voice.shtmlNote
Server and Operating System Requirements
The following servers support the Network Teaming Driver:
•
•
•
•
•
•
•
•
Note
Preparation and Considerations
Review the following information before you configure the Network Teaming Driver:
•
•
•
•
•
Note
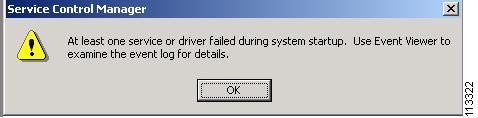
If you do not perform the tasks in the recommended order and decide to configure the driver after the application upgrade, you might encounter a Service Control Manager error message, as shown in Figure 8. To resolve this problem, follow the procedure in the "Troubleshooting the Network Teaming Driver" section.Perform the following procedure before you configure the driver:
Procedure
Step 1
Step 2
Step 3
Step 4
Tip
Step 5
Step 6
Step 7
Step 8
These could be one or two different settings, depending on the server type.
Step 9
Step 10
Step 11
Note
In addition, make sure the second network card is connected to the network. The network team will not be created correctly if only one network card is connected. If the network team is not created correctly, verify the connection of the second network card and rerun the Network Teaming Driver configuration procedures.
Configuration Tasks
This section includes information about configuring the Network Teaming Driver.
Configuring the Network Teaming Driver
To configure the Network Teaming Driver, perform the following procedure:
Procedure
Step 1
Figure 1 shows this icon.
Figure 1 HP Network Configuration Utility 7 Icon
Step 2
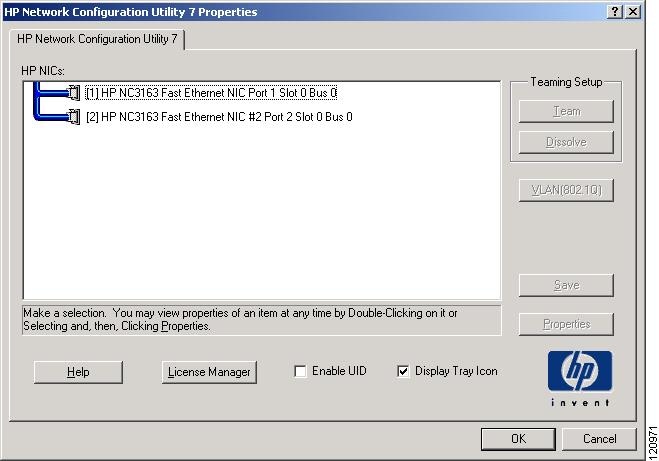
The HP Network Configuration Utility Properties window displays, as shown in Figure 2.
Figure 2 HP Network Configuration Utility Properties Window
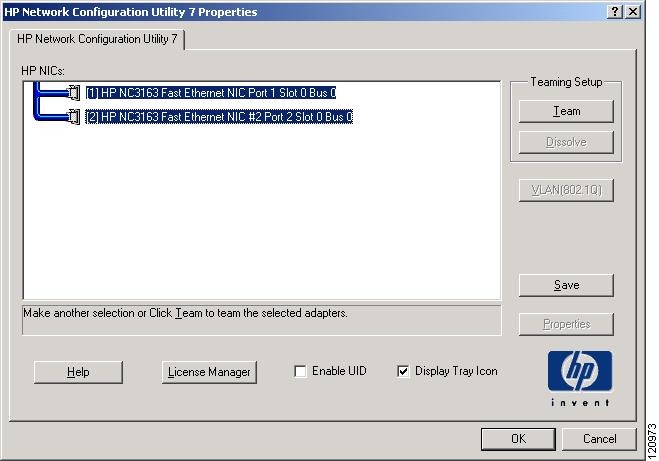
Step 3
Figure 3 Selected HP NICs
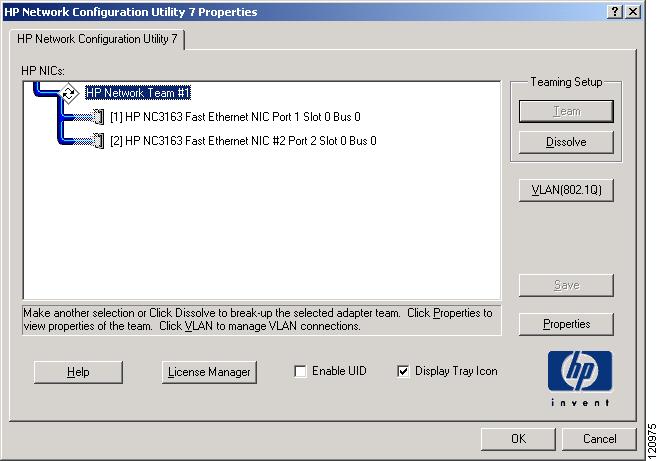
Step 4
The NICs are teamed, as shown in Figure 4:
Figure 4 Team Created
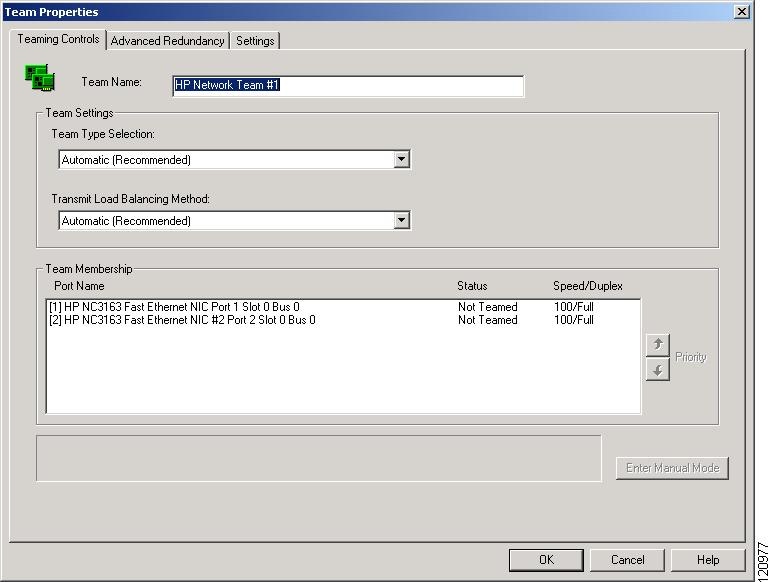
Step 5
The Team Properties window displays, as shown in Figure 5. In this figure, HP Network Team #1 represents the default name for the team
Figure 5 Team Properties Window
Step 6
•
•
Step 7
You have created the HP Network Team.
Step 8
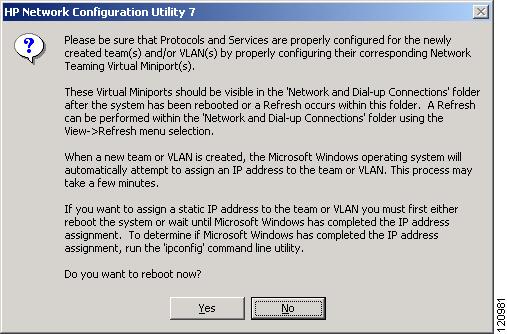
A confirmation window displays, as shown in Figure 6.
Figure 6 Confirmation
Tip
Step 9
Step 10
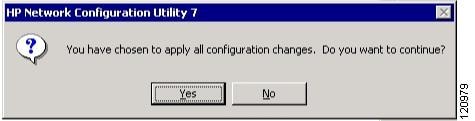
Figure 7 Successful Configuration Changes
Step 11
Step 12
Step 13
Step 14
Step 15
Step 16
Step 17
Step 18
Step 19
An additional network card, Local Area Connection 3, displays in the window.
Step 20
Step 21
Step 22
Tip
Step 23
Step 24
Step 25
You do not need to reboot the server.
Step 26
Step 27
Dissolving the Network Teaming Driver
When you dissolve the driver, you disassociate the two NICs and the virtual NIC that is used for the driver. The teaming drivers remain installed, but they no longer are configured or used.
In this case, the server will use NIC #1 only for IP telephony.
To dissolve the Network Teaming Driver, perform the following procedure:
Procedure
Step 1
Step 2
Step 3
Step 4
Step 5
Step 6
Caution
Uninstallation Tasks
When you uninstall the driver, you delete the drivers from the server. The server will use NIC #1 only for IP telephony.
To uninstall the Network Teaming Driver, perform the following procedure:
Procedure
Step 1
Step 2
Step 3
Step 4
Step 5
Step 6
Note
Caution
Uninstallation Verification
To verify that you have uninstalled the driver, perform the following procedure:
Procedure
Step 1
A list, which should not include the network team, displays.
Step 2
Step 3
Step 4
Troubleshooting the Network Teaming Driver
After you configure the Network Teaming Driver and install Cisco CallManager, you might encounter a Service Control Manager error message, such as the one shown in Figure 8.
Figure 8 Service Control Manager Error Message
To identify and resolve this problem, perform the following procedure:
Procedure
Step 1
Step 2
Step 3
•
•
Step 4
The following description displays:
The HP Network Configuration Utility 7 service failed to start due to the following error:
The service cannot be started, either because it is disabled or because it has enabled
devices associated with it.
Step 5
The utility runs for a few seconds. The fix takes effect without rebooting the server.
Starting with the next reboot of the server, this error message no longer appears.
Obtaining Documentation
Cisco documentation and additional literature are available on Cisco.com. Cisco also provides several ways to obtain technical assistance and other technical resources. These sections explain how to obtain technical information from Cisco Systems.
Cisco.com
You can access the most current Cisco documentation at this URL:
http://www.cisco.com/univercd/home/home.htm
You can access the Cisco website at this URL:
You can access international Cisco websites at this URL:
http://www.cisco.com/public/countries_languages.shtml
Ordering Documentation
You can find instructions for ordering documentation at this URL:
http://www.cisco.com/univercd/cc/td/doc/es_inpck/pdi.htm
You can order Cisco documentation in these ways:
•
http://www.cisco.com/en/US/partner/ordering/index.shtml
•
Documentation Feedback
You can send comments about technical documentation to bug-doc@cisco.com.
You can submit comments by using the response card (if present) behind the front cover of your document or by writing to the following address:
Cisco Systems
Attn: Customer Document Ordering
170 West Tasman Drive
San Jose, CA 95134-9883We appreciate your comments.
Obtaining Technical Assistance
For all customers, partners, resellers, and distributors who hold valid Cisco service contracts, Cisco Technical Support provides 24-hour-a-day, award-winning technical assistance. The Cisco Technical Support Website on Cisco.com features extensive online support resources. In addition, Cisco Technical Assistance Center (TAC) engineers provide telephone support. If you do not hold a valid Cisco service contract, contact your reseller.
Cisco Technical Support Website
The Cisco Technical Support Website provides online documents and tools for troubleshooting and resolving technical issues with Cisco products and technologies. The website is available 24 hours a day, 365 days a year at this URL:
http://www.cisco.com/techsupport
Access to all tools on the Cisco Technical Support Website requires a Cisco.com user ID and password. If you have a valid service contract but do not have a user ID or password, you can register at this URL:
http://tools.cisco.com/RPF/register/register.do
Submitting a Service Request
Using the online TAC Service Request Tool is the fastest way to open S3 and S4 service requests. (S3 and S4 service requests are those in which your network is minimally impaired or for which you require product information.) After you describe your situation, the TAC Service Request Tool automatically provides recommended solutions. If your issue is not resolved using the recommended resources, your service request will be assigned to a Cisco TAC engineer. The TAC Service Request Tool is located at this URL:
http://www.cisco.com/techsupport/servicerequest
For S1 or S2 service requests or if you do not have Internet access, contact the Cisco TAC by telephone. (S1 or S2 service requests are those in which your production network is down or severely degraded.) Cisco TAC engineers are assigned immediately to S1 and S2 service requests to help keep your business operations running smoothly.
To open a service request by telephone, use one of the following numbers:
Asia-Pacific: +61 2 8446 7411 (Australia: 1 800 805 227)
EMEA: +32 2 704 55 55
USA: 1 800 553 2447For a complete list of Cisco TAC contacts, go to this URL:
http://www.cisco.com/techsupport/contacts
Definitions of Service Request Severity
To ensure that all service requests are reported in a standard format, Cisco has established severity definitions.
Severity 1 (S1)—Your network is "down," or there is a critical impact to your business operations. You and Cisco will commit all necessary resources around the clock to resolve the situation.
Severity 2 (S2)—Operation of an existing network is severely degraded, or significant aspects of your business operation are negatively affected by inadequate performance of Cisco products. You and Cisco will commit full-time resources during normal business hours to resolve the situation.
Severity 3 (S3)—Operational performance of your network is impaired, but most business operations remain functional. You and Cisco will commit resources during normal business hours to restore service to satisfactory levels.
Severity 4 (S4)—You require information or assistance with Cisco product capabilities, installation, or configuration. There is little or no effect on your business operations.
Obtaining Additional Publications and Information
Information about Cisco products, technologies, and network solutions is available from various online and printed sources.
•
http://www.cisco.com/go/marketplace/
•
http://cisco.com/univercd/cc/td/doc/pcat/
•
•
•
http://www.cisco.com/go/iqmagazine
•
•
http://www.cisco.com/en/US/learning/index.html
CCSP, the Cisco Square Bridge logo, Follow Me Browsing, and StackWise are trademarks of Cisco Systems, Inc.; Changing the Way We Work, Live, Play, and Learn, and iQuick Study are service marks of Cisco Systems, Inc.; and Access Registrar, Aironet, ASIST, BPX, Catalyst, CCDA, CCDP, CCIE, CCIP, CCNA, CCNP, Cisco, the Cisco Certified Internetwork Expert logo, Cisco IOS, Cisco Press, Cisco Systems, Cisco Systems Capital, the Cisco Systems logo, Cisco Unity, Empowering the Internet Generation, Enterprise/Solver, EtherChannel, EtherFast, EtherSwitch, Fast Step, FormShare, GigaDrive, GigaStack, HomeLink, Internet Quotient, IOS, IP/TV, iQ Expertise, the iQ logo, iQ Net Readiness Scorecard, LightStream, Linksys, MeetingPlace, MGX, the Networkers logo, Networking Academy, Network Registrar, Packet, PIX, Post-Routing, Pre-Routing, ProConnect, RateMUX, ScriptShare, SlideCast, SMARTnet, StrataView Plus, SwitchProbe, TeleRouter, The Fastest Way to Increase Your Internet Quotient, TransPath, and VCO are registered trademarks of Cisco Systems, Inc. and/or its affiliates in the United States and certain other countries.
All other trademarks mentioned in this document or Website are the property of their respective owners. The use of the word partner does not imply a partnership relationship between Cisco and any other company. (0501R)
Copyright © 2005 Cisco Systems, Inc. All rights reserved.