[an error occurred while processing this directive]

Cisco Unified Communications Manager (CallManager)

Backing Up and Restoring Cisco CallManager Release 3.2

 Feedback

Table Of Contents

Backing Up and Restoring Cisco CallManager Release 3.2

Contents

Conventions

Locating Related Cisco CallManager Documentation

Frequently Asked Questions about the Cisco IP Telephony Applications Backup Utility

How does the Cisco IP Telephony Applications Backup Utility work?

What data does the Cisco IP Telephony Applications Backup Utility back up?

Can I use any backup utility that I want?

What if I forgot to configure the backup during the initial Cisco CallManager installation?

How do I know if the backup completed successfully?

Backing Up the Data

Frequently Asked Questions about the Cisco IP Telephony Applications Restore Utility

How does the Cisco IP Telephony Applications Restore Utility work?

I backed up my system after I upgraded. Now, I need to restore my server. What do I do?

I forgot to back up my system after I upgraded. Now, I need to restore my server. What do I do?

The entire Cisco CallManager cluster experienced a catastrophic failure. What do I do?

May I change my administrator, SQL, and Directory Manager passwords when I restore or replace the server?

May I run Cisco-certified McAfee antivirus services when I restore or replace the server?

May I run the Cisco IDS agent when I restore or replace the server?

What post-restoration tasks should I perform?

How do I know if the restoration completed successfully?

Recovering (Restoring) the Same Cisco IP Telephony Applications Server

Replacing an Existing or a Failed Cisco IP Telephony Applications Server

Restoring the Cisco CallManager Data Only

Obtaining Documentation

World Wide Web

Documentation CD-ROM

Ordering Documentation

Documentation Feedback

Obtaining Technical Assistance

Cisco.com

Technical Assistance Center

Cisco TAC Web Site

Cisco TAC Escalation Center


Backing Up and Restoring Cisco CallManager Release 3.2


This document describes how to back up Cisco CallManager data and restore the Cisco IP Telephony Applications Server, the Cisco CallManager cluster, and Cisco CallManager data. This document also describes how to replace an existing or failed Cisco IP Telephony Applications Server.

Contents

This document contains the following topics:

Cisco IP Telephony Applications Backup Utility

Frequently Asked Questions about the Cisco IP Telephony Applications Backup Utility

How does the Cisco IP Telephony Applications Backup Utility work?

What data does the Cisco IP Telephony Applications Backup Utility back up?

Can I use any backup utility that I want?

What if I forgot to configure the backup during the initial Cisco CallManager installation?

How do I know if the backup completed successfully?

Backing Up the Data

Cisco IP Telephony Applications Restore Utility

Frequently Asked Questions about the Cisco IP Telephony Applications Restore Utility

How does the Cisco IP Telephony Applications Restore Utility work?

I backed up my system after I upgraded. Now, I need to restore my server. What do I do?

I forgot to back up my system after I upgraded. Now, I need to restore my server. What do I do?

The entire Cisco CallManager cluster experienced a catastrophic failure. What do I do?

May I change my administrator, SQL, and Directory Manager passwords when I restore or replace the server?

May I run Cisco-certified McAfee antivirus services when I restore or replace the server?

May I run the Cisco IDS agent when I restore or replace the server?

What post-restoration tasks should I perform?

How do I know if the restoration completed successfully?

Recovering (Restoring) the Same Cisco IP Telephony Applications Server

Replacing an Existing or a Failed Cisco IP Telephony Applications Server

Restoring the Cisco CallManager Data Only

Related Documentation

Obtaining Documentation

Obtaining Technical Assistance

Conventions

Consider the following documentation conventions as you review this document:


Note Reader, take note. Notes contain helpful suggestions or references to material not covered in the publication.


Caution Reader, be careful. You may do something that could result in equipment damage or loss of data.

Locating Related Cisco CallManager Documentation

Cisco strongly recommends that you review the following documents before you perform the Cisco CallManager any backup and restore procedures:

Release Notes for Cisco CallManager Release 3.2

This document lists and describes the system requirements, new features, changed information, documentation updates, and open caveats for Cisco CallManager. Cisco provides versions of this document that match the version of the installation document.

The appropriate Cisco IP telephony application documentation

Locate the release notes, installation/upgrade, and configuration guides for the applications that you want to integrate with Cisco CallManager.

You can navigate to the appropriate Cisco CallManager documentation by clicking the following URL:

http://www.cisco.com/univercd/cc/td/doc/product/voice/c_callmg/index.htm


Note If you need Cisco CallManager installation and backup/restore information for the Cisco Integrated Communications System (ICS) 7750, refer to the latest version of the Cisco ICS 7750 Getting Started Guide and the Cisco ICS 7750 Release Notes.


Frequently Asked Questions about the Cisco IP Telephony Applications Backup Utility

Review the following questions and responses before configuring or performing the backup.

How does the Cisco IP Telephony Applications Backup Utility work?

The Cisco IP Telephony Applications Backup Utility provides a reliable and convenient way to perform regularly scheduled automatic backups of your Cisco CallManager data.

The Cisco CallManager publisher database contains all the information that you configure with Cisco CallManager Administration, and the database updates each time you make a change. Cisco CallManager also updates directory, and configuration information also updates periodically. Cisco strongly recommends that you make a backup of the Cisco CallManager database, configuration, and directory information using the Cisco IP Telephony Applications Backup Utility every time you make changes through Cisco CallManager Administration.

Your Cisco CallManager cluster has only one publisher database, and no necessity exists to back up subscriber database servers containing replicates of the same database. However, you can configure the Cisco IP Telephony Applications Backup Utility to back up more than one Cisco IP Telephony Applications Server, such as publishing database servers of other Cisco CallManager clusters or Cisco uOne servers.

The backup server actually performs the backup operation. It stores the backup data in the local the backup destination that you specify. Cisco strongly recommends that you specify a tape drive or a network directory as the backup destination, not a local directory. If you choose a network directory as destination for the backup server, the directory must be shared in Windows 2000. To share a directory, log in on that server, right-click the directory folder icon that you want to share, click Sharing..., click Share this folder, and then click OK.

The backup target(s) contains the data to be backed up. You can choose more than one target but only one server. If a server is configured as a backup server, Cisco CallManager will automatically add it to the backup target list.

By default, one file called MCS.sti stores all data backed up from the target servers in the target list. The Cisco IP Telephony Applications Restore Utility extracts and restores archived MCS.sti files or MCS.tar files that you have named and stored properly.


Caution Each time a backup is performed, the new backup file overwrites the existing MCS.sti file. If you want to retain previous backup data, you must archive or rename the existing MCS.sti file before the next backup is performed.

Backups occur automatically according to the settings in the Schedule window of the Cisco IP Telephony Applications Backup Utility; however, you can also perform a backup at any time, as instructed in the procedure that follows.

What data does the Cisco IP Telephony Applications Backup Utility back up?

If you configure the backup settings as instructed in this document, the Cisco IP Telephony Applications Backup Utility automatically backs up the following information:

Cisco CallManager database on SQL Server 7, including the Call Detail Records (CDR) database

Administrative Reporting Tool (ART) database

DC Directory LDAP directory

Distribution.ini, which contains the publisher and subscriber configuration information

Database.dat, if present

lmhosts file

HKLM\Software\Cisco Systems, Inc.

Cisco uOne

Cisco Customer Response Applications

Can I use any backup utility that I want?

Cisco strongly recommends against using any third-party backup utilities. Cisco strongly recommends that you use the Cisco IP Telephony Applications Backup Utility to perform backups and that no third-party backup software is used. However, if you do not want to use the Cisco IP Telephony Applications Backup Utility, complete the installation as instructed and then stop the service called "stiBack for Cisco IP Telephony Applications." To stop the service, choose Start > Run, enter services.msc /s, choose the service in the main window, and click Stop Service.

What if I forgot to configure the backup during the initial Cisco CallManager installation?

Verify that the Cisco IP Telephony Applications Backup Utility icon exists in the Windows 2000 system tray. If the icon does not exist, you did not configure the backup during the installation.

To obtain the backup utility, perform the following procedure:

Procedure


Step 1 Click http://www.cisco.com/kobayashi/sw-center/sw-voice.shtml.

Step 2 Choose Cisco CallManager Version 3.2 > Download CallManager Cryptographic Software... > Download Cisco 3DES Cryptographic Software under export licensing controls.

Step 3 Download the MCS-backup.exe file to your hard drive.

Step 4 Make note of the location where you saved the file.

Step 5 Double-click the file to begin the installation.

Step 6 When a prompt asks if you want to install the backup, click Yes.

When the Cisco IP Telephony Applications Backup icon displays in the Windows 2000 system tray, you have completed the installation.

Step 7 Perform Step 4 through Step 11 in "Backing Up the Data" section to configure backup settings for the application.


How do I know if the backup completed successfully?

The backup process creates the log file, stiBack, under C:\Winnt on the backup server. If the following error messages display in the log file, the process did not successfully backup up the data:

Cisco CallManager database could not be found on <Server Name>.

Could not determine APPS version

Could not find a CCM/ART/CDR SQL database on <Server Name>

Error finding SQL database

Error enumerating registry keys on <Server Name>

Open file request returned Not Enough Space

Backing Up the Data

To configure/modify your backup settings or to start a backup now, perform the following steps:

Procedure


Step 1 In the Windows 2000 system tray, click the Cisco IP Telephony Applications Backup Utility icon and choose View status. If the Cisco IP Telephony Applications Backup Utility icon is not in the Windows 2000 system tray, choose Start > Programs > Cisco IP Telephony Applications Backup > Backup Viewer; then, click the Cisco IP Telephony Applications Backup Utility icon in the Windows 2000 system tray and choose View status. Verify that the current status is "Waiting until <time> on <date>." You can keep this window open to view the progress of the backup utility.

Step 2 In the Windows 2000 system tray, click the Cisco IP Telephony Applications Backup Utility icon and choose Configure settings.

Step 3 Perform the following procedure:

If you are configuring the backup for the first time, go to Step 4.

If you are modifying existing settings, go toStep 6.

If you want to start the backup now, go to Step 12.

Step 4 After the Cisco IP Telephony Applications Backup Utility Setup loads, specify whether this server will act as a backup target or the backup server during the backup and restore operation.

Defining Backup Server

The backup server actually performs the backup operation. It stores the backup data in the directory or tape drive destination that you specify. If a server is configured as a backup server and has the Cisco CallManager component installed on it, Cisco CallManager automatically adds it to the backup target list. Cisco recommends that when you are installing Cisco CallManager on the publisher database server, you choose Backup Server.

Defining Backup Target

A backup target acts as a server that contains data to be backed up. You can choose more than one target, but you can choose only one server.

Choose either Server or Target and then click OK.

Step 5 If you chose Target in the previous step, a message displays indicating that the setup is complete. You will need to configure this server as a Cisco CallManager target on the backup server. Go to Step 11.

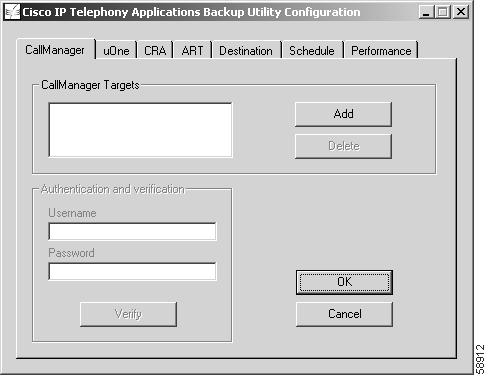
If you chose Server in the previous step, the CallManager tab automatically opens. Figure 1 shows an example of the CallManager tab in the Cisco IP Telephony Applications Backup Utility.

Figure 1 Cisco CallManager Tab in the Cisco IP Telephony Applications Backup Utility

Step 6 Verify that the servers listed in the target field are the ones that you want to include in this backup. If necessary, add additional targets by clicking Add. To remove servers from the target list, click Delete. If you want to add a remote server, you must install it and connect it to the network before you add it to the target list. Enter a username and password with administrator access rights on the remote server and then click Verify.


Note The Backup Utility attempts to connect to the remote server. If the remote server is not found, the authentication fails. The server name remains in the target list but may not be accessible.


Step 7 Click the uOne, CRA (Cisco Customer Response Applications), or ART (Cisco Administrative Reporting Tool) tab and repeat Step 6 to configure the backup for Cisco uOne, CRA, or Cisco ART.

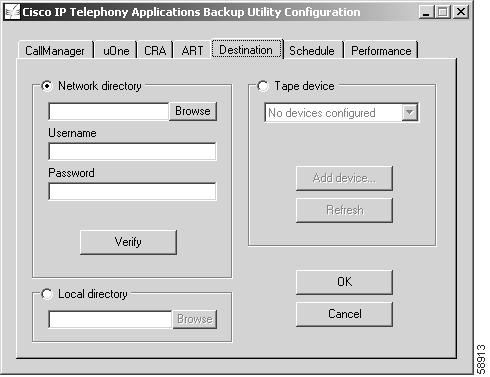
Figure 2 shows an example of the Destination tab in the Cisco IP Telephony Applications Backup Utility. Cisco allows you to configure only one destination for all applications that use the backup utility.

Figure 2 Destination Tab in the Cisco IP Telephony Applications Backup Utility Configuration Window

Step 8 Click the Destination tab. Make sure that the destination directory or tape device is configured.


Note You may click the Tape device radio button only if you have the MCS-7835, MCS-7845-1400, IBM xSeries 340, or xSeries 342 server.

To use the Cisco IP Telephony Applications Restore Utility on your server, you must choose Network directory or Tape device.


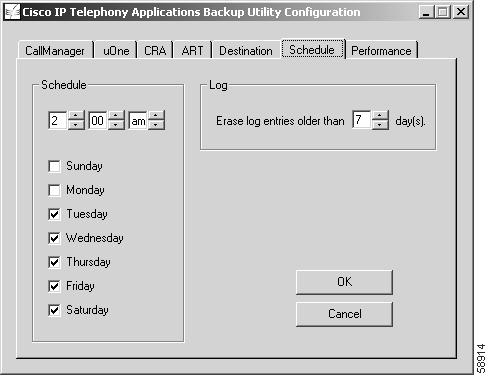
Figure 3 shows an example of the Schedule tab in the Cisco IP Telephony Applications Backup Utility Configuration window. Cisco allows you to schedule only one day and time for all applications that use the backup utility. The backup utility backs up all affected applications during the scheduled time.


Caution Schedule Cisco CallManager backups to occur during off-peak hours because CPU utilization is high during the backup process.

Figure 3 Schedule Tab in Cisco IP Telephony Applications Backup Utility Configuration Window

Step 9 Click the Schedule tab. Choose the days and times when you want an automatic backup to occur. The default sets the backup time to 2:00 am Tuesday through Saturday. Click OK.

Step 10 The Performance tab allows the operating system to modify the allocation of CPU resources during the backup process. Click the Performance tab to prioritize when the backup service (stiBack.exe) will run during the next backup. Three options, Low, Normal, and Below Normal, appear in the window. Before you click one of the three options, consider the following information:

a. Clicking the Normal radio button accepts the default priority associated with the server.

b. Clicking the Below Normal radio button ensures that configured services remain responsive while the backup occurs. When you click this option, which is available only on a Windows 2000 server, be aware that your backup may take longer than the Normal setting.

c. Clicking the Low radio button ensures that configured services remain completely responsive during the backup. Be aware that your backup may take longer than the Normal of Below Normal setting.

If you do not click one of the performance radio buttons, the Normal radio button serves as the default priority for the backup service (sti.Back.exe) that runs on the server during the next backup.

Step 11 Click OK to save the settings.

Step 12 If you want to start a backup now, click the Cisco IP Telephony Applications Backup Utility icon in the Windows 2000 system tray and choose Start backup now.

Step 13 The Backup Utility Viewer displays the status of the backup operation by highlighting each task as it occurs. Use the information generated in the log window to help identify problems. When the current status returns to "Waiting until <time> on <date>," the backup is complete. The last line in the log file indicates that the log is closed.


Note For information on preserving the server hard drive after a backup, refer to the latest version of Upgrading Cisco CallManager Release 3.2.


Frequently Asked Questions about the Cisco IP Telephony Applications Restore Utility

Review the following questions and responses before any Cisco CallManager restoration procedures:

How does the Cisco IP Telephony Applications Restore Utility work?

Cisco CallManager comes with the Cisco IP Telephony Applications Restore Utility. This utility provides a reliable and convenient way to perform a recovery of your server or Cisco CallManager data in the unlikely event of a server/cluster failure, or if your server is being replaced.

When you restore, you choose and restore data from one server at a time.

Recovering (Restoring) the Same Cisco IP Telephony Applications Server

In the unlikely event of a server failure, you can use the Cisco CallManager Installation and Recovery CD-ROMs and the most recent backup information to restore the Cisco CallManager server. The Recovery option on the Installation and Recovery CD-ROMs restores the operating system, Cisco CallManager, and other included software, and then restores the backup data, a file known as MCS.sti, using the Cisco IP Telephony Applications Restore Utility. The Cisco IP Telephony Applications Restore Utility prompts you to verify the location of the backup file (MCS.sti). Then, it automatically executes a restore operation to restore the Cisco CallManager backup data from the specified tape or network directory. Of course, you must have a good backup of the Cisco CallManager data for the recovery to be successful.


Note You must have a good backup of the Cisco CallManager data stored on tape or on a network directory, not on the server local directory, to perform restoration procedure.


You need not perform a recovery on a server that contains a subscriber database because that database is only a backup copy of the publisher database. For subscriber servers, performing a new installation provides the best solution. Refer to the latest version of Installing Cisco CallManager Release 3.2 for more information on performing a new installation on a subscriber server.

During the recovery process, the system recovers IP information, computer name, and other configuration data from backup and populates the data entry fields. However, as a security measure, you should make sure that you have the configuration information for this server available before you begin. You can use the configuration data table in the latest version of Installing Cisco CallManager Release 3.2 to record or confirm the data.

Replacing an Existing or a Failed Cisco IP Telephony Applications Server

When one server is configured to replace an existing or failed server, the new server uses the IP information and computer name of the original machine. The process installs the operating system, Cisco CallManager, and other included software as if it were a new installation and then restores the Cisco CallManager backup data on the new server.


Note You must have a good backup of the Cisco CallManager data stored on tape or on a network directory, not on the local directory of the existing server, to perform the restoration procedure.


When you perform a server replacement, you must always manually enter the IP information, computer name, and other configuration data exactly as it was on the original server. Make sure you have the configuration information for this server available before you begin. You can use the configuration data table in the latest version of Installing Cisco CallManager Release 3.2 to confirm the data.

I backed up my system after I upgraded. Now, I need to restore my server. What do I do?

If you upgraded to a version of Cisco CallManager, performed a backup after the upgrade, and now need to restore your Cisco CallManager server, complete the following tasks:

Perform a restoration on the server by employing the CD-ROMs you used during the initial Cisco CallManager installation.

After you complete the restoration, upgrade to the version of Cisco CallManager that you want to run on the server.

Finally, restore your Cisco CallManager data.

I forgot to back up my system after I upgraded. Now, I need to restore my server. What do I do?

If you upgraded to a version of Cisco CallManager, did not back up your data after the upgrade, and now need to restore your server, complete the following tasks:

Restore the data to your server by employing the CD-ROMs that you used during the initial Cisco CallManager installation.

After you restore the data, upgrade to the version of Cisco CallManager that you want to run on the server.


Note For detailed information on restoring your system and data, refer to the Cisco CallManager installation guide that matches the version number on your Cisco CallManager Installation and Recovery CD-ROM. Click the following URL to navigate to the appropriate Cisco CallManager installation or upgrade documentation: http://www.cisco.com/univercd/cc/td/doc/product/voice/c_callmg/index.htm


The entire Cisco CallManager cluster experienced a catastrophic failure. What do I do?

In the unlikely event of a In the unlikely event of a catastrophic multiserver failure, you must restore every server in the Cisco CallManager cluster. Consider the following guidelines before you restore the cluster:

Restore the publisher database server first.

Cisco requires that you restore the server to the version of the last successful Cisco CallManager database backup.

Restore the Cisco CallManager database.

Install Cisco CallManager on all subscribers in the cluster.

May I change my administrator, SQL, and Directory Manager passwords when I restore or replace the server?

Cisco strongly recommends that you do not change any passwords when you are restoring/replacing the server or cluster. The restoration process restores the previously backed up passwords, does not acknowledge the new passwords, and causes the system to malfunction.

If you change the Directory Manager password when you are restoring/replacing the server or cluster, the server cannot access the directory.

May I run Cisco-certified McAfee antivirus services when I restore or replace the server?

Through the Control Panel, Cisco strongly recommends that you set all Cisco-approved McAfee antivirus services to Disabled. You can enable all antivirus services after you complete the upgrade.

To disable the antivirus services, perform the following procedure:

Procedure


Step 1 If you have not already done so, disable all Cisco-approved McAfee antivirus services through the Control Panel by completing the following procedure:

a. Choose Start > Settings > Control Panel > Administrative Tools > Services.

b. From the Services window, right-click one of the antivirus services; i.e, Network Associates Alert Manager, Network Associates McShield, or Network Associates Task Manager, and choose Properties.

c. Verify that the General tab displays in the Properties window.

d. From the Startup type drop-down list box, choose Disabled.

e. Click OK.

f. In the Services window, right-click the antivirus service and click Stop.

Step 2 Disable all Cisco-approved McAfee antivirus services; i.e., Network Associates Alert Manager, Network Associates McShield, and Network Associates Task Manager.


May I run the Cisco IDS agent when I restore or replace the server?

If you have Cisco IDS agent installed on the server, you must set the IDS Agent to On Warning mode instead of Protecting mode. You can change the mode after you complete the restoration.

You should stop the following services before you restore the server:

entercept Agent

entercept Watchdog

entercept Notification Manager

entercept Server

You can start the services after you restore the server

For information on how to perform these tasks, click the following URL:

http://www.cisco.com/warp/public/788/AVVID/ids_host_sensor_cm.html

What post-restoration tasks should I perform?

Perform the following post-restoration tasks:

For the restoration to take effect, make sure that you reboot the server when prompted to do so.

If necessary, restore the Cisco IP telephony applications/products/plugins to the version compatible with the restored version of Cisco CallManager. Refer to the Cisco CallManager Compatibility Matrix for more information.

How do I know if the restoration completed successfully?

The restoration process creates the log file, stiRestore, under C:\Winnt on the backup server. If the following error messages display in the log file, the process did not successfully restore the data or server:

Failed to drop CCM/ART/CDR database from <Server Name>

Failed to restore DC Directory

Failed to stop DC Directory service

Failed to restart DC Directory service

Recovering (Restoring) the Same Cisco IP Telephony Applications Server

This section describes how to restore the hard drive, operating system, software, and data onto the same Cisco IP Telephony Applications Server in the unlikely event of a catastrophe. For a description of how the restoration works on the same Cisco CallManager server, see "How does the Cisco IP Telephony Applications Restore Utility work?" section.

To restore the operating system and software to the server, perform the following steps:

Procedure


Step 1 Connect a monitor, keyboard, and mouse to the server as described in the "Connecting a Monitor, Keyboard, and Mouse to the Server" section in the latest version of Installing Cisco CallManager Release 3.2.

Step 2 Locate the Cisco IP Telephony Server Operating System Hardware Detection CD-ROM (CD #1) and insert it into the CD-ROM drive.


Note For a successful recovery, make sure that the version of Cisco CallManager running on your system matches the last successful backup.


Step 3 Shut down and restart the server by pressing Ctrl+Alt+Del. Click Shutdown, choose Restart, and then click OK. If this method does not work, turn the server off. Wait 10 seconds and then power up the server. The server takes several minutes to shut down and restart.


Note During recovery, the server reboots several times. Do not power off the server at any time during this process, unless instructed to do so in the procedure. Any power interruption during the recovery process could prevent proper completion of the configuration and might prevent the operating system from restarting.


Step 4 The Welcome window opens. Click Next.

Step 5 Choose Same Server Recovery; then, click Next.

Step 6 The Perform a Recovery window displays a warning that all data will be overwritten except for recovery information. Click Next.

Step 7 In the Ready to Complete Installation window, click Next. This process takes about 5 minutes to complete.

Step 8 When prompted by the system to do so, eject the CD-ROM and press any key to reboot the server.


Note If the CD-ROM is not ejected and the server reboots, the installation process loads again and will start over from the beginning.


Step 9 The Cisco IP Telephony Applications Server Configuration Wizard begins. Click Next to continue.


Caution In the configuration entry windows that follow, Cisco CallManager automatically populates the data entry fields with configuration data that was recovered from the backup. Do not change IP addresses or the computer name during the recovery.

Step 10 The user name and the name of your organization appear in the appropriate fields. The computer name and DNS domain suffix appear. Click Next.

Step 11 From the drop-down box, choose the appropriate time zone. Reset the current date and time, if applicable; then, click Next.

Step 12 If you chose Use the following IP address during the original installation, the IP information for the server displays in the next window. Do not change any entries on this window. If your server was configured for Domain Name System (DNS) or Windows Internet Name Service (WINS), the IP addresses of the primary DNS and WINS servers display. If DNS or WINS was not configured, empty IP addresses fields display. Click Next.

Step 13 If your server was configured with local name resolution, you must update the lmhosts file, so it contains a mapping of the IP address and hostname of each server in the cluster. Perform the following steps to configure the lmhosts file:

a. In the LMHost window, check the Check if you want to edit LMHosts file check box.

b. Enter the IP Address and Server Name.

For example:

172.16.0.10 dallascm1

c. Click Add Server.

d. Click Next to continue.


Note The Windows 2000 SNMP agent provides security through the use of community names and authentication traps. All SNMP implementations universally accept the default name "public." Cisco sets the community rights to none for security reasons. If you want to use SNMP with this server, you must configure it.


Step 14 To ensure security within the Windows 2000 SNMP agent, Cisco recommends that you change the default public community name. Enter a new name and then click Next.

Step 15 The installation process automatically enables Telnet and Terminal services. If you want, you can disable these services; then, click Next.

Step 16 The CD-ROM drive automatically opens. Remove CD #1 from the CD-ROM drive; a prompt asks you to insert the appropriate Operating System Installation and Recovery CD-ROM for your server into the CD-ROM drive. The configuration process continues automatically after detection of the appropriate CD-ROM. The server begins an installation and reboot process that takes about 6 minutes to complete.

Step 17 The CD-ROM drive automatically opens. When prompted, remove the appropriate Operating System Installation and Recovery CD-ROM from the CD-ROM drive and click any key to reboot. Windows 2000 setup begins and takes about 10 minutes to complete. Do not power down the server or click any keys during setup.

Step 18 When prompted to do so, insert the Cisco CallManager 3.2 Installation and Recovery CD-ROM. The installation script automatically continues loading from the CD-ROM.


Note For a successful recovery, make sure that the version of Cisco CallManager running on your system matches the last successful backup.


Step 19 In the Welcome to the Cisco CallManager Installation Wizard window, click Next.

Step 20 In the CallManager Components window, choose the services you want to activate; then, click Next. When Cisco CallManager services are activated, Cisco CallManager places them in a stopped state. To start services after the installation is complete, refer to the Cisco CallManager Serviceability Administration Guide or online help in the Cisco CallManager application.


Note The following information applies to the services in the CallManager Components window. The Cisco IP Voice Media Streamer contains the Media Termination Point (MTP), music on hold (MOH), and conference bridge services. To add or remove services later, refer to the "Activating Cisco CallManager Services" section in the latest version of Installing Cisco CallManager Release 3.2.


Caution You automatically install the database with any selection from the CallManager Components window. If you want a standalone database server only (does not have Cisco CallManager installed), check the Cisco CallManager Web Components check box. With this selection, only Cisco CallManager Web Components and the database install on the standalone database server. If you choose not to install Cisco CallManager Web Components at this time, be aware that you will have to reinstall Cisco CallManager if you want Cisco CallManager Administration, the GUI-based web application, on the server.

Step 21 Choose I am upgrading/installing the CallManager Publisher and then click Next.

Step 22 If you chose I am upgrading/installing the CallManager Publisher, the Directory Server Configuration window opens and prompts you for the Directory Manager password. Enter the password in the Password field; then, enter the same password again in the Confirm Password field. Click Next.

Step 23 You have completed the configuration of Cisco CallManager and the database server. The Cisco CallManager and other included software are ready to be installed. Click Next. This part of the recovery takes about 30 minutes.

Step 24 The Cisco IP Telephony Applications Backup Utility Setup loads automatically. You must specify whether this server will act as a backup target or the backup server during the backup and restore operation.

Choose backup Server or Target. Make sure this selection matches the server original configuration. Click OK.


Note Cisco strongly recommends that you use the Cisco IP Telephony Applications Backup Utility to perform backups and that no third-party backup software is used. However, if you do not want to use the Cisco IP Telephony Applications Backup Utility, complete the installation as instructed and then stop the service called "stiBack for Cisco IP Telephony Applications." To stop the service, choose Start > Run, enter services.msc /s, choose the service in the main window, and click Stop Service.


Step 25 When you are asked to confirm the backup settings in the following windows, click OK.

Step 26 If you chose Target in the previous window, go to Step 27. If you chose Server, perform Step 4 through Step 11 from the "Backing Up the Data" section; then go to Step 27.


Caution When entering passwords for the local Administrator and SA (SQL Server system administrator) accounts in the next steps, do not use the apostrophe ('). Enter the same Administrator password for the publisher and all subscribers in the cluster, so Cisco CallManager database replication occurs.

Step 27 A prompt asks you to enter a new password for the local Administrator account. Enter a new password in the New Password field and then enter it in the Retype Password field. Click OK.

Step 28 A prompt asks you to enter a new password for the SA (SQL Server system administrator) account. Enter a new password of at least 5 characters in the New Password field and then enter it in the Retype Password field. Click OK.


Note Do not lose or forget this password. If you do, you will not be able to reconfigure the server.


Step 29 A message indicates that both passwords changed successfully. Click OK.

Step 30 Eject the CD-ROM from the CD-ROM drive; click Yes when prompted to reboot the server.

Step 31 The logon window should already contain the user name Administrator. Enter the new password for the Administrator account and then click OK.

Step 32 When the Cisco IP Telephony Applications Restore Utility window opens, choose the location of the backup file that you want to restore by clicking Browse, choosing the file, and clicking Open. If the backup file is located on a network drive, you must enter the username and password for authentication and click Verify. When a message notifies you of successful authentication, click OK. Click Next to continue.


Note If the backup file is located on a network drive, the restore utility must authenticate with that server and verify that the backup file exists before the restore operation can continue.


Step 33 When the backup file is detected, the target files it contains display in the CallManager Targets list. Choose the Cisco CallManager target that you want to restore. Enter the username and password for that server and then click Verify. Once you have successfully authenticated to that server, click Next to continue.

By default, one file called MCS.sti stores all data backed up from the target servers in the target list. When you restore, you choose and restore data from one target server at a time.

Step 34 You are warned that if you proceed, you will overwrite the target server. Click Yes to continue.


Note For a successful recovery, make sure that the version of Cisco CallManager on your system matches the last successful backup.


Step 35 The restore utility restores the Cisco CallManager data. During the restore process, the Cisco IP Telephony Applications Restore Utility log window displays each event that occurs and can be used to help identify errors. When the operation is complete, click OK to close the utility.

Step 36 Reboot the server by pressing Ctrl+Alt+Del.

Step 37 Click the Shut Down button.

Step 38 From the drop-down menu, choose Restart and click OK.

Step 39 After you log on with administrative privileges, verify the restored data.


Replacing an Existing or a Failed Cisco IP Telephony Applications Server

This section describes how to replace an existing or failed Cisco IP Telephony Applications Server with a different one. You must have the Cisco CallManager data from the original server backed up on tape or in a network area, so that it can be restored to the new server. Before you perform the procedure, see "How does the Cisco IP Telephony Applications Restore Utility work?" for more information.

To replace an existing or failed server, perform the following steps:

Procedure


Step 1 Connect a monitor, keyboard, and mouse to the server as described in the "Connecting a Monitor, Keyboard, and Mouse to the Server" section in the latest version of Installing Cisco CallManager Release 3.2.

Step 2 Locate the Cisco IP Telephony Server Operating System Hardware Detection CD-ROM (CD #1) and insert it into the CD-ROM drive.


Note For a successful recovery, make sure that the version of Cisco CallManager running on your system matches the last successful backup.


Step 3 Power up the server.


Note During this process, the server reboots several times. Do not power off the server at any time during this process, unless instructed to do so in the procedure. Any unexpected power interruption during the installation process could prevent proper completion of the configuration and might prevent the operating system from restarting.


Step 4 The Cisco IP Telephony Applications Server QuickBuilder welcome window opens. Click Next.

Step 5 If your server is new and has never had Cisco CallManager 3.2 installed on it, go to Step 7. Otherwise, in the Type of Installation window, choose New Installation or Server Replacement, and then click Next.

If the New Installation or Server Replacement window opens, click Next.

Step 6 The next window displays a warning that your configuration and data will be overwritten. Click Next.

Step 7 When a message prompts you to cycle the system power, turn the server off. Wait 10 seconds and then power up the server. The startup may take several minutes.

Step 8 The New Installation and Replacement window opens. Click Next.

Step 9 The Configuration Process window opens. Click Next. The system reboots automatically.

Step 10 Enter your product key BTOO VQES CCJU IEBI; then, click Next.

The Cisco product key comprises alphabetical letters only. It contains no numbers or special characters. Based on a file encryption system that allows you to install only the components you have purchased, it prevents other supplied software from being installed for general use.

Step 11 The End User License Agreement window opens. Read through the contents of the agreement. If you consent to the terms of the agreement, click I Agree. If you do not consent, you must terminate the installation by clicking Exit.

Step 12 In the Server Replacement window, check the I am recovering a system from backup check box.

Step 13 In the Ready to Complete Installation window, Click Next. This process takes about 2 to 5 minutes to complete, depending on your server type.

Step 14 The Cisco IP Telephony Applications Server Configuration Wizard begins. Click Next to continue.


Caution On the configuration entry windows that follow, ensure the data entry fields are populated with the same configuration data that was used on the server that is being replaced.

Step 15 Enter the user name and the name of your organization in the appropriate fields. Enter the computer name and DNS domain suffix. Click Next.

Step 16 You can choose to remain a workgroup member or to join an NT domain. If you want to join a domain, enter the NT domain name and the username and password of a user with administrator privileges on this server; then, click OK.

Step 17 Choose the appropriate time zone for the server. Set the current date and time; then, click Next.

Step 18 The Static Dynamic IP Address window opens. Cisco recommends that you choose Use the following IP address when prompted about the method used to configure the IP information.


Note Cisco recommends choosing static IP information, which ensures that the Cisco CallManager server obtains a fixed IP address. With this selection, Cisco IP phones can register with Cisco CallManager when you plug the phones into the network.

If you choose to use Dynamic Host Configuration Protocol (DHCP), Cisco Technical Assistance Center (TAC) insists that you reserve an IP address for each Cisco CallManager server in the DHCP server scope. This action prevents the release or reassignment of IP addresses. If you do not reserve IP addresses through the DHCP server scope, the DHCP server may assign a different address to the Cisco CallManager server if the server is disconnected from, and then reconnected to, the network. To return the Cisco CallManager server to its original IP address, you would have to reprogram the IP addresses of the other devices on the network. For information on DHCP option settings, refer to the Cisco CallManager Administration Guide.


Step 19 Enter the server IP address, subnet mask, and default gateway in the appropriate fields.


Caution If you are installing multiple servers in a cluster, you must have a name resolution method in place. If you are not using DNS or WINS, you must configure local name resolution by updating the lmhosts file with IP address and hostname information for every server in your cluster, as instructed in
Step 21.

Step 20 If you are using DNS or WINS, enter the IP addresses of the primary and secondary DNS servers and primary and secondary WINS servers. Click Next and continue to Step 22.

If you are not using DNS, leave the DNS and WINS fields empty. Click Next.

Step 21 If you did not enter DNS or WINS server information in the previous window, and if you are installing multiple servers in a cluster, you must configure local name resolution by updating the lmhosts file, so it contains a mapping of the IP address and hostname of each server in the cluster. To configure the lmhosts file, perform the following steps:

a. In the LMHost window, check the Check if you want to edit LMHosts file check box.

b. Enter the IP Address and Server Name.

For example:

172.16.0.10 dallascm1

c. Click Add Server.

d. Click Next to continue.


Note The Windows 2000 SNMP agent provides security through the use of community names and authentication traps. All SNMP implementations universally accept the default name "public." You should change this name to limit access.


Step 22 To ensure security within the Windows 2000 SNMP agent, Cisco recommends that you change the default public community name. Enter a new name and then click Next.

Step 23 The installation process automatically enables Telnet and Terminal services. If you want, you can disable these services; then, click Next.

Step 24 The CD-ROM drive automatically opens. Remove CD #1 from the CD-ROM drive; insert the appropriate Operating System Installation and Recovery CD-ROM for your server into the CD-ROM drive. The configuration process continues automatically after detection of the appropriate CD-ROM. The server begins an installation and reboot process that takes about 6 minutes to complete.

Step 25 The CD-ROM drive automatically opens. When prompted, remove the Operating System Installation and Recovery CD-ROM and click any key to reboot. Windows 2000 setup begins and takes about 10 minutes to complete. Do not power down the server or click any keys during setup.

Step 26 When prompted to do so, insert the Cisco CallManager 3.2 Installation and Recovery CD-ROM. The installation script automatically continues loading from the CD-ROM.


Note For a successful recovery, make sure that the version of Cisco CallManager running on your system matches the last successful backup.


Step 27 In the Welcome to the Cisco CallManager Installation Wizard window, click Next.

Step 28 In the CallManager Components window, choose the services you want to activate in this installation and then click Next. When Cisco CallManager services are activated, Cisco CallManager places them in a stopped state. To start services after the installation is complete, refer to the Cisco CallManager Serviceability Administration Guide or online help in the Cisco CallManager application.


Note The following information applies to the services in the CallManager Components window. The Cisco IP Voice Media Streamer contains the Media Termination Point (MTP), music on hold (MOH), and conference bridge services. To add or remove services later, refer to the "Activating Cisco CallManager Services" section in the latest version of Installing Cisco CallManager Release 3.2.


Caution You automatically install the database with any selection from the CallManager Components window. If you want a standalone database server only (does not have Cisco CallManager installed), check the Cisco CallManager Web Components check box. With this selection, only Cisco CallManager Web Components and the database install on the standalone database server. If you choose not to install Cisco CallManager Web Components at this time, be aware that you will have to reinstall Cisco CallManager if you want Cisco CallManager Administration, the GUI-based web application, on the server.

Step 29 Choose I am upgrading/installing the CallManager Publisher and then click Next.

Step 30 If you chose I am upgrading/installing the CallManager Publisher, the Directory Server Configuration window opens and prompts you for the Directory Manager password. Enter the password in the Password field; then, enter the same password again in the Confirm Password field. Click Next.

Step 31 You have completed the configuration of Cisco CallManager and the database server. The Cisco CallManager and other included software are ready to be installed. Click Next.

Step 32 The Cisco IP Telephony Applications Backup Utility Setup loads automatically. You must specify whether this server will act as a backup target or the backup server during the backup and restore operation.

Choose backup Server or Target. Make sure this selection matches the original configuration of the server. Click OK.

Step 33 If you chose Target in the previous window, go to Step 34. If you chose Server, perform Step 4 through Step 11 from the "Backing Up the Data" section; then go to Step 34.


Note When entering passwords for the local Administrator and SA (SQL Server system administrator) accounts in the next steps, do not use the apostrophe ('). Enter the same Administrator password for the publisher and all subscribers in the cluster, so Cisco CallManager database replication occurs.


Step 34 The Cisco Product Activation window opens and prompts you to enter a new password for the local administrator account. Enter the new password in the New Password field and then enter it in the Retype Password field. Click OK.

Step 35 A second window opens and prompts you to enter a new password for the SA (SQL Server system administrator) account. Enter a new password of at least 5 characters in the New Password field and then enter it in the Retype Password field. Click OK.


Note Do not lose or forget this password. If you do, you will not be able to reconfigure the server.


Step 36 A message indicates that both passwords changed successfully. Click OK.

Step 37 Eject the CD-ROM from the CD-ROM drive, and if you want to reboot the system now, click Yes when prompted.

Step 38 After the system reboots, press Ctrl+Alt+Del to display the logon window.

The logon window should already contain the username Administrator.

Step 39 Enter the new password for the Administrator account and then click OK.

Step 40 After you log in to the server, the Cisco IP Telephony Applications Restore Utility window opens. Figure 4 shows what you may see in the window. Choose the location and name of the backup file that you want to restore. Click Next.

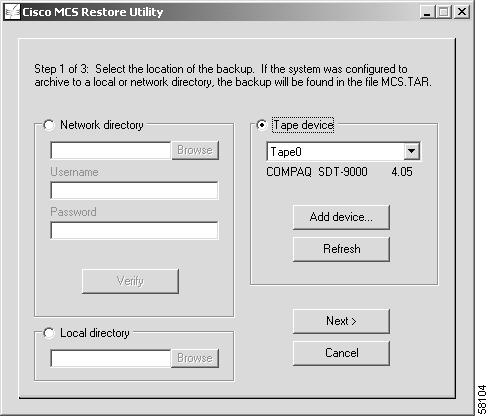
Figure 4 Cisco IP Telephony Applications Restore Utility Window


Note The restore utility must verify that the file exists before the restore operation continues. If the file is not found, you must specify the correct destination location of the backup file by clicking the destination tab in the Cisco IP Telephony Applications Backup window and entering the appropriate information.


Step 41 When the backup file is detected, the target files that it contains display in the CallManager Targets list. Choose the CallManager target that you want to restore and then click Next.

By default, one file called MCS.sti stores all data backed up from the target servers in the target list. When you restore, you choose and restore data from one target server at a time.

Step 42 You are warned that if you proceed you will overwrite the target server. Click Yes to continue.


Note For a successful recovery, make sure that the latest Cisco CallManager backup matches the version of Cisco CallManager running on the system.


Step 43 The restore utility restores the Cisco CallManager data. During the restore process, the Cisco IP Telephony Applications Restore Utility log window displays each event that occurs and can be used to help identify errors. When the operation is complete, click OK to close the utility.

Step 44 Reboot the server by pressing Ctrl+Alt+Del.

Step 45 Click the Shut Down button.

Step 46 From the drop-down menu, choose Restart and click OK.

Step 47 After you log on with administrative privileges, verify the restored data.


Restoring the Cisco CallManager Data Only

This section describes the process of restoring the Cisco CallManager data only. This process does not restore the operating system, Cisco CallManager, and other included software. To restore the Cisco CallManager database, directory information, and configuration files, perform the following steps:

Procedure


Step 1 Choose Start > Programs > Cisco IP Telephony Applications Backup > Restore Utility.

Step 2 Choose the location and name of the backup file that you want to restore and then click Next.


Note By default, one file called MCS.sti stores all data backed up from the target servers in the target list. When you restore, you choose and restore data from one server at a time.


Step 3 Choose the target server where you want this backup to be restored. Click Next.

Step 4 You are warned that all existing data will be lost, and you will overwrite the target server. Click Yes.


Note For a successful recovery, make sure that the version of Cisco CallManager running on your system matches the last successful backup.


Step 5 During the restore process, the Cisco IP Telephony Applications Restore Utility log window displays each event that occurs. You can use it to help identify errors. When the restore is complete, click OK.

Step 6 Reboot the server by pressing Ctrl+Alt+Del.

Step 7 Click the Shut Down button.

Step 8 From the drop-down menu, choose Restart and click OK.

Step 9 After you log on with administrative privileges, verify the restored data.


Obtaining Documentation

The following sections explain how to obtain documentation from Cisco Systems.

World Wide Web

You can access the most current Cisco documentation on the World Wide Web at the following URL:

http://www.cisco.com

Translated documentation is available at the following URL:

http://www.cisco.com/public/countries_languages.shtml

Documentation CD-ROM

Cisco documentation and additional literature are available in a Cisco Documentation CD-ROM package, which is shipped with your product. The Documentation CD-ROM is updated monthly and may be more current than printed documentation. The CD-ROM package is available as a single unit or through an annual subscription.

Ordering Documentation

Cisco documentation is available in the following ways:

Registered Cisco Direct Customers can order Cisco product documentation from the Networking Products MarketPlace:

http://www.cisco.com/cgi-bin/order/order_root.pl

Nonregistered Cisco.com users can order documentation through a local account representative by calling Cisco corporate headquarters (California, USA) at 408 526-7208 or, elsewhere in North America, by calling 800 553-NETS (6387).

Documentation Feedback

If you are reading Cisco product documentation on Cisco.com, you can submit technical comments electronically. Click Feedback at the top of the Cisco Documentation home page. After you complete the form, print it out and fax it to Cisco at 408 527-0730.

You can e-mail your comments to bug-doc@cisco.com.

To submit your comments by mail, use the response card behind the front cover of your document, or write to the following address:

Cisco Systems, Inc.
Attn: Document Resource Connection
170 West Tasman Drive
San Jose, CA 95134-9883

We appreciate your comments.

Obtaining Technical Assistance

Cisco provides Cisco.com as a starting point for all technical assistance. Customers and partners can obtain documentation, troubleshooting tips, and sample configurations from online tools by using the Cisco Technical Assistance Center (TAC) Web Site. Cisco.com registered users have complete access to the technical support resources on the Cisco TAC Web Site.

Cisco.com

Cisco.com is the foundation of a suite of interactive, networked services that provides immediate, open access to Cisco information, networking solutions, services, programs, and resources at any time, from anywhere in the world.

Cisco.com is a highly integrated Internet application and a powerful, easy-to-use tool that provides a broad range of features and services to help you to

Streamline business processes and improve productivity

Resolve technical issues with online support

Download and test software packages

Order Cisco learning materials and merchandise

Register for online skill assessment, training, and certification programs

You can self-register on Cisco.com to obtain customized information and service. To access Cisco.com, go to the following URL:

http://www.cisco.com

Technical Assistance Center

The Cisco TAC is available to all customers who need technical assistance with a Cisco product, technology, or solution. Two types of support are available through the Cisco TAC: the Cisco TAC Web Site and the Cisco TAC Escalation Center.

Inquiries to Cisco TAC are categorized according to the urgency of the issue:

Priority level 4 (P4)—You need information or assistance concerning Cisco product capabilities, product installation, or basic product configuration.

Priority level 3 (P3)—Your network performance is degraded. Network functionality is noticeably impaired, but most business operations continue.

Priority level 2 (P2)—Your production network is severely degraded, affecting significant aspects of business operations. No workaround is available.

Priority level 1 (P1)—Your production network is down, and a critical impact to business operations will occur if service is not restored quickly. No workaround is available.

Which Cisco TAC resource you choose is based on the priority of the problem and the conditions of service contracts, when applicable.

Cisco TAC Web Site

The Cisco TAC Web Site allows you to resolve P3 and P4 issues yourself, saving both cost and time. The site provides around-the-clock access to online tools, knowledge bases, and software. To access the Cisco TAC Web Site, go to the following URL:

http://www.cisco.com/tac

All customers, partners, and resellers who have a valid Cisco services contract have complete access to the technical support resources on the Cisco TAC Web Site. The Cisco TAC Web Site requires a Cisco.com login ID and password. If you have a valid service contract but do not have a login ID or password, go to the following URL to register:

http://www.cisco.com/register/

If you cannot resolve your technical issues by using the Cisco TAC Web Site, and you are a Cisco.com registered user, you can open a case online by using the TAC Case Open tool at the following URL:

http://www.cisco.com/tac/caseopen

If you have Internet access, it is recommended that you open P3 and P4 cases through the Cisco TAC Web Site.

Cisco TAC Escalation Center

The Cisco TAC Escalation Center addresses issues that are classified as priority level 1 or priority level 2; these classifications are assigned when severe network degradation significantly impacts business operations. When you contact the TAC Escalation Center with a P1 or P2 problem, a Cisco TAC engineer will automatically open a case.

To obtain a directory of toll-free Cisco TAC telephone numbers for your country, go to the following URL:

http://www.cisco.com/warp/public/687/Directory/DirTAC.shtml

Before calling, please check with your network operations center to determine the level of Cisco support services to which your company is entitled; for example, SMARTnet, SMARTnet Onsite, or Network Supported Accounts (NSA). In addition, please have available your service agreement number and your product serial number.


[an error occurred while processing this directive]