Feedback Feedback
|
Table Of Contents
Installing Cisco CallManager Release 3.1(3a)
Server Hardware Specifications
Before You Begin the Cisco CallManager Release 3.1 Installation
Connecting a Monitor, Keyboard, and Mouse to the Server
Connecting the Server to the Network
Performing the Cisco CallManager Release 3.1 Installation
Starting the Operating System Installation
Installing the Operating System on a Customer-Provided IBM xSeries Server
Entering Server Configuration Data and Completing the Operating System Installation
Performing Post-Installation Tasks
Changing Passwords for CCMAdmin and SQLSvc Accounts
Activating Cisco CallManager Services
Viewing the Component Versions Installed on the Server
Using the Cisco CallManager Music On Hold CD-ROM or Download
Re-creating Subscriber Connections
Obtaining Technical Assistance
Installing Cisco CallManager Release 3.1(3a)
This document describes how to install and configure Cisco CallManager Release 3.1 on the Cisco Media Convergence Server, customer-provided Compaq DL320 and DL380 server, or customer-provided IBM xSeries 330, 340, and 342 servers. Cisco requires that any CD-ROM purchased for installation on a customer-provided server be installed on a server meeting approved Cisco configuration standards.
Use this document in conjunction with the latest versions of Backing Up and Restoring Cisco CallManager Release 3.1, Upgrading Cisco CallManager Release 3.1, the Cisco CallManager Administration Guide, the Cisco CallManager System Guide, the Cisco CallManager Serviceability Administration Guide, online help in the Cisco CallManager application, and the Cisco Documentation CD-ROM. For a list of new features, compatibility caveats, and enhancements in Cisco CallManager Release 3.1, refer to the version of Release Notes for Cisco CallManager Release 3.1 that matches your installation document. You can view this document by clicking the following URL:
http://www.cisco.com/univercd/cc/td/doc/product/voice/c_callmg/3_1/rel_note/index.htm
Note
If you need Cisco CallManager installation and backup/restore information for the Cisco Integrated Communications System (ICS) 7750, refer to the latest version of the Cisco ICS 7750 Getting Started Guide and the Cisco ICS 7750 Release Notes.
Contents
This document contains the following topics:
•
•
•
•
•
•
Introduction
Cisco CallManager on the Cisco Media Convergence Server (MCS), customer-provided Compaq, or
customer-provided IBM xSeries server provides a network business communications system for high-quality telephony over IP networks. After you install Cisco CallManager on your server, the server becomes a Cisco IP Telephony Applications Server. Cisco CallManager, along with the Cisco IP Telephony Applications Server, enables the conversion of conventional, proprietary, circuit-switched telecommunication systems to multiservice, open LAN systems.Use the task roadmaps that follow to determine which sections of this document that you need to accomplish a desired task.
Before You Install Cisco CallManager
Before you install Cisco CallManager software on any server, see the following sections:
•
•
•
•
Installing Cisco CallManager
To install Cisco CallManager software on a Cisco MCS, customer-provided Compaq server, or customer-provided IBM xSeries server, complete the following procedures in the order indicated:
•
•
•
Post-Installation Tasks
After you complete the installation, perform the following post-installation tasks:
•
•
•
•
•
For information on backing up Cisco CallManager data and restoring your Cisco IP Telephony Applications Server, refer to the latest version of Backing Up and Restoring Cisco CallManager Release 3.1. To obtain this document, click the following URL:
http://www.cisco.com/univercd/cc/td/doc/product/voice/c_callmg/3_1/install/index.htm
For information on upgrading your Cisco CallManager server via the web or CD-ROM, refer to the latest version of Upgrading Cisco CallManager Release 3.1. To obtain this document, click the following URL: http://www.cisco.com/univercd/cc/td/doc/product/voice/c_callmg/3_1/install/index.htm
Server Hardware Specifications
Before you begin the installation, carefully review the hardware documentation that accompanies your server. Make sure that you have the appropriate hardware before installing Cisco CallManager. To review the server hardware specifications, click the following URL:
http://www.cisco.com/warp/public/779/largeent/avvid/products/infrastructure.html
Before You Begin the Cisco CallManager Release 3.1 Installation
Before you begin installing Cisco CallManager for a distributed call-processing system, you should plan your system configuration.You can distribute the call-processing load for your system across multiple Cisco CallManagers as a single cluster. A cluster comprises a set of Cisco CallManagers that share the same database.
In a Cisco CallManager distributed system, one server maintains the master, or publisher, database, and all others in the cluster maintain subscriber databases. Subscriber databases provide replicates of the master database. During normal operation, all Cisco CallManagers in the cluster read data from and write data to the publisher database. Periodically, Cisco CallManager automatically updates the subscriber copies of the database from the publisher database.
At a minimum, you should determine how many Cisco CallManager servers the cluster will contain, which server will house the publisher database, and where backup tasks will be performed. Additional planning should include a strategy for distributing the devices (such as phones or gateways) among the Cisco CallManagers in the cluster to achieve the type of distribution that you want. For more information on planning a Cisco CallManager distribution system, refer the Cisco CallManager System Guide or online help in the Cisco CallManager application.
Caution
Cisco strongly recommends that you do not run a web browser on the Cisco CallManager server. Running a web browser on the server causes CPU usage to surge.
Be aware that Cisco does not support third-party software that is installed on any Cisco Media Convergence Server (MCS) or customer-provided server meeting approved Cisco configuration standards.
Caution
If you have Cisco IDS Host Sensor installed on the server before you perform Cisco CallManager installation, upgrade, or restoration procedures, you must set the IDS Agent to On Warning mode instead of Protecting mode. You can change the mode after you complete the procedures. For information on how to perform these tasks, click the following URL:
http://www.cisco.com/warp/public/788/AVVID/ids_host_sensor_cm.html
You do not receive a monitor with any Cisco Media Convergence Server or any customer-provided server. The MCS-7830, MCS-7825, and MCS-7835 do not include a keyboard or mouse. During initial startup and configuration of the server and Cisco CallManager, you must supply a monitor and, if necessary, a keyboard and mouse.
The Cisco Media Convergence Server and all customer-provided servers ship with a blank hard drive. When you install Cisco CallManager Release 3.1, you use the appropriate CD-ROMs, depending on your server type:
•
•
For information on the tasks that CD #2 accomplishes, refer to the version of Upgrading Cisco CallManager Release 3.1 that matches this installation guide.
•
You will use only one of the server-specific Cisco IP Telephony Server Operating System Installation and Recovery CD-ROMs that come in your software kit. During the operating system installation, you receive a prompt to insert the appropriate CD-ROM into the CD-ROM drive.
•
•
When you begin the installation, you boot the server from the Cisco IP Telephony Server Operating System Hardware Detection CD-ROM. After the system boots, the Cisco IP Telephony Applications Server QuickBuilder installation utility loads automatically and guides you through the installation process. Cisco IP Telephony Applications Server QuickBuilder performs several preinstallation tasks including preparing your server hard drive and loading server configuration information. If necessary, it upgrades your system BIOS to a recommended version to support Windows 2000. Cisco IP Telephony Applications Server QuickBuilder then automatically installs the following software applications:
•
•
•
•
Table 1 describes the services, features, and applications that are installed when you choose the options from the CallManager Components window.
Cisco CallManager places services in a stopped state until the installation completes. After the installation completes, the services activate and start after the server reboots. For information on starting and stopping services, refer to the Cisco CallManager Serviceability Administration Guide or to online help in the Cisco CallManager application.
During the installation process, you receive prompts telling you to enter important configuration information about the server, such as the server name and IP address. You can complete the initial power up more efficiently if you gather all the necessary configuration information before beginning the installation process. The following information applies:
Cisco Product Key
Cisco supplies you with a Cisco Product Key when you purchase a Cisco IP telephony product. The product key, based on a file encryption system, allows you to install only the components that you have purchased, and it prevents other supplied software from being installed for general use. The product key comprises alphabetical letters only. It contains no numbers or special characters. Table 2 on page page 10 shows the product key, and it also appears in each step procedure where you are prompted to enter it.
The product key provided in this document allows you to install only Cisco CallManager Release 3.0 or 3.1. To install another Cisco IP telephony product, you must purchase the product and obtain the appropriate product key.
User and organization name
Registering the software product that you are installing requires user and organization name.
Computer name
Assign a unique network name of 15 characters or less for this server. It may contain alpha and numeric characters, hyphens (-), and underscores (_), and it must begin with an alphabetical character. You should follow your local naming conventions, if applicable.
Caution
Workgroup
This entry records the name of the workgroup of which this computer is a member. A workgroup comprises a collection of computers that have the same workgroup name. Ensure this entry of 15 characters or less follows the same naming conventions as the computer name.
Domain suffix
Always enter the Domain Name System (DNS) domain suffix in the format "mydomain.com" or "mycompany.mydomain.com." If you are not using DNS, use a fictitious domain suffix, such as acme.com.
TCP/IP properties
Assign an IP address, subnet mask, and default gateway. Because the IP addresses that you assign are permanent properties, you should not change them after installation.
Cisco recommends choosing static IP information, which ensures that the Cisco CallManager server obtains a fixed IP address. With this selection, Cisco IP phones can register with Cisco CallManager when you plug the phones into the network.
If you choose to use Dynamic Host Configuration Protocol (DHCP), Cisco Technical Assistance Center (TAC) insists that you reserve an IP address for each Cisco CallManager server in the DHCP server scope. This action prevents the release or reassignment of IP addresses. If you do not reserve IP addresses through the DHCP server scope, the DHCP server may assign a different address to the Cisco CallManager server if the server is disconnected from, and then reconnected to, the network. To return the Cisco CallManager server to its original IP address, you would have to reprogram the IP addresses of the other devices on the network. For information on DHCP option settings, refer to the Cisco CallManager Administration Guide.
Domain Name System (DNS)
Identify a primary DNS server for this optional field.
Caution
By default, the phones attempt to connect to the Cisco CallManager using DNS. Therefore, if you use DNS, make sure that the DNS contains a mapping of the IP address and the fully qualified domain name of the Cisco CallManager server. If you do not use DNS, use the server IP address instead of a server name for the phones to register with the Cisco CallManager. If you choose not to use DNS, install Cisco CallManager normally and then refer to the Cisco CallManager Administration Guide or online help in the Cisco CallManager application for information on changing the server name.
Windows 2000 Simple Network Management Protocol (SNMP) agent
The Windows 2000 SNMP agent provides security through the use of community names and authentication traps. All SNMP implementations universally accept the default name "public." You should change this name to limit access.
Database server
Determine whether this server will be configured as a publishing database server or a subscriber database server. This decision designates a permanent selection. If you want to reassign the database server type at a later date, you must reinstall the Cisco CallManager server.
Caution
Backup server or target
Determine whether this server will be configured as a backup server or a backup target.
The backup server actually performs the backup operation. It stores the backup data in the local directory, local tape drive, or network directory that you specify. If you choose a network directory as destination for the backup server, the directory must be shared in Windows 2000. A backup target contains the data to be backed up. You can choose more than one target but only one server. If a server is configured as a backup server, Cisco CallManager will automatically add it to the backup target list.
New password for the system administrator
Cisco CallManager Release 3.0 and later support password protection. At the end of the installation, a prompt asks you to supply a new password for the system administrator.
Note
Table 2 shows the configuration information required for installing software on your server. Complete all fields unless otherwise noted. Gather this information for each Cisco CallManager server that you are installing in the cluster. Make copies of this table and record your entries for each server in a separate table. Have the completed lists with you when you begin the installation.
Connecting a Monitor, Keyboard, and Mouse to the Server
You do not receive a monitor with any Cisco Media Convergence Server or any customer-provided server. The MCS-7820 and MCS-7822 include a keyboard and mouse, but the MCS-7830, MCS-7825, and MCS-7835 do not. You must supply a monitor and, if necessary, a keyboard and mouse to use during initial startup and configuration of the server and Cisco CallManager.
Plug the mouse and keyboard into the standard mouse and keyboard connectors marked on the back of the server. Plug the monitor cable into the monitor connector on the back of the server.
Caution
Connecting the Server to the Network
Make sure that you connect your server to the network before you begin the installation. The special, limited edition of Windows 2000, intended for use with Cisco CallManager only, will not install if you do not connect the server to the network.
The servers in Table 3 contain two network interface cards (NIC), but Cisco CallManager supports only one NIC. When you connect the server to the network, use the NIC connector listed in the table because the other NIC is disable during the installation.
Table 3 Connecting to the Network
MCS-7825
Use the lower NIC connector.
MCS-7835-1266
Use the NIC 1 connector.
IBM xSeries 330
Use the upper NIC connector.
Performing the Cisco CallManager Release 3.1 Installation
The entire installation process, excluding post-installation tasks, takes 60 to 90 minutes per server. To perform an installation on a Cisco Media Convergence Server or customer-provided server meeting approved Cisco configuration standards, see the following sections:
•
•
Starting the Operating System Installation
In this portion of the installation, which takes about 20 minutes, you will perform the following tasks:
•
•
•
•
Caution
During the installation, the server reboots several times. Do not power off the server at any time during this process, unless instructed. Any unexpected power interruption during the installation process could prevent proper completion of the configuration and might prevent the operating system from restarting.
Installing the Operating System on the Cisco Media Convergence Server and Customer-Provided Compaq Server
Unless otherwise specified in this document, all further references to the MCS-7835 apply to the MCS-7835, which contains a 733-MHz processor, the MCS-7835-1000, which contains a 1-GHz processor, the MCS-7835-1266, which contains a 1.26-GHz processor, and the customer-provided DL380. All further references to the MCS-7825 apply to the MCS-7825, which contains an 800-MHz processor, and the MCS-7825-1133, which contains a 1.2-GHz processor.
Perform the following steps to begin the operating system installation:
Procedure
Step 1
Step 2
Step 3
If you have previously installed Cisco CallManager on the server
If you are installing a server that has had a previous installation, insert the CD-ROM into the CD-ROM drive and then restart the system immediately.
If you have never installed Cisco CallManager on the server
If you are installing a new server, you will need to boot from the CD-ROM. This means that you must power up the server and then insert the CD-ROM early in the startup process.
Note
Step 4
Caution
a.
b.
c.
d.
e.
Caution
Step 5
You do not perform this step on an existing MCS-7835 containing a 733-MHz or a 1-GHz processor.
Step 6
You do not perform this step on an existing MCS-7835 containing a 733-MHz or a 1-GHz processor.
Step 7
You only perform this step on an existing MCS-7825.
Step 8
You do not perform this step on a MCS-7835 containing a 733-MHz or a 1-GHz processor.
Step 9
You do not perform this step on the following servers: all MCS-7835 containing a 733-MHz or a 1-GHz processor, a new MCS-7835-1266, a new MCS-7825, containing an 800-MHz processor, and a new MCS-7825-1133.
Step 10
You do not perform this step on any Cisco MCS except new and existing MCS-7835 containing a 733-MHz or a 1-GHz processor.
Step 11
You perform this step on all MCS-7835 except a new MCS-7835-1266. You do not perform this step on any MCS-7825.
Step 12
You do not perform this step on the following servers: an existing MCS-7835-1266, an existing MCS-7825, containing an 800-MHz processor, and an existing MCS-7825-1133.
Step 13
You perform this step on all Cisco MCS except an existing MCS-7825 containing an 800-MHz processor.
Note
Step 14
Step 15
Step 16
Step 17
You do not need to reboot the system before entering server configuration data. Continue configuring the server by completing the steps in "Entering Server Configuration Data and Completing the Operating System Installation" section.
Installing the Operating System on a Customer-Provided IBM xSeries Server
Perform the following steps to begin the operating system installation:
Procedure
Step 1
Step 2
Step 3
If you have previously installed Cisco CallManager on the server
If you are installing a server that has had a previous installation, insert the CD-ROM into the CD-ROM drive and then restart the system immediately.
If you have never installed Cisco CallManager on the server
Step 4
Note
Step 5
a.
b.
c.
d.
e.
f.
g.
Caution
Step 6
If the window does not open, continue with Step 7.
Step 7
If the window does not open, continue with Step 9.
Step 8
If the window does not open, continue with Step 9.
Step 9
Step 14.If the server does not automatically reboot, continue with Step 10.
Step 10
If you do not receive the prompt, continue with Step 11.
Step 11
If the window does not open, continue with Step 12.
Step 12
If the window does not open, continue with Step 13.
Step 13
If the window does not open, continue with Step 14.
Step 14
If you do not receive the prompt, continue with Step 15.
Note
Step 15
Step 16
Step 17
Step 18
You do not need to reboot the system before entering server configuration data. Continue configuring the server by completing the steps in "Entering Server Configuration Data and Completing the Operating System Installation" section.
Entering Server Configuration Data and Completing the Operating System Installation
In this portion of the installation, which takes about 30 minutes, you will perform the following tasks:
•
•
•
•
•
•
•
•
Using the data that you collected in Table 2, complete the following steps to configure each server:
Procedure
Step 1
Step 2
Caution
Due to a restriction in Microsoft SQL Server 7.0, you cannot change the Windows 2000 computer name after installation. If the computer name is changed, you must reinstall the server. Make sure that the name that you assign is the permanent server name.
Note
Step 3
Step 4
Step 5
Note
If you choose to use DHCP, Cisco Technical Assistance Center (TAC) insists that you reserve an IP address for each Cisco CallManager server in the DHCP server scope. This action prevents the release or reassignment of IP addresses. If you do not reserve IP addresses through the DHCP server scope, the DHCP server may assign a different address to the Cisco CallManager server if the server is disconnected from, and then reconnected to, the network. To return the Cisco CallManager server to its original IP address, you would have to reprogram the IP addresses of the other devices on the network. For information on DHCP option settings, refer to the Cisco CallManager Administration Guide.Step 6
Caution
Step 7
If you are not using DNS, leave the DNS and WINS fields empty. Make sure that the Use the following DNS and WINS server addresses radio button is chosen, so you can configure local name resolution; then, click Next.
Step 8
a.
b.
For example:
172.16.0.10 dallascm1c.
d.
Note
Step 9
Step 10
Step 11
Step 12
Continue the installation process by performing the steps in the"Installing Cisco CallManager" section.
Installing Cisco CallManager
Note
In this portion of the installation, which takes about 45 minutes, you will perform the following tasks:
•
•
•
•
Perform the following steps to complete the installation:
Procedure
Step 1
Step 2
Step 3
When Cisco CallManager services are activated, the installation process places them in a stopped state. All services activate and start upon completion of the installation. For information on starting services, refer to the Cisco CallManager Serviceability Administration Guide or to online help in the Cisco CallManager application.
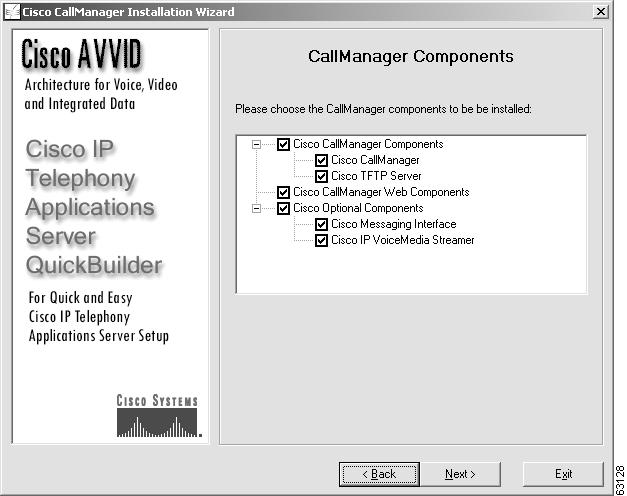
Figure 1 shows an example of the CallManager Components window.
Figure 1 CallManager Components Window
Choose the services that you want to activate in this initial installation; then, click Next.
Note
Step 4
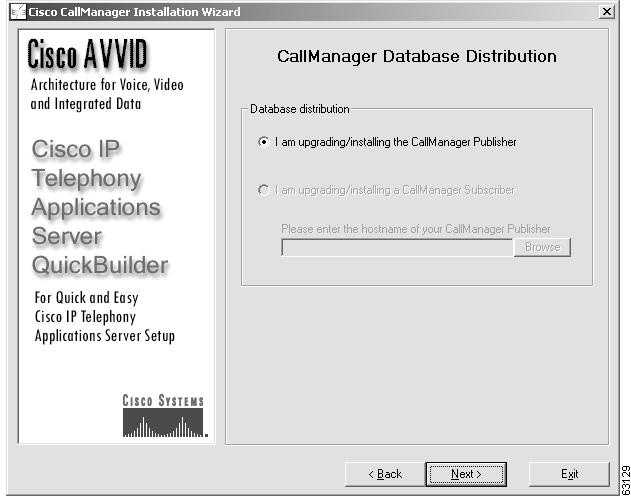
Figure 2 shows an example of the Cisco CallManager Database Distribution window.
Figure 2 Cisco CallManager Database Distribution
If a publisher database already exists and you are configuring a subscriber database server, choose I am upgrading/installing the CallManager Subscriber. By default, the publisher database server associated with the subscriber displays in the hostname publisher field. You may choose another publisher by clicking Browse. After you choose the appropriate publisher, click Next and go to Step 5.
Step 5
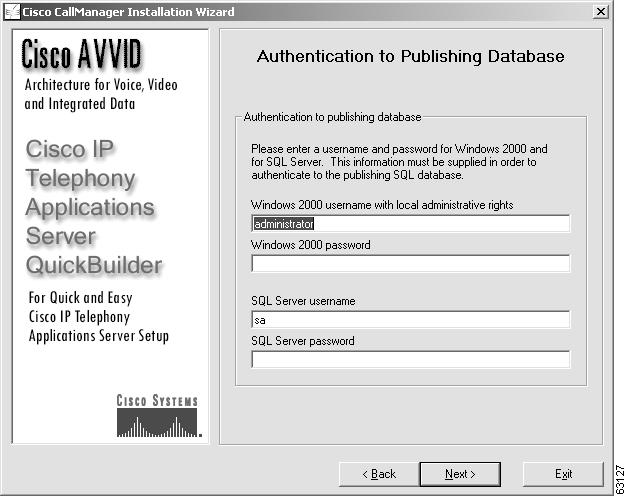
If you chose I am upgrading/installing the CallManager Subscriber, an authentication window opens and prompts you to enter usernames and passwords for a Windows 2000 user with administrative privileges and a SQL Server user with SQL Server administrative privileges on the publishing database server. Enter the account information in the appropriate fields as prompted; then, click Next, and go to Step 6. The system connects to the publishing database server.
Figure 3 shows an example of the authentication window.
Figure 3 Authentication to Publishing Database
Step 6
Step 7
The backup server actually performs the backup operation. It stores the backup data in the directory or tape drive destination that you specify. If a server is configured as a backup server, Cisco CallManager automatically adds it to the backup target list. Cisco recommends when you are installing Cisco CallManager on the publisher server that you choose Backup Server.
A backup target acts as a server that contains data to be backed up. You can choose more than one target, but you can choose only one server.
Choose either Server or Target and then click OK. If you choose Cancel, the backup utility does not install for use.
Note
Step 8
If you chose Server in the previous step, continue with Step 9.
Step 9
Note
Step 10
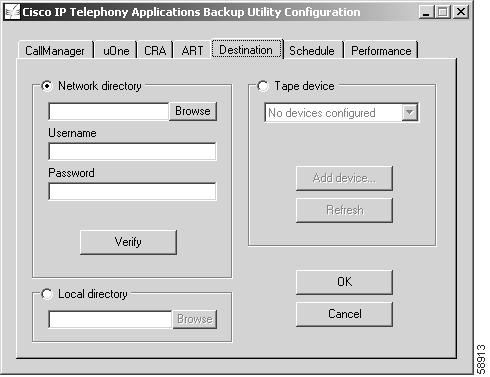
Figure 4 shows an example of the Destination tab in the Cisco IP Telephony Applications Backup Utility.
Figure 4 Destination Tab in the Cisco IP Telephony Applications Backup Utility Configuration Window
Note
You may click the Tape device radio button only if you have the MCS-7835, IBM xSeries 340, or
xSeries 342 server. Only the MCS-7835, IBM xSeries 340, or xSeries 342 server has a tape drive available. You must click Network directory or Tape device to use the Cisco IP Telephony Applications Restore Utility on your server.Step 11
Step 12
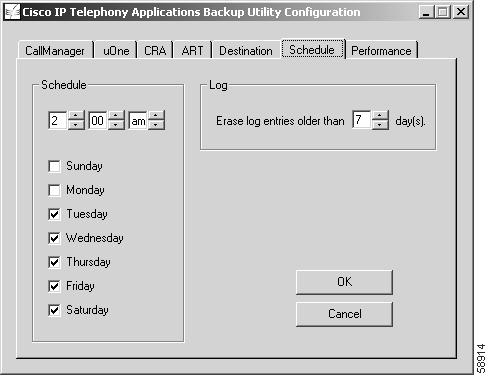
Figure 5 Schedule Tab in Cisco IP Telephony Applications Backup Utility Configuration Window
Step 13
Caution
Step 14
a.
b.
c.
If you do not click one of the performance radio buttons, the Normal radio button serves as the default priority for the backup service (sti.Back.exe) that runs on the server during the next backup.
Step 15
Caution
Step 16
Step 17
Note
Step 18
Step 19
You have completed the Cisco CallManager installation process. Your server now becomes a Cisco IP Telephony Applications Server. See the "Performing Post-Installation Tasks" section to complete post-installation tasks.
Performing Post-Installation Tasks
After installing Cisco CallManager on your server, you must set some configuration parameters for Cisco CallManager and perform other post-installation tasks before you can begin using it. Perform these tasks for each server that you install and complete them before or after the other servers in the cluster are installed.
This section explains how to perform the following operations:
•
•
•
•
•
After you install Cisco CallManager, you need to verify that you have the latest Microsoft patches and hotfixes running on your system. Click http://www.cisco.com/kobayashi/sw-center/sw-voice.shtml. Choose Cisco CallManager Version 3.1 > Download CallManager Cryptographic Software... > Download Cisco 3DES Cryptographic Software under export licensing controls; download the latest Microsoft patches and hotfixes.
After you have performed these tasks and your Cisco CallManager is operational, you should back up your Cisco CallManager data. For information on backing up Cisco CallManager data, refer to the latest version of Backing Up and Restoring Cisco CallManager Release 3.1.
Changing Passwords for CCMAdmin and SQLSvc Accounts
The Cisco CallManager Release 3.1 installation creates two user accounts: CCMAdmin and SQLSvc. At installation, each user account receives a unique and secure default password. If you want, you may change these passwords after the installation.
Caution
CCMAdmin
The CCMAdmin user provides a common administrator login account for all Cisco CallManagers in the cluster. For example, if you are logged in as CCMAdmin, you can view all the services in all the servers in the cluster in one Control Center window. To have access to all servers in the cluster simultaneously, you must ensure the password for CCMAdmin is identical on every server in the cluster.
To change the CCMAdmin password, perform the following steps:
Procedure
Step 1
Step 2
Step 3
Step 4
SQLSvc
Only the Microsoft SQL Server service can use the SQLSvc account. The server uses it as the core account for server-to-server interaction by the Cisco CallManager system. For the service to function properly, ensure the password for the SQLSvc account is identical on all servers in the cluster.
The default SQLSvc password that is set up during installation provides an encrypted password that is unique to the cluster. This identical password applies on all servers in the cluster. If you change the password, make sure that the passwords are identical on all servers in the cluster.
Caution
Perform the following steps to change the SQLSvc password:
Procedure
Step 1
Step 2
Step 3
Step 4
Step 5
Step 6
Step 7
Step 8
Step 9
Step 10
Step 11
Step 12
Step 13
Step 14
Step 15
Step 16
Step 17
Step 18
Step 19
Step 20
Step 21
Step 22
Step 23
Step 24
Step 25
Configuring Auto-Registration
You can configure Cisco CallManager to automatically assign directory numbers to the phones. Directory number assignment occurs sequentially starting with the number that you specify as the starting directory number and ending with the number that you specify as the ending directory number. For example, if the range of directory numbers that you specify is 1000 through 2000, Cisco CallManager assigns the phones directory numbers of 1000, 1001, 1002, and so on, until the ending directory number of 2000 is reached. For more information on configuring Auto-Registration, refer to the Cisco CallManager Administration Guide or online help in the Cisco CallManager application.
Configuring DNS
Although DNS or WINS should be used during the installation of multiple Cisco CallManagers, Cisco strongly recommends against using a DNS name resolution server in a Cisco CallManager production environment unless you are confident about the reliability and availability of your DNS server and network structure.
If you use a DNS server, your call-processing system depends on the accessibility of that server. For example, if the DNS server goes down or the connection between it and the Cisco CallManager is broken, the phones must rely on cached server name information. If the phones have been reset and have lost their cached information, they may be unable to resolve the DNS name of the Cisco CallManager server, and call processing may be interrupted.
To prevent this situation, Cisco recommends that you disable DNS after installation and change the Cisco CallManager server name to an IP address using the procedures that follow.
Caution
To disable DNS after installing Cisco CallManager, perform the following steps:
Procedure
Step 1
Step 2
Step 3
Step 4
Step 5
Step 6
Step 7
Step 8
Step 9
To change the Cisco CallManager server name to the IP address, perform the following steps:
Procedure
Step 1
Step 2
Step 3
Step 4
Configuring the Database
After installing Cisco CallManager, you can use Cisco CallManager Administration to begin configuring the database. The Cisco CallManager database contains information and parameters relating to the system as a whole, to connected devices, and to individual users. For more information about configuring the Cisco CallManager database, refer to the Cisco CallManager Administration Guide, the Cisco CallManager System Guide, or online help in the Cisco CallManager application.
Activating Cisco CallManager Services
Although Cisco CallManager services were installed on your server during the installation process, only those that you chose during the installation were activated.
Caution
To activate additional Cisco CallManager services, or to deactivate existing services, perform the following steps:
Procedure
Step 1
Step 2
Step 3
Step 4
Viewing the Component Versions Installed on the Server
The stiver.exe program reports the current version of all installation components, including the operating system, upgrade, and backup and restore utility. Be aware that Cisco does not report the actual Cisco CallManager version through this program. Most of these components, run from the installation CD-ROMs during the initial installation, no longer exist on the system.
The version for OS Image equals your operating system CD-ROM version number. The version of OS Image will change only if you do a new installation using the Cisco IP Telephony Server Operating System Hardware Detection CD-ROM (CD #1).
The version for stiOSUpg.exe equals the version of the operating system upgrade that you last ran either via CD-ROM or via the web. When Cisco updates and releases the Cisco IP Telephony Server Operating System OS/BIOS Upgrade CD-ROM (CD #2), the version of stiOSUpg changes.
Perform the following procedure to view the component versions installed on the server:
Procedure
Step 1
C:\sti\stiver
Step 2
Using the Cisco CallManager Music On Hold CD-ROM or Download
When you install Cisco CallManager on your server, a default music on hold sample automatically installs for customer use. To increase your music on hold (MOH) selection, you may also install the Cisco CallManager Music On Hold CD-ROM that ships with your Cisco IP Telephony Applications Server, or you may download one of two following files via the web:
•
•
For information on the MOH feature, refer to the latest version of the Cisco CallManager Administration Guide and the latest version of the Cisco CallManager System Guide.
As a Cisco CallManager user, you can use any of the contents of the CD-ROM/files with music on hold. Because of licensing restrictions, you must not distribute the Cisco CallManager Music on Hold CD-ROM/files to anyone else, and you must not use it for any other purpose.
Ongoing Server Management
The Compaq Insight Management Agent or the IBM UM Services, both SNMP agent extensions, allow you to monitor and manage the specific components of your server, such as CPU, virtual memory, and disk usage. They also monitor server temperature, fan status, power supplies, and NIC information.
On Cisco Media Convergence Servers and customer-provided Compaq servers, the drivers upgrade when you insert the latest version of the Cisco IP Telephony Server Operating System OS/BIOS Upgrade CD-ROM (CD #2) into the CD-ROM drive. For information on how to use CD #2, refer to the latest version of Upgrading Cisco CallManager Release 3.1. For driver, BIOS, or firmware upgrades on the IBM xSeries servers, contact the hardware manufacturer directly or navigate to the IBM website through the following URL: http://www.cisco.com/warp/public/779/largeent/avvid/products/infrastructure.html
After you install Cisco CallManager, you need to verify that you have the latest Microsoft patches and hotfixes running on your system. Click http://www.cisco.com/kobayashi/sw-center/sw-voice.shtml. Choose Cisco CallManager Version 3.1 > Download CallManager Cryptographic Software... > Download Cisco 3DES Cryptographic Software under export licensing controls; download the latest Microsoft patches and hotfixes.
Re-creating Subscriber Connections
If the connections between the publishing Cisco CallManager database and the subscribers within a cluster are broken for any reason, you cannot replicate the database to the subscribers. If you suspect a problem with subscriber connections, you should verify the status of the subscriptions or the jobs. On the publisher server, perform the following steps to verify the status of the subscribers and jobs:
Procedure
Step 1
Step 2
To see the status of jobs, choose the Jobs folder located in the following path: Microsoft SQL Servers/SQL Server Group/<this server's hostname>/Management/SQL Server Agent.
The Expired Subscription Cleanup service could display a red `x' under normal operation; however, if a red `x' appears next to a subscriber name or a job name other than Expired Subscription Cleanup, assume the subscriber connection is broken. You must reinitialize it.
Note
If you determine that one or more subscription connections are broken, you must perform the following actions:
•
•
On each subscriber server, perform the following steps to delete and re-create the subscriptions:
Procedure
Step 1
Step 2
Step 3
Step 4
Step 5
Step 6
Step 7
Step 8
Step 9
Step 10
Step 11
Step 12
Step 13
Step 14
On the publisher server, perform the following steps to reinitialize the subscriptions and start the replication snapshot agent:
Procedure
Step 1
Step 2
Step 3
Step 4
Step 5
Obtaining Documentation
The following sections explain how to obtain documentation from Cisco Systems.
World Wide Web
You can access the most current Cisco documentation on the World Wide Web at the following URL:
Translated documentation is available at the following URL:
http://www.cisco.com/public/countries_languages.shtml
Documentation CD-ROM
Cisco documentation and additional literature are available in a Cisco Documentation CD-ROM package, which is shipped with your product. The Documentation CD-ROM is updated monthly and may be more current than printed documentation. The CD-ROM package is available as a single unit or through an annual subscription.
Ordering Documentation
Cisco documentation is available in the following ways:
•
http://www.cisco.com/cgi-bin/order/order_root.pl
•
http://www.cisco.com/go/subscription
•
Documentation Feedback
If you are reading Cisco product documentation on Cisco.com, you can submit technical comments electronically. Click Feedback at the top of the Cisco Documentation home page. After you complete the form, print it out and fax it to Cisco at 408 527-0730.
You can e-mail your comments to bug-doc@cisco.com.
To submit your comments by mail, use the response card behind the front cover of your document, or write to the following address:
Cisco Systems, Inc.
Attn: Document Resource Connection
170 West Tasman Drive
San Jose, CA 95134-9883We appreciate your comments.
Obtaining Technical Assistance
Cisco provides Cisco.com as a starting point for all technical assistance. Customers and partners can obtain documentation, troubleshooting tips, and sample configurations from online tools by using the Cisco Technical Assistance Center (TAC) Web Site. Cisco.com registered users have complete access to the technical support resources on the Cisco TAC Web Site.
Cisco.com
Cisco.com is the foundation of a suite of interactive, networked services that provides immediate, open access to Cisco information, networking solutions, services, programs, and resources at any time, from anywhere in the world.
Cisco.com is a highly integrated Internet application and a powerful, easy-to-use tool that provides a broad range of features and services to help you to
•
•
•
•
•
You can self-register on Cisco.com to obtain customized information and service. To access Cisco.com, go to the following URL:
Technical Assistance Center
The Cisco TAC is available to all customers who need technical assistance with a Cisco product, technology, or solution. Two types of support are available through the Cisco TAC: the Cisco TAC Web Site and the Cisco TAC Escalation Center.
Inquiries to Cisco TAC are categorized according to the urgency of the issue:
•
•
•
•
Which Cisco TAC resource you choose is based on the priority of the problem and the conditions of service contracts, when applicable.
Cisco TAC Web Site
The Cisco TAC Web Site allows you to resolve P3 and P4 issues yourself, saving both cost and time. The site provides around-the-clock access to online tools, knowledge bases, and software. To access the Cisco TAC Web Site, go to the following URL:
All customers, partners, and resellers who have a valid Cisco services contract have complete access to the technical support resources on the Cisco TAC Web Site. The Cisco TAC Web Site requires a Cisco.com login ID and password. If you have a valid service contract but do not have a login ID or password, go to the following URL to register:
http://www.cisco.com/register/
If you cannot resolve your technical issues by using the Cisco TAC Web Site, and you are a Cisco.com registered user, you can open a case online by using the TAC Case Open tool at the following URL:
http://www.cisco.com/tac/caseopen
If you have Internet access, it is recommended that you open P3 and P4 cases through the Cisco TAC Web Site.
Cisco TAC Escalation Center
The Cisco TAC Escalation Center addresses issues that are classified as priority level 1 or priority level 2; these classifications are assigned when severe network degradation significantly impacts business operations. When you contact the TAC Escalation Center with a P1 or P2 problem, a Cisco TAC engineer will automatically open a case.
To obtain a directory of toll-free Cisco TAC telephone numbers for your country, go to the following URL:
http://www.cisco.com/warp/public/687/Directory/DirTAC.shtml
Before calling, please check with your network operations center to determine the level of Cisco support services to which your company is entitled; for example, SMARTnet, SMARTnet Onsite, or Network Supported Accounts (NSA). In addition, please have available your service agreement number and your product serial number.
AccessPath, AtmDirector, Browse with Me, CCIP, CCSI, CD-PAC, CiscoLink, the Cisco Powered Network logo, Cisco Systems Networking Academy, the Cisco Systems Networking Academy logo, Cisco Unity, Fast Step, Follow Me Browsing, FormShare, FrameShare, IGX, Internet Quotient, IP/VC, iQ Breakthrough, iQ Expertise, iQ FastTrack, the iQ Logo, iQ Net Readiness Scorecard, MGX, the Networkers logo, ScriptBuilder, ScriptShare, SMARTnet, TransPath, Voice LAN, Wavelength Router, and WebViewer are trademarks of Cisco Systems, Inc.; Changing the Way We Work, Live, Play, and Learn, and Discover All That's Possible are service marks of Cisco Systems, Inc.; and Aironet, ASIST, BPX, Catalyst, CCDA, CCDP, CCIE, CCNA, CCNP, Cisco, the Cisco Certified Internetwork Expert logo, Cisco IOS, the Cisco IOS logo, Cisco Press, Cisco Systems, Cisco Systems Capital, the Cisco Systems logo, Empowering the Internet Generation, Enterprise/Solver, EtherChannel, EtherSwitch, FastHub, FastSwitch, GigaStack, IOS, IP/TV, LightStream, MICA, Network Registrar, Packet, PIX, Post-Routing, Pre-Routing, RateMUX, Registrar, SlideCast, StrataView Plus, Stratm, SwitchProbe, TeleRouter, and VCO are registered trademarks of Cisco Systems, Inc. and/or its affiliates in the U.S. and certain other countries.
All other trademarks mentioned in this document or Web site are the property of their respective owners. The use of the word partner does not imply a partnership relationship between Cisco and any other company. (0110R)
Copyright © 2002, Cisco Systems, Inc.
All rights reserved.