-
Cisco CallManager System Guide, Release 3.3(3)
-
Index
-
Preface
-
Introduction
-
Cisco IP Telephony Overview
-
System Configuration Overview
-
System-Level Configuration Settings
-
Clustering
-
Redundancy
-
Call Admission Control
-
Cisco TFTP
-
Device Support
-
Services
-
Auto-Registration
-
Partitions and Calling Search Spaces
-
Understanding Route Plans
-
Understanding the LDAP Directory
-
Managing User Directory Information
-
Media Resource Management
-
Conference Bridges
-
Transcoders
-
Music On Hold
-
Media Termination Points
-
Cisco Catalyst DSP Resources for Transcoding and Conferencing
-
Voice Mail Connectivity to Cisco CallManager
-
SMDI Voice Mail Integration
-
Cisco Unity Messaging Integration
-
Cisco uOne Voice Messaging Integration
-
Cisco DPA Integration
-
Call Park
-
Call Pickup and Group Call Pickup
-
Cisco IP Phone Services
-
Cisco CallManager Extension Mobility and Phone Login Features
-
Cisco CallManager Attendant Console
-
Custom Phone Rings
-
Cisco IP Manager Assistant
-
Understanding Voice Gateways
-
Cisco IP Phones
-
Computer Telephony Integration
-
Cisco ATA 186
-
Administrative Tools Overview
-
Administrative Accounts and Passwords
-
 Feedback
Table Of Contents
Default Phone Button Templates
Guidelines for Customizing Phone Button Templates
Maximum Phones Register Per Second Service Parameter
Where to Find More Information
Cisco IP Phones
Cisco IP Phones as full-featured telephones can plug directly into your IP network. H.323 clients and CTI ports comprise software-based devices that you configure similarly to the Cisco IP Phones. Cisco CallManager Administration allows you to configure phone features such as call forwarding and call waiting for your phone devices. You can also create phone button templates to assign a common button configuration to a large number of phones.
After you have added the phones, you can associate users with them. By associating a user with a phone, you give that user control over that device.
This section covers the following topics:
•
Phone Configuration Checklist
•
Supported Cisco IP Phones
Table 35-1 provides an overview of the features that are available on the following Cisco IP Phones that are supported by Cisco CallManager:
•
•
•
•
•
H.323 Clients and CTI Ports
Cisco CallManager Administration enables you to configure software-based devices such as H.323 clients and CTI ports. Software-based Cisco CallManager applications such as Cisco SoftPhone, Cisco AutoAttendant, and Cisco IP Interactive Voice Response (IVR) use CTI ports that are virtual devices.
H.323 clients include Microsoft NetMeeting devices and NetVision Symbol phones.
You configure H.323 clients and CTI ports through the Phone Configuration window in the Cisco CallManager Administration like you do phones, but they often require fewer configuration settings.
For instructions on how to configure H.323 clients and CTI ports, refer to "Cisco IP Phone Configuration" in the Cisco CallManager Administration Guide.
Phone Button Templates
Cisco CallManager includes several default phone button templates. When adding phones, you can assign one of these templates to the phones or create a new template.
Creating and using templates provides a fast way to assign a common button configuration to a large number of phones. For example, if users in your company do not use the conference feature, you can create a template that reassigns this button to a different feature, such as speed dial.
To create a template, you must make a copy of an existing template and assign the template a unique name. You can make changes to the custom templates that you created, and you can change the labels of the default phone button templates. You cannot change the function of the buttons in the default templates. You can rename existing templates and modify them to create new ones, update custom templates to add or remove features, lines, or speed dials, and delete custom templates that are no longer being used. When you update a template, the change affects all phones that use the template.
Renaming a template does not affect the phones that use that template. All Cisco IP Phones that use this template continue to use this template after it is renamed.
Make sure that all phones have at least one line that is assigned to each phone. Normally, this assignment specifies button 1. Phones can have additional lines that are assigned, depending on the Cisco IP Phone model. Phones also generally have several features, such as speed dial and call forward, that are assigned to the remaining buttons.
You can delete phone templates that are not currently assigned to any phone in your system if they are not the only template for a given phone model. You cannot delete a template that is assigned to one or more devices or the default template for a model (specified in the Device Defaults Configuration window). You must reassign all Cisco IP Phones that are using the template that you want to delete to a different phone button template before you can delete the template.
Cisco CallManager does not directly control all features on Cisco IP Phones through phone button templates. Refer to the Cisco IP Phone Administration Guide for Cisco CallManager and other phone documentation for detailed information about individual Cisco IP Phone 7900 family models.
Default Phone Button Templates
Although all Cisco IP Phones support similar features, you implement these features differently on various models. For example, some models configure features such as Hold or Transfer by using phone button templates; other models have fixed buttons or onscreen program keys for these features that are not configurable. Also, the maximum number of lines or speed dials that are supported differs for some phone models. These differences require different phone button templates for specific models.
Each Cisco IP Phone model comes with a default phone button template. You can use the default templates as is to quickly configure phones. You can also copy and modify the templates to create custom templates.
Custom templates enable you to make features available on some or all phones, restrict the use of certain features to certain phones, configure a different number of lines or speed dials for some or all phones, and so on, depending on how the phone will be used. For example, you may want to create a custom template that can be applied to phones that will be used in conference rooms. Table 35-2 provides descriptions of the default phone button template for each Cisco IP Phone model.
Guidelines for Customizing Phone Button Templates
Use the following guidelines when you are creating custom phone button templates:
•
–
–
–
–
•
Softkey Templates
Use softkey templates to manage softkeys that are associated with applications such as Cisco IPMA or call-processing features such as Cisco Call Back on the Cisco IP Phone Models 7905, 7940, and 7960. The administrator uses the Softkey Template Configuration windows in Cisco CallManager Administration to create and update softkey templates.
Cisco CallManager supports two types of softkey templates: standard and nonstandard. Standard softkey templates in the Cisco CallManager database contain the recommended selection and positioning of the softkeys for an application. Standard User, Standard IPMA Assistant, and Standard IPMA Manager represent examples of standard softkey templates.
Note
The administrator creates a nonstandard softkey template by using the Softkey Template Configuration windows in Cisco CallManager Administration. To create a nonstandard softkey template, the administrator copies a standard softkey template and makes changes. The administrator can add and remove applications that are associated with any nonstandard softkey template. Additionally, the administrator can configure softkey sets for each call state for a nonstandard softkey template.
The Softkey Template Configuration window lists the standard and nonstandard softkey templates and uses different icons to differentiate between standard and nonstandard templates.
The administrator assigns softkey templates in the following Cisco CallManager Administration configuration windows:
•
•
•
•
Add Application Button
The administrator can add a standard softkey template that is associated with a Cisco application to a nonstandard softkey template. When the administrator clicks the Add Application button from the Softkey Template Configuration window, a separate window displays and allows the administrator to choose the standard softkey template that is to be added to the end of the nonstandard softkey template. Duplicate softkeys get deleted from the end of the set that is moving to the front of the set.
Tip
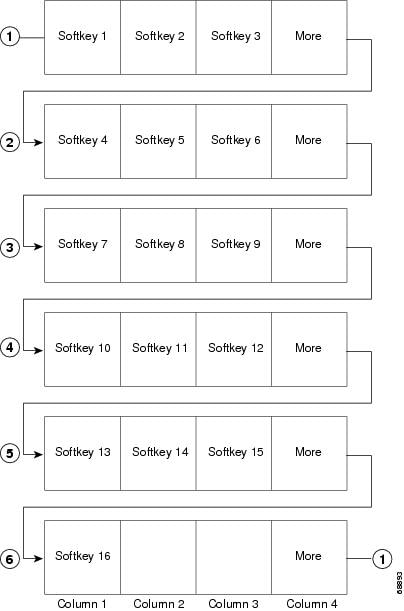
The number of softkeys in any given call state cannot exceed 16. An error message displays, and the add application procedure stops when the maximum number of softkeys is reached. The administrator must manually remove some softkeys from the call state before trying to add another application to the template.
The Delete Application button allows the administrator to delete application softkey templates that are associated with a nonstandard softkey template. Only the softkeys that are associated with the application get deleted. When softkeys are commonly shared between applications, they remain in the softkey template until the last application that shares the softkeys is removed from the softkey template.
Configure Softkey Layout
The administrator can configure softkey sets for each call state for a nonstandard softkey template. When the administrator clicks the Configure Softkey Layout link from the Softkey Template Configuration window, the Softkey Layout Configuration window displays.
The Softkey Layout Configuration window contains the following fields:
•
•
•
Note
Figure 35-1 Softkey Layout
Softkey Template Operation
For applications such as Cisco IPMA to support softkeys, ensure softkeys and softkey sets are configured in the database for each device that uses the application.
You can mix application and call-processing softkeys in any softkey template. A static softkey template associates with a device in the database. When a device registers with Cisco CallManager, the static softkey template gets read from the database into call processing and then gets passed to the device to be used throughout the session (until the device is no longer registered or is reset). When a device resets, it may get a different softkey template or softkey layout because of updates that are made by the administrator.
Softkeys support a field called application ID. An application, such as Cisco IPMA, activates/deactivates application softkeys by sending a request to the device through the Cisco CTIManager and call processing with a specific application ID.
When a user logs into the Cisco IPMA service and chooses an assistant for the service, the application sends a request to the device, through Cisco CTIManager and call processing, to activate all its softkeys with its application ID.
At any time, several softkey sets may display on a Cisco IP Phone (one set of softkeys for each call).
The softkey template that is associated with a device (such as a Cisco IP Phone) in the database designates the one that is used when the device registers with call processing. Perform the association of softkey templates and devices by using Softkey Template configuration in Cisco CallManager Administration. See Softkey Template Configuration in the Cisco CallManager Administration Guide.
Methods for Adding Phones
You can automatically add phones to the Cisco CallManager database by using auto-registration, manually by using the phone configuration windows, or in groups with the Bulk Administration Tool (BAT).
By enabling auto-registration before you begin installing phones, you can automatically add a Cisco IP Phone to the Cisco CallManager database when you connect the phone to your IP telephony network. For information on enabling auto-registration, refer to "Enabling Auto-Registration" in the Cisco CallManager Administration Guide. During auto-registration, Cisco CallManager assigns the next available sequential directory number to the phone. In many cases, you might not want to use auto-registration; for example, if you want to assign a specific directory number to a phone.
If you do not use auto-registration, you must manually add phones to the Cisco CallManager database or use the Bulk Administration Tool (BAT). BAT, a plug-in application, enables system administrators to perform batch add, modify, and delete operations on large numbers of Cisco IP Phones. Refer to the Bulk Administration Tool Guide for Cisco CallManager for detailed instructions on using BAT.
Directory Numbers
Using Cisco CallManager, you can configure and modify directory numbers (lines) that are assigned to specific phones.
You can set up one or more lines with a shared line appearance. A Cisco CallManager system considers a directory number to be a shared line if it appears on more than one device in the same partition.
In a shared line appearance, for example, you can set up a shared line, so a directory number appears on line 1 of a manager phone and also on line 2 of an assistant phone. Another example of a shared line would be a single incoming 800 number that is set up to appear as line 2 on every sales representative phone in an office.
The following notes and tips apply to using shared line appearances with Cisco CallManager:
•
•
•
•
•
•
•
•
•
Phone Features
Cisco CallManager enables you to configure the following phone features on Cisco IP Phones: barge, call back, call waiting, call forward, call park, and call pickup.
Barge
Barge adds a user to a call that is in progress. The barge feature supports shared lines only. Pressing the barge soft key automatically adds the user (initiator) to the shared line call (target), and the users currently on the call receive a tone.
When the barge initiator hangs up, the remaining users receive a disconnect tone, leaving the original call in progress. When the user to whom the barge was initiated releases the call, the barge initiator and the other users disconnect. Additionally, when a user other than the barge initiator or barge target releases the call, all parties disconnect.
If the barge target puts the call on hold, puts it in a conference, or transfers it, the barge initiator gets disconnected from the call; the other users remain connected. If any other user puts the call on hold, puts it in a conference, or transfers it, the barge initiator and the barge target remain connected to the call.
Enable or disable barge, a system-wide feature, in Cisco CallManager Administration by using the service parameter BargeEnabled. Disabled designates the default setting for the barge service parameter. To make the barge feature available on the Cisco CallManager cluster, the administrator must set the BargeEnabled service parameter to enabled.
To set the BargeEnabled service parameter, choose Service > Service Parameters from the Cisco CallManager Administration window. When the service parameters configuration window displays, the administrator chooses a Cisco CallManager server and the Cisco CallManager service. Cluster Wide Parameters, General Feature lists the Barge Enabled Flag service parameter. Change the parameter value to True to enable barge and click the Update button. When the change takes affect, all Cisco CallManager servers in the cluster support barge. Refer to "Service Parameters Configuration" of the Cisco CallManager Administration Guide.
The barge feature has the following restrictions:
•
•
Call Back
The Cisco Call Back feature allows you to receive call back notification on your Cisco IP Phone when a called party line becomes available. To receive call back notification, a user presses the CallBack softkey while receiving a busy or ringback tone. You can activate call back notification on a line on a Cisco IP Phone Model 7940 or 7960 within the same Cisco CallManager cluster as your phone. You cannot activate call back notification if the called party has forwarded all calls to another extension.
For more information about the Call Back feature, refer to the Cisco CallManager Features and Services Guide and the Cisco IP Phone Models 7960 and 7940 User Guide.
Call Waiting
Call waiting lets users receive a second incoming call on the same line without disconnecting the first call. When the second call arrives, the user receives a brief call waiting indicator tone.
Configure call waiting in the Directory Number Configuration window in Cisco CallManager Administration.
Call Forward
Call forward allows a user to configure a Cisco IP Phone, so all calls that are destined for it ring another phone. Three types of call forward exist:
•
•
•
Configure call forward in the Directory Number Configuration window in Cisco CallManager Administration.
Call Park
Call park allows a user to place a call on hold, so anyone who is configured to use call park on the Cisco CallManager system can retrieve it.
For example, if a user is on an active call at extension 1000, the user can park the call to a call park extension such as 1234 and another use can dial 1234 to retrieve the call.
To use call park, you must add the call park extension (in this case, 1234) in Cisco CallManager Administration when you are configuring phone features. For more information about call park, see the "Call Park" section.
Call Pickup
Call pickup allows you to use your phone to answer another ringing phone in your designated call pickup group.
You configure call pickup when you are configuring phone features in Cisco CallManager.
When adding a directory line, you can indicate the call pickup group. The call pick up group indicates a number that can be dialed to answer calls to this directory number (in the specified partition). For more information about call pickup, see the "Call Pickup and Group Call Pickup" section.
Phone Association
Users can control some devices, such as phones. Applications that are identified as users control other devices, such as CTI ports. When users have control of a phone, they can control certain settings for that phone, such as speed dial and call forwarding. For more information on associating phones with users, refer to "Associating Devices to a User" in the Cisco CallManager Administration Guide.
Phone Administration Tips
The following sections contain information that might help you configure phones in the Cisco CallManager Administration.
Phone Search
The following sections describe how to modify your search to locate a phone. If you have thousands of Cisco IP Phones in your network, you might need to limit your search to find the phone that you want. If you are unable to locate a phone, you may need to expand your search to include more phones.
Note
Searching by MAC Address
To search for a phone by its MAC address, choose Device Name and ends with, and enter the last 4 or 5 characters in the MAC address.
Searching by Description
If you enter a user name and/or extension in the Description field when you are adding the phone, you can search by using that value in the Find and List Phones window.
Searching by Calling Search Space or Device Pool
If you choose calling search space or device pool, the options that are available in the database display, you can choose one of these options from the drop-down list box below the Find button.
Searching by Device Type
To search for a phone by its device type, choose Device Type and either enter a device type or choose a device type from the drop-down list box below the Find button.
Searching by Call Pickup Group
To search for a phone by its call pickup group, choose Call Pickup Group and either enter a call pickup group name or click the Find button.
Searching by Directory Number
To search for a phone by its directory number (DN), choose Directory Number and either enter a search criteria (such as begins with or ends with) or click the Find button.
Finding All Phones in the Database
To find all phones that are registered in the database, choose Device Name from the list of fields; choose "is not empty" from the list of patterns; then, click the Find button.
Note
Messages Button
By performing the following actions, you can configure a voice-mail access number for the messages button on Cisco IP Phone 7960/7940, so users can access voice mail by simply pressing the messages button:
1.
2.
3.
Note
For more information on configuring voice mail, see Voice Mail Connectivity to Cisco CallManager.
Note
Note
Directories Button
The Cisco IP Phone 7960/7940 can display a directory of employee names and phone numbers. Although you access this directory from the directories button on the IP phone, you must configure it before users can access it. To use the corporate directory, you must enter users into a Lightweight Directory Access Protocol (LDAP) directory that is configured with Cisco CallManager.
The Directories URL enterprise parameter defines the URL that points to the global directory for display on Cisco IP Phone 7960/7940 phones. The XML device configuration file for the phone stores this URL.
Tip
To verify that the phone is accessing the correct URL after you change the Directories URL enterprise parameter, perform the following steps on the Cisco IP Phone: press settings, 3 (Network Configuration); then, press 27 (Directories URL).
If the phone URL was not updated correctly after the Directories URL parameter was changed, try stopping and restarting the Cisco TFTP service; then, reset the phone.
Note
Maximum Phones Register Per Second Service Parameter
The Cisco CallManager service uses the Maximum Phones Register Per Second service parameter to control the number of phones that are registered per second. Cisco CallManager queues the registration messages up front and processes them at the rate that you specify. The default specifies 10 phones per second. In the Service Parameters Configuration window, you can modify the Maximum Phones Register Per Second service parameter. If the performance value is set too high (the maximum is 500), phone registrations could slow the Cisco CallManager real-time response. If the value is set too low (the minimum is 1), the total time for a large group of phones to register will be slow.
Dependency Records
If you need to find out what directory numbers a specific phone is using, click the Dependency Records link that is provided on the Cisco CallManager Administration Phone Configuration window. The Dependency Records Summary window displays information about directory numbers that are using the phone. To find out more information about the directory number, click the directory number and the Dependency Records Details window displays.
For more information about Dependency Records, refer to Accessing Dependency Records and Deleting a Directory Number in the Cisco CallManager Administration Guide.
Phone Failover and Failback
This section describes how phones failover and failback if the Cisco CallManager to which they are registered becomes unreachable. This section also covers conditions that can affect calls that are associated with a phone, such as reset or restart.
Cisco CallManager Fails or Becomes Unreachable
The active Cisco CallManager designation applies to the Cisco CallManager from which the phone receives call-processing services. The active Cisco CallManager usually serves as the primary Cisco CallManager for that phone (unless the primary is not available).
If the active Cisco CallManager fails or becomes unreachable, the phone attempts to register with the next available Cisco CallManager in the Cisco CallManager Group that is specified for the device pool to which the phone belongs.
The phone device reregisters with the primary Cisco CallManager as soon as it becomes available after a failure.
Phone is Reset
If a call is in progress, the phone does not reset until the call finishes.
Phone Configuration Checklist
Table 35-5 provides steps to manually configure a phone in Cisco CallManager Administration. If you are using auto-registration, Cisco CallManager adds the phone and automatically assigns the directory number.
Table 35-5 Phone Configuration Checklist
Step 1
Gather the following information about the phone:
•
•
•
•
•
•
Step 2
Add and configure the phone.
Adding a Phone, Cisco CallManager Administration Guide
Step 3
Add and configure lines (DNs) on the phone. You can also configure phone features such as call waiting, call forward, call park, and call pickup.
Adding a Directory Number, Cisco CallManager Administration Guide
Step 4
Configure speed-dial buttons.
You can configure speed-dial buttons for phones if you want to provide speed-dial buttons for users or if you are configuring phones that do not have a specific user who is assigned to them. Users can change the speed-dial buttons on their phones by using the Cisco IP Phone Configuration windows.
Configuring Speed-Dial Buttons, Cisco CallManager Administration Guide
Step 5
Configure Cisco IP Phone services.
You can configure services for Cisco IP Phone 7960/7940 models if you want to provide services for users or if you are configuring phones that do not have a specific user who is assigned to them. Users can change the services on their phones by using the Cisco IP Phone User Options windows.
Configuring Cisco IP Phone Services, Cisco CallManager Administration Guide
Step 6
Provide power, install, verify network connectivity, and configure network settings for the Cisco IP Phone.
Cisco IP Phone Administration Guide for Cisco CallManager
Step 7
Associate user with the phone (if required).
Associating Devices to a User, Cisco CallManager Administration Guide
Step 8
Make calls with the Cisco IP Phone.
Refer to the user guide for your Cisco IP Phone.
Where to Find More Information
Related Topics
•
•
•
•
•
•
Additional Cisco CallManager Documentation
•
•
•
•
•
•