Cisco CallManager Administration Guide, Release 3.1(1)
Cisco TAPI Service Provider Installation and Configuration

Table Of Contents

Cisco TAPI Service Provider Installation and Configuration

Installing the Cisco TSP

Activating the Cisco TSP

Configuring the Cisco TSP

Cisco TSP Configuration Settings

General Tab

User Tab

CTI Manager Tab

Wave Tab

Trace Tab

Advanced Tab

Installing the Wave Driver

Saving Wave Driver Information

Verifying the Wave Driver Exists

Verifying the Cisco TSP Installation

Setting up Client-Server Configuration

Uninstalling the Wave Driver

Removing the Cisco TSP

Managing the Cisco TSP

Reinstalling the Cisco TSP

Upgrading the Cisco TSP

Uninstalling the Cisco TSP


Cisco TAPI Service Provider Installation and Configuration


The Cisco Telephony Application Programming Interface (TAPI) solution allows you to install multiple Cisco TAPI Service Providers (TSPs) on the same machine. This configuration allows TAPI applications to increase the number of lines that can be supported and to increase the amount of call traffic. Configure each Cisco TSP with a different username and password that is administered in the Cisco CallManager Directory. Configure each user in the Directory, so that no two users are associated to the same device. TSPs in the multiple TSP system do not communicate with each other and create a separate computer telephony integration (CTI) connection to the Cisco CallManager.


Note If you have upgraded to Cisco CallManager 3.1, you must upgrade the TAPI client software on any application server or client workstation on which TAPI applications are installed. If you do not upgrade the TAPI client, your application will fail to initialize. If you need to upgrade, download the appropriate client from the Cisco CallManager Administration as described in the "Installing the Cisco TSP" section.

The upgraded TAPI client software does not work with older releases of Cisco CallManager.


The following sections outline the installation of the Cisco TSP and describe some of the issues you need to be aware of after installation:

Installing the Cisco TSP

Activating the Cisco TSP

Configuring the Cisco TSP

Cisco TSP Configuration Settings

Installing the Wave Driver

Saving Wave Driver Information

Verifying the Wave Driver Exists

Verifying the Cisco TSP Installation

Setting up Client-Server Configuration

Uninstalling the Wave Driver

Removing the Cisco TSP

Managing the Cisco TSP

Installing the Cisco TSP

Install the Cisco TSP software either directly from the Cisco CallManager CD-ROM or from Cisco CallManager Administration. For information on installing plugins from the Cisco CallManager, see the "Installing Plugins" section on page 46-1.

To install the Cisco TSP from the Cisco CallManager CD-ROM, perform the following steps.


Note If you install TSP 3.1 on a system that contains a previous version of TSP, the installation program deletes the old version and installs TSP 3.1. The installation wizard varies depending on whether you have a previous version of TSP installed.


Note Installing multiple TSPs installs multiple CiscoTSPXXX.tsp and CiscoTUISPXXX.dll files in the same Windows system directory.


Procedure


Step 1 Insert the Cisco CallManager CD-ROM.

Step 2 Double-click My Computer.

Step 3 Double-click the CD-ROM drive.

Step 4 Double-click the Installs folder.

Step 5 Double-click Cisco TSP.exe.

Step 6 Follow the online instructions.


Next Steps

You should install Cisco wave driver if you plan to use first-party call control. (Do this even if you are performing your own media termination.) For more information, see the "Installing the Wave Driver" section.

Activating the Cisco TSP

You can install up to 10 TSPs on a computer. Use the following procedure to activate each of these TSPs. When you install a Cisco TSP, you add it to the set of active TAPI service providers. The TSP displays as CiscoTSPXXX, where X is between 001 and 010. If a TSP has been removed or if some problem has occurred, you can manually add it to this set.

To manually add the Cisco TSP to the list of telephony drivers, perform the following steps.

Procedure for Windows 2000


Step 1 Open the Control Panel.

Step 2 Double-click Phone and Modem Options.

Step 3 On the Phone and Modem Options dialog box, click the Advanced tab.


Note If the Cisco TSP is either not there or you removed it previously and want to add it now, you can do so from this window.


Step 4 Click Add.

Step 5 On the Add Provider dialog box, choose the appropriate TSP. Labels identify the TSPs in the Telephony providers pane as CiscoTSPXXX, where XXX is between 001 and 010.

Step 6 Click Add.

The TSP you chose displays in the provider list on the Phone and Modem Options window.

Step 7 Configure the Cisco TSP as described in the "Configuring the Cisco TSP" section or click Close to complete the setup.


Procedure for Windows NT, Windows 98, and Windows 95


Step 1 Open the Control Panel.

Step 2 Double-click Telephony.

Step 3 Click the Telephony Drivers tab.


Note If the Cisco TSP is either not there or you removed it previously and want to add it now, you can do so from this window.


Step 4 Click Add.

Step 5 On the Add Provider dialog box, choose the appropriate TSP. Labels identify the TSPs in the Telephony providers pane as CiscoTSPXXX, where XXX is between 001 and 010.

Step 6 Click Add.

The Provider list on the Telephony Drivers window now includes the CiscoTSPXXX range 001 - 010.

Step 7 Configure the Cisco TSP as described in the "Configuring the Cisco TSP" section or click Close to complete the setup.


Configuring the Cisco TSP

You configure the Cisco TSP by setting parameters on the Cisco IP-PBX Service Provider configuration window. Perform the following steps to configure Cisco TSP.

Procedure for Windows 2000


Step 1 Open the Control Panel.

Step 2 Double-click Phone and Modem Options.

Step 3 Choose the Cisco TSP you want to configure.

Step 4 Click Configure.

The system displays the Cisco IP PBX Service Provider dialog box.

Step 5 Enter the appropriate settings as described in "Cisco TSP Configuration Settings" section.

Step 6 Click OK to save changes.


Note After the TSP is configured, you must restart the telephony service before an application can run and connect with its devices.


Procedure for Windows NT, Windows 98, and Windows 95


Step 1 Open the Control Panel.

Step 2 Double-click Telephony.

Step 3 Choose the Cisco TSP you want to configure.

Step 4 Click Configure.

The system displays the Cisco IP PBX Service Provider dialog box.

Step 5 Enter the appropriate settings as described in "Cisco TSP Configuration Settings" section.

Step 6 Click OK to save changes.


Note After configuring the TSP, you must restart the telephony service before an application can run and connect with its devices.


Cisco TSP Configuration Settings

The following sections describe the fields on the Cisco_IP PBX Service Provider dialog box:
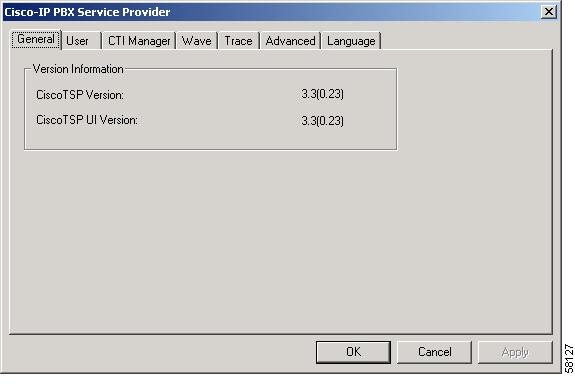
General Tab

User Tab

CTI Manager Tab

Wave Tab

Trace Tab

Advanced Tab

General Tab

The General Tab displays TSP and TSPUI version information, as illustrated in Figure 47-1.

Figure 47-1 Cisco-IP PBX Service Provider General Tab
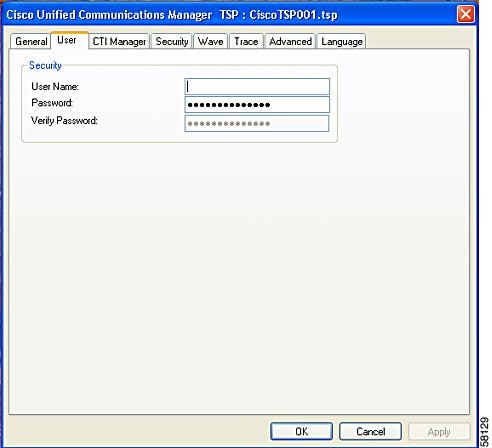
User Tab

The User tab allows you to configure security information, as illustrated in Figure 47-2.

Figure 47-2 Cisco-IP PBX Service Provider User Tab

Table 47-1 contains a list of the fields for the User tab that must be set and their descriptions.
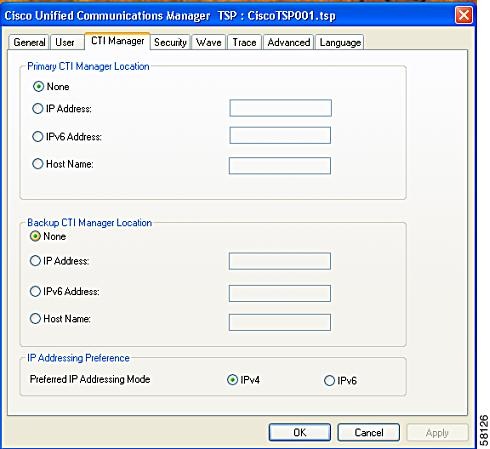
Table 47-1 User Tab Configuration Fields 

Field
Description

User Name

Enter the user name of the user you want to give access to devices. This TSP can access devices and lines associated with this user. Make sure this user is also configured in the Cisco CallManager, so that TSP can connect to Cisco CallManager.

The TSP configuration registry keys store the user name and password you enter.

Note You can designate only one user name and password to be active at a time for a TSP.

Password

Enter the password associated with the user you entered in the User Name field. The computer encrypts the password and stores it in the registry.

Verify Password

Reenter the user password.


CTI Manager Tab

The CTI Manager tab allows you to configure primary and secondary CTI Manager information, as illustrated in Figure 47-3.

Figure 47-3 Cisco-IP PBX Service Provider CTI Manager Tab

Table 47-2 contains a list of the CTI Manager tab fields that must be set and their descriptions.
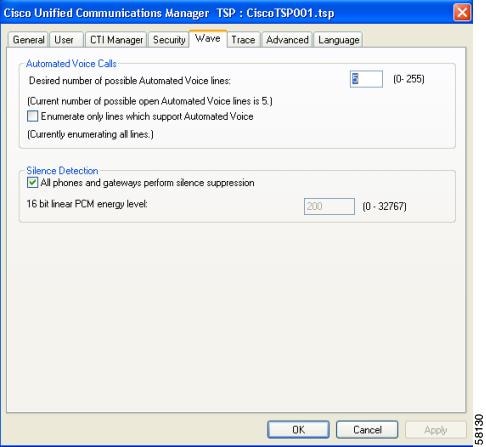
Table 47-2 CTI Manager Configuration Fields 

Field
Description

Primary CTI Manager Location

Specifies the CTI Manager to which the TSP attempts to connect first.

If the TSP is on the same computer as the primary CTIManager, choose the Local Host radio button.

If the primary CTIManager is on a different computer, choose the IP Address radio button and enter the IP address of primary CTIManager or choose the Host Name radio button and enter the host name of primary CTI Manager.

Backup CTI Manager Location

Specifies the CTI Manager to which the TSP attempts to connect if a connection to the primary CTI Manager fails.

If the TSP is on the same computer as the backup CTIManager, choose the Local Host radio button.

If the backup CTIManager is on a different computer, choose the IP Address radio button and enter the IP address of backup CTIManager or choose the Host Name radio button and enter the host name of backup CTI Manager.


Wave Tab

The Wave tab allows you to configure settings for your wave devices, as illustrated in Figure 47-4.

Figure 47-4 Cisco-IP PBX Service Provider Wave Tab

Table 47-3 contains a list of the Wave tab fields that must be set and their descriptions.
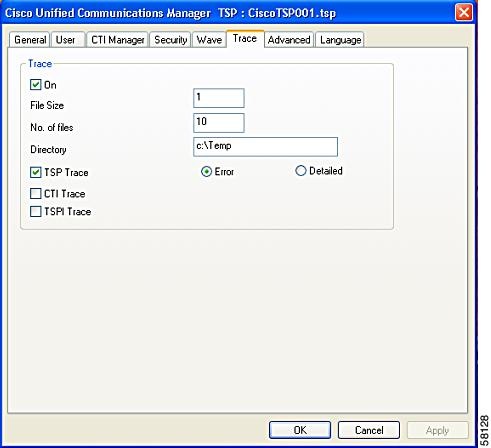
Table 47-3 Wave Tab Configuration Fields 

Field
Description

Automated Voice Calls

The number of Cisco wave devices you are using determines the possible number of automated voice lines. (The default is 5.) You can open as many CTI ports as the number of Cisco wave devices configured. For example, if you enter "5," you need to create five CTI port devices in Cisco CallManager. If you change this number, you need to remove and then reinstall any Cisco wave devices that you installed.

You can only configure a maximum of 255 wave devices for all installed TSPs because Microsoft limits the number of wave devices per wave driver to 255.

When you configure 256 or more wave devices (including Cisco or other wave devices), Windows displays the following error when you access the Sounds and Multimedia control panel: "An Error occured while Windows was working with the Control Panel file C:\Winnt\System32\MMSYS.CPL." TSP can still handle the installed Cisco wave devices as long as you have not configured more than 255 Cisco devices.

The current number of possible automated voice lines designates the maximum number of lines that can be simultaneously opened using both LINEMEDIAMODE_AUTOMATEDVOICE and LINEMEDIAMODE_INTERACTIVEVOICE.

If you are not developing a third-party call control application, check the Enumerate only lines that support automated voice check box, so that the Cisco TSP detects only lines associated with a CTI port device.

Silence Detection

If you use silence detection, this check box notifies the wave driver which method to use to detect silence on lines that support automated voice calls using the Cisco Wave Driver. If the check box is checked (default), the wave driver searches for the absence of audio-stream RTP packets. Because all devices on the network suppress silence and stop sending packets, this method provides a very efficient way for the wave driver to detect silence.

However, if some phones or gateways do not perform silence suppression, the wave driver must analyze the content of the media stream and, at some threshold, declare that silence is in effect. This CPU-intensive method handles media streams from any type of device.

If some phones or gateways on your network do not perform silence suppression, you must specify the energy level at which the wave driver declares that silence is in effect. This value of the 16-bit linear PCM energy level ranges from 0 to 32767, and the default is 200. If all phones and gateways perform silence suppression, the system ignores this value.


Trace Tab

The Trace tab allows you to configure various trace settings, as illustrated in Figure 47-5. Changes to trace parameters take effect immediately, even if TSP is running.

Figure 47-5 Cisco-IP PBX Service Provider Trace Tab

Table 47-4 contains a list of the Trace tab fields that must be set and their descriptions.

Table 47-4 Trace Tab Configuration Fields 

Field
Description

On

Allows you to enable Global CiscoTSP trace.

Check the check box to enable CiscoTSP trace. When you enable trace, you can modify other trace parameters in the dialog box. The CiscoTSP trace depends on the other values you enter in these fields.

Uncheck the check box to disable CiscoTSP trace. When you disable trace, you cannot choose any trace parameters in the dialog box, and TSP ignores the values entered in these fields.

Max lines/file

Specifies the maximum number of lines the trace file can contain. The default is 10,000. Once the file contains the maximum number of lines, trace opens the next file and writes to that file.

No. of files

Specifies the maximum number of trace files. The default is 10. File numbering occurs in a rotating sequence starting at 0. The counter restarts at 0 after it reaches the maximum number of files minus one.

Directory

Specifies the location in which trace files for all Cisco TSPs are stored. Make sure that the specified directory exists.

The system creates a subdirectory for each Cisco TSP. For example, the CiscoTSP001Log directory stores Cisco TSP 1 log files. The system creates trace files with filename TSP001Debug000xxx.txt for each TSP in its respective subdirectory.

TSP Trace

Activates internal TSP tracing. When you activate TSP tracing, Cisco TSP logs internal debug information that you can use for debugging purposes. You can choose one of the following levels:

Error—Logs only TSP errors.

Detailed—Logs all TSP details (i.e., log function calls in the order they are called.)

The system checks the TSP Trace check box and chooses the Error radio button by default.

CTI Trace

Traces all messages and function calls between TAPI and Cisco TSP. The system leaves this check box unchecked by default.

If you check the check box, TSP traces all the function calls made by TAPI to Cisco TSP with parameters and messages (events) from Cisco TSP to TAPI.

TSPI Trace

Traces messages flowing between Cisco TSP and CTI. Cisco TSP communicates with the CTI Manager. By default, the system leaves the check box unchecked.


Advanced Tab

The Advanced tab allows you to configure timer settings, as illustrated in Figure 47-6.


Note These timer settings meant for advanced users only rarely change.


Figure 47-6 Cisco-IP PBX Service Provider Advanced Tab

Table 47-5 contains a list of the Advanced tab fields that must be set and their descriptions.

Table 47-5 Advanced Configuration Fields 

Field
Description

Synchronous Message Timeout (secs)

Designates the time the TSP waits to receive a response to a synchronous message. The value displays in seconds, and the default is 15. Range goes from 5 to 60 seconds.

Requested Heartbeat Interval (secs)

Designates the time the heartbeat messages are sent from TSP to detect whether the CTI Manager connection is still alive. TSP sends heartbeats when no traffic exists between the TSP and CTI Manager for 30 seconds or more. The default interval is 30 seconds. Range goes from 30 to 300 seconds.

Connect Retry Interval (secs)

Designates the interval between reconnection attempts after a CTI Manager connection failure. The default is 30 seconds. Range goes from 10 to 300 seconds.

Provider Open Completed Timeout (secs)

Designates the time the TSP waits for a Provider Open Completed Event. This event indicates the initialization of CTI Manager is done and is ready to serve TSP requests. This initialization time is directly proportional to the number of devices configured in the system. The default value is 30 seconds. Range goes from 5 to 300 seconds.


Installing the Wave Driver

You can use the Cisco wave driver with Windows 2000 and Windows NT only. Windows 98 and Windows 95 do not support it.

You should install Cisco wave driver if you plan to use first-party call control. (Do this even if you are performing your own media termination.)


Caution Because of a restriction in Windows NT, the software may overwrite or remove existing wave drivers from the system when you install or remove the Cisco wave driver on a Windows NT system. The procedures in this section for installing and uninstalling the Cisco wave driver on Windows NT include instructions on how to prevent existing wave drivers from being overwritten or removed.

To install the Cisco wave driver, perform the following steps.

Procedure for Windows 2000


Step 1 Open the Control Panel.

Step 2 Double-click Add/Remove Hardware.

Step 3 Click Next.

Step 4 Click Add/Troubleshoot a Device and click Next.

Step 5 Click Add a New Device and click Next.

Step 6 Click No, I want to select the hardware from a list.

Step 7 Choose Sound, video and game controllers and click Next.

Step 8 Click Have Disk.

Step 9 Click Browse and change to the Wave Drivers folder in the folder where the Cisco TSP is installed.

Step 10 Choose OEMSETUP.INF and click Open.

Step 11 In the Install From Disk window, click OK.

Step 12 The Cisco TAPI Wave Driver displays on the screen. Click Next.

Step 13 Click Next.

Step 14 Click Yes.

Step 15 Click Finish.

Step 16 Click Yes to restart.


Procedure for Windows NT


Step 1 Before you add the Cisco wave driver, you must save the wave driver information from the registry in a separate file as described in the "Saving Wave Driver Information" section.

Step 2 Open the Control Panel.

Step 3 Double-click Multimedia.

Step 4 Click Next.

Step 5 Click Add.

Step 6 Click Unlisted or Updated Driver.

Step 7 Click OK.

Step 8 Click Browse and change to the Wave Drivers folder in the folder where the Cisco TSP is installed.

Step 9 Click OK. Follow the online instruction, but do not restart the system when prompted.

Step 10 Examine the contents of the registry to verify the new driver was installed and the old drivers still exist, as described in the "Verifying the Wave Driver Exists" section.

Step 11 Restart the computer.


Saving Wave Driver Information

Use the following steps to save wave driver information from the registry in a separate file. You must perform this procedure when installing or uninstalling the Cisco wave driver on a Windows NT computer.

Procedure


Step 1 Click Start > Run.

Step 2 Enter regedit in the text box.

Step 3 Click OK.

Step 4 Choose the Drivers32 key located in the following path:

HKEY_LOCAL_MACHINE\SOFTWARE\Microsoft\Windows NT\ CurrentVersion

Step 5 Choose Registry > Export Registry File.

Step 6 Enter a filename and choose the location to save.

Step 7 Click Save.

The file receives a .reg extension.


Verifying the Wave Driver Exists

When you install or uninstall the Cisco wave driver, you must verify whether it exists on your system. Use these steps to verify whether the wave driver exists.

Procedure


Step 1 Click Start > Run.

Step 2 Enter regedit in the text box.

Step 3 Click OK.

Step 4 Choose the Drivers32 key located in the following path:

HKEY_LOCAL_MACHINE\SOFTWARE\Microsoft\Windows NT\ CurrentVersion

Step 5 If you are installing the wave driver, make sure the driver "avaudio32.dll" displays in the data column. If you are uninstalling the wave driver, make sure the driver "avaudio32.dll does not display in the data column. This designates the Cisco wave driver.

Step 6 Verify that the previously existing wave values appear in the data column for wave1, wave2, wave3, and so on. You can compare this registry list to the contents of the .reg file you saved in the "Saving Wave Driver Information" section by opening the .reg file in a text editor and viewing it and the registry window side-by-side.

Step 7 If necessary, add the appropriate waveX string values for any missing wave values that should be installed on the system. For each missing wave value, choose
Edit > New > String Value and enter a value name. Then, choose Edit > Modify, enter the value data, and click OK.

Step 8 Close the registry by choosing Registry > Exit.


Verifying the Cisco TSP Installation

You can use the Microsoft Windows Phone Dialer Application to verify that the Cisco TSP is operational. For Windows NT and Windows 2000, locate the dialer application in

C:\Program Files\Windows NT\dialer.exe

For windows 95 and Windows 98, locate the dialer application in

C:\Windows\dialer.exe

Procedure For Windows 2000


Step 1 Open the Dialer application by locating it in Windows Explorer and double-clicking it.

Step 2 Choose Edit > Options.

Step 3 Choose Phone as the Preferred Line for Calling.

Step 4 In the Line Used For area, choose one of the Cisco Lines in the Phone Calls drop-down menu.

Step 5 Click OK.

Step 6 Click Dial.

Step 7 Enter a number to dial, choose Phone Call in the Dial as box, and then click Place Call.


Procedure for Windows NT, Windows 98, and Windows 95


Step 1 Open the Dialer application by locating it in Windows Explorer and double-clicking it:

A dialog box appears requesting the line and address that you want to use. If no lines are listed in the Line drop-down list box, a problem may exist between the Cisco TSP and the Cisco CallManager.

Step 2 Choose one of the lines from the Line drop-down menu. Make sure Address is set to Address 0.

Step 3 Click OK.

Step 4 Enter a number to dial.


If the call suceeds, you have verified that the Cisco TSP is operational on the machine where the Cisco TSP is installed.

If you encounter problems during this procedure, or if no lines appear in the line drop-down list on the dialer application, check the following items:

Make sure the Cisco TSP is configured properly.

Test the network link between the Cisco TSP and the Cisco CallManager by using the ping command to check connectivity.

Make sure the Cisco CallManager server is functioning.

Setting up Client-Server Configuration

For information on setting up a client-server configuration (Remote TSP) in Windows 2000, refer to the Microsoft Windows Help feature. For information on client-server configuration in Windows NT, refer to Microsoft White Papers.

Uninstalling the Wave Driver

To remove the Cisco wave driver, perform the following steps.

Procedure for Windows 2000


Step 1 Open the Control Panel.

Step 2 Double-click Add/Remove Hardware.

Step 3 Click Next.

Step 4 Choose Uninstall/Unplug a device and click Next.

Step 5 Choose Uninstall a device and click Next.

Step 6 Choose Cisco TAPI Wave Driver and click Next.

Step 7 Choose Yes, I want to uninstall this device and click Next.

Step 8 Click Finish.

Step 9 Restart the computer.


Procedure for Windows NT


Step 1 Before you uninstall the Cisco wave driver, you must save the wave driver information from the registry in a separate file. For information on how to save the wave drive information to a separate file, see the "Saving Wave Driver Information" section.

Step 2 After the registry information is saved, open the Control Panel.

Step 3 Double-click Multimedia.

Step 4 Click the Devices tab.

Step 5 Click the `+' symbol next to Audio Devices to view all the audio devices.

Step 6 Click Audio for Cisco Sound System.

Step 7 Click Remove.

Step 8 Click Finish. Do not restart the system.

Step 9 Verify that the Cisco wave driver was removed and the old drivers still exist. For information on how to do this, see the "Verifying the Wave Driver Exists" section.


Note When you verify the removal of the driver, make sure that Cisco wave driver "avaudio32.dll" does not appear in the data column.


Step 10 Restart the computer.


Removing the Cisco TSP

This process removes the Cisco TSP from the provider list but does not uninstall the TSP. To make these changes, perform the following steps.

Procedure for Windows 2000


Step 1 Open the Control Panel.

Step 2 Double-click the Phone and Modem icon.

Step 3 Click the Advanced tab.

Step 4 Choose the Cisco TSP you want to remove.

Step 5 Click Remove to delete the Cisco TSP from the list.


Procedure for Windows NT, Windows 98, and Windows 95


Step 1 Open the Control Panel.

Step 2 Double-click the Telephony icon.

Step 3 Click the Advanced tab.

Step 4 Choose the Cisco TSP you want to remove.

Step 5 Click Remove to delete the Cisco TSP from the list.


Managing the Cisco TSP

You can perform the following actions on all installed TSPs:

Reinstall the existing Cisco TSP version

Upgrade to the newer version of the Cisco TSP

Uninstall the Cisco TSP

You cannot change the number of installed Cisco TSPs when you reinstall or upgrade the CiscoTSPs.

Related Topics

Reinstalling the Cisco TSP

Upgrading the Cisco TSP

Uninstalling the Cisco TSP

Reinstalling the Cisco TSP

Use the following procedure to reinstall the Cisco TSP on all supported platforms.

Procedure


Step 1 Open the Control Panel and double-click Add/Remove Programs.

Step 2 Choose CiscoTSP and click Add/Remove.

The Cisco TSP maintenance install dialog box displays.

Step 3 Click Reinstall TSP 3.1(0.X) radio button and click Next.

Step 4 Follow the online instructions.


Note The installation program prompts you to restart the computer if TSP files are locked.


Upgrading the Cisco TSP

Use the following procedure to reinstall the Cisco TSP on all supported platforms.

Procedure


Step 1 Double-click CiscoTSP.exe.

Step 2 The CiscoTSP maintenance install dialog box displays.

If CiscoTSP.exe contains different version of Cisco TSP than you have installed, the installation program displays Upgrade from TSP 3.1(0.X) to 3.1(0.Y) or Uninstall options.

Step 3 Choose Upgrade from TSP 3.1(0.X) to 3.1(0.Y) radio button and click Next.

Step 4 Follow the online instructions.


Note The installation program prompts you to restart the computer if TSP files are locked.


Uninstalling the Cisco TSP

Use the following procedure to reinstall the Cisco TSP on all supported platforms.

Procedure


Step 1 Open the Control Panel and double-click Add/Remove Programs.

Step 2 Choose CiscoTSP and click Add/Remove.

The Cisco TSP maintenance install dialog box displays.

Step 3 Choose Uninstall: Remove the installed TSP radio button and click Next.

Step 4 Follow the online instructions.


Note The installation program prompts you to restart the computer if TSP files are locked.