-
Cisco Unity Connection User Guide, Release 1.x
-
Index
-
Getting Started
-
The Tools You Use
-
Accessing Cisco Unity Connection
-
Securing and Changing Your Cisco Unity Connection Passwords
-
Managing the Size of Your Mailbox
-
About System Broadcast Messages
-
Checking Messages
-
Managing Receipts
-
Finding Messages by Phone
-
Deleting Messages
-
Sending and Replying to Messages
-
Managing Your Personal Contacts List
-
Placing Calls by Using Voice Commands
-
Changing Personal Settings
-
Changing Cisco Unity Connection Conversation Settings
-
Changing Recording and Playback Settings
-
Managing Personal Greetings
-
Changing Call Transfer and Screening Settings
-
Managing Personal Call Transfer Rules to Handle Incoming Calls
-
Changing Message Playback Settings
-
Changing Message Notification Settings
-
Changing Private List Settings
-
Cisco Unity Connection Voice Commands and Phone Menus
-
Reference Information
-
 Feedback
Table Of Contents
Working with Cisco Unity Connection by Phone
Using Touchtone Keys with the Cisco Unity Connection Conversation
Using Voice Commands with the Cisco Unity Connection Conversation
Customizing the Cisco Unity Connection Conversation
Working with the Cisco Unity Web Tools
Working with the Cisco Unity Assistant Web Tool
Working with the Cisco Unity Inbox Web Tool
Working with the Cisco Unity Personal Call Transfer Rules Web Tool
Setting Up Your Browser to Access the Cisco PCA
Managing Voice Messages in Your E-mail Program
The Tools You Use
As a Cisco Unity Connection user, you can send and manage messages by using a phone and by using the Cisco Unity Inbox web tool; you may also be able to manage voice messages in your e-mail program. The Cisco Unity Assistant web tool lets you personalize your Connection phone settings.
This chapter contains the following sections:
•
Working with Cisco Unity Connection by Phone
•
•
•
•
Working with Cisco Unity Connection by Phone
When you access Cisco Unity Connection by phone, you hear the Connection conversation. Its recorded instructions guide you as you send and receive messages, record greetings, and change your personal settings. You can use any phone to access Connection.
There are two ways in which you can use Cisco Unity Connection by phone:
Note
Using Touchtone Keys with the Cisco Unity Connection Conversation
There are several versions of the Connection conversation, each providing different keypad mappings for the Connection menu options. (For example, you may press 3 to delete a message in one version but press 7 to delete a message in another version.)
Your Connection administrator determines the conversation version that you hear. Typically, an administrator will choose a conversation that has a keypad mapping that is familiar to you. Ask your Connection administrator which conversation you are set up to use.
Features described in the Cisco Unity Connection User Guide are available with all conversations. However, procedures in the guide use the keypad mapping for the standard conversation. Keypad mappings for other conversations are provided in the "Cisco Unity Connection Voice Commands and Phone Menus" chapter.
Note that touchtone keys listed in the "Voice Commands" section of the "Cisco Unity Connection Voice Commands and Phone Menus" chapter apply only when the voice-recognition option is enabled and you are using voice commands.
Using Voice Commands with the Cisco Unity Connection Conversation
Cisco Unity Connection provides a voice-recognition option that lets you say what you want to do in the Connection conversation. Voice commands are intuitive, easy to use, and available for most voice-messaging tasks.
Procedures in the Cisco Unity Connection User Guide describe the voice commands you can use, or you can say "Help" at any time to get more information on any menu. For a list of available voice commands, see the "Voice Commands" section on page 23-1.
Tip
If you are not comfortable saying commands or you are in a situation where your commands are not recognized by the system (for example, you are on a mobile phone where there is background noise), the voice-recognition option offers a small set of touchtone-key options for select commands. To hear the touchtone-key options available for any menu, press 0 or say "Touchtone command Help".
For a temporary switch from using voice commands to using only touchtone keys, say "Touchtone conversation" or press 9 at the Main menu. To switch back to using voice commands, hang up and log on to Cisco Unity Connection again.
Your Connection administrator determines whether the voice-recognition option is available to you. When voice recognition is enabled, you have the option of changing the Input Style setting in the Cisco Unity Assistant to using only touchtone keys, or using touchtone keys and voice commands. (For information on changing the setting, see the "Changing Your Phone Input Style" section on page 15-4.)
Customizing the Cisco Unity Connection Conversation
Although you cannot control which conversation version that you hear when you access Cisco Unity Connection by phone, you can customize it in many ways. For example, there are two styles of menus available, full and brief. You can also choose the language you hear, and specify the order in which Connection plays your messages.
For information on customizing the Connection conversation, see the "Changing Cisco Unity Connection Conversation Settings" and "Changing Message Playback Settings" chapters.
Working with the Cisco Unity Web Tools
You use the following web tools to manage messages and personal preferences with Cisco Unity Connection:
•
•
•
Access to the web tools is provided through the Cisco Personal Communications Assistant (PCA) website.
This section contains descriptions of each tool. Information on using the tools to do specific tasks is provided throughout this guide and in Cisco PCA Help.
Note that your Internet browser must be set up to use the Cisco PCA. (See also the "Setting Up Your Browser to Access the Cisco PCA" section.)
Working with the Cisco Unity Assistant Web Tool
The Cisco Unity Assistant web tool lets you customize how you and your callers interact with Cisco Unity Connection by phone. You can also use it to personalize your Connection settings—including your recorded greetings and message-delivery options—and to set up message-notification devices and to create private lists.
Some Cisco Unity Assistant pages contain a Media Master, which you use to record and play greetings and names. (See also the "Working with the Media Master" section.)
Working with the Cisco Unity Inbox Web Tool
Note
The Cisco Unity Inbox web tool contains voice messages and any message receipts you receive.
By default, ten messages are presented at a time, though you can change the number for each session by clicking a different value in the Messages Per Page list. When the number of messages in your Cisco Unity Inbox exceeds the value specified in the Messages Per Page list, click the arrows or the page number at the bottom of the page to navigate to additional Cisco Unity Inbox pages.
By clicking the applicable icon on each Cisco Unity Inbox page, you can sort and delete the messages on the page, and compose and listen to a voice message. You use the Media Master to play and record messages.
The Cisco Unity Inbox does not refresh the display automatically; you must click the Refresh Message List icon to check for new messages.
Tip
Working with the Cisco Unity Personal Call Transfer Rules Web Tool
Note
You use the Cisco Unity Personal Call Transfer Rules web tool to set up forwarding and screening of incoming calls according to rules you set up.
Cisco Unity Connection can route calls according to the identity of the caller, the time of day, and your meeting schedule. You can set up rules to:
•
•
•
For information on setting up personal call transfer rules, see the "Managing Personal Call Transfer Rules to Handle Incoming Calls" chapter.
Setting Up Your Browser to Access the Cisco PCA
The Internet browser on your workstation must be set up to use the Cisco PCA and the web tools you access through it. See the applicable section, depending on the browser(s) installed on your computer:
Note that your Connection administrator may have already set up the browser on your workstation. However, if your organization offers remote access to the Cisco PCA, you must set up the installed browser(s) on any other computer that you plan to use for accessing the Cisco PCA.
Apple Safari
Do the following tasks to set up Safari for accessing the Cisco PCA. Contact your Connection administrator for more information.
1.
2.
a.
b.
c.
Microsoft Internet Explorer
Do the following tasks to set up Internet Explorer for accessing the Cisco PCA. Contact your Connection administrator for more information.
1.
2.
a.
b.
c.
d.
e.
f.
g.
Mozilla Firefox
Do the following tasks to set up Firefox for accessing the Cisco PCA. Contact your Connection administrator for more information.
1.
2.
•
•
•
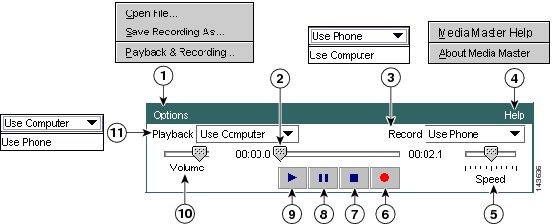
Working with the Media Master
The Media Master appears on assorted pages in the Cisco Unity web tools. By clicking the controls, you can make and play recordings with either your phone or your computer microphone and speakers.
Figure 2-1 Media Master
Options menu
Stop
Recording/playback progress
Pause
Record list
Play
Help menu
Volume control
Playback speed control
Playback list
Record
The Options menu on the Media Master (1 in Figure 2-1) allows you to work with other sound (WAV) files in your recordings, and to set your playback and recording devices. Table 2-1 describes the available options.
Table 2-2 describes the Media Master options in the Playback and Recording Settings dialog box (on the Options menu, click Playback & Recording). The phone is the default recording and playback device for the Media Master.
Once you have specified the active phone number and performance preference in the Playback and Recording Settings dialog box, you can choose devices in the Playback and Record lists on the Media Master (11 and 3 in Figure 2-1). The lists offer a quick way to change devices, and your selections are saved for all web-tool pages that contain the Media Master until you change them again.
Table 2-3 describes the options available on the Media Master Help menu (4 in Figure 2-1).
Table 2-3 Help Menu
Media Master Help
Open Media Master Help.
About Media Master
Display Media Master version and configuration information.
Tip
•
Managing Voice Messages in Your E-mail Program
Note
With Cisco Unity Connection, you can access voice messages and receipts in your e-mail program. You can only listen to and delete voice messages; you cannot send, reply, or forward them from your e-mail program.
The location of your voice messages depends on the e-mail program, but typically voice messages are in a separate folder in your e-mail program. Messages contain a WAV file attachment with the recording. You play a voice message by opening the attachment.
Information on managing voice messages and receipts in your e-mail program is provided later in the Cisco Unity Connection User Guide.