Feedback
Table Of Contents
Using the VQE Channel Provisioning Tool
Working with VCPT Configuration Files
Performing Non-Push Configuration-File Operations
Sending or Pushing Channel Information to Servers
Sending Channel Information to a Subset of Servers
Viewing or Updating Channel Information
Defining VQE Servers and VQE Client Channel Configuration Delivery Servers
Viewing or Updating Server Information
Defining Channel Associations for a Server
Copying Channel Associations from Another Server
Using the VQE Channel Provisioning Tool
This chapter describes how to use Cisco VQE Channel Provisioning Tool (VCPT). The tasks that you perform with VCPT are listed in Table 3-1. When you use VCPT for the first time, the required tasks are performed in the order shown in the table.
Table 3-1 VCPT Tasks
1.
Log in to VCPT
2.
3.
4.
Defining VQE Servers and VQE Client Channel Configuration Delivery Servers
5.
6.
Logging in to VCPT
Before logging in to VCPT, you need a valid UNIX username and password on the Cisco CDE110 hosting VCPT. The username does not have to belong to any special group. Creation of the username is the responsibility of the Cisco CDE110 system administrator.
VCPT supports two web browsers: Microsoft Internet Explorer version 6.0 or later, and Mozilla Firefox version 2.0 or later. VCPT uses secure HTTPS. The minimum screen resolution required for VCPT is 1024 x 768 pixels.
To log in to VCPT, follow these steps:
Step 1
https://ip_addressor
https://fully_qualified_domain_nameThe VQE login dialog box is displayed.
Step 2
Step 3
If the username and password are valid, the VQE Channel Provisioning Tool main window is displayed.
If you log in to VCPT when another person is using the same VCPT, the following message is displayed and your access to VCPT is a read-only view. To get read-write access, wait and try to open a VCPT session at a later time when no one else is using the tool.
Figure 3-1 Read-only View Message
VCPT sessions are timed out after 25 minutes of inactivity. If VCPT detects a network failure or server failure, the session is timed out after one minute.
With certain versions of Microsoft Internet Explorer 6, if you close a read-write session and try to open it again immediately, you get a read-only view. In this case, wait a minute and open another session to get read-write access.
Working with VCPT Configuration Files
The VCPT channel, server, and association provisioning information is stored in a persistent local database on the Cisco CDE110 appliance. When the Cisco CDE110 or VCPT is restarted, channel, server, and association data are read from the local database. The VCPT configuration file can be saved at any time and should be saved frequently to store your work.
Caution
VCPT configuration files are stored in the /etc/opt/vcpt/data directory on the Cisco CDE110. File management tasks for VCPT are the responsibility of the VCPT user.
Caution
When the user completes channel and server configuration and initiates the VCPT send operation, VCPT sends the channel information in Session Description Protocol (SDP) format to the set of VQE Servers and VQE Client Channel Configuration Delivery Servers.
Figure 3-2 shows the buttons that you use for working with VCPT configuration files and for sending channel information.
Figure 3-2 VCPT Configuration File Operations
The following sections explain the configuration file and channel information operations:
•
•
•
Performing Non-Push Configuration-File Operations
The VCPT configuration file buttons used for non-push operations are:
•
•
•
•
•
VCPT configuration file names can be up to 60 characters long and use lowercase a to z, uppercase A to Z, numeric characters 0 to 9, and the underscore (_), hyphen (-) and period (.) characters. No spaces are allowed in the name.
Sending or Pushing Channel Information to Servers
The VCPT buttons used to send or push channel information to VQE Servers and VQE Client Channel Configuration Delivery Servers are the Send and Force Update buttons.
Send Button
Use the Send button to send channel information in the current configuration file to the VQE Servers and VQE Client Channel Configuration Delivery Servers that have been defined.
Note
Note
The channel information to send is based on the channel associations that have been defined for the VQE Servers and VQE Client Channel Configuration Delivery Servers. When channel information is sent to a set of servers, VCPT saves the current configuration file. When channel information is sent to servers, VCPT displays the following:
•
•
Force Update Button
Note
For the following types of configuration file changes, use the Force Update button to send the channel information to the VQE Servers and VQE Client Channel Configuration Delivery Servers.
•
•
•
If configuration information is sent to the servers and the changes to channel information are not present on the servers after the send, you can use the Force Update button to force the channel information changes to be accomplished on the servers.
Sending Channel Information to a Subset of Servers
To send a channel information file to a subset of servers, follow these steps:
Step 1
Step 2
Step 3
Step 4
Step 5
Provisioning VQE Channels
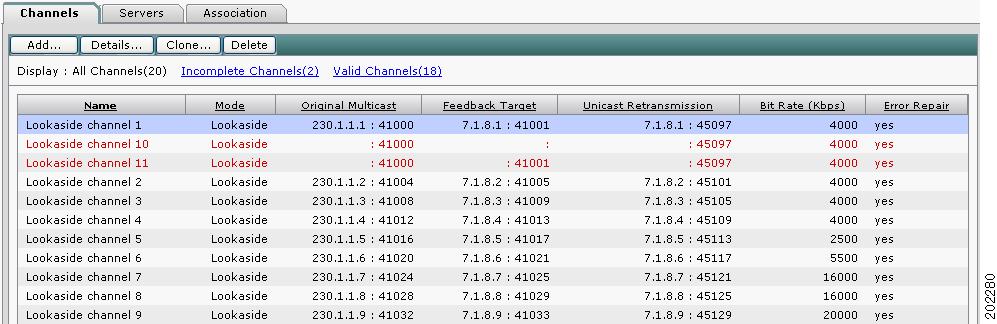
In the Cisco VQE Channel Provisioning Tool, use the Channels tab to add a new channel, clone an existing channel, delete an existing channel, and get detailed information on an existing channel. The practical limit on the number of channels that can be serviced by one VQE-S is approximately 250.
When you click the Channels tab, VCPT displays summary information (Figure 3-3) on all channels that have been created. An incomplete channel is displayed in red.
Figure 3-3 Channels Summary
From the Channels tab, you can do the following:
•
•
•
•
•
–
–
–
The sections that follow provide more information on the tasks that can be performed from the Channels tab.
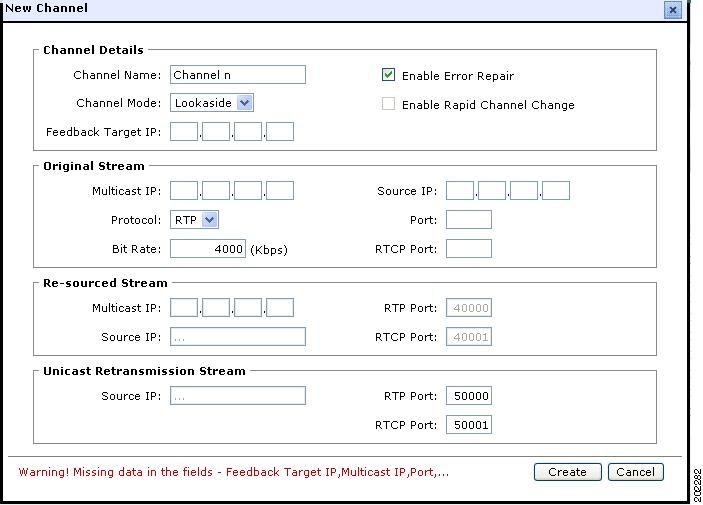
Adding a Channel
In the VCPT channel definition, each channel is associated with a feedback target IP address. The feedback target address is a unique anycast address that VQE Server configures on its host Cisco CDE110 based on the channel information that is sent to it by VCPT. An anycast address is a unicast address that is assigned to multiple interfaces. With the appropriate routing topology, packets addressed to an anycast address are delivered to a single interface (in this case, the nearest VQE Server's CDE110 interface that is identified by the address). The use of anycast addresses to identify feedback targets is useful for VQE Server redundancy.
To add a channel, follow these steps:
Step 1
The New Channel dialog box (Figure 3-4) is displayed.
Figure 3-4 New Channel Dialog Box
Step 2
The following rules apply when adding a channel:
•
•
•
–
•
•
•
•
•
•
Step 3
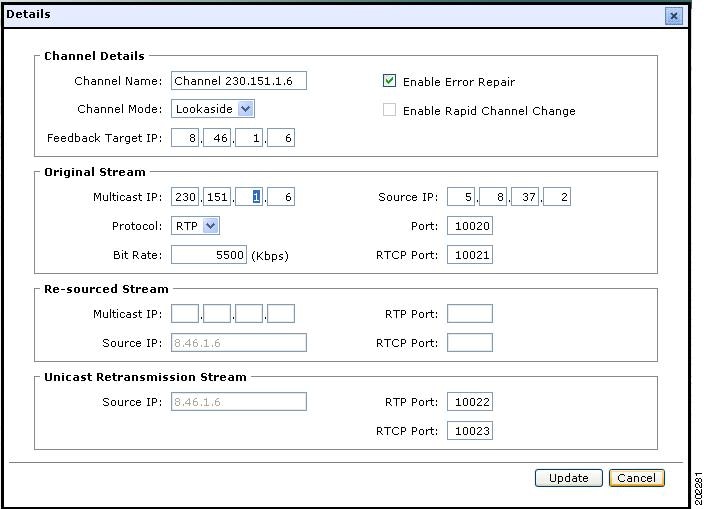
Viewing or Updating Channel Information
To view or update channel information, follow these steps:
Step 1
Step 2
The Details dialog box (Figure 3-5) is displayed.
Figure 3-5 Details Dialog Box
Step 3
Step 4
•
•
Cloning a Channel
To clone a channel, follow these steps:
Step 1
Step 2
The Clone dialog box is displayed. Only appropriate information from the existing channel is cloned.
Step 3
Step 4
•
•
Deleting a Channel
To delete a channel, follow these steps:
Step 1
Step 2
A dialog box asking if you want to delete the channel is displayed.
Step 3
•
•
Step 4
Defining VQE Servers and VQE Client Channel Configuration Delivery Servers
The Cisco VQE Channel Provisioning Tool requires that you provide information on each VQE Server and each VQE Client Channel Configuration Delivery Server that will receive channel configuration information from the VQE Channel Provisioning Tool.
In the VQE Channel Provisioning Tool, use the Servers tab to add a new server, delete an existing server, and get information on an existing server. When you click the Servers tab, VCPT displays summary information (Figure 3-3) on all servers that have been created.
Figure 3-6 Servers Summary
From the Servers tab, you can do the following:
•
•
•
•
–
–
The Status of Last Send column provides information on the last attempt by VCPT to send channel configuration information to the server. Table 3-3 lists the possible messages.
The sections that follow provide more information on the tasks that can be performed from the Servers tab.
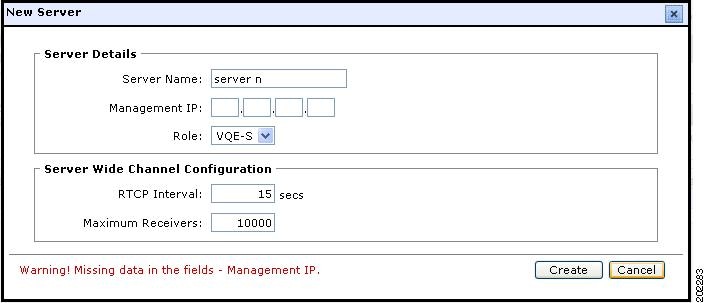
Adding a Server
To add a server, follow these steps:
Step 1
The New Server dialog box (Figure 3-7) is displayed.
Figure 3-7 New Server Dialog Box
Step 2
Step 3
•
•
Viewing or Updating Server Information
To view or update server information, follow these steps:
Step 1
Step 2
The Details dialog box is displayed.
Step 3
Step 4
•
•
Deleting a Server
To delete a server, follow these steps:
Step 1
Step 2
A dialog box asking if you want to delete the server is displayed.
Step 3
•
•
Step 4
Defining Channel Associations
After VQE channels and the VQE Servers and VQE Client Channel Configuration Delivery Servers have been defined, you associate a set of channels with the servers. When the channel information file is sent to the VQE Servers and VQE Client Channel Configuration Delivery Servers, only the channels associated with the server are included in the file.
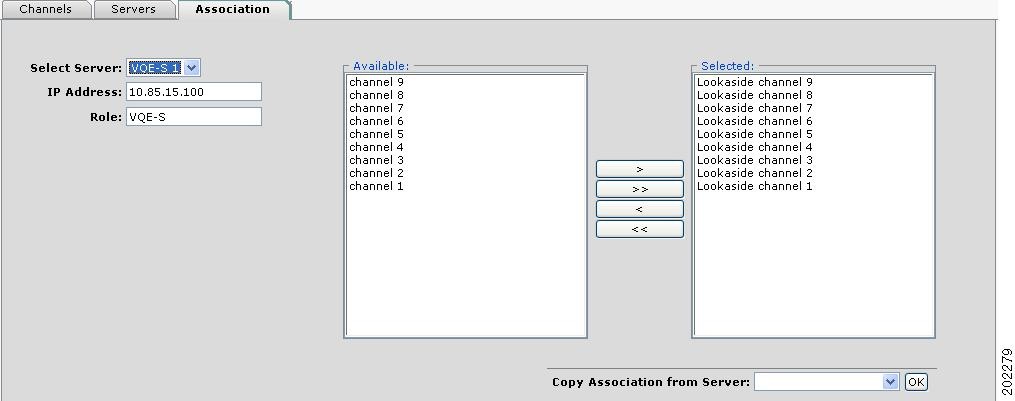
In the VQE Channel Provisioning Tool, use the Association tab (Figure 3-8) to associate servers with channels or copy an existing channel association.
Figure 3-8 Association Tab
The following sections explain how to associate channels with servers:
•
•
Defining Channel Associations for a Server
To define channel associations for a server, follow these steps:
Step 1
VCPT displays the IP address and role for the server.
Step 2
•
•
The associations for the channel are updated.
Copying Channel Associations from Another Server
To copy channel associations for a server, follow these steps:
Step 1
VCPT displays the IP address and role for the server.
Step 2
Step 3
The associations for the channel are updated.