Feedback Feedback
|
Table Of Contents
Configuring the Cisco TelePresence Content Server for Streaming Flash from a Wowza Media Server
Wowza Media Server Configuration
Configure for On-Demand Streaming
TelePresence Content Server Configuration
Obtaining Documentation and Submitting a Service Request
Configuring the Cisco TelePresence Content Server for Streaming Flash from a Wowza Media Server
Contents
•
Wowza Media Server Configuration
•
•
Introduction
This deployment guide is designed to provide guidelines for configuring the Cisco TelePresence Content Server and an external Wowza Media server for live and on demand Flash media streaming. These guidelines are for a Content Server running release 5.0.
The Content Server default installation supports only HTTP-based on demand hosting (also known as progressive download) of MPEG-4 for Flash content from its local IIS Web Server. An external Wowza Media server is required for live and on-demand streaming of MPEG-4 content for Flash.
Wowza Media Server Configuration
The information presented here regarding the setup and configuration of your Wowza Media Server is offered as a guideline only and assumes that you are configuring the Wowza Media Server from a fresh install.
Further information regarding the setup and configuration of Wowza Media Server as well as information regarding more advanced configuration alternatives can be found in the Wowza Media support forums through the Wowza Media web site.
Configure for Live Streaming
To set up your Wowza Media Server to accept live streaming of media from your Content Server, follow these steps:
Step 1
[install-dir]/applications/live
Note
Step 2
Step 3
Step 4
Step 5
a.
b.
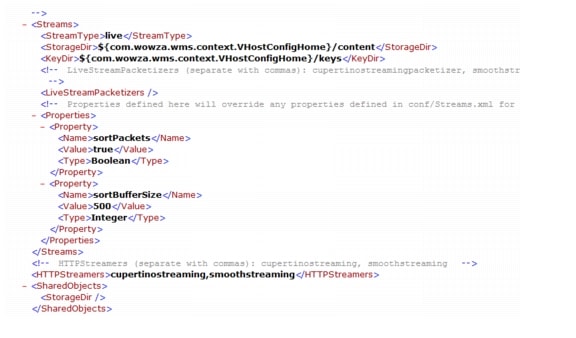
<Property><Name>sortPackets</Name><Value>true</Value><Type>Boolean</Type></Property><Property><Name>sortBufferSize</Name><Value>500</Value><Type>Integer</Type></Property>Example of XML Code: StreamType and Stream Properties
c.
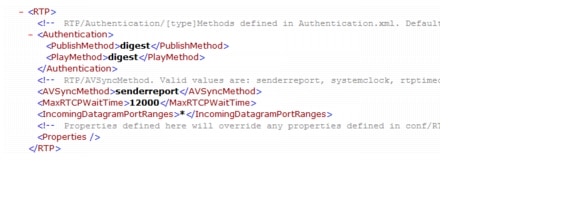
Example of XML Code: Authentication
Step 6
# RTP password file (format [username][space][password])# username passwordcisco changeme
Note
Note
Step 7
Note
Configure for On-Demand Streaming
To set up your Wowza Media Server to stream on-demand media follow these steps:
Step 1
While there are no further changes required to the Wowza Media Server setup to have it stream media generated by the Content Server on-demand, there needs to be some way for the Content Server to get the media to the Wowza Streaming Server. The suggested method for this is FTP.
Ensure that you have an FTP service running on same server as your Wowza Media Server and that the FTP service has access to write into the [install-dir]/content folder on your Wowza Media Server. Please refer to the administration manual of your FTP service for details on how to accomplish this.
Note
Step 2
TelePresence Content Server Configuration
Now that your Wowza Media Server is configured for live and on-demand streaming, you need to set up the Content Server using that configuration information.
The steps for setting up your Content Server are described below:
Create a Media Server
The following steps will create a new media server on the Content Server with support for live and on demand streaming through Wowza Media Server. If you only require support for one type of streaming, follow the steps as applicable to create a live streaming only or on-demand only media server.
Step 1
Step 2
Step 3
Step 4
a.
b.
Step 5
The default Application directory is live and should not require changing.
You should choose to use alternate live URLs only if you know the live streaming URLs for the Wowza Media Server require different path or filename information to that generated by the Content Server.
Step 6
From the On demand settings section, click FTP movies to location and enter the required FTP server information:
•
•
•
•
Step 7
The default Application directory is vod and should not require changing.
You should enter alternate on-demand URLs only if you know the streaming server requires a different path or filename information to that generated by the Content Server.
Step 8
Create a Template
Now that you have created a media server which supports streaming of Flash from a Wowza Media Server, you need to use this media server in a Content Server template. Multiple templates can use the same media server.
Step 1
Step 2
Step 3
Step 4
Step 5
Step 6
a.
b.
Step 7
Step 8
Step 9
Step 10
Create a Recording Alias
Now that you have a template that is set up for streaming from a Wowza Media Server, you need to create a recording alias on the Content Server that uses this template. Multiple recording aliases can use the same template.
Step 1
Step 2
Step 3
Step 4
Step 5
Step 6
You have now configured the Content Server for streaming Flash from your Wowza Media Server. You should now make a test call on the recording alias you have created to verify your configuration.
Disclaimers and Notices
The objective of this guide is to provide the reader with assistance in using and configuring this product. Product capabilities of Cisco and other manufacturers' products change over time and so the required configuration may be different from that indicated here. If you have any suggestions for changes to this document, please feed them back to Cisco through your Cisco Authorized Service Representative.
If you need technical support, please contact your Cisco Authorized Service Representative.
The specifications for the product and the information in this Guide are subject to change at any time, without notice, by Cisco. Every effort has been made to supply complete and accurate information in this Guide; however, Cisco assumes no responsibility or liability for any errors or inaccuracies that may appear in this document.
Cisco® is a registered trademark belonging to Cisco ASA. Other trademarks used in this document are the property of their respective holders.
This Guide may be reproduced in its entirety, including all copyright and intellectual property notices, in limited quantities in connection with the use of this product. Except for the limited exception set forth in the previous sentence, no part of this Guide may be reproduced, stored in a retrieval system, or transmitted, in any form, or by any means, electronically, mechanically, by photocopying, or otherwise, without the prior written permission of Cisco.
Obtaining Documentation and Submitting a Service Request
For information on obtaining documentation, submitting a service request, and gathering additional information, see the monthly What's New in Cisco Product Documentation, which also lists all new and revised Cisco technical documentation, at:
http://www.cisco.com/en/US/docs/general/whatsnew/whatsnew.html
Subscribe to the What's New in Cisco Product Documentation as a Really Simple Syndication (RSS) feed and set content to be delivered directly to your desktop using a reader application. The RSS feeds are a free service and Cisco currently supports RSS Version 2.0.
THE SPECIFICATIONS AND INFORMATION REGARDING THE PRODUCTS IN THIS MANUAL ARE SUBJECT TO CHANGE WITHOUT NOTICE. ALL STATEMENTS, INFORMATION, AND RECOMMENDATIONS IN THIS MANUAL ARE BELIEVED TO BE ACCURATE BUT ARE PRESENTED WITHOUT WARRANTY OF ANY KIND, EXPRESS OR IMPLIED. USERS MUST TAKE FULL RESPONSIBILITY FOR THEIR APPLICATION OF ANY PRODUCTS.
THE SOFTWARE LICENSE AND LIMITED WARRANTY FOR THE ACCOMPANYING PRODUCT ARE SET FORTH IN THE INFORMATION PACKET THAT SHIPPED WITH THE PRODUCT AND ARE INCORPORATED HEREIN BY THIS REFERENCE. IF YOU ARE UNABLE TO LOCATE THE SOFTWARE LICENSE OR LIMITED WARRANTY, CONTACT YOUR CISCO REPRESENTATIVE FOR A COPY.
The Cisco implementation of TCP header compression is an adaptation of a program developed by the University of California, Berkeley (UCB) as part of UCB's public domain version of the UNIX operating system. All rights reserved. Copyright © 1981, Regents of the University of California.
NOTWITHSTANDING ANY OTHER WARRANTY HEREIN, ALL DOCUMENT FILES AND SOFTWARE OF THESE SUPPLIERS ARE PROVIDED "AS IS" WITH ALL FAULTS. CISCO AND THE ABOVE-NAMED SUPPLIERS DISCLAIM ALL WARRANTIES, EXPRESSED OR IMPLIED, INCLUDING, WITHOUT LIMITATION, THOSE OF MERCHANTABILITY, FITNESS FOR A PARTICULAR PURPOSE AND NONINFRINGEMENT OR ARISING FROM A COURSE OF DEALING, USAGE, OR TRADE PRACTICE.
IN NO EVENT SHALL CISCO OR ITS SUPPLIERS BE LIABLE FOR ANY INDIRECT, SPECIAL, CONSEQUENTIAL, OR INCIDENTAL DAMAGES, INCLUDING, WITHOUT LIMITATION, LOST PROFITS OR LOSS OR DAMAGE TO DATA ARISING OUT OF THE USE OR INABILITY TO USE THIS MANUAL, EVEN IF CISCO OR ITS SUPPLIERS HAVE BEEN ADVISED OF THE POSSIBILITY OF SUCH DAMAGES.
Cisco and the Cisco Logo are trademarks of Cisco Systems, Inc. and/or its affiliates in the U.S. and other countries. A listing of Cisco's trademarks can be found at www.cisco.com/go/trademarks. Third party trademarks mentioned are the property of their respective owners. The use of the word partner does not imply a partnership relationship between Cisco and any other company. (1005R)
Any Internet Protocol (IP) addresses and phone numbers used in this document are not intended to be actual addresses and phone numbers. Any examples, command display output, network topology diagrams, and other figures included in the document are shown for illustrative purposes only. Any use of actual IP addresses or phone numbers in illustrative content is unintentional and coincidental.
© 2010-2013 Cisco Systems, Inc. All rights reserved.