-
Cisco MDS 9000 Family Fabric Manager User Guide, Release 1.0(2)
-
Index
-
Preface
-
Getting Started with Cisco Fabric Manager
-
Using Cisco MDS 9000 Family Fabric Manager Views
-
Managing Zones and Zone Sets
-
Managing VSANs
-
Managing Administrator Access
-
Managing Software and Configuration Files
-
Managing Interfaces
-
Managing Events and Alarms
-
Managing the System and Components
-
Managing Fibre Channel Routing and FSPF
-
Managing Advanced Features
-
 Feedback
Table Of Contents
Viewing SNMP Users, Roles, and Communities
Configuring RADIUS Security for CLI Access
Configuring RADIUS Authentication
Managing Administrator Access
The Cisco Fabric Manager lets you control management access to Cisco MDS 9000 Family switches, whether you are using the command-line interface (CLI) or SNMP. The Cisco Fabric Manager uses SNMP to communicate remotely with switches. This chapter describes how to set up SNMP users and roles, and how to assign different administrative privileges to different roles.
This chapter also describes how to set up a RADIUS server to provide authentication services to CLI users. To remotely access switches using the CLI, you use Telnet or SSH. For information about managing remote CLI access or configuring a local database for authenticating CLI users, refer to the Cisco 9000 Family Configuration Guide.
This chapter includes the following sections:
•
Managing SNMP Users and Roles
•
Managing SNMP Users and Roles
This section describes how to configure or view SNMPv3 users and roles, which allow you to control remote administrative access to Cisco MDS 9000 Family switches. It includes the following topics:
•
Viewing SNMP Users, Roles, and Communities
SNMP v3 provides a security model for controlling management access to managed devices in the form of a set of users and roles. Users are assigned to specific roles, and specific administrative privileges are assigned to each role. User names are authenticated through passwords, which are stored and transmitted in encrypted form. In addition, SNMPv3 includes the Privacy option, which encrypts all management traffic exchanged between switches.
SNMP v1 and v2 provide a very limited authentication scheme in the form of read and write community strings. Community strings are like user names, without passwords, and are stored and sent over the SNMP network in clear text (unencrypted) form. For this reason, SNMPv3 should be used wherever network security is a concern.
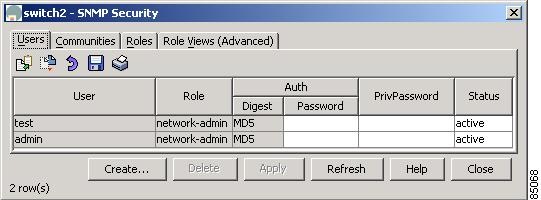
To view information about SNMP users, roles, and communities from Fabric Manager, choose Security > SNMP > Users on the menu tree. To view this information from the Device Manager, choose SNMP from the Security menu. Figure 5-1 shows the SNMP dialog box from the Device Manager.
Figure 5-1 Security > SNMP Dialog Box, Device Manager
Both dialog boxes show the display-only information described in Table 5-1.
Table 5-2 describes the configurable attributes for SNMP security.
To add a user or community string, follows these steps:
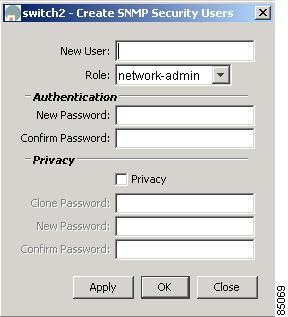
Step 1
From Device Manager, you see the dialog box shown in Figure 5-2.
Figure 5-2 Create User, Device Manager
The dialog box from Fabric Manager also provides a check box to specify one or more switches.
Step 2
Step 3
Step 4
Step 5
Enter the Authentication password in the Clone Password field to use the same password. Enter a new password twice in the New Password and Confirm Password fields.
Step 6
Configuring SNMP Communities
If you are running SNMPv3, you must define users (or security names), assign them to roles (or groups), and assign system access based on those roles. If you are running SNMPv1 or SNMPv2c, you must define communities, which are equivalent to SNMPv3 users or security names. SNMPv3 allows you to define user access to the object level. SNMPv1 and SNMPv2c do not allow you to define system access at the object level.
Table 5-3 shows the mapping of users (SNMPv3) and communities (SNMPv1 and SNMPv2c).
To configure users and communities from the Device Manager, choose SNMP from the Security menu. and click the Communities tab. To configure users and communities from the Fabric Manager, choose
Security > SNMP > Communities from the menu tree. Figure 5-3 shows the SNMP dialog box with the Communities tab selected from the Device Manager.Figure 5-3 Security > SNMP > Communities Dialog Box, Device Manager
Both dialog boxes show the display-only information described in Table 5-4.
To add a community string, follow these steps:
Step 1
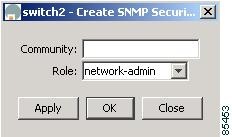
From Device Manager, the system displays the dialog box shown in Figure 5-4.
Figure 5-4 Create Community, Device Manager
The dialog box from Fabric Manager also provides a check box to specify one or more switches.
Step 2
Step 3
Step 4
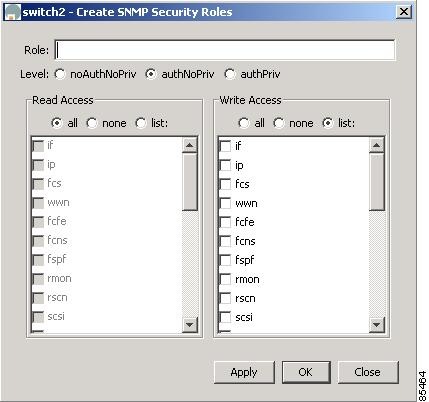
Configuring User Roles
User roles let you define a set of administrative permissions to a role and then assign this role to different users.
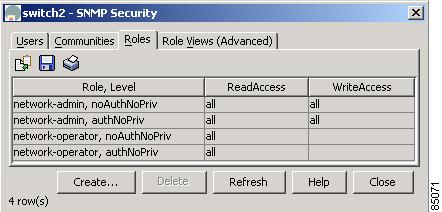
To configure users roles, choose SNMP from the Device Manager Security menu, and click the Roles tab. See Figure 5-5.
Figure 5-5 Security > SNMP > Roles Dialog Box, Device Manager
This dialog box shows the display-only information described in Table 5-5.
To create a new role, follow these steps:
Step 1
The system displays the dialog box shown in Figure 5-6.
Figure 5-6 Create Role, Device Manager
Step 2
Step 3
•
•
Step 4
Step 5
Step 6
Role Views (Advanced)
To see role views from the Device Manager, choose SNMP from the Security menu, and click the Role Views (Advanced) tab.
The dialog box shows the display-only information described in Table 5-6.
Configuring RADIUS Security for CLI Access
This section describes how to configure RADIUS servers for managing administrative access to the CLI. It includes the following topics:
•
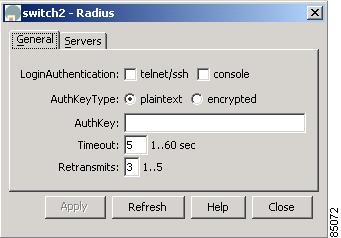
Configuring RADIUS Authentication
To configure RADIUS authentication from the Fabric Manager, choose Radius > General from the menu tree. To configure RADIUS authentication from the Device Manager, choose Radius (CLI) from the Security menu. Figure 5-7 shows the dialog box with the General tab selected from the Device Manager.
Figure 5-7 Security > Radius Dialog Box, Device Manager
Table 5-7 describes the configurable attributes for RADIUS authentication.
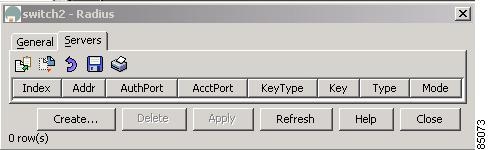
Configuring RADIUS Servers
To configure RADIUS servers from the Device Manager, choose Radius from the Security menu and click the Servers tab. To configure RADIUS servers from the Fabric Manager, choose Radius > Servers from the menu tree. Figure 5-8 shows the dialog box with the Servers tab selected from the Device Manager.
Figure 5-8 Security > Radius > Servers Dialog Box, Device Manager
Table 5-8 describes the configurable attributes for RADIUS servers.
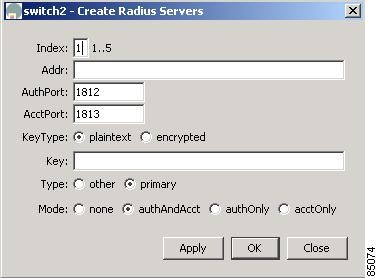
To add a Radius server, click Create on the Device Manager dialog box, or click the Create Row button on the Fabric Manager toolbar.
From Device Manager, you see the dialog box shown in Figure 5-9.
Figure 5-9 Create Radius Server, Device Manager
The dialog box from Fabric Manager lets you specify the switches to which the configuration applies
See Table 5-8 for information about each field, complete the fields, and click OK.