Feedback
Table Of Contents
Managing External Identity Sources
Certificate Authentication Profiles
Adding or Editing a Certificate Authentication Profile
Key Features of the Integration of Cisco ISE and Active Directory
Integrating Cisco ISE with Active Directory
Enabling Active Directory Debug Logs
Configure Group Policy in Active Directory
Configure Odyssey 5.X Supplicant for EAP-TLS Machine Authentications Against Active Directory
Key Features of Integration of Cisco ISE and LDAP
Adding and Editing LDAP Identity Sources
Key Features of the Integration of Cisco ISE and RADIUS Identity Source
Adding or Editing a RADIUS Token Server
Deleting a RADIUS Token Server
Integrating Cisco ISE with RSA SecurID Server
Adding and Editing RSA Identity Sources
Creating Identity Source Sequences
Deleting Identity Source Sequences
Viewing and Monitoring the Identity Sources
Managing External Identity Sources
The Cisco Identity Services Engine (Cisco ISE) integrates with external identity sources to validate credentials in user authentication functions, and to retrieve group information and other attributes that are associated with the user for use in authorization policies. You must configure the external identity source that contains your user information in Cisco ISE. External identity sources also include certificate information for the Cisco ISE server and certificate authentication profiles.
Both internal and external identity sources can be used as the authentication source for sponsor authentication and also for authentication of remote guest users.
Table 5-1 lists the identity sources and the protocols that they support.
Table 5-1 Protocol Versus Database Support
Yes
Yes
Yes
Yes
MS-CHAP4 password hash:
MSCHAPv1/v25
EAP-MSCHAPv26
LEAP7
Yes
Yes
No
No
EAP-MD58
CHAP9
Yes
No
No
No
EAP-TLS10
PEAP-TLS11
(certificate retrieval)
Note
For TLS authentications (EAP-TLS and PEAP-TLS), identity sources are not required, but are optional and can be added for authorization policy conditions.
No
Yes
Yes
No
1 LDAP = Lightweight Directory Access Protocol.
2 EAP-GTC = Extensible Authentication Protocol-Generic Token Card
3 PAP = Password Authentication Protocol
4 MS-CHAP = Microsoft Challenge Handshake Authentication Protocol
5 MS-CHAPv1/v2 = Microsoft Challenge Handshake Authentication Protocol Version 1/Version 2
6 EAP-MSCHAPv2 = Extensible Authentication Protocol-Microsoft Challenge Handshake Authentication Protocol Version 2
7 LEAP = Lightweight Extensible Authentication Protocol
8 EAP-MD5 = Extensible Authentication Protocol-Message Digest 5
9 CHAP = Challenge-Handshake Authentication Protocol
10 EAP-TLS = Extensible Authentication Protocol-Transport Layer Security
11 PEAP-TLS = Protected Extensible Authentication Protocol-Transport Layer Security
This chapter describes how you can configure the following identity sources and certificate authentication profiles in Cisco ISE and contains the following topics:
•
•
•
•
Certificate Authentication Profiles
Certificate authentication profiles are used in authentication policies for certificate-based authentications in place of identity sources to verify the authenticity of the user. The certificate authentication profiles allow you to specify the following items:
•
•
The Certificate Authentication Profiles page lists the certificate authentication profiles that you have added.
For more information:
Adding or Editing a Certificate Authentication Profile
Adding or Editing a Certificate Authentication Profile
Prerequisite:
Every Cisco ISE administrator account is assigned one or more administrative roles. To perform the operations described in the following procedure, you must have one of the following roles assigned: Super Admin or System Admin. See Cisco ISE Admin Group Roles and Responsibilities for more information on the various administrative roles and the privileges associated with each of them.
To add or edit a certificate authentication profile, complete the following steps:
Step 1
Step 2
The Certificate Authentication Profile page appears.
Step 3
•
•
•
Step 4
•
•
•
–
–
–
–
–
–
–
•
If you check this check box, you must choose the LDAP or Active Directory identity source from the available list.
•
Step 5
Next Steps:
1.
2.
Microsoft Active Directory
Cisco ISE uses Active Directory as an external identity source to access resources such as users, machines, groups, and attributes. You can configure Cisco ISE to authenticate users and machines. This section contains the following topics:
•
•
•
Note
Key Features of the Integration of Cisco ISE and Active Directory
Supported Authentication Protocols
•
•
•
•
•
•
•
•
Refer to the Release Notes for the Cisco Identity Services Engine, Release 1.0 for a list of Windows Server Operating Systems that support Active Directory services.
Directory Service
Active Directory is a directory service that allows for central administration and management of user accounts, clients, and servers. Active Directory can interoperate with other directory services such as Lightweight Directory Access Protocol (LDAP) and is mostly used in distributed networking environments.
User Authentication
User authentication provides network access to only those users who are listed in Active Directory.
Machine Authentication
Machine authentication provides access to network services to only those devices that are listed in Active Directory.
Attribute Retrieval for Authorization
You can configure Cisco ISE to retrieve user or machine Active Directory attributes to be used in authorization rules. The attributes are mapped to the Cisco ISE policy results and determine the authorization level for the user or machine. Cisco ISE retrieves user and machine Active Directory attributes after a successful user or machine authentication and can also retrieve the attributes for an authorization that is independent of authentication.
Group Retrieval for Authorization
Cisco ISE can retrieve user or machine groups from Active Directory after a successful authentication. Cisco ISE can also retrieve the user or machine group that is independent of authentication for authorization. You can use the Active Directory group data for authorization and introduce special conditions to match them against the retrieved groups.
Certificate Retrieval for EAP-TLS Authentication
Cisco ISE supports certificate retrieval for user or machine authentication that uses the EAP-TLS protocol. The user or machine record on Active Directory includes a certificate attribute of the binary data type. This certificate attribute can contain one or more certificates. Cisco ISE identifies this attribute as userCertificate and does not allow you to configure any other name for this attribute. Cisco ISE retrieves this certificate and uses it to verify the identity of the user or machine. The certificate authentication profile determines the field to be used for retrieving the certificates. For example, Subject Alternative Name (SAN), Common Name, or Social Security Number (SSN). After Cisco ISE retrieves the certificate, it performs a binary comparison of this certificate with the client certificate. When multiple certificates are received, Cisco ISE compares the certificates to check for one that matches. When a match is found, Cisco ISE grants the user or machine access to the network.
User Access Restriction
While authenticating or querying a user, Cisco ISE checks for the following:
•
•
•
•
If the user has one of these limitations, the Active Directory Identifier::IdentityAccessRestricted attribute on the Active Directory dictionary is set to indicate that the user has restricted access. You can use this attribute in all policy rules.
Active Directory identifier is the name that you enter for the Active Directory identity source.
Support for Multidomain Forests
Cisco ISE supports multidomain forests. Cisco ISE connects to a single domain, but can access resources from the other domains in the Active Directory forest if trust relationships are established between the domain to which Cisco ISE is connected and the other domains.
For more information:
•
•
Integrating Cisco ISE with Active Directory
Prerequisites:
Before you connect your Cisco ISE server with the Active Directory domain, you must check the following:
•
Refer to the Cisco Identity Services Engine CLI Reference Guide, Release 1.0 for information on how to configure the NTP server settings from the CLI.
•
LDAP
389 (UDP)
SMB1
445 (TCP)
KDC2
88 (TCP)
Global Catalog
3268 (TCP), 3289
KPASS
464 (TCP)
NTP
123 (UDP)
LDAP
389 (TCP)
LDAPS3
636 (TCP)
1 SMB = Server Message Block
2 KDC = Kerberos Key Distribution Center
3 LDAPS = Lightweight Directory Access Protocol over TLS/SSL
•
•
•
–
–
–
After you join your Cisco ISE server to the Active Directory domain, you might still need the permissions discussed previously to do the following:
–
–
–
•
•
•
This section contains the following topics:
•
•
•
•
Connecting to the Active Directory Domain
To connect to an Active Directory domain, complete the following steps:
Step 1
Step 2
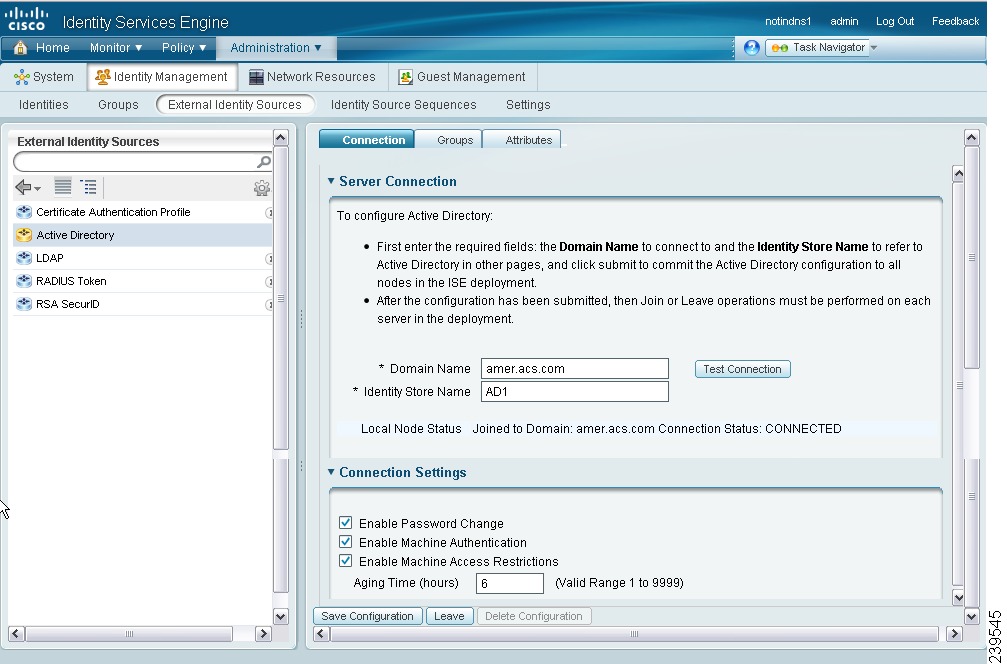
The Active Directory pages appear as shown in Figure 5-1.
Figure 5-1 Active Directory Connections Page
Step 3
Step 4
Step 5
Saving the configuration saves the Active Directory domain configuration globally (in the primary as well as the secondary policy service nodes), but none of the Cisco ISE nodes will be joined to the domain.
Note
Step 6
Step 7
A dialog box appears with the status of the test connection operation.
Step 8
Step 9
The Join Domain dialog box appears.
Step 10
Note
After your Cisco ISE server is joined to a domain, you will get the following success message:
Status: Join Operation Succeeded
Note
Step 11
Step 12
Step 13
Step 14
This value specifies the expiration time for machine authentication. If the time expires, the user authentication fails. For example, if you have enabled MARs and enter a value of 2 hours, the user authentication fails if the user tries to authenticate after 2 hours.
Step 15
Next Steps:
1.
2.
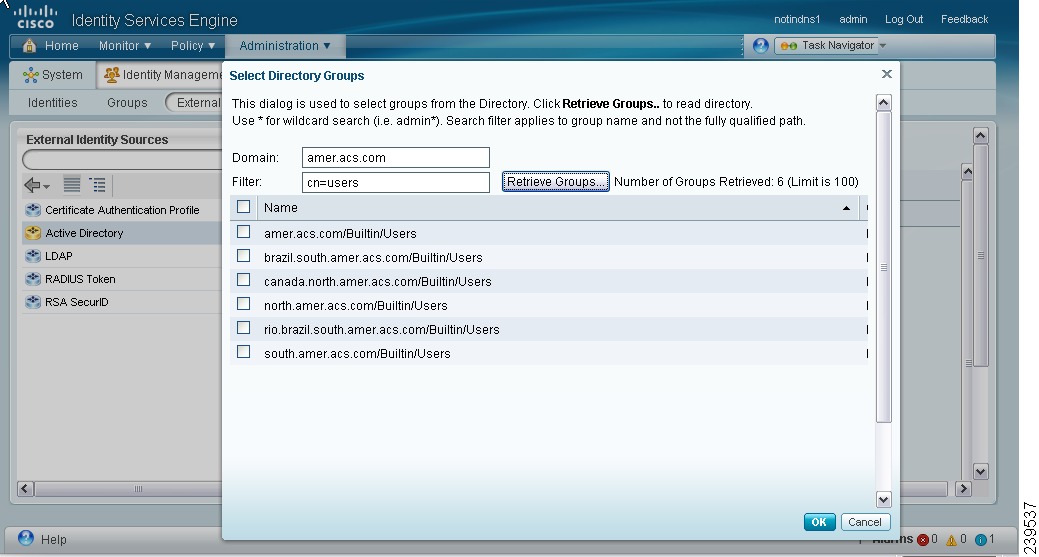
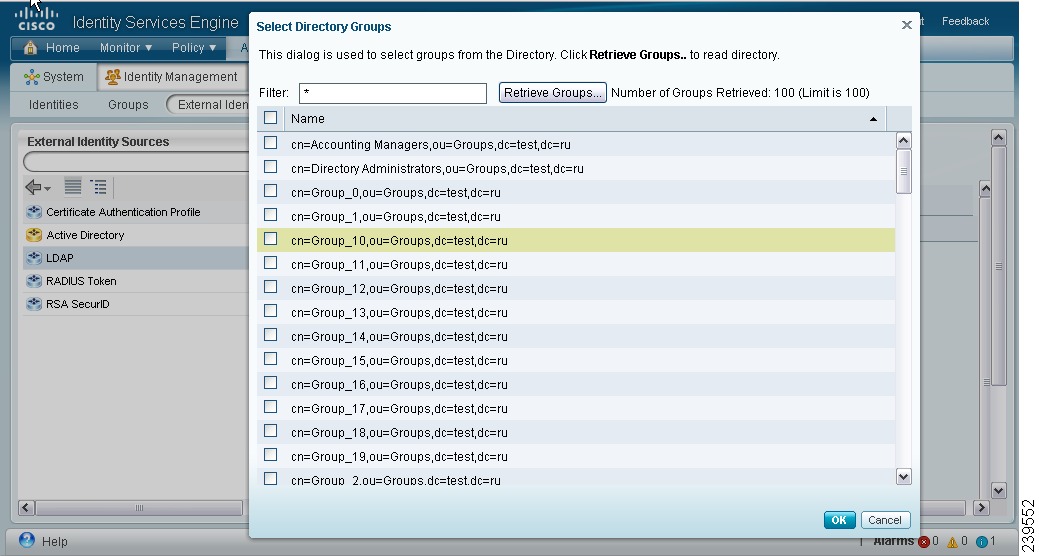
Configuring Active Directory Groups
To configure Active Directory groups that will be available for use in authorization policy conditions, complete the following steps:
Step 1
Step 2
Step 3
Step 4
The Groups page appears. The groups that you configure in this page will be available for use in policy conditions.
Step 5
•
•
Figure 5-2 Active Directory Groups Page
Step 6
You will return to the Groups page. The groups that you have selected appear in the Groups page.
a.
The following message appears:
"Are you sure you want to delete?"
b.
Next Step:
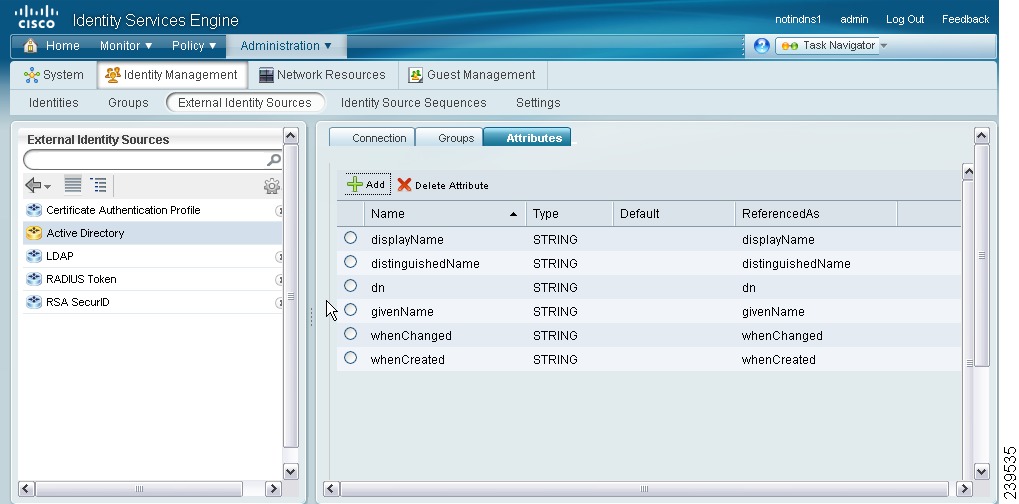
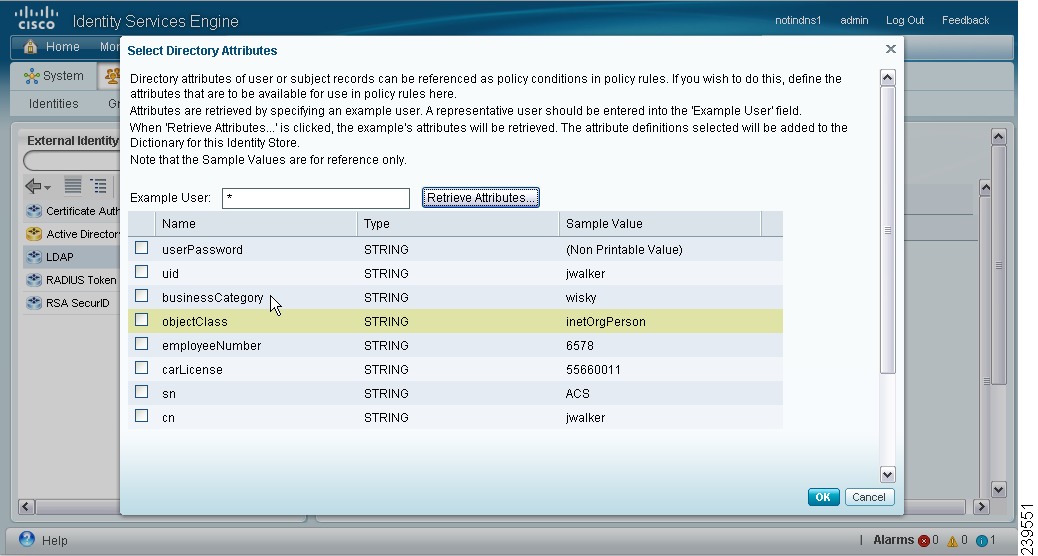
Configuring Active Directory Attributes
Configuring Active Directory Attributes
To configure Active Directory attributes that will be available for use in authorization policy conditions, complete the following steps:
Step 1
Step 2
Step 3
Step 4
Step 5
•
•
Note
•
Step 6
The Attributes page appears. The attributes that you have selected will appear in this page as shown in Figure 5-3.
Figure 5-3 Selected Active Directory Attributes
To remove any attribute that you do not want to use in policy conditions, click the radio button next to the attribute and click Delete Attribute.
Next Steps:
1.
2.
Leaving the Active Directory Domain
Note
To leave the Active Directory domain, complete the following steps:
Step 1
Step 2
Step 3
The Leave Domain dialog box appears as shown in Figure 5-4.
Figure 5-4 Leave Domain Dialog Box
Step 4
Note
Step 5
If you have checked the No Credentials Available check box, the primary Cisco ISE node will leave the Active Directory domain. The Active Directory administrator has to manually remove the entry that is made in the Active Directory database that was created during the join.
If you have entered the Active Directory credentials, the Cisco ISE will leave the Active Directory domain and delete the configuration from the Active Directory database.
Note
Deleting Active Directory Configuration
Prerequisites:
1.
2.
To remove the Active Directory configuration from Cisco ISE, complete the following steps:
Step 1
Step 2
The Active Directory page appears.
Note
Step 3
You have removed the configuration from the Active Directory database. If you want to use Active Directory at a later point in time, you can resubmit a valid Active Directory configuration.
Enabling Active Directory Debug Logs
Active Directory debug logs are not logged by default. You must enable this option on the Cisco ISE node that has assumed the Policy Service persona in your deployment from which you want to obtain debug information.
To enable Active Directory debug logs, complete the following steps:
Step 1
Step 2
The Node List window displays a list of nodes in your deployment.
Step 3
The Debug Level Configuration page appears.
Step 4
Step 5
Step 6
The log file is saved in the following location:
/opt/CSCOcpm/logs/ad_agent.log
To download the ad_agent.log file, complete the following steps:
Step 1
Step 2
Step 3
Step 4
Supplemental Information
This section provides pointers to help you:
•
•
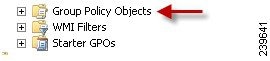
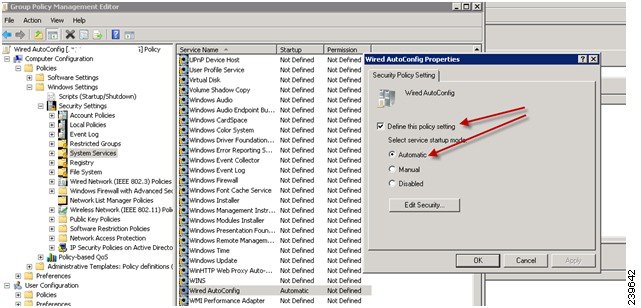
Configure Group Policy in Active Directory
This section provides pointers to set up a group policy for wired services. For more information about how to access the Group Policy management editor, refer to Microsoft Active Directory Documentation.
To configure group policy in Active Directory, complete the following steps:
1.
Figure 5-5 Group Policy Objects
2.
3.
Figure 5-6 Policy Properties
4.
Configure Odyssey 5.X Supplicant for EAP-TLS Machine Authentications Against Active Directory
If you are using the Odyssey 5.x supplicant for EAP-TLS machine authentications against Active Directory, you must configure the following in your Odyssey supplicant.
1.
2.
3.
4.
a.
b.
c.
d.
e.
If this option is enabled, the Odyssey supplicant sends the machine name in the format host\<machine_name> and Active Directory identifies the request as coming from a machine and will look up computer objects to perform authentication. If this option is disabled, the Odyssey supplicant sends the machine name without the host\ prefix and Active Directory will look up user objects and the authentication will fail.
LDAP
Lightweight Directory Access Protocol (LDAP), is a networking protocol defined by RFC 2251 for querying and modifying directory services that run on TCP/IP. LDAP is a lightweight mechanism for accessing an X.500-based directory server.
Cisco ISE integrates with an LDAP external database, which is also called an identity source, by using the LDAP protocol. See the "Adding and Editing LDAP Identity Sources" section for information about configuring an LDAP identity source.
This section contains the following topics:
•
•
Key Features of Integration of Cisco ISE and LDAP
This section contains the following:
•
Directory Service
The directory service is a software application, or a set of applications, for storing and organizing information about the users and resources of a computer network. You can use the directory service to manage user access to these resources. The LDAP directory service is based on a client-server model. A client starts an LDAP session by connecting to an LDAP server, and sends operation requests to the server. The server then sends its responses. One or more LDAP servers contain data from the LDAP directory tree or the LDAP backend database.
The directory service manages the directory, which is the database that holds the information. Directory services use a distributed model for storing information, and that information is usually replicated between directory servers.
An LDAP directory is organized in a simple tree hierarchy and can be distributed among many servers. Each server can have a replicated version of the total directory, which is synchronized periodically.
An entry in the tree contains a set of attributes, where each attribute has a name (an attribute type or attribute description) and one or more values. The attributes are defined in a schema.
Each entry has a unique identifier: its distinguished name (DN). This name contains the relative distinguished name (RDN), which is constructed from attributes in the entry, followed by the DN of the parent entry. You can think of the DN as a full filename, and the RDN as a relative filename in a folder.
Multiple LDAP Instances
You can create more than one LDAP instance in Cisco ISE. By creating more than one LDAP instance with different IP addresses or port settings, you can configure Cisco ISE to authenticate by using different LDAP servers or different databases on the same LDAP server. Each primary server IP address and port configuration, along with the secondary server IP address and port configuration, forms an LDAP instance that corresponds to one Cisco ISE LDAP identity source instance.
Cisco ISE does not require that each LDAP instance correspond to a unique LDAP database. You can have more than one LDAP instance set to access the same database. This method is useful when your LDAP database contains more than one subtree for users or groups. Because each LDAP instance supports only one subtree directory for users and one subtree directory for groups, you must configure separate LDAP instances for each user directory subtree and group directory subtree combination for which Cisco ISE should submit authentication requests.
Failover
Cisco ISE supports failover between a primary LDAP server and a secondary LDAP server. In the context of LDAP authentication with Cisco ISE, failover applies when an authentication request fails because Cisco ISE could not connect to an LDAP server. Failover can occur when the server is down or is otherwise unreachable by Cisco ISE. To use this feature, you must define the primary and secondary LDAP servers, and you must set failover settings.
If you establish failover settings and if the first LDAP server that Cisco ISE attempts to contact cannot be reached, Cisco ISE always attempts to contact the other LDAP server. The first server that Cisco ISE attempts to contact might not always be the primary LDAP server. Instead, the first LDAP server that Cisco ISE attempts to contact depends on the previous LDAP authentication attempts and on the value that you enter in the Failback Retry Delay box.
Note
LDAP Connection Management
Cisco ISE supports multiple concurrent LDAP connections. Connections are opened on demand at the time of the first LDAP authentication. The maximum number of connections is configured for each LDAP server. Opening connections in advance shortens the authentication time. You can set the maximum number of connections to use for concurrent binding connections. The number of opened connections can be different for each LDAP server (primary or secondary) and is determined based on the maximum number of administration connections configured for each server.
Cisco ISE retains a list of open LDAP connections (including the binding information) for each LDAP server that is configured in Cisco ISE. During the authentication process, the connection manager attempts to find an open connection from the pool. If an open connection does not exist, a new one is opened.
If the LDAP server closed the connection, the connection manager reports an error during the first call to search the directory, and tries to renew the connection. After the authentication process is complete, the connection manager releases the connection.
User Authentication
LDAP can be used as an external database against which Cisco ISE users authenticate. Cisco ISE supports plain password authentication of users. User authentication includes the following actions:
•
•
•
•
To authenticate a user, Cisco ISE sends a bind request to the LDAP server. The bind request contains the DN and password of the user in clear text. A user is authenticated when the DN and password of the user match the username and password in the LDAP directory.
Note
•
•
–
–
–
–
–
Authentication Using LDAP
Cisco ISE can authenticate a subject (user or host) against an LDAP identity source by performing a bind operation on the directory server to find and authenticate the subject. After a successful authentication, Cisco ISE can retrieve groups and attributes that belong to the subject whenever they are required. You can configure the attributes to be retrieved in the Cisco ISE user interface by choosing Administration > Identity Management > External Identity Sources > LDAP. These groups and attributes can be used by Cisco ISE to authorize the subject.
To authenticate a user or query the LDAP identity source, Cisco ISE connects to the LDAP server and maintains a connection pool. See the "LDAP Connection Management" section.
Binding Errors
Possible reasons for an LDAP server to return binding (authentication) errors include the following:
•
•
The following errors are logged as external resource errors, indicating a possible problem with the LDAP server:
•
•
•
•
The following error is logged as an Unknown User error:
•
The following error is logged as an Invalid Password error, where the user exists, but the password sent is invalid:
•
User Lookup
Cisco ISE supports the user lookup feature with the LDAP server. This feature allows you to search for a user in the LDAP database and retrieve information without authentication. The user lookup process includes the following actions:
•
•
•
MAC Address Lookup
Cisco ISE supports the MAC address lookup feature. This feature allows you to search for a MAC address in the LDAP database and retrieve information without authentication. The MAC address lookup process includes the following actions:
•
•
•
Group Membership Information Retrieval
For user authentication, user lookup, and MAC address lookup, Cisco ISE must retrieve the group membership information from LDAP databases. LDAP servers represent the association between a subject (a user or a host) and a group in one of the following two ways:
•
–
–
•
LDAP identity sources contain the following parameters for group membership information retrieval:
•
•
•
•
•
Attributes Retrieval
For user authentication, user lookup, and MAC address lookup, Cisco ISE must retrieve the subject attributes from LDAP databases. For each instance of an LDAP identity source, an identity source dictionary is created. These dictionaries support attributes of the following data types:
•
•
•
For unsigned integers and IPv4 attributes, Cisco ISE converts the strings that it has retrieved to the corresponding data types. If conversion fails or if no values are retrieved for the attributes, Cisco ISE logs a debug message, but does not fail the authentication or the lookup process.
You can optionally configure default values for the attributes that Cisco ISE can use when the conversion fails or when Cisco ISE does not retrieve any values for the attributes.
Certificate Retrieval
If you have configured certificate retrieval as part of user lookup, then Cisco ISE must retrieve the value of the certificate attribute from LDAP. To retrieve the value of the certificate attribute from LDAP, you must have previously configured the certificate attribute in the list of attributes to be accessed while configuring an LDAP identity source.
For information on how to add LDAP identity sources, see the "Adding and Editing LDAP Identity Sources" section.
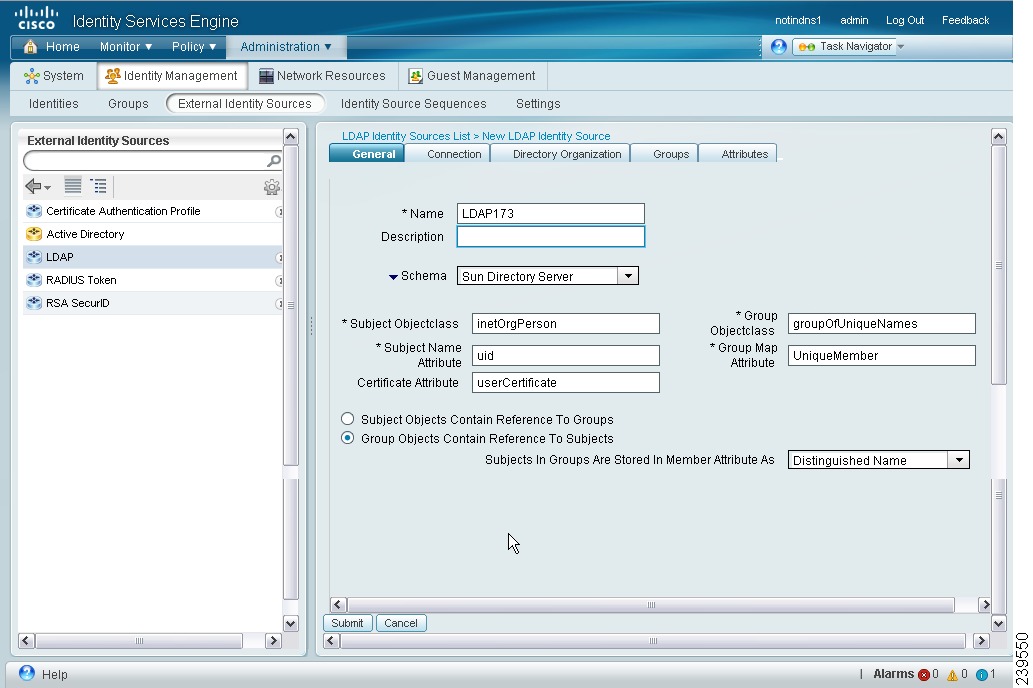
Adding and Editing LDAP Identity Sources
Prerequisites:
•
•
To create an LDAP identity source, complete the following steps:
Step 1
Step 2
Step 3
Step 4
Figure 5-7 LDAP General Tab
Step 5
Step 6
LDAP General Information
Table 5-2 lists the fields in the LDAP general tab and their descriptions.
You can edit an LDAP instance to accomplish the following tasks:
•
•
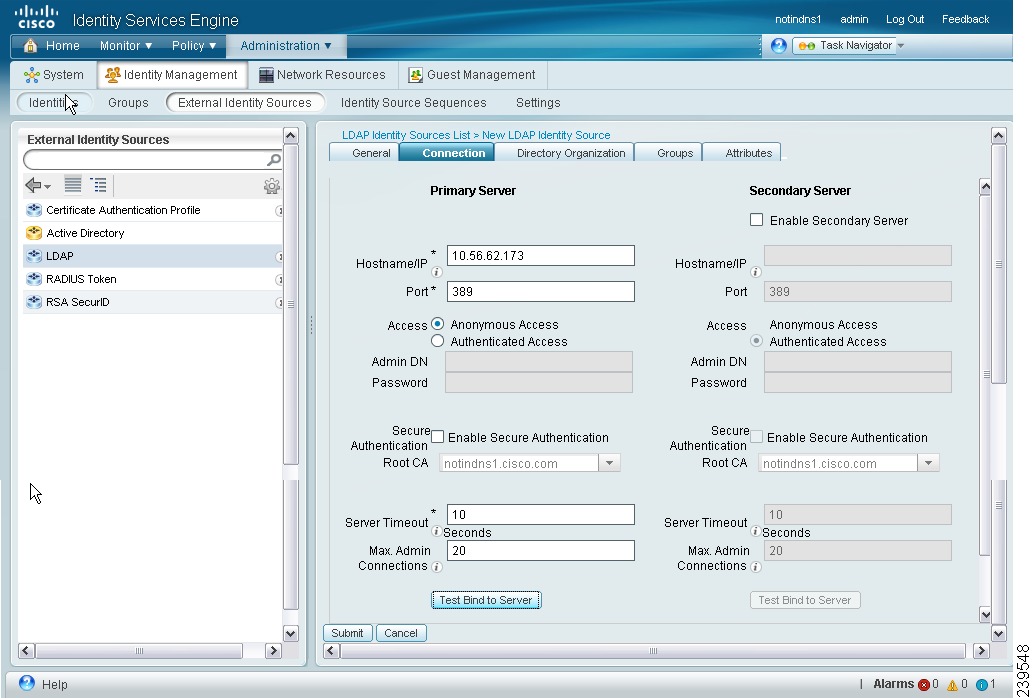
Configure LDAP Connection Settings
To connect to the LDAP server, complete the following steps:
Step 1
Step 2
The LDAP page appears.
Step 3
Step 4
A screen similar to the one shown in Figure 5-8 appears.
Figure 5-8 LDAP Connection Tab
Step 5
Step 6
LDAP Connection Settings
Table 5-3 lists the fields in the LDAP connection tab and their descriptions.
Table 5-3 LDAP Connection Tab
Enable Secondary Server
Check this option to enable the secondary LDAP server to be used as a backup in the event that the primary LDAP server fails. If you check this check box, you must enter configuration parameters for the secondary LDAP server.
Hostname/IP
(Required) Enter the IP address or DNS name of the machine that is running the LDAP software. The hostname can contain from 1 to 256 characters or a valid IP address expressed as a string. The only valid characters for hostnames are alphanumeric characters (a to z, A to Z, 0 to 9), the dot (.), and the hyphen (-).
Port
(Required) Enter the TCP/IP port number on which the LDAP server is listening. Valid values are from 1 to 65,535. The default is 389, as stated in the LDAP specification. If you do not know the port number, you can find this information from the LDAP server administrator.
Access
(Required) Anonymous Access—Click to ensure that searches on the LDAP directory occur anonymously. The server does not distinguish who the client is and will allow the client read access to any data that is configured as accessible to any unauthenticated client. In the absence of a specific policy permitting authentication information to be sent to a server, a client should use an anonymous connection.
Authenticated Access—Click to ensure that searches on the LDAP directory occur with administrative credentials. If so, enter information for the Admin DN and Password fields.
Admin DN
Enter the DN of the administrator. The Admin DN is the LDAP account that permits searching of all required users under the User Directory Subtree and permits searching groups. If the administrator specified does not have permission to see the group name attribute in searches, group mapping fails for users who are authenticated by that LDAP.
Password
Enter the LDAP administrator account password.
Secure Authentication
Click to use SSL to encrypt communication between Cisco ISE and the primary LDAP server. Verify that the Port field contains the port number used for SSL on the LDAP server. If you enable this option, you must choose a root CA.
Root CA
Choose a trusted root certificate authority from the drop-down list box to enable secure authentication with a certificate.
See the "Certificate Authority Certificates" section on page 12-17 and "Adding a Certificate Authority Certificate" section on page 12-19 for information on CA certificates.
Server Timeout
Enter the number of seconds that Cisco ISE waits for a response from the primary LDAP server before determining that the connection or authentication with that server has failed. Valid values are 1 to 300. The default is 10.
Max. Admin Connections
Enter the maximum number of concurrent connections (greater than 0) with LDAP administrator account permissions that can run for a specific LDAP configuration. These connections are used to search the directory for users and groups under the User Directory Subtree and the Group Directory Subtree. Valid values are 1 to 99. The default is 20.
Test Bind to Server
Click to test and ensure that the LDAP server details and credentials can successfully bind. If the test fails, edit your LDAP server details and retest.
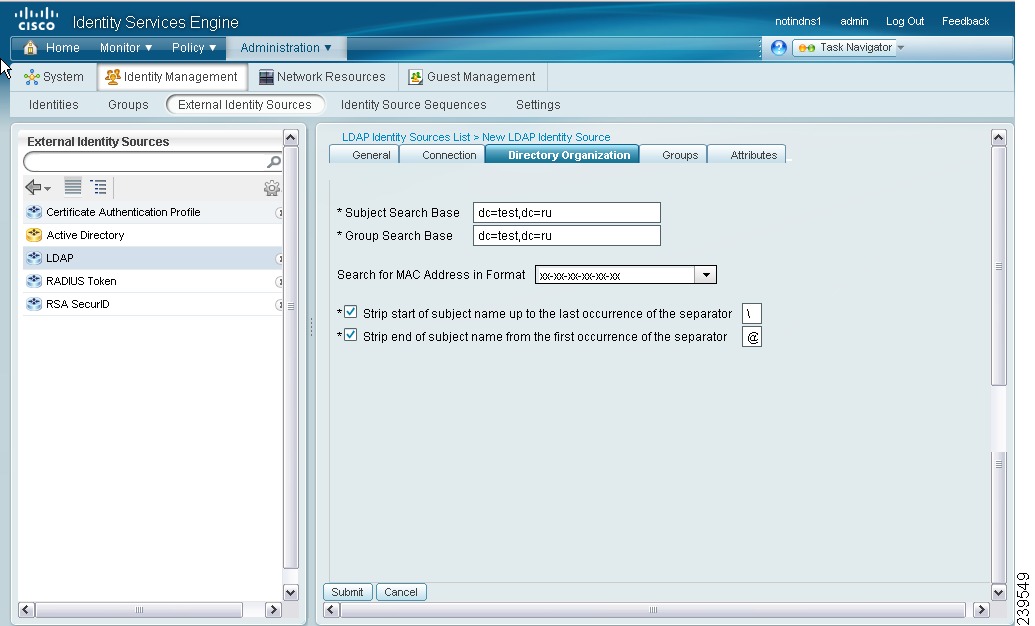
Configure Directory Organization Values
To configure directory organization values, complete the following steps:
Note
•
•
•
Step 1
Step 2
The LDAP page appears.
Step 3
Step 4
A screen similar to the one shown in Figure 5-9 appears.
Figure 5-9 LDAP Directory Organization Tab
Step 5
Step 6
LDAP Directory Organization Settings
Table 5-4 lists the fields in the LDAP directory organization tab and their descriptions.
Add LDAP Groups
To add LDAP groups, complete the following steps:
Step 1
Step 2
The LDAP page appears.
Step 3
Step 4
The Groups page appears.
Step 5
Step 6
Step 7
A screen similar to the one shown in Figure 5-10 appears.
Figure 5-10 LDAP Select Groups Page
Step 8
The groups that you have selected will appear in the Groups page.
Step 9
Select LDAP Attributes
To choose LDAP attributes, complete the following steps:
Step 1
Step 2
The LDAP page appears.
Step 3
Step 4
The Attributes page appears.
Step 5
Step 6
Step 7
Step 8
Figure 5-11 Select Directory Attributes Page
Step 9
The attributes that you have selected appear in the Attributes page.
Step 10
Next Steps:
1.
2.
RADIUS Token Identity Sources
A server that supports the RADIUS protocol and provides authentication, authorization, and accounting (AAA) services to users and devices is called the RADIUS server. The RADIUS identity source is simply an external identity source that contains a collection of subjects and their credentials and uses the RADIUS protocol for communication. For example, the Safeword token server is an identity source that can contain several users and their credentials as one-time passwords that provides an interface that you can query using the RADIUS protocol.
Cisco ISE supports any RADIUS RFC 2865-compliant server as an external identity source. Cisco ISE supports multiple RADIUS token server identities, for example, the RSA SecurID server and the SafeWord server. RADIUS identity sources can work with any RADIUS token server that is used to authenticate the user. RADIUS identity sources use the User Datagram Protocol (UDP) port for authentication sessions. The same UDP port is used for all RADIUS communication.
For Cisco ISE to successfully send RADIUS messages to a RADIUS-enabled server, you must ensure that the gateway devices between the RADIUS-enabled server and Cisco ISE allow communication over the UDP port. You can configure the UDP port through the Cisco ISE user interface.
This section contains the following topics:
•
•
Key Features of the Integration of Cisco ISE and RADIUS Identity Source
Supported Authentication Protocols
Cisco ISE supports the following authentication protocols for RADIUS identity sources:
•
•
•
Constraints
RADIUS token servers use the UDP port for authentication sessions. This port is used for all RADIUS communication. For Cisco ISE to send RADIUS one-time password (OTP) messages to a RADIUS-enabled token server, you must ensure that the gateway devices between Cisco ISE and the RADIUS-enabled token server allow communication over the UDP port.
RADIUS Shared Secret
You must provide a shared secret while configuring RADIUS identity sources in Cisco ISE. This shared secret should be the same as the shared secret that is configured on the RADIUS token server.
Failover
Cisco ISE allows you to configure multiple RADIUS identity sources. Each RADIUS identity source can have primary and secondary RADIUS servers. When Cisco ISE is unable to connect to the primary server, it uses the secondary server.
Password Prompt
RADIUS identity sources allow you to configure the password prompt. You can configure the password prompt through the Cisco ISE user interface.
User Authentication
Cisco ISE obtains the user credentials (username and passcode) and passes them to the RADIUS token server. Cisco ISE also relays the results of the RADIUS token server authentication processing to the user.
User Attribute Cache
RADIUS token servers, by default, do not support user lookups. However, the user lookup functionality is essential for the following Cisco ISE features:
•
•
Cisco ISE caches the results of successful authentications to process user lookup requests for these features. For every successful authentication, the name of the authenticated user and the retrieved attributes are cached. Failed authentications are not written to the cache.
The cache is available in the memory at runtime and is not replicated between Cisco ISE nodes in a distributed deployment. You can configure the Time to Live (TTL) limit for the cache through the Cisco ISE user interface. You must enable the identity caching option and set the aging time in minutes. The cache is available in the memory for the specified amount of time.
RADIUS Identity Source in Identity Sequence
You can add the RADIUS identity source for authentication sequence in an identity source sequence. However, you cannot add the RADIUS identity source for attribute retrieval sequence because you cannot query the RADIUS identity source without authentication. Cisco ISE cannot distinguish among different error cases while authenticating with a RADIUS server. RADIUS servers return an Access-Reject message for all error cases. For example, when a user is not found in the RADIUS server, instead of returning a User Unknown status, the RADIUS server returns an Access-Reject message. You can, however, enable the Treat Rejects as Authentication Failed or User Not Found option, which is available in the RADIUS identity source pages of the Cisco ISE user interface.
Authentication Failure Messages
When a user is not found in the RADIUS server, the RADIUS server returns an Access-Reject message. Cisco ISE provides the option to configure this message through the Cisco ISE user interface as either Authentication Failed or User Not Found. However, this option returns a User Not Found message not only for cases where the user is not known, but for all failure cases.
Table 5-5 lists the different failure cases that are possible with RADIUS identity servers.
Username Special Format with SafeWord Server
The SafeWord token server supports authentication with the following username format:
Username—Username, OTP
As soon as Cisco ISE receives the authentication request, it parses the username and converts it to the following username:
Username—Username
The SafeWord token servers support both of these formats. Cisco ISE works with various token servers. While configuring a SafeWord server, you must check the SafeWord Server check box in the Cisco ISE user interface for Cisco ISE to parse the username and convert it to the specified format. This conversion is done in the RADIUS token server identity source before the request is sent to the RADIUS token server.
Authentication Request and Response
When Cisco ISE forwards an authentication request to a RADIUS-enabled token server, the RADIUS authentication request contains the following attributes:
•
•
•
Cisco ISE expects to receive any one of the following responses:
•
•
•
–
–
–
No other attributes are allowed in Access-Challenge.
For information on how to add RADIUS token servers, see the "Adding or Editing a RADIUS Token Server" section.
For information on how to delete RADIUS token servers, see the "Deleting a RADIUS Token Server" section.
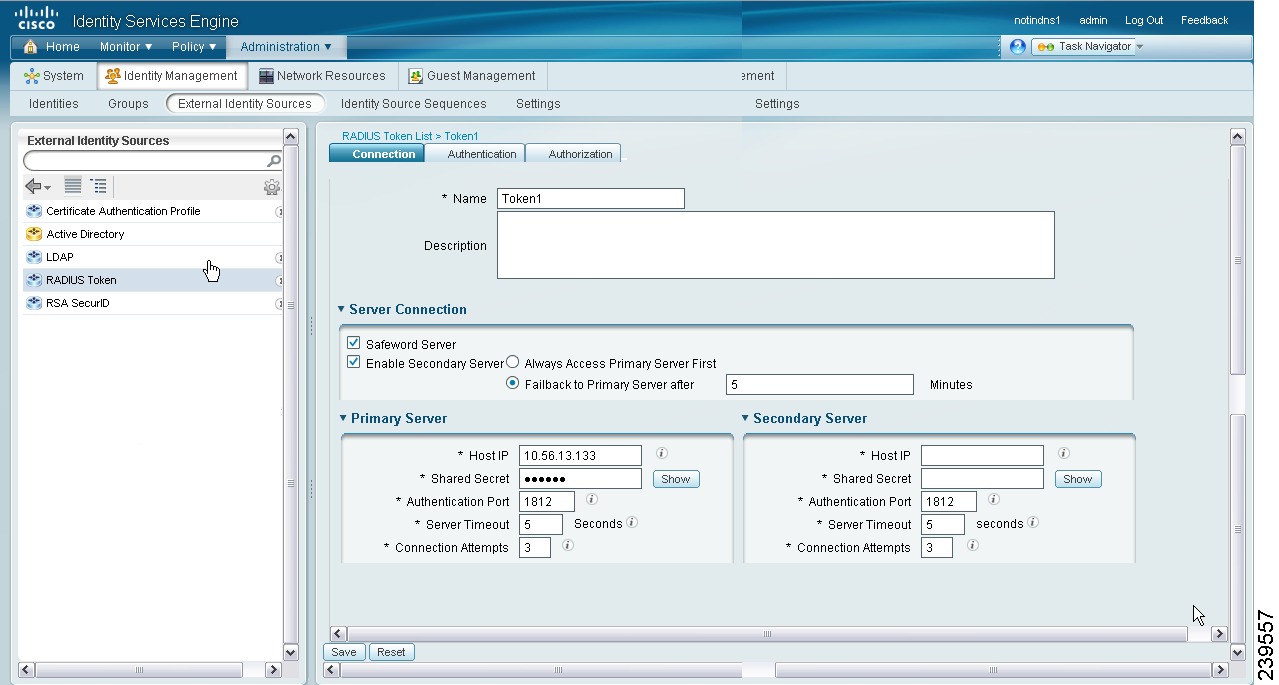
Adding or Editing a RADIUS Token Server
Prerequisite:
Every Cisco ISE administrator account is assigned one or more administrative roles. To perform the operations described in the following procedures, you must have one of the following roles assigned: Super Admin or System Admin. See Cisco ISE Admin Group Roles and Responsibilities for more information on the various administrative roles and the privileges associated with each of them.
To create or edit a RADIUS identity source, complete the following steps:
Step 1
Step 2
The RADIUS Token Identity Sources page appears.
Step 3
A screen similar to the one shown in Figure 5-12 appears.
Figure 5-12 RADIUS Token Server Prompts Tab
Step 4
Step 5
This tab allows you to control the responses to an Access-Reject message from the RADIUS token server. This response could either mean that the credentials are invalid or that the user is not known. Cisco ISE accepts either one of the following responses: Failed authentication or User not found. This tab also allows you to enable identity caching and to set the aging time for the cache. You can also configure a prompt to request the password.
Step 6
•
•
•
Step 7
This tab allows you to configure a name that will appear for this single attribute returned by the RADIUS token server while sending an Access-Accept response to Cisco ISE. This attribute can be used in authorization policy conditions. Enter a name for this attribute in the Attribute Name field. The default value is GroupIdentifier.
Step 8
RADIUS Token Server Connections
Table 5-6 lists the fields in the RADIUS Token Server Connections tab and their default values.
Next Steps:
1.
2.
Deleting a RADIUS Token Server
Prerequisites:
•
•
To delete a RADIUS identity source, complete the following steps:
Step 1
Step 2
The RADIUS Token Identity Sources page appears with a list of configured RADIUS token servers.
Step 3
Cisco ISE prompts you with the following message:
Are you sure you want to delete?
Step 4
Note
RSA Identity Sources
Cisco ISE supports the RSA SecurID server as an external database. RSA SecurID two-factor authentication consists of the PIN of the user and an individually registered RSA SecurID token that generates single-use token codes based on a time code algorithm. A different token code is generated at fixed intervals (usually each at 30 or 60 seconds). The RSA SecurID server validates this dynamic authentication code. Each RSA SecurID token is unique, and it is not possible to predict the value of a future token based on past tokens. Thus, when a correct token code is supplied together with a PIN, there is a high degree of certainty that the person is a valid user. Therefore, RSA SecurID servers provide a more reliable authentication mechanism than conventional reusable passwords.
Cisco ISE supports the following RSA identity sources:
•
•
You can integrate with RSA SecurID authentication technology in any one of the following ways:
•
•
The RSA SecurID token server in Cisco ISE integrates with the RSA SecurID authentication technology by using the RSA SecurID Agent.
Cisco Cisco ISE Version 1.0 supports only one RSA realm.
This section contains the following topics:
•
Integrating Cisco ISE with RSA SecurID Server
These are the two administrative roles involved in integrating Cisco ISE with an RSA SecurID server:
•
•
This section describes the processes that are involved in integrating Cisco ISE with the RSA SecurID server as an external identity source. For more information on RSA servers, please refer to the RSA documentation.
Configuring RSA in Cisco ISE
The RSA administrative system generates an sdconf.rec file, which the RSA system administrator will provide to you. This file allows you to add Cisco ISE servers as RSA SecurID agents in the realm. You have to browse and add this file to Cisco ISE. By the process of replication, the primary Cisco ISE server distributes this file to all the secondary servers.
Authenticating RSA Agents in Cisco ISE Against the RSA SecurID Server
After the sdconf.rec file is installed on all Cisco ISE servers, the RSA agent module initializes, and authentication with RSA-generated credentials proceeds on each of the Cisco ISE servers. After the agent on each of the Cisco ISE servers in a deployment has successfully authenticated, the RSA server and the agent module together download the securid file. This file resides in the Cisco ISE file system and is in a well-known place defined by the RSA agent.
Maintaining RSA Servers in Cisco ISE Deployment
After you have added the sdconf.rec file in Cisco ISE, the RSA SecurID administrator might have to update the sdconf.rec file in case of decommissioning an RSA server or adding a new RSA secondary server. The RSA SecurID administrator will provide you with an updated file. You can then reconfigure Cisco ISE with the updated file. The replication process in Cisco ISE distributes the updated file to the secondary Cisco ISE servers in the deployment. Cisco ISE first updates the file in the file system and coordinates with the RSA agent module to phase the restart process appropriately. When the sdconf.rec file is updated, the sdstatus.12 and securid files are reset (deleted).
Overriding Automatic RSA Routing
You can have more than one RSA server in a realm. The sdopts.rec file performs the role of a load balancer. Cisco ISE servers and RSA SecurID servers operate through the agent module. The agent module that resides on Cisco ISE maintains a cost-based routing table to make the best use of the RSA servers in the realm. You can, however, choose to override this routing with a manual configuration. You can override with a manual configuration for each Cisco ISE server for the realm using a text file called sdopts.rec through the Cisco ISE user interface. Refer to the RSA documentation for information on how to create this file.
Resetting an RSA Node Secret
The securid file is a secret node key file. When RSA is initially set up, it uses a secret to validate the agents. When the RSA agent that resides in Cisco ISE successfully authenticates against the RSA server for the first time, it creates a file on the client machine called securid and uses it to ensure that the data exchanged between the machines is valid. At times, you may have to delete the securid file from a specific Cisco ISE server or a group of servers in your deployment (for example, after a key reset on the RSA server). You can use the Cisco ISE user interface to delete this file from an Cisco ISE server for the realm. When the RSA agent in Cisco ISE authenticates successfully the next time, it creates a new securid file.
Resetting an RSA Automatic Availability
The sdstatus.12 file provides information about the availability of RSA servers in the realm. For example, it provides information on which servers are active and which are down. The agent module works with the RSA servers in the realm to maintain this availability status. This information is serially listed in the sdstatus.12 file, which is sourced in a well-known location in the Cisco ISE file system. Sometimes this file becomes old and the current status is not reflected in this file. You must remove this file so that the current status can be re-created. You can use the Cisco ISE user interface to delete the file from a specific Cisco ISE server for a specific realm. Cisco ISE coordinates with the RSA agent and ensures correct restart phasing.
The availability file sdstatus.12 will be deleted whenever the securid file is reset, or the sdconf.rec or sdopts.rec files are updated.
Distributed Environment Considerations
Managing RSA identity sources in a distributed Cisco ISE environment involves the following:
•
•
For more information, see the following topics:
•
•
•
Adding and Editing RSA Identity Sources
To create or edit an RSA identity source, you must import the RSA configuration file (sdconf.rec). See the "Importing the RSA Configuration File" section for more information.
Prerequisites:
1.
2.
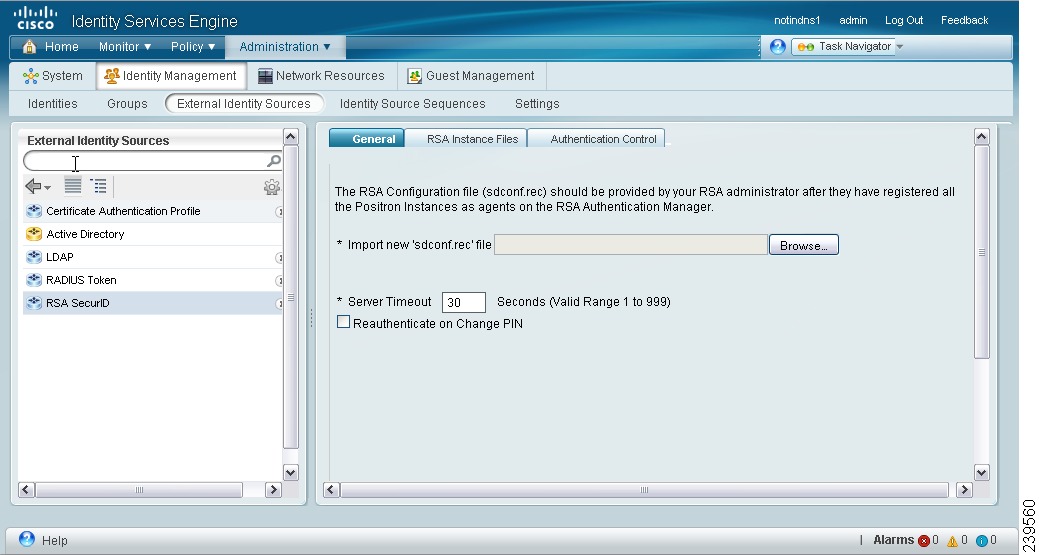
Importing the RSA Configuration File
To configure general RSA settings, complete the following steps:
Step 1
Step 2
Step 3
The RSA General tab appears as shown in Figure 5-13.
Figure 5-13 RSA General Tab
Step 4
When you create the RSA identity source for the first time, the Import new sdconf.rec file field will be a mandatory field. From then on, you can replace the existing sdconf.rec file with an updated one, but replacing the existing file is optional.
Step 5
Step 6
Step 7
Cisco ISE also supports the following scenarios:
•
•
Configuring the Options File for a Cisco ISE Server and Resetting SecurID and sdstatus.12 Files
To configure the sdopts.rec file, and to reset the securid and sdstatus.12 files, complete the following steps:
Step 1
Step 2
Step 3
Step 4
Step 5
Figure 5-14 RSA Instance Files Tab
This page lists the sdopts.rec files for all the Cisco ISE servers in your deployment.
Step 6
A screen similar to the one shown in Figure 5-15 appears.
Figure 5-15 RSA Options File
The existing file is displayed in the Current File region (display only).
Step 7
•
•
Step 8
Step 9
Figure 5-16 Resetting securid and sdstatus.12 Files
Step 10
Note
Step 11
Step 12
Configuring Authentication Control Options
You can use this page to specify how Cisco ISE defines authentication failures and to enable identity caching. The RSA identity source does not differentiate between "Authentication failed" and "User not found" errors and sends an Access-Reject response.
You can define how such failures should be handled by Cisco ISE for processing requests and for reporting failures. Identity caching enables Cisco ISE to process requests that fail to authenticate against the Cisco ISE server a second time. The results and the attributes retrieved from the previous authentication are available in the cache.
To configure authentication control options, complete the following steps:
Step 1
Step 2
Step 3
The Authentication Control tab appears as shown in Figure 5-17.
Figure 5-17 Authentication Control Tab
Step 4
•
•
Step 5
Next Steps:
1.
2.
For more information:
Configuring RSA Prompts
Cisco ISE allows you to configure RSA prompts that will be presented to the user while processing requests to the RSA SecurID server.
Prerequisite:
Every Cisco ISE administrator account is assigned one or more administrative roles. To perform the operations described in the following procedures, you must have one of the following roles assigned: Super Admin or System Admin. See Cisco ISE Admin Group Roles and Responsibilities for more information on the various administrative roles and the privileges associated with each of them.
To configure the RSA prompts, complete the following steps:
Step 1
Step 2
The RSA SecurID Identity Sources list page appears.
Step 3
The RSA Prompts page appears with the default prompts as shown in Figure 5-18.
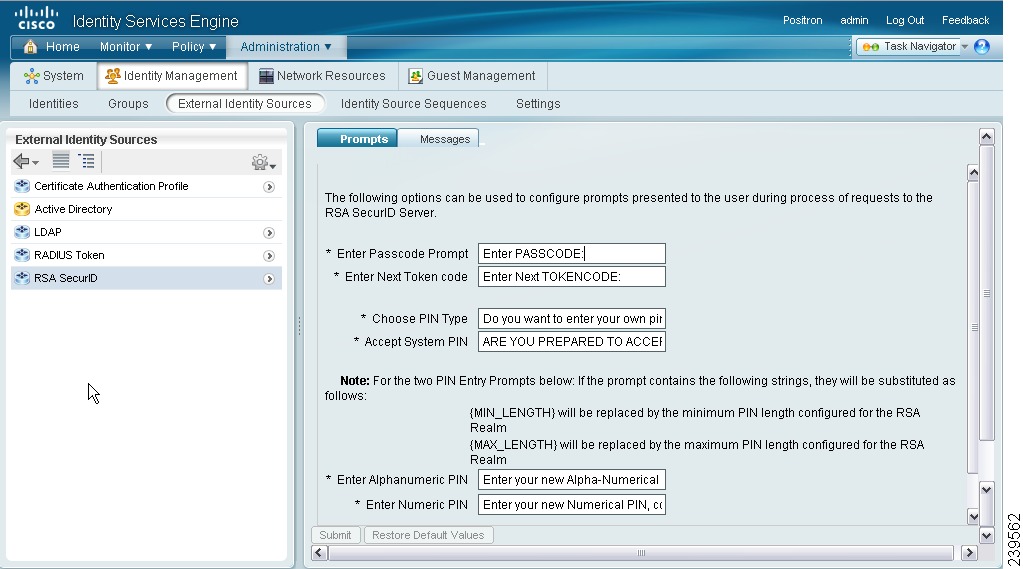
Figure 5-18 RSA Prompts Configuration Page
Step 4
Step 5
RSA Prompts
Table 5-7 lists the fields in the RSA prompts tab and their default values.
1 For the prompts, enter a string with a maximum length of 256 characters.
Next Step:
See the "Configuring RSA Messages" section for the next steps.
Configuring RSA Messages
Cisco ISE allows you to configure the messages that are presented to the user while processing requests to the RSA SecurID server.
Prerequisite:
Every Cisco ISE administrator account is assigned one or more administrative roles. To perform the operations described in the following procedures, you must have one of the following roles assigned: Super Admin or System Admin. See Cisco ISE Admin Group Roles and Responsibilities for more information on the various administrative roles and the privileges associated with each of them.
To configure the RSA messages, complete the following steps:
Step 1
Step 2
The RSA SecurID Identity Sources list page appears.
Step 3
The RSA Prompts page appears.
Step 4
The RSA Messages tab appears as shown in Figure 5-19.
Figure 5-19 RSA Messages Tab
Step 5
Step 6
RSA Messages
Table 5-8 lists the fields in the RSA messages tab and their default values.
Identity Source Sequences
Identity source sequences define the order in which Cisco ISE will look for user credentials in the different databases. Cisco ISE supports the following databases:
•
•
•
•
•
•
•
If you have your user information in more than one of these databases that are connected to your Cisco ISE, you can define the order in which you want Cisco ISE to look for user information in these databases. Once a match is found, Cisco ISE does not look any further, but evaluates the credentials, and returns the result to the user. This policy is the first match policy.
This section contains the following topics:
•
•
Creating Identity Source Sequences
Prerequisites:
1.
2.
To define an identity source sequence, complete the following steps:
Step 1
The Identity Source Sequences page appears with a list of identity source sequences that you have defined.
Step 2
Step 3
Step 4
Step 5
button to move it to the Selected list box. You can add more databases to the Selected list box if you want. You can click the
button to move all the databases from the Available list to the Selected list.
Step 6
) or move down (
) buttons.
Step 7
•
•
Step 8
Note
Note
Next Steps:
See the "Configuring the Simple Authentication Policy" section on page 15-25 and the "Configuring the Rule-Based Authentication Policy" section on page 15-28 for information on how to use the identity source sequence in authentication policies.
Deleting Identity Source Sequences
Prerequisite:
1.
2.
To delete an identity source sequence, complete the following steps:
Step 1
The Identity Source Sequences page appears with a list of identity source sequences that you have defined.
Step 2
Note
The following message appears:
"Are you sure you want to delete?"
Step 3
Viewing and Monitoring the Identity Sources
Cisco ISE provides information about the identity sources through the following:
Prerequisite:
Every Cisco ISE administrator account is assigned one or more administrative roles. To view the reports in Cisco ISE, you must have one of the following roles assigned: Super Admin or Helpdesk Admin or Monitoring Admin. See Cisco ISE Admin Group Roles and Responsibilities for more information on the various administrative roles and the privileges associated with each of them.
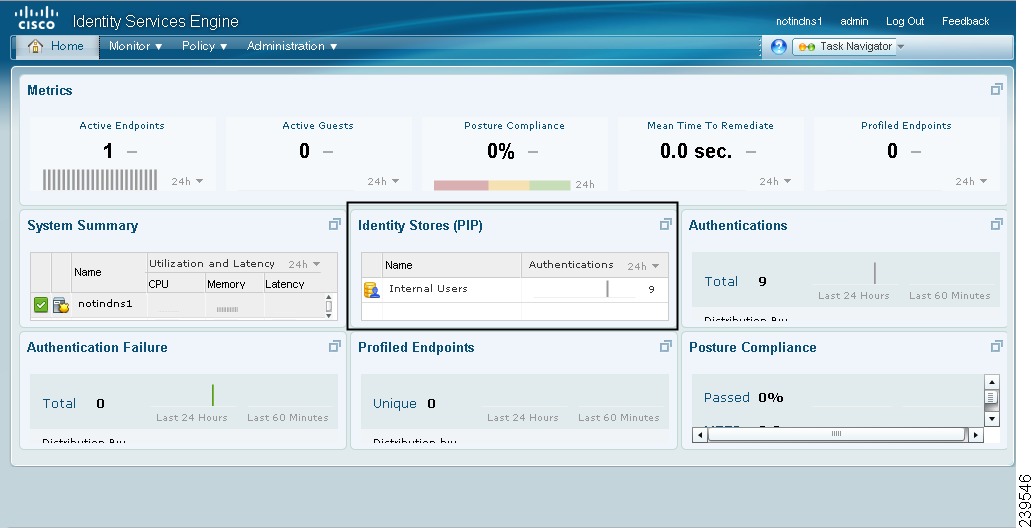
Cisco ISE Dashboard
Cisco ISE provides an at-a-glance view of identity source-related information in a dashlet that appears on the Cisco ISE dashboard. Figure 5-20 shows the Cisco ISE dashboard and the Identity Sources dashlet that provides statistical data.
Figure 5-20 Cisco ISE Dashboard
Click the
icon in the Identity Sources dashlet to view the details in a new window. You can drill down further for granular information.
For more information on the Cisco ISE dashboard and how to work with it, see the "Cisco ISE Dashboard Monitoring" section on page 22-3.
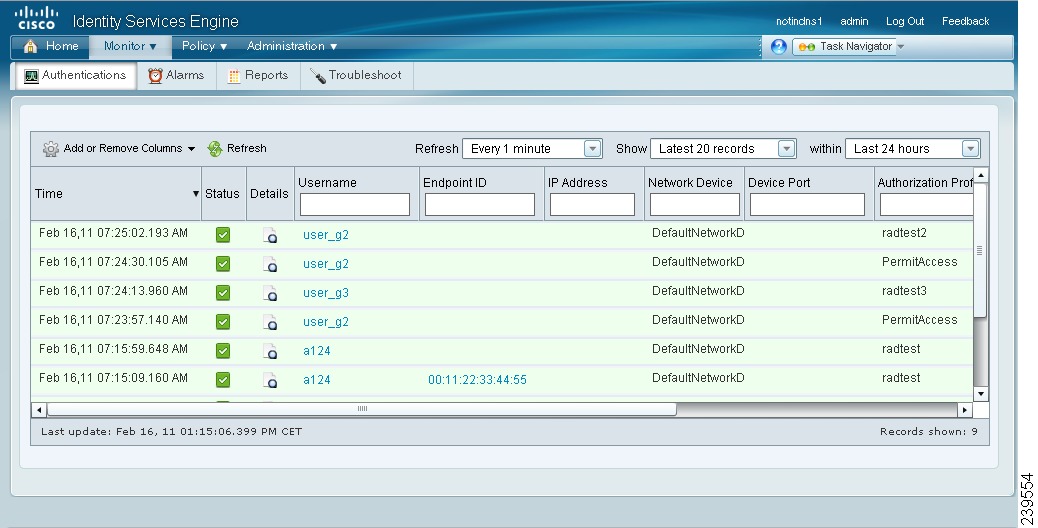
Live Authentications
From the Live Authentications page, you can drill down to find more information including failure reasons.
Figure 5-21 shows the live authentications page and highlights the magnifier icon that you must click to drill down for details.
Figure 5-21 Live Authentications Page
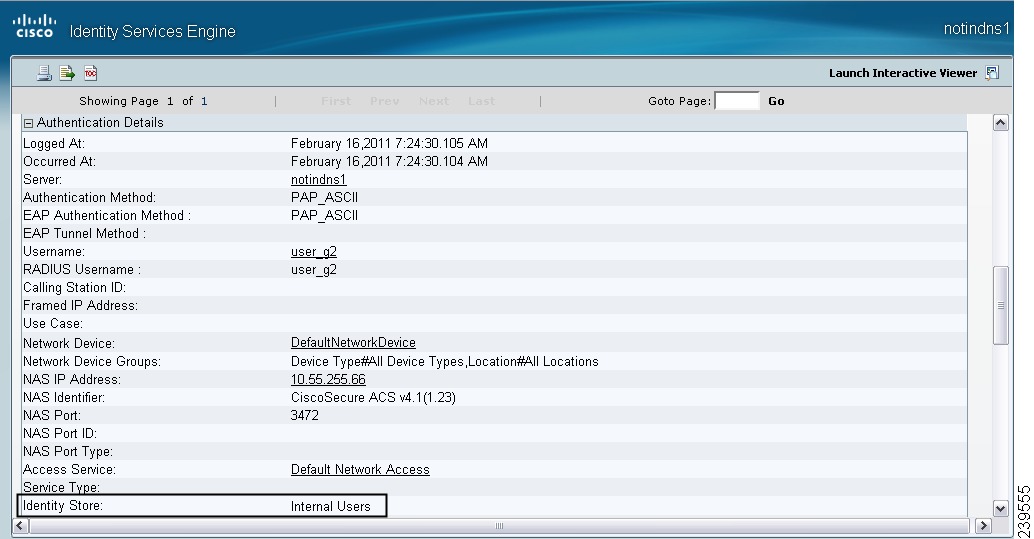
Figure 5-22 shows the drill-down view that identifies the identity source that was used for authentication.
Figure 5-22 Drill-Down View of Live Authentications Page
For more information on the Live Authentications page, see the "Monitoring Live Authentications" section on page 22-25.
Reports
Cisco ISE provides various reports that include information about identity sources. Authentication, authentication summary, and top N reports allow you to query for information based on identity sources. Table 5-9 provides a list of reports that allow you to run a query and generate a report based on identity sources.
See the "Available Reports" section on page 23-42 for a description of these reports.
To run a query and generate a report, for example, the User Authentication Summary report, go to Monitor > Reports > Catalog. Click User from the type of reports listed on the left pane. Click the User Authentication Summary radio button and choose Run > Query And Run. Enter the username and any other search criteria that you want to use to run the report and click Run. A report similar to the one shown in Figure 5-23 appears.
Figure 5-23 User Authentication Summary Report
You can run any of the reports listed in Table 5-9 for information on authentication, authentication summary, or top N details based on identity sources.
For information on how to run, view, navigate, customize, export, and print these reports, see the following sections:
•
•