Feedback
Table Of Contents
WLC Interaction for Local WebAuth
Wired NAD Interaction for Central WebAuth
Wired NAD Interaction with Local WebAuth
Cisco ISE Guest Service Components
Cisco ISE Guest Service Applications
Guest High Availability and Replication
Operating System and Browser Support
Configuring Guest Policy Conditions
Creating a New Sponsor Group Policy
Creating and Editing Sponsor Groups
Mapping Active Directory Groups to Sponsor Groups
SMTP Server Settings for Email Notifications
Setting Ports for the Sponsor and Guest Portals
Configuring Language Templates
Adding and Editing a Language Template
Deleting an Existing Language Template
Configuring a Template to Create a Single Guest Account
Configuring a Template for Guest Notification
Sample HTML Code for Creating Portal Pages
Configuring Guest Portal Policy
Configuring Guest Password Policy
Adding, Editing, or Duplicating Time Profiles
Configuring Guest Username Policy
Monitoring Sponsor and Guest Activity
Guest Management
This chapter provides information on how to manage guest and sponsor accounts and create guest policies. This chapter contains:
•
Guest High Availability and Replication
•
•
•
•
•
Overview
The Cisco Identity Services Engine (ISE) Guest service allows guests, visitors, contractors, consultants, or customers to perform an HTTP or HTTPS login to access a network whether that network is a corporate intranet or the public Internet. The network is defined through a VLAN and downloadable access control list (DACL) configuration in the network access device (NAD).
The Cisco ISE Guest service allows any user with privileges to easily create temporary guest accounts and to sponsor guests. The Cisco ISE Guest Service performs full authentication of sponsors. The sponsors are users who create guest accounts. Cisco ISE allows sponsors to provide account details to the guest by printout, email, or short message service (SMS). The entire experience, from user account creation to guest network access, is stored for audit and reporting purposes.
When a guest user first attaches to the local network, either through a wireless or hard-wire connection, the user is placed in a segregated network with limited access. You can define this segregated network through the VLAN and DACL configuration on the wireless LAN controller (WLC) or NAD. In order for a guest user to function properly, the WLC or NAD must support captive HTTP and HTTPS portal login scenarios where login URLs can be mapped to RADIUS servers.
The Cisco ISE Guest Service offers a simple client configurable Sponsor Portal for creating and managing Guest User accounts.
Guest Service also supports default and customizable Guest Login Portals to handle Guest User login.
Guest service provisions a guest account for the amount of time specified when the account is created.
Functional Description
To gain full access to the network, the guest user uses a browser to make any HTTP or HTTPS request, for example, www.cisco.com or yahoo.com. Since the user has limited initial access, the WLC or NAD intercepts the HTTP request and redirects it to the Guest User Login portal. Here the Guest User Portal is configured as the captive portal in the case of WLC Local WebAuth. In the case of wired NAD, a URL-redirect value is returned to the NAD from Cisco ISE during an initial MAB lookup failure. The user is presented with a login page where they can enter username and password.
The Cisco ISE Guest Services support the following scenarios:
•
•
Wireless LAN Controller with Local WebAuth
In this scenario, the Guest User Login portal redirects the guest user's browser to request a login to the WLC. This request to login takes the form of an HTTP URL posted to the WLC and contains the user credentials. The WLC receives the user login request and authenticate the user using a configured RADIUS server which points to the Cisco ISE RADIUS server implementation.
For more details, see WLC Interaction for Local WebAuth.
Wired NAD with Central WebAuth
In this scenario, the guest user's credentials are added to the Cisco ISE session cache and a Change of Authorization (CoA) is requested with the NAD. The NAD makes a new authorization request to the Cisco ISE server and the session cache attributes are used to fully authenticate and authorize the guest user.
For more details, see Wired NAD Interaction for Central WebAuth.
Wired NAD with Local WebAuth
In this scenario, the Guest User Login portal redirects the guest user's browser to request a login to the switch. This request to login takes the form of an HTTP URL posted to the switch and contains the user credentials. The switch receives the user login request and authenticate the user using a configured RADIUS server which points to the Cisco ISE RADIUS server implementation.
Fro more details, see Wired NAD Interaction with Local WebAuth.
WLC Interaction for Local WebAuth
Before a user is authenticated, the WLC intercepts all HTTP request traffic and redirects the user to the guest user login portal. The admin configures the guest portal as an external web login portal with the WLC. This value points to the guest portal:
https://ip:8443/guestportal/portal.jsp.
The WLC redirects the user to this guest portal instead of it own internal portal. The guest enters the username and password into the portal, and perform the optional accept use policy (AU)P and change password. The guest portal will then redirect the client browser to the login URL supplied by the WLC in the initial portal redirection. This login URL contains the username and password of the URL and is directed to the WLC. The WLC takes these credentials and makes a RADIUS request to the Cisco ISE server to authenticate and authorize the user. The Cisco ISE then returns the network access to the user, based on the policies defined in the Cisco ISE server.
Wired NAD Interaction for Central WebAuth
If your client's machine is hard wired to a NAD, the guest service interaction takes the form of a failed MAB request that leads to a guest portal Central WebAuth login.
The Central WebAuth triggered by a MAB failure flow follows these steps:
1.
2.
3.
4.
5.
The NAD uses this value to redirect all client HTTP/HTTPS traffic on ports 8080 or 8443 to the URL-redirect value. The standard URL value in this case is:
https://ip:port/guestportal/gateway?sessionId=NetworkSessionId&action=cwa.
6.
7.
8.
9.
10.
11.
12.
Since there is no Client Provisioning or Posture Agent for Linux, guest portal redirects to Client Provisioning, which in turn redirects back to a guest authentication servlet to perform optional IP release/renew and then CoA.
13.
14.
15.
16.
Note
Wired NAD Interaction with Local WebAuth
The Wired NAD with Local WebAuth flow follows these steps:
1.
2.
3.
4.
Switch Configuration
HTML code for the login.html page is listed below. The IP address and port values must be changed to those being used by the Cisco ISE Policy Services nodes. The default port is 8443.
<!DOCTYPE HTML PUBLIC "-//W3C//DTD HTML 4.0 Transitional//EN"><HTML><head><title>ISE Guest Portal</title><meta Http-Equiv="Cache-Control" Content="no-cache"><meta Http-Equiv="Pragma" Content="no-cache"><meta Http-Equiv="Expires" Content="0"><meta http-equiv="content-type" content="text/html; charset=ISO-8859-1"><meta http-equiv="REFRESH" content="0;url=https://ip:port/guestportal/portal.jsp?switch_url=wired"></HEAD><BODY><center>Redirecting ... Login<br><br><a href="https://ip:port/guestportal/portal.jsp?switch_url=wired">ISE Guest Portal</a></center></BODY></HTML>To use web-based authentication, you must enable the HTTP server within the switch. You can enable the server for either HTTP or HTTPS. To do so, use the following commands:
Additional pages for success, expiry, and failure can also be upload to the NAD. These pages can contain any HTML the client desires, there are no Cisco ISE specific information required here.
Configure web authentication to display four substitute HTML pages to the user in place of the switch default HTML pages during web-based authentication.
To specify the use of your custom authentication proxy web pages, first store your custom HTML files on the switch flash memory. To copy your HTML files to the switch flash memory, run the following command on the switch:
copy tftp/ftp flash
After copying your HTML files to the switch, perform the following task in global configuration mode:
When configuring customized authentication proxy web pages, follow these guidelines:
•
•
•
•
•
•
•
•
Because the custom login page is a public web form, consider these guidelines for the page:
•
•
This example shows how to configure custom authentication proxy web pages:
Switch(config)# ip admission proxy http login page file flash:login.htmSwitch(config)# ip admission proxy http success page file flash:success.htmSwitch(config)# ip admission proxy http fail page file flash:fail.htmSwitch(config)# ip admission proxy http login expired page flash flash:expired.htmThis example shows how to verify the configuration of a custom authentication proxy web pages:
Switch# show ip admission configurationAuthentication proxy webpageLogin page : flash:login.htmSuccess page : flash:success.htmFail Page : flash:fail.htmLogin expired Page : flash:expired.htmAuthentication global cache time is 60 minutesAuthentication global absolute time is 0 minutesAuthentication global init state time is 2 minutesAuthentication Proxy Session ratelimit is 100Authentication Proxy Watch-list is disabledAuthentication Proxy Auditing is disabledMax Login attempts per user is 5Cisco ISE Guest Service Components
The Cisco ISE Guest service is composed of three main components:
Guest User
The guest user is the person who needs a guest user account to access the network.
Sponsor
The sponsor user is the person who creates the guest user account. This person is often an employee of the organization. For example, a lobby ambassador who creates and manages guest user accounts through a sponsor-oriented web portal. Cisco ISE authenticates sponsors through a local database, or through external Lightweight Directory Access Protocol (LDAP) or Microsoft Active Directory identity stores.
Admin
The admin user is the administrator who configures and maintains the Cisco ISE appliance.
Cisco ISE Guest Service Applications
The Cisco ISE Guest Services consists of three applications:
Cisco ISE Admin Portal
The admin portal facilitates in configuring global policies for the sponsor and guest users. You can configure user groups and policies from the admin portal. From the Cisco ISE Admin portal you can configure the following:
•
•
•
•
•
•
Sponsor Portal
The sponsor portal facilitates in creating and managing guest user accounts. The sponsor portal allows you to perform the following functions:
•
•
Guest User Portal
The Guest User Portal facilitates the guest user login and consists of the following elements.
•
•
•
•
•
•
Guest Licensing
Guest services are available in Cisco ISE with both basic and advanced licensing. When you first install Cisco ISE, you must enter a license through the Admin user interface. Until this license is entered both the Guest and Sponsor portals will return a HTTP 503 error response, suggesting that the service is not available.
For more information on Cisco ISE licensing, see Chapter 11, "Managing Licenses."
Guest High Availability and Replication
The Cisco ISE guest services make use of the Distributed Management System of the Cisco ISE to allow multiple Cisco ISE nodes to work in a deployment. In this deployment a single node is the master or the primary node where configurations are made for all of the nodes in the deployment. Configurations made on the primary node are replicated to the secondary nodes.
You must register a secondary node with the designated primary node in the deployment. Once a node is registered the primary database is replicated to the secondary and the secondary restarts as a node in the deployment.
The Cisco ISE guest services function on either a primary or secondary. When running on a secondary, changes to the guest user accounts made through the Guest or Sponsor portals are propagated to the primary for replication to the entire deployment.
Guest portals must be located on the same secondary nodes where the Cisco ISE Network Access is configured to handle RADIUS requests in the NAD.
For example, if node A is used to handle RADIUS requests for a NAD, the Guest portal must also be enabled on the same node A for the guest services to work correctly.
See "Guest Service Control" section for details on enabling guest services on a node.
The Sponsor portal should be allowed to work on any node in a deployment, as long as that node also has Policy Services functionality enabled. For Sponsor portal updates to occur, the primary node with Administration persona must be online. If the node with Administration persona is offline, you can only view the account details. You cannot make any changes to the account.
The Guest portal can run on a node that assumes the Policy Services persona when the primary node with Administration persona is offline. However, it has the following restrictions:
•
•
•
•
•
You can make Guest administration user interface action only from the primary Admin user interface. All configuration made for guest service is the same for all nodes in the deployment.
Multiportal uploads to the primary is replicated to the secondary nodes and installed as part of the standard data replication system.
Guest and Sponsor portal port number configuration is replicated to secondary nodes and the secondary node is restarted once the replication is complete.
Note
Guest Service Control
The Guest and Sponsor portal can be disabled on a Cisco ISE node through the Cisco ISE Admin user interface.
To enable or disable Guest and Sponsor portals on any node, complete the following steps:
Step 1
Deployment Nodes page appears, displaying all the Cisco ISE nodes in the deployment.
Step 2
Step 3
Operating System and Browser Support
Refer to the Cisco Identity Services Engine Network Component Compatibility document for information on operating systems and browsers supported by the Cisco ISE Guest services.
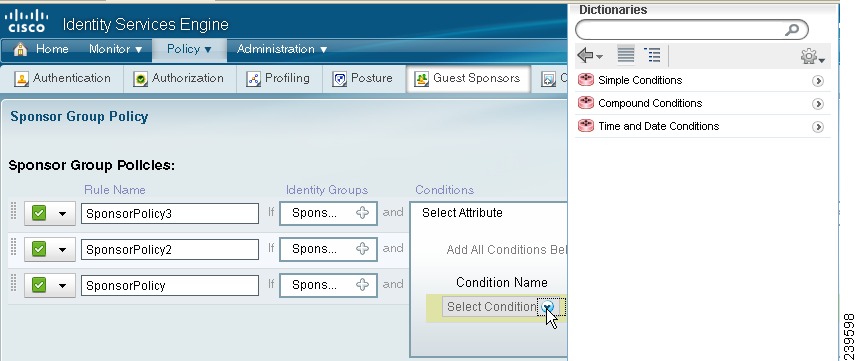
Configuring Guest Policy Conditions
Cisco ISE provides a way to create conditions that are individual, reusable policy elements that can be referred from other rule-based policies. You can create conditions from within the policy pages and as separate policy elements to be reused by other types of Cisco ISE policies such as Sponsor group or Client Provisioning policies. Whenever a policy is being evaluated, the conditions that comprise it are evaluated first.
The guest simple and compound conditions are used while you create sponsor group policies.
Simple Conditions
Simple conditions consist of an attribute, an operator, and a value. You can create simple conditions from within the policy pages and also as separate policy elements that can be reused in policies. Cisco ISE allows you to create, edit, and delete simple authentication conditions. This page lists all the simple authentication policy conditions that you have defined in Cisco ISE.
See "Configuring Policy Elements Conditions" section on page 16-16, for more detailed information.
See "Creating Simple Conditions" section, for information on how to define simple conditions.
Related Topics
•
Creating Simple Conditions
To create simple conditions as separate policy elements, complete the following steps:
Step 1
Step 2
Step 3
The Guest Simple Conditions page appears.
Step 4
Step 5
•
•
•
•
•
Note
Step 6
You can now use this condition in creating Sponsor Group Policies.
Next Step
See the "Creating a New Sponsor Group Policy" section for information on how to define a sponsor group policy using the simple conditions that you have created.
Compound Conditions
Compound conditions are made up of two or more simple conditions. You can create compound conditions as reusable objects from within the policy creation page or from the Conditions page. This page lists all the compound conditions that you have defined in Cisco ISE.
See "Configuring Policy Elements Conditions" section on page 16-16, for more detailed information.
See "Creating Compound Conditions" section for information on how to create compound conditions.
Related Topics
•
Creating Compound Conditions
To create a compound condition from the Conditions page, complete the following steps:
Step 1
Step 2
Step 3
The Guest Compound Conditions page appears. This page lists any compound conditions that have been defined.
Step 4
Step 5
Step 6
a.
b.
–
–
–
–
The condition is saved as a simple condition and will be available for use in other policies.
Step 7
Step 8
Step 9
Step 10
Step 11
Next Step
See the "Creating a New Sponsor Group Policy" section for information on how to define a sponsor group policy using the compound conditions that you have created.
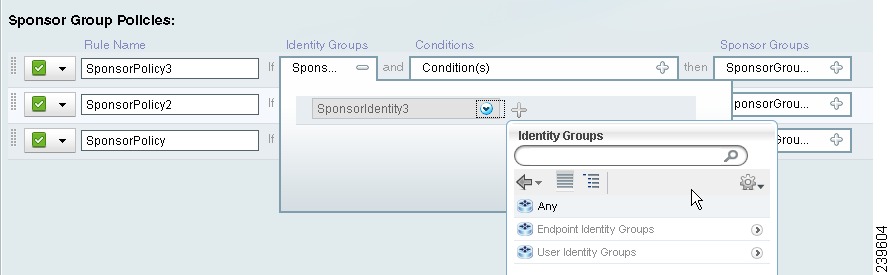
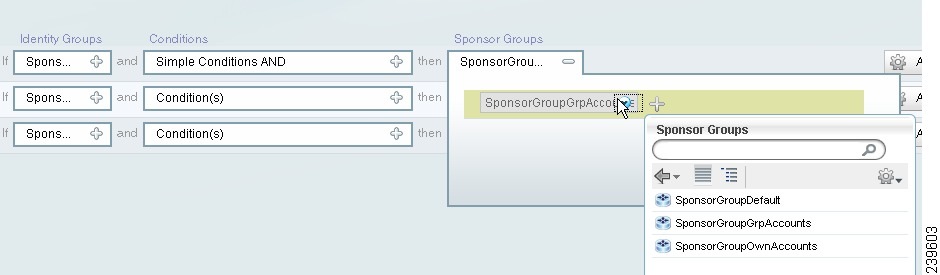
Sponsor Group Policy
The sponsor portal processes the sponsor group policy that allows you to log into the sponsor portal. The sponsor portal obtains the guest sponsor group from the matching sponsor group policy that allows you to access the sponsor portal. The guest sponsor groups contain a set of permissions and user settings that enable you to access the sponsor portal when you log into the sponsor portal. The sponsor portal uses the access permissions in the selected guest sponsor group to limit access within the portal. If your credentials fail, or if the sponsor group policy does not match the user settings that are defined for you when you log into the sponsor portal, then the portal returns you to the Sponsor Portal Login page.
A sponsor group policy contains one or more user roles and identity groups. It also contains one or more attribute conditions that allow you to assign the guest sponsor group. The conditions that are used in the sponsor group policy are the attributes that are selected from the dictionary attribute. One or more sponsor group policies assign you to the guest sponsor group.
A internal user that you create and store in the Cisco ISE database, and that is locally assigned to a user role or an identity group, can be a sponsor user. For the internal user to be identified as a sponsor user, the user needs to be assigned to a guest sponsor group. If you assign the internal user to a user role or identity group, and the internal user possesses the attribute conditions that are defined in the sponsor group policy, then the internal user is assigned to the guest sponsor group that is selected in the sponsor group policy.
Internal users are mapped to sponsor groups by assigning an identity group role that is used in a sponsor group policy. If both the identity group role and the conditions of the sponsor group policy match the internal user, that user will be mapped to the sponsor group associated with that sponsor group policy. For more information on how to map identity groups to sponsor groups, see "Mapping Active Directory Groups to Sponsor Groups" section.
The sponsor user can also originate from an external identity store like LDAP or Active Directory. For the external user to be identified as a sponsor user, the attributes from the external identity store need to match the conditions in the sponsor group policy that map the external user to a local guest sponsor group. If the external user possesses the attribute conditions that are defined in a sponsor group policy, then the user is assigned to the guest sponsor group that is selected in the sponsor group policy.
The Cisco ISE deployment contains the following guest sponsor groups by default:
•
•
•
You can also create your own sponsor group and associate it to any identity group in the sponsor group policy.
Related Topics
Creating a New Sponsor Group Policy
Creating a New Sponsor Group Policy
Prerequisites:
Before you begin this procedure you should have understood and created Simple Conditions and Compound Conditions.
To create a new sponsor group policy, complete the following steps:
Step 1
Step 2
A new policy entry appears in the position you designated in the Sponsor Group Policy window.
Step 3
•
•
–
•
–
–
•
–
Step 4
Modifying an Existing Sponsor Group Policy
To modify an existing sponsor group policy, complete the following steps:
Step 1
Step 2
A duplicate policy entry appears in the Standard panel of the Sponsor Group Policy window (either above or below the existing policy that you selected).
Step 3
Step 4
Step 5
Deleting an Existing Sponsor Group Policy
To delete an existing authorization policy, complete the following steps:
Step 1
Step 2
A confirmation dialog appears in the Standard panel of the Sponsor Group Policy window.
Step 3
Step 4
Note
Related Topics
Sponsor Groups
Guest sponsor groups contain the permissions and settings for the sponsor user. Sponsor users belonging to a particular sponsor group have a certain set of permissions and settings when logged into the sponsor portal. You can set role-based permissions for sponsors to allow or restrict access to different functions, such as creating accounts, modifying accounts, and sending account details to guests by email or short message service (SMS).
For example, if you want a set of sponsors to be unable to login for a short period of time while some configuration is being changed, you can set the sponsor group permission to prevent login. This way you can restrict a set of sponsor users from logging in without having to remove the sponsor group.
This section describes the procedures for:
•
Creating and Editing Sponsor Groups
To create a sponsor group, complete the following steps:
Step 1
Step 2
•
•
Step 3
Step 4
a.
–
–
–
–
–
–
–
–
–
b.
–
–
–
–
c.
–
–
–
–
d.
e.
Step 5
Guest roles allow a sponsor to assign different levels of access to a guest account. These roles are used in the authorization policies to relate guest user accounts to identity groups.
Step 6
•
•
•
Time profiles provide a way to give different levels of time access to different guest accounts. Sponsors under any sponsor group do not have permission to make any changes to the time profiles.
Step 7
For More Information
See "Configuring Network Access and Sponsor Users" section on page 4-9 for more information on guest roles.
See "Time Profiles" section for more information on time profiles.
Related Topics
Deleting the Sponsor Group
To delete sponsor groups, complete the following steps
Step 1
Step 2
Step 3
Note
For More Information
See "Sponsor Group Policy" section for more information on sponsor group policy.
Related Topics
•
Mapping Active Directory Groups to Sponsor Groups
Prerequisite
Before beginning this task, you should have successfully understood and performed Configuring Active Directory Groups, page 5-9.
To map the Active Directory (AD) groups to the sponsor groups:
Step 1
The Sponsor Group Policies page appears.
Step 2
•
•
•
•
Step 3
Related Topics
•
Creating Sponsor Users
To be able to log into the Sponsor portal, you must first create a sponsor user. There are no predefined sponsor users in Cisco ISE. You must create new sponsor user and assign them to one of the predefined sponsor groups. Refer to the section Configuring Network Access and Sponsor Users, page 4-9 for detailed steps on how to create sponsor users.
See "Sponsor Groups" section for more information on sponsor groups.
Next Step
See "Setting Ports for the Sponsor and Guest Portals" section for information on how to assign ports for the Sponsor and Guest portals.
Creating Guest Users
See the Cisco Identity Services Engine Sponsor Portal User Guide, Release 1.0 for detailed steps on how to create guest users.
SMTP Server Settings for Email Notifications
You must set up a Simple Mail Transfer Protocol (SMTP) server to send email notification to the guest user. This server is also used to send email to the short message service (SMS) gateway to deliver the SMS text message.
To set the SMTP server, complete the following steps:
Step 1
Step 2
Step 3
Step 4
Step 5
Step 6
For More Information
See Cisco Identity Services Engine Sponsor Portal User Guide, Release 1.0 for more information on the sponsor portal and how to create guest users.
Related Topic
•
General Settings
You can configure general settings like the port and SMTP server settings.
•
Setting Ports for the Sponsor and Guest Portals
You can configure whether sponsors and guests access the portal using HTTP or HTTPS. You can also specify the port number used for each of the portals and protocols.
To configure the protocols and port numbers for the sponsor and guest portals, complete the following steps:
Step 1
Step 2
Step 3
Step 4
Step 5
You must select at least one protocol for each of the portals. You must also set port numbers for the selected protocols. The default settings for each of the sponsor and guest portals are HTTP on port 8080 redirecting to HTTPS and HTTPS on port 8443. The Admin user interface runs on HTTP port 80 and HTTPS port 443.
To access the sponsor portal type:
http://ip address:8080/sponsorportal or https://ip address:8443/sponsorportal
To access the guest portal type:
http://ip address:8080/guestportal/Login.action or https://ip address:8443/guestportal/Login.action
If both HTTP and HTTPS protocols are selected within a portal section, the HTTP protocol is set to redirect to the HTTPS protocol for each client request.
Each of the Portal settings should either have unique port configurations for both the protocols or the two protocol settings must be equal to the values in another Portal.
For example, the administrator portal can be on port 80 and 443 and the sponsor portal can be on port 80 and 443, with guest running on port 8080 and 8443. But you will not be able to configure administrator portal on port 80 and 443 with sponsor and guest portals on port 80 and 8443. This configuration will cause a port conflict with the sponsor and guest portals on port 80 and 443.
For More Information
See Cisco Identity Services Engine Sponsor Portal User Guide, Release 1.0 for more information on the sponsor portal.
Related Topics
Purging Guest User Records
You can purge the expired guest user records from the system. You can configure the purge settings for an automatic purge at a regular interval of time or you can do a manual purge by clicking the Purge Now button.
To schedule the purge of expired guest user records, complete the following steps:
Step 1
The Purge Settings page is displayed.
Step 2
Step 3
a.
b.
Date of last purge displays the date and time when the last purge operation occurred.
Date of next purge displays the date and time when the next purge operation is scheduled to occur.
Step 4
This executes a purge manually even if Enable purge check box is not checked. This option provides you the freedom to purge records whenever you seem fit.
Step 5
There might be a 15 minute sleep cycle after the scheduled purge time. After this the system checks whether it is the correct hour and date to start the purge. Due to this sleep cycle, it takes up to 15 minutes for the purge to start after configured hour.
If the Cisco ISE server is down and the purge operation did not execute, it will not run again until the next time the server is running at the correct hour.
By default, the purge operation is enabled and executes every 15 days, at 23:00 hrs.
Note
Related Topics
Setting Ports for the Sponsor and Guest Portals
Sponsor Settings
You can configure sponsor settings under this sub menu. The following configuration options are available here:
•
Authentication Source
To allow a sponsor user to log into the sponsor portal, you have to choose an identity store sequence. This sequence is used with the login credentials of the sponsor to authenticate and authorize the sponsor for access to the sponsor portal. The sequence can include external stores as well as the local Cisco ISE identity store. The identity store sequence defines which stores should be accessed and in what order they should be accessed to resolve the authentication of a sponsor user.
There is one sequence value used for all the sponsor logins. It is up to the administrator to set up one of these sequences at install time.
By default, internal users are allowed to access the sponsor portal. You can set an identity store sequence to over ride this default setting. Also, internal NSF users must be assigned to an identity group that is related to a sponsor group through a sponsor group policy, to gain access to the sponsor portal.
Note
Note
Prerequisite
Before beginning this task, you should have successfully completed Creating Identity Source Sequences, page 5-49.
To set the identity store sequence for sponsor authentication, complete the following steps:
Step 1
Step 2
Step 3
For More Information
See Cisco Identity Services Engine Sponsor Portal User Guide, Release 1.0 for more information on the sponsor portal.
Related Topics
•
Portal Customization
You can customize the look and feel of the sponsor portal from the admin user interface. You can change settings like the background color, and the company logo of the sponsor portal.
To customize the sponsor portal, complete the following steps:
Step 1
Step 2
Step 3
Login Page Logo
Use this to change the logo on the Login page of the sponsor portal (Figure 20-1). You have the option to choose the default Cisco logo or upload a custom logo.
To upload a logo, complete the following steps:
Step 1
Step 2
Step 3
Recommended size for the login page logo is:
•
•
Figure 20-1 Sponsor Portal Login Page
Login Page Background Image
Use this to change the background image on the login page of the sponsor portal. You have the option to choose the default Cisco background or upload a custom background.
To upload a background, complete the following steps:
Step 1
Step 2
Step 3
Banner Logo
Use this to change the banner logo of the Sponsor portal (Figure 20-2). You have the option to choose the default Cisco logo or upload a custom logo.
To upload a banner logo, complete the following steps:
Step 1
Step 2
Step 3
Figure 20-2 Banner in the Sponsor Portal
Banner Background Image
Use this to change the banner background image of the sponsor portal. You have the option to choose the default Cisco background image or upload a custom image.
To upload an image, complete the following steps:
Step 1
Step 2
Step 3
Login Background Color
To change the background color of the login page of the sponsor portal.
To set the login background color, complete the following steps:
Step 1
Each pair of hexadecimal digits expresses an RGB value from 0-255.
Step 2
Banner Background Color
To change the background color of the banner in the sponsor portal.
To set the login background color, complete the following steps:
Step 1
Each pair of hexadecimal digits expresses an RGB value from 0-255.
Step 2
Content Background Color
To change the background color of the body pages in the sponsor portal (Figure 20-3).
To set the login background color of the body pages, complete the following steps:
Step 1
Each pair of hexadecimal digits expresses an RGB value from 0-255.
Step 2
Figure 20-3 Body Page in the Sponsor Portal
Note
For More Information
See Cisco Identity Services Engine Sponsor Portal User Guide, Release 1.0 for more information on the sponsor portal.
Related Topics
•
Configuring Language Templates
The administrator can use the language templates to customize the sponsor portal user interface and the guest account notification text.
A default English template is available in the Cisco ISE Admin portal. If you want to change the default language presentation of the sponsor portal or the language and text of the guest notifications, you can add new templates. You can customize the print, email, and short message service (SMS) templates and set the information that is printed, emailed, or text-messaged to guests.
To use the Language templates properly, the sponsor should map to the correct template in the Sponsor > Settings Customizations page in the sponsor portal.
For more details on sponsor portal, see the Cisco Identity Services Engine Sponsor Portal User Guide, Release 1.0.
This section describes the procedures for:
•
•
Adding and Editing a Language Template
To add or edit a language template, complete the following steps:
Step 1
Step 2
•
•
Step 3
Step 4
•
•
•
•
•
•
•
•
•
Step 5
•
•
•
Step 6
•
•
Step 7
Step 8
Some example configurations are described in the following sections:
•
•
Related Topics
•
•
Deleting an Existing Language Template
To delete a language template, complete the following steps:
Step 1
Step 2
Step 3
Note
Related Topics
•
•
Configuring a Template to Create a Single Guest Account
The Create Single Guest Account template includes the fields that appear in the Create Single Guest Account page in the sponsor portal. You can customize each field name and button in the manner and language in which you want them to appear in the sponsor portal.
To configure the Create Single Guest Account template, complete the following steps:
Step 1
Step 2
Step 3
The Edit Language Template page appears.
Step 4
Step 5
Step 6
Related Topics
•
•
•
•
Configuring a Template for Guest Notification
When a guest account is created, the details of the account need to be passed from the sponsor to the guest. The Cisco ISE guest services provides the following ways to do this:
•
•
•
•
Email and SMS text message notification require email servers to be configured.
The following sections describe how to configure different notification templates:
•
•
•
Configuring a Template for Email Notification
In the Email Notification template you can specify the subject and the body of the email that will be sent to guests for their account notification.
To configure the Email Notification template, complete the following steps:
Step 1
Step 2
Step 3
Step 4
Step 5
Step 6
The following is an example of the login information for the body of an email in an English language template:
Welcome to the Guest Portal, your username is %username% and password is %password%
The %username% and %password% strings will be replaced with the username and password values from the Guest User account.
In the email body you can use the following special variables to provide the details for the created guest account.
•
•
•
•
•
•
•
•
•
•
•
•
•
•
•
•
•
Step 7
Related Topics
•
•
Configuring a Template for SMS Text Message Notification
In the SMS Text Message Notification template you can set the SMS gateway, the subject and the message of the SMS.
The SMS Notification uses a third-party SMS gateway that allows email messages sent to the gateway containing formatted text messages to be forwarded through SMS to the specified end user account. An example of an SMS gateway is clickatell.com. You should have a valid account with the third party. Cisco does not provide a default account. SMS messages are sent by email to this gateway with a specific format defined by the third-party gateway.
To configure the SMS Text Message Notification template, complete the following steps:
Step 1
Step 2
Step 3
Step 4
Step 5
Step 6
Step 7
You can use the following special variables, which will be replaced with the details from the created guest account:
•
•
•
•
•
•
•
•
•
•
•
•
•
•
•
•
•
To send the text message to the mobile phone number of the guest, use the variable %MOBILENUMBER%. The %MOBILENUMBER% variable is replaced by the mobile phone number as entered by the sponsor.
Step 8
Related Topics
•
•
•
Configuring a Template for Print Notification
In the Print Notification template, you can set the guest account details, which the sponsor can bring up in a browser, print, and hand to the guest after the account is created.
To configure the SMS Text Message Notification template, complete the following steps:
Step 1
Step 2
Step 3
Step 4
Step 5
Step 6
You can use the following special variables, which will be replaced with the details from the created guest account:
•
•
•
•
•
•
•
•
•
•
•
•
•
•
•
•
•
Step 7
Related Topics
•
•
•
Guest Settings
You can configure guest settings under this sub menu. The following configuration options are available here:
•
•
•
Configuring Details Policy
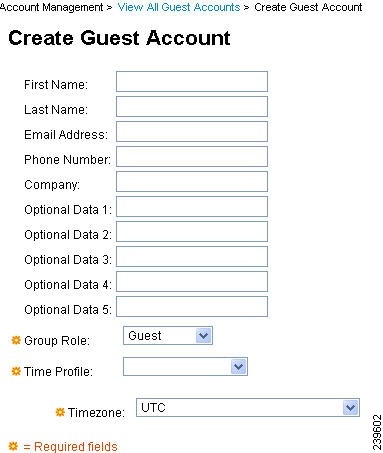
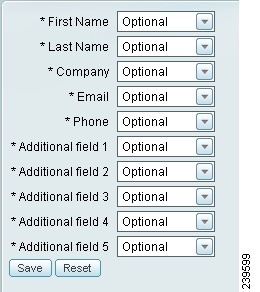
The details policy determines the data that the sponsor needs to enter to create a guest account. In the details page, the Cisco ISE administrator must define the fields that should appear on the Sponsor Guest User Create and Edit pages and in the Guest User Self Registration page.
To configure a details policy, complete the following steps:
Step 1
Several fields like First Name, Last Name, Company, Email, Phone are listed as in Figure 20-4.
Step 2
•
•
•
There are five Additional Fields that you can use to add any additional information that you require sponsors to fill out when creating guest accounts. These are described on the Details page as Additional Fields 1 through Additional Fields 5.
Note
See Dictionaries and Dictionary Attributes, page 7-1 for details on editing the field names.
Step 3
Figure 20-4 Details Policy Page
Related Topics
•
•
•
MultiPortal Configurations
Cisco ISE provides you with the ability to host multiple guest portals in the Cisco ISE server. The Guest user portal has a default Cisco look and feel. These pages are dynamically generated to offer portal features such as change password and self registration in the Login Screen.
You can use the Multi-portal configuration to upload set of GUI pages specific to your organization to handle the Login, AUP, Change Password and Self Registration. In order to access an uploaded client portal the guest portal URL must include the name of the portal specified during the upload.
You can design and upload HTML pages to define new guest portals or replace the default guest portal. These pages must use plain HTML code and must contain form actions that point to the guest portal backend servlets. You must define separate HTML pages for login, acceptable use policy (AUP), the change-password function, and self-registration.
Related Topics
•
Hosting Multiple Portals
Prerequisite
Before beginning this task, you should have successfully understood and configured the following:
•
•
•
A predefined DefaultGuestPortal is available under Multi-Portal Configurations. This portal has the default Cisco look-and-feel and you cannot customize it. To create a customized portal, you must first begin by adding a new portal.
To host multiple portals, complete the following steps:
Step 1
Step 2
Step 3
The name of the portal is used to access the portal and will appear in the captive portal URL specified in the network access device (NAD) for wireless LAN controller (WLC) setups. For example, a portal with the name ClientPortal will have the following access URL:
https://ip address:port number/guestportal/portals/ClientPortal/portal.jsp
Step 4
•
•
•
•
•
Step 5
•
•
•
For details, see "VLAN DHCP IP Release/Renew" section
Step 6
•
•
•
For details, see "Accept Use Policy" section
Step 7
These pages can include images and other links to the upload files. All uploaded files are held in a single directory with no subdirectories. All URL references should be made as a relative reference between the upload files. You cannot run any backend scripts in the Cisco ISE server. Only HTML, HTM, JPEG, GIF, PNG, and CSS files are allowed.
Step 8
This is important for the guest flow to redirect and display the appropriate client-defined portal pages during the guest login access.
The fields under File Mapping tab are grayed out or enabled based on the selections made in the General tab.
Step 9
Choose one of the following options:
•
•
•
In this case, Guest is the local guest user and Central WebAuth is the non-guest user. If you have a non-guest user or both a guest and non-guest user, you have to specify an identity sequence for the authentication.
If Guest is chosen the default portal only authenticates guest user accounts in the local database.
If Central WebAuth is chosen the specified identity sequence is used to check authentication for the user. This sequence can contain both a local database and external identity stores such as Lightweight Directory Access Protocol (LDAP) or Microsoft Active Directory.
If you chose to authenticate both, the user will be authenticated against the local database guest users first. If a user is not found, authentication will be attempted using the identity sequence.
For Central WebAuth to allow network access, appropriate authentication policies must be defined within Cisco ISE for the underlying RADIUS server to process authentication correctly.
Step 10
The Guest portal URL for the wired and wireless local web authentication is:
https://ip:8443/guestportal/portals/NameOfPortal/portal.jsp
Where the NameOfPortal is the name of the portal as it is created during the upload.
The Guest portal redirect URL for wired CWA is:
https://ip:port/guestportal/gateway?sessionId=SessionIdValue&portal=NameOfPortal&action=cwa
The `ip' and `port' values will be updated by the RADIUS server as the URL-redirect is returned to the NAD. These values will be the IP address and port number for the Cisco ISE guest portal server.
Note
Customizable Guest Portal Pages
The following are customizable Guest portal pages:
Accept Use Policy
This page displays the terms of use of the network, which the user must accept in order to fully enable their account. If the user does not accept the policy the user will not gain expanded network access. For guest users, the AUP can be selected to appear at first login only or at every login.
Change Password
Once the guest user or internal user has accepted the policy Cisco ISE checks if the password has expired, if so the Password Change screen is displayed. External users do not have their password expiration enforced.
To configure the guest password contents, see "Configuring Guest Password Policy" section.
To configure password policy for the internal users, see "User Password Policy" section on page 4-58.
Screens in the default portal show the password criteria for Guest or Internal Users depending on the identity of the User. You can set your own criteria in the custom portals screens.
Self Registration
The Self Registration screen appears as a link on the guest user login page. This screen allows new guest users to fill in their personal information and create a new user account. Upon submission, the user account is created and the new account information is displayed on the screen. The user can print the account information.
User accounts are created with a random generated password. This password follows the password policy that is set for the guest users. The user accounts are created with the default Guest Role and Time Profile as selected in the Guest Portal Policy page.
Device Registration
The Device Registration screen appears as a link on the guest user login page. This screen allows a guest user to register their own network devices based on the MAC address of the devices.
You can configure the maximum number of devices per user from the Guest Portal Policy page and it is a global value for the entire system. The default maximum number of devices per user is five. Lowering this value will not remove existing registered devices, it will only limit the addition of new devices. The default Device Registration page has a list of existing devices for the user. Users can add new devices or remove devices from this page.
You can also add device registration page for your custom portal. But, this page will only have the ability to add new devices. There will be no list of existing devices nor can you delete devices. These limitations exist because listing is a dynamically created page and does not allow customization.
Client Provisioning Interaction with Guest Portal
The guest user portal includes interaction with Client Provisioning application so that the client machine posture can be controlled at the time of a network access request. This interaction consists of redirecting the client browser to download a Client Provisioning agent and controlling posture before allowing full access to the network with a final user login.
You can configure custom portal to perform Client Provisioning and Posture. If you select this option, the guest login flow performs a CWA and the guest portal will be redirected to Client Provisioning after performing AUP and change password checks. In this case, the posture subsystem performs a CoA to the NAD to re-authenticate the client connection once the posture has been assessed.
Note
If Vlan Dhcp Release is selected under Multi-Portal Configurations, posture will perform the client side IP release and renew operation.
VLAN DHCP IP Release/Renew
This affects the CWA user login flow when the network access during the final authorization switches the guest VLAN to a new VLAN. In this case, the old IP of the guest needs to be released before the VLAN change and a new guest IP needs to be requested through DHCP once the new VLAN access is in place. The Cisco ISE server redirects the guest browser to download an applet to perform the IP release renew operation.
The delay to release time should be low since it needs to occur immediately after the applet is downloaded and before the Cisco ISE server directs the NAD to re-authenticate with a CoA request. The default release value is 1 second.
The delay to CoA delays the Cisco ISE from executing the CoA. Here, enough time should be given to allow the applet to download and perform the IP release on the client. The default value is 8 seconds.
The delay to renew value is added to the IP release value and does not begin timing until the control is downloaded. The renew should be given enough time so that the CoA is allowed to process and the new VLAN access granted. The default value is 12 seconds.
For More Information
For switch configuration details and other Cisco ISE deployment information, see Chapter 9, "Setting Up Cisco ISE in a Distributed Environment."
Related Topics
•
•
•
Sample HTML Code for Creating Portal Pages
The following are some example HTML codes that you can use to create multiple guest portal pages:
•
•
•
•
•
•
•
Note
Login Form Action and Parameters
<head><meta http-equiv="Content-Type" content="text/html; charset=utf-8" /><title>Guest Portal Login</title><link href="portals/demo2/style.css" rel="stylesheet" type="text/css" /><script language='javascript'></script></head><body class="pagebg"><table width="100%" border="0" align="center" cellpadding="0" cellspacing="0"><tr><td height="107"> </td></tr><tr><td height="172" align="center" valign="middle"><table width="90%" border="0" align="center" cellpadding="0" cellspacing="0"><tr><td width="45%" height="172" align="left" valign="middle"><table width="75%" border="0" align="left" cellpadding="0" cellspacing="0"><tr><td width="27%"><img src="portals/demo2/logo.png" alt="" width="218" height="63" /></td><td width="73%"><table width="85%" border="0" align="right" cellpadding="0" cellspacing="0"><tr><td height="35" align="left" class="headding">ISE 1.0</td></tr><tr><td align="left" class="label">Guest Access</td></tr><tr><td align="left"> </td></tr><tr><td align="left" class="headding1">Version:1.0</td></tr></table></td></tr></table></td><td width="45%" align="right" valign="middle"><table width="50%" border="0" cellspacing="0" cellpadding="0"><form id="cuesLoginForm" method="POST" action="/guestportal/LoginCheck.action"><tr><td width="32%" height="30" align="left" valign="middle" class="label">Username :</td><td width="68%" align="left"><input alt="Username:" name="guestUser.name" id="username" type="text" size="20" value=""/></td></tr><tr><td height="30" align="left" valign="middle" class="label">Password :</td><td align="left"><input alt="Password:" name="guestUser.password" id="password" type="password" size="20" value=""/></td></tr><tr><td height="12" align="left" valign="middle"></td><td height="12" align="left"></td></tr><tr><td align="left" valign="middle"> </td><td align="left"><input type="submit" name="button" id="button" value="Log In" /></td></tr><input type="hidden" name="drpPassword" id="drpPassword" /><input type="hidden" name="drpUsername" id="drpUsername" /></form><!-- <form id="doSelfService" action="/guestportal/SelfService.action">--><!-- <input type="hidden" id="buttonClicked" name="buttonClicked" value=""></input>--><!-- <input type="hidden" id="switch_url" name="switch_url" value=""></input>--><!-- <input type="hidden" id="redirect" name="redirect" value=""></input>--><!-- <input type="hidden" id="err_flag" name="err_flag" value=""></input>--><!-- </form>--><!-- form for self service --><struts2:form id="selfServiceForm" action="SelfService.action"><input type="hidden" id="buttonClicked" name="buttonClicked" value="${buttonClicked}"></input><input type="hidden" id="switch_url" name="switch_url" value="${switch_url}"></input><input type="hidden" id="redirect" name="redirect" value="${redirect}"></input><input type="hidden" id="err_flag" name="err_flag" value="${err_flag}"></input></struts2:form><struts2:form id="changePasswordForm" action="ChangePassLoginMultiPortal.action"><input type="hidden" id="username" name="guestUser.name" value="${username}"></input><input type="hidden" id="password" name="guestUser.password" value="${password}"></input></struts2:form><tr><td align="left" valign="middle"> </td><td align="left"> </td></tr><tr><td align="left" valign="middle"> </td><td align="left"><a href="javascript:doChangePassword();" class="link" >Change Password</a> <a href="javascript:doSelf();" class="link">SelfService</a> <a href="javascript:submitMyForm();" class="link">Device Registration</a></td></tr></table></td></tr></table></td></tr></table><div id="footer"><div style="padding:0 0 0 10px;">2009-2011, Sample App, Inc. All rights reserved.</div></div></body></html><script>function doSelf(){document.forms[0].action = "SelfService.action";document.getElementById("buttonClicked").value = document.getElementById("buttonClicked").value;document.getElementById("redirect").value = document.getElementById("redirect").value;document.getElementById("switch_url").value = document.getElementById("switch_url").value;document.forms[0].submit();}function doChangePassword(){//var changePasswordForm = document.getElementById("changePasswordForm");//changePasswordForm.submit();document.forms[0].action = "ChangePassLoginMultiPortal.action";document.getElementById("username").value = document.getElementById("username").value;document.getElementById("password").value = document.getElementById("password").value;document.forms[0].submit();}function submitMyForm(){document.forms[0].action = "DevRegPortalLogin.action";document.getElementById("drpUsername").value = document.getElementById("username").value;document.getElementById("drpPassword").value = document.getElementById("password").value;document.forms[0].submit();}</script>AUP Form Action and Parameters
<head><meta http-equiv="Content-Type" content="text/html; charset=utf-8" /><title>Guest Portal Login</title><link href="portals/demo2/style.css" rel="stylesheet" type="text/css" /></head><body bgcolor="#ccebfe"><table width="100%" border="0" align="center" cellpadding="0" cellspacing="0"><tr><td height="75" bgcolor="#022d4d"><table width="98%" border="0" align="center" cellpadding="0" cellspacing="0"><tr><td width="15%" align="left" valign="middle"><img src="portals/demo2/logo.png" alt="" width="157" height="44" /></td><td width="72%" class="headding">ISE 1.0 Guest Portal </td><td width="13%" align="right" valign="middle" > </td></tr></table></td></tr><tr><td bgcolor="#ccebfe"><table width="98%" border="0" align="center" cellpadding="0" cellspacing="0" class="content"><tr><td> </td></tr><tr><td align="left" class="headding2">Acceptable Use Policy</td></tr><tr><td align="left" >Please accept the policy:<br /><br />1. You are responsible for </br>(1) maintaining the confidentiality of the password and </br>(2) all activities that occur under your username and password.</br></br>2. Cisco systems offers the Service for activities such as the active use of e-mail, instant messaging, browsing the World Wide Web and accessing corporate intranets. High volume data transfers, especially sustained high volume data transfers, are not permitted. Hosting a web server or any other server by use of our Service is prohibited. Trying to access someone else’s account, sending unsolicited bulk e-mail, collection of other people’s personal data without their knowledge and interference with other network users are all prohibited.</br></br>3. Cisco systems reserves the right to suspend the Service if (1) Cisco systems reasonably believes that your use of the Service is unreasonably excessive or (2) you are using the Service for criminal or illegal activities.</br></br>4. You do not have the right to resell this Service to a third party.</br></br>5. Cisco systems reserves the right to revise, amend or modify these Terms & Conditions, our other policies and agreements, and aspects of the Service itself. Notice of any revision, amendment, or modification will be posted on Cisco system’s website and will be effective as to existing users 30 days after posting same.</br></br></td></tr><form action="/guestportal/AcceptPolicy.action" method="post"><tr><td align="left"><input type="checkbox" name="guestUser.acceptUsePolicy" id="guestUser.acceptUsePolicy" value="false" onclick="javascript:enableButtons()" />Accept terms and conditions</td></tr><tr><td align="left"> </td></tr><tr><td align="left"><input type="Submit" id="acceptButton" value="Accept" /><input type="button" id="declineButton" value="Decline" onclick="javascript:doDeclineTerms()"/></td></tr><tr><td align="left"> </td></tr></form></table></td></tr></table><form id="declineTerms" onsubmit="return true;" action="/guestportal/DeclinePolicy.action" method="post"><table class="wwFormTable"><input type="hidden" id="buttonClicked" name="buttonClicked" value=""></input><input type="hidden" id="switch_url" name="switch_url" value=""></input><input type="hidden" id="redirect" name="redirect" value=""></input><input type="hidden" id="err_flag" name="err_flag" value=""></input></table></form><div id="footer"><div style="padding:0 0 0 10px;">2009-2011, Sample App, Inc. All rights reserved.</div></div></body></html><script>enableButtons();function enableButtons(){accepttermsCheckbox = document.getElementById('guestUser.acceptUsePolicy').checked;if (!accepttermsCheckbox) {document.getElementById('acceptButton').disabled = true;document.getElementById('guestUser.acceptUsePolicy').value = false;}else {document.getElementById('acceptButton').disabled = false;document.getElementById('guestUser.acceptUsePolicy').value = true;}}</script><script>function doDeclineTerms(){var declineTermsForm = document.getElementById("declineTerms");declineTermsForm.submit();}</script>Change Password Form Action and Parameters
<head><meta http-equiv="Content-Type" content="text/html; charset=utf-8" /><title>Guest Portal Login</title><link href="portals/demo2/style.css" rel="stylesheet" type="text/css" /></head><body class="pagebg"><table width="100%" border="0" align="center" cellpadding="0" cellspacing="0"><tr><td height="107"> </td></tr><tr><td height="172" align="center" valign="middle"><table width="90%" border="0" align="center" cellpadding="0" cellspacing="0"><tr><td width="45%" height="172" align="left" valign="middle"><table width="75%" border="0" align="left" cellpadding="0" cellspacing="0"><tr><td width="27%"><img src="portals/demo2/logo.png" alt="" width="218" height="63" /></td><td width="73%"><table width="85%" border="0" align="right" cellpadding="0" cellspacing="0"><tr><td height="35" align="left" class="headding">ISE 1.0</td></tr><tr><td align="left" class="label">Guest Access</td></tr><tr><td align="left"> </td></tr><tr><td align="left" class="headding1">Version:1.0</td></tr></table></td></tr></table></td><td width="45%" align="right" valign="middle"><table width="65%" border="0" cellspacing="0" cellpadding="0"><form action="/guestportal/ChangePassword.action" method="post"><tr><td height="30" align="left" valign="middle" class="label">Enter current password :</td><td align="left"><input alt="Password:" name="currentpassword" id="currentpassword" type="password" size="20" value=""/></td></tr><tr><td height="30" align="left" valign="middle" class="label">Enter new password :</td><td align="left"><input alt="Password:" name="newpassword" id="newpassword" type="password" size="20" value=""/></td></tr><tr><td height="30" align="left" valign="middle" class="label">Re-enter new password :</td><td align="left"><input alt="Password:" name="confirmpassword" id="confirmpassword" type="password" size="20" value=""/></td></tr><tr><td height="12" align="left" valign="middle"></td><td height="12" align="left"></td></tr><tr><td align="left" valign="middle"> </td><td align="left"><input type="submit" name="button" id="button" value="Log In" /></td></tr></form></table></td></tr></table></td></tr></table><div id="footer"><div style="padding:0 0 0 10px;">2009-2011, Sample App, Inc. All rights reserved.</div></div></body></html>Self-Registration Form Action and Parameters
<head><meta http-equiv="Content-Type" content="text/html; charset=utf-8" /><title>Guest Portal Login</title><link href="portals/demo2/style.css" rel="stylesheet" type="text/css" /></head><body bgcolor="#ccebfe"><table width="100%" border="0" align="center" cellpadding="0" cellspacing="0"><tr><td height="75" bgcolor="#022d4d"><table width="98%" border="0" align="center" cellpadding="0" cellspacing="0"><tr><td width="15%" align="left" valign="middle"><img src="portals/demo2/logo.png" alt="" width="157" height="44" /></td><td width="72%" class="headding">ISE 1.0 Guest Portal </td><td width="13%" align="right" valign="middle" > </td></tr></table></td></tr><tr><td valign="top" bgcolor="#ccebfe"><table width="98%" border="0" align="center" cellpadding="0" cellspacing="0" class="content"><tr><td> </td></tr><tr><td align="left" class="headding2">Self Registration</td></tr><tr><td align="left"> </td></tr><tr><td align="left"><table width="50%" border="0" align="left" cellpadding="0" cellspacing="0" class="content"><form id="selfServiceForm" action="/guestportal/SelfServiceSubmit.action" method="post"><tr><td width="30%" height="30" align="left" valign="middle" class="content">First Name :</td><td width="70%" align="left"><input alt="Username:" name="guestUser.firstName" id="firstName" type="text" size="20" /></td></tr><tr><td width="30%" height="30" align="left" valign="middle" class="content">Last Name :</td><td width="70%" align="left"><input alt="Username:" name="guestUser.lastName" id="lastName" type="text" size="20" /></td></tr><tr><td width="30%" height="30" align="left" valign="middle" class="content">Email Address :</td><td width="70%" align="left"><input alt="Username:" name="guestUser.emailAddress" id="emailId" type="text" size="20" /></td></tr><tr><td width="30%" height="30" align="left" valign="middle" class="content">Phone Number :</td><td width="70%" align="left"><input alt="Username:" name="guestUser.phoneNumber" id="phoneno" type="text" size="20" /></td></tr><tr><td width="30%" height="30" align="left" valign="middle" class="content">Company :</td><td width="70%" align="left"><input alt="Username:" name="guestUser.company" id="company" type="text" size="20" /></td></tr><tr><td width="30%" height="30" align="left" valign="middle" class="content">Optional Data 1 :</td><td width="70%" align="left"><input alt="Username:" name="guestUser.optionalData1" id="data1" type="text" size="20" /></td></tr><tr><td width="30%" height="30" align="left" valign="middle" class="content">Optional Data 2 :</td><td width="70%" align="left"><input alt="Username:" name="guestUser.optionalData2" id="data2" type="text" size="20" /></td></tr><tr><td width="30%" height="30" align="left" valign="middle" class="content">Optional Data 3 :</td><td width="70%" align="left"><input alt="Username:" name="guestUser.optionalData3" id="data3" type="text" size="20" /></td></tr><tr><td width="30%" height="30" align="left" valign="middle" class="content">Optional Data 4 :</td><td width="70%" align="left"><input alt="Username:" name="guestUser.optionalData4" id="data4" type="text" size="20" /></td></tr><tr><td width="30%" height="30" align="left" valign="middle" class="content">Optional Data 5 :</td><td width="70%" align="left"><input alt="Username:" name="guestUser.optionalData5" id="data5" type="text" size="20" /></td></tr><tr><td width="30%" height="30" align="left" valign="middle" class="content">TimeZone :</td><td width="70%" align="left"><select name="guestUser.timezone"><option value="UTC">UTC</option><option value="America\New_York">America\New_York</option><option value="Europe\London">Europe\London</option></select></td></tr><tr><td height="12" align="left" valign="middle"></td><td height="12" align="left"></td></tr><tr><td align="left" valign="middle"> </td><td align="left"><input type="submit" name="button" id="button" onclick="javascript:doOnSubmit()" value="Submit" /><input type="submit" name="button2" id="button2" onclick="javascript:doCancel()" value="Cancel" /> </td></tr></form></table></td></tr><tr><td align="left"> </td></tr><tr><td align="left"> </td></tr></table></td></tr></table><div id="footer"><div style="padding:0 0 0 10px;">2009-2011, Sample App, Inc. All rights reserved.</div></div></body></html><script>function doOnSubmit(){var selfServiceForm = document.getElementById("selfServiceForm");selfServiceForm.submit();}function doCancel(){document.forms[0].action = "Login.action";document.forms[0].submit();}</script>Device Registration Form Action and Parameters
<head><meta http-equiv="Content-Type" content="text/html; charset=utf-8" /><title>Guest Portal Login</title><link href="portals/demo2/style.css" rel="stylesheet" type="text/css" /><script language='javascript'></script></head><body bgcolor="#ccebfe"><form id="deviceRegistrationPortal" action="/guestportal/RegisterDevice.action" method="post"><input type="hidden" name="drpUsername" id="drpUsername" value="" /><input type="hidden" name="devRegLimit" id="devRegLimit" value="" /><input type="hidden" name="regDevices" id="regDevices" value="" /><table width="100%" border="0" align="center" cellpadding="0" cellspacing="0"><tr><td height="75" bgcolor="#022d4d"><table width="98%" border="0" align="center" cellpadding="0" cellspacing="0"><tr><td width="15%" align="left" valign="middle"><img src="portals/demo2/logo.png" alt="" width="157" height="44" /></td><td width="72%" class="headding">ISE 1.0 Device Registration Portal</td><td width="13%" align="right" valign="middle" > </td></tr></table></td></tr><tr><td align="left" valign="top" bgcolor="#ccebfe"><table width="98%" border="0" align="center" cellpadding="0" cellspacing="0" class="content"><tr><td> </td></tr><tr><td align="left"><table width="100%" border="0" cellpadding="0" cellspacing="0" bgcolor="#abcee4" style="padding:10px; border:#6b93ac solid 1px;"><tr><td style="padding:10px 0 0 10px;">Please register your device :<br />Please note that you can not register more than 5 devices</td></tr><tr><td height="15"></td></tr><tr><td style="padding:0 0 0 10px;"><table width="100%" border="0" cellspacing="0" cellpadding="0"><tr><td width="7%">MAC Address : </td><td width="93%"><input id="registeredMac" name="registeredMac" type="text" /></td></tr></table></td></tr><tr><td height="15"></td></tr><tr><td style="padding:0 0 0 10px;"><input type="Submit" value="Register" /></td></tr><tr><td height="15"></td></tr></table></td></tr><tr><td align="left"> </td></tr><tr><td align="left"></td></tr><tr><td align="left"> </td></tr></table></td></tr></table><div id="footer"><div style="padding:0 0 0 10px;">2009-2011, Sample App, Inc. All rights reserved.</div></div></form></body></html>Self-Service Result Form Action and Parameters
<head><meta http-equiv="Content-Type" content="text/html; charset=utf-8" /><title>Guest Portal Login</title><link href="portals/demo2/style.css" rel="stylesheet" type="text/css" /></head><body bgcolor="#ccebfe"><table width="100%" border="0" align="center" cellpadding="0" cellspacing="0"><tr><td height="75" bgcolor="#022d4d"><table width="98%" border="0" align="center" cellpadding="0" cellspacing="0"><tr><td width="15%" align="left" valign="middle"><img src="portals/demo2/logo.png" alt="" width="157" height="44" /></td><td width="72%" class="headding">ISE 1.0 Guest Portal </td><td width="13%" align="right" valign="middle" > </td></tr></table></td></tr><tr><td valign="top" bgcolor="#ccebfe"><table width="98%" border="0" align="center" cellpadding="0" cellspacing="0" class="content"><tr><td> </td></tr><tr><!--INSERT HEADER HERE --><td align="left" class="headding2"> Self Registration created user: fsdf</td><!--END HEADER HERE --></tr><tr><td align="left"> </td></tr><tr><td align="left"><table width="50%" border="0" align="left" cellpadding="0" cellspacing="0" class="content"><!--INSERT RESULTS HERE --><tr><td width="30%" align="left" class="content"> User name: fsdf</td></tr><tr><td width="30%" align="left" class="content"> Password: 9F_</td></tr><tr><td width="30%" align="left" class="content"> First Name: fdsf</td></tr><tr><td width="30%" align="left" class="content"> Last Name: sdf</td></tr><tr><td width="30%" align="left" class="content"> Email Address: </td></tr><tr><td width="30%" align="left" class="content"> Phone Number: </td></tr><tr><td width="30%" align="left" class="content"> Company: </td></tr><tr><td width="30%" align="left" class="content"> Optional Data 1: </td></tr><tr><td width="30%" align="left" class="content"> Optional Data 2: </td></tr><tr><td width="30%" align="left" class="content"> Optional Data 3: </td></tr><tr><td width="30%" align="left" class="content"> Optional Data 4: </td></tr><tr><td width="30%" align="left" class="content"> Optional Data 5: </td></tr><!--END RESULTS HERE --><tr><td height="12" align="left" valign="middle"></td><td height="12" align="left"></td></tr><form id="loginform" action="/guestportal/Login.action" method="post"><tr><td align="left" valign="middle"> </td><td align="left"><input type="submit" name="button2" id="button2" onclick="javascript:doOk()" value="OK" /> </td></tr></form></table></td></tr><tr><td align="left"> </td></tr><tr><td align="left"> </td></tr></table></td></tr></table><div id="footer"><div style="padding:0 0 0 10px;">2009-2011, Sample App, Inc. All rights reserved.</div></div></body></html><script>function doOk(){document.forms[0].action = "Login.action";document.forms[0].submit();}</script>Error Page Form Action and Parameters
<head><meta http-equiv="Content-Type" content="text/html; charset=utf-8" /><title>Guest Portal Error Detected</title><link href="portals/demo2/style.css" rel="stylesheet" type="text/css" /><script language='javascript'></script></head><body class="pagebg"><table width="100%" border="0" align="center" cellpadding="0" cellspacing="0"><tr><td height="107"> </td></tr><tr><td height="172" align="center" valign="middle"><table width="90%" border="0" align="center" cellpadding="0" cellspacing="0"><tr><td width="45%" height="172" align="left" valign="middle"><table width="75%" border="0" align="left" cellpadding="0" cellspacing="0"><tr><td width="27%"><img src="portals/demo2/logo.png" alt="" width="218" height="63" /></td><td width="73%"><table width="85%" border="0" align="right" cellpadding="0" cellspacing="0"><tr><td height="35" align="left" class="heading">Error Detected in Guest Portal</td></tr><tr><!--INSERT ERROR HERE --><td height="35" align="left" class="heading">Second</td><!--END ERROR HERE --></tr></table></td></tr></table></td><td width="45%" align="right" valign="middle"><table width="50%" border="0" cellspacing="0" cellpadding="0"><tr><td align="left" valign="middle"> </td><td align="left"> </td></tr></table></td></tr></table></td></tr></table><div id="footer"><div style="padding:0 0 0 10px;">2009-2011, Sample App, Inc. All rights reserved.</div></div></body></html><script>function doSelf(){document.forms[0].action = "Login.action";document.forms[0].submit();}</script>Sample style.css
@charset "utf-8";/* CSS Document */body {margin-left: 0px;margin-top: 0px;margin-right: 0px;margin-bottom: 0px;}.pagebg {background:url("../demo2/pageBg.jpg") repeat-x;}.label {font-family:Arial, Helvetica, sans-serif;color:#FFFFFF;font-size:12px;}#footer {height:23px;font-family:Arial, Helvetica, sans-serif;color:#022d4d;position:absolute;width:100%;margin:0px auto;text-align:left;bottom:-0px;font-size:12px;}.headding {font-family:Arial, Helvetica, sans-serif;color:#ffffff;font-size:20px;}.headding1 {font-family:Arial, Helvetica, sans-serif;font-size:12px;font-weight:bold;color:#ffffff;}.headding2 {font-family:Arial, Helvetica, sans-serif;color:#022d4d;font-size:17px;font-weight:bold;}.headding3 {font-family:Arial, Helvetica, sans-serif;color:#022d4d;font-size:12px;font-weight:bold;}.content {font-family:Arial, Helvetica, sans-serif;font-size:11px;color:#022d4d;}.link {font-family:Arial, Helvetica, sans-serif; font-size:11px; color:#ffffff; text-decoration:none;}a.link:link {font-family:Arial, Helvetica, sans-serif; font-size:11px; color:#ffffff; text-decoration:none;}a.link:hover {font-family:Arial, Helvetica, sans-serif; font-size:11px; color:#ffffff; text-decoration:underline; }Configuring Guest Portal Policy
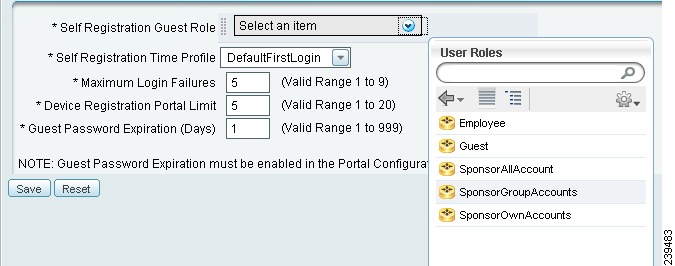
The admin can use the guest portal policy page to specify the required flow for the guest user login.
To configure a guest portal policy, complete the following steps:
Step 1
Step 2
•
•
•
•
•
Step 3
Figure 20-5 Guest Portal Policy Page
Related Topics
•
•
Configuring Guest Password Policy
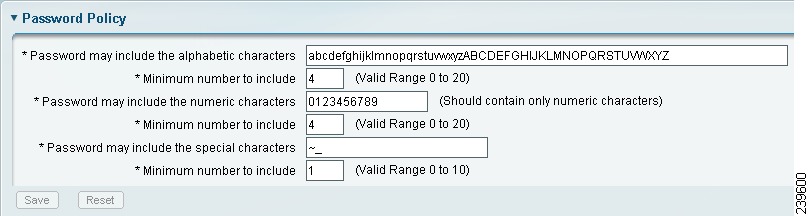
The guest password policy determines how the password should be generated for all guest accounts. You can create a password policy based upon a mixture of alphabetic, numeric, or special characters.
To configure a guest password policy, complete the following steps:
Step 1
Step 2
Step 3
Step 4
Note
Figure 20-6 Password Policy Page
Related Topics
•
•
Time Profiles
Time profiles allow a sponsor to assign different levels of access time to a guest account. For example, you can assign a time profile that allows a guest access during a workweek day but not during a weekend day.
After time profiles are created, you must change the sponsor user group to allow sponsors in that group to be able to provision accounts to the appropriate time profiles that are created. You can choose the sponsor user groups that are allowed to assign certain time profiles to guests.
By default, a sponsor user group has the ability to assign guests to the default time profile. Administrators can choose which additional time profiles the sponsor can be assigned, and they can also remove the default time profile from the user group.
Each sponsor user group must have the ability to assign guests to at least one time profile.
If a sponsor user group has only one time profile selected, sponsors will be able to select that time profile alone. If sponsors can choose more than one time profile, they can view a drop-down menu from which they can choose the time profile to be assigned to the account during the account creation.
Related Topics
•
•
•
•
Adding, Editing, or Duplicating Time Profiles
To add or edit a time profile, complete the following steps:
Step 1
Step 2
•
•
•
Step 3
Step 4
Step 5
•
•
•
Step 6
Step 7
These restrictions are composed of a day of the week and a start and end clock time. The Time Zone value specified in the time profile affects the clock times set in any of the Time Restrictions within the time profile. For example, a Time Restriction that specifies Monday 12:00 am to 8:00 am and Monday 6:00 pm to 11:59 pm would only grant system access between 8:00 am and 6:00 pm on Mondays within the time zone of the time profile. Any other day of the week would have no time restriction in this example and system access would be granted at any time.
Step 8
Time profiles do not define the start and end times. This is done during the account creation. The time profile can have restrictions that fall outside the start and end time specified in a Guest account while creation. Only those restrictions that cover the start end time of the account will be applied to the account.
For a wired network the Termination-Action must be set to 0 "Default" so that the Session-Timeout is treated as a terminate session. This value must be set on the Authorization Profile as a RADIUS value.
For a WLC the Allow AAA Override must be turned on in the WLAN configuration. The RADIUS access-accept will contain a Session-Timeout value in seconds, remaining for the account. When this time has elapsed, NAD will close the connection.
At the time of Guest login the Network Access system will return the remaining time left in the guest account to the NAD that is making the access request. This is so that the NAD can enforce account expiration.
Note
Related Topics
•
•
•
Deleting Time Profiles
To delete time profiles, complete these steps:
Step 1
Step 2
Step 3
Related Topics
•
•
•
•
Configuring Guest Username Policy
The Guest Username Policy Configuration page allows the Cisco ISE administrator to specify how the user names will be created for the guest accounts. Username policy configuration can be done in two ways:
•
•
Configuring General Guest Username Policy
You can create a guest username based on the email address or the first and last name of the guest.
To configure general guest username policy, complete the following steps:
Step 1
Step 2
Step 3
c.
d.
Step 4
If the guest user names formed by the email address or by the combination of first and last name are shorter than the minimum length, the username will be appended with 0 (zero) characters and a 1 at the end. If the username is not unique, numeric characters are appended to the name to make it unique.
For example, if there are two guest users named John Smith, the first username would be jsmith and the second username would be jsmith1. Similarly, if the Minimum Username length is set to eight, then the two user names would be generated as jsmith01 and jsmith02.
Step 5
Configuring Random Guest Username Policy
You can create a guest usernames based upon a random mixture of alphabetic, numeric or special characters. The random guest username policy is used when the sponsor creates random accounts.
To configure a random guest username policy, complete the following steps:
Step 1
Step 2
Step 3
Step 4
Step 5
Random username length is the combination of the three length fields that is alphabetic, numeric and special other characters. The length of the username defines the total number of unique names that can be created. For example, if 10,000 users are to be created, you will not be able to create enough unique values with a name space that is two characters in length.
Note
Related Topics
•
•
Monitoring Sponsor and Guest Activity
Cisco ISE provides the following ways to view and monitor sponsor and guest activities:
Metric Meter
Cisco ISE provides an at-a-glance view of active guests in the network in a metric meter that appears on the Cisco ISE dashboard.
Guest Activity Report
This report helps you to view the Guest information for a selected time period.
To view this report,
1.
2.
Guest Accounting
This report helps you to view the logged in/out information for the particular guest for a selected time period.
To view this report,
1.
2.
Guest Sponsor Summary
This report helps you to view the sponsor information along with a graphical representation for a selected time period.
To view this report,
1.
2.
For More Information
See Chapter 23, "Reporting," for details on how to configure these reports.
See Chapter 22, "Monitoring and Troubleshooting," for details on monitoring and troubleshooting tools.
Audit Logging
During specific actions within the Guest and Sponsor portals, audit log messages are sent to the underlying audit system. By default, these messages appear in the /opt/CSCOcpm/logs/localStore/iseLocalStore.log file.
You can configure these messages to be sent by syslog to the Monitoring and Troubleshooting system and log collector. The monitoring subsystem presents the Sponsor and Guest activity logs.
See Chapter 22, "Monitoring and Troubleshooting," for more information on logging and log collection.
Guest login flow gets logged in the audit logs regardless whether the guest login has passed or failed.