Table Of Contents
Installing SharePoint Agent
Assumptions and Prerequisites
Installation Steps
Uninstallation Steps
Uninstalling CEPM SharePoint Agent V3.2.x.x
Installing SharePoint Agent
This chapter provides a step-by-step procedure for installing and uninstalling the SharePoint Agent.
Note
If you are using an older version of the SharePoint Agent (V3.2.x.x), you must uninstall it completely and install the current version. The uninstall steps for the current version will not work for uninstalling the older versions. You must follow the old procedures for unstalling SharePoint Agent V3.2.x.x.
Assumptions and Prerequisites
You must meet the following prerequisites before using the SharePoint Agent:
•
It is assumed that a fully-functional Microsoft Office SharePoint Server (MOSS) 2007 infrastructure exists with the following RTM builds:
–
NET FX 3.0
–
Office SharePoint Server 2007 including Excel Services
•
Some of the one-time installation components require system administration privileges on the SharePoint host to install.
•
It is also assumed that MOSS 2007 and IIS are not hardened prior to the implementation of the integrated solution including CEPM.
•
It is assumed that DMZ firewall ports will be open to allow point-to-point HTTP or HTTPS traffic between the PEPs resident on the MOSS IIS servers and the Policy Decision Points (PDPs) located in the internal network segment on a specific port (as configured).
•
The use of CEPM supported platform is assumed:
–
CEPM v3.x
–
Sun JDK 1.5/1.6 (with most recent minor version)
–
Windows Server 2003 Enterprise Edition SP1 (or more recent)
–
SQL Server 2005 (with most recent service pack)
–
IIS 6
–
Tomcat 5.5.20 windows service build or WebLogic/WebSphere application server
•
It is assumed that you have a basic knowledge of CEPM and MOSS 2007 solutions; this document is not meant to replace existing solution guides and other solution-related documentation.
•
It is assumed that you have already installed CEPM V3.3.0.0.
Caution 
Whenever you do the dataload in CEPM, you must relogin to the PAP console and accept the license agreement before doing the site synchronization.
Installation Steps
To install the SharePoint Agent, follow these steps:
Step 1
Expand the distribution (CEPM_SharepointAgentV3.3.0.0_32bit_NCache3.2.3.zip) file into the target directory. This creates a folder called `CEPM_SharepointAgentV3.3.0.0_32bit_NCache3.2.3' in the unzipped location.
Step 2
Go to \CEPM_SharepointAgentV3.3.0.0_32bit_NCache3.2.3\SPInstaller folder and run SharePointInstaller.exe file (by double-clicking it).
Step 3
This opens the MOSS Agent SolutionSetup Wizard which will prompt you through the installation steps in the following sequence:
1.
Welcome message: This screen displays the welcome message as given below:
Welcome to the MOSS Agent setup wizard.
The setup wizard will install and deploy MOSS Agent Solution to your SharePoint 2007
farm.
Click Next to continue.
2.
System Check - The wizard verifies the system configuration in a pre-defined sequence. If it is a fresh installation, a message "MOSS Agent Solution is not deployed" is displayed in the last stage of system verification. If the agent is already installed in the machine, this message will look like "MOSS Agent Solution is already installed." Click Next to continue.
3.
End-User License Agreement: This screen contains the end-user license agreement. It is important to read all the terms and conditions before accepting the license agreement. Select "I accept the terms in the license agreement" check box and click Next to continue.
4.
Site Collection Deployment Targets: This page displays a list of all the site applications existed in MOSS farm. A check box is present besides each site name. Select the required site(s) from the list by clicking on the coresponding checkbox(es). Click Next to continue. CEPM MOSS Agent Solution deployment will begin.
5.
Installing (Status bar): A status bar is displayed showing the percentage of completion of the installtion task. You can abort the installation at any time during the installation by clicking Abort. The Next button will be in disabled during the installation. It will be enabled once the process is comepleted.Click Next when done.
6.
Installation Successfully Completed: This screen shows the installation summary. If the installation is done successfully, it shows a message about the successful deployment of the solution in the selected site applications.
Step 4
Verify the installation. To do this, open the SharePoint Admin site and choose Central Administration > Operations > Solution Management page. In the list of solutions, you can see Com.Cisco.Agent.SharePoint.Deploy.wsp with the status as "Deployed". It also displays the names of the web applications under the heading "Deploy To". If the solution is deployed to multiple applications, you can verify the deployment by clicking on the solution.
Step 5
Open your site application. Click Site Actions > Site Settings.
Step 6
Under the Site Administration column, click Site Features link. In the Site features page, you will find two new features named CEPMCustomNavigationProvider and CEPMEventHandlers which are shown in deactivate state.
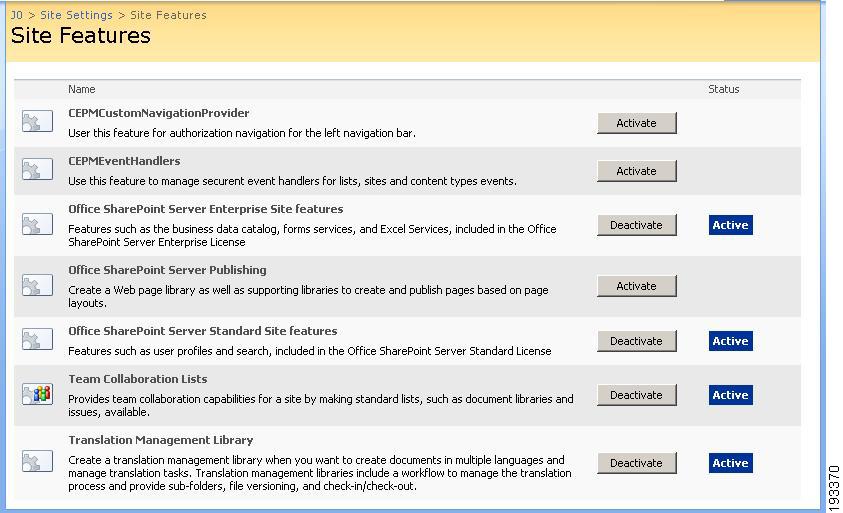
Figure 3-1 Site features
Step 7
Activate CEPMEventHandlers and CEPMCustomNavigationProvider features by clicking Activate button placed against each feature.
Activating these feature will:
a.
Install new menu items (CEPM Site Sync and CEPM EventHandler) for Site Administration and (CEPM Permissions) for Users and Permission contained in all Site Settings throughout the current site (see the following figure).
b.
Help synchronize site data with the PAP (on clicking CEPM Site Sync).
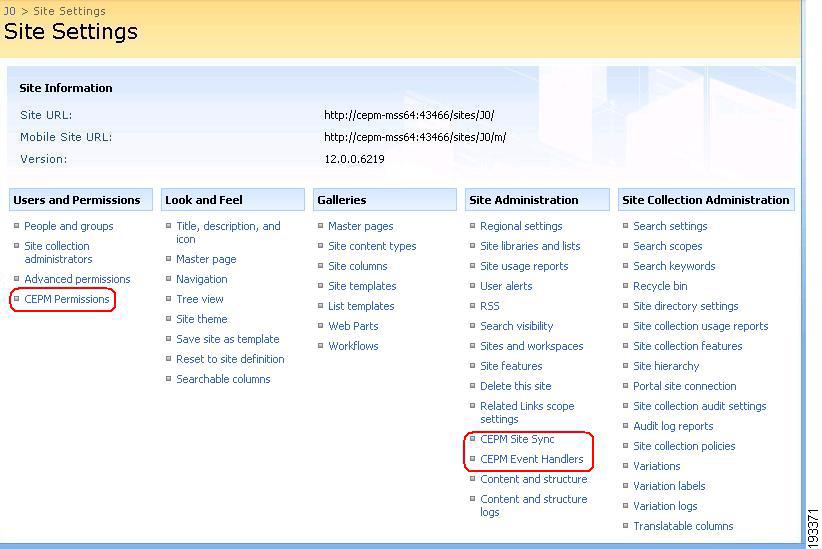
Figure 3-2 New menu items in Site Settings page
Step 8
Configuration for protecting Web Parts, items and documents
You can protect the MOSS resources by using HTTPModule (applicable to pages, items and documents)
Protecting MOSS resource types using HTTP Module:
You can make use of HTTPModule to protect the MOSS resource types such as pages, items and documents. To do this, edit the web.config file and enter the following text within the <httpModules> element to enable protection of MOSS resource types:
<add name="EMSIISAgentModule"
type="EMSIISAgent.EMSIISAgentModule, Com.Cisco.Agent.SharePoint,
Version=3.3.0.0, Culture=neutral,
PublicKeyToken=5e4be1f4e6ef363a" />
To protect webparts, add the following <RunTimeFilter Assembly> tag by commenting the existing tag present in the web.config file:
<!- - RuntimeFilter Assembly="Microsoft.Office.Server, Version=12.0.0.0, Culture=neutral,
PublicKeyToken=71e9bce111e9429c" Class="Microsoft.Office.Server.Audience.AudienceManager"
BuilderURL="audience_chooser.aspx" /-->
<RuntimeFilter Assembly="Com.Cisco.Agent.SharePoint, Version=3.3.0.0, Culture=neutral,
PublicKeyToken=5e4be1f4e6ef363a" Class="Com.Cisco.Agent.Sharepoint.CEPMRunTimeFilter" />
Step 9
Configuration for protecting navigation items
This is optional. If you want to enable CEPM authorization for items shown in left navigation pane, you must add the following code to <providers> tag of the web.config file.
<siteMap defaultProvider="CEPMNavigationProvider" enabled="true">
<add name="CEPMNavigationProvider"
description="Provider for trimming navigation using CEPM
authorization"
type="Com.Cisco.Agent.Sharepoint.CEPMNavigation,
Com.Cisco.Agent.SharePoint,
Version=3.3.0.0,
Culture=neutral, PublicKeyToken=5e4be1f4e6ef363a"
NavigationType="Current"/>
Step 10
This is optional. Use this step to enable caching in SharePoint Agent using NCache or DNCache. To do this, open pep_config.xml file and update the following tags:
a.
Update the cache tag by setting desicioncacheEnabled element to true. Mention the provider and the implementor details. Refer to CEPM PEP Configuration Guide for more details about configuring cache mechanism.
b.
Set the cache path under <dncache> tag with the location of DNCache.xml. For example:
<cachepath>C:/DNCache.xml</cachepath>
<cachename>sampleCacheNoIdle</cachename>
Make sure that DNCache.xml file must contain an entry named sampleCacheNoIdle.
If you wish to enable caching mechanism using NCache, open pep_config.xml and update the cache name under <ncache> tag as shown below:
<cachename>TestCache</cachename>
Step 11
Finally, copy the two CEPM SharePoint Agent files - pep.config and log.config files into the port directory of the site collection where web.config is present. For example, C:\Inetpub\wwwroot\wss\VirtualDirectories\2001, where 2001 is the port number in which the site is created.
Uninstallation Steps
Note
To uninstall the older version (V3.2.x.x) from your machine, refer to Uninstalling CEPM SharePoint Agent V3.2.x.x.
Follow this procedure to uninstall the SharePoint Agent from your machine:
Step 1
Go to \CEPM_SharepointAgentV3.3.0.0_32bit_NCache3.2.3\SPInstaller folder and run SharePointInstaller.exe file (by double-clicking it).
Step 2
This opens the MOSS Agent SolutionSetup Wizard which will prompt you through the uninstallation steps in the following sequence:
1.
Welcome message: This screen displays the welcome message. Click Next to continue.
2.
System Check - The wizard verifies the system configuration in a pre-defined sequence. As the agent is already installed in the machine, a message "MOSS Agent Solution is deployed" is displayed in the last stage of system verification. Click Next to continue.
3.
Repair or Remove: This screen prompts you to either repair or remove the solution.
–
Choose Repair to retract the solution from all web applications and redeploy it.
–
Choose Remove to retract the solution and remove it completely by deleting the solution from the SharePoint farm.
Click Next to continue.
4.
Uninstalling (Status bar): A status bar is displayed showing the percentage of completion of the uninstalltion task. Click Next when done.
5.
Uninstall Successfully Completed: This screen shows the task summary. If the uninstallation is done successfully, it shows a message about the successful retraction of the solution from your SharePoint farm.
Step 3
Verify the uninstallation. To do this, open the SharePoint Admin site and choose Central Administration > Operations > Solution Management page. The SharePoint Agent solution Com.Cisco.Agent.SharePoint.Deploy.wsp is removed from the list of solutions.
Uninstalling CEPM SharePoint Agent V3.2.x.x
You can uninstall the SharePoint Agent from your machine in two ways:
a) Through command prompt:
Execute RetractSolution.cmd file from the folder in which the installation build (CEPM_SharepointAgentV3.3.0.0_32bit_NCache3.2.3.zip) has been unzipped. This retracts and removes the solution.
b) Through UI:
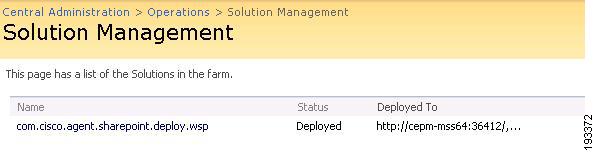
To Retract and delete the older solution from SharePoint Administration:
Step 1
Go to each site collection in which you have activated CEPMEventHandlers and CEPMCustomNavigationProvider features and deactivate it. You can do this by going to the Site Settings page and then clicking the link to go to the Site Features Management page.
Step 2
Ensure that the feature has been deactivated on all sites.
Step 3
Start up the WSS Central Administration application and navigate to the Operations tab. In the Global Configuration section, click Solution Management. You should see that the solution package named Com.Cisco.Agent.Sharepoint.Deploy.wsp is available and deployed as shown in the following figure.
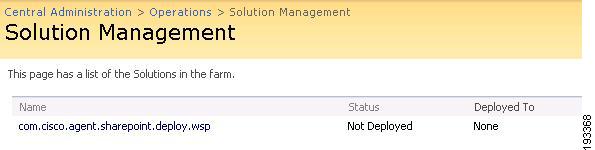
Figure 3-3 Solution Management Page
Step 4
Click on the name of the solution. The Solution Properties page appears from where you can retract the solution.
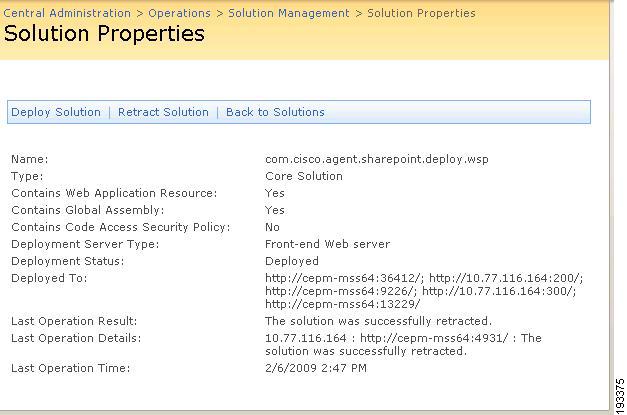
Figure 3-4 Solution Properties
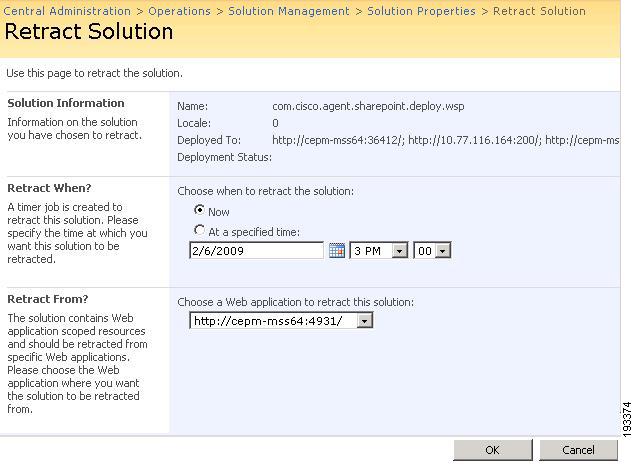
Step 5
Click Retract Solution, which displays the following page.
Figure 3-5 Retract Solution
If the solution is globally deployed, it will be retracted globally. The `Retract When?' section of this page provides you with two options either to retract the solution now or on a future specified time. The Retract From?' section provides you with a option to retract the solution globally or for a selected web application.
Step 6
Check the required options and click OK to undeploy the solution. This will take you back to the Solution Management page. You can see the status of the solution is changed to `Not Deployed'.
Figure 3-6 Solution Management page showing status of the solution as Not Deployed
Step 7
Click the package link again to totally remove the solution. The `Solution Properties' page appears.
Figure 3-7 Solution Properties page showing solution retraction message
Step 8
At this stage, you can either redeploy the solution or remove the solution. Click `Remove Solution' to remove the SharePoint Agent features from the MOSS site.
Step 9
Remove the following tag from the <httpModules> within web.config file:
<add name="EMSIISAgentModule"
type="EMSIISAgent.EMSIISAgentModule, Com.Cisco.Agent.SharePoint,
Version=3.3.0.0, Culture=neutral,
PublicKeyToken=5e4be1f4e6ef363a" />
Step 10
Optionally, remove CEPM Agent assembly files from the .NET GAC:
•
Com.Cisco.Agent.SharePoint
•
CEPMAgent3.x
•
log4net
•
DNCache
Step 11
Optionally, remove the SharePoint Agent from the MOSS site by editing the site's web.config file to remove the following safe-control:
<siteMap defaultProvider="CEPMNavigationProvider" enabled="true">
<add name="CEPMNavigationProvider"
description="Provider for trimming navigation using CEPM authorization"
type="Com.Cisco.agent.sharepoint.CEPMNavigation,
Com.Cisco.Agent.SharePoint,
Culture=neutral, PublicKeyToken=5e4be1f4e6ef363a"
NavigationType="Current"/>