Downloads |
 Feedback Feedback
|
Table Of Contents
Setting Up Axis Agent in a Web Application
Resource Discovery (For Creating Web Services Resources) using wsdl in CEPM
Steps to Test StockQuote Sample with CEPM Axis Agent
Obtaining Documentation and Submitting a Service Request
CEPM Axis Agent Guide
Revised: July 13, 2009, Doc Part No: OL-19563-01Contents
•
Setting Up Axis Agent in a Web Application
•
•
•
About This Document
Objective
This document gives the overview about the Axis Agent and explains the steps for setting up the Axis agent for the Web Application.
Audience
This guide is for administrators who use CEPM and are responsible for resource modelling and entitlement management.
Introduction
The Axis Authorization Handler operates as a coarse-grained authorization module for the protection of any Axis web service. The handler is inserted in the request flow of a web application, in front of any resource that requires authorization protection. The handler examines every incoming Simple Object Access Protocol (SOAP) request. It extracts the client certificate and the optional policy and role parameters. It passes the subject and other optional parameters to the authorization manager, and it sends back the result of the authorization operation.
•
•
When a web-based application is using Axis Handler, which is integrated with Cisco Entitlement Policy Manager (CEPM), Axis Handler helps the Axis Agent to fine-grain the authorization module.
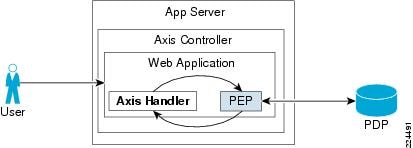
Figure 1 Axis Handler Flow
In Axis framework, while a user is trying to access a web application, the user is intercepted by an Axis Authorization Handler. This handler sends the authorization request to the Policy Enforcement Point (PEP) embedded within the same application. As a part of the CEPM features, the PEP forwards the request to the concerned Policy Decision Point(s) (PDP[s]). The PDP(s) authenticates the access permission and sends the decision to the PEP, which enables the user to access the requested application, based on the policy configured in the Policy Administation Point (PAP).
Setting Up Axis Agent in a Web Application
To set up Axis Agent in a web application, follow these steps:
Step 1
Step 2
Step 3
a.
b.
c.
d.
e.
–
–
<xpath key="key1">/soapenv:Envelope/soapenv:Header/EnvironmentVariables/KeyValues[key='ke y1']/value/text()</xpath>You can add as many attributes in the <environmentalAttribute> tag.
Step 4
a.
<requestFlow><handler type="java:com.cisco.epm.agent.axis.CepmAuthorizationHandler"/></requestFlow>b.
Step 5
-DCEPM_AGENT_CONFIG=<AXIS_HOME>\config\pep\pep_config.xml
-Dlog4j.configuration=<AXIS_HOME>\config\logging\logging.xml
-DCEPM_DECISION_CACHE_CONFIG=<AXIS_HOME>\config\jbosscache\jbosscache.xml
Step 6
Resource Discovery (For Creating Web Services Resources) using wsdl in CEPM
Step 1
Step 2
Step 3
Step 4
For example: http://host:port/TestService/services/StockQuoteService?wsdl.Step 5
Step 6
Steps to Test StockQuote Sample with CEPM Axis Agent
This distribution contains a sample StockQuote service which runs in Tomcat server.
Step 1
Step 2
Step 3
Step 4
•
<cache..<applicationgroup>Prime group</applicationgroup><application>StockQuote</application></cache>•
<axis-web-service><environmentalvariables><xpath key="key1">/soapenv:Envelope/soapenv:Header/EnvironmentVariables/KeyValues/key1/text()</xpath><xpath key="key2">/soapenv:Envelope/soapenv:Header/EnvironmentVariables/KeyValues/key2/text()</xpath></environmentalvariables></axis-web-service>Step 5
•
•
Step 6
URL: http://host:port/TestService/services/StockQuoteService?wsdlStep 7
Step 8
a.
http://host:port/TestService/services/StockQuoteServiceb.
c.
d.
e.
For Example:
testClient.bat http://localhost:8080/TestService/services/StockQuoteService Tom SUNW
value1 value2
Step 9
•
•
Documentation Updates
Table 1 Updates to CEPM Axis Agent Guide
July 9, 2009
Minor edits and template/boilerplate updates for publication to Cisco.com
April 3, 2009
Cisco Enterprise Policy Manager (EPM) Release 3.3.0.0
Related Documentation
CEPM_User_Guide_V3.3.0.0.pdf
Obtaining Documentation and Submitting a Service Request
For information on obtaining documentation, submitting a service request, and gathering additional information, see the monthly What's New in Cisco Product Documentation, which also lists all new and revised Cisco technical documentation, at:
http://www.cisco.com/en/US/docs/general/whatsnew/whatsnew.html
Subscribe to the What's New in Cisco Product Documentation as a Really Simple Syndication (RSS) feed and set content to be delivered directly to your desktop using a reader application. The RSS feeds are a free service and Cisco currently supports RSS Version 2.0.
CCDE, CCSI, CCENT, Cisco Eos, Cisco HealthPresence, the Cisco logo, Cisco Lumin, Cisco Nexus, Cisco Nurse Connect, Cisco Stackpower, Cisco StadiumVision, Cisco TelePresence, Cisco WebEx, DCE, and Welcome to the Human Network are trademarks; Changing the Way We Work, Live, Play, and Learn and Cisco Store are service marks; and Access Registrar, Aironet, AsyncOS, Bringing the Meeting To You, Catalyst, CCDA, CCDP, CCIE, CCIP, CCNA, CCNP, CCSP, CCVP, Cisco, the Cisco Certified Internetwork Expert logo, Cisco IOS, Cisco Press, Cisco Systems, Cisco Systems Capital, the Cisco Systems logo, Cisco Unity, Collaboration Without Limitation, EtherFast, EtherSwitch, Event Center, Fast Step, Follow Me Browsing, FormShare, GigaDrive, HomeLink, Internet Quotient, IOS, iPhone, iQuick Study, IronPort, the IronPort logo, LightStream, Linksys, MediaTone, MeetingPlace, MeetingPlace Chime Sound, MGX, Networkers, Networking Academy, Network Registrar, PCNow, PIX, PowerPanels, ProConnect, ScriptShare, SenderBase, SMARTnet, Spectrum Expert, StackWise, The Fastest Way to Increase Your Internet Quotient, TransPath, WebEx, and the WebEx logo are registered trademarks of Cisco Systems, Inc. and/or its affiliates in the United States and certain other countries.
All other trademarks mentioned in this document or website are the property of their respective owners. The use of the word partner does not imply a partnership relationship between Cisco and any other company. (0903R)
Any Internet Protocol (IP) addresses and phone numbers used in this document are not intended to be actual addresses and phone numbers. Any examples, command display output, network topology diagrams, and other figures included in the document are shown for illustrative purposes only. Any use of actual IP addresses or phone numbers in illustrative content is unintentional and coincidental.
© 2009 Cisco Systems, Inc. All rights reserved