Table Of Contents
Carrier Grade IPv6 over Virtualized Services Module (VSM)
Virtualized Services Module (VSM)
VSM Components
Features and Considerations
Installing CGv6 on VSM
Prerequisites
Installing CGv6 OVA Package
Activating CGv6 VM
Uninstalling CGv6 on VSM
Deactivating CGv6 VM
Uninstalling CGv6 OVA Package
Disabling the Service Enablement Feature
Implementing NAT44 on VSM
TCP Sequence Check
Address and Port-Dependent Filtering
Configuring NAT44 on VSM
Configuring a NAT44 Instance
Configuring the Application Service Virtual Interface
Configuring an Inside and Outside Address Pool Map
Configuring the Policy Functions
Configuring External Logging for the NAT Table Entries
Netflow Logging
Syslog Logging
Configuration Examples for Implementing CGv6
Configuring a Different Inside VRF Map to a Different Outside VRF for NAT44: Example
NAT44 Configuration: Example
Configuring TCP Sequence-Check: Example
Configuring Address and Port-Dependent Filtering: Example
Bulk Port Allocation and Syslog Configuration: Example
External Logging
Netflow v9 Support
Bulk Port Allocation
Destination-Based Logging
Carrier Grade IPv6 over Virtualized Services Module (VSM)
This module describes how to implement the Carrier Grade IPv6 (CGv6) over Virtualized Services Module (VSM).
This module consists of the following sections:
• Virtualized Services Module (VSM)
•Installing CGv6 on VSM
•Uninstalling CGv6 on VSM
•Implementing NAT44 on VSM
•Configuration Examples for Implementing CGv6
•External Logging
Virtualized Services Module (VSM)
VSM is the next generation service card on the Cisco ASR 9000 Series Aggregation Services Router. The software infrastructure on this card provides a virtual environment and the services run as virtual machines (VM) in this environment. The VMs simulate individual physical computing environments over a common hardware. The available hardware resources, like processor, memory, hard disk, and so on, are virtualized and allocated to individual virtual machines by the hypervisor.
VSM Components
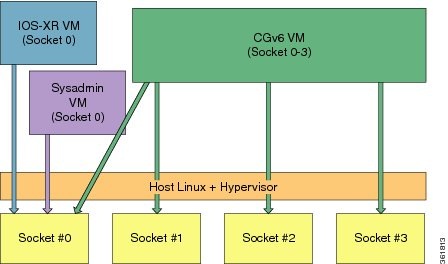
VSM is capable of hosting multiple VMs. It consists of the following components:
•IOS XR VM: This VM is used for managing the routing functions.
•System Admin VM: This VM is used for the system administration.
•Application VM: CGv6 is the application VM running on VSM. In the current release, only one CGv6 VM can run at a given time.
•Linux Host and Hypervisor: The routing functions and the system administration functions are run on separate virtual machines (VMs) over a Linux host operating system. The CGv6 VM, along with the other VMs, runs on the top of the KVM hypervisor.
Features and Considerations
Some of the features and considerations of VSM are:
•The CGv6 application has to run in a VM environment.
•The IOS XR Service Enablement CLIs are needed to create, delete, access, and operate on CGv6 VM.
•The VSM card can co-exist with other LCs including ISM.
•Each NP has 6 NP ports and can send traffic to 24 CGv6 Application processes.
•For each VSM card, a ServiceInfra interface needs to be configured.
•Traffic diversion may be done based on a static route or ACL-based forwarding (ABF).
•In the current release, VSM does not support multiple CGv6 VMs on the same card.
Installing CGv6 on VSM
The process of installing CGv6 on VSM involves the following:
•Prerequisites
•Installing CGv6 OVA Package
•Activating CGv6 VM
Note If you are performing an upgrade of CGv6 VM, it needs to be deactivated first, uninstalled, installed, and then activated.
Prerequisites
Ensure that you have installed the following images:
•asr9k-mini-px.vm (Base IOS-XR image)
•asr9k-services-infra.pie (VSM Services Infra package)
•asr9k-services-px.pie (CGv6 Services package)
•asr9k-fpd-px.pie (FPGA Image IOS XR package)
•asr9k-vsm-cgv6-<version>.ova (Linux Open Virtual Alliance or OVA package)
Installing CGv6 OVA Package
The CGv6 Virtual Machine (VM) is provided as an OVA package. Open Virtualization Appliance (OVA) is a single file distribution of the file package. The CGv6 OVA package consists of the following files:
•OVA Profile Descriptor file
•Package version file
•Linux Image file
The process of installation of CGv6 OVA package consists of the following steps:
Step 1 Copy the OVA file from the remote location to the RP disk.
RP/0/RSP0/CPU0:router# copy <tftp location>/asr9k-vsm-cgv6.ova disk0:/
Note Once the CGv6 OVA package is copied to RP's disk, you can install it on multiple VSMs on the same chasis.
Step 2 Before you run any VM command, enable virtual service.
RP/0/RSP0/CPU0:router(config)#virtual-service enable
RP/0/RSP0/CPU0:router(config)#commit
Step 3 Install CGv6 VM on a specific VSM card.
RP/0/RSP0/CPU0:router#virtual-service install name <service/VM name> package <OVA package
name> node <VSM_location>
Note The installation process might take about 7-8 minutes.
Step 4 Check the progress of the installation process by using the show virtual-service list command. Once the installation is complete, the status is changed to Installed.
RP/0/RSP0/CPU0:router#sh virtual-service list
Name Status Package Name Node
cgn1 Installing asr9k-vsm-cgv6.ova 0/1/CPU0
RP/0/RSP0/CPU0:NAT#sh virtual-service list
Name Status Package Name Node
cgn1 Installed asr9k-vsm-cgv6.ova 0/1/CPU0
Activating CGv6 VM
The steps to activate the CGv6 VM are as follows:
Step 1 Configure the CGv6 VM and the 12 Gigabit Ethernet (GE) interfaces in the global configuration mode.
RP/0/RSP0/CPU0:router(config)#virtual-service cgn123
RP/0/RSP0/CPU0:router(config-virt-service)#vnic interface tenGigE 0/2/1/0
RP/0/RSP0/CPU0:router(config-virt-service)#vnic interface tenGigE 0/2/1/1
RP/0/RSP0/CPU0:router(config-virt-service)#vnic interface tenGigE 0/2/1/2
RP/0/RSP0/CPU0:router(config-virt-service)#vnic interface tenGigE 0/2/1/3
RP/0/RSP0/CPU0:router(config-virt-service)#vnic interface tenGigE 0/2/1/4
RP/0/RSP0/CPU0:router(config-virt-service)#vnic interface tenGigE 0/2/1/5
RP/0/RSP0/CPU0:router(config-virt-service)#vnic interface tenGigE 0/2/1/6
RP/0/RSP0/CPU0:router(config-virt-service)#vnic interface tenGigE 0/2/1/7
RP/0/RSP0/CPU0:router(config-virt-service)#vnic interface tenGigE 0/2/1/8
RP/0/RSP0/CPU0:router(config-virt-service)#vnic interface tenGigE 0/2/1/9
RP/0/RSP0/CPU0:router(config-virt-service)#vnic interface tenGigE 0/2/1/10
RP/0/RSP0/CPU0:router(config-virt-service)#vnic interface tenGigE 0/2/1/11
RP/0/RSP0/CPU0:router(config-virt-service)#commit
Step 2 Activate the CGv6 VM.
RP/0/RSP0/CPU0:router(config-virt-service)#activate
RP/0/RSP0/CPU0:router(config-virt-service)#commit
Step 3 Check the progress of the activation process by using the show virtual-service list command. Once the VM is activated, the status changes to Activated.
RP/0/RSP0/CPU0:router#sh virtual-service list Fri Aug  2 18:12:23.863 UTC   Virtual
Service List:
------------------------------------------------------------
cgn123 Activated asr9k-vsm-cgv6.ova
Note Once the VM is activated, it takes about 5 minutes for the CGv6 applications to come up.
Step 4 Configure the ServiceInfra interface.
RP/0/RSP0/CPU0:router#conf t
RP/0/RSP0/CPU0:router(config)# interface ServiceInfra 1
RP/0/RSP0/CPU0:router(config-int)# ipv4 address 3.1.1.1 255.255.255.252
RP/0/RSP0/CPU0:router(config-int)# service-location 0/2/CPU0
RP/0/RSP0/CPU0:router(config-int)# commit
Step 5 Before you configure NAT44, ensure that the 12 Gigabit Ethernet (GE) interfaces are up. If they are in the shutdown mode, then change their mode by using the no shut command.
RP/0/RSP0/CPU0:router(config)#interface tenGigE 0/2/1/0
RP/0/RSP0/CPU0:router(config-if)#interface tenGigE 0/2/1/1
RP/0/RSP0/CPU0:router(config-if)#interface tenGigE 0/2/1/2
RP/0/RSP0/CPU0:router(config-if)#interface tenGigE 0/2/1/3
RP/0/RSP0/CPU0:router(config-if)#interface tenGigE 0/2/1/4
RP/0/RSP0/CPU0:router(config-if)#interface tenGigE 0/2/1/5
RP/0/RSP0/CPU0:router(config-if)#interface tenGigE 0/2/1/6
RP/0/RSP0/CPU0:router(config-if)#interface tenGigE 0/2/1/7
RP/0/RSP0/CPU0:router(config-if)#interface tenGigE 0/2/1/8
RP/0/RSP0/CPU0:router(config-if)#interface tenGigE 0/2/1/9
RP/0/RSP0/CPU0:router(config-if)#interface tenGigE 0/2/1/10
RP/0/RSP0/CPU0:router(config-if)#interface tenGigE 0/2/1/11
RP/0/RSP0/CPU0:router(config-if)#no shut
RP/0/RSP0/CPU0:router(config-if)#commit
Uninstalling CGv6 on VSM
The process of uninstalling CGv6 VSM involves the following processes:
•Deactivating CGv6 VM
•Uninstalling CGv6 OVA Package
•Disabling the Service Enablement Feature
Deactivating CGv6 VM
To de-activate the CGv VM, perform the following in the global configuration mode:
RP/0/RP0/CPU0:router(config)#virtual-service cgn123
RP/0/RP0/CPU0:router(config-virt-service)#no activate
RP/0/RP0/CPU0:router(config-virt-service)#commit
To remove the CGv6 instance, perform the following in the global configuration mode:
RP/0/RP0/CPU0:router(config)#no virtual-service cgn123
RP/0/RP0/CPU0:router(config)#commit
Uninstalling CGv6 OVA Package
To uninstall the CGv6 OVA package, run the following commands in the EXEC mode:
RP/0/RSP0/CPU0:router# virtual-service uninstall name cgn123 node 0/2/CPU0
Disabling the Service Enablement Feature
To disable the service enablement feature, run the following commands in the global configuration mode.
RP/0/RP0/CPU0:router(config)#no virtual-service enable
RP/0/RP0/CPU0:router(config)#commit
Implementing NAT44 on VSM
This section explains the implementation of NAT44 on VSM.
In this release, VSM supports the following two features on NAT44. The configurations for these features are explained in the later sections.
•TCP Sequence Check
•Address and Port-Dependent Filtering
TCP Sequence Check
In order to overcome security threats to less secure networks, Cisco Virtualized Services Module (VSM) performs TCP sequence check.
A sequence number is a 32-bit number that is included in a packet in a TCP session. The sequence numbers of the incoming packets are stored in the translation or session entry. If a packet's sequence number does not match the expected sequence number, then the packet is dropped . In this way, the networks can be secured from spoofed packets.
You can perform these TCP sequence checks by using the sequence-check command. An optional keyword, diff-window, has been provided for a user to define and configure the accepted expected range of sequence numbers. But it is recommended that the user does not specify this range and instead allows the router to compute the range for each TCP session based on the client-server negotiation.
Two counters are configured for the TCP sequence checks:
•Out-to-In packets counter: This counter keeps a count of the packets whose sequence numbers did not match the expected range. But yet these packets are translated and forwarded because TCP sequence check has not been configured.
•Dropped packets counter: This counter keeps a count of the packets that were dropped because of the TCP sequence check.
The counters are displayed by using the show cgn nat44 counters command.
Address and Port-Dependent Filtering
Currently, CGN on VSM implements the following by default:
•Endpoint-Independent Mapping: This mapping process reuses the port mapping for subsequent packets that are sent from the same internal IP address and port to any external IP address and port.
•Endpoint-Independent Filtering: This filtering process filters out only packets that are not destined to the internal address and port regardless of the external IP address and port source.
In such a configuration, by knowing the translated IP address and the port of a private host, any malicious host in a public network can initiate packet floods to that private host. In order to prevent such attacks, the address and port-dependent filtering feature has to be enabled by using the filter-policy command. The user can disable the filtering based on port by using the ignore-port keyword with this command.
Two counters are configured for the address and port-dependent filtering:
•Total number of sessions created due to Out2In packets: This counter keeps a count of the sessions that were created by the packets coming from outside.
•Number of Out2In drops due to end point filtering: This counter keeps a count of the packets that were dropped because of the endpoint filtering.
The counters are displayed by using the show cgn nat44 counters command.
Configuring NAT44 on VSM
Perform these tasks to configure NAT44 on VSM.
•Configuring a NAT44 Instance
•Configuring the Application Service Virtual Interface
•Configuring the Policy Functions
•Configuring One-to-One Mapping for NAT44 over VSM
Configuring a NAT44 Instance
Perform this task to configure a NAT44 instance.
SUMMARY STEPS
1. configure
2. service cgn instance-name
3. service-type nat44 instance-name
4. end
or
commit
DETAILED STEPS
| |
Command or Action
|
Purpose
|
Step 1
|
configure
Example:
RP/0/RP0/CPU0:router# configure
|
Enters global configuration mode.
|
Step 2
|
service cgn nat44 instance-name
Example:
RP/0/RP0/CPU0:router(config)# service cgn cgn1
RP/0/RP0/CPU0:router(config-cgn)#
|
Configures the instance named cgn1 for the CGv6 NAT44 application and enters CGv6 configuration mode.
|
Step 3
|
service-location preferred-active node-id
|
Configures the active locations for the CGv6 application.
Note: preferred-standby option is supported in Cisco
IOS XR Release 4.3.0 onwards for redundancy.
|
Step 4
|
service-type nat44 nat1
Example:
RP/0/RP0/CPU0:router(config-cgn)# service-type
nat44 nat1
|
Configures the service type keyword definition for CGv6 NAT44 application.
|
Step 5
|
end
or
commit
Example:
RP/0/RP0/CPU0:router(config-cgn)# end
or
RP/0/RP0/CPU0:router(config-cgn)# commit
|
Saves configuration changes.
•When you issue the end command, the system prompts you to commit changes:
Uncommitted changes found, commit them before
exiting (yes/no/cancel)?
[cancel]:
–Entering yes saves configuration changes to the running configuration file, exits the configuration session, and returns the router to EXEC mode.
–Entering no exits the configuration session and returns the router to EXEC mode without committing the configuration changes.
–Entering cancel leaves the router in the current configuration session without exiting or committing the configuration changes.
•Use the commit command to save the configuration changes to the running configuration file and remain within the configuration session.
|
Configuring the Application Service Virtual Interface
The following section lists guidelines for selecting serviceapp interfaces for NAT44. Here <n> is an odd integer.
•Pair ServiceApp<n> with ServiceApp<n+1>. This is to ensure that the ServiceApp pairs works with a maximum throughput. For example, ServiceApp1 with ServiceApp2 or ServiceApp3 with ServiceApp4.
•Pair ServiceApp<n> with ServiceApp<n+5> or ServiceApp<n+9>. However, maintaining a track of these associations can be error prone. For example, ServiceApp1 with ServiceApp6, ServiceApp1 with ServiceApp10, ServiceApp3 with ServiceApp8, or ServiceApp3 with ServiceApp12. Hence it is not recommended.
•Pair ServiceApp<n> with ServiceApp<n+4>. For example, ServiceApp1 with ServiceApp5, or ServiceApp2 with ServiceApp6. Although such ServiceApp pairs work, the aggregate throughput for Inside-to-Outside and Outside-to-Inside traffic for the ServiceApp pair is halved.
•Do not pair ServiceApp<n> with ServiceApp<n+1>. When used, Outside-to-Inside traffic is dropped because traffic flows in the wrong dispatcher and core.
One ServiceApp interface pair can be used as inside and the other as outside.
Perform the following tasks to configure the application service virtual interface (SVI) to forward data traffic.
SUMMARY STEPS
1. configure
2. interface ServiceApp value
3. ipv4 address address/mask
4. service cgn instance-name service-type nat44
5. vrf vrf-name
6. end
or
commit
DETAILED STEPS
| |
Command or Action
|
Purpose
|
Step 1
|
configure
Example:
RP/0/RP0/CPU0:router# configure
|
Enters global configuration mode.
|
Step 2
|
interface ServiceApp value
Example:
RP/0/RP0/C
PU0:router(config)# interface ServiceApp 1
RP/0/RP0/CPU0:router(config-if)#
|
Configures the application SVI as 1 and enters interface configuration mode.
|
Step 3
|
ipv4 address address/mask
Example:
RP/0/RP0/CPU0:router(config-if)# ipv4 address
1.1.1.1/30
|
Sets the primary IPv4 address for an interface.
|
Step 4
|
service cgn instance-name service-type nat44
Example:
RP/0/RP0/CPU0:router(config-if)# service cgn
cgn1 service-type nat44
|
Configures the instance named cgn1 for the CGv6 application and enters CGv6 configuration mode.
|
Step 5
|
vrf vrf-name
Example:
RP/0/RP0/CPU0:router(config-if)# vrf insidevrf1
|
Configures the VPN routing and forwarding (VRF) for the
Service Application interface
|
Step 6
|
end
or
commit
Example:
RP/0/RP0/CPU0:router(config-if)# end
or
RP/0/RP0/CPU0:router(config-if)# commit
|
Saves configuration changes.
•When you issue the end command, the system prompts you to commit changes:
Uncommitted changes found, commit them before
exiting (yes/no/cancel)?
[cancel]:
–Entering yes saves configuration changes to the running configuration file, exits the configuration session, and returns the router to EXEC mode.
–Entering no exits the configuration session and returns the router to EXEC mode without committing the configuration changes.
–Entering cancel leaves the router in the current configuration session without exiting or committing the configuration changes.
•Use the commit command to save the configuration changes to the running configuration file and remain within the configuration session.
|
Configuring an Inside and Outside Address Pool Map
Perform this task to configure an inside and outside address pool map with the following scenarios.
•The designated address pool is used for CNAT.
•One inside VRF is mapped to only one outside VRF or a default VRF.
•Max Outside public pool per VSM/CGv6 instance is 64 K or 65536 addresses. That is, if a /16 address pool is mapped, then we cannot map any other pool to that particular VSM.
•Multiple inside vrf cannot be mapped to same outside address pool.
•While Mapping Outside Pool Minimum value for prefix is 16 and maximum value is 27.
SUMMARY STEPS
1. configure
2. service cgn instance-name
3. service-type nat44 nat1
4. inside-vrf vrf-name
5. map [outside-vrf outside-vrf-name] address-pool address/prefix
6. end
or
commit
DETAILED STEPS
| |
Command or Action
|
Purpose
|
Step 1
|
configure
Example:
RP/0/RP0/CPU0:router# configure
|
Enters global configuration mode.
|
Step 2
|
service cgn instance-name
Example:
RP/0/RP0/CPU0:router(config)# service cgn cgn1
RP/0/RP0/CPU0:router(config-cgn)#
|
Configures the instance named cgn1 for the CGv6 application and enters CGv6 configuration mode.
|
Step 3
|
service-type nat44 nat1
Example:
RP/0/RP0/CPU0:router(config-cgn)# service-type
nat44 nat1
|
Configures the service type keyword definition for CGv6 NAT44 application.
|
Step 4
|
inside-vrf vrf-name
Example:
RP/0/RP0/CPU0:router(config-cgn-nat44)#
inside-vrf insidevrf1
RP/0/RP0/CPU0:router(config-cgn-invrf)#
|
Configures an inside VRF named insidevrf1 and enters CGv6 inside VRF configuration mode.
|
Step 5
|
map [outside-vrf outside-vrf-name] address-pool
address/prefix
Example:
RP/0/RP0/CPU0:router(config-cgn-invrf)# map
outside-vrf outside vrf1 address-pool
10.10.0.0/24
|
Configures an inside VRF to an outside VRF and address pool mapping. Sometimes, if 2 inside VRFs are mapped to a single outside VRF, then use the following:
map outside-vrf outside vrf1 outsideServiceApp ServiceApp206 address-pool 10.10.0.0/24
|
Step 6
|
end
or
commit
Example:
RP/0/RP0/CPU0:router(config-cgn-invrf-afi)# end
or
RP/0/RP0/CPU0:router(config-cgn-invrf-afi)#
commit
|
Saves configuration changes.
•When you issue the end command, the system prompts you to commit changes:
Uncommitted changes found, commit them before
exiting (yes/no/cancel)?
[cancel]:
–Entering yes saves configuration changes to the running configuration file, exits the configuration session, and returns the router to EXEC mode.
–Entering no exits the configuration session and returns the router to EXEC mode without committing the configuration changes.
–Entering cancel leaves the router in the current configuration session without exiting or committing the configuration changes.
•Use the commit command to save the configuration changes to the running configuration file and remain within the configuration session.
|
Configuring the Policy Functions
Perform these tasks to configure the policy functions.
•Configuring the Port Limit Per Subscriber
•Configuring the Timeout Value for the Protocol
•Configuring FTP ALG
•Configuring PPTP ALG
•Configuring RTSP ALG
•Configuring the TCP Adjustment Value for the Maximum Segment Size
•Configuring the Refresh Direction for the Network Address Translation
•Configuring Static Port Forwarding for Port Numbers
•Configuring the Dynamic Port Ranges
Configuring the Port Limit Per Subscriber
Perform this task to configure the port limit per subscriber for the system that includes TCP, UDP, and ICMP.
SUMMARY STEPS
1. configure
2. service cgn instance-name
3. service-type nat44 nat1
4. portlimit value
5. end
or
commit
DETAILED STEPS
| |
Command or Action
|
Purpose
|
Step 1
|
configure
Example:
RP/0/RP0/CPU0:router# configure
|
Enters global configuration mode.
|
Step 2
|
service cgn instance-name
Example:
RP/0/RP0/CPU0:router(config)# service cgn cgn1
RP/0/RP0/CPU0:router(config-cgn)#
|
Configures the instance named cgn1 for the CGv6 application and enters CGv6 configuration mode.
|
Step 3
|
service-type nat44 nat1
Example:
RP/0/RP0/CPU0:router(config-cgn)# service-type
nat44 nat1
|
Configures the service type keyword definition for CGv6 NAT44 application.
|
Step 4
|
portlimit value
Example:
RP/0/RP0/CPU0:router(config-cgn-nat44)#
portlimit 10
|
Limits the number of entries per address for each subscriber of the system
|
Step 5
|
end
or
commit
Example:
RP/0/RP0/CPU0:router(config-cgn)# end
or
RP/0/RP0/CPU0:router(config-cgn)# commit
|
Saves configuration changes.
•When you issue the end command, the system prompts you to commit changes:
Uncommitted changes found, commit them before
exiting (yes/no/cancel)?
[cancel]:
–Entering yes saves configuration changes to the running configuration file, exits the configuration session, and returns the router to EXEC mode.
–Entering no exits the configuration session and returns the router to EXEC mode without committing the configuration changes.
–Entering cancel leaves the router in the current configuration session without exiting or committing the configuration changes.
•Use the commit command to save the configuration changes to the running configuration file and remain within the configuration session.
|
Configuring the Timeout Value for the Protocol
•Configuring the Timeout Value for the ICMP Protocol
•Configuring the Timeout Value for the TCP Session
•Configuring the Timeout Value for the UDP Session
Configuring the Timeout Value for the ICMP Protocol
Perform this task to configure the timeout value for the ICMP type for the CGv6 instance.
SUMMARY STEPS
1. configure
2. service cgn instance-name
3. service-type nat44 nat1
4. protocol icmp
5. timeout seconds
6. end
or
commit
DETAILED STEPS
| |
Command or Action
|
Purpose
|
Step 1
|
configure
Example:
RP/0/RP0/CPU0:router# configure
|
Enters global configuration mode.
|
Step 2
|
service cgn instance-name
Example:
RP/0/RP0/CPU0:router(config)# service cgn cgn1
RP/0/RP0/CPU0:router(config-cgn)#
|
Configures the instance named cgn1 for the CGv6 application and enters CGv6 configuration mode.
|
Step 3
|
service-type nat44 nat1
Example:
RP/0/RP0/CPU0:router(config-cgn)# service-type
nat44 nat1
|
Configures the service type keyword definition for CGv6 NAT44 application.
|
Step 4
|
protocol icmp
Example:
RP/0/RP0/CPU0:router(config-cgn-nat44)#
protocol icmp
RP/0/RP0/CPU0:router(config-cgn-proto)#
|
Configures the ICMP protocol session. The example shows how to configure the ICMP protocol for the CGv6 instance named cgn1.
|
Step 5
|
timeout seconds
Example:
RP/0/RP0/CPU0:router(config-cgn-proto)# timeout
908
|
Configures the timeout value as 908 for the ICMP session for the CGv6 instance named cgn1.
|
Step 6
|
end
or
commit
Example:
RP/0/RP0/CPU0:router(config-cgn-proto)# end
or
RP/0/RP0/CPU0:router(config-cgn-proto)# commit
|
Saves configuration changes.
•When you issue the end command, the system prompts you to commit changes:
Uncommitted changes found, commit them before
exiting (yes/no/cancel)?
[cancel]:
–Entering yes saves configuration changes to the running configuration file, exits the configuration session, and returns the router to EXEC mode.
–Entering no exits the configuration session and returns the router to EXEC mode without committing the configuration changes.
–Entering cancel leaves the router in the current configuration session without exiting or committing the configuration changes.
•Use the commit command to save the configuration changes to the running configuration file and remain within the configuration session.
|
Configuring the Timeout Value for the TCP Session
Perform this task to configure the timeout value for either the active or initial sessions for TCP.
SUMMARY STEPS
1. configure
2. service cgn instance-name
3. service-type nat44 nat1
4. protocol tcp
5. session {active | initial} timeout seconds
6. end
or
commit
DETAILED STEPS
| |
Command or Action
|
Purpose
|
Step 1
|
configure
Example:
RP/0/RP0/CPU0:router# configure
|
Enters global configuration mode.
|
Step 2
|
service cgn instance-name
Example:
RP/0/RP0/CPU0:router(config)# service cgn cgn1
RP/0/RP0/CPU0:router(config-cgn)#
|
Configures the instance named cgn1 for the CGv6 application and enters CGv6 configuration mode.
|
Step 3
|
service-type nat44 nat1
Example:
RP/0/RP0/CPU0:router(config-cgn)# service-type
nat44 nat1
|
Configures the service type keyword definition for CGv6 NAT44 application.
|
Step 4
|
protocol tcp
Example:
RP/0/RP0/CPU0:router(config-cgn-nat44)#
protocol tcp
RP/0/RP0/CPU0:router(config-cgn-proto)#
|
Configures the TCP protocol session. The example shows how to configure the TCP protocol for the CGv6 instance named cgn1.
|
Step 5
|
session {active | initial} timeout seconds
Example:
RP/0/RP0/CPU0:router(config-cgn-proto)# session
initial timeout 90
|
Configures the timeout value as 90 for the TCP session. The example shows how to configure the initial session timeout.
|
Step 6
|
end
or
commit
Example:
RP/0/RP0/CPU0:router(config-cgn-proto)# end
or
RP/0/RP0/CPU0:router(config-cgn-proto)# commit
|
Saves configuration changes.
•When you issue the end command, the system prompts you to commit changes:
Uncommitted changes found, commit them before
exiting (yes/no/cancel)?
[cancel]:
–Entering yes saves configuration changes to the running configuration file, exits the configuration session, and returns the router to EXEC mode.
–Entering no exits the configuration session and returns the router to EXEC mode without committing the configuration changes.
–Entering cancel leaves the router in the current configuration session without exiting or committing the configuration changes.
•Use the commit command to save the configuration changes to the running configuration file and remain within the configuration session.
|
Configuring the Timeout Value for the UDP Session
Perform this task to configure the timeout value for either the active or initial sessions for UDP.
SUMMARY STEPS
1. configure
2. service cgn instance-name
3. service-type nat44 nat1
4. protocol udp
5. session {active | initial} timeout seconds
6. end
or
commit
DETAILED STEPS
| |
Command or Action
|
Purpose
|
Step 1
|
configure
Example:
RP/0/RP0/CPU0:router# configure
|
Enters global configuration mode.
|
Step 2
|
service cgn instance-name
Example:
RP/0/RP0/CPU0:router(config)# service cgn cgn1
RP/0/RP0/CPU0:router(config-cgn)#
|
Configures the instance named cgn1 for the CGv6 application and enters CGv6 configuration mode.
|
Step 3
|
service-type nat44 nat1
Example:
RP/0/RP0/CPU0:router(config-cgn)# service-type
nat44 nat1
|
Configures the service type keyword definition for CGv6 NAT44 application.
|
Step 4
|
protocol udp
Example:
RP/0/RP0/CPU0:router(config-cgn-nat44)#
protocol udp
RP/0/RP0/CPU0:router(config-cgn-proto)#
|
Configures the UDP protocol sessions. The example shows how to configure the TCP protocol for the CGv6 instance named cgn1.
|
Step 5
|
session {active | initial} timeout seconds
Example:
RP/0/RP0/CPU0:router(config-cgn-proto)# session
active timeout 90
|
Configures the timeout value as 90 for the UDP session. The example shows how to configure the active session timeout.
|
Step 6
|
end
or
commit
Example:
RP/0/RP0/CPU0:router(config-cgn-proto)# end
or
RP/0/RP0/CPU0:router(config-cgn-proto)# commit
|
Saves configuration changes.
•When you issue the end command, the system prompts you to commit changes:
Uncommitted changes found, commit them before
exiting (yes/no/cancel)?
[cancel]:
–Entering yes saves configuration changes to the running configuration file, exits the configuration session, and returns the router to EXEC mode.
–Entering no exits the configuration session and returns the router to EXEC mode without committing the configuration changes.
–Entering cancel leaves the router in the current configuration session without exiting or committing the configuration changes.
•Use the commit command to save the configuration changes to the running configuration file and remain within the configuration session.
|
Configuring FTP ALG
Perform this task to configure FTP as the ALG for the specified NAT44 instance.
SUMMARY STEPS
1. configure
2. service cgn instance-name
3. service-type nat44 instance-name
4. alg activeFTP
5. end
or
commit
DETAILED STEPS
| |
Command or Action
|
Purpose
|
Step 1
|
configure
Example:
RP/0/RP0/CPU0:router# configure
|
Enters global configuration mode.
|
Step 2
|
service cgn instance-name
Example:
RP/0/RP0/CPU0:router(config)# service cgn cgn1
RP/0/RP0/CPU0:router(config-cgn)#
|
Configures the instance named cgn1 for the CGN application and enters CGN configuration mode.
|
Step 3
|
service-type nat44 nat1
Example:
RP/0/RP0/CPU0:router(config-cgn)# service-type
nat44 nat1
|
Configures the service type keyword definition for NAT44 application.
|
Step 4
|
alg activeFTP
Example:
RP/0/RP0/CPU0:router(config-cgn-nat44)# alg
activeFTP
|
Configures the FTP ALG on the NAT44 instance.
|
Step 5
|
end
or
commit
Example:
RP/0/RP0/CPU0:router(config-cgn)# end
or
RP/0/RP0/CPU0:router(config-cgn)# commit
|
Saves configuration changes.
•When you issue the end command, the system prompts you to commit changes:
Uncommitted changes found, commit them before
exiting (yes/no/cancel)?
[cancel]:
–Entering yes saves configuration changes to the running configuration file, exits the configuration session, and returns the router to EXEC mode.
–Entering no exits the configuration session and returns the router to EXEC mode without committing the configuration changes.
–Entering cancel leaves the router in the current configuration session without exiting or committing the configuration changes.
•Use the commit command to save the configuration changes to the running configuration file and remain within the configuration session.
|
Configuring PPTP ALG
Perform this task to configure PPTP as the ALG for the specified NAT44 instance.
SUMMARY STEPS
1. configure
2. service cgn instance-name
3. service-type nat44 instance-name
4. alg pptpAlg
5. end
or
commit
DETAILED STEPS
| |
Command or Action
|
Purpose
|
Step 1
|
configure
Example:
RP/0/RP0/CPU0:router# configure
|
Enters global configuration mode.
|
Step 2
|
service cgn instance-name
Example:
RP/0/RP0/CPU0:router(config)# service cgn cgn1
RP/0/RP0/CPU0:router(config-cgn)#
|
Configures the instance named cgn1 for the CGN application and enters CGN configuration mode.
|
Step 3
|
service-type nat44 nat1
Example:
RP/0/RP0/CPU0:router(config-cgn)# service-type
nat44 nat1
|
Configures the service type keyword definition for NAT44 application.
|
Step 4
|
alg pptpAlg
Example:
RP/0/RP0/CPU0:router(config-cgn-nat44)# alg
pptpAlg
|
Configures PPTP as the ALG for the NAT44 instance.
|
Step 5
|
end
or
commit
Example:
RP/0/RP0/CPU0:router(config-cgn)# end
or
RP/0/RP0/CPU0:router(config-cgn)# commit
|
Saves configuration changes.
•When you issue the end command, the system prompts you to commit changes:
Uncommitted changes found, commit them before
exiting (yes/no/cancel)?
[cancel]:
–Entering yes saves configuration changes to the running configuration file, exits the configuration session, and returns the router to EXEC mode.
–Entering no exits the configuration session and returns the router to EXEC mode without committing the configuration changes.
–Entering cancel leaves the router in the current configuration session without exiting or committing the configuration changes.
•Use the commit command to save the configuration changes to the running configuration file and remain within the configuration session.
|
Configuring RTSP ALG
Perform this task to configure RTSP as the ALG for the specified NAT44 instance. RTSP packets are usually destined to port 554. But this is not always true because RTSP port value can be configured.
SUMMARY STEPS
1. configure
2. service cgn instance-name
3. service-type nat44 instance-name
4. alg rtsp server-port value
5. end
or
commit
DETAILED STEPS
| |
Command or Action
|
Purpose
|
Step 1
|
configure
Example:
RP/0/RP0/CPU0:router# configure
|
Enters global configuration mode.
|
Step 2
|
service cgn instance-name
Example:
RP/0/RP0/CPU0:router(config)# service cgn cgn1
RP/0/RP0/CPU0:router(config-cgn)#
|
Configures the instance named cgn1 for the CGN application and enters CGN configuration mode.
|
Step 3
|
service-type nat44 nat1
Example:
RP/0/RP0/CPU0:router(config-cgn)# service-type
nat44 nat1
|
Configures the service type keyword definition for NAT44 application.
|
Step 4
|
alg rtsp [server-port] value
Example:
RP/0/RP0/CPU0:router(config-cgn-nat44)# alg
rtsp server-port 5000
|
Configures the rtsp ALG on the NAT44 instance for server port 5000. The range is from 1 to 65535. The default port is 554.
Caution The option of specifying a server port) is currently not supported. Even if you configure some port, RTSP works only on the default port (554).
|
Step 5
|
end
or
commit
Example:
RP/0/RP0/CPU0:router(config-cgn)# end
or
RP/0/RP0/CPU0:router(config-cgn)# commit
|
Saves configuration changes.
•When you issue the end command, the system prompts you to commit changes:
Uncommitted changes found, commit them before
exiting (yes/no/cancel)?
[cancel]:
–Entering yes saves configuration changes to the running configuration file, exits the configuration session, and returns the router to EXEC mode.
–Entering no exits the configuration session and returns the router to EXEC mode without committing the configuration changes.
–Entering cancel leaves the router in the current configuration session without exiting or committing the configuration changes.
•Use the commit command to save the configuration changes to the running configuration file and remain within the configuration session.
|
Configuring the TCP Adjustment Value for the Maximum Segment Size
Perform this task to configure the adjustment value for the maximum segment size (MSS) for the VRF. You can configure the TCP MSS adjustment value on each VRF.
SUMMARY STEPS
1. configure
2. service cgn instance-name
3. service-type nat44 nat1
4. inside-vrf vrf-name
5. protocol tcp
6. mss size
7. end
or
commit
DETAILED STEPS
| |
Command or Action
|
Purpose
|
Step 1
|
configure
Example:
RP/0/RP0/CPU0:router# configure
|
Enters global configuration mode.
|
Step 2
|
service cgn instance-name
Example:
RP/0/RP0/CPU0:router(config)# service cgn cgn1
RP/0/RP0/CPU0:router(config-cgn)#
|
Configures the instance named cgn1 for the CGv6 application and enters CGv6 configuration mode.
|
Step 3
|
service-type nat44 nat1
Example:
RP/0/RP0/CPU0:router(config-cgn)#
service-location preferred-active 0/1/CPU0
|
Configures the service type keyword definition for CGv6 NAT44 application.
|
Step 4
|
inside-vrf vrf-name
Example:
RP/0/RP0/CPU0:router(config-cgn-nat44)#
inside-vrf insidevrf1
RP/0/RP0/CPU0:router(config-cgn-invrf)#
|
Configures the inside VRF for the CGv6 instance named cgn1 and enters CGv6 inside VRF configuration mode.
|
Step 5
|
protocol tcp
Example:
RP/0/RP0/CPU0:router(config-cgn-invrf)#
protocol tcp
RP/0/RP0/CPU0:router(config-cgn-invrf-proto)#
|
Configures the TCP protocol session and enters CGv6 inside VRF AFI protocol configuration mode.
|
Step 6
|
mss size
Example:
RP/0/RP0/CPU0:router(config-cgn-invrf-afi-proto
)# mss 1100
|
Configures the adjustment MSS value as 1100 for the inside VRF.
|
Step 7
|
end
or
commit
Example:
RP/0/RP0/CPU0:router(config-cgn-invrf-proto)# e
nd
or
RP/0/RP0/CPU0:router(config-cgn-invrf-proto)#
commit
|
Saves configuration changes.
•When you issue the end command, the system prompts you to commit changes:
Uncommitted changes found, commit them before
exiting (yes/no/cancel)?
[cancel]:
–Entering yes saves configuration changes to the running configuration file, exits the configuration session, and returns the router to EXEC mode.
–Entering no exits the configuration session and returns the router to EXEC mode without committing the configuration changes.
–Entering cancel leaves the router in the current configuration session without exiting or committing the configuration changes.
•Use the commit command to save the configuration changes to the running configuration file and remain within the configuration session.
|
Configuring the Refresh Direction for the Network Address Translation
Perform this task to configure the NAT mapping refresh direction as outbound for TCP and UDP traffic.
SUMMARY STEPS
1. configure
2. service cgn instance-name
3. service-type nat44 nat1
4. refresh-direction Outbound
5. end
or
commit
DETAILED STEPS
| |
Command or Action
|
Purpose
|
Step 1
|
configure
Example:
RP/0/RP0/CPU0:router# configure
|
Enters global configuration mode.
|
Step 2
|
service cgn instance-name
Example:
RP/0/RP0/CPU0:router(config)# service cgn cgn1
RP/0/RP0/CPU0:router(config-cgn)#
|
Configures the instance named cgn1 for the CGv6 application and enters CGv6 configuration mode.
|
Step 3
|
service-type nat44 nat1
Example:
RP/0/RP0/CPU0:router(config-cgn)# service-type
nat44 nat1
|
Configures the service type keyword definition for CGv6 NAT44 application.
|
Step 4
|
refresh-direction Outbound
Example:
RP/0/RP0/CPU0:router(config-cgn-nat44)#
protocol tcp
RP/0/RP0/CPU0:router(config-cgn-proto)#refresh-
direction Outbound
|
Configures the NAT mapping refresh direction as outbound for the CGv6 instance named cgn1.
|
Step 5
|
end
or
commit
Example:
RP/0/RP0/CPU0:router(config-cgn)# end
or
RP/0/RP0/CPU0:router(config-cgn)# commit
|
Saves configuration changes.
•When you issue the end command, the system prompts you to commit changes:
Uncommitted changes found, commit them before
exiting (yes/no/cancel)?
[cancel]:
–Entering yes saves configuration changes to the running configuration file, exits the configuration session, and returns the router to EXEC mode.
–Entering no exits the configuration session and returns the router to EXEC mode without committing the configuration changes.
–Entering cancel leaves the router in the current configuration session without exiting or committing the configuration changes.
•Use the commit command to save the configuration changes to the running configuration file and remain within the configuration session.
|
Configuring Static Port Forwarding for Port Numbers
Perform this task to configure static port forwarding for reserved or nonreserved port numbers.
SUMMARY STEPS
1. configure
2. service cgn instance-name
3. service-type nat44 nat1
4. inside-vrf vrf-name
5. protocol tcp
6. static-forward inside
7. address address port number
8. end
or
commit
DETAILED STEPS
| |
Command or Action
|
Purpose
|
Step 1
|
configure
Example:
RP/0/RP0/CPU0:router# configure
|
Enters global configuration mode.
|
Step 2
|
service cgn instance-name
Example:
RP/0/RP0/CPU0:router(config)# service cgn cgn1
RP/0/RP0/CPU0:router(config-cgn)#
|
Configures the instance named cgn1 for the CGv6 application and enters CGv6 configuration mode.
|
Step 3
|
service-type nat44 nat1
Example:
RP/0/RP0/CPU0:router(config-cgn)# service-type
nat44 nat1
|
Configures the service type keyword definition for CGv6 NAT44 application.
|
Step 4
|
inside-vrf vrf-name
Example:
RP/0/RP0/CPU0:router(config-cgn-nat44)#
inside-vrf insidevrf1
RP/0/RP0/CPU0:router(config-cgn-invrf)#
|
Configures the inside VRF for the CGv6 instance named cgn1 and enters CGv6 inside VRF configuration mode.
|
Step 5
|
protocol tcp
Example:
RP/0/RP0/CPU0:router(config-cgn-invrf)#
protocol tcp
RP/0/RP0/CPU0:router(config-cgn-invrf-proto)#
|
Configures the TCP protocol session and enters CGv6 inside VRF AFI protocol configuration mode.
|
Step 6
|
static-forward inside
Example:
RP/0/RP0/CPU0:router(config-cgn-invrf-proto)#
static-forward inside
RP/0/RP0/CPU0:router(config-cgn-ivrf-sport-insi
de)#
|
Configures the CGv6 static port forwarding entries on reserved or nonreserved ports and enters CGv6 inside static port inside configuration mode.
|
Step 7
|
address address port number
Example:
RP/0/RP0/CPU0:router(config-cgn-ivrf-sport-insi
de)# address 1.2.3.4 port 90
|
Configures the CGv6 static port forwarding entries for the inside VRF.
|
Step 8
|
end
or
commit
Example:
RP/0/RP0/CPU0:router(config-cgn-ivrf-sport-insi
de)# end
or
RP/0/RP0/CPU0:router(config-cgn-ivrf-sport-insi
de)# commit
|
Saves configuration changes.
•When you issue the end command, the system prompts you to commit changes:
Uncommitted changes found, commit them before
exiting (yes/no/cancel)?
[cancel]:
–Entering yes saves configuration changes to the running configuration file, exits the configuration session, and returns the router to EXEC mode.
–Entering no exits the configuration session and returns the router to EXEC mode without committing the configuration changes.
–Entering cancel leaves the router in the current configuration session without exiting or committing the configuration changes.
•Use the commit command to save the configuration changes to the running configuration file and remain within the configuration session.
|
Configuring the Dynamic Port Ranges
Perform this task to configure dynamic port ranges for TCP, UDP, and ICMP ports. The default value range of 0 to 1023 is preserved and not used for dynamic translations. Therefore, if the value of dynamic port range start is not configured explicitly, the dynamic port range value starts at 1024.
SUMMARY STEPS
1. configure
2. service cgn instance-name
3. service-type nat44 nat1
4. dynamic port range start value
5. end
or
commit
DETAILED STEPS
| |
Command or Action
|
Purpose
|
Step 1
|
configure
Example:
RP/0/RP0/CPU0:router# configure
|
Enters global configuration mode.
|
Step 2
|
service cgn instance-name
Example:
RP/0/RP0/CPU0:router(config)# service cgn cgn1
RP/0/RP0/CPU0:router(config-cgn)#
|
Configures the instance named cgn1 for the CGv6 application and enters CGv6 configuration mode.
|
Step 3
|
service-type nat44 nat1
Example:
RP/0/RP0/CPU0:router(config-cgn)# service-type
nat44 nat1
|
Configures the service type keyword definition for CGv6 NAT44 application.
|
Step 4
|
dynamic port range start value
Example:
RP/0/RP0/CPU0:router(config-cgn-nat44)# dynamic
port range start 1024
|
Configures the value of dynamic port range start for a CGv6 NAT 44 instance. The value can range from 1 to 65535.
|
Step 5
|
end
or
commit
Example:
RP/0/RP0/CPU0:router(config-cgn-ivrf-sport-insi
de)# end
or
RP/0/RP0/CPU0:router(config-cgn-ivrf-sport-insi
de)# commit
|
Saves configuration changes.
•When you issue the end command, the system prompts you to commit changes:
Uncommitted changes found, commit them before
exiting (yes/no/cancel)?
[cancel]:
–Entering yes saves configuration changes to the running configuration file, exits the configuration session, and returns the router to EXEC mode.
–Entering no exits the configuration session and returns the router to EXEC mode without committing the configuration changes.
–Entering cancel leaves the router in the current configuration session without exiting or committing the configuration changes.
•Use the commit command to save the configuration changes to the running configuration file and remain within the configuration session.
|
Configuring One-to-One Mapping for NAT44 over VSM
Perform this task to configure one-to-one mapping for private addresses in NAT44 over VSM.
SUMMARY STEPS
1. configure
2. service cgn instance-name
3. service-type nat44 nat1
4. inside-vrf vrf-name
5. map ip one-to-one
6. end
or
commit
DETAILED STEPS
| |
Command or Action
|
Purpose
|
Step 1
|
configure
Example:
RP/0/RP0/CPU0:router# configure
|
Enters global configuration mode.
|
Step 2
|
service cgn instance-name
Example:
RP/0/RP0/CPU0:router(config)# service cgn cgn1
RP/0/RP0/CPU0:router(config-cgn)#
|
Configures the instance named cgn1 for the CGv6 application and enters CGv6 configuration mode.
|
Step 3
|
service-type nat44 nat1
Example:
RP/0/RP0/CPU0:router(config-cgn)# service-type
nat44 nat1
|
Configures the service type keyword definition for CGv6 NAT44 application.
|
Step 4
|
inside-vrf vrf-name
Example:
RP/0/RP0/CPU0:router(config-cgn-nat44)#
inside-vrf insidevrf1
RP/0/RP0/CPU0:router(config-cgn-invrf)#
|
Configures an inside VRF named insidevrf1 and enters CGv6 inside VRF configuration mode.
|
Step 5
|
map ip one-to-one
Example:
RP/0/RP0/CPU0:router(config-cgn-invrf)# map ip
one-to-one
|
Configures one-to-one mapping for a CGv6 NAT44 instance.
|
Step 6
|
end
or
commit
Example:
RP/0/RP0/CPU0:router(config-cgn-invrf-afi)# end
or
RP/0/RP0/CPU0:router(config-cgn-invrf-afi)#
commit
|
Saves configuration changes.
•When you issue the end command, the system prompts you to commit changes:
Uncommitted changes found, commit them before
exiting (yes/no/cancel)?
[cancel]:
–Entering yes saves configuration changes to the running configuration file, exits the configuration session, and returns the router to EXEC mode.
–Entering no exits the configuration session and returns the router to EXEC mode without committing the configuration changes.
–Entering cancel leaves the router in the current configuration session without exiting or committing the configuration changes.
•Use the commit command to save the configuration changes to the running configuration file and remain within the configuration session.
|
Configuring TCP Sequence Check
Perform the following steps for checking the sequence numbers of the packets in a TCP session:
SUMMARY STEPS
1. configure
2. service cgn instance-name
3. service-type nat44 nat1
4. inside-vrf vrf-name
5. firewall protocol tcp
6. sequence-check
7. end
or
commit
DETAILED STEPS
| |
Command or Action
|
Purpose
|
Step 1
|
configure
Example:
RP/0/RP0/CPU0:router# configure
|
Enters global configuration mode.
|
Step 2
|
service cgn instance-name
Example:
RP/0/RP0/CPU0:router(config)# service cgn cgn1
RP/0/RP0/CPU0:router(config-cgn)#
|
Configures the instance named cgn1 for the CGv6 application and enters CGv6 configuration mode.
|
Step 3
|
service-type nat44 instance-name
Example:
RP/0/RP0/CPU0:router(config-cgn)# service-type
nat44 nat1
|
Configures the service type keyword definition for CGv6 NAT44 application.
|
Step 4
|
inside-vrf vrf-name
Example:
RP/0/RP0/CPU0:router(config-cgn-nat44)#
inside-vrf insidevrf1
RP/0/RP0/CPU0:router(config-cgn-invrf)#
|
Configures an inside VRF named insidevrf1 and enters CGv6 inside VRF configuration mode.
|
Step 5
|
firewall protocol tcp
Example:
RP/0/RP0/CPU0:router(config-cgn-invrf)#
firewall protocol tcp
|
Enters the firewall mode and the protocol tcp submode.
|
Step 6
|
sequence-check
RP/0/RP0/CPU0:router(config-cgn-invrf)#
firewall protocol tcp
|
Enables checking of the sequence numbers. The optional diff-window keyword allows user to configure a value equal to the difference between the expected and received sequence numbers. The range for this value is 0 to 1,073,725,440.
|
Step 7
|
end
or
commit
Example:
RP/0/RP0/CPU0:router(config-cgn-invrf-afi)# end
or
RP/0/RP0/CPU0:router(config-cgn-invrf-afi)#
commit
|
Saves configuration changes.
•When you issue the end command, the system prompts you to commit changes:
Uncommitted changes found, commit them before
exiting (yes/no/cancel)?
[cancel]:
–Entering yes saves configuration changes to the running configuration file, exits the configuration session, and returns the router to EXEC mode.
–Entering no exits the configuration session and returns the router to EXEC mode without committing the configuration changes.
–Entering cancel leaves the router in the current configuration session without exiting or committing the configuration changes.
•Use the commit command to save the configuration changes to the running configuration file and remain within the configuration session.
|
Configuring Address and Port-Dependent Filtering
Perform the following steps to configure address and port-dependent filtering in a NAT44 configuration.
SUMMARY STEPS
1. configure
2. service cgn instance-name
3. service-type nat44 nat1
4. inside-vrf vrf-name
5. filter-policy ignore-port
6. end
or
commit
DETAILED STEPS
| |
Command or Action
|
Purpose
|
Step 1
|
configure
Example:
RP/0/RP0/CPU0:router# configure
|
Enters global configuration mode.
|
Step 2
|
service cgn instance-name
Example:
RP/0/RP0/CPU0:router(config)# service cgn cgn1
RP/0/RP0/CPU0:router(config-cgn)#
|
Configures the instance named cgn1 for the CGv6 application and enters CGv6 configuration mode.
|
Step 3
|
service-type nat44 instance-name
Example:
RP/0/RP0/CPU0:router(config-cgn)# service-type
nat44 nat1
|
Configures the service type keyword definition for CGv6 NAT44 application.
|
Step 4
|
inside-vrf vrf-name
Example:
RP/0/RP0/CPU0:router(config-cgn-nat44)#
inside-vrf insidevrf1
RP/0/RP0/CPU0:router(config-cgn-invrf)#
|
Configures an inside VRF named insidevrf1 and enters CGv6 inside VRF configuration mode.
|
Step 5
|
filter-policy ignore-port
Example:
To enable address and port-dependent filtering:
RP/0/RP0/CPU0:router(config-cgn-invrf)#
filter-policy
To enable address and port-dependent filtering when the port is not checked:
RP/0/RP0/CPU0:router(config-cgn-invrf)#
filter-policy ignore-port
|
Enables the address and port-dependent filtering. The optional ignore-port keyword is used to disable the port-dependent filtering.
|
Step 6
|
end
or
commit
Example:
RP/0/RP0/CPU0:router(config-cgn-invrf-afi)# end
or
RP/0/RP0/CPU0:router(config-cgn-invrf-afi)#
commit
|
Saves configuration changes.
•When you issue the end command, the system prompts you to commit changes:
Uncommitted changes found, commit them before
exiting (yes/no/cancel)?
[cancel]:
–Entering yes saves configuration changes to the running configuration file, exits the configuration session, and returns the router to EXEC mode.
–Entering no exits the configuration session and returns the router to EXEC mode without committing the configuration changes.
–Entering cancel leaves the router in the current configuration session without exiting or committing the configuration changes.
•Use the commit command to save the configuration changes to the running configuration file and remain within the configuration session.
|
Configuring External Logging for the NAT Table Entries
Perform the following to configure external logging for NAT table entries.
Netflow Logging
Perform the following tasks to configure Netflow Logging for NAT table entries.
•Configuring the Server Address and Port for Netflow Logging
•Configuring the Path Maximum Transmission Unit for Netflow Logging
•Configuring the Refresh Rate for Netflow Logging
•Configuring the Timeout for Netflow Logging
Configuring the Server Address and Port for Netflow Logging
Perform this task to configure the server address and port to log network address translation (NAT) table entries for Netflow logging.
SUMMARY STEPS
1. configure
2. service cgn instance-name
3. service-type nat44 nat1
4. inside-vrf vrf-name
5. external-logging netflow version 9
6. server
7. address address port number
8. end
or
commit
DETAILED STEPS
| |
Command or Action
|
Purpose
|
Step 1
|
configure
Example:
RP/0/RP0/CPU0:router# configure
|
Enters global configuration mode.
|
Step 2
|
service cgn instance-name
Example:
RP/0/RP0/CPU0:router(config)# service cgn cgn1
RP/0/RP0/CPU0:router(config-cgn)#
|
Configures the instance named cgn1 for the CGv6 application and enters CGv6 configuration mode.
|
Step 3
|
service-type nat44 nat1
Example:
RP/0/RP0/CPU0:router(config-cgn)# service-type
nat44 nat1
|
Configures the service type keyword definition for CGv6 NAT44 application.
|
Step 4
|
inside-vrf vrf-name
Example:
RP/0/RP0/CPU0:router(config-cgn)# inside-vrf
insidevrf1
RP/0/RP0/CPU0:router(config-cgn-invrf)#
|
Configures the inside VRF for the CGv6 instance named cgn1 and enters CGv6 inside VRF configuration mode.
|
Step 5
|
external-logging netflow version 9
Example:
RP/0/RP0/CPU0:router(config-cgn-invrf)#
external-logging netflow version 9
RP/0/RP0/CPU0:router(config-cgn-invrf-af-extlog
)#
|
Configures the external-logging facility for the CGv6 instance named cgn1 and enters CGv6 inside VRF address family external logging configuration mode.
|
Step 6
|
server
Example:
RP/0/RP0/CPU0:router(config-cgn-invrf-af-extlog
)# server
RP/0/RP0/CPU0:router(config-cgn-invrf-af-extlog
-server)#
|
Configures the logging server information for the IPv4 address and port for the server that is used for the netflowv9-based external-logging facility and enters CGv6 inside VRF address family external logging server configuration mode.
|
Step 7
|
address address port number
Example:
RP/0/RP0/CPU0:router(config-cgn-invrf-af-extlog
-server)# address 2.3.4.5 port 45
|
Configures the IPv4 address and port number 45 to log Netflow entries for the NAT table.
|
Step 8
|
end
or
commit
Example:
RP/0/RP0/CPU0:router(config-cgn-invrf-af-extlog
-server)# end
or
RP/0/RP0/CPU0:router(config-cgn-invrf-af-extlog
-server)# commit
|
Saves configuration changes.
•When you issue the end command, the system prompts you to commit changes:
Uncommitted changes found, commit them before
exiting (yes/no/cancel)?
[cancel]:
–Entering yes saves configuration changes to the running configuration file, exits the configuration session, and returns the router to EXEC mode.
–Entering no exits the configuration session and returns the router to EXEC mode without committing the configuration changes.
–Entering cancel leaves the router in the current configuration session without exiting or committing the configuration changes.
•Use the commit command to save the configuration changes to the running configuration file and remain within the configuration session.
|
Configuring the Path Maximum Transmission Unit for Netflow Logging
Perform this task to configure the path maximum transmission unit (MTU) for the netflowv9-based external-logging facility for the inside VRF.
SUMMARY STEPS
1. configure
2. service cgn instance-name
3. service-type nat44 nat1
4. inside-vrf vrf-name
5. external-logging netflow version 9
6. server
7. path-mtu value
8. end
or
commit
DETAILED STEPS
| |
Command or Action
|
Purpose
|
Step 1
|
configure
Example:
RP/0/RP0/CPU0:router# configure
|
Enters global configuration mode.
|
Step 2
|
service cgn instance-name
Example:
RP/0/RP0/CPU0:router(config)# service cgn cgn1
RP/0/RP0/CPU0:router(config-cgn)#
|
Configures the instance named cgn1 for the CGv6 application and enters CGv6 configuration mode.
|
Step 3
|
service-type nat44 nat1
Example:
RP/0/RP0/CPU0:router(config-cgn)# service-type
nat44 nat1
|
Configures the service type keyword definition for CGv6 NAT44 application.
|
Step 4
|
inside-vrf vrf-name
Example:
RP/0/RP0/CPU0:router(config-cgn)# inside-vrf
insidevrf1
RP/0/RP0/CPU0:router(config-cgn-invrf)#
|
Configures the inside VRF for the CGv6 instance named cgn1 and enters CGv6 inside VRF configuration mode.
|
Step 5
|
external-logging netflow version 9
Example:
RP/0/RP0/CPU0:router(config-cgn-invrf)#
external-logging netflow version 9
RP/0/RP0/CPU0:router(config-cgn-invrf-af-extlog
)#
|
Configures the external-logging facility for the CGv6 instance named cgn1 and enters CGv6 inside VRF address family external logging configuration mode.
|
Step 6
|
server
Example:
RP/0/RP0/CPU0:router(config-cgn-invrf-af-extlog
)# server
RP/0/RP0/CPU0:router(config-cgn-invrf-af-extlog
-server)#
|
Configures the logging server information for the IPv4 address and port for the server that is used for the netflowv9-based external-logging facility and enters CGv6 inside VRF address family external logging server configuration mode.
|
Step 7
|
path-mtu value
Example:
RP/0/RP0/CPU0:router(config-cgn-invrf-af-extlog
-server)# path-mtu 200
|
Configures the path MTU with the value of 200 for the netflowv9-based external-logging facility.
|
Step 8
|
end
or
commit
Example:
RP/0/RP0/CPU0:router(config-cgn-invrf-af-extlog
-server)# end
or
RP/0/RP0/CPU0:router(config-cgn-invrf-af-extlog
-server)# commit
|
Saves configuration changes.
•When you issue the end command, the system prompts you to commit changes:
Uncommitted changes found, commit them before
exiting (yes/no/cancel)?
[cancel]:
–Entering yes saves configuration changes to the running configuration file, exits the configuration session, and returns the router to EXEC mode.
–Entering no exits the configuration session and returns the router to EXEC mode without committing the configuration changes.
–Entering cancel leaves the router in the current configuration session without exiting or committing the configuration changes.
•Use the commit command to save the configuration changes to the running configuration file and remain within the configuration session.
|
Configuring the Refresh Rate for Netflow Logging
Perform this task to configure the refresh rate at which the Netflow-v9 logging templates are refreshed or resent to the Netflow-v9 logging server.
SUMMARY STEPS
1. configure
2. service cgn instance-name
3. service-type nat44 nat1
4. inside-vrf vrf-name
5. external-logging netflow version 9
6. server
7. refresh-rate value
8. end
or
commit
DETAILED STEPS
| |
Command or Action
|
Purpose
|
Step 1
|
configure
Example:
RP/0/RP0/CPU0:router# configure
|
Enters global configuration mode.
|
Step 2
|
service cgn instance-name
Example:
RP/0/RP0/CPU0:router(config)# service cgn cgn1
RP/0/RP0/CPU0:router(config-cgn)#
|
Configures the instance named cgn1 for the CGv6 application and enters CGv6 configuration mode.
|
Step 3
|
service-type nat44 nat1
Example:
RP/0/RP0/CPU0:router(config-cgn)# service-type
nat44 nat1
|
Configures the service type keyword definition for CGv6 NAT44 application.
|
Step 4
|
inside-vrf vrf-name
Example:
RP/0/RP0/CPU0:router(config-cgn)# inside-vrf
insidevrf1
RP/0/RP0/CPU0:router(config-cgn-invrf)#
|
Configures the inside VRF for the CGv6 instance named cgn1 and enters CGv6 inside VRF configuration mode.
|
Step 5
|
external-logging netflow version 9
Example:
RP/0/RP0/CPU0:router(config-cgn-invrf)#
external-logging netflow version 9
RP/0/RP0/CPU0:router(config-cgn-invrf-af-extlog
)#
|
Configures the external-logging facility for the CGv6 instance named cgn1 and enters CGv6 inside VRF address family external logging configuration mode.
|
Step 6
|
server
Example:
RP/0/RP0/CPU0:router(config-cgn-invrf-af-extlog
)# server
RP/0/RP0/CPU0:router(config-cgn-invrf-af-extlog
-server)#
|
Configures the logging server information for the IPv4 address and port for the server that is used for the netflow-v9 based external-logging facility and enters CGv6 inside VRF address family external logging server configuration mode.
|
Step 7
|
refresh-rate value
Example:
RP/0/RP0/CPU0:router(config-cgn-invrf-af-extlog
-server)# refresh-rate 50
|
Configures the refresh rate value of 50 to log Netflow-based external logging information for an inside VRF.
|
Step 8
|
end
or
commit
Example:
RP/0/RP0/CPU0:router(config-cgn-invrf-af-extlog
-server)# end
or
RP/0/RP0/CPU0:router(config-cgn-invrf-af-extlog
-server)# commit
|
Saves configuration changes.
•When you issue the end command, the system prompts you to commit changes:
Uncommitted changes found, commit them before
exiting (yes/no/cancel)?
[cancel]:
–Entering yes saves configuration changes to the running configuration file, exits the configuration session, and returns the router to EXEC mode.
–Entering no exits the configuration session and returns the router to EXEC mode without committing the configuration changes.
–Entering cancel leaves the router in the current configuration session without exiting or committing the configuration changes.
•Use the commit command to save the configuration changes to the running configuration file and remain within the configuration session.
|
Configuring the Timeout for Netflow Logging
Perform this task to configure the frequency in minutes at which the Netflow-V9 logging templates are to be sent to the Netflow-v9 logging server.
SUMMARY STEPS
1. configure
2. service cgn instance-name
3. service-type nat44 nat1
4. inside-vrf vrf-name
5. external-logging netflow version 9
6. server
7. timeout value
8. end
or
commit
DETAILED STEPS
| |
Command or Action
|
Purpose
|
Step 1
|
configure
Example:
RP/0/RP0/CPU0:router# configure
|
Enters global configuration mode.
|
Step 2
|
service cgn instance-name
Example:
RP/0/RP0/CPU0:router(config)# service cgn cgn1
RP/0/RP0/CPU0:router(config-cgn)#
|
Configures the instance named cgn1 for the CGv6 application and enters CGv6 configuration mode.
|
Step 3
|
service-type nat44 nat1
Example:
RP/0/RP0/CPU0:router(config-cgn)# service-type
nat44 nat1
|
Configures the service type keyword definition for CGv6 NAT44 application.
|
Step 4
|
inside-vrf vrf-name
Example:
RP/0/RP0/CPU0:router(config-cgn)# inside-vrf
insidevrf1
RP/0/RP0/CPU0:router(config-cgn-invrf)#
|
Configures the inside VRF for the CGv6 instance named cgn1 and enters CGv6 inside VRF configuration mode.
|
Step 5
|
external-logging netflowv9
Example:
RP/0/RP0/CPU0:router(config-cgn-invrf)#
external-logging netflow version 9
RP/0/RP0/CPU0:router(config-cgn-invrf-af-extlog
)#
|
Configures the external-logging facility for the CGv6 instance named cgn1 and enters CGv6 inside VRF address family external logging configuration mode.
|
Step 6
|
server
Example:
RP/0/RP0/CPU0:router(config-cgn-invrf-af-extlog
)# server
RP/0/RP0/CPU0:router(config-cgn-invrf-af-extlog
-server)#
|
Configures the logging server information for the IPv4 address and port for the server that is used for the netflowv9-based external-logging facility and enters CGv6 inside VRF address family external logging server configuration mode.
|
Step 7
|
timeout value
Example:
RP/0/RP0/CPU0:router(config-cgn-invrf-af-extlog
-server)# timeout 50
|
Configures the timeout value of 50 for Netflow logging of NAT table entries for an inside VRF.
|
Step 8
|
end
or
commit
Example:
RP/0/RP0/CPU0:router(config-cgn-invrf-af-extlog
-server)# end
or
RP/0/RP0/CPU0:router(config-cgn-invrf-af-extlog
-server)# commit
|
Saves configuration changes.
•When you issue the end command, the system prompts you to commit changes:
Uncommitted changes found, commit them before
exiting (yes/no/cancel)?
[cancel]:
–Entering yes saves configuration changes to the running configuration file, exits the configuration session, and returns the router to EXEC mode.
–Entering no exits the configuration session and returns the router to EXEC mode without committing the configuration changes.
–Entering cancel leaves the router in the current configuration session without exiting or committing the configuration changes.
•Use the commit command to save the configuration changes to the running configuration file and remain within the configuration session.
|
Syslog Logging
Perform the following tasks to configure Syslog Logging for NAT table entries.
•Configuring the Server Address and Port for Syslog Logging
•Configuring the Host-Name for Syslog Logging
•Configuring the Path Maximum Transmission Unit for Syslog Logging
Configuring the Server Address and Port for Syslog Logging
Perform this task to configure the server address and port to log NAT table entries for Syslog logging.
SUMMARY STEPS
1. configure
2. service cgn instance-name
3. service-type nat44 nat1
4. inside-vrf vrf-name
5. external-logging syslog
6. server
7. address address port number
8. end
or
commit
DETAILED STEPS
| |
Command or Action
|
Purpose
|
Step 1
|
configure
Example:
RP/0/RP0/CPU0:router# configure
|
Enters global configuration mode.
|
Step 2
|
service cgn instance-name
Example:
RP/0/RP0/CPU0:router(config)# service cgn cgn1
RP/0/RP0/CPU0:router(config-cgn)#
|
Configures the instance named cgn1 for the CGv6 application and enters CGv6 configuration mode.
|
Step 3
|
service-type nat44 nat1
Example:
RP/0/RP0/CPU0:router(config-cgn)# service-type
nat44 nat1
|
Configures the service type keyword definition for CGv6 NAT44 application.
|
Step 4
|
inside-vrf vrf-name
Example:
RP/0/RP0/CPU0:router(config-cgn)# inside-vrf
insidevrf1
RP/0/RP0/CPU0:router(config-cgn-invrf)#
|
Configures the inside VRF for the CGv6 instance named cgn1 and enters CGv6 inside VRF configuration mode.
|
Step 5
|
external-logging syslog
Example:
RP/0/RP0/CPU0:router(config-cgn-invrf)#
external-logging syslog
RP/0/RP0/CPU0:router(config-cgn-invrf-af-extlog
)#
|
Configures the external-logging facility for the CGv6 instance named cgn1 and enters CGv6 inside VRF address family external logging configuration mode.
|
Step 6
|
server
Example:
RP/0/RP0/CPU0:router(config-cgn-invrf-af-extlog
)# server
RP/0/RP0/CPU0:router(config-cgn-invrf-af-extlog
-server)#
|
Configures the logging server information for the IPv4 address and port for the server that is used for the syslog-based external-logging facility and enters CGv6 inside VRF address family external logging server configuration mode.
|
Step 7
|
address address port number
Example:
RP/0/RP0/CPU0:router(config-cgn-invrf-af-extlog
-server)# address 2.3.4.5 port 45
|
Configures the IPv4 address and port number 45 to log Netflow entries for the NAT table.
|
Step 8
|
end
or
commit
Example:
RP/0/RP0/CPU0:router(config-cgn-invrf-af-extlog
-server)# end
or
RP/0/RP0/CPU0:router(config-cgn-invrf-af-extlog
-server)# commit
|
Saves configuration changes.
•When you issue the end command, the system prompts you to commit changes:
Uncommitted changes found, commit them before
exiting (yes/no/cancel)?
[cancel]:
–Entering yes saves configuration changes to the running configuration file, exits the configuration session, and returns the router to EXEC mode.
–Entering no exits the configuration session and returns the router to EXEC mode without committing the configuration changes.
–Entering cancel leaves the router in the current configuration session without exiting or committing the configuration changes.
•Use the commit command to save the configuration changes to the running configuration file and remain within the configuration session.
|
Configuring the Host-Name for Syslog Logging
Perform this task to configure the host name to be filled in the Netflow header for the syslog logging.
SUMMARY STEPS
1. configure
2. service cgn instance-name
3. service-type nat44 nat1
4. inside-vrf vrf-name
5. external-logging syslog
6. server
7. host-name name
8. end
or
commit
DETAILED STEPS
| |
Command or Action
|
Purpose
|
Step 1
|
configure
Example:
RP/0/RP0/CPU0:router# configure
|
Enters global configuration mode.
|
Step 2
|
service cgn instance-name
Example:
RP/0/RP0/CPU0:router(config)# service cgn cgn1
RP/0/RP0/CPU0:router(config-cgn)#
|
Configures the instance named cgn1 for the CGv6 application and enters CGv6 configuration mode.
|
Step 3
|
service-type nat44 nat1
Example:
RP/0/RP0/CPU0:router(config-cgn)# service-type
nat44 nat1
|
Configures the service type keyword definition for CGv6 NAT44 application.
|
Step 4
|
inside-vrf vrf-name
Example:
RP/0/RP0/CPU0:router(config-cgn)# inside-vrf
insidevrf1
RP/0/RP0/CPU0:router(config-cgn-invrf)#
|
Configures the inside VRF for the CGv6 instance named cgn1 and enters CGv6 inside VRF configuration mode.
|
Step 5
|
external-logging syslog
Example:
RP/0/RP0/CPU0:router(config-cgn-invrf)#
external-logging syslog
RP/0/RP0/CPU0:router(config-cgn-invrf-af-extlog
)#
|
Configures the external-logging facility for the CGv6 instance named cgn1 and enters CGv6 inside VRF address family external logging configuration mode.
|
Step 6
|
server
Example:
RP/0/RP0/CPU0:router(config-cgn-invrf-af-extlog
)# server
RP/0/RP0/CPU0:router(config-cgn-invrf-af-extlog
-server)#
|
Configures the logging server information for the IPv4 address and port for the server that is used for the syslog-based external-logging facility and enters CGv6 inside VRF address family external logging server configuration mode.
|
Step 7
|
host-name name
Example:
RP/0/RP0/CPU0:router(config-cgn-invrf-af-extlog
-server)# host-name host1
|
Configures the host name for the syslog-based external-logging facility.
|
Step 8
|
end
or
commit
Example:
RP/0/RP0/CPU0:router(config-cgn-invrf-af-extlog
-server)# end
or
RP/0/RP0/CPU0:router(config-cgn-invrf-af-extlog
-server)# commit
|
Saves configuration changes.
•When you issue the end command, the system prompts you to commit changes:
Uncommitted changes found, commit them before
exiting (yes/no/cancel)?
[cancel]:
–Entering yes saves configuration changes to the running configuration file, exits the configuration session, and returns the router to EXEC mode.
–Entering no exits the configuration session and returns the router to EXEC mode without committing the configuration changes.
–Entering cancel leaves the router in the current configuration session without exiting or committing the configuration changes.
•Use the commit command to save the configuration changes to the running configuration file and remain within the configuration session.
|
Configuring the Path Maximum Transmission Unit for Syslog Logging
Perform this task to configure the path maximum transmission unit (MTU) for the syslog-based external-logging facility for the inside VRF.
SUMMARY STEPS
1. configure
2. service cgn instance-name
3. service-type nat44 nat1
4. inside-vrf vrf-name
5. external-logging syslog
6. server
7. path-mtu value
8. end
or
commit
DETAILED STEPS
| |
Command or Action
|
Purpose
|
Step 1
|
configure
Example:
RP/0/RP0/CPU0:router# configure
|
Enters global configuration mode.
|
Step 2
|
service cgn instance-name
Example:
RP/0/RP0/CPU0:router(config)# service cgn cgn1
RP/0/RP0/CPU0:router(config-cgn)#
|
Configures the instance named cgn1 for the CGv6 application and enters CGv6 configuration mode.
|
Step 3
|
service-type nat44 nat1
Example:
RP/0/RP0/CPU0:router(config-cgn)# service-type
nat44 nat1
|
Configures the service type keyword definition for CGv6 NAT44 application.
|
Step 4
|
inside-vrf vrf-name
Example:
RP/0/RP0/CPU0:router(config-cgn)# inside-vrf
insidevrf1
RP/0/RP0/CPU0:router(config-cgn-invrf)#
|
Configures the inside VRF for the CGv6 instance named cgn1 and enters CGv6 inside VRF configuration mode.
|
Step 5
|
external-logging syslog
Example:
RP/0/RP0/CPU0:router(config-cgn-invrf)#
external-logging syslog
RP/0/RP0/CPU0:router(config-cgn-invrf-af-extlog
)#
|
Configures the external-logging facility for the CGv6 instance named cgn1 and enters CGv6 inside VRF address family external logging configuration mode.
|
Step 6
|
server
Example:
RP/0/RP0/CPU0:router(config-cgn-invrf-af-extlog
)# server
RP/0/RP0/CPU0:router(config-cgn-invrf-af-extlog
-server)#
|
Configures the logging server information for the IPv4 address and port for the server that is used for the syslog-based external-logging facility and enters CGv6 inside VRF address family external logging server configuration mode.
|
Step 7
|
path-mtu value
Example:
RP/0/RP0/CPU0:router(config-cgn-invrf-af-extlog
-server)# path-mtu 200
|
Configures the path MTU with the value of 200 for the syslog-based external-logging facility.
|
Step 8
|
end
or
commit
Example:
RP/0/RP0/CPU0:router(config-cgn-invrf-af-extlog
-server)# end
or
RP/0/RP0/CPU0:router(config-cgn-invrf-af-extlog
-server)# commit
|
Saves configuration changes.
•When you issue the end command, the system prompts you to commit changes:
Uncommitted changes found, commit them before
exiting (yes/no/cancel)?
[cancel]:
–Entering yes saves configuration changes to the running configuration file, exits the configuration session, and returns the router to EXEC mode.
–Entering no exits the configuration session and returns the router to EXEC mode without committing the configuration changes.
–Entering cancel leaves the router in the current configuration session without exiting or committing the configuration changes.
•Use the commit command to save the configuration changes to the running configuration file and remain within the configuration session.
|
Configuration Examples for Implementing CGv6
This section provides the following configuration examples for CGv6:
•Configuring a Different Inside VRF Map to a Different Outside VRF for NAT44: Example
•NAT44 Configuration: Example
•
Configuring a Different Inside VRF Map to a Different Outside VRF for NAT44: Example
This example shows how to configure a different inside VRF map to a different outside VRF and different outside address pools:
map outside-vrf outsidevrf1 address-pool 100.1.1.0/24
map outside-vrf outsidevrf2 address-pool 100.1.2.0/24
service-location preferred-active 0/2/cpu0
ipv4 address 210.1.1.1 255.255.255.0
ipv4 address 211.1.1.1 255.255.255.0
100.1.1.0/24 serviceapp 2
ipv4 address 1.1.1.1 255.255.255.0
ipv4 address 2.2.2.1 255.255.255.0
100.1.2.0/24 serviceapp 4
NAT44 Configuration: Example
This example shows a NAT44 sample configuration:
description IPv4 Host for NAT44
ipv4 address 40.22.22.22 255.255.0.0
description IPv4 Host for NAT44
ipv4 address 41.22.22.22 255.255.0.0
interface GigabitEthernet0/3/0/0.1
description Connected to P2_ASR9000-8 GE 0/6/5/0.1
ipv4 address 10.222.5.22 255.255.255.0
address-family ipv4 unicast
Hardware Configuration for VSM
address-family ipv4 unicast
address-family ipv4 unicast
hw-module service cgn location 0/3/CPU0
interface GigabitEthernet0/6/5/0.1
ipv4 address 10.222.5.2 255.255.255.0
interface GigabitEthernet0/6/5/1.1
ipv4 address 10.12.13.2 255.255.255.0
ipv4 address 1.1.1.1 255.255.255.252
service cgn cgn1 service-type nat44
ipv4 address 2.1.1.1 255.255.255.252
service cgn cgn1 service-type nat44
ipv4 address 75.75.75.75 255.255.255.0
service-location 0/3/CPU0
address-family ipv4 unicast
181.1.0.0/16 vrf OutsideCustomer1 GigabitEthernet0/6/5/1.1 10.12.13.1
address-family ipv4 unicast
40.22.0.0/16 vrf InsideCustomer1 GigabitEthernet0/6/5/0.1 10.222.5.22
41.22.0.0/16 vrf InsideCustomer1 GigabitEthernet0/6/5/0.1 10.222.5.22
VSM Configuration
service-location preferred-active 0/3/CPU0
inside-vrf InsideCustomer1
map outside-vrf OutsideCustomer1 address-pool 100.0.0.0/24
address 41.22.22.22 port 80
address 41.22.22.22 port 80
external-logging netflow version 9
address 172.29.52.68 port 2055
description IPv4 Host for NAT44
ipv4 address 180.1.1.1 255.255.0.0
description IPv4 Host for NAT44
ipv4 address 181.1.1.1 255.255.0.0
interface GigabitEthernet0/6/5/1.1
ipv4 address 10.12.13.1 255.255.255.0
address-family ipv4 unicast
100.0.0.0/24 10.12.13.2 !
Configuring TCP Sequence-Check: Example
Configuring Address and Port-Dependent Filtering: Example
filter-policy ignore-port
Bulk Port Allocation and Syslog Configuration: Example
map address-pool 100.1.2.0/24
address 20.1.1.2 port 514!!
bulk-port-alloc size 64!!
External Logging
External logging configures the export and logging of the NAT table entries, private bindings that are associated with a particular global IP port address, and to use Netflow to export the NAT table entries.
•Netflow v9 Support
•Bulk Port Allocation
•Destination-Based Logging
Netflow v9 Support
The NAT44 and DS Lite features support Netflow for logging of the translation records. Logging of the translation records can be mandated by for Lawful Intercept. The Netflow uses binary format and hence requires software to parse and present the translation records. For more information on templates, see the External Logging chapter in this guide.
Bulk Port Allocation
The creation and deletion of NAT sessions need to be logged and these create huge amount of data. These are stored on Syslog collector which is supported over UDP. In order to reduce the volume of data generated by the NAT device, bulk port allocation can be enabled. When bulk port allocation is enabled and when a subscriber creates the first session, a number of contiguous outside ports are pre-allocated. A bulk allocation message is logged indicating this allocation. Subsequent session creations will use one of the pre-allocated port and hence does not require logging.
For more information on bulk port allocation, see the External Logging chapter in this guide.
Destination-Based Logging
Destination-Based Logging (DBL) includes the destination IPv4 address and port number in the Netflow create and delete records for NAT44, Stateful NAT64, and DS-Lite applications. It is also known as Session-Logging.
For more information on DBL, see the External Logging chapter in this guide.
Note Session-Logging and Bulk Port Allocation are mutually exclusive.

 Feedback