Downloads |
 Feedback Feedback
|
Table Of Contents
Viewing a List of Configured Source Routers
Viewing Source Router Properties
Viewing a List of Defined Targets
Viewing a List of Defined Operations
Setting Thresholds and Generating Alerts
Viewing a List of Defined Collectors
Viewing a Collector State Summary
Adding Components Using Seed Files
Sample Source Router Seed File
Loading Components from a Seed File
Viewing Seed File Output Files
Setting IPM Database Preferences
Displaying the Current Database Preferences
Changing the Database Preferences
Database Preferences File Format
Setting SNMP Timeout and Retry Environment Variables
Setting SNMP Environment Variables in Solaris
Setting SNMP Environment Variables in Windows NT and Windows 2000
Setting New IPM Server Process Timeout Values
Setting Server Timeout Values in Solaris
Setting Server Timeout Values in Windows NT and Windows 2000
Setting the DISPLAY Variable in Solaris
Backing Up or Restoring the IPM Database
Changing IPM Database Password
Modifying IPM Components
This chapter provides information about modifying IPM components. IPM components include collectors, source routers, target devices, and operations. Information is provided on viewing, updating, and deleting these components.
This chapter contains the following major sections:
•
Adding Components Using Seed Files
•
•
•
•
•
•
Working with Source Routers
IPM source routers are the routers from which you initiate operations for measuring network performance statistics. Each source router must contain the SA Agent feature and an SNMP agent.
Information about working with source routers is provided in the following subsections:
•
•
Viewing a List of Configured Source Routers
To view a list of configured source routers, select Edit > Configuration from the IPM Main window. The Configuration window (Figure 2-3) appears. By default, Sources is selected in the navigation pane and the Source Configuration window appears within the Configuration window.
The Source Configuration window displays source routers you have already configured. From this window, you can add a new source router, change the configuration of an existing source, or delete an existing source.
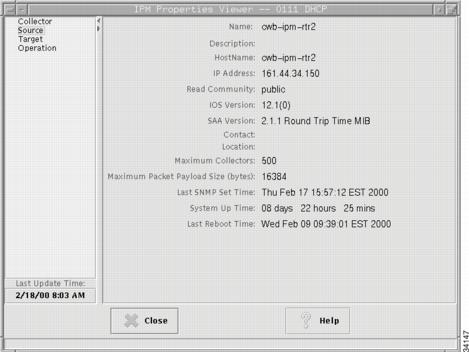
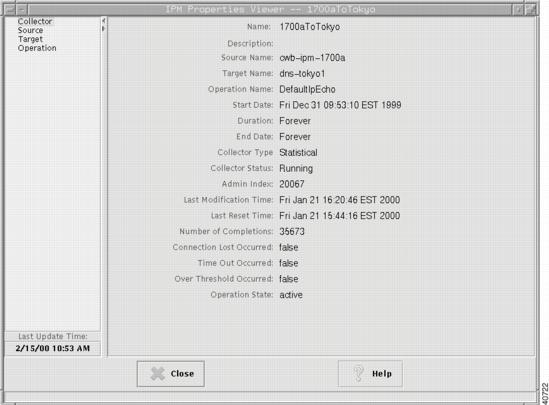
Viewing Source Router Properties
The Source Properties window allows you to view the properties of a defined source router.
To view source router properties:
Step 1
Step 2
Step 3
Figure 4-1 Source Properties Window
For information about these fields, refer to the "Source Properties Window" topic in the online help.
Adding a New Source Router
Before you can use a router as a source for a collector, you must define the router as an IPM source router.
To add a new source router:
Step 1
For information about configuring SNMP on the source router, see the "Configuring Your Routers to Send SA Agent-Related Traps" section in the "Preparing to Install" chapter of the Cisco Internetwork Performance Monitor Installation Guide.
Step 2
Step 3
Step 4
Step 5
Step 6
Step 7
Step 8
Note
Step 9
For information about using a seed file to add source routers to IPM, see the "Adding Components Using Seed Files" section.
Deleting Source Routers
You can delete source routers you no longer need. You can delete more than one source router at a time.
Note
To delete a source router:
Step 1
Step 2
Step 3
Working with Target Devices
IPM targets are destination devices for which you want to gather network performance statistics. A target can be any IP-addressable device, a Cisco router running the SA Agent Responder, or an SNA host.
Note
Information about working with target devices is provided in the following subsections:
•
Viewing a List of Defined Targets
After you have defined a device as an IPM target, it appears in the list of defined targets in the Target Configuration window.
To view a list of defined targets:
Step 1
Step 2
The Target Configuration window displays a list of all devices defined as IPM targets. From this window, you can define a new target, modify an existing target, or delete a target.
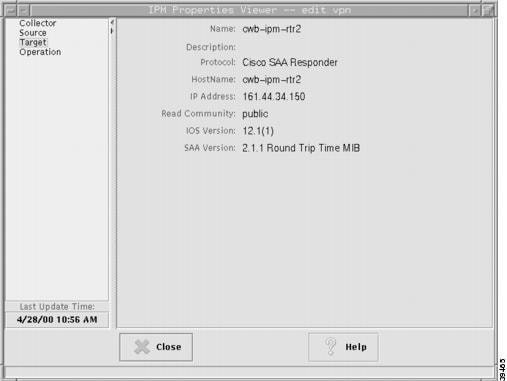
Viewing Target Properties
The Target Properties window allows you to view the properties of a defined target.
To view target properties:
Step 1
Step 2
Step 3
Figure 4-2 Target Properties Window
For information about these fields, refer to the "Target Properties Window" topic in the online help.
Adding a New Target
IPM targets are destination devices for which you want to gather data. A target can be any IP-addressable device, an SA Agent Responder, or an SNA host.
To add a new target:
Step 1
Step 2
Step 3
•
•
You must enable the SA Agent Responder at the router using the rtr responder configuration command.
•
NSPECHO must be installed on the VTAM mainframe to be used as the target. The NSPECHO application is provided on the IPM product CD. For information about installing NSPECHO, see the "Installing NSPECHO to Measure SNA Response Times" chapter in the Cisco Internetwork Performance Monitor Installation Guide.
Step 4
•
•
•
Step 5
Step 6
Step 7
Note
Step 8
For information about using a seed file to add targets to IPM, see the "Adding Components Using Seed Files" section.
Deleting Targets
You can delete targets you no longer need. You can delete more than one target at a time.
Note
To delete a target:
Step 1
Step 2
Step 3
If you try to delete a target and IPM issues an error message such as Could not delete the target, the reason could be:
•
•
To resolve the problem:
Step 1
Step 2
a.
b.
c.
d.
Working with Operations
An IPM operation is an alias for a set of parameters used in measuring performance. information about working with operations is provided in the following subsections:
•
•
Viewing a List of Defined Operations
To view a list of defined operations:
Step 1
Step 2
Step 3
The Operation Configuration window displays a list of all defined operations. From this window, you can define a new operation, modify an existing operation, or delete an existing operation.
Note
Figure 4-3 Operation Configuration Window
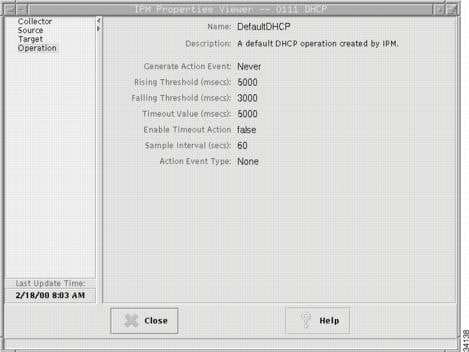
Viewing Operation Properties
The Operation Properties window allows you to view the properties of a defined operation.
To view operation properties:
Step 1
Step 2
Step 3
Figure 4-4 Operation Properties Window
For information about these fields, refer to the "Operation Properties Window" topic in the online help.
Adding a New Operation
An IPM operation is an alias for a set of parameters used for measuring performance between source router and a target device.
To define an operation:
Step 1
Step 2
Step 3
Step 4
Step 5
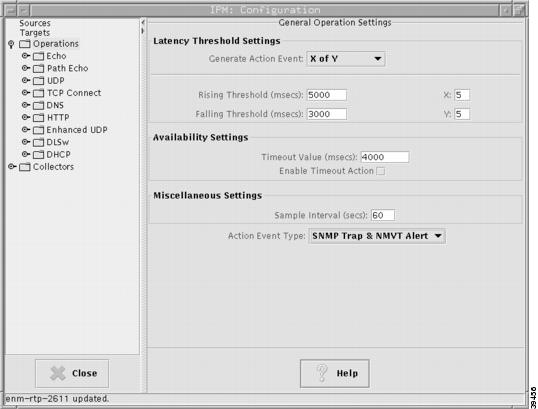
Setting Thresholds and Generating Alerts
From the Operation Configuration window, you can configure thresholds and event notifications on the source router.
To set thresholds and generate alerts using an operation:
Step 1
Step 2
•
•
•
•
•
Step 3
Step 4
Step 5
Step 6
Step 7
The default value is:
•
•
•
Note
Step 8
Step 9
Step 10
•
•
•
For the action type to occur for threshold events, the threshold type must be defined to any value other than Never. The possible actions are:
•
The SNMP traps are sent from the source router to the NMS configured to receive them. IPM itself does not receive or process traps.
•
•
•
Traps and Alerts are sent from the source router to any network management stations that were defined in the source router to receive SA Agent traps or alerts.
Step 11
Deleting Operations
You can delete operations you no longer need.You can delete more than one operation at a time.
Collectors that use the deleted operation continue to function correctly.
Note
To delete an operation:
Step 1
Step 2
Step 3
Working with Collectors
A collector is a definition of the source router, the target device, an operation, and the collector schedule. To collect network performance statistics using IPM, you must define a collector.
Information about working with collectors is provided in the following subsections:
•
•
Viewing a List of Defined Collectors
All of the defined collectors are listed in the IPM Main window (Figure 2-1). Any collectors with start dates and times earlier than the current date and time, and end dates and times later than the current date and time, are considered active collectors.
The following status information appears about each collector in the IPM Main window:
•
•
•
•
•
•
•
•
You can sort the collector information displayed in the IPM Main window by clicking on the column titles. By default, the information is sorted based on collector name. Optionally, you can sort the information based on start time, target, or operation type.
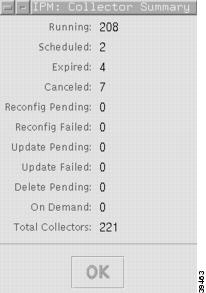
Viewing a Collector State Summary
To view a summary of the number of collectors on the server, broken down by current state (Running, Expired, and so on), select View > Collector State Summary from the IPM Main window. The Collector State Summary(Figure 4-5) window appears.
For information about these fields, refer to the "Collector State Summary Window" topic in the online help.
Figure 4-5 Collector State Summary Window
Viewing Collector Properties
To view detailed information about a defined collectors:
Step 1
Step 2
Figure 4-6 Collector Properties Window
Note
For information about these fields, refer to the "Collector Properties Window" topic in the online help.
Adding a New Collector
Defining a new collector involves selecting a source router, a target, an operation, and a collector schedule.
To define a new collector:
Step 1
Step 2
Step 3
Step 4
Step 5
Step 6
•
•
For additional information about setting the start time and end time, see the "Set Date Range Window" topic in the online help.
Step 7
Step 8
Note
Step 9
For a brief description of the predefined operations provided with IPM, see Table 2-1.
Note
Step 10
For information about using a seed file to add collectors to IPM, see the "Adding Components Using Seed Files" section.
Deleting Collectors
You can delete collectors you no longer need. When you delete a collector, all data related to that collector is removed from the database, and the collector and the SA Agent entry are removed from the source router. If the selected collector is active, IPM first stops the collector, then deletes it. The collector remains in Delete Pending state until the data is completely deleted from the IPM database. It can take several minutes or more to delete a collector that has a large amount of data stored in the IPM database. You can delete more than one collector at a time.
To delete an IPM collector:
Step 1
Step 2
Step 3
Adding Components Using Seed Files
In addition to defining source routers, targets, and collectors from their respective Configuration windows, you can define them using seed files. A seed file is a text file containing the information required to define one or more components. This is especially useful if you must add a large number of sources, targets, or collectors quickly.
You must create a separate seed file for each type of component. For example, you cannot mix source router definitions and collector definitions in the same seed file.
The following sections provide detailed information about seed files:
•
•
Creating a Seed File
To create a source router, target, or collector seed file:
Step 1
Step 2
Note
Seed File Syntax
The top of the seed file contains a comments section for any information you want to note about the file, followed by each component's definition on a separate line.
•
•
•
You must separate each part of a component's definition with a delimiter. Valid delimiters are spaces, commas (,), semicolons (;), and tabs (\t). Use the same delimiter throughout a given seed file.
Do not begin a component with a comma, semicolon, or tab.
The following example is a valid source router definition, using spaces as delimiters:
#a router1 public privateIf any part of a component's definition contains a space, you must use either a comma or a semicolon as the delimiter between all the parts of that definition. If the host name in the preceding example included a space (for example, router 1), you would use commas or semicolons as delimiters, instead of spaces:
#a,router 1,public,privateTable 4-1 describes each of the parts of a component's definition.
Sample Source Router Seed File
A sample source router seed file is shown below:
################################################################################# This file has example definitions for source routers.## Comments starts with the "#" character## The format of the file is as follows:## <command><delim><hostname[|aliasname]><delim><read community><delim><write community>## <delim> characters are " ;,\t" "space,semicolon,comma,tab"## <hostname[|aliasname]> : Host name followed by optional aliasName# separated with a `|' ("vertical bar")## The valid commands are 'a|A' for add; 'd|D' for delete; 'u|U' for update;## WARNING: Please assure the permissions on these files# do not allow read access to all users due to# the inclusions of SNMP community names.#################################################################################a router1 public private#a router2 santa claus#a router3.foobar.com open secretSample Target Seed File
A sample target seed file is shown below:
################################################################################# This file has example definitions for target devices## Comments starts with the "#" character## The format of the file is as follows:## <command><delim><target type><delim><hostname [<aliasname]><delim><read community>## <delim> characters are " ;,\t" "space,semicolon,comma,tab"## <hostname[|aliasname]> : Host name followed by optional aliasName# separated with a `|' ("vertical bar")## The valid commands are 'a|A' for add; 'd|D' for delete; 'u|U' for update;## The <target type> is 1 for IP; 2 for CISCO_SAA_RESPONDER; 3 for SNA## For CISCO_SAA_RESPONDER target type, read community string is required.# and the IOS RTR (SA Agent) Responder must be enabled## WARNING: Please assure the permissions on these files# do not allow read access to all users due to# the inclusions of SNMP community names.#################################################################################a 1 www.foobar.com#a 2 ios_router.foobar.com public#a 3 sna_target.foobar.com#a 1 server1#a 2 router1 publicSample Collector Seed File
A sample collector seed file is shown below:
################################################################################# This file has example definitions for collectors## Comments starts with the "#" character## The format of the file is as follows:## <command><delim><collName><delim><source><delim><target><delim># <operation><delim><startTime><delim><duration><delim><collType>## <delim> characters are " ;,\t" "space,semicolon,comma,tab"## The valid commands are 'a|A' for add, 'd|D' for delete, 'u|U' for update;## <collType> is M for Monitored, S for Statistical## <startTime> is in the format MM:DD:YYYY:hh:mm:ss## <startTime> = 1 -> start time will be now## <duration> is in number of hours## <duration> = 0 -> Forever## <startTime> = zero and <duration> = zero -> ON_DEMAND collector## For DHCP, HTTP, and DNS Operation types, the target field must be Unused or unused.# MyHTTP should be replaced with the name of an HTTP operation you created.## DefaultJitter should be replaced by Default60ByteVoice, Default160ByteVoice,# DefaultVideo, or DefaultVPN.#################################################################################a coll1 router1.cisco.com target1 DefaultIpEcho 1 12 M#a coll2 router1.cisco.com target2 DefaultUDPEcho 1 0 S#a coll3 router1.cisco.com target3 DefaultJitter 1 24 M#a coll4 router1.cisco.com target4 DefaultDLSw 0 36 S#a coll5 router2.cisco.com target1 DefaultSnaLu0Echo 1 6 M#a coll6 router2.cisco.com target2 DefaultSnaLu2Echo 1 12 M#a coll7 router2.cisco.com target3 DefaultSnaRuEcho 1 24 S#a coll8 router2.cisco.com target2 DefaultIpPathEcho 10:20:1999:01:00:00 36 M#a coll9 router.cisco.com Unused DefaultHTTPConn 1 0 S#a coll10 router.cisco.com Unused MyHTTP 1 0 S#a coll11 router.cisco.com Unused DefaultDNS 1 0 S#a coll12 router.cisco.com Unused DefaultDHCP 1 0 S###############################################################################Loading Components from a Seed File
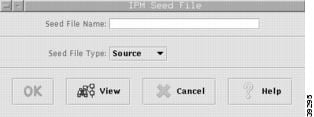
To load components from a seed file into IPM:
Step 1
Figure 4-7 Seed File Window
Step 2
Step 3
Step 4
If you do not remember the name of the seed file you want to load, you can view a list of available seed files from the Seed File window. Select Source, Target, or Collector as the Seed File Type and click View.
For information about listing, viewing, editing, or loading seed files from the command line, see the "IPM Command Reference" section.
Viewing Seed File Output Files
When you add a source router, target, or collector using a seed file, you create an output file that indicates whether the addition of the resource was successful. The output file has the same path and name as the seed file, with the addition of the .out suffix. For example, a seed file named labsrcfile.txt generates an output file named labsrcfile.txt.out. An output file contains the same information as its seed file, with the addition of messages that indicate whether the addition of the resource was successful. For example, if labsrcfile.txt contains the following information:
a cwb-ipm-1600a public privatea cwb-ipm-1600b public privatea cwb-ipm-1700a public privateThen, if the addition of the resources is successful, the output file labsrcfile.txt.out would contain the following information:
a cwb-ipm-1600a public private - OKa cwb-ipm-1600b public private - OKa cwb-ipm-1700a public private - OKIf the resources cannot be added for some reason, OK is replaced with an appropriate error message. Possible error messages include:
ERROR: BAD VALUE PASSEDERROR: COLLECTOR LIMIT EXCEEDEDERROR: COLLECTOR NOT FOUNDERROR: DATABASE ERRORERROR: DUPLICATE ENTRYERROR: DUPLICATE NAMEERROR: INTERNAL ERRORERROR: INVALID COMMANDERROR: INVALID ENTRYERROR: INVALID IOS VERSION FOR TARGETERROR: INVALID PROTOCOL TYPEERROR: INVALID RTT TYPEERROR: INVALID TARGET FOR THE SELECTED OPERATIONERROR: LOST CONNECTION TO SNMP SERVERERROR: OPERATION NOT FOUNDERROR: SOURCE NOT FOUNDERROR: TARGET NOT FOUNDChanging IP Addresses
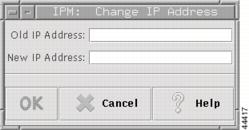
When you physically move routers, servers, or other devices, you might need to change their IP addresses. You might also need to change IP addresses as your network grows. If you have a DNS server, IPM enables you to change an old IP address to a new IP address throughout the IPM database.
Caution
To change the IP address:
Step 1
Figure 4-8 Change IP Address Window
Step 2
Step 3
Step 4
The IPM client can seem unresponsive while the IP address is being changed. This is due to the high volume of messages being received by the client during this time.
If you change an IP address, you must wait until the change is complete in the IPM database before making another IP address change.
When you change the IP address of a device, IPM performs two checks. IPM first checks whether the same IP address is used by another device in the IPM database. IPM also checks whether the new IP address is mapped to the same DNS entry as the old IP address, if one existed.
Note
For more detailed information about the Change IP Address window, see the "Change IP Address Window" topic in the online help.
Setting IPM Database Preferences
For collectors that are using a statistical operation, IPM gathers network performance and error statistics from the source router once every hour and stores the data in the IPM database. The collected hourly data is used to calculate daily, weekly, and monthly data.
By default, IPM stores the collected data for the following periods:
•
•
•
•
The IPM database preferences file allows you to control these parameters and also define the business hours and days. Defined business hours are used in determining the daily, weekly, and monthly averages, whereas business days are used in determining the weekly and monthly averages. The database preferences file also allows you to set the length of time that daily data is retained in the database.
Information about viewing and changing the database preferences is provided in the following sections:
•
•
•
Displaying the Current Database Preferences
To display the preferences in the currently running IPM database in Solaris, enter:
# cd /opt/CSCOipm/bin# ./ipm dbprefs viewIn Windows, enter:
cd c:\Program Files\Internetwork Performance Monitor\Server\binipm dbprefs viewTo display the preferences in the configuration file (which might differ from the preferences in the currently running IPM database), in Solaris, enter:
# cd /opt/CSCOipm/bin# ./ipm dbprefs viewfileIn Windows, enter:
cd c:\Program Files\Internetwork Performance Monitor\Server\binipm dbprefs viewfileThe output from the view and viewfile versions of this command is formatted differently because ipm dbprefs view displays the contents of a database, but ipm dbprefs viewfile displays the contents of a file.Changing the Database Preferences
To change the IPM database preferences:
Step 1
Step 2
ipm_daily_stats_life=180Step 3
For example, to store collected statistics over a business day that runs from 8:00 a.m. to 5:00 p.m., you would use the following setting:
ipm_business_hour_0=0ipm_business_hour_1=0ipm_business_hour_2=0ipm_business_hour_3=0ipm_business_hour_4=0ipm_business_hour_5=0ipm_business_hour_6=0ipm_business_hour_7=0ipm_business_hour_8=1ipm_business_hour_9=1ipm_business_hour_10=1ipm_business_hour_11=1ipm_business_hour_12=1ipm_business_hour_13=1ipm_business_hour_14=1ipm_business_hour_15=1ipm_business_hour_16=1ipm_business_hour_17=0ipm_business_hour_18=0ipm_business_hour_19=0ipm_business_hour_20=0ipm_business_hour_21=0ipm_business_hour_22=0ipm_business_hour_23=0By default, the business day is defined as 24 hours, 0:00 a.m. to 11:59 p.m.
Step 4
•
•
•
•
•
•
•
For the days you want to set as business days, set the day to a value of 1. Days with a value of 0 are not counted as business days.
For example, to set the business days to Monday through Friday, you would use the following setting (the default setting):
ipm_business_day_0=0ipm_business_day_1=1ipm_business_day_2=1ipm_business_day_3=1ipm_business_day_4=1ipm_business_day_5=1ipm_business_day_6=0By default, the business week is defined as 7 days, Sunday morning to Saturday evening.
Step 5
Step 6
In Solaris, enter:
# cd /opt/CSCOipm/bin# ./ipm dbprefs reloadIn Windows, enter:
cd c:\Program Files\Internetwork Performance Monitor\Server\binipm dbprefs reload
Note
Database Preferences File Format
The contents of the default IPM database preferences file (ipmDbPref.conf) are shown in the following example. This file is stored in the /opt/CSCOipm/etc directory in Solaris and in the c:\Program Files\Internetwork Performance Monitor\server\etc directory in Windows.
### (C) Copyright 1998 Cisco Systems, Inc.# All Rights Reserved## IPM Web Report Preferences## The default maximum number of rows returned to the browser# in any web report can be controlled with ipm_max_web_rpt_rows.#ipm_max_web_rpt_rows=500### IPM Database Preferences## This file contains the IPM Database Preferences used for# data aging, data reduction, and web reporting.## To change these values, update the values below and run the command:# ipmDbPref.sh -s## To display the values currently set in the database, run the command:# ipmDbPref.sh## NOTE: Changing these parameters has no effect on daily, weekly and# monthly data that has already been calculated. Only new daily, weekly# and monthly data will use these new settings.## The weekly and monthly data are always kept forever.# The ipm_hourly_stats_life setting determines the number of days that IPM# stores hourly statistics information. You can change this to any number# of days.#ipm_hourly_stats_life=32### The ipm_daily_stats_life setting determines the number of days that IPM# stores daily statistics information. You can change this to any number# of days.#ipm_daily_stats_life=180## The ipm_business_hour_x settings describe which hours of the day IPM# will use when generating daily, weekly and monthly reports. Each hour# of the day, starting with 0 (midnight) and going through 23 (11 PM)# may be included in the reports. However, you will probably want to# restrict the hours included in the reports to normal business hours.## The hours are defined as starting at 0 minutes past the hour, and going# through 59 minutes and 59 seconds past the hour.### Set the value of each ipm_business_hour_x parameter to either 0 or 1.# A value of 1 indicates that IPM will use this hour of the day when# generating daily, weekly and monthly reports. A value of 0 indicates# that IPM will ignore this hour of the day when generating daily, weekly# and monthly reports.## For example, setting 'ipm_business_hour_9=1' will cause all data collected# between 9:00AM and 9:59AM on business days to be included in reports.#ipm_business_hour_0=1ipm_business_hour_1=1ipm_business_hour_2=1ipm_business_hour_3=1ipm_business_hour_4=1ipm_business_hour_5=1ipm_business_hour_6=1ipm_business_hour_7=1ipm_business_hour_8=1ipm_business_hour_9=1ipm_business_hour_10=1ipm_business_hour_11=1ipm_business_hour_12=1ipm_business_hour_13=1ipm_business_hour_14=1ipm_business_hour_15=1ipm_business_hour_16=1ipm_business_hour_17=1ipm_business_hour_18=1ipm_business_hour_19=1ipm_business_hour_20=1ipm_business_hour_21=1ipm_business_hour_22=1ipm_business_hour_23=1## The ipm_business_day settings describe which days of the week IPM will# use when generating weekly and monthly reports. Each day of the week# is represented by a number:## Sunday is 0# Monday is 1# Tuesday is 2# Wednesday is 3# Thursday is 4# Friday is 5# Saturday is 6## Set the value of each ipm_business_day_x parameter to either 0 or 1.# A value of 1 indicates that IPM will use this day of the week when# generating weekly and monthly reports. A value of 0 indicates that IPM# will ignore this day of the week when generating weekly and monthly reports.## For example, setting 'ipm_business_day_2=1' will cause all# data collected on Tuesday during business hours to be included in reports.#ipm_business_day_0=1ipm_business_day_1=1ipm_business_day_2=1ipm_business_day_3=1ipm_business_day_4=1ipm_business_day_5=1ipm_business_day_6=1Setting SNMP Timeout and Retry Environment Variables
An IPM server and source router need not be physically near each other. In fact, they can be thousands of miles apart. However, as the distance increases, so does the time it takes the source router to respond to SNMP requests. If the response time exceeds a predefined timeout value, IPM interprets the delay as an SNMP timeout, which could impact the operation of your collectors.
For example, if you have an IPM server in New York and a source router in Tokyo, SNMP timeouts might prevent you from configuring collectors on the source router. Or you might be able to configure the collectors, but timeouts might result in periods when no statistical data can be collected from the source router.
If you experience this problem, the best solution is to define an additional IPM server that is physically nearer the source router. However, if that is not an option, you can set new values for the SNMP timeout and retry environment variables.
Note
The following environment variables control SNMP timeouts and retries
:
Using the default values, IPM waits 50 seconds before determining that an SNMP request cannot be completed—5 seconds for the initial timeout, followed by 3 retries of 10, 15, and 20 seconds each.
If excessive SNMP timeouts are a problem in your network, try slightly increasing the timeout and timeout increment values until the problem is eliminated.
To set new values for these variables, use one of the following procedures:
•
•
Setting SNMP Environment Variables in Solaris
To set SNMP environment variables in Solaris, use the following procedure:
Step 1
# cd /opt/CSCOipm/bin# ./ipm stopStep 2
Note
By default, the variable definitions are commented out in the file:
# Max value is 60, default is 5, min is 1#IPM_SNMP_TIMEOUT=5#export IPM_SNMP_TIMEOUT# Max value is 5, default is 3, min is 1#IPM_SNMP_RETRIES=3#export IPM_SNMP_RETRIES# Max value is 60, default is 5, min is 1#IPM_SNMP_TIMEOUT_INCREMENT=5#export IPM_SNMP_TIMEOUT_INCREMENTStep 3
# Max value is 60, default is 5, min is 1IPM_SNMP_TIMEOUT=10export IPM_SNMP_TIMEOUTStep 4
Step 5
Step 6
# cd /opt/CSCOipm/bin# ./ipm restartWhen the IPM servers start up, they discover the variables and use the new timeout and retry values.
Setting SNMP Environment Variables in Windows NT and Windows 2000
To set SNMP environment variables in Windows:
Step 1
cd c:\Program Files\Internetwork Performance Monitor\Server\binipm stopStep 2
Note
By default, the variable definitions are commented out in the file:
# Max value is 60, default is 5, min is 1#set IPM_SNMP_TIMEOUT=5# Max value is 5, default is 3, min is 1#set IPM_SNMP_RETRIES=3# Max value is 60, default is 5, min is 1#set IPM_SNMP_TIMEOUT_INCREMENT=5Step 3
# Max value is 60, default is 5, min is 1set IPM_SNMP_TIMEOUT=10Step 4
Step 5
Step 6
cd c:\Program Files\Internetwork Performance Monitor\server\binipm restartWhen the IPM servers start up, they discover the variables and use the new timeout and retry values.
Setting New IPM Server Process Timeout Values
The default timeout value for data collection servers and configuration servers is 120 seconds. This value accommodates the longer startup times encountered when you have a large number of collectors. However, if you have configured more than 1000 collectors on a single IPM server, you might need to increase this timeout value. These timeout values control internal IPM timing; they do not affect communication with source routers.
For each 500 collectors above 1000, add 30 seconds to the default timeout value of 120 seconds for both the data collection server and configuration server. For example, for 1500 collectors change the timeout value to 150 seconds for both servers. If you do not make this change, the Process Manager might timeout while waiting for the data collection server to start up, thus preventing initialization of the configuration server.
To increase the timeout value, allowing sufficient time for the data collection server process to start, use one of the following procedures:
•
•
Setting Server Timeout Values in Solaris
To set server timeout values in Solaris:
Step 1
Note
The data collection server's timeout value is defined in the following line in the file:
DataCollectionServer R MessageLogServer,SNMPServer
/opt/CSCOipm/bin/CWB_ipmData_colld
-ORBagentPort,44342,-PMCserverName,IPMProcessMgr,-PMCname,DataCollecti
onServer,-MLCserverName,IPMMsgLogServer,-MLCname,DataCollectionServer,
-N,IPMDataCollectionServer,-R,/opt/CSCOipm 120
The configuration server's timeout value is defined in the following line in the file:
ConfigServer R MessageLogServer,SNMPServer,DataCollectionServer
/opt/CSCOipm/bin/CWB_ipmConfigServerd
-ORBagentPort,44342,-PMCserverName,IPMProcessMgr,-PMCname,ConfigServer
,-MLCserverName,IPMMsgLogServer,-MLCname,ConfigServer 120
Step 2
ConfigServer R MessageLogServer,SNMPServer,DataCollectionServer
/opt/CSCOipm/bin/CWB_ipmConfigServerd
-ORBagentPort,44342,-PMCserverName,IPMProcessMgr,-PMCname,ConfigServer
,-MLCserverName,IPMMsgLogServer,-MLCname,ConfigServer 240
Step 3
Step 4
Step 5
# cd /opt/CSCOipm/bin# ./ipm restartWhen the IPM servers start up, they use the new timeout values.
Setting Server Timeout Values in Windows NT and Windows 2000
To set server timeout values in Windows NT and Windows 2000:
Step 1
Note
The data collection server's timeout value is defined in the following line in the file:
DataCollectionServer R MessageLogServer,SNMPServer
C:\PROGRA~1\INTERN~1\Server\bin\CWB_ipmData_colld
-ORBagentPort,44342,-OAconnectionMaxIdle,8640000,-PMCserverName,IPMPro
cessMgr,-PMCname,DataCollectionServer,-MLCserverName,IPMMsgLogServer,-
MLCname,DataCollectionServer,-N,IPMDataCollectionServer,-R,C:\PROGRA~1
\INTERN~1\Server,-MLCfilterFileName,C:\PROGRA~1\INTERN~1\Server\logs\D
ataCollectionServer.flt 120
The configuration server's timeout value is defined in the following line in the file:
ConfigServer R MessageLogServer,SNMPServer,DataCollectionServer
C:\PROGRA~1\INTERN~1\Server\bin\CWB_ipmConfigServerd
-ORBagentPort,44342,-OAconnectionMaxIdle,8640000,-PMCserverName,IPMPro
cessMgr,-PMCname,ConfigServer,-MLCserverName,IPMMsgLogServer,-MLCname,
ConfigServer,-MLCfilterFileName,C:\PROGRA~1\INTERN~1\Server\logs\Confi
gServer.flt 120
Step 2
ConfigServer R MessageLogServer,SNMPServer,DataCollectionServer
C:\PROGRA~1\INTERN~1\Server\bin\CWB_ipmConfigServerd
-ORBagentPort,44342,-OAconnectionMaxIdle,8640000,-PMCserverName,IPMPro
cessMgr,-PMCname,ConfigServer,-MLCserverName,IPMMsgLogServer,-MLCname,
ConfigServer,-MLCfilterFileName,C:\PROGRA~1\INTERN~1\Server\logs\Confi
gServer.flt 240
Step 3
Step 4
Step 5
cd c:\Program Files\Internetwork Performance Monitor\server\binipm restartWhen the IPM servers start up, they use the new timeout value.
Setting the DISPLAY Variable in Solaris
The DISPLAY variable is set as part of your login environment on Solaris. However, if you Telnet into a remote workstation, you must set the DISPLAY variable to local display. To do so, enter:
setenv DISPLAY local_ws:0.0
where local_ws is your local workstation.
If your shell does not support the setenv command, use:
export DISPLAY=local_ws:0.0
If you Telnet into a remote workstation and you do not set the DISPLAY variable to local display, you cannot use:
•
•
•
•
•
Backing Up or Restoring the IPM Database
The IPM database is backed up automatically every day at 1:00 a.m. If your database file is corrupted, you can restore the data in the IPM database from the previous day's backed-up data.
To restore the IPM database from a previous back up:
•
# cd /opt/CSCOipm/bin# ./ipm dbrestore•
cd c:\Program Files\Internetwork Performance Monitor\server\binipm dbrestore
Note
Warning
Changing IPM Database Password
You can change the IPM database password using the command:
ipm dbpasswordIPM prompts you to enter the old password. After you enter the old password, you need to enter the new password and confirm it by entering it again.
The password is case sensitive and should be atleast four characters long. You cannot use spaces in the password.
When you try to restore an old database after you change the database password and if the password in the old database is different from the new one, then the password in the old database will be modified to the new password and IPM restores the database.