Downloads |
 Feedback Feedback
|
Table Of Contents
About Client-to-Server Security
About Server Internal Security
About Administrator-Imposed Security
About Server-to-Device Security
Application Integration with CAM
Setting Up Server Internal Security
Using the Shared Secret Client API
Setting Up Server-to-Device Security
Handling Symmetrical Encryption
Handling Asymmetrical (One-Way) Encryption
Stopping Eavesdropping Using SSL
What Kind of SSL Support is Available in CWCS?
Configuring System Identity Setups
Configuring a Cisco.com User and Password
Using the Security System
The CWCS Security system provides authentication and authorization services for CWCS-based applications. The following topics explain how to use the CWCS security system with your application:
•
Integrating a New Application
•
•
•
For more information about the security system or security in general, refer to the following resources:
•
•
•
•
•
•
•
•
Understanding CWCS Security
The CWCS Server software provides some of the security controls necessary for a web-based network management system, but also relies heavily on the end user's own security measures and controls to provide a secure computing environment for CiscoWorks applications. CiscoWorks Server requires three levels of security to be implemented to ensure a secure environment:
•
•
About Client-to-Server Security
The Client-Server environment is architected to split an application's processing across multiple processors to gain the maximum benefit while minimizing the network traffic between machines. The key phase is to split the application processing. In Client-Server mode, each processor works independently but in cooperation with other processors .
About Server Internal Security
The shared secret system works by associating a secret character string with an alias name. If this alias name matches an existing CiscoWorks user name, then the shared secret authenticated user obtains the roles granted to the matching CiscoWorks user. If no matching CiscoWorks name exists, the authenticated shared secret user (Peer Server Account Setup) is given whatever roles are assigned to the guest user.
The secret tool shipped with CiscoWorks is a command line tool. The secretTool.pl file is located in the NMSROOT/bin directory.
Name
secretTool.pl
Description
A command line tool for managing the shared secrets used by external applications to gain authenticated access to CMF URLs.
Syntax
secretTool.pl [-add alias secret | -remove alias | -list]
Input Arguments
-add alias secret
Adds a new alias to the database, or overwrite an existing one
-remove alias
Remove an existing alias from the database
-list
Lists all alias names configured in the database
Examples
/opt/CSCOpx/bin/secretTool.pl -add myApplication mySecret/opt/CSCOpx/bin/secretTool.pl -remove myApplication/opt/CSCOpx/bin/secretTool.pl -listUser Name Length Restrictions
By default, the system will not allow a user to be created/authenticated where the user name length < 5 characters. If there is a need to include shorter user names, users can set the property "validateUser=false" in NMSROOT\lib\classpath\ss.properties on WIN and NMSROOT/lib/classpath/ss.properties on SOL. The check for usernames <5 character is skipped
Using CWCS Single Sign-On
CWCS provides a single sign-on mechanism. To use it, ensure you do the following for the initial setup:
1.
2.
3.
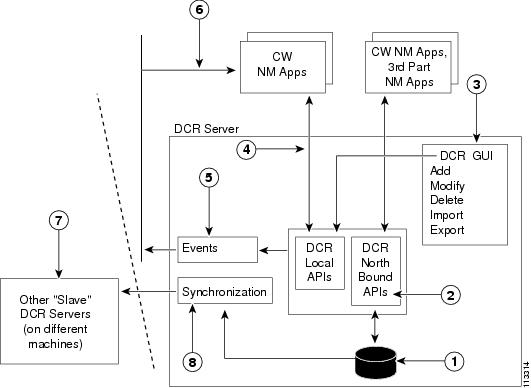
Figure 10-1 Login Protocol Path
The following is the path the protocol travels:
1.
2.
3.
4.
5.
6.
7.
8.
SSL is used to provide confidentiality for the transactions between the CWCS server and the authentication server. All transactions from steps 3 through 7 are protected via SSL.
How the Login Protocol Works
The login protocol works as follows:
1.
2.
3.
4.
5.
6.
7.
How the Logout Protocol Works
The login protocol works as follows:
1.
2.
3.
4.
About Server-Imposed Security
The CWCS Server provides the following security mechanisms:
•
On UNIX systems all files and directories are owned by casuser with group equal to casusers. Temporary files are created as the user casuser with permissions set to read-write for the user casuser and read only for members of group casusers. The only exception to this rule is the log files created by the CWCS web server. The CWCS web server must be started as root. Therefore, its log files are owned by the user root with group equal to casusers.
All backend processes are executed with a umask value of 027. This means that all files created by these programs are created with permissions equal to rwx r-x ---, with an owner and group of the user ID and group of the program that created it. Typically this will be casuser and casusers.
The Windows user casuser is created at installation time and given a random password to which the CWCS Daemon Manager has access. No user of the CWCS system should have to log into the Windows system as the user casuser.
Files installed by CWCS are readable by anyone logged into the Windows system, but files created in the NMSROOT\files folder can be read only by the casuser and administrator users.
•
For example, if an executable file is owned by user "Joe", it will be executed by the CWCS Daemon Manager under the user ID of "Joe".
The exception is the root user ID. To prevent a potentially harmful program from being executed by the process manager with root permissions, the process manager will execute only a limited set of CWCS programs that need root privilege. This list is not documented to preclude any user from trying to impersonate these programs.
CWCS foreground processes (typically cgi-bin programs or servlets) are executed under the control of the web server's child processes. These processes run as the user casuser.
On Windows 2000 and Windows 2003, the runtime environment executes some backend processes as system level processes, so there are some programs that run under the system account. These programs are limited in number and controlled by entries in the Windows Registry. Only administrators have write access to these Registry entries.
•
About Administrator-Imposed Security
To maximize CWCS Server security, follow these system administration guidelines:
•
•
•
•
About Server-to-Device Security
In CiscoWorks, the data is sent across in clear-text when the CiscoWorks server and devices communicate with each other. This means if someone uses a sniffer on your network, they may be able to get the device specific details (such as telnet password, and SNMP community strings) that are being passed between CiscoWorks server and a device.
CWCS implements Secure Shell (SSH) to address this vulnerability.
About Secure Shell (SSH)
SSH (Secure Shell) is a program to logon to other computers or devices over the network, to execute commands in the remote computer or device, and to move files from one computer or device to another.
It provides strong authentication and secure communications over insecure networks like internet. Currently, there are two major SSH versions available, SSH version 1 and SSH version 2.
A few minor versions of SSH are also available. SSH version 1.5 is the most popular version, since it is the only version supported in Cisco IOS. Therefore, the APIs have been written specifically for SSH version 1.5. In this document, any reference to SSH means SSH version 1.5. (See ENG 167300 for details about SSH implementation in CMF 2.1.)
Using CWCS Server Security
The CWCS security system is a non-hierarchical, session-oriented, role-based system that works using registration and filtering. Each application specifies which of its tasks are visible to each of the user roles via the XML encoded application registry files.
See the "Application Integration with CAM" section for more details.
The operating system on which the server runs is designed to enable administrators to fully protect their environment. The CWCS Server software relies on this operating system to protect its features from unauthorized use. The CWCS Server provides some of the security controls that are necessary for a web-based application server. However, it relies heavily on the end user's own security measures and controls to provide a secure computing environment for CWCS Server applications.
The CWCS Server provides and requires the following three levels of security:
•
•
•
About General Security
The CWCS Server provides an environment that allows the deployment of web-based network management applications. Web access provides an easy to use and easy to access computing paradigm. This is more difficult to secure than the traditional style of computing that requires a login to an operating system before applications can be executed.
The CWCS Server provides the security mechanisms (authentication and authorization) needed to prevent unauthenticated access to the CWCS Server and unauthorized access to CWCS Server applications.
Since the CWCS Server applications are capable of changing the behavior and security of your network devices, it is critical that access to the applications and servers be restricted to only those personnel who need access to applications or the data that the applications provide. To ensure a high level of security, you can:
•
•
The application must integrate with CAM for client-to-server security.
Application Integration with CAM
Applications that employ the next generation features provided by CWCS integrate with the CAM infrastructure. The integration involves:
•
•
•
Application Integration with CAM requires applications to do the following.
1.
2.
3.
How CAM Cache works :
CAM maintains two caches internally:
•
•
When ACS is used, the DeviceCache object provides an interface to manipulate the local ACS cache. CAM maintains this local cache so that it does not have to go to the ACS server for every authorization request. The cache information is stored in the memory and is global to all clients.
To obtain the Device Cache created within the tomcat context:
DeviceCache dc = MICEKeys.getCAMObject().getDeviceCache();if ( dc==null || !dc.isCacheInitialized() ) {DeviceCache acsDevCache = (com.cisco.core.mice.cam.DeviceCache)coreAdmin.getDeviceCache();acsDevCache.initDeviceCache() ;}The cache can become stale when:
•
•
You should configure cache updates to occur when:
•
•
Note
•
•
API Level Details
The following is a list of CsAuthServlet APIs and equivalent CAM APIs.
Authorization Checking
The following two examples explain the authorization checks performed using CsAuthServlet in previous versions of CWCS, and suggest the modifications to be made in order to integrate with CAM.
Assume that there is a component that allows a user to edit device configuration files. Typically this is an activity that a network administrator performs. The following is an example of how authorization is implemented in CWCS using CAM.
Foe more details and examples, see Guidelines for CW2k Applications to Integrate with the CAM Infrastructure, EDCS-210589.
Example 10-1 Older CWCS Model
{if ( !CsAuthServlet.checkRole(req, SA) ){out.println("ERROR: Authorization Failure");out.close();return;}Perform operation}Example 10-2 Current CAM Model
{String editConfigTask = "Edit_Config";HashMap taskList = new HashMap ();taskList.put (editConfigTask, new Privilege (editConfigTask));PrivilegeTask privTask = new PrivilegeTask ( "RME", taskList ,NULL);CoreAdmin coreAdmin = CoreAdminFactory.produce();CoreAdmin.authorize (username, privTask, NULL);Iterator i = privTask.getPrivileges().values().iterator();while (i.hasNext()){if (! ((Privilege) i.next()).getAuthorized()){out.println("ERROR: Authorization Failure");out.close();return;}}Perform operation}
Setting Up Server Internal Security
This topic discusses the setting up server internal security and administration of the shared secret authentication mechanism built into CMF 1.2, including CiscoWorks. This mechanism allows external programs to have authenticated access to CWCS URL-based APIs. This is accomplished by executing a secure validation process based on a pre-shared secret sequence of characters. If a successful validation occurs, the servlet session associated with the connection attempt is given the security attributes needed to execute remote servlet API calls. This topic primarily covers the setup and administration of this mechanism.
Using the Shared Secret Client API
The shared secret client side API is used by external applications to gain authenticated access to CWCS server URLs. The application model is simple.
•
•
The client API is provided as an unsigned jar file named SecretClient.jar which is installed with CWCS in the NMSROOT/www/classpath directory. That this jar file must be in the external program's classpath in order for the shared secret mechanism to work (copy the SecretClient.jar file to whatever machine the external program is running on if necessary).
The following code shows how to use the shared secret client API to create an authenticated session and use the returned cookie in subsequent CWCS URL calls.
// This code will contact the SecretService running on the server, and //if everything
validates properly, it will return a valid cookie
// string. All subsequent calls to the CMF server should include this // cookie in their requests, and this will allow server side// authentication to operate normally.String host = "http://xxx.xxx.x.x:xxxx";String name = "foo";String secret = "bar";
Note
String host = "https://xxx.xxx.x.x:xxxx";
String name = "foo";
String secret = "bar";
com.cisco.nm.cmf.ssl.initssl.initialize (true);SecretClient sc = new SecretClient();String cookie = sc.secretLogon( host, name, secret );if( cookie != null )System.out.println( "Returned cookie=" + cookie );else{System.out.println( "Returned error code=" +sc.getErrCode() + ", " + sc.getErrReason() );return;}// This code will post the validSession command to the CMF CsAuthServlet as an example// of how to call a URL using the cookie returned from secretLogon().try{String servlet = host +"/CSCOnm/servlet/com.cisco.nm.cmf.servlet.CsAuthServlet";URLConnection cnn =SecretClient.doPost( servlet, "cmd=validSession",null, cookie );System.out.print( "Code returned from CsAuthServlet.validSession():" );SecretClient.dumpResponse( cnn.getInputStream() );}catch( IOException e ){System.out.println( "IOException " + e );}}Client Side API Details
In your external applications, use the following shared secret methods to gain authenticated access to CMF server URLs:
•
•
•
•
•
SecretClient.secretLogon
public java.lang.String secretLogon(String host, String name, String secret);Client service to submit a name and secret to a remote CMF host.
Input Arguments
host
Server host to contact, such as "http://xxx.xxx.x.x:xxxx"
name
Name associated with the secret on the server
secret
Secret associated with the name on the server
Return Values
Success
Returns a validated session cookie.
Failure
Returns null. The getErrCode() and getErrReason() functions may be queried for more information.
Examples
/opt/CSCOpx/bin/secretTool.pl -add myApplication mySecret/opt/CSCOpx/bin/secretTool.pl -remove myApplication/opt/CSCOpx/bin/secretTool.pl -listSecretClient.getErrCode
public int getErrCode()Get the last error code that occurred.
Return Values
The code returned will be one of the following integer constants:
SecretClient.getErrReason
public java.lang.String getErrReason()Get any supplemental information available with the last error code.
Return Values
SecretClient.doPost
public static java.net.URLConnection doPost(String host, String data, Object payload, String cookie )throws MalformedURLException, IOException;Optional helper method to execute post with handling of servlet parameters and a cookie.
Input Arguments
Return Values
A URL connection object that can be used to read the response. Executes post with optional cookie and optional payload of a serialized Java object, returns connection.
Exceptions
•
•
SecretClient.dumpResponse
public static void dumpResponse( InputStream in) throws IOException;Optional helper method to dump a response stream of text lines.
Input Arguments
Return Values
Setting Up Server-to-Device Security
Other applications use SSH APIs to establish secure connection between the device and CiscoWorks server. A package named CSCOssh is provided for SSH. This package gets installed when you install CMF 2.1. The class files are available at $NMSROOT/lib/classpath/com/cisco/nm/cmf/ssh
Five APIs are provided for the use of applications. SSHIO is the main class. You must initialize SSHIO before using the APIs provided for SSH.
Connecting to Device
public boolean connect (String HostName, int PortNumber, String UserName, String
Password) throws SshPasswdException, SshCRCException, SshException
This API connects to SSH enabled device and goes into Normal User mode.
Input Arguments
Return Values
True
If the connection is successful and the user name/ password combination is wrong
FalsE
Something went wrong while establishing the connection
Exceptions
SshPasswdException
Throws when the UserName/Password Combination is wrong
SshCRCException
When Checksum of SSH packet fails
SshException
General SSH exception.
Reading From Device
public String read ( ) throws SshCRCExceptionThis API reads the data from SSH device. This API will be used when we want to See the Output of any device commands. This will read from the device until a device prompt appears.
Return Values
Sending Command to a Device:
public void send (String Command)This API executes the command in device.
Input Argument
Closing Connection
public void close( )This API disconnecs the SSH session and closes the socket.
Debugging
public void setDebug(boolean Debug)This API is used to enable or disable debugging.
Input Arguments
The following sample code shows how to use SSH APIs to establish a secure connection.
Example 10-3 Using SSH APIs to Establish Secure Connections
// This code contacts SSH enabled device and gets// Startup Configimport com.cisco.nm.cmf.ssh.*;class test{public static void main( String[] args){String OP;boolean verify= false;SSHIO TS=null;try{TS = new SSHIO();TS.setDebug(true);verify = TS.Connect("10.64.158.184",22,"test","test");iif (verify != false ){TS.ExecuteCommand("terminal length 0");OP = TS.GetResult();TS.ExecuteCommand("enable");OP = TS.GetResult();System.out.println(OP);TS.ExecuteCommand("madras");OP = TS.GetResult();TS.ExecuteCommand("show conf");OP = TS.GetResult();System.out.println(OP);TS.DisConnect();}else{System.out.println("Some thing wrong");}} catch (Exception e) {System.out.println("Exception");e.printStackTrace();}}}
Integrating a New Application
Application integration is performed using CMIC. For details see the "Integrating CMIC with CWHP and Device Center" section on page 9-3.
Securing Applications
Developers should secure their applications using CAM. For details, see Guidelines for CW2k Applications to Integrate with the CAM Infrastructure, EDCS-210589.
The following is a deprecated mechanism of integration.
CMF provides user authentication and session tracking, but it is up to the applications to do authorization verification using the CMF security APIs.
The following topics contain guidelines for securing
•
•
•
•
Use this set of APIs in your applications to determine if an attempt to execute an application is valid. This prevents users from by-passing the login process and attempting to execute applications directly.
If this code is not incorporated, users may be able to avoid the login/authentication process by entering the URL from the desktop.
For additional Java documentation, refer to the following location on any installed CMF Server machine: http://machine_name/javadocs/cmf/packages.html.
Securing Java Servlets
The CsAuthServlet provides the static checkRole() method for doing an authorization verification prior to performing a task. Adding a call to this method in your servlet ensures that the HTTP request is from a browser with a valid session and that the user logged in has the specified role.
Note
Securing Java Applets
The CMF CsAuthServlet provides a checkRole URL for applets to do an authorization verification before starting. Calling this URL in your applet ensures that your applet is being shown in browser that has a valid user session and that the user logged in has the specified role.
Backend Perl Script
Use the following guidelines to implement a backend Perl script. The checkRole function supports both numbers and two-letter abbreviations.
Note
Java Server Pages (JSP)
The CMF CsAuthServlet provides the static checkRole() method for doing an authorization verification prior to performing a task. Adding a call to this method in your JSP page ensures that the HTTP request is from a browser with a valid session and that the user logged in has the specified role.
Note
Creating Auto Login Pages
If you must provide access to an application URL from outside the desktop, use the AutoLogin mechanism. A typical example of when to use this mechanism is when applications send email notifications which include a URL that can be clicked on by the recipient to view a report inside CWCS. The AutoLogin mechanism verifies that a valid session exists. If so, the specified URL is displayed. If not, the CWCS login panel is displayed and the URL is shown only after the user logs in. The URL to display must be URL encoded with the java.net. URLEncoder class or a similar function if URL parameters are included in the URLtoDisplay.
Note
The Windows 2000 and Windows 2003 casuser account must have a random initial password that is never changed.
During an upgrade, the framework renames the old user, bin, to the new user, casuser. The user, casuser, is created during a new install by the installation framework.
The casuser does not have admin privileges on Windows 2000 or Windows 2003. It is created with User level privileges and the following additional privileges:
•
•
Performing Encryption
CWCS Security APIs can perform both symmetrical and asymmetrical encryption. The following topics discuss how to use the CWCS Java encryption APIs to encode data in your applications.
•
•
Handling Symmetrical Encryption
One problem frequently encountered by application developers is the need to encrypt sensitive data (such as device credentials) when stored in a file or a database. CWCS provides the simple EncryptedObject API for doing this type of symmetrical encryption. It provides very strong encryption (Twofish/256/CBC) and the internal code is exempt from ITAR under the 15 CFR registered open source exemption. Example 10-4 shows typical code using the EncryptedObject API.
Caution
Example 10-4 Symmetrical Encryption
import com.cisco.nm.cmf.security.EncryptedObject;// To encrypt an object:// Object to protect (NOTE: the object must be serializable!)MyObject foo = new foo();// Obtain the passphrase to protect accessbyte[] pass = { 0, 1, 2, 3, 4, 5 ... }; // Use a decent length (32+)// byte[] pass = passwordString.getBytes(); // Another way...// Encrypt and encapsulate it in serializable EncryptedObject instanceEncryptedObject e = new EncryptedObject( foo, pass );// Encrypted object e is now safe, do whatever with it including read/write to/from disk...// To unencrypted the object later:// Obtain the passphrase to protect accessbyte[] pass = { 0, 1, 2, 3, 4, 5 ... }; // Use a decent length (32+)// byte[] pass = passwordString.getBytes(); // Another way...// Obtain the encrypted objectEncryptedObject e = ...; // read from disk, e.g.// Recover the encapsulated encrypted objectMyObject foo = (MyObject)e.getObject( pass );
Handling Asymmetrical (One-Way) Encryption
Use asymmetrical encryption when you do not need to recover encrypted data. A common use for this type of encryption is for UNIX password files. Asymmetrical encryption is performed using a message digest algorithm which is a secure one-way hashing function. To perform one-way encryption on a string, the java.security. MessageDigest class can be used (available in Java 1.1). Example 10-4 shows a typical implementation of this kind.
Example 10-5 Asymmetrical Encryption
import java.security.MessageDigest;String myString = new String("Data to encrypt");Byte[] encryptedData;// instantiate and initialize MessageDigest objecttry {MessageDigest md = MessageDigest.getInstance( "SHA" );}catch( NoSuchAlgorithmException ) {...}md.reset();// set data to encryptmd.update( myString );// get encrypted dataencryptedData = md.digest();
Stopping Eavesdropping Using SSL
Using a network sniffer is a common practice among malicious hackers. Hackers look for decipherable data transferring across the network that can be used to hack into unsuspecting networks or provide them with confidential information. Data between a customer's browser and CiscoWorks is in sent across the network in clear-text. This means if someone uses a sniffer on your network they may be able to see any data that is being passed between CiscoWorks and the user. This is detrimental due to the amount of data in CiscoWorks that would be very useful to a malicious hacker (topology information, device passwords, and so on).
Why Use SSL in CWCS?
One way customers can protect themselves from eavesdropping is through SSL (Secure Socket Layer). SSL encrypts the transmission channel between the client and server.
Using SSL does come at a slight cost. The encryption technology used in SSL is math intensive, meaning it can slow down the computer's processor. Also, since the transmission needs to be encrypted/decrypted, it can add latency to the connection.
SSL Support in CWCS
CWCS provides secure access between the client browser and management server and also between the management server and devices. It uses SSL encryption to provide secure access between the client browser and management server, and Secure Shell (SSH) to provide secure access between the management server and devices.
Users can enable or disable SSL from the CWCS desktop, depending on their need to use secure access between the client browser and the management server. CWCS has provisions to manage security certificates, both self-signed certificates and certificates issued by third-party certificate agencies (CA). To learn more about enabling and disabling SSL, and the certificate management functions, see the User Guide for CiscoWorks CommonServices.
What Kind of SSL Support is Available in CWCS?
All applications in CWCS support SSL. If the web server is SSL enabled, you can invoke the applications through Hypertext Transfer Protocol Secure (HTTPS).
The web server supports SSL version 2, 3, and TLS version 1. We support strong 128-bit encryption to enable customers to have maximum security. Since the export laws have recently been relaxed, the strong 128-bit encryption does not affect the exportability of CWCS.
Note
SSL-Enabling Your Application
Though the the CWCS Web Server had the ability to support SSL connections (HTTPS) over port 1742 in addition to the default HTTP (over port 1741) from CMF version 1.2, the CiscoWorks code did not work over this connection. However, there are provisions to make the CiscoWorks code work correctly over the SSL session.
You can find the details for enabling your application to work over SSL in the document CW2000 applications over SSL Sessions, EDCS ENG-123901.
Configuring System Identity Setups
Applications use System Identity Setup to authenticate processes on remote CiscoWorks Servers.
Suppose there are two CiscoWorks servers A and B. You configure x, x1 and x2 as Peer Server Account Setup on A and y, y1, and y2 as Peer Server Account Setup on server B. To set up a System Identity Setup, you have to configure one Peer Server Account Setup in A, say, x, as the System Identity Setup in B.
The System Identity Setup should have the necessary privileges to perform the desired tasks. Also, the System Identity Setup should be configured with the same password.
In ACS mode, the System Identity Setup needs to be configured with the required privileges in ACS.
Note
The following is an example of CommonTrustUser API.
public String getCommonTrustUser () : Returns the system identity setup.public void setCommonTrustUser (String username, String secret) :Sets the system identity setup and writes into the file, Input : UserName and SecretKeypublic char[] getCommonTrustUserKey () :Returns system identity setup key if it is configured.public String getCommonTrustUserAndKey (): Returns system identity setup and key in the format username:keyConfiguring a Cisco.com User and Password
Certain CWCS features require access to the cisco.com web site work. For example, CiscoWorks must be configured with a cisco.com account to use when downloading new and updated packages. This user account is also used with so-called CCO APIs, which allow your CWCS application to access cisco.com. Example 10-6 shows some typical uses of CCO APIs
Example 10-6 CCO APIs
public String getCCOLogin() : Returns the CCO Loginpublic void setCCOUser (String username, String secret): Sets the cco user and writes into the file Input : UserName and SecretKeypublic String getCCOPassword (): Returns cco password if it is configured.public String getCCOInfo (): Returns cco login and password in the format login:password