Downloads |
 Feedback Feedback
|
Table Of Contents
Diagnosing Network Connectivity Problems
Make Sure the ANI Server Has the Most Current Network and End-User Host Information
Locate the End-User Host and HR Server in the Network
Check for Duplicate MAC and IP Addresses in User Tracking
Highlight Path Trace on Topology View
Where You Should End Up—Verification
Diagnosing Network Connectivity Problems
A common network problem is loss of IP connectivity. This scenario takes you through one example, stepping you through each action and interpreting specific results. For a more general troubleshooting procedure, see "Troubleshooting Connectivity Problems Using Campus Manager Applications."
In this scenario, Susan, an end-user, calls your network help desk reporting that she is unable to access the Human Resources server, but she is not sure when the problem first began. She is confident that she was able to do so last week, but she is not sure whether she had tried yet this week. She is still able to use her web browser and read e-mail.
As the network administrator, you need to determine the reason that this end-user is unable to access the HR server. To diagnose this problem, refer to the following sections:
•
Where You Should End Up—Verification
What You Need—Prerequisites
In this scenario, you will use these applications:
•
•
•
Your help desk personnel immediately begins using Campus Manager to start troubleshooting the problem.
How To Do It—Procedure
Use the following procedure:
•
•
•
•
Note
Make Sure the ANI Server Has the Most Current Network and End-User Host Information
To verify whether the ANI server has the most current network and end-user host information:
Step 1
Step 2
Step 3
Step 4
Locate the End-User Host and HR Server in the Network
You can display the end user and HR server information in the User Tracking database by performing a query based on specific search criteria or by sorting on one of the table columns, such as the device column, and then scanning the column for specific information. To locate the end-user host and HR server in the network using a simple query:
Step 1
In this case, you can ask Susan what cubicle number and wall jack she is attached to. The cubicle number and wall jack are useful because your company entered this information into the Catalyst switches configuration (in the port name field) using Cisco View or the CLI during the initial setup and installation. You can use this information to help locate the user's physical network location, which helps you begin resolving the problem.
Step 2
Step 3
Step 4
Step 5
Step 6
Step 7
Step 8
The User Tracking application locates the user with the reported cubicle and wall jack numbers.
The User Tracking application displays important information about this user, including the user's IP and MAC address, Catalyst 5000 series switch, and specific port that she is connected to based on the cubicle number you entered. This information provides you with detailed information about the user's location, which can help you resolve the printing problem.
Ask Susan the name of the server she is attempting to use. Using this information, you obtain the DNS name or IP address or the server.
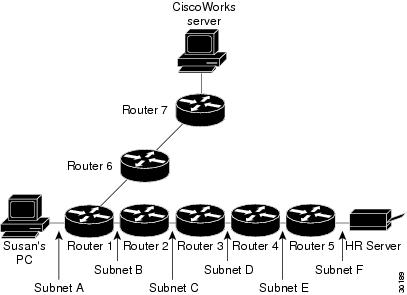
From this information, you determine the network topology of the affected segments (see Figure 8-1).
Figure 8-1 Network Topology of Affected Segments
Check for Duplicate MAC and IP Addresses in User Tracking
You can easily check for common causes, such as duplicate MAC and IP addresses using User Tracking. To check for duplicate MAC and IP addresses:
Step 1
Step 2
Run a Path Trace
Because you have ruled out duplicate MAC and IP addresses, you should now check the connectivity of the path between the two points in question. To get an indication whether IP connectivity at the PC end is the cause for the failure, run a path trace:
Step 1
a.
b.
c.
d.
The result of the path trace is unsuccessful.
Step 2
a.
b.
You get a partial path trace from the HR server to Susan's PC; the last Layer 3 hop is not shown. You have now localized the problem to the subnet to which Susan's PC belongs.
Highlight Path Trace on Topology View
Using Path Analysis, you have localized the problem; now you can highlight the path trace on the topology view to identify any points of failure:
Step 1
Step 2
Step 3
Path Analysis displays a message indicating that it is highlighting the trace in the topology network view. Then, the Layer 2 View is displayed with the path trace highlighted.
Step 4
Investigate Link Attributes
To check the link attributes:
Step 1
Step 2
You notice that the port speed on one side of the link is set to 100M; however, the port speed on the other side of the link is set to 10M. You suspect that this might be the cause of the failure. You use CiscoView (or telnet) to reach the suspected device and change the port speed to match the speed of the other side of the link.
Where You Should End Up—Verification
You want to make sure that you have correctly identified and resolved the user's problem. To do this, you run another path trace between Susan's PC and the HR server.
Step 1
Step 2
Step 3
Step 4
The result of the path trace is successful.