-
User Guide for Cisco Secure ACS Solution Engine Version 3.3
-
Preface
-
Overview
-
Deployment Considerations
-
Interface Configuration
-
Network Configuration
-
Shared Profile Components
-
User Group Management
-
User Management
-
System Configuration: Basic
-
System Configuration: Advanced
-
System Configuration: Authentication and Certificates
-
Logs and Reports
-
Administrators and Administrative Policy
-
User Databases
-
Network Admission Control
-
Unknown User Policy
-
User Group Mapping and Specification
-
Troubleshooting
-
TACACS+ Attribute-Value Pairs
-
RADIUS Attributes
-
VPDN Processing
-
RDBMS Synchronization Import Definitions
-
Internal Architecture
-
 Feedback
Table Of Contents
Determining the Status of Cisco Secure ACS Services
Stopping, Starting, or Restarting Services
Configuring Local Password Management
Reports of Cisco Secure ACS Backups
Performing a Manual Cisco Secure ACS Backup
Scheduling Cisco Secure ACS Backups
Disabling Scheduled Cisco Secure ACS Backups
Cisco Secure ACS System Restore
About Cisco Secure ACS System Restore
Backup Filenames and Locations
Reports of Cisco Secure ACS Restorations
Restoring Cisco Secure ACS from a Backup File
Cisco Secure ACS Active Service Management
Setting the Cisco Secure ACS Host and Domain Names
Viewing or Downloading Diagnostic Logs
About Appliance Upgrades and Patches
Distribution Server Requirements
Transferring an Upgrade Package to an Appliance
System Configuration: Basic
This chapter addresses the basic features found in the System Configuration section of Cisco Secure ACS Solution Engine.
This chapter contains the following topics:
•
Cisco Secure ACS System Restore
•
•
•
Service Control
Cisco Secure ACS uses several services. The Service Control page provides basic status information about the services, and enables you to configure the service log files and to stop or restart the services. For more information about Cisco Secure ACS services, see "Overview".
Tip
This section contains the following topics:
•
•
Determining the Status of Cisco Secure ACS Services
You can determine whether Cisco Secure ACS services are running or stopped by accessing the Service Control page.
To determine the status of Cisco Secure ACS services, follow these steps:
Step 1
Step 2
The status of the services appears in the CiscoSecure ACS on hostname table, where hostname is the name of the Cisco Secure ACS.
Stopping, Starting, or Restarting Services
You can stop, start, or restart Cisco Secure ACS services as needed. This achieves the same result as starting and stopping Cisco Secure ACS services from the serial console. This stops, starts, or restarts the Cisco Secure ACS services except for CSAdmin, which is responsible for the HTML interface.
Note
Tip
To stop, start, or restart Cisco Secure ACS services, follow these steps:
Step 1
Step 2
The status of the services appears in the CiscoSecure ACS on hostname table, where hostname is the name of the Cisco Secure ACS.
If the services are running, the Restart and Stop buttons appear at the bottom of the page.
If the services are stopped, the Start button appears at the bottom of the page.
Step 3
The status of Cisco Secure ACS services changes to the state appropriate to the button you clicked.
Logging
You can configure Cisco Secure ACS to generate logs for administrative and accounting events, depending on the protocols and options you have enabled. For more information, including configuration steps, see "Overview".
Date Format Control
Cisco Secure ACS allows for one of two possible date formats in its logs, reports, and administrative interface. You can choose either a month/day/year format or a day/month/year format.
Setting the Date Format
Note
To set the date format, follow these steps:
Step 1
Step 2
Cisco Secure ACS displays the Date Format Selection table.
Step 3
Step 4
Cisco Secure ACS restarts its services and implements the date format you selected.
Note
Local Password Management
The Local Password Management page enables you to configure settings that apply to managing passwords stored in the CiscoSecure user database. It contains the following two sections:
•
Note
The password validation options are listed below:
–
–
–
–
•
The remote change password options are listed below:
–
–
This feature depends upon having the CiscoSecure Database Replication feature configured properly; however, replication scheduling does not apply to propagation of changed password information. Cisco Secure ACS sends changed password information immediately, regardless of replication scheduling.
Changed password information is replicated only to Cisco Secure ACSes that are properly configured to receive replication data from this Cisco Secure ACS. The automatically triggered cascade setting for the CiscoSecure Database Replication feature does not cause Cisco Secure ACSes that receive changed password information to send it to their own replication partners.
For more information about CiscoSecure Database Replication, see CiscoSecure Database Replication.
Configuring Local Password Management
To configure password validation options, follow these steps:
Step 1
Step 2
The Local Password Management page appears.
Step 3
a.
b.
c.
d.
e.
Step 4
a.
b.
c.
d.
Tip
Step 5
Cisco Secure ACS restarts its services and implements the settings you specified.
Cisco Secure ACS Backup
This section provides information about the Cisco Secure ACS Backup feature, including procedures for implementing this feature.
This section contains the following topics:
•
•
•
•
•
About Cisco Secure ACS Backup
The Cisco Secure ACS Backup feature backs up Cisco Secure ACS system information to a file that it sends to an FTP server you specify. You can manually back up the Cisco Secure ACS system. You can also establish automated backups that occur at regular intervals or at selected days of the week and times. Maintaining backup files can minimize downtime if system information becomes corrupt or is misconfigured. We recommend copying the files from the FTP server to another computer in case the hardware fails on the FTP server.
The filename given to a backup is determined by Cisco Secure ACS. For more information about filenames assigned to backup files generated by Cisco Secure ACS, see Backup Filenames and Locations.
For information about using a backup file to restore Cisco Secure ACS, see Cisco Secure ACS System Restore.
Components Backed Up
The Cisco Secure ACS Backup utility backs up the CiscoSecure user database and other Cisco Secure ACS configuration data. The user database backup includes all user information, such as username, password, and other authentication information, including server certificates and the certificate trust list. The other configuration data includes information such as NDG information, AAA client configuration, and administrator accounts.
Reports of Cisco Secure ACS Backups
When a system backup takes place, whether it was manually generated or scheduled, the event is logged in the Administration Audit report and the ACS Backup and Restore report. You can view recent reports in the Reports and Activity section of Cisco Secure ACS.
For more information about Cisco Secure ACS reports, see "Overview".
Backup Options
The ACS System Backup Setup page contains the following configuration options:
•
•
•
•
•
•
•
•
•
Note
Performing a Manual Cisco Secure ACS Backup
You can back up Cisco Secure ACS whenever you want, without scheduling the backup.
To perform an immediate backup of Cisco Secure ACS, follow these steps:
Step 1
Step 2
The ACS System Backup Setup page appears. At the top of the page, information about the last backup appears, including the following:
•
•
•
•
Step 3
Step 4
Step 5
Step 6
Step 7
a.
b.
Note
Step 8
Cisco Secure ACS immediately begins a backup. The filename given to a backup is determined by Cisco Secure ACS. For more information about filenames assigned to backup files generated by Cisco Secure ACS, see Backup Filenames and Locations.
Scheduling Cisco Secure ACS Backups
You can schedule Cisco Secure ACS backups to occur at regular intervals or at selected days of the week and times.
To schedule the times at which Cisco Secure ACS performs a backup, follow these steps:
Step 1
Step 2
The ACS System Backup Setup page appears.
Step 3
Note
Step 4
a.
b.
Tip
Step 5
Step 6
Step 7
Step 8
Step 9
a.
b.
Note
Step 10
Cisco Secure ACS implements the backup schedule you configured.
Disabling Scheduled Cisco Secure ACS Backups
You can disable scheduled Cisco Secure ACS backups without losing the schedule itself. This allows you to end scheduled backups and resume them later without having to re-create the schedule.
To disable a scheduled backup, follow these steps:
Step 1
Step 2
The ACS System Backup Setup page appears.
Step 3
Step 4
Cisco Secure ACS does not continue any scheduled backups. You can still perform manual backups as needed.
Cisco Secure ACS System Restore
This section provides information about the Cisco Secure ACS System Restore feature, including procedures for restoring your Cisco Secure ACS from a backup file.
This section contains the following topics:
•
•
•
•
About Cisco Secure ACS System Restore
The ACS System Restore feature enables you to restore your system configuration from backup files generated by the ACS Backup feature. This feature helps minimize downtime if Cisco Secure ACS system information becomes corrupted or is misconfigured.
The ACS System Restore feature only works with backup files generated by a Cisco Secure ACS running an identical Cisco Secure ACS version and patch level.
Backup Filenames and Locations
The ACS System Restore feature restores the Cisco Secure ACS user database and other Cisco Secure ACS configuration data from a backup file that was created by the ACS Backup feature. You can restore from a backup file on any FTP server. You can restore from the latest backup file, or if you suspect that the latest backup was incorrect, you can select an earlier backup file to restore from.
Cisco Secure ACS sends backup files to an FTP server specified on the ACS System Backup Setup page. On the FTP server, backup files are written to the directory specified when you schedule backups or perform a manual backup.
Cisco Secure ACS creates backup files using the date and time format:
dd-mmm-yyyy-hh-nn-ss.dmp
where:
•
•
•
•
•
•
For example, if Cisco Secure ACS started a backup on October 13, 1999, 11:41:35 a.m., Cisco Secure ACS would generate a backup file named:
13-Oct-1999-11-41-35.dmpIf you chose to encrypt the backup file, the backup filename includes the lowercase letter e just before the ".dmp" file extension. If the previous example was an encrypted backup file, the file name would be:
13-Oct-1999-11-41-35e.dmpIf you are not sure of the FTP server and directory used to create the latest backup file, check the ACS System Restore Setup page. Information about the most recent backup and restore, if any, is displayed at the top of the page.
Components Restored
You can select the components to restore: the user and group databases, the system configuration, or both.
Reports of Cisco Secure ACS Restorations
When a Cisco Secure ACS system restoration takes place, the event is logged in the Administration Audit report and the ACS Backup and Restore report. You can view recent reports in the Reports and Activity section of Cisco Secure ACS.
For more information about Cisco Secure ACS reports, see "Overview".
Restoring Cisco Secure ACS from a Backup File
You can perform a system restoration of Cisco Secure ACS whenever needed.
Note
To restore Cisco Secure ACS from a backup file generated by the Cisco Secure ACS Backup feature, follow these steps:
Step 1
Step 2
The ACS System Restore Setup page appears.
With the exception of the Decryption Password box, the boxes under Select Backup To Restore From contain the values used for the most recent successful backup, as configured on the ACS System Backup Setup page.
Step 3
Step 4
a.
b.
c.
d.
e.
After a pause to retrieve a file list from the FTP server, a dialog box lists the Cisco Secure ACS backup files found in the directory specified. Encrypted backup files include the lowercase letter e before the ".dmp" filename extension.
Tip
f.
The filename you select appears in the File box. The dialog box closes.
Step 5
Note
Step 6
Step 7
Step 8
Cisco Secure ACS displays a confirmation dialog box indicating that performing the restoration will restart Cisco Secure ACS services and log out all administrators.
Step 9
Cisco Secure ACS restores the system components specified using the backup file you selected. The restoration should require several minutes to complete, depending on which components you selected to restore and the size of your database.
When the restoration is complete, you can log in again to Cisco Secure ACS.
Cisco Secure ACS Active Service Management
ACS Active Service Management is an application-specific service monitoring tool that is tightly integrated with ACS. The two features that compose ACS Active Service Management are described in this section.
This section contains the following topics:
System Monitoring
Cisco Secure ACS system monitoring enables you to determine how often Cisco Secure ACS tests its authentication and accounting processes, and what automated actions it takes should tests detect a failure of these processes. Cisco Secure ACS accomplishes system monitoring with the CSMon service. For more information about the CSMon service, see CSMon. For information about monitoring the performance of system services, see Monitoring System Information.
System Monitoring Options
You have the following options for configuring system monitoring:
•
When this option is enabled, at the interval defined, Cisco Secure ACS tests authentication and accounting. If a test fails, after four unsuccessful retries Cisco Secure ACS performs the action identified in the If no successful authentications are recorded list and logs the event.
•
–
–
–
–
•
•
–
–
Setting Up System Monitoring
To setup Cisco Secure ACS System Monitoring, follow these steps:
Step 1
Step 2
The ACS Active Service Management Setup page appears.
Step 3
a.
b.
c.
Step 4
Step 5
Step 6
Cisco Secure ACS implements the service management settings you made.
Event Logging
The Event Logging feature enables you to configure whether Cisco Secure ACS generates an e-mail when an event occurs. Cisco Secure ACS detects events using the System Monitoring feature. For more information about system monitoring, see System Monitoring Options.
Setting Up Event Logging
To setup Cisco Secure ACS event logging, follow these steps:
Step 1
Step 2
The ACS Active Service Management Setup page appears.
Step 3
a.
b.
Note
c.
Note
Step 4
Step 5
Cisco Secure ACS implements the service management settings you made.
VoIP Accounting Configuration
The VoIP Accounting Configuration feature enables you to specify which accounting logs receive VoIP accounting data. There are three options for VoIP accounting:
•
•
•
Configuring VoIP Accounting
Note
To configure VoIP accounting, follow these steps:
Step 1
Step 2
Note
The VoIP Accounting Configuration page appears. The Voice-over-IP (VoIP) Accounting Configuration table displays the options for VoIP accounting.
Step 3
Step 4
Cisco Secure ACS implements the VoIP accounting configuration you specified.
Appliance Configuration
Use the Appliance Configuration page to set the Cisco Secure ACS hostname, domain names, and system date and time. If you are using an appliance base image that incorporate Cisco Security Agent (CSA) or have applied an CSA update to Cisco Secure ACS Solution Engine, you can use the Appliance Configuration page to enable and disable the CSAgent service.
This section contains the following topics:
•
•
Setting System Time and Date
This procedure details how to set system time and date from within the HTML interface. This procedure also details how to maintain the system date and time using a network time protocol (NTP) server with which the system synchronizes its date and time.
Tip
To set the system date and time, follow these steps:
Step 1
Step 2
Cisco Secure ACS displays the Appliance Configuration page.
Note
Step 3
Step 4
Step 5
Step 6
Step 7
Step 8
a.
b.
Note
Step 9
The system time and date are set as specified.
Setting the Cisco Secure ACS Host and Domain Names
Use this procedure to configure Cisco Secure ACS host and domain names.
Note
To set the Cisco Secure ACS host and domain names, follow these steps:
Step 1
Step 2
Cisco Secure ACS displays the Appliance Configuration page.
Note
Step 3
Step 4
Step 5
Enabling or Disabling CSAgent
You enable or disable the protection and restrictions imposed by CSA on an appliance by enabling or disabling CSAgent. Disabling CSAgent is necessary for the following two purposes:
•
•
Note
When you disable CSAgent, it remains disabled until you explicitly re-enable it. Rebooting the appliance does not restart a disabled CSAgent service.
To enable or disable CSAgent on the appliance, follow these steps:
Step 1
Step 2
Cisco Secure ACS displays the Appliance Configuration page.
Note
Step 3
Step 4
Cisco Secure ACS enables or disables CSAgent, as specified.
Support
You use the Support page for two purposes:
•
•
Each of these activities is detailed in the following procedures:
•
Running Support
You use the Support page to package system information that can be forwarded to your Technical Assistance Center (TAC) representative. When you perform this procedure, Cisco Secure ACS automatically packages all its current logs. You also have the option to package either, or both, of the following:
•
•
Support information is packaged in a cabinet file, which has the file extension .cab. Cabinet files are a compressed format, so that you can more easily send the support information to TAC or other support personnel.
To package system state information into a file for tech support, follow these steps:
Note
Step 1
Step 2
The Support page appears.
Step 3
Step 4
a.
b.
Step 5
The File Download dialog box appears.
Step 6
The Save As dialog box appears.
Step 7
Cisco Secure ACS briefly suspends normal services while a support file is generated and saved as specified. When the download is complete, a Download Complete dialog box appears.
Step 8
A current cabinet file of support information is written to the location you specified. You can forward it as needed to a TAC representative or other Cisco support personnel.
Monitoring System Information
You use this procedure to view the status and distribution of Cisco Secure ACS resources.
The top row in the Resource Usage table displays CPU idle resource percentage and available memory space.
The remainder of the Resource Usage table shows each service, profiled as having allocated to it:
•
•
•
•
To monitor the status of the Cisco Secure ACS services, follow these steps:
Step 1
Step 2
Cisco Secure ACS displays the Support page.
Step 3
Tip
Viewing or Downloading Diagnostic Logs
Cisco Secure ACS records diagnostic logs whenever you apply upgrades or patches to the software running on the appliance. It also creates a diagnostic log if you use the recovery CD to restore the appliance to its original state.
In addition, if you are using an appliance base image that incorporates Cisco Security Agent (CSA) or have applied a CSA update to Cisco Secure ACS, the View Diagnostic Logs page provides access to two logs created by CSA.
To view or download an appliance diagnostic log,
Step 1
Step 2
Cisco Secure ACS displays the View Diagnostic Logs page. In the Log File column, the log files are listed by name. In the File Size column, the size of each log file appears, in kilobytes. If Cisco Secure ACS failed to create an expected log file, "Log file is not created" appears in the File Size column.
Step 3
A copy of the log file is available for viewing in a third-party application, such as Microsoft Excel or a text editor. If it is requested, you can also send the diagnostic log file to Cisco support technicians.
Step 4
Cisco Secure ACS displays the contents of the diagnostic log.
Appliance Upgrade Status
This section contains the following topics:
•
•
•
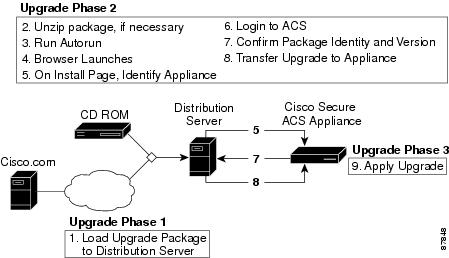
About Appliance Upgrades and Patches
All upgrades and patches for Cisco Secure ACS Solution Engine are packaged using the upgrade mechanism. Upgrading or patching a Cisco Secure ACS Solution Engine is a three-phase process. See Figure 8-1.
Figure 8-1 Appliance Upgrade Process
•
•
•
Tip
Distribution Server Requirements
The distribution server must meet the following requirements:
•
–
Note
–
•
–
–
–
–
Note
•
•
Tip
•
Gateway devices between the distribution server and any appliance that you want to upgrade must permit HTTP traffic to the distribution server on port 8080. They must also permit a Cisco Secure ACS remote administrative session; therefore, they must permit HTTP traffic to the appliance on port 2002 and the range of ports allowed for administrative sessions. For more information, see HTTP Port Allocation for Administrative Sessions.
Upgrading an Appliance
Upgrading the software on Cisco Secure ACS Solution Engine
Before You Begin
Always back up Cisco Secure ACS Solution Engine before upgrading. For information about backing up Cisco Secure ACS, see Cisco Secure ACS Backup.
To upgrade an appliance, follow these steps:
Step 1
•
•
•
Step 2
Step 3
a.
b.
Tip
Step 4
Step 5
The upgrade package is on the appliance and ready to be applied.
Step 6
Step 7
Cisco Secure ACS applies the upgrade and runs using the upgraded software.
Step 8
Note
Transferring an Upgrade Package to an Appliance
Use this procedure to transfer an upgrade package from a distribution server to a Cisco Secure ACS Solution Engine.
After you have performed this procedure to upload the upgrade files, you must still apply the upgrade for it to become effective. For information on applying the upgrade, see Applying an Upgrade. For more general information about the upgrade process, see About Appliance Upgrades and Patches.
Before You Begin
You must have acquired the upgrade package and selected a distribution server. For more information, see Upgrading an Appliance.
To transfer an upgrade to your Cisco Secure ACS appliance, follow these steps:
Step 1
a.
Tip
b.
•
•
locate the
autorun.batfile on the CD or in the directory that you extracted the compressed upgrade package in and run it.The HTTP server starts. Messages from
autorun.batappear in a console window. Two web browser windows appear. The browser window titled Appliance Upgrade contains the Enter appliance hostname or IP address box. You can use the second browser window, titled New Desktop, to start transfers to other appliances.Step 2
a.
b.
autorun.shfile on the CD or in the directory that you extracted the compressed upgrade package in.c.
autorun.sh.
Tip
chmod +x autorun.shand repeat c..The HTTP server starts. Messages from
autorun.shappear in a console window. Two web browser windows appear. The browser window titled Appliance Upgrade contains the Enter appliance hostname or IP address box. You can use the second browser window, titled New Desktop, to start transfers to other appliances.Step 3
http://127.0.0.1:8080/install/index.html
Tip
http://IP address:8080/install/index.html, where IP address is the IP address of the distribution server.Step 4
The Cisco Secure ACS login page for the appliance specified appears.
Step 5
a.
b.
c.
Step 6
Step 7
Cisco Secure ACS displays the Appliance Upgrade page.
Step 8
Cisco Secure ACS displays the Appliance Upgrade Form page. This page contains the Transfer Setup table, which enables you to identify the distribution server.
Step 9
The Appliance Upgrade Form page displays the Software Install table, which details the version and name of the upgrade available from the distribution server.
Step 10
The Appliance Upgrade page appears and the upgrade file is downloaded from the distribution server to the appliance. Below the Appliance Versions table, Cisco Secure ACS displays the status of the download.
Tip
Step 11
Tip
If you click Refresh while the transfer is in progress, Cisco Secure ACS displays the number of kilobytes downloaded. If you click Refresh after the transfer is complete, the Apply Upgrade button appears and the transfer progress text is replaced with a message indicating that an upgrade package is available on the appliance.
Step 12
The upgrade package is successfully transferred to the appliance.
Step 13
Tip
Step 14
The HTTP server stops and the resources it used on the distribution server are released.
Step 15
Applying an Upgrade
Perform this procedure to apply an upgrade package to a Cisco Secure ACS Solution Engine.
Note
Before You Begin
Before performing this procedure, you must have transferred the upgrade package to the appliance. For detailed steps, see Transferring an Upgrade Package to an Appliance. For general steps required to upgrade an appliance, see Upgrading an Appliance.
Always back up Cisco Secure ACS before upgrading. For information about backing up Cisco Secure ACS, see Cisco Secure ACS Backup.
Be sure that the CSAgent service is disabled. Applying the upgrade will fail if CSAgent is running. For detailed steps, see Enabling or Disabling CSAgent.
While you apply the upgrade, Cisco Secure ACS cannot provide AAA services. If it is not critical to apply an upgrade package immediately, consider performing this phase when Cisco Secure ACS downtime will have the least impact.
To apply an upgrade to a Cisco Secure ACS Solution Engine, follow these steps:
Step 1
Step 2
Cisco Secure ACS displays the Appliance Upgrade page.
Step 3
Step 4
Cisco Secure ACS displays the Apply Upgrade Message table. This table displays messages about the upgrade process.
Step 5
Note
After you have answered all confirmation prompts, Cisco Secure ACS applies the upgrade. Be aware of the following:
•
•
•
•
Caution
Step 6
Note
The Appliance Versions table lists the versions of software running on the appliance. The table entries should reflect the upgrade package that you applied.