Downloads |
 Feedback Feedback
|
Table Of Contents
Default Configuration Templates
Importing a Configuration Template
Editing a Configuration Template
Deleting a Custom Configuration Template
Updating All to Default IOS Image
Viewing the History of an IOS Image
Using the Modem Firmware Image Manager
Setting the Default Modem Image
Updating All to Default Modem Image
Viewing the History of a Modem Image
Using the Configuration File Manager
Importing a Configuration File
Viewing History of a Configuration File
Using the User Account Manager
Adding, Modifying, or Deleting a User
Using Tools
Cisco Access Manager (CAM) provides a set of tools to help you to manage various features of your Cisco AccessPath system and System Controller. The tool set includes the several managers as described in the following sections:
•
"Using the Template Manager" on page 5-1
•
•
•
•
•
Using the Template Manager
The Template Manager helps you to manage the CAM configuration templates. The Template Manager supports the following tasks:
•
•
•
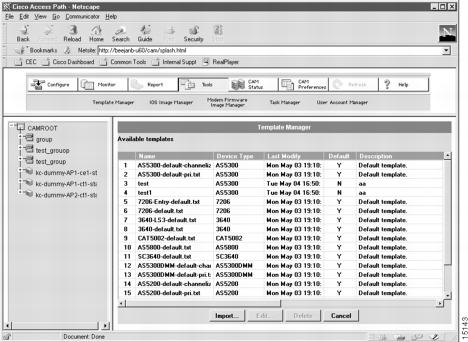
The Template Manager lists all the available templates. The information displayed in the main Template Manager dialog box is independent of the device or container you might have selected in the Device Tree View. (See .)
Figure 8-1 Template Manager—Main Dialog Box
lists and briefly describes each of the fields that display on the main dialog box of the Template Manager.
Table 8-1 Template Manager Fields
CAM configuration templates are text files that contain Cisco IOS command-line interface (CLI) commands and template variables that allow you to easily define configuration data for a device. CAM creates your configuration files by substituting the template variables with data derived from selections or entries you made at the various dialog boxes during the create and modify procedures for System Controllers and shelves. CAM then downloads these configuration files to the devices that make up your Cisco AccessPath system.
You do not specify a configuration template for a stack. You specify a configuration template during the creation or modification of only System Controllers and shelves. You can also schedule when the download of the configuration is to occur. For details about the create and modify procedures, see the "Configuring System Controllers" section and the "Shelf Configuration for System Controllers" section.
Note
CAM supports two types of templates:
•
•
Note
All of the CLI code entered into a custom configuration template must be written in valid Cisco IOS syntax. Otherwise, when CAM attempts to download the configuration file, the shelf rejects the command.
Default Configuration Templates
lists the default configuration templates for each type of device.
Table 8-2 CAM Standard Configuration Templates
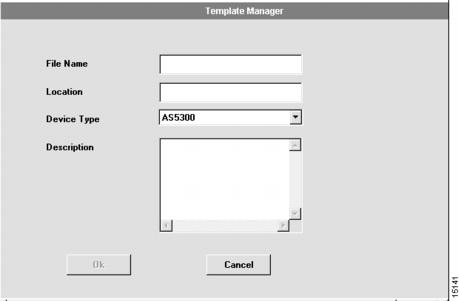
Importing a Configuration Template
You can create a custom configuration template using the Import feature in the Template Manager.
To create a custom configuration template by importing:
Figure 8-2 Template Manager—Import Dialog Box
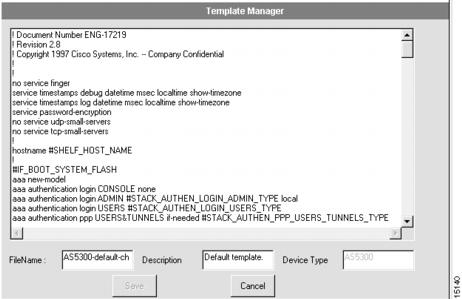
Editing a Configuration Template
You can create a custom configuration template using the Edit feature in the Template Manager.
To edit a custom configuration template:
Figure 8-3 Template Manager—Edit Dialog Box
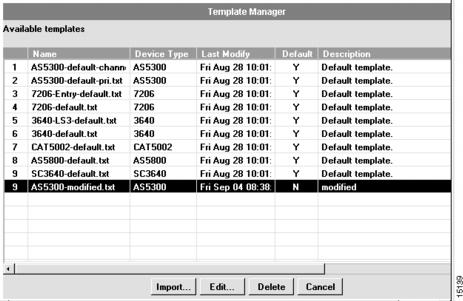
Deleting a Custom Configuration Template
You cannot delete a default configuration template. You can only delete custom configuration templates that you have either imported or renamed and edited. In addition, a custom template cannot be deleted if it is currently used by a shelf.
CautionIf you delete a custom configuration template, you cannot recover it.
To delete a custom configuration template:
Figure 8-4 Template Manager—Main Dialog Box
Using the IOS Image Manager
The IOS Image Manager provides device-dependent management functions. The IOS Manager supports the following tasks:
•
•
•
The IOS Image Manager allows you to upgrade or restore a Cisco IOS image on a device. It checks the Cisco IOS images loaded on the shelves within a stack or System Controller. The IOS Image Manager compares the loaded version against the default image version. If the Cisco IOS images do not match, the IOS Image Manager reports the discrepancy.
CAM provides autoverify and autoupdate capability as options. For more information about these options, see the "Setting UI Preference" section.
The Cisco 3640, System Controller-3640, Cisco 7206, and Cisco AS5800 devices have two slots (slot0 and slot1) for Flash memory cards. CAM always uses slot0 as the default Flash memory device when loading Cisco IOS images to these devices. Be sure to have a Flash memory card inserted in slot0. Otherwise, CAM cannot successfully load the Cisco IOS image.
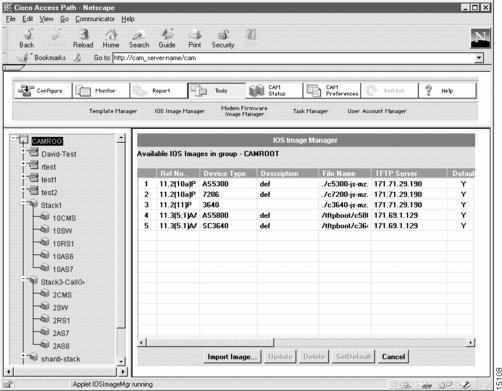
shows the main dialog box for the IOS Image Manager.
Figure 8-5 IOS Image Manager—Main Dialog Box
The following table lists and briefly describes each of the fields on the main dialog box of the IOS Image Manager:
Table 8-3 IOS Image Manager Fields
The IOS Image Manager provides different capabilities for groups, stacks, System Controllers, and shelves. The following table lists the available options:
Table 8-4 IOS Image Manager Option Summary
Setting the Default IOS Image
You can set the default Cisco IOS image for a device type across the entire CAM system. You can override this default for individual devices. This option is only available if you have selected the CAMROOT group in the Device Tree View. This option is not enabled for any other container or shelf.
For a summary of the options available in the IOS Image Manager for containers and devices, see .
To set the default Cisco IOS image for a device type:
Importing an IOS Image
You can import a Cisco IOS image file for use by a group, System Controller, and shelf (including Cisco AS5800).
For a summary of the options available in the IOS Image Manager for containers and devices, see .
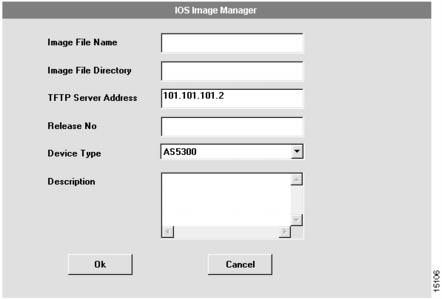
To import a Cisco IOS image:
Figure 8-6 IOS Image Manager—Import Dialog Box
Updating an IOS Image
Updating a Cisco IOS image allows you to update the Cisco IOS image for all the devices in the group of a particular type, System Controller, or shelf.
For a summary of the options available in the IOS Image Manager for containers and devices, see .
To update a Cisco IOS image for a System Controller, shelf, or all devices of a specific type:
1
Select a group, System Controller, or shelf by clicking on its name in the Device Tree View.
The group of devices or device for which you want to update a Cisco IOS image.
2
Click Tools.
The Task Selection bar displays all of the tasks CAM can perform for the selected device.
3
Click IOS Image Manager.
4
Select a Cisco IOS image from the list and click Update.
5
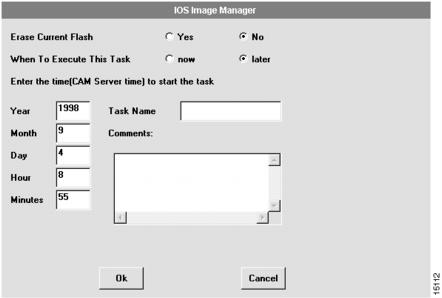
Click Yes or No to erase current Flash memory.
Click Yes, to erase the Cisco IOS image currently stored in Flash memory. It cannot be recovered. Click No, to have the Cisco IOS image currently stored in Flash memory reside concurrently with the image you have selected.
6
Click now or later to execute this task.
Click now if you want the Cisco IOS image updated immediately and skip to Step 10. Click later to schedule the update for a later time. If you click later, you must define task information.
7
Enter the time you want the update to take place.
You must ensure that there is a value in the year, month, day, hour, and minutes fields. It must be a time in the future. You must select a date, time, and task name.
8
Enter a Task Name.
You must enter a task name. It can be up to 16 characters.You can manage the task through the Task Manager. After a scheduled task executes, you might need to refresh your system. See "Refreshing Your System" section for details.
9
Enter information in the Comment field.
You can enter any information about the task that you want. You can specify up to 255 characters.
10
Click OK.
You have successfully updated the Cisco IOS image for a System Controller, shelf, or all the devices of the specified type. You are returned to the IOS Image Manager main dialog box.
Figure 8-7 IOS Image Manager—Update Dialog Box
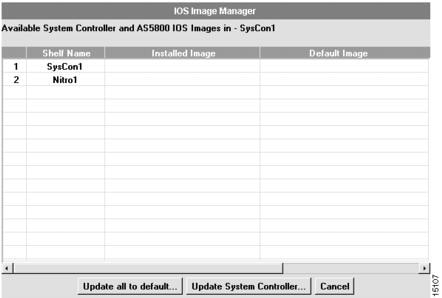
Updating All to Default IOS Image
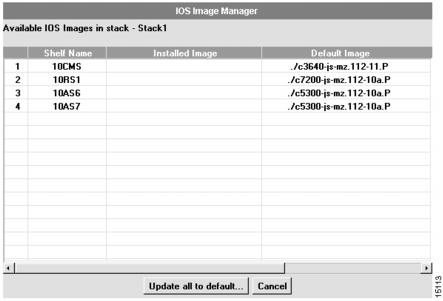
Updating All to Default IOS image allows you to update all the shelves in the stack or System Controller to the Cisco IOS image that you have defined as the default.
For a summary of the options available in the IOS Image Manager for containers and devices, see .
To update all to a default Cisco IOS image for all the shelves:
1
Select a stack or System Controller from the Device Tree View.
The stack or System Controller for which you want to update information.
2
Click Tools.
The Task Selection bar displays all of the tasks CAM can perform for the device selected in the Device Tree View.
3
Click IOS Image Manager.
4
Select a Cisco IOS image from the list and click Update all to default.
5
Click Yes or No to erase current Flash memory.
Click Yes to erase the Cisco IOS image currently stored in Flash memory. It cannot be recovered. Click No to have the modem image currently stored in Flash memory reside concurrently with the image you have selected. For System Controllers, if there is more than one image in Flash memory, the Cisco IOS image must be erased first to successfully load the image. Therefore, this option is disabled if you have selected a System Controller from the Device Tree View.
6
Click now or later to execute this task.
Click now if you want the Cisco IOS image updated immediately and skip to Step 10. Click later to schedule the update for a later time. If you click later, you must define task information.
7
Enter the time you want the update to take place.
You must ensure that there is a value in the year, month, day, hour, and minutes fields. It must be a time in the future. You must select a date, time, and task name.
8
Enter a Task Name.
You must enter a task name. It can be up to 16 characters.You can manage the task through the Task Manager. After a scheduled task executes, you might need to refresh your system. See "Refreshing Your System" section for details.
9
Enter information in the Comment field.
You can enter any information about the task that you want. You can specify up to 255 characters.
10
Click OK.
You have successfully updated the Cisco IOS image for all the devices of the specified type. You are returned to the IOS Image Manager main dialog box.
Figure 8-8 IOS Image Manager—Update All Dialog Box
Figure 8-9 IOS Image Manager—Update Dialog Box
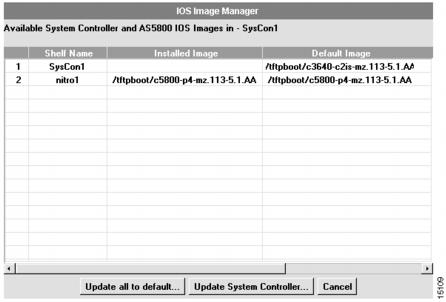
Updating System Controller
Updating a Cisco IOS image allows you to update the System Controller to the Cisco IOS image that you select from the list.
For a summary of the options available in the IOS Image Manager for containers and devices, see .
To update the System Controller:
1
Select a System Controller from the Device Tree View.
The System Controller for which you want to update information.
2
Click Tools.
The Task Selection bar displays all of the tasks CAM can perform for the device selected in the Device Tree View.
3
Click IOS Image Manager.
4
Click Update System Controller.
5
Select a Cisco IOS image from the list.
The Cisco IOS image with which you want to update the System Controller.
6
Click Update image.
7
Click Yes or No to erase current Flash memory.
Click Yes, to erase the Cisco IOS image currently stored in Flash memory. It cannot be recovered. Click No, to have the modem image currently stored in Flash memory reside concurrently with the image you have selected. For System Controllers, if there is more than one image in Flash memory, the Cisco IOS image must be erased first to successfully load the image. Therefore, this option is disabled if you have selected a System Controller from the Device Tree View.
8
Click now or later to execute this task.
Click now if you want the Cisco IOS image updated immediately. Click later to schedule the update for a later time. If you click later, you must select a date, time and task name. You can manage the task through the Task Manager. After a scheduled task executes, you might need to refresh your system. See "Refreshing Your System" section for details.
9
Click OK.
You have successfully updated the Cisco IOS image for all the devices of the specified type. You are returned to the IOS Image Manager main dialog box.
Figure 8-10 IOS Image Manager—Main System Controller Dialog Box
Figure 8-11 IOS Image Manager—Update System Controller Dialog Box
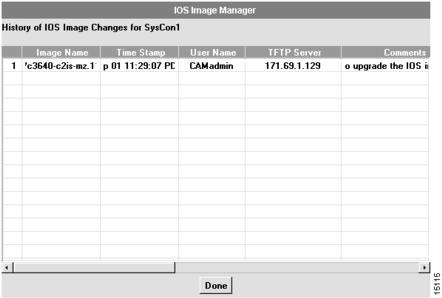
Viewing the History of an IOS Image
Viewing the history of a Cisco IOS image allows you to view all the records of changes that have been made to the Cisco IOS image for the System Controller or shelf (either System Controller shelf or stack shelf) that you select.
For a summary of the options available in the IOS Image Manager for containers and devices, see .
To view changes:
Figure 8-12 IOS Image Manager—History Dialog Box
Deleting an IOS Image
Deleting a Cisco IOS image removes it from the list of managed Cisco IOS images. It does not delete it from the devices onto which has been loaded.
For a summary of the options available in the IOS Image Manager for containers and devices, see .
To delete a Cisco IOS image from the list of managed images:
Figure 8-13 IOS Image Manager—Main Dialog Box
Using the Modem Firmware Image Manager
The Modem Firmware Image Manager provides device-dependent management functions which allow you to upgrade or restore a modem image on a device. The Modem Firmware Image Manager supports the following tasks:
•
•
•
During the upgrade and restore operations, the Modem Firmware Image Manager checks the modem images loaded on the shelves within a stack and compares the loaded version against the default image version. If the modem images do not match, the Modem Firmware Image Manager reports the discrepancy. CAM provides autoverify and autoupdate options for checking purposes. For more information about these options, see "Setting UI Preference" section.
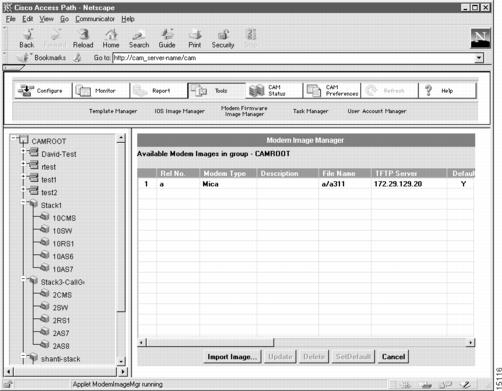
shows the main dialog box for the Modem Firmware Image Manager.
Figure 8-14 Modem Image Manager—Main Dialog Box
lists and briefly describes each of the fields that display on the main dialog box of the Modem Firmware Image Manager.
Table 8-5 Modem Firmware Image Manager Fields
The Modem Firmware Image Manager provides different capabilities for groups, stacks, System Controllers, and shelves. lists the available options.
Setting the Default Modem Image
You can set the default modem firmware image for a device type across the entire CAM system. You cannot override this default for individual devices. This option is only available if you have selected the CAMROOT group in the Device Tree View. This option is not enabled for any other group.
For a summary of the options available in the Modem Firmware Image Manager for containers and devices, see .
To set the default modem image:
Figure 8-15 Modem Image Manager—Main Dialog Box
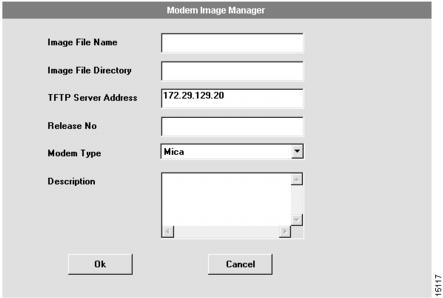
Importing a Modem Image
You can import a modem firmware image file for use by a group or shelf. After you import image files, they appear on a list from which you can select specific images to be downloaded onto the devices.
For a summary of the options available in the Modem Firmware Image Manager for containers and devices, see .
To import a modem firmware image:
Figure 8-16 Modem Image Manager—Import Dialog Box
Updating a Modem Image
Updating a modem firmware image allows you to update the modem firmware image for all the modems in the group of a particular type. This option downloads the selected image onto the selected group or shelf.
For a summary of the options available in the Modem Firmware Image Manager for containers and devices, see .
To update a modem firmware image for all devices of a specific type:
1
Select a group or shelf by clicking on its name in the Device Tree View.
The group for which you want to update the modem image.
2
Click Tools.
The Task Selection bar displays all of the tasks CAM can perform for the selected group or shelf.
3
Click Modem Image Firmware Manager.
The Modem Image Firmware Manager dialog box appears. (See .)
4
Select an modem image from the list and click Update.
5
Click Busy Out or Reload to determine when the modem image is updated.
Click Busy Out to update the modem image on Busy Out. Click Reload to update the modem image when the device reloads.
6
Click now or later to execute this task.
Click now if you want the Cisco modem image updated immediately and skip to Step 10. Click later to schedule the update for a later time. If you click later, you must define task information.
7
Enter the time you want the update to take place.
You must ensure that there is a value in the year, month, day, hour, and minutes fields. It must be a time in the future.you must select a date, time, and task name.
8
Enter a Task Name.
You must enter a task name. It can be up to 16 characters.You can manage the task through the Task Manager. After a scheduled task executes, you might need to refresh your system. See "Refreshing Your System" section for details.
9
Enter information in the Comment field.
You can enter any information about the task that you want. You can specify up to 255 characters.
10
Click OK.
You have successfully updated the modem image for all the devices of the specified type. You are returned to the Modem Image Manager main dialog box.
Figure 8-17 Modem Image Manager—Update Dialog Box
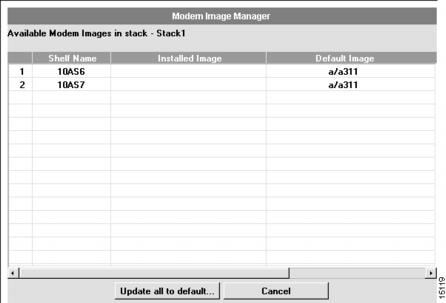
Updating All to Default Modem Image
Updating a modem firmware image allows you to update all the Cisco AS5300 shelves in the stack to the modem image that you have defined as the default.
For a summary of the options available in the Modem Firmware Image Manager for containers and devices, see .
To update all to the default modem firmware image for all the shelves:
1
Select a stack from the Device Tree View.
The stack for which you want to update information.
2
Click Tools.
The Task Selection bar displays all of the tasks CAM can perform for the device selected in the Device Tree View.
3
Click Modem Image Firmware Manager.
The Modem Image Firmware Manager Update All dialog box appears. (See .)
4
Select a modem image from the list and click Update all to default.
5
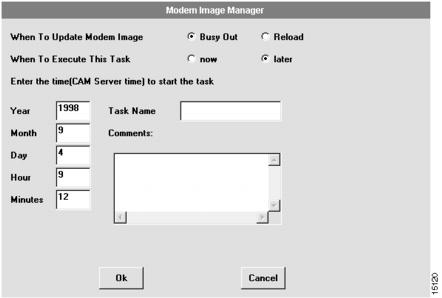
Click Busy Out or Reload to determine when the modem image is updated.
Click Busy Out to update the modem image on Busy Out. Click Reload to update the modem image when the device reloads.
6
Click now or later to execute this task.
Click now if you want the Cisco IOS image updated immediately and skip to Step 10. Click later to schedule the update for a later time. If you click later, you must define task information.
7
Enter the time you want the update to take place.
You must ensure that there is a value in the year, month, day, hour, and minutes fields. It must be a time in the future. You must select a date, time, and task name.
8
Enter a Task Name.
You must enter a task name. it can be up to 16 characters.You can manage the task through the Task Manager. After a scheduled task executes, you might need to refresh your system. See "Refreshing Your System" section for details.
9
Enter information in the Comment field.
You can enter any information about the task that you want. You can specify up to 255 characters.
10
Click OK.
You have successfully updated the modem image for all the devices of the specified type. You are returned to the Modem Image Manager main dialog box.
Figure 8-18 Modem Image Manager—Update All Dialog Box
Figure 8-19 Modem Image Manager—Update Dialog Box
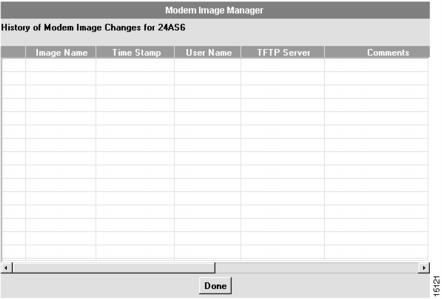
Viewing the History of a Modem Image
Viewing history of the modem firmware image allows you to view records of all the changes that have been made to the modem firmware image for the shelves that you select.
For a summary of the options available in the Modem Firmware Image Manager for containers and devices, see .
To view changes made to the modem firmware image:
Figure 8-20 Modem Image Manager—History Dialog Box
Deleting a Modem Image
Deleting a modem firmware image removes it from the list of managed modem images. It does not delete it from the devices on which it has been loaded.
For a summary of the options available in the Modem Firmware Image Manager for containers and devices, see .
To delete a modem firmware image from the list of managed images:
Using the Configuration File Manager
The Configuration File Manager helps you to manage configuration files for System Controllers and shelves.
Note
The Configuration File Manager supports the following tasks:
•
•
•
•
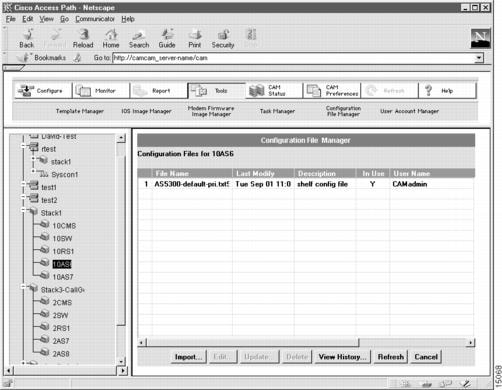
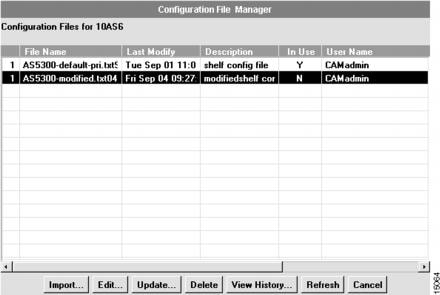
shows the main dialog box for the Configuration File Manager. You can refresh the information on the Configuration File Manager main dialog box by clicking the Refresh button.
Figure 8-21 Configuration File Manager—Main Dialog Box
lists and briefly describes each of the fields that display on the main dialog box of the Configuration File Manager.
Table 8-7 Configuration File Manager Fields
The Configuration File Manager provides different capabilities for groups, stacks, System Controllers, and shelves.
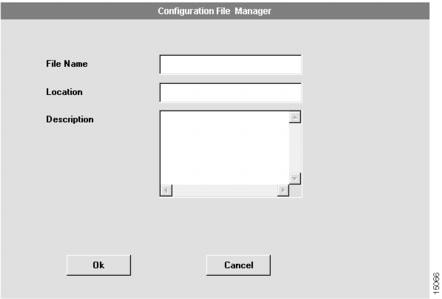
Importing a Configuration File
You can add configuration files to the list of files that can be selected using the Import feature in the Configuration File Manager.
For a summary of the options available in the Configuration File Manager for containers and devices, see .
To add a configuration file by importing:
Figure 8-22 Configuration File Manager—Import Dialog Box
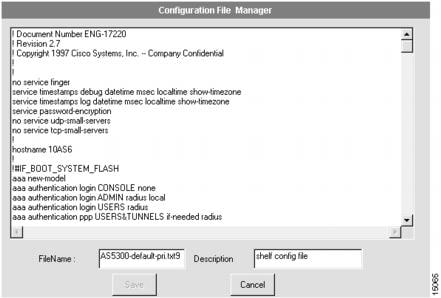
Editing a Configuration File
You can create a custom configuration file using the Edit feature in the Configuration File Manager.
For a summary of the options available in the Configuration File Manager for containers and devices, see .
To create a custom configuration file by editing:
Figure 8-23 Configuration File Manager—Edit Dialog Box
Updating a Configuration File
Updating a configuration file allows you to update any shelf or System Controller to use the configuration file that you select from the list. If the configuration file is in use, you cannot update it.
For a summary of the options available in the Configuration File Manager for containers and devices, see .
To update the configuration file:
1
Select a System Controller or shelf from the Device Tree View.
The System Controller or shelf for which you want to update information.
2
Click Tools.
The Task Selection bar displays all of the tasks CAM can perform for the device selected in the Device Tree View.
3
Click Configuration File Manager.
4
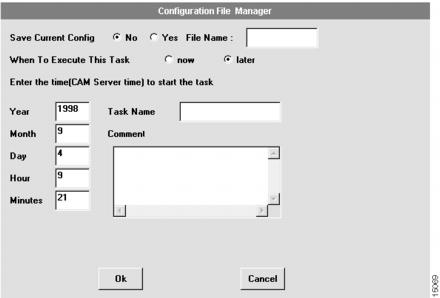
Select a configuration file from the list and click Update.
The Configuration File Manager Update dialog box appears with the configuration file content. (See .)
5
Select whether to save the configuration file currently loaded on the device, before the update.
If you want to save the configuration file currently loaded on the device, click Yes, and enter a file name in the File Name field. If you do not want to save the current configuration, click No. The default is No.
6
Select whether to execute the task now or later.
If you select now, proceed to Step 10. If you select later, you must define task information. The task information specifies when the download is to take place. The default is later.
7
Enter the time you want the update task to take place.
You must ensure that there is a value in the year, month, day, hour, and minutes fields. It must be a time in the future.
8
Enter a task name.
You must enter a task name. It can be up to 16 characters in length.
9
(Optional.) Enter information in the Comment field.
You can enter any information about the task that you want. You can specify up to 128 characters.
10
Click OK.
The selected configuration file is downloaded to the selected device. You are returned to the Configuration File Manager main dialog box. You might need to refresh as described in Step 11.
11
Click Refresh to refresh the displayed information.
If you selected now in Step 6 and the update is successful, the displayed information is updated automatically. CAM displays a message indicating that the update operation was successful. The InUse field value becomes Y, indicating that the selected file is currently running on the device.
If you selected later in Step 6, the information is not automatically updated. You must click Refresh to update the displayed information. In addition, to determine that the update operation was successful, check the status of the scheduled task in the Task Manager. No message displays to indicate the update operation was successful. See "Refreshing Your System" section for details.
Figure 8-24 Configuration File Manager—Update Dialog Box
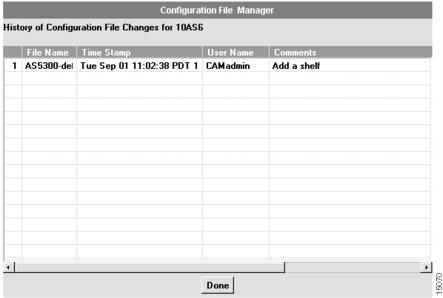
Viewing History of a Configuration File
Viewing the history of a configuration file allows you to view all the records of changes that have been made to the configuration file on a per-device basis starting from the first download.
For a summary of the options available in the Configuration File Manager for containers and devices, see .
To view changes:
Figure 8-25 Configuration File Manager—History Dialog Box
Deleting a Configuration File
You can delete a configuration file that you have either imported or renamed and edited. If the configuration file is in use, you cannot delete it.
For a summary of the options available in the Configuration File Manager for containers and devices, see .
CautionIf you delete a configuration file, you cannot recover it.
To delete a configuration file:
Figure 8-26 Configuration File Manager—Main Dialog Box
Using the Task Manager
The Task Manager helps you to manage the scheduled tasks in CAM. The Task Manager supports the following tasks:
You do not add tasks for scheduling at the Task Manager dialog box. You add a task by means of other operations in CAM. lists the CAM operations that allow you to schedule a task and have it managed by the Task Manager.
In addition to user-scheduled tasks, CAM supports 11 internal tasks, 3 ReportInternal tasks, and 8 OtherInternal tasks. CAM displays and executes tasks in chronological order, by their scheduled start time at the Task Manager dialog box. However, if user-scheduled tasks are scheduled to execute at the same time, CAM executes them one after the other in random sequence. If ReportInternal tasks, OtherInternal tasks, and user-scheduled tasks are scheduled to execute at the same time, CAM executes them simultaneously.
Note
If a system crash occurs, the status of all tasks is reset to scheduled after recovery. CAM then executes them in chronological order.
You can use the Tasks Manager for:
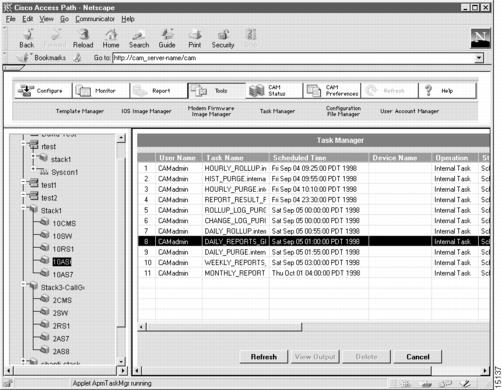
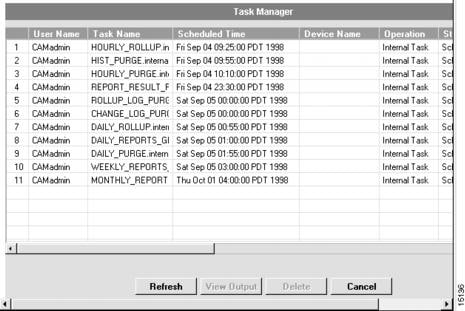
shows the main dialog box for the Task Manager.
Figure 8-27 Task Manager—Main Dialog Box
lists and briefly describes each of the fields that display on the main dialog box of the Task Manager.
Table 8-10 Task Manager Fields
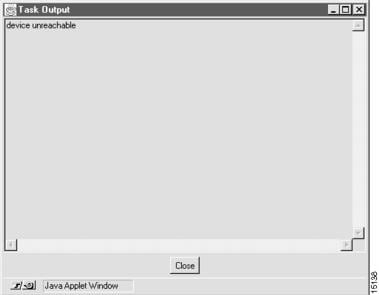
Viewing Task Output
You can view task output of a configuration task only if it has failed.
To view task output:
Figure 8-28 Task Manager—View Task Output Dialog Box
Deleting a Task
You cannot delete an internal task or tasks in the InProgress state. You can only delete tasks that you have scheduled. In addition, tasks that you have scheduled continue to display at the Task Manager dialog box until you manually delete them. However, internal tasks that have succeeded are deleted from the Task Manager dialog box automatically; they are replaced by the next task in the scheduled state.
To delete a task:
Figure 8-29 Task Manager—Main Dialog Box
Using the User Account Manager
The User Account Manager helps you to manage CAM users. The User Account Manager supports the following tasks:
•
•
•
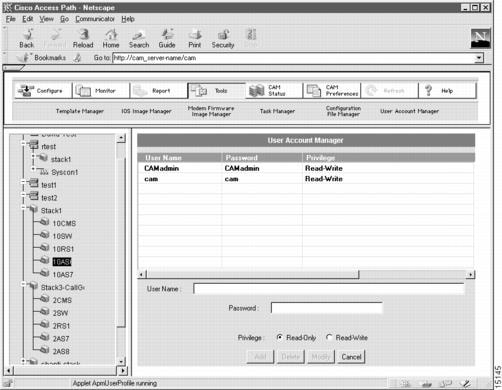
The privileges defined at the User Account Manager dialog box determine the possible operations a user can do at the various CAM dialog boxes. The User Account Manager dialog box lists all users in addition to their respective passwords and privileges currently defined in CAM.
If you have administrator privileges, you can use all dialog boxes without restriction. You must have administrator privileges to use the User Account Manager. If you have administrator privileges, you can add, modify, and delete users at the User Account Manager dialog box. Additionally, you can set the user name, password, and read-write or read-only privileges for each CAM user.
If you have read-only or read-write privilege, you are restricted. The read-only privilege prevents you from creating or making changes at any of the dialog boxes in CAM. read-only users have access only to monitor and report dialog boxes. The read-write privilege limits a user to adding or editing his/her own settings. Read-write users have access to all dialog boxes except the User Account Manager dialog box.
If you do not have administrator privileges, the User Account Manager is not visible to you.
Table 8-11 User Account Manager Fields
User Name
Name of the user who you want to add, modify, or delete.
Password
Password assigned to the user name.
Privilege
Privilege assigned to the username.
Adding, Modifying, or Deleting a User
You can add, modify, or delete a CAM user at the User Account Manager dialog box. You can modify a user's name, password, or privilege, and you can delete a CAM user, but you cannot delete the administrator. You must have administrator privileges to use the User Account Manager.
To add, modify, or delete a user:
Figure 8-30 User Account Manager—Main Dialog Box