Downloads |
 Feedback Feedback
|
Table Of Contents
Installing Cisco Access Manager
Overview of the Installation Process
Install the CSCOcamdb Oracle Database
Create an Additional CAM Database Instance (Optional)
Install the CSCOcam Executables
Changing Netscape FastTrack Admin Server Port, User ID, and Password
Backing Up the CAM Installation
Remove Any Additional CAM Database Instances
Remove the CSCOcamdb Files and the Primary Database Instance
Installing Cisco Access Manager
The Cisco AccessPath Integrated Access System and the Cisco AS5800 Universal Access Server are scalable, high-density dial systems designed to terminate a large number of mixed digital and analog calls. Cisco Access Manager (CAM) provides configuration and management functions for your Cisco AS5800 or Cisco AccessPath system.
This chapter describes the procedures for installing and removing CAM and configuring the Netscape FastTrack web server software. You can install the CAM software before or after you install your hardware.
Timesaver
If you use CAM to configure your Cisco AccessPath system or Cisco AS5800, you might not need to use the software configuration guide that shipped with your hardware.
Topics covered in this chapter include:
•
Backing Up the CAM Installation
System Requirements
To install CAM, you must have the following:
•
12,000
Ultra 60
2
512 MB
360 MHz
8 GB
512 MB
3.9 GB
Note
•
•
•
•
•
•
Software Installation
This section describes first-time installation of CAM on local or remote workstations.
Overview of the Installation Process
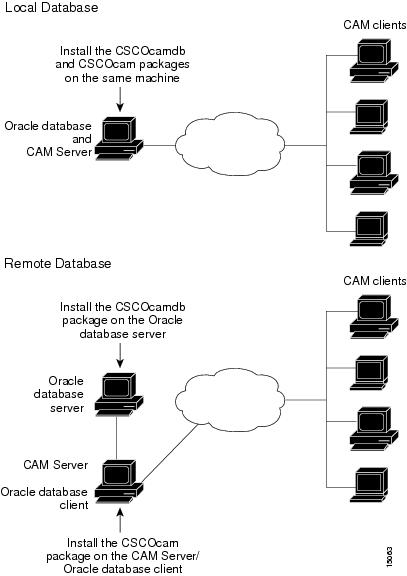
CAM installation involves two packages:
CAM can be set up in one of two ways:
•
•
In either case, however, the CAM database instance can serve only one CAM system, locally or remotely.
Figure 1-1 CAM Databases—Local and Remote
Preinstallation Tasks
Prior to installing CAM, the Oracle database must be installed and running. To install Oracle, refer to your Oracle database documentation and Appendix A, "."
During the CAM installation, you will need to know the following information:
•
•
•
Note
CAM installation includes Netscape FastTrack web server software. The Netscape FastTrack web server (httpd) port number is 80. The Netscape FastTrack Admin Server port number is 8887. (Make sure that ports 80 and 8887 are available for the Netscape FastTrack Server. Refer to the Netscape online help for instructions.)The CAM installation process will install and run a copy of the Netscape FastTrack web server. Prior to installing CAM, you must shut down any other web server that is already installed on the CAM workstation.
Installation Procedure
To install CAM software:
2
3
4
Note
Note
After the installation, continue with the "Configure the Netscape FastTrack Server and Install Additional Instances of Netscape Navigator (Optional)" section.
Mount the CD-ROM
Step 1
Step 2
CD-ROM mount policies vary with different systems. In some systems, the CD-ROM is automounted or managed by the Solaris void process. In such cases, you will have a standard mount point for the CD-ROM such as /cdrom/cdrom0.
If your CD-ROM is not automounted, enter the following command to manually mount the CD-ROM:
# mount -F hsfs -r -r /dev/dsk/cddevice /cdpathwhere:
•
•
Install the CSCOcamdb Oracle Database
If you will be installing the CSCOcamdb database on the same machine as the CSCOcam executables, Cisco recommends that you run camdb_pkgadd first.
Step 1
# cd /device# ./camdb_pkgaddwhere device is the device name of the CD-ROM drive.
The script will allow you to install CAM in a location other than the default location (/opt/CSCOcam). A symbolic link (/opt/CSCOcam) to the actual location will be created automatically.
For example:
# cd /cdrom/cdrom0# ./camdb_pkgaddYou can terminate the script by typing Ctrl-c.
Note
Step 2
This package must be installed on the machine where Oracle server
software is installed.
Continue with CSCOcamdb installation ? (y/n) [y]Step 3
•
•
For instructions on manual database installation, refer to the file /opt/CSCOcamdb/README.database.
By default, the installation will automatically configure theCisco Access Manager Oracle database. Automatic configurationcreates the needed table space sufficient to support:1,000 port Cisco Access Manager system (requiring 1GB of disk space)10,000 port Cisco Access Manager system (requiring 2.9GB of disk space)15,000 port Cisco Access Manager system (requiring 3.9GB of disk space)If your Oracle server and Cisco Access Manager will run ondifferent machines, you must configure the Oracle serveras a remote database server.Remote Oracle database for Cisco Access Manager support is divided intotwo sections: setting up the database and configuring SQL*NET.This installation will cover the section of setting up the database.Manually configuration SQL*NET for both the local and remoteworkstations is needed. Contact your Oracle administrator forsite-specific information on configuring SQL*NET.For more information on manual database configuration, referto /opt/CSCOcamdb/README.database.Proceed with Automatic configuration of Cisco Access Manager Database (y/n)? [y]Step 4
•
•
•
Please enter Cisco Access Manager database size:1,000 port database (1 GB disk space required) [1k], or10,000 port database (2.9 GB disk space required) [10k] or 15,000 port database (3.9 GB disk space required)] [15k] ? [1k] 1kStep 5
Please enter Oracle Home location? [$ORACLE_HOME]where $ORACLE_HOME is the Oracle home directory.
For example: /oracle/db/product/7.3.4
Oracle must be installed before CAM can be installed. If Oracle is not installed, quit the installation process with Ctrl-c, and install Oracle before continuing.
Step 6
Please enter Oracle user name? [oracle]Step 7
Please enter Oracle group name? [dba]Step 8
Please enter Oracle DB instance name: ? [CAMDB]Step 9
Please enter Oracle Base location ? [/oracle/db]Step 10
Please enter Oracle default 'system' user password: ? [manager]Step 11
Please enter CAM DB user name? [cam]Step 12
Please enter CAM DB user password? [cam]Step 13
•
•
The following settings will be used:Installation location (or default link) is: /opt/CSCOcamdbOracle Home location is: /oracle/db/product/7.3.4Oracle Unix user name: oracleOracle Unix group name: dbaAutomatic Database configuration: YESDatabase size: 1,000 portsOracle DB SID: CAMDBLocation of the database admin files: /oracle/db/admin/CAMDBLocation of the database data files: /oracle/db/oradata/CAMDBCisco Access Manager Oracle DB user name: camCisco Access Manager Oracle DB user password camOracle default system user password: managerAre these acceptable, continue install (y/n)? yStep 14
Enter path to package base directory [?,q] /opt/CSCOcamdbThe selected base directory </opt/CSCOcamdb> must exist beforeinstallation is attempted.Do you want this directory created now [y,n,?,q] yStep 15
This package contains scripts which will be executed withsuper-user permission during the process of installing thispackage.Do you want to continue with the installation of <CSCOcamdb> [y,n,?] yThe installation process now installs the CSCOcamdb database on your workstation. No additional CAM-specific intervention should be required for the package installation and configuration to complete.
During the final steps of the installation process, file ownerships and permissions will be set, and the Oracle CAM database will be created and started up. The installation takes 10 to 20 minutes.
If you will run Cisco Access Manager on a machine other than the one on which you have installed the CSCOcamdb Oracle database, you will need to manually configure SQL*NET for both the local and remote workstations. Contact your Oracle administrator for site-specific information on configuring SQL*NET. In addition, you will need to restart the listener for the new CAMDB database instance.
Create an Additional CAM Database Instance (Optional)
Step 1
Step 2
# su oracleStep 3
# cd /opt/CSCOcamdb/db/adminStep 4
# ./add_dbinstance.shStep 5
Please enter Oracle default 'system' user password: ? [manager]Step 6
Please enter Oracle DB instance name: ?Step 7
By default, database admin scripts will be placed in <Oracle
Base>/admin/MYDB, and data files will be placed in <Oracle
Base>/oradata/MYDB.
Please enter Oracle Base location ? [/oracle/db]Step 8
Please enter database size:1,000 port database ( 1GB disk space required) [1k], or10,000 port database ( 2.9GB disk space required) [10k], or15,000 port database ( 3.9GB disk space required) [15k] ? [1k] 1kStep 9
Please enter Oracle DB user name ?Please enter Oracle DB user password ?Step 10
•
•
CAMHOME=/opt/CSCOcamdbORACLE_HOME=/oracle/db/product/7.3.4ORA_SYSTEMPWD=managerORACLE_SID=MYDBORACLE_BASE=/oracle/dbCAM_DBADMIN=/oracle/db/admin/MYDBCAM_DBDATA=/oracle/db/oradata/MYDBCAM_DBUSER=oracleCAM_DBPASSWORD=passwordCreate a database for up to 1,000 portsPlease review that the environment variables are correctand enter 'y' to continue or 'n' to enter new value (default n) yInstall the CSCOcam Executables
To install the CSCOcam package:
Step 1
# cd /device# ./cam_pkgaddwhere device is the device name of the CD-ROM drive.
The script will allow you to install CAM in a location other than the default location (/opt/CSCOcam). A symbolic link (/opt/CSCOcam) to the actual location will be created automatically.
For example:
# cd /cdrom/cdrom0# ./cam_pkgaddYou can terminate the script by typing Ctrl-c.
Step 2
Cisco Access Manager can use either a local Oracle database or aremote Oracle database.Answer 'Y' if Cisco Access Manager use the local Oracle database,or 'N' if Cisco Access Manager use a remote Oracle database.Will Cisco Access Manager use the local Oracle database. (y/n)? [y]Continue as follows:
•
•
Note
Step 3
Please enter Oracle Home location? [$ORACLE_HOME]where $ORACLE_HOME is the Oracle home directory.
For example: /oracle/db/product/7.3.4
Oracle must be installed before CAM can be installed. If Oracle is not installed, quit the installation process with Ctrl-c, and install Oracle before continuing.
Step 4
Remote Oracle DB alias is needed for Cisco Access Managerto connect to the database and it has to match the namesetup in /var/opt/oracle/tnsnames.ora in this machine.Please enter remote Oracle DB alias?Step 5
The existing CAM tables in CAMDB will be dropped and recreated.The default data will be loaded. You can skip this if you choose to retain the existing historical and config data in CAMDB.If CAMDB is a newly created DB Instance, you must answer n.Do you want to retain the CAM data in CAMDB ? (y/n)? [n]Continue as follows:
•
•
Step 6
Please enter the Oracle DB user name ? [cam]Please enter the Oracle DB password ? [cam]Step 7
Please enter tftpd root directory ? [/opt/CSCOcam/tftpboot]Step 8
Please enter the device username ? [CAMadmin]Step 9
Please enter the device password ? [cam]Step 10
Please enter the CAM admin user (CAMadmin) password ? [cam]
Note
Step 11
•
•
The following settings will be used:Installation location (or default link) is: /opt/CSCOcamUse local Cisco Access Manager Oracle DB: YES (local)Oracle Home location is: /oracle/db/product/7.3.4Oracle DB SID (local database): CAMDBCisco Access Manager Oracle DB user name: camCisco Access Manager Oracle DB user password: camtftpd root directory: /opt/CSCOcam/tftpbootDevice login username: CAMadminDevice login password: camCisco Access Manager administrator password: camAre these acceptable, continue install (y/n)? [y]Step 12
Enter path to package base directory [?,q] /opt/CSCOcamThe selected base directory </opt/CSCOcam> must exist beforeinstallation is attempted.Do you want this directory created now [y,n,?,q] yStep 13
This package contains scripts which will be executed withsuper-user permission during the process of installing thispackage.Do you want to continue with the installation of <CSCOcam> [y,n,?] yThe installation process now installs the CSCOcam executables on your workstation. No additional CAM-specific intervention should be required for the package installation and configuration to complete.
During the final steps of the installation process, file ownerships and permissions will be set, and the Netscape FastTrack web server will be configured and started. The installation takes 10 to 20 minutes.
When the installation of CAM is complete, you can change Netscape FastTrack configuration items, such as the Admin password. For instructions, see the next section, "Configure the Netscape FastTrack Server and Install Additional Instances of Netscape Navigator (Optional)."
Configure the Netscape FastTrack Server and Install Additional Instances of Netscape Navigator (Optional)
Netscape FastTrack web server is included with CAM and is used by default. It is installed and configured during the CAM installation, however, if you want to customize its installation, use this section.
Normal CAM interaction requires only a Java-enabled web browser. However, to customize the Netscape FastTrack Server, you will need a Javascript-enabled browser. CAM includes the Netscape Navigator for Solaris browser that has both Java and Javascript capabilities enabled.
Note
File Locations
The following are key file locations used by Netscape FastTrack Server software:
Web Access
Netscape FastTrack Server software includes two servers that are important for CAM:
•
•
By default, both of these servers are started during installation and the workstation boot procedure.
By default, only the CAM server will be allowed to access the Netscape FastTrack Admin Server. For information on allowing other hosts access to the Netscape FastTrack Admin Server, see the Netscape online documentation on editing the ns-admin.conf file.
For example, if your CAM machine name is cam_server_name, you would use the following URLs for access:
•
http://cam_server_name/cam•
http://cam_server_name:8887
Note
Web Security
Using the Netscape FastTrack Admin Server, several web security measures can be used. The following are recommended for CAM web security:
•
•
•
The procedure for making these changes is described in the following section.
Changing Netscape FastTrack Admin Server Port, User ID, and Password
Note
To change the CAM default settings for the Netscape FastTrack Admin Server:
Step 1
Step 2
Step 3
Step 4
Step 5
Step 6
Step 7
Step 8
Step 9
Step 10
Step 11
# /opt/CSCOcam/ns-home/start-adminThis completes the procedure for editing the CAM default settings for the Netscape FastTrack Admin Server.
Backing Up the CAM Installation
To back up your CAM installation, back up both the CAM filesystem and the Oracle database files. Follow the appropriate procedure: local or remote.
Removing CAM Software
To remove the CAM software:
2
3
Note
Remove CSCOcam Executables
To remove the CSCOcam package:
Step 1
# cd /device# ./cam_pkgrmwhere device is the device name of the CD-ROM drive.
For example:
# cd /cdrom/cdrom0# ./cam_pkgrmThe cam_pkgrm command automatically does the following:
•
•
•
•
Step 2
Do you want to remove this package? yStep 3
This package contains scripts which will be executed withsuper-user permission during the process of removing this package.Do you want to continue with the removal of this package [y,n,?,q] yRemove Any Additional CAM Database Instances
Step 1
# su oracle%Step 2
% cd /opt/CSCOcamdb/db/adminStep 3
% ./remove_dbinstance.shStep 4
Please enter the ORACLE_SID which you want to take action: MYDBStep 5
Please enter the ORACLE_BASE for MYDB:[/oracle/db]Step 6
Database MYDB about to be removed from server.Enter 'y' to continue or 'n' to abort removal (default n) yRemove the CSCOcamdb Files and the Primary Database Instance
Step 1
# cd /device# ./camdb_pkgrmwhere device is the device name of the CD-ROM drive.
For example:
# cd /cdrom/cdrom0# ./camdb_pkgrmStep 2
Do you want to remove this package? yStep 3
This package contains scripts which will be executed with
super-user permission during the process of removing this package.
Do you want to continue with the removal of this package? [y,n,?,q] yStep 4
# /tmp/camdb_remove.shThis completes the procedure for removing CAM.
If you need additional documentation, see the "Related and Referenced Documents" section on page xiv.