-
Cisco IOS Terminal Services Configuration Guide, Release 12.2
-
About Cisco IOS Software Documentation
-
Using Cisco IOS Software
-
Terminal Services Overview
-
Configuring Terminal Operating Characteristics for Dial-In Sessions
-
Configuring Dial-In Terminal Services
-
Configuring AppleTalk Remote Access
-
Configuring Support for NASI Clients to Access Network Resources
-
Configuring the Cisco PAD Facility for X.25 Connections
-
Configuring Protocol Translation and Virtual Asynchronous Devices
- Appendixes
-
Table Of Contents
Configuring AppleTalk Remote Access
Configuring the Line and the Modem
Configuring ARA to Start Up Automatically
Local or Remote Security Database
TACACS and TACACS+ Security for ARA
Enabling AAA/TACACS+ for ARA Authentication
Connecting to an AppleTalk Network from a Client Running a Different Virtual Terminal Protocol
Monitoring the AppleTalk Network
Troubleshooting ARA Connections
ARA Configuration and Connection Examples
ARA Server Configuration Procedure
Dedicated ARA Line with User Authentication Example
Autostart Multiple ARA Lines with User Authentication Example
Telebit T-3000 Modem Setup Procedure
Modified and Unmodified CCL Scripts Sample Commands
Extended AppleTalk Network Example
Extended Network in Discovery Mode Example
TACACS Username Authentication Example
TACACS Enabled for ARA Authentication Example
AppleTalk Network Connection over a Foreign Protocol Example
Configuring AppleTalk Remote Access
This chapter describes how to configure your router to act as an AppleTalk Remote Access (ARA) server. It includes the following main sections:
•
Monitoring the AppleTalk Network
•
•
This chapter does not describe how to configure or use the client Macintosh. Refer to the Apple Computer, Inc. Apple Remote Access Client User's Guide and the Apple Remote Access Personal Server User's Guide for information about how to set up and use the ARA software on your Macintosh.
For a complete description of the commands in this chapter, refer to the Cisco IOS Terminal Services Command Reference, Release 12.2. To locate documentation of other commands that appear in this chapter, use the command reference master index or search online.
To identify the hardware platform or software image information associated with a feature, use the Feature Navigator on Cisco.com to search for information about the feature or refer to the software release notes for a specific release. For more information, see the "Identifying Supported Platforms" section in the "Using Cisco IOS Software" chapter.
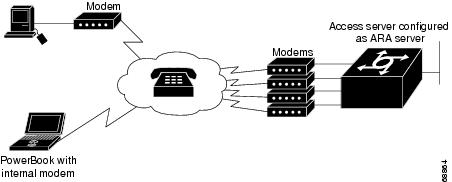
ARA Overview
The Cisco implementation of ARA gives Macintosh users direct access to information and resources in remote AppleTalk networks over standard telephone lines. For example, if you have a PowerBook at home and need to get a file from your Macintosh at the office, ARA software can make the connection between your home and office computers over telephone lines.
You can configure your router to act as an ARA server by enabling AppleTalk and ARA protocol on physical terminal (TTY) or virtual terminal lines. Configuring your router to act as an ARA server allows remote Macintosh users to dial in, become a network node, and connect to devices on other networks. ARA protocol support is transparent to the Macintosh end user. Macintosh users can also use Serial Line Internet Protocol (SLIP) to access remote IP network resources and PPP to access both AppleTalk and IP resources.
The following Macintosh and Cisco IOS software support is required for ARA connectivity:
•
•
Figure 17 shows how your router can act as an ARA server between remote Macintosh computers (in Figure 17, a Power Macintosh and a PowerBook) and devices on another network.
Figure 17 ARA Configuration Overview
ARA Configuration Task List
To set up the Cisco IOS software to act as an ARA server, perform the tasks described in the following sections:
•
•
•
•
•
•
To enable remote clients running PPP to dial in and access AppleTalk resources on a network, you must configure AppleTalk Control Protocol (ATCP). To configure ATCP, refer to the section "Configuring AppleTalk and PPP" in the chapter "Configuring Asynchronous SLIP and PPP" in the Cisco IOS Dial Technologies Configuration Guide, Release 12.2.
The section "Making ARA Connections" later in this chapter provides connection information. Refer to the "Monitoring an ARA Server," "Monitoring the AppleTalk Network," and "Troubleshooting ARA Connections" sections for information about maintaining and troubleshooting the ARA server and AppleTalk network. The section "ARA Configuration and Connection Examples" provides configuration examples.
Connecting Cables
Figure 18 shows how to connect a Macintosh using internal and external modems.
Figure 18 ARA Server Cabling and Connections
Use the MMOD version of the RJ-45-to-DB-25 adapter (labeled "Modem" if the adapter is from Cisco) to connect a "rolled" RJ-45 cable from the router to the modem. Use a high-speed modem cable with hardware flow control to connect a modem to your Macintosh (see the user documentation for your modem for more specific information).
Some Cisco access servers such as the Cisco AS5800 and Cisco AS5300 have internal modems. Therefore there are no modem cables for you to connect.
For more information about connecting cables, see the installation and configuration or product user guide that came with your router.
Configuring the Line and the Modem
To configure the line, perform the following steps:
Step 1
•
•
•
Note
Step 2
Note
Step 3
Step 4
For more information about configuring lines and modem control, refer to the chapter "Preparing Modem and Asynchronous Interfaces" in the Cisco IOS Dial Technologies Configuration Guide, Release 12.2. For information about configuring security, refer to the Cisco IOS Security Configuration Guide, Release 12.2.
Note
Configuring ARA
To allow ARA connections to pass through the access server or router, use the following commands beginning in global configuration mode:
Step 1
Router(config)# appletalk routing
Enables AppleTalk.1
Step 2
Router(config)# arap network [network-number] [zone-name]
Creates a new network or zone for ARA clients when they dial in. The network-number argument must be a unique network number.
Step 3
Router(config-if)# appletalk send-rtmps
In interface configuration mode, ensures that a new internal network is advertised by enabling the Routing Table Maintenance Protocol (RTMP).
You need to configure an AppleTalk interface using the discovery mode in the Cisco IOS software. To do so, an interface on the router must be connected to a network that has at least one other router configured for AppleTalk.
Step 4
Router(config-if)# appletalk routing
Returns to global configuration mode and turns on AppleTalk routing.
Step 5
Router(config)# line [tty | aux | vty] line-number [ending-line-number]
Enters line configuration mode.
Step 6
Router(config-line)# arap enable
Enables ARA on a line.
1 For more information about configuring AppleTalk, refer to the chapter "Configuring AppleTalk" in the Cisco IOS AppleTalk and Novell IPX Configuration Guide.
If you discover that an AppleTalk network already exists, the zone and cable range must match the existing configuration. To identify existing cable ranges and zone names, configure the Cisco IOS software for discovery mode. You must manually configure an AppleTalk interface on a segment for which there are no AppleTalk routers. For more information, refer to the chapter "Configuring AppleTalk" in the Cisco IOS AppleTalk and Novell IPX Configuration Guide, Release 12.2.
Configuring ARA to Start Up Automatically
Refer to this section after you have configured AppleTalk routing, created an internal ARA network or zone, and enabled ARA. At this point, you can enable optional tasks.
To configure the Cisco IOS software to allow an ARA session to start automatically, use the following commands beginning in global configuration mode:
The autoselect command permits the router to start an ARA session automatically when it detects the start character for an Appletalk Remote Accesses Protocol (ARAP) packet. The Cisco IOS software detects either a Return character, which is the start character for an EXEC session, or the start character for the ARA protocol. By entering the autoselect command with the during-login keyword, you can display the username or password prompt without pressing the Return key. While the username or password prompts are displayed, you can choose to answer these prompts or to start sending packets from an autoselected protocol.
Normally a router avoids line and modem noise by clearing the initial data received within the first few seconds. However, when the autoselect PPP feature is configured, the router flushes characters initially received and then waits for more traffic. This flush causes timeout problems with applications that send only one carriage return. To ensure that the input data sent by a modem or other asynchronous device is not lost after line activation, enter the flush-at-activation line configuration command.
For information about using ARA with TACACS, Extended TACACS, and AAA/TACACS+, refer to the section "Configuring ARA Security" in this chapter, and the Cisco IOS Security Configuration Guide, Release 12.2.
Note
To customize the AppleTalk configuration even further, you can perform the following additional tasks:
•
•
For more information about these and other tasks you can perform to customize your AppleTalk configuration, refer to the chapter "Configuring AppleTalk" in the Cisco IOS AppleTalk and Novell IPX Configuration Guide, Release 12.2.
Configuring ARA Security
The following three types of security can be used with ARA:
•
•
•
The following sections describe these tasks. Refer to the Cisco IOS Security Command Reference, Release 12.2, for information about commands listed in these tasks.
ARA Server Security
Security features that are specific to the ARA protocol are described in the following sections:
•
Requiring Manual Password Entry
You can control access by requiring users to enter their password manually at the time they log in. To force manual password entry, use the following command in line configuration mode:
Limiting Network Visibility
You can control Macintosh access to zones and networks by using arap commands to reference access control lists configured using AppleTalk access-list commands.
To control which zones the Macintosh user can see, use the following command in line configuration mode:
Router(config-line)# arap zonelist zone-access-list-number
Limits the zones the Macintosh user sees.
To control traffic from the Macintosh to networks, use the following command in line configuration mode:
Router(config-line)# arap net-access-list net-access-list-number
Controls access to networks.
Disallowing Guests
A guest is a user that connects to the network without the need to give a name or a password. To prohibit Macintosh guests from logging in through the router, use the following command in line configuration mode. Use the optional if-needed argument to allow users to log in as guests if they are already authenticated with a username or password.
Router(config-line)# arap noguest [if-needed]
Prohibits guests from logging in to the ARA network.
Note
Local or Remote Security Database
To prevent unauthenticated users from accessing your network resources, you configure a username and password database. This database can be local on the router or can be stored on a remote security server (a PC or UNIX computer set up with a security database). To configure the Cisco IOS software to support either local or remote authentication, perform the tasks described in the following sections:
•
•
Configuring Local Username Authentication
To configure internal username authentication, use the following command in global configuration mode. Enter this information for each supported user.
When users try to log in to the access server, username and password prompts require them to authenticate themselves before they can have access to the router or the network.
Enabling Remote TACACS or TACACS+ Server Authentication
To enable the Cisco IOS software to use a remote TACACS or TACACS+ authentication database, use the following commands in global configuration mode:
After you specify these commands in the Cisco IOS software, you must populate the remote username database to all users to whom you want to provide network access. When users try to log in to the router, username and password prompts require them to authenticate themselves before they can have access to the router or the network.
TACACS and TACACS+ Security for ARA
You can prevent unauthenticated users from accessing your network resources using the following security mechanisms:
•
•
For more information about each of these security mechanisms, refer to the Cisco IOS Security Configuration Guide, Release 12.2.
To configure TACACS and TACACS+ security to authenticate clients that are using ARA to dial in, perform the tasks described in the following sections:
•
•
•
Enabling Standard and Extended TACACS for ARA Authentication
To use extended TACACS, you must already have set up an extended TACACS server using the Cisco extended TACACS server software, available from the ftp.cisco.com directory. Refer to the README file in this directory for more information. The following two authentication methods are used with standard TACACS:
•
•
Note
To configure the router to authenticate using TACACS, use the following commands in line configuration mode:
Step 1
Router(config-line)# arap use-tacacs [single-line]
Enables TACACS under ARA.
Step 2
Router(config-line)# login tacacs
Enables login authentication using TACACS.
For an example of enabling TACACS for ARA authentication, refer to the section "ARA Configuration and Connection Examples" later in this chapter.
Enabling AAA/TACACS+ for ARA Authentication
To enable TACACS+ authentication for ARA sessions, use the following commands beginning in global configuration mode:
Modifying Scripts to Support a Standard EXEC Security Dialog
This section describes how to modify your CCL script to work with TACACS security and how to configure a line to use a TACACS server for user authentication.
Caution
For information on how to use TACACS without modifying scripts, refer to the section "Enabling Standard and Extended TACACS for ARA Authentication" earlier in this chapter. For information about the arap commands, refer to the Cisco IOS Terminal Services Command Reference, Release 12.2.
If you are currently using modified CCL scripts and want to migrate to nonmodified scripts, refer to the section "Modified and Unmodified CCL Scripts Sample Commands" later in this chapter for information on how to use both in the same environment.
For several popular modems, Cisco provides CCL files that you can use as examples to modify your CCL scripts to support TACACS security. This section explains how to use the CCL files provided by Cisco with TACACS security.
For more information about creating modem initialization scripts, use the ARA Modem Toolkit provided through the AppleTalk Programmers and Developers Association (APDA); it provides both syntax checking and a script tester.
The Macintosh client uses ARA CCL scripts to establish point-to-point links with the modem to the AppleTalk network. When the connection has been established, the script ends and ARA is activated. TACACS authentication occurs after the connection is established and the ARA script ends, but before the ARAP protocol becomes active.
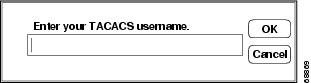
Insert TACACS logic just before the end of a script. The CCL TACACS logic performs the following user authentication tasks:
1.
Figure 19 TACACS Login Screen on the Macintosh Computer
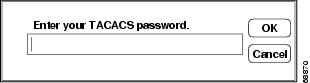
2.
Figure 20 TACACS Password Screen on the Macintosh Computer
3.
4.
CCL scripts control logical flow by jumping to labels. The labels are the numbers 1 through 128 and are not necessarily in sequential order in script files. The TACACS logic in the Cisco IOS software CCL files has label numbers from 100 through 127. In most environments, you can copy the complete TACACS logic from a sample file.
To create a new TACACS CCL file, perform the following steps:
Step 1
In most cases, you can insert the TACACS logic at the appropriate place in your CCL script. The one case that requires extra attention is when the original CCL script has labels that conflict with the logic in the new file. The labels must be resolved on a case-by-case basis, usually by changing the label numbers used in the original CCL script. Be sure to read the manual that comes with the ARA Modem Toolkit before beginning.
Step 2
You can locate the logical end of the script by following its flow. Most scripts have the following basic structure:
•
•
•
The characteristic logical end of the script is as follows:
@label N! N is any integer between 1 and 128.if ANSWER N+1! If we're answering the phone, jump directly! to the label N+1.pause 30! We're not answering the phone, therefore we! must be calling. Wait three seconds for the! modems to sync up.@label N+1exit 0! Quit and start up ARA.It is common in this case to replace "pause 30" with "jump 100." In fact, this replacement is usually the only change made to the logic of the original CCL script.
Refer to the chapter "Preparing Modem and Asynchronous Interfaces" in the Cisco IOS Dial Technologies Configuration Guide, Release 12.2 for information about configuring a line to support your modem.
Enabling Kerberos Security for ARA Authentication
You can use Kerberos as an authentication method within ARA sessions. To do so, you configure Kerberos using the AAA/TACACS+ facility in the Cisco IOS software.
To enable Kerberos security, use the following commands beginning in global configuration mode:
For more information about Kerberos authentication, refer to the Cisco IOS Security Configuration Guide, Release 12.2.
Using Access Lists to Control Access to AppleTalk Networks
An access list is a list of AppleTalk network numbers or zones that is maintained by the Cisco IOS software and used to control access to or from specific zones or networks. For more information about AppleTalk access lists, refer to the section "Control Access to AppleTalk Networks" in the chapter "Configuring AppleTalk" in the Cisco IOS AppleTalk and Novell IPX Configuration Guide, Release 12.2.
Connecting to an AppleTalk Network from a Client Running a Different Virtual Terminal Protocol
ARA can run on any point-to-point link, such as a Public Switched Telephone Network (PSTN) or an X.25 WAN. This capability permits remote Macintosh users to dial in to a remote network and access AppleTalk services (such as file sharing and printing). For example, you can enable a Macintosh client on the remote side of an X.25 WAN to connect to an AppleTalk network through the router. To do so, you configure a vty on the router so that the client sees one of two scenarios:
•
•
To enable ARA on virtual terminal lines and enable clients running different virtual terminal protocols to connect to an AppleTalk network through the router, use the following commands beginning in global configuration mode. The first four steps are required. The next eight steps are optional.
Making ARA Connections
If you are a Macintosh user, you can use ARA to connect to an AppleTalk network through a Cisco access server. The Cisco IOS Release 10.2 and later release software support ARA 2.0 and ARA 1.0 so that you can remotely dial in through asynchronous network devices using ARA to access AppleTalk services (such as file sharing and printing) elsewhere on the network. For example, you can dial in from an X.25 network and connect to an AppleTalk network through a router. To enable ARA and dial-in access, configure a vty on the router. You can also configure ARA on TTY lines.
Because there are no user commands for connecting to the network from your Macintosh client, the process is not described in this publication. To start a connection in most ARA client packages, you click the Connect button from within the client software.
Monitoring an ARA Server
To display information about a running ARA connection, use the following command in privileged EXEC mode (reached by entering the enable command and a password at the EXEC prompt):
Router# show arap [line-number]
Displays information about a running ARA connection.
The show arap command with no arguments displays a summary of ARA traffic since the router was last booted. The show arap command with a specified line number displays information about the connection on that line.
Monitoring the AppleTalk Network
The Cisco IOS software provides several commands that you can use to monitor an AppleTalk network. In addition, you can use Inter-Poll from Apple Computer, which is a tool to verify that a device is configured and operating properly. Use the commands described in this section to monitor an AppleTalk network using both Cisco IOS software commands and Inter-Poll.
To monitor the AppleTalk network, use any of the the following commands in EXEC mode:
Troubleshooting ARA Connections
Use ARA debugging enhancements to troubleshoot one or more asynchronous lines on an access server. These enhancements are supported on all Macintosh terminals and all Cisco routers and access servers that support the AppleTalk software feature set.
Allowing users to specify a single line via an additional parameter for troubleshooting produces the following benefits:
•
•
•
To enable ARAP debugging, use the following commands beginning in EXEC mode:
To verify if the debug level and target are set correctly, enter the show debug command:
Router# show debugAppleTalk Remote Access:ARAP MNP4 debugging is on for line 7ARAP Debugging Examples
The following example sets ARAP debugging in memory mode on line 7. The show debug command confirms the configuration.
Router# debug arap mn 7ARAP MNP4 debugging is on for line 7Router# debug arap mn 8ARAP MNP4 debugging is on for line 8Router# debug arap mn 9ARAP MNP4 debugging is on for line 9Router# show debugAppleTalk Remote Access:ARAP MNP4 debugging is on for line 7ARAP MNP4 debugging is on for line 8ARAP MNP4 debugging is on for line 9
Note
The following example sets ARAP debugging in internal mode on line 6, memory mode on line 10, and V.42bis compression mode on line 6. The show debug command confirms the configuration.
Router# debug arap in 6ARAP internal packet debugging is on for line 6Router# debug arap me 10ARAP memory debugging is on for line 10Router# debug arap v 6ARAP V.42bis debugging is on for line 6Router# show debugAppleTalk Remote Access:ARAP V.42bis debugging is on for line 6ARAP internal packet debugging is on for line 6ARAP memory debugging is on for line 10The following example sets ARAP debugging for each mode in succession and for all lines. The show debug command confirms the configuration.
Router# debug arap mnp4ARAP MNP4 debugging is onRouter# debug arap internalARAP internal packet debugging is onRouter# debug arap v42bisARAP V.42bis debugging is onRouter# debug arap memoryARAP memory debugging is onRouter# show debugAppleTalk Remote Access:ARAP MNP4 debugging is onARAP V.42bis debugging is onARAP internal packet debugging is onARAP memory debugging is onRouter#The following example sets all debugging (including ARAP debugging) for all modes and for all lines. The show debug command confirms the configuration. Note that turning on all debugging utilities can slow down performance.
Router# debug allThis may severely impact network performance. Continue? [confirm] yAll possible debugging has been turned onRouter# show debug"debug all" is in effect.The following example turns off ARAP debugging. The show debug command confirms the configuration.
Router# undebug allAll possible debugging has been turned offRouter# show debugRouter#The following example shows debug output for two lines, 2 and 4. The boldfaced portion of this example shows that for line 2, LA is the MNP4 acknowledge frame, 31 is the sequence number of the last frame, and 08 is the window size.
ARAP MEM TTY 4: arap_getbuffer 94745CARAP MEM TTY 4: arap_datagram_done 7BD324MNP4 TTY 4:mnp4_input()MNP4 TTY 2:mnp4_input()ARAP MEM TTY 2: arap_getbuffer 7BD158MNP4 TTY 2:Rcv LA Nr[31] Nk[08]ARAP MEM TTY 2: arap_datagram_done 7BD6BCMNP4 TTY 4:mnp4_input()ARAP SMARTBUF TTY 2: ring end 936C62, start 934ED4, need 58 bytesARAP SMARTBUF TTY 2: new seq 161ARAP TTY 4: Received TICKLEARAP TTY 4: --------- ACKing 125 ---------ARAP SMARTBUF TTY 2: ring end 936C28, start 934ED4, need 58 bytesARAP SMARTBUF TTY 2: new seq 160ARAP SMARTBUF TTY 2: ring end 9342B4, start 9322EC, need 64 bytesARAP SMARTBUF TTY 2: new seq 144ARAP SMARTBUF TTY 2: search...ARAP SMARTBUF TTY 2: search...0 ddp; trailing; 1 ddp; trailing; 2 ddp; trailing; 3 ddp; trailing; 4 ddp; trailing; 5 ddp; 6 offset; 7 ddp; trailing; 8 ddp; 9 offset; 10 ddp; trailing; 11 ddp; trailing; 12 ddp; trailing; 13 ddp; trailing; 14 ddp; 15 ddp; trailing; 16 ddpARAP SMAR@TBUF TTY 2: ring end 936C62, start 934ED4, need 58 bytesARAP SMARTBUF TTY 2: new seq 161ARAP TTY 4: Received TICKLEARAP TTY 4: --------- ACKing 125 ---------ARAP TTY 2: Received TICKLEARAP TTY 2: --------- ACKing 114 ---------V42bis TTY 4: OUT uncomp (12): 0 10 16 33 0 9 1 195 255 255 255 255V42bis TTY 4: OUT comp (6): 10 38 229 203 3 0V42bis TTY 4: IN comp (6): 205 145 196 79 2 0V42bis TTY 4: IN uncomp (12): 0 10 16 143 0 9 0 0 255 255 255 255V42bis TTY 4: OUT uncomp (6): 0 4 16 143 0 0V42bis TTY 4: OUT comp (6): 182 244 235 0 2 0V42bis TTY 4: IN comp (6): 217 111 250 0 2 0V42bis TTY 4: IN uncomp (6): 0 4 16 33 0 0V42bis TTY 2: IN comp (5): 247 225 15 102 0V42bis TTY 2: IN uncomp (12): 0 10 16 132 0 9 255 219 255 255 255 255V42bis TTY 2: OUT uncomp (6): 0 4 16 132 0 0V42bis TTY 2: OUT comp (6): 126 63 196 65 2 0...ARA Configuration and Connection Examples
This section contains the following examples of and procedures for ARA configuration:
•
•
•
•
•
•
•
•
•
•
•
ARA Server Configuration Procedure
The following sample procedure shows how to set up ARA functionality.
Log in to the router, use the enable command to enter your password if one is set, use the configure command to enter configuration mode, and add the following commands to your configuration:
appletalk routingarap network 104 ARAP Dialin Zoneinterface ethernet 0appletalk cable-range 0-0 0.0! Puts router in discovery mode.line 5 6modem inoutspeed 38400arap enabledautoselectIf you already know the cable range and the zone names you need, include the information in the configuration file. If you do not know this information, perform the following steps to use the discovery mode to allow the Cisco IOS software to learn about the AppleTalk network:
Step 1
Step 2
Step 3
Step 4
Step 5
appletalk cable-range 105-105 105.222appletalk zone Marketing Labusername arauser password arapasswd! Add as many users as you need.Step 6
Step 7
Dedicated ARA Line with User Authentication Example
The following example configures line 2 as a dedicated ARA line with user authentication information on the ARA server; guests are not allowed to make ARA sessions:
username jsmith password woofline 2arap dedicatedarap noguestAutostart Multiple ARA Lines with User Authentication Example
The following example enables ARA on lines 2 through 16. Username authentication is configured on the ARA server, and the lines are configured to automatically start an ARA session when an ARA user on a Macintosh attempts a connection.
username jsmith password woofline 2 16autoselectarap enabledarap noguestTelebit T-3000 Modem Setup Procedure
To set up a Telebit T-3000 modem that attaches to a router, which supports hardware flow control, perform the following steps. The Macintosh will use a CCL script to configure the attached modem.
Caution
Step 1
Step 2
Step 3
ATS51=6 E0 Q1 S0=2 &D3 &R3 S58=2 &W
This sequence directs the modem to perform the following tasks:
•
•
•
•
•
•
•
•
Step 4
Step 5
The following Cisco IOS commands are compatible with the Telebit 3000 settings described in this section:
line 1 8arap enableautoselectno escape-characterflowcontrol hardwaremodem dialinspeed 38400Modified and Unmodified CCL Scripts Sample Commands
If you are using modified CCL scripts and want to migrate to nonmodified scripts, you can set your system to accept logins using both modified CCL and unmodified scripts. Use the following commands in line configuration mode:
autoselect arapautoselect during-loginarap noguest if-neededARA Router Support Example
The following example configures the router for ARA support, as described in the comments (lines beginning with an exclamation point [!]):
! Enable AppleTalk on the router.appletalk routing!interface Ethernet 0ip address 172.30.1.1 255.255.255.0!! On interface Ethernet 0, assign network number 103 to the physical cable and ! assign zone name "Marketing Lab" to the interface. Assign a zone name if! you are creating a new AppleTalk internet. If the internet already exists,! the zone and cable range must match exactly, or you can leave the cable! range at 0 to enter discovery mode. The suggested AppleTalk address for the interface in ! this example is 103.1.interface Ethernet 0appletalk cable-range 103-103 103.1appletalk zone Marketing Lab! Configure a username and password for the router. username jake password sesame! On lines 4 through 8, InOut modems are specified, the lines are configured ! to automatically start an EXEC session or enable AppleTalk, AppleTalk Remote ! Access Protocol is enabled, the modem speed is specified as 38400 bps, and ! hardware flow control is enabled.line 4 8modem InOutautoselectarap enabledspeed 38400flowcontrol hardware
Note
Extended AppleTalk Network Example
The following example configures the interface for an extended AppleTalk network. It defines the zones named Orange and Brown. The cable range of 1 allows compatibility with nonextended AppleTalk networks.
appletalk routinginterface ethernet 0appletalk cable-range 1-1appletalk zone Orangeappletalk zone BrownCable Range Expansion Example
The following example changes the cable range and reenters the zone name. The initial configuration is as follows:
appletalk cable-range 100-103appletalk zone Twilight ZoneThe cable range is expanded as follows:
appletalk cable-range 100-109At this point, you must reenter the zone name as follows:
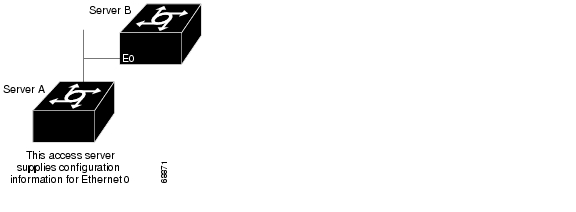
appletalk zone Twilight ZoneExtended Network in Discovery Mode Example
The following example configures an extended network in discovery mode. In Figure 21, the access server named Server A provides the zone and network number information to the interface when it starts.
Figure 21 Discovery Mode
The following example configures an extended network in discovery mode:
appletalk routinginterface ethernet 0appletalk cable-range 0-0 0.0TACACS Username Authentication Example
The following example for TACACS and Extended TACACS configures line 1 for ARA and username authentication on a TACACS server:
line 1login tacacsarap enableThe following example configures AAA/TACACS+ on line 1 for ARA and username authentication on a TACACS server:
line 1login authenticationarap authenticationTACACS Enabled for ARA Authentication Example
The following example shows regular TACACS enabled for ARA authentication:
line 3arap use-tacacsThe following example shows AAA/TACACS+ enabled for ARA authentication:
line 3aaa authentication arapAppleTalk Network Connection over a Foreign Protocol Example
The following example enables a Macintosh client running ARA on a remote network to connect across an X.25 network, through the router, to an AppleTalk network. In this example, virtual terminal lines 0 through 19 are configured for ARA:
appletalk routingline vty 0 19arap enableautocommand araparap dedicatedarap timelimit 45arap warningtime 5arap noguestarap require-manual-passwordarap net-access-list 611The Macintosh client connects to any vty from 0 through 19. When the EXEC prompt appears, ARA begins automatically on the line (because of the autocommand arap command). The virtual terminal lines 0 through 19 are dedicated to ARA dial-in clients, and those clients have a 45-minute time limit. Five minutes before the line is disconnected, a warning message appears indicating that the session will be disconnected. Guest access is denied, and manual password entry is required. The AppleTalk access list 611 has been applied to the virtual terminal lines, meaning that access to other networks through these virtual terminal lines has been limited.