Downloads |
 Feedback Feedback
|
Contents
- Implementing OSPFv3
- Finding Feature Information
- Prerequisites for Implementing OSPFv3
- Restrictions for Implementing OSPFv3
- Information About Implementing OSPFv3
- How OSPFv3 Works
- Comparison of OSPFv3 and OSPF Version 2
- OSPFv3 Address Families
- LSA Types for OSPFv3
- OSPFv3 Max-Metric Router LSA
- Fast Convergence: LSA and SPF Throttling
- Addresses Imported into OSPFv3
- OSPFv3 Authentication Support with IPsec
- OSPFv3 Virtual Links
- OSPFv3 Cost Calculation
- OSPFv3 Customization
- OSPFv3 Virtual Links
- Link Quality Metrics Reporting for OSPFv3 with VMI Interfaces
- OSPFv3 External Path Preference Option
- OSPFv3 Graceful Restart
- How to Implement OSPFv3
- Configuring the OSPFv3 Router Process
- Configuring the IPv6 Address Family in OSPFv3
- Configuring the IPv4 Address Family in OSPFv3
- Configuring Route Redistribution in OSPFv3
- Enabling OSPFv3 on an Interface
- Defining an OSPFv3 Area Range for the IPv6 or IPv4 Address Family
- Defining an OSPFv3 Area Range
- Configuring the OSPFv3 Max-Metric Router LSA
- Configuring IPsec on OSPFv3
- Defining Authentication on an Interface
- Defining Encryption on an Interface
- Defining Authentication in an OSPFv3 Area
- Defining Encryption in an OSPFv3 Area
- Tuning LSA and SPF Transmission for OSPFv3 Fast Convergence
- Configuring LSA and SPF Throttling for OSPFv3 Fast Convergence
- Enabling Event Logging for LSA and SPF Rate Limiting for the IPv6 or IPv4 Address Family
- Enabling Event Logging for LSA and SPF Rate Limiting
- Clearing the Content of an Event Log
- Calculating OSPFv3 External Path Preferences per RFC 5340
- Enabling OSPFv3 Graceful Restart
- Enabling OSPFv3 Graceful Restart on a Graceful-Restart-Capable Router
- Enabling OSPFv3 Graceful Restart on a Graceful-Restart-Capable Router
- Enabling OSPFv3 Graceful Restart on a Graceful-Restart-Aware Router
- Enabling OSPFv3 Graceful Restart on a Graceful-Restart-Aware Router
- Forcing an SPF Calculation
- Verifying OSPFv3 Configuration and Operation
- Verifying OSPFv3 Configuration and Operation
- Examples
- Sample Output for the show ipv6 ospf interface Command
- Sample Output for the show ipv6 ospf Command
- Sample Output for the show ipv6 ospf graceful-restart Command
- Configuration Examples for Implementing OSPFv3
- Example: Enabling OSPFv3 on an Interface Configuration
- Example Defining an OSPFv3 Area Range
- Example: Configuring LSA and SPF Throttling for OSPFv3 Fast Convergence
- Example: Forcing SPF Configuration
- Additional References
- Feature Information for Implementing OSPFv3
Implementing OSPFv3
The Implementing OSPF for IPv6 module expands on Open Shortest Path First version 3 (OSPFv3), or OSPF for IPv6, to provide support for IPv6 routing prefixes.
Finding Feature Information
Your software release may not support all the features documented in this module. For the latest feature information and caveats, see the release notes for your platform and software release. To find information about the features documented in this module, and to see a list of the releases in which each feature is supported, see the Feature Information Table at the end of this document.
Use Cisco Feature Navigator to find information about platform support and Cisco software image support. To access Cisco Feature Navigator, go to www.cisco.com/go/cfn. An account on Cisco.com is not required.
Prerequisites for Implementing OSPFv3
- Complete the OSPFv3 network strategy and planning for your IPv6 network. For example, you must decide whether multiple areas are required.
- Enable IPv6 unicast routing.
- Enable IPv6 on the interface.
- Configure the IP security (IPsec) secure socket application program interface (API) on OSPFv3 in order to enable authentication and encryption.
- Before you can use the IPv4 unicast address families (AFs) in OSPFv3, you must enable IPv6 on a link, although the link may not be participating in IPv6 unicast AF.
- With the OSPFv3 Address Families feature, you may have two device processes per interface, but only one process per AF. If the AF is IPv4, you must first configure an IPv4 address on the interface, but IPv6 must be enabled on the interface.
Restrictions for Implementing OSPFv3
- When running a dual-stack IP network with OSPF version 2 for IPv4 and OSPFv3, be careful when changing the defaults for commands used to enable OSPFv3. Changing these defaults may affect your OSPFv3 network, possibly adversely.
- A packet will be rejected on a router if the packet is coming from an IPv6 address that is found on any interface on the same router.
Information About Implementing OSPFv3
- How OSPFv3 Works
- Comparison of OSPFv3 and OSPF Version 2
- OSPFv3 Address Families
- LSA Types for OSPFv3
- Fast Convergence: LSA and SPF Throttling
- Addresses Imported into OSPFv3
- OSPFv3 Authentication Support with IPsec
- OSPFv3 Customization
- Link Quality Metrics Reporting for OSPFv3 with VMI Interfaces
- OSPFv3 External Path Preference Option
- OSPFv3 Graceful Restart
How OSPFv3 Works
OSPFv3 is a routing protocol for IPv4 and IPv6. It is a link-state protocol, as opposed to a distance-vector protocol. Think of a link as being an interface on a networking device. A link-state protocol makes its routing decisions based on the states of the links that connect source and destination machines. The state of a link is a description of that interface and its relationship to its neighboring networking devices. The interface information includes the IPv6 prefix of the interface, the network mask, the type of network it is connected to, the devices connected to that network, and so on. This information is propagated in various type of link-state advertisements (LSAs).
A device's collection of LSA data is stored in a link-state database. The contents of the database, when subjected to the Dijkstra algorithm, result in the creation of the OSPF routing table. The difference between the database and the routing table is that the database contains a complete collection of raw data; the routing table contains a list of shortest paths to known destinations via specific device interface ports.
OSPFv3, which is described in RFC 5340, supports IPv6 and IPv4 unicast AFs.
Comparison of OSPFv3 and OSPF Version 2
Much of the OSPFv3 feature is the same as in OSPF version 2. OSPFv3, which is described in RFC 5340, expands on OSPF version 2 to provide support for IPv6 routing prefixes and the larger size of IPv6 addresses.
In OSPFv3, a routing process does not need to be explicitly created. Enabling OSPFv3 on an interface will cause a routing process, and its associated configuration, to be created.
In OSPFv3, each interface must be enabled using commands in interface configuration mode. This feature is different from OSPF version 2, in which interfaces are indirectly enabled using the router configuration mode.
In IPv6, users can configure many address prefixes on an interface. In OSPFv3, all address prefixes on an interface are included by default. Users cannot select some address prefixes to be imported into OSPFv3; either all address prefixes on an interface are imported, or no address prefixes on an interface are imported.
Unlike OSPF version 2, multiple instances of OSPFv3 can be run on a link.
In OSPFv3, it is possible that no IPv4 addresses will be configured on any interface. In this case, the user must use the router-id command to configure a router ID before the OSPF process will be started. A router ID is a 32-bit opaque number. OSPF version 2 takes advantage of the 32-bit IPv4 address to pick an IPv4 address as the router ID. If an IPv4 address does exist when OSPFv3 is enabled on an interface, then that IPv4 address is used for the router ID. If more than one IPv4 address is available, a router ID is chosen using the same rules as for OSPF version 2.
OSPF automatically prefers a loopback interface over any other kind, and it chooses the highest IP address among all loopback interfaces. If no loopback interfaces are present, the highest IP address in the router is chosen. You cannot tell OSPF to use any particular interface.
OSPFv3 Address Families
The OSPFv3 address families feature enables both IPv4 and IPv6 unicast traffic to be supported. With this feature, users may have two router processes per interface, but only one process per AF. If the IPv4 AF is used, an IPv4 address must first be configured on the interface, but IPv6 must be enabled on the interface. A single IPv4 or IPv6 OSPFv3 process running multiple instances on the same interface is not supported.
Users with an IPv6 network that uses OSPFv3 as its IGP may want to use the same IGP to help carry and install IPv4 routes. All routers on this network have an IPv6 forwarding stack. Some (or all) of the links on this network may be allowed to do IPv4 forwarding and be configured with IPv4 addresses. Pockets of IPv4-only routers exist around the edges running an IPv4 static or dynamic routing protocol. In this scenario, users need the ability to forward IPv4 traffic between these pockets without tunneling overhead, which means that any IPv4 transit router has both IPv4 and IPv6 forwarding stacks (e.g., is dual stack).
This feature allows a separate (possibly incongruent) topology to be constructed for the IPv4 AF. It installs IPv4 routes in IPv4 RIB, and then the forwarding occurs natively. The OSPFv3 process fully supports an IPv4 AF topology and can redistribute routes from and into any other IPv4 routing protocol.
An OSPFv3 process can be configured to be either IPv4 or IPv6. The address-family command is used to determine which AF will run in the OSPFv3 process, and only one address family can be configured per instance. Once the AF is selected, users can enable multiple instances on a link and enable address-family-specific commands.
Different instance ID ranges are used for each AF. Each AF establishes different adjacencies, has a different link state database, and computes a different shortest path tree. The AF then installs the routes in AF-specific RIB. LSAs that carry IPv6 unicast prefixes are used without any modification in different instances to carry each AFs' prefixes.
The IPv4 subnets configured on OSPFv3-enabled interfaces are advertised through intra-area prefix LSAs, just as any IPv6 prefixes. External LSAs are used to advertise IPv4 routes redistributed from any IPv4 routing protocol, including connected and static. The IPv4 OSPFv3 process runs the SPF calculations and finds the shortest path to those IPv4 destinations. These computed routes are then inserted in the IPv4 RIB (computed routes are inserted into an IPv6 RIB for an IPv6 AF).
Because the IPv4 OSPFv3 process allocates a unique pdbindex in the IPv4 RIB, all other IPv4 routing protocols can redistribute routes from it. The parse chain for all protocols is same, so the ospfv3 keyword added to the list of IPv4 routing protocols causes OSPFv3 to appear in the redistribute command from any IPv4 routing protocol. With the ospfv3 keyword, IPv4 OSPFv3 routes can be redistributed into any other IPv4 routing protocol as defined in the redistribute ospfv3 command.
The OSPFv3 address families feature is supported as of Cisco IOS XE Release 3.4S. Cisco routers that run software older than this release and third-party routers will not neighbor with routers running the AF feature for the IPv4 AF because they do not set the AF bit. Therefore, those routers will not participate in the IPv4 AF SPF calculations and will not install the IPv4 OSPFv3 routes in the IPv6 RIB.
LSA Types for OSPFv3
The following list describes LSA types, each of which has a different purpose:
- Router LSAs (Type 1)--Describes the link state and costs of a router's links to the area. These LSAs are flooded within an area only. The LSA indicates if the router is an Area Border Router (ABR) or Autonomous System Boundary Router (ASBR), and if it is one end of a virtual link. Type 1 LSAs are also used to advertise stub networks. In OSPFv3, these LSAs have no address information and are network-protocol-independent. In OSPFv3, router interface information may be spread across multiple router LSAs. Receivers must concatenate all router LSAs originated by a given router when running the SPF calculation.
- Network LSAs (Type 2)--Describes the link-state and cost information for all routers attached to the network. This LSA is an aggregation of all the link-state and cost information in the network. Only a designated router tracks this information and can generate a network LSA. In OSPFv3, network LSAs have no address information and are network-protocol-independent.
- Interarea-prefix LSAs for ABRs (Type 3)--Advertises internal networks to routers in other areas (interarea routes). Type 3 LSAs may represent a single network or a set of networks summarized into one advertisement. Only ABRs generate summary LSAs. In OSPFv3, addresses for these LSAs are expressed as prefix, prefix length instead of address, mask. The default route is expressed as a prefix with length 0.
- Interarea-router LSAs for ASBRs (Type 4)--Advertises the location of an ASBR. Routers that are trying to reach an external network use these advertisements to determine the best path to the next hop. Type 4 LSAs are generated by ABRs on behalf of ASBRs.
- Autonomous system external LSAs (Type 5)--Redistributes routes from another autonomous system, usually from a different routing protocol into OSPFv3. In OSPFv3, addresses for these LSAs are expressed as prefix, prefix length instead of address, mask. The default route is expressed as a prefix with length 0.
- Link LSAs (Type 8)--Have local-link flooding scope and are never flooded beyond the link with which they are associated. Link LSAs provide the link-local address of the router to all other routers attached to the link, inform other routers attached to the link of a list of prefixes to associate with the link, and allow the router to assert a collection of Options bits to associate with the network LSA that will be originated for the link.
- Intra-Area-Prefix LSAs (Type 9)--A router can originate multiple intra-area-prefix LSAs for each router or transit network, each with a unique link-state ID. The link-state ID for each intra-area-prefix LSA describes its association to either the router LSA or the network LSA and contains prefixes for stub and transit networks.
An address prefix occurs in almost all newly defined LSAs. The prefix is represented by three fields: PrefixLength, PrefixOptions, and Address Prefix. In OSPFv3, addresses for these LSAs are expressed as prefix, prefix length instead of address, mask. The default route is expressed as a prefix with length 0. Type 3 and Type 9 LSAs carry all prefix (subnet) information that, in OSPFv2, is included in router LSAs and network LSAs. The Options field in certain LSAs (router LSAs, network LSAs, interarea-router LSAs, and link LSAs) has been expanded to 24 bits to provide support for OSPFv3.
In OSPFv3, the sole function of the link-state ID in interarea-prefix LSAs, interarea-router LSAs, and autonomous-system external LSAs is to identify individual pieces of the link-state database. All addresses or router IDs that are expressed by the link-state ID in OSPF version 2 are carried in the body of the LSA in OSPFv3.
The link-state ID in network LSAs and link LSAs is always the interface ID of the originating router on the link being described. For this reason, network LSAs and link LSAs are now the only LSAs whose size cannot be limited. A network LSA must list all routers connected to the link, and a link LSA must list all of the address prefixes of a router on the link.
OSPFv3 Max-Metric Router LSA
The OSPFv3 max-metric router LSA feature enables OSPFv3 to advertise its locally generated router LSAs with a maximum metric. The feature allows OSPFv3 processes to converge but not attract transit traffic through the device if there are better alternate paths. After a specified timeout or a notification from Border Gateway Protocol (BGP), OSPFv3 advertises the LSAs with normal metrics.
The max-metric LSA control places the OSPFv3 router into the stub router role using its LSA advertisement. A stub router only forwards packets destined to go to its directly connected links. In OSPFv3 networks, a device could become a stub router by advertising large metrics for its connected links, so that the cost of a path through this device becomes larger than that of an alternative path. OSPFv3 stub router advertisement allows a device to advertise the infinity metric (0xFFFF) for its connected links in router LSAs and advertise the normal interface cost if the link is a stub network.
Fast Convergence: LSA and SPF Throttling
The OSPFv3 LSA and SPF throttling feature provides a dynamic mechanism to slow down link-state advertisement updates in OSPFv3 during times of network instability. It also allows faster OSPFv3 convergence by providing LSA rate limiting in milliseconds.
OSPFv3 can use static timers for rate-limiting SPF calculation and LSA generation. Although these timers are configurable, the values used are specified in seconds, which poses a limitation on OSPFv3 convergence. LSA and SPF throttling achieves subsecond convergence by providing a more sophisticated SPF and LSA rate-limiting mechanism that is able to react quickly to changes and also provide stability and protection during prolonged periods of instability.
Addresses Imported into OSPFv3
When importing the set of addresses specified on an interface on which OSPFv3 is running into OSPFv3, you cannot select specific addresses to be imported. Either all addresses are imported, or no addresses are imported.
OSPFv3 Authentication Support with IPsec
In order to ensure that OSPFv3 packets are not altered and re-sent to the router, causing the router to behave in a way not desired by its system administrators, OSPFv3 packets must be authenticated. OSPFv3 uses the IPsec secure socket API to add authentication to OSPFv3 packets. This API supports IPv6.
OSPFv3 requires the use of IPsec to enable authentication. Crypto images are required to use authentication, because only crypto images include the IPsec API needed for use with OSPFv3.
In OSPFv3, authentication fields have been removed from OSPFv3 packet headers. When OSPFv3 runs on IPv6, OSPFv3 requires the IPv6 authentication header (AH) or IPv6 ESP header to ensure integrity, authentication, and confidentiality of routing exchanges. IPv6 AH and ESP extension headers can be used to provide authentication and confidentiality to OSPFv3.
To use the IPsec AH, you must enable the ipv6 ospf authentication command. To use the IPsec ESP header, you must enable the ipv6 ospf encryption command. The ESP header may be applied alone or in combination with the AH, and when ESP is used, both encryption and authentication are provided. Security services can be provided between a pair of communicating hosts, between a pair of communicating security gateways, or between a security gateway and a host.
To configure IPsec, you configure a security policy, which is a combination of the security policy index (SPI) and the key (the key is used to create and validate the hash value). IPsec for OSPFv3 can be configured on an interface or on an OSPFv3 area. For higher security, you should configure a different policy on each interface configured with IPsec. If you configure IPsec for an OSPFv3 area, the policy is applied to all of the interfaces in that area, except for the interfaces that have IPsec configured directly. Once IPsec is configured for OSPFv3, IPsec is invisible to you.
The secure socket API is used by applications to secure traffic. The API needs to allow the application to open, listen, and close secure sockets. The binding between the application and the secure socket layer also allows the secure socket layer to inform the application of changes to the socket, such as connection open and close events. The secure socket API is able to identify the socket; that is, it can identify the local and remote addresses, masks, ports, and protocol that carry the traffic requiring security.
Each interface has a secure socket state, which can be one of the following:
- NULL: Do not create a secure socket for the interface if authentication is configured for the area.
- DOWN: IPsec has been configured for the interface (or the area that contains the interface), but OSPFv3 either has not requested IPsec to create a secure socket for this interface, or there is an error condition.
- GOING UP: OSPFv3 has requested a secure socket from IPsec and is waiting for a CRYPTO_SS_SOCKET_UP message from IPsec.
- UP: OSPFv3 has received a CRYPTO_SS_SOCKET_UP message from IPsec.
- CLOSING: The secure socket for the interface has been closed. A new socket may be opened for the interface, in which case the current secure socket makes the transition to the DOWN state. Otherwise, the interface will become UNCONFIGURED.
- UNCONFIGURED: Authentication is not configured on the interface.
OSPFv3 will not send or accept packets while in the DOWN state.
OSPFv3 Virtual Links
For each virtual link, a master security information datablock is created for the virtual link. Because a secure socket must be opened on each interface, there will be a corresponding security information datablock for each interface in the transit area. The secure socket state is kept in the interface's security information datablock. The state field in the master security information datablock reflects the status of all of the secure sockets opened for the virtual link. If all of the secure sockets are UP, then the security state for the virtual link will be set to UP.
OSPFv3 Cost Calculation
Because cost components can change rapidly, it might be necessary to reduce the volume of changes to reduce network-wide churn. The recommended values for S2, S3, and S4 in the second table below are based on network simulations that may reduce the rate of network changes. The recommended value for S1 is 0 to eliminate this variable from the route cost calculation.
The overall link cost is computed using the formula shown in the figure below.
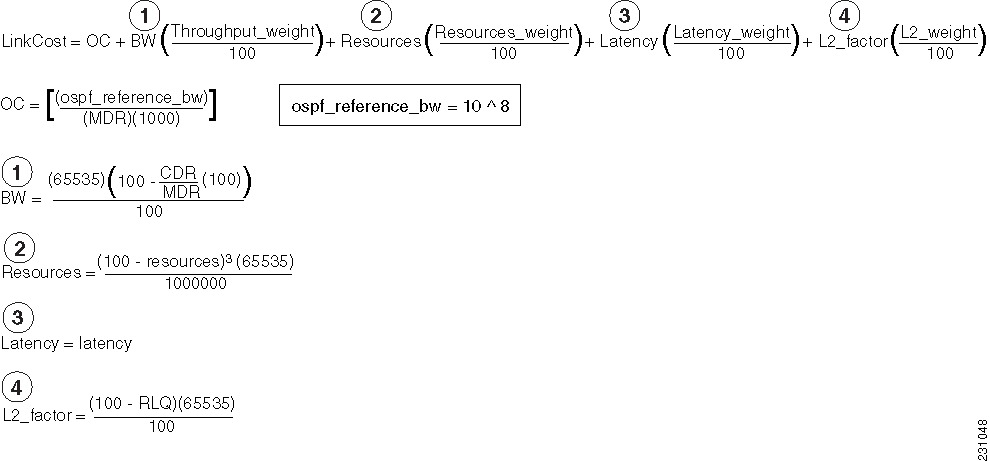
The table below defines the symbols used in the OSPFv3 cost calculation.
| Table 1 | OSPFv3 Cost Calculation Definitions |
|
Cost Component |
Component Definition |
|---|---|
|
OC |
The default OSPFv3 cost. Calculated from reference bandwidth using reference_bw / (MDR*1000), where reference_bw=10^8. |
|
A through D |
Various radio-specific data-based formulas that produce results in the 0 through 64,000 range. |
|
A |
CDR- and MDR-related formula: (2^16 * (100 - (CDR * 100 / MDR)))/100 |
|
B |
Resources related formula: ((100 - RESOURCES)^3 * 2^16 / 10^6) |
|
C |
Latency as reported by the radio, already in the 0 through 64,000 range when reported (LATENCY). |
|
D |
RLF-related formula: ((100 - RLF) * 2^16)/100 |
|
S1 through S4 |
Scalar weighting factors input from the CLI. These scalars scale down the values as computed by A through D. The value of 0 disables and the value of 100 enables full 0 through 64,000 range for one component. |
Because each network might have unique characteristics that require different settings to optimize actual network performance, these are recommended values intended as a starting point for optimizing an OSPFv3 network. The table below lists the recommended value settings for OSPFv3 cost metrics.
| Table 2 | Recommended Value Settings for OSPFv3 Cost Metrics |
|
Setting |
Metric Description |
Default Value |
Recommended Value |
|---|---|---|---|
|
S1 |
ipv6 ospf dynamic weight throughout |
100 |
0 |
|
S2 |
ipv6 ospf dynamic weight resources |
100 |
29 |
|
S3 |
ipv6 ospf dynamic weight latency |
100 |
29 |
|
S4 |
ipv6 ospf dynamic weight L2 factor |
100 |
29 |
The default path costs were calculated using this formula, as noted in the following list. If these values do not suit your network, you can use your own method of calculating path costs.
- 56-kbps serial link--Default cost is 1785.
- 64-kbps serial link--Default cost is 1562.
- T1 (1.544-Mbps serial link)--Default cost is 64.
- E1 (2.048-Mbps serial link)--Default cost is 48.
- 4-Mbps Token Ring--Default cost is 25.
- Ethernet--Default cost is 10.
- 16-Mbps Token Ring--Default cost is 6.
- FDDI--Default cost is 1.
- X25--Default cost is 5208.
- Asynchronous--Default cost is 10,000.
- ATM--Default cost is 1.
To illustrate these settings, the following example shows how OSPFv3 cost metrics might be defined for a Virtual Multipoint Interface (VMI) interface:
interface vmi1
 ipv6 ospf cost dynamic weight throughput 0
 ipv6 ospf cost dynamic weight resources 29
 ipv6 ospf cost dynamic weight latency 29
 ipv6 ospf cost dynamic weight L2-factor 29
OSPFv3 Customization
You can customize OSPFv3 for your network, but you likely will not need to do so. The defaults for OSPFv3 are set to meet the requirements of most customers and features. If you must change the defaults, refer to the IPv6 command reference to find the appropriate syntax.
 Caution | Be careful when changing the defaults. Changing defaults will affect your OSPFv3 network, possibly adversely. |
OSPFv3 Virtual Links
For each virtual link, a master security information datablock is created for the virtual link. Because a secure socket must be opened on each interface, there will be a corresponding security information datablock for each interface in the transit area. The secure socket state is kept in the interface's security information datablock. The state field in the master security information datablock reflects the status of all of the secure sockets opened for the virtual link. If all of the secure sockets are UP, then the security state for the virtual link will be set to UP.
Link Quality Metrics Reporting for OSPFv3 with VMI Interfaces
OSPFv3 is one of the routing protocols that can be used with Virtual Multipoint Interfaces (VMIs) in router-to-radio networks. The quality of a radio link has a direct impact on the throughput that can be achieved by router-router traffic. The PPPoE protocol has been extended to provide a process by which a router can request, or a radio can report, link quality metric information. Cisco's OSFPv3 implementation has been enhanced so that the route cost to a neighbor is dynamically updated based on metrics reported by the radio, thus allowing the best route to be chosen within a given set of radio links.
The routing protocols receive raw radio link data, and compute a composite quality metric for each link. In computing these metrics, the following factors may be considered:
- Maximum Data Rate--the theoretical maximum data rate of the radio link, in bytes per second
- Current Data Rate--the current data rate achieved on the link, in bytes per second
- Latency--the transmission delay packets encounter, in milliseconds
- Resources--a percentage (0 to 100) that can represent the remaining amount of a resource (such as battery power)
- Relative Link Quality--a numeric value (0-100) representing relative quality, with 100 being the highest quality
Metrics can be weighted during the configuration process to emphasize or de-emphasize particular characteristics. For example, if throughput is a particular concern, the current data rate metric could be weighted so that it is factored more heavily into the composite metric. Similarly, a metric that is of no concern can be omitted from the composite calculation.
Link metrics can change rapidly, often by very small degrees, which could result in a flood of meaningless routing updates. In a worst case scenario, the network would be churning almost continuously as it struggled to react to minor variations in link quality. To alleviate this concern, Cisco provides a tunable dampening mechanism that allows the user to configure threshold values. Any metric change that falls below the threshold is ignored.The quality of a connection to a neighbor varies, based on various characteristics of the interface when OSPF is used as the routing protocol. The routing protocol receives dynamic raw radio link characteristics and computes a composite metric that is used to reduce the effect of frequent routing changes.
A tunable hysteresis mechanism allows users to adjust the threshold to the routing changes that occur when the router receives a signal that a new peer has been discovered, or that an existing peer is unreachable. The tunable metric is weighted and is adjusted dynamically to account for the following characteristics:
- Current and maximum bandwidth
- Latency
- Resources
- L2 factor
Individual weights can be deconfigured and all weights can be cleared so that the cost is set back to the default value for the interface type. Based on the routing changes that occur, cost can be determined by the application of these metrics.
OSPFv3 External Path Preference Option
Per RFC 5340, the following rules indicate which paths are preferred when multiple intra-AS paths are available to ASBRs or forwarding addresses:
- Intra-area paths using nonbackbone areas are always the most preferred.
- The other paths, intraarea backbone paths and interarea paths, are of equal preference.
These rules apply when the same ASBR is reachable through multiple areas, or when trying to decide which of several AS-external-LSAs should be preferred. In the former case the paths all terminate at the same ASBR, and in the latter the paths terminate at separate ASBRs or forwarding addresses. In either case, each path is represented by a separate routing table entry. This feature applies only when RFC 1583 compatibility is set to disabled using the no compatibility rfc1583 command (RFC 5340 provides an update to RFC 1583).
Caution | To minimize the chance of routing loops, set identical RFC compatibility for all OSPF routers in an OSPF routing domain. |
OSPFv3 Graceful Restart
The graceful restart feature in OSPFv3 allows nonstop data forwarding along routes that are already known while the OSPFv3 routing protocol information is being restored. A device can participate in graceful restart either in restart mode (such as in a graceful-restart-capable router) or in helper mode (such as in a graceful-restart-aware router).
To perform the graceful restart function, a device must be in high availability (HA) stateful switchover (SSO) mode (that is, dual Route Processor (RP)). A device capable of graceful restart will perform the graceful restart function when the following failures occur:
The graceful restart feature requires that neighboring devices be graceful-restart aware.
For further information about SSO and nonstop forwarding (NSF), see the Stateful Switchover and Cisco Nonstop Forwarding documents.
How to Implement OSPFv3
- Configuring the OSPFv3 Router Process
- Configuring the IPv6 Address Family in OSPFv3
- Configuring the IPv4 Address Family in OSPFv3
- Configuring Route Redistribution in OSPFv3
- Enabling OSPFv3 on an Interface
- Defining an OSPFv3 Area Range for the IPv6 or IPv4 Address Family
- Configuring the OSPFv3 Max-Metric Router LSA
- Configuring IPsec on OSPFv3
- Tuning LSA and SPF Transmission for OSPFv3 Fast Convergence
- Configuring LSA and SPF Throttling for OSPFv3 Fast Convergence
- Enabling Event Logging for LSA and SPF Rate Limiting for the IPv6 or IPv4 Address Family
- Calculating OSPFv3 External Path Preferences per RFC 5340
- Enabling OSPFv3 Graceful Restart
- Forcing an SPF Calculation
- Verifying OSPFv3 Configuration and Operation
Configuring the OSPFv3 Router Process
Once you have completed step 3 and entered OSPFv3 router configuration mode, you can perform any of the subsequent steps in this task as needed to configure OSPFv3 router configuration.
DETAILED STEPS
Configuring the IPv6 Address Family in OSPFv3
Perform this task to configure the IPv6 address family in OSPFv3. Once you have completed step 4 and entered IPv6 address-family configuration mode, you can perform any of the subsequent steps in this task as needed to configure the IPv6 AF.
DETAILED STEPS
Configuring the IPv4 Address Family in OSPFv3
Perform this task to configure the IPv4 address family in OSPFv3. Once you have completed step 4 and entered IPv4 address-family configuration mode, you can perform any of the subsequent steps in this task as needed to configure the IPv4 AF.
DETAILED STEPS
Configuring Route Redistribution in OSPFv3
DETAILED STEPS
Enabling OSPFv3 on an Interface
DETAILED STEPS
Defining an OSPFv3 Area Range for the IPv6 or IPv4 Address Family
The cost of the summarized routes will be the highest cost of the routes being summarized. For example, if the following routes are summarized:
OI  2001:DB8:0:7::/64 [110/20]
     via FE80::A8BB:CCFF:FE00:6F00, GigabitEthernet0/0/0
OI  2001:DB8:0:8::/64 [110/100]
     via FE80::A8BB:CCFF:FE00:6F00, GigabitEthernet0/0/0
OI  2001:DB8:0:9::/64 [110/20]
     via FE80::A8BB:CCFF:FE00:6F00, GigabitEthernet0/0/0
They become one summarized route, as follows:
OI  2001:DB8::/48 [110/100]
     via FE80::A8BB:CCFF:FE00:6F00, GigabitEthernet0/0/0
DETAILED STEPS
Defining an OSPFv3 Area Range
DETAILED STEPS
Configuring the OSPFv3 Max-Metric Router LSA
DETAILED STEPS
Configuring IPsec on OSPFv3
Once you have configured OSPFv3 and decided on your authentication, you must define the security policy on each of the routers within the group. The security policy consists of the combination of the key and the SPI. To define a security policy, you must define an SPI and a key.
You can configure an authentication or encryption policy either on an interface or for an OSPFv3 area. When you configure for an area, the security policy is applied to all of the interfaces in the area. For higher security, use a different policy on each interface.
You can configure authentication and encryption on virtual links.
- Defining Authentication on an Interface
- Defining Encryption on an Interface
- Defining Authentication in an OSPFv3 Area
- Defining Encryption in an OSPFv3 Area
Defining Authentication on an Interface
Before you configure IPsec on an interface, you must configure OSPFv3 on that interface.
DETAILED STEPS
Defining Encryption on an Interface
Before you configure IPsec on an interface, you must configure OSPFv3 on that interface.
DETAILED STEPS
Defining Authentication in an OSPFv3 Area
DETAILED STEPS
Defining Encryption in an OSPFv3 Area
DETAILED STEPS
Tuning LSA and SPF Transmission for OSPFv3 Fast Convergence
DETAILED STEPS
Configuring LSA and SPF Throttling for OSPFv3 Fast Convergence
DETAILED STEPS
Enabling Event Logging for LSA and SPF Rate Limiting for the IPv6 or IPv4 Address Family
DETAILED STEPS
Enabling Event Logging for LSA and SPF Rate Limiting
DETAILED STEPS
Clearing the Content of an Event Log
DETAILED STEPS
Calculating OSPFv3 External Path Preferences per RFC 5340
DETAILED STEPS
Enabling OSPFv3 Graceful Restart
- Enabling OSPFv3 Graceful Restart on a Graceful-Restart-Capable Router
- Enabling OSPFv3 Graceful Restart on a Graceful-Restart-Aware Router
Enabling OSPFv3 Graceful Restart on a Graceful-Restart-Capable Router
DETAILED STEPS
Enabling OSPFv3 Graceful Restart on a Graceful-Restart-Capable Router
DETAILED STEPS
Enabling OSPFv3 Graceful Restart on a Graceful-Restart-Aware Router
DETAILED STEPS
Enabling OSPFv3 Graceful Restart on a Graceful-Restart-Aware Router
DETAILED STEPS
Forcing an SPF Calculation
DETAILED STEPS
Verifying OSPFv3 Configuration and Operation
This task is optional. The commands in this task are available in Cisco IOS XE Release 3.4S and later releases.
DETAILED STEPS
Verifying OSPFv3 Configuration and Operation
DETAILED STEPS
Examples
- Sample Output for the show ipv6 ospf interface Command
- Sample Output for the show ipv6 ospf Command
- Sample Output for the show ipv6 ospf graceful-restart Command
Sample Output for the show ipv6 ospf interface Command
The following is sample output from the show ipv6 ospf interface command with regular interfaces and a virtual link that are protected by encryption and authentication:
Router# show ipv6 ospf interface
OSPFv3_VL1 is up, line protocol is up
   Interface ID 69
   Area 0, Process ID 1, Instance ID 0, Router ID 10.0.0.1
   Network Type VIRTUAL_LINK, Cost: 64
   Configured as demand circuit.
   Run as demand circuit.
   DoNotAge LSA allowed.
   NULL encryption SHA-1 auth SPI 3944, secure socket UP (errors: 0)
   Transmit Delay is 1 sec, State POINT_TO_POINT,
   Timer intervals configured, Hello 2, Dead 10, Wait 40, Retransmit 5
     Hello due in 00:00:00
   Index 1/3/5, flood queue length 0
   Next 0x0(0)/0x0(0)/0x0(0)
   Last flood scan length is 1, maximum is 1
   Last flood scan time is 0 msec, maximum is 0 msec
   Neighbor Count is 1, Adjacent neighbor count is 1
     Adjacent with neighbor 10.2.0.1  (Hello suppressed)
   Suppress hello for 1 neighbor(s)
OSPFv3_VL0 is up, line protocol is up
   Interface ID 67
   Area 0, Process ID 1, Instance ID 0, Router ID 10.0.0.1
   Network Type VIRTUAL_LINK, Cost: 128
   Configured as demand circuit.
   Run as demand circuit.
   DoNotAge LSA allowed.
   MD5 authentication SPI 940, secure socket UP (errors: 0)
   Transmit Delay is 1 sec, State POINT_TO_POINT,
   Timer intervals configured, Hello 10, Dead 40, Wait 40, Retransmit 5
     Hello due in 00:00:09
   Index 1/2/4, flood queue length 0
   Next 0x0(0)/0x0(0)/0x0(0)
   Last flood scan length is 1, maximum is 10
   Last flood scan time is 0 msec, maximum is 0 msec
   Neighbor Count is 1, Adjacent neighbor count is 1
     Adjacent with neighbor 10.1.0.1  (Hello suppressed)
   Suppress hello for 1 neighbor(s)
Gigabitethernet1/0/0 is up, line protocol is up
   Link Local Address FE80::A8BB:CCFF:FE00:6601, Interface ID 6
   Area 0, Process ID 1, Instance ID 0, Router ID 10.0.0.1
   Network Type BROADCAST, Cost: 10
   Transmit Delay is 1 sec, State DR, Priority 1
   Designated Router (ID) 10.0.0.1, local address FE80::A8BB:CCFF:FE00:6601
   No backup designated router on this network
   Timer intervals configured, Hello 10, Dead 40, Wait 40, Retransmit 5
     Hello due in 00:00:09
   Index 1/1/1, flood queue length 0
   Next 0x0(0)/0x0(0)/0x0(0)
   Last flood scan length is 0, maximum is 0
   Last flood scan time is 0 msec, maximum is 0 msec
   Neighbor Count is 0, Adjacent neighbor count is 0
   Suppress hello for 0 neighbor(s)
Serial12/0 is up, line protocol is up
   Link Local Address FE80::A8BB:CCFF:FE00:6600, Interface ID 50
   Area 1, Process ID 1, Instance ID 0, Router ID 10.0.0.1
   Network Type POINT_TO_POINT, Cost: 64
   AES-CBC encryption SHA-1 auth SPI 2503, secure socket UP (errors: 0)
   authentication NULL
   Transmit Delay is 1 sec, State POINT_TO_POINT,
   Timer intervals configured, Hello 10, Dead 40, Wait 40, Retransmit 5
     Hello due in 00:00:09
   Index 1/2/3, flood queue length 0
   Next 0x0(0)/0x0(0)/0x0(0)
   Last flood scan length is 1, maximum is 5
   Last flood scan time is 0 msec, maximum is 0 msec
   Neighbor Count is 1, Adjacent neighbor count is 1
     Adjacent with neighbor 10.2.0.1
   Suppress hello for 0 neighbor(s)
Serial11/0 is up, line protocol is up
   Link Local Address FE80::A8BB:CCFF:FE00:6600, Interface ID 46
   Area 1, Process ID 1, Instance ID 0, Router ID 10.0.0.1
   Network Type POINT_TO_POINT, Cost: 64
   MD5 authentication (Area) SPI 500, secure socket UP (errors: 0)
   Transmit Delay is 1 sec, State POINT_TO_POINT,
   Timer intervals configured, Hello 10, Dead 40, Wait 40, Retransmit 5
     Hello due in 00:00:09
   Index 1/1/2, flood queue length 0
   Next 0x0(0)/0x0(0)/0x0(0)
   Last flood scan length is 1, maximum is 5
   Last flood scan time is 0 msec, maximum is 0 msec
   Neighbor Count is 1, Adjacent neighbor count is 1
     Adjacent with neighbor 1.0.0.1
   Suppress hello for 0 neighbor(s)
Sample Output for the show ipv6 ospf Command
The following is sample output from the show ipv6 ospf command:
Router# show ipv6 ospf
Routing Process "ospfv3 1" with ID 172.16.3.3
 It is an autonomous system boundary router
 Redistributing External Routes from,
    static
 SPF schedule delay 5 secs, Hold time between two SPFs 10 secs
 Minimum LSA interval 5 secs. Minimum LSA arrival 1 secs
 LSA group pacing timer 240 secs
 Interface flood pacing timer 33 msecs
 Retransmission pacing timer 66 msecs
 Number of external LSA 1. Checksum Sum 0x218D
 Number of areas in this router is 1. 1 normal 0 stub 0 nssa
    Area 1
        Number of interfaces in this area is 2
        SPF algorithm executed 9 times
        Number of LSA 15. Checksum Sum 0x67581
        Number of DCbitless LSA 0
        Number of indication LSA 0
        Number of DoNotAge LSA 0
        Flood list length 0
Sample Output for the show ipv6 ospf graceful-restart Command
The following is sample output from the show ipv6 ospf graceful-restartcommand:
Router# show ipv6 ospf graceful-restart
Routing Process "ospf 1"
 Graceful Restart enabled
    restart-interval limit: 120 sec, last restart 00:00:15 ago (took 36 secs)
  Graceful Restart helper support enabled
  Router status : Active
  Router is running in SSO mode
  OSPF restart state : NO_RESTART
  Router ID 10.1.1.1, checkpoint Router ID 10.0.0.0
Configuration Examples for Implementing OSPFv3
- Example: Enabling OSPFv3 on an Interface Configuration
- Example Defining an OSPFv3 Area Range
- Example: Configuring LSA and SPF Throttling for OSPFv3 Fast Convergence
- Example: Forcing SPF Configuration
Example Defining an OSPFv3 Area Range
The following example specifies an OSPFv3 area range:
interface gigabitethernet7/0/0
 ipv6 address 2001:DB8:0:7::/64 eui-64
 ipv6 enable
 ipv6 ospf 1 area 1
!
interface gigabitethernet8/0/0
 ipv6 address 2001:DB8:0:8::/64 eui-64
 ipv6 enable
 ipv6 ospf 1 area 1
!
interface gigabitethernet9/0/0
 ipv6 address 2001:DB8:0:9::/64 eui-64
 ipv6 enable
 ipv6 ospf 1 area 1
!
ipv6 router ospf 1
 router-id 10.11.11.1
 area 1 range 2001:DB8::/48
Example: Configuring LSA and SPF Throttling for OSPFv3 Fast Convergence
The following example show how to display the configuration values for SPF and LSA throttling timers:
Router# show ipv6 ospf

Routing Process "ospfv3 1" with ID 10.9.4.1
Event-log enabled, Maximum number of events: 1000, Mode: cyclic
 It is an autonomous system boundary router
 Redistributing External Routes from,
    ospf 2
 Initial SPF schedule delay 5000 msecs
 Minimum hold time between two consecutive SPFs 10000 msecs
 Maximum wait time between two consecutive SPFs 10000 msecs
 Minimum LSA interval 5 secs
 Minimum LSA arrival 1000 msecs
Additional References
Related Documents
MIBs
RFCs
|
RFCs |
Title |
|---|---|
|
RFC 1583 |
OSPF version 2 |
|
RFC 2401 |
Security Architecture for the Internet Protocol |
|
RFC 2402 |
IP Authentication Header |
|
RFC 2406 |
IP Encapsulating Security Payload (ESP) |
|
RFC 3137 |
OSPF Stub Router Advertisement |
|
RFC 4552 |
Authentication/Confidentiality for OSPFv3 |
|
RFC 5187 |
OSPFv3 Graceful Restart |
|
RFC 5340 |
OSPF for IPv6 |
|
RFC 5838 |
Support of Address Families in OSPFv3 |
Technical Assistance
|
Description |
Link |
|---|---|
|
The Cisco Support and Documentation website provides online resources to download documentation, software, and tools. Use these resources to install and configure the software and to troubleshoot and resolve technical issues with Cisco products and technologies. Access to most tools on the Cisco Support and Documentation website requires a Cisco.com user ID and password. |
http://www.cisco.com/cisco/web/support/index.html |
Feature Information for Implementing OSPFv3
The following table provides release information about the feature or features described in this module. This table lists only the software release that introduced support for a given feature in a given software release train. Unless noted otherwise, subsequent releases of that software release train also support that feature.
Use Cisco Feature Navigator to find information about platform support and Cisco software image support. To access Cisco Feature Navigator, go to www.cisco.com/go/cfn. An account on Cisco.com is not required.
| Table 3 | Feature Information for Implementing OSPFv3 |
|
Feature Name |
Releases |
Feature Information |
|---|---|---|
|
IPv6 Routing--Fast Convergence--LSA and SPF Throttling |
Cisco IOS XE Release 2.1 |
The OSPFv3 LSA and SPF throttling feature provides a dynamic mechanism to slow down link-state advertisement updates in OSPFv3 during times of network instability. The following commands were modified by this feature: clear ipv6 ospf events, event-log, ipv6 router ospf, show ipv6 ospf event, timers lsa arrival, timers pacing flood, timers throttle lsa, timers throttle spf |
|
IPv6 Routing--LSA Types in OSPFv3 |
Cisco IOS XE Release 2.1 |
A router's collection of LSA data is stored in a link-state database. The contents of the database, when subjected to the Dijkstra algorithm, result in the creation of the OSPFv3 routing table. |
|
IPv6 Routing-- OSPFv3 |
Cisco IOS XE Release 2.1 |
OSPF version 3 for IPv6 expands on OSPF version 2 to provide support for IPv6 routing prefixes and the larger size of IPv6 addresses. The following commands were modified by this feature: area range, clear ipv6 ospf, ipv6 ospf area, ipv6 router ospf, show ipv6 ospf, show ipv6 ospf interface |
|
OSPFv3 Address Families |
Cisco IOS XE Release 3.4S |
The OSPFv3 address families feature enables IPv4 and IPv6 unicast traffic to be supported with a single network topology. |
|
OSPFv3 External Path Preference Option |
Cisco IOS XE Release 3.4S |
This feature is provides a way to calculate external path preferences per RFC 5340. |
|
OSPFv3 Graceful Restart |
Cisco IOS XE Release 2.1 Cisco IOS XE Release 3.3SG |
The graceful restart feature in OSPFv3 allows nonstop data forwarding along routes that are already known while the OSPFv3 routing protocol information is being restored. The following commands were modified by this feature: graceful-restart, graceful-restart helper, ipv6 router ospf, show ipv6 ospf graceful-restart |
|
OSPFv3 Max-Metric Router LSA |
Cisco IOS XE Release 3.4S |
The OSPFv3 max-mtric router LSA feature enables OSPF to advertise its locally generated router LSAs with a maximum metric. |
|
OSPFv3 IPSec ESP Encryption and Authentication |
Cisco IOS XE Release 3.3SG |
Supports ESP authentication and encryption, including virtual links. |
Cisco and the Cisco logo are trademarks or registered trademarks of Cisco and/or its affiliates in the U.S. and other countries. To view a list of Cisco trademarks, go to this URL: www.cisco.com/go/trademarks. Third-party trademarks mentioned are the property of their respective owners. The use of the word partner does not imply a partnership relationship between Cisco and any other company. (1110R)
Any Internet Protocol (IP) addresses and phone numbers used in this document are not intended to be actual addresses and phone numbers. Any examples, command display output, network topology diagrams, and other figures included in the document are shown for illustrative purposes only. Any use of actual IP addresses or phone numbers in illustrative content is unintentional and coincidental.